RSS
 

Posts Tagged ‘technique’

Lens Technique: Wide-angle portraiture with the Sigma 24-35mm F2 DG HSM Art

15 Feb

Photographers tend to shy away from wide-angle lenses when shooting portraits, but DPReview Technical Editor Rishi Sanyal thinks that’s all wrong. In this video, he uses the Sigma 24-35mm F2 Art to illustrate his case for wide-angle portraits, capturing a couple of models with a setting sun in Seattle’s lovely Discovery Park. Step away from your 85mm comfort zone and learn some of Rishi’s tips for environmental portraits.

Articles: Digital Photography Review (dpreview.com)

 
Comments Off on Lens Technique: Wide-angle portraiture with the Sigma 24-35mm F2 DG HSM Art

Posted in Uncategorized


Understanding the Focus and Recompose Technique

28 Jan

Digital cameras have an array of squares or dots, that you see when you look through the viewfinder, which represent the points at which it is capable of focusing. Put your subject on top of one of those dots, press the shutter button, and you’ll get a nice sharp image….usually.

But, sometimes your camera doesn’t light up the right dot, or your subject is out of the range of the focus points, or you want to select a specific point but you have trouble moving the buttons, knobs, and dials on your camera fast enough. If this sounds like you, or if you just want to check out a new way of using your camera, you might want to try the focus-and-recompose technique.

focus-and-recompose-shoes

Kids move around all the time, so rather than hunt for a specific focus point I used the center point to focus on their shoes and then instantly recomposed before snapping the photo.

Every digital camera allows you several options when selecting which focus points to use such as:

  • Full automatic – Your camera decides which dot to use, and what should be in in focus, often based on what’s closest to the viewfinder.
  • Face Detect – Your camera looks at the scene to see if there are any faces and prioritizes those above all else. If there are multiple faces, it usually looks for the ones that are closest.
  • Single Point – You select one point to be in focus and your camera makes sure that one specific spot is sharp before taking the picture.

There are other methods as well, but these are the most common, and all of them are quite effective but can also be a bit limiting. Automatic and Face Detect generally work fine but aren’t always accurate. If you want to select the focus point yourself you will usually have to turn a dial or press a joystick on the back of your camera, which can cost you precious seconds, and lead to some missed shots. Focus-and-recompose inverts the equation a bit, and instead of moving the focus point around you focus once, and then move your camera around to compose and get the shot you want.

focus-and-recompose-squirrel

Focus-and-recompose is a process wherein you select the focus point, often just one single dot or square in your viewfinder, and lock focus with a half-press of the shutter button. Then with a flick of your wrist you physically move your camera back and forth, or up and down just a bit, in order to recompose your shot will still keeping the focus where you locked it. It sounds a bit complicated, but once you get used to this technique it quickly becomes second nature, and is much faster than fiddling with buttons and dials to select a focus point every time.

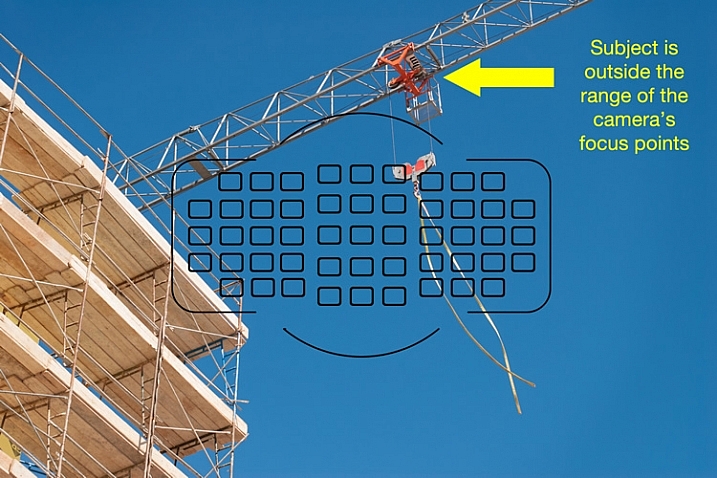
In the following image I have overlaid an exact representation of all 51 focus points on my Nikon D750 camera. You will notice that the object on which I wanted to focus, the red pully mechanism on the crane arm, falls outside the focus points of my camera.

focus-and-recompose-focus-points-crane

If I had to rely solely on the focus points of my camera, I wouldn’t have been able to get the shot I wanted. However, the focus-and-recompose technique offered an easy solution. All I had to do was focus on the top pully, lock it with a button on my camera, and then recompose the shot by shifting my camera’s field of view down just a bit. By using this method I did not need to make an compromises, and I am pleased with the final image

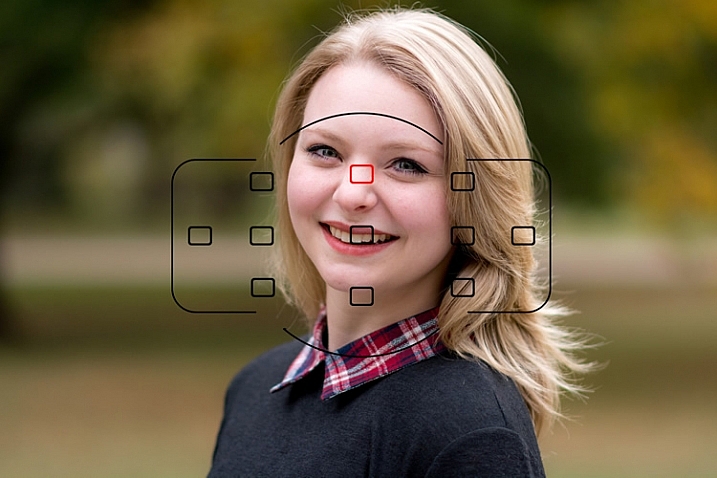
Even though some cameras offer a much broader spread of focus points that can reach to the very edge of the frame, it is time-consuming to select them, or shift from one to the next using the dials on your camera. Some cameras don’t have nearly the number of focus points as higher-end models, which can be a bit frustrating when your subject falls between two points, but focus-and-recompose can solve this issue as well. I don’t even use all 51 of my camera’s points, because it’s quicker to select one from only 11, as you can see in the image below, and then recompose as needed.

focus-and-recompose-portrait

It’s not always possible to get the focus precisely where you want it, if you let your camera do all the work for you.

This portrait of a college sophomore (above) illustrates a big problem for traditional focusing methods, especially on cameras without a lot of focus points. In order to get the focus point precisely on her left eye where I wanted it, the only option using traditional methods would have been to scoot my camera’s field of view over a bit, which would have meant compromising what I wanted the shot to look like. Rather than sacrifice my artistic vision because of the limitations of my camera, I selected the top center point (highlighted in red), focused my camera on her eye, and then shifted my camera over just a bit to get the picture. Because I was only using 11 out of 51 possible focus points it was much quicker to select the one I wanted instead of repeatedly tap-tap-tapping on the dial on the back of my camera.

focus-and-recompose-baby

This baby’s eyes were out of the reach of my focusing area so I used the top-left square to lock focus and then recomposed to get the shot I wanted.

There are some important limitations to know about this method, and it does not work for every type of photographic situation. Most cameras have a few different autofocus modes such as single (the camera focuses once and doesn’t refocus until you shoot a picture) and continuous (the camera refocuses continually until you take a shot). If you shoot static subjects, such as landscapes and architecture, you can leave your camera in single mode, in which focus-and-recompose works quite well.

However if you shoot things that are always on the move such as families, kids, sports, autos, or animals, you will get better results using continuous focusing. This makes focus-and-recompose tricky because as soon as you move your camera to re-frame your shot, the focusing point moves too. In these instances I usually just leave my camera in continuous focusing mode while I move myself around to get the picture I want, since the subject has usually moved by the time I would normally lock focus, and recompose the shot.

One of the trickiest aspects of focus-and-recompose involves the physical action of holding the shutter button halfway down with your finger, while you reframe your shot. Fortunately you can solve this if you use the back button focus, technique which decouples the action of focusing, from that of actually taking a picture. Moving to back button focus, along with using focus-and-recompose, has entirely transformed my approach to photography, and made me a lot more nimble and versatile as a photographer.

focus-and-recompose-tesla

I used focus-and-recompose to nail focus precisely on the Tesla “T” logo.

One other thing to note about focus-and-recompose is that the center focusing points on most cameras are typically more sensitive than those along the outer edge of the frame, and are thus able to get more a more accurate focus, especially in dim light. If you use the outer focusing points, your pictures might not always be as sharp as they could be, but if you focus with the center point and then recompose your shot you will likely get more keepers. Of course this is not recommended for macro photography or other applications where your depth of field is razor thin, since any tiny movement of the camera will dramatically alter your picture, but for most other situations it can be a huge benefit.

What about you? Have you tried this technique or do you have other focusing tips to share? Leave your thoughts in the comments below!

googletag.cmd.push(function() {
tablet_slots.push( googletag.defineSlot( “/1005424/_dPSv4_tab-all-article-bottom_(300×250)”, [300, 250], “pb-ad-78623” ).addService( googletag.pubads() ) ); } );

googletag.cmd.push(function() {
mobile_slots.push( googletag.defineSlot( “/1005424/_dPSv4_mob-all-article-bottom_(300×250)”, [300, 250], “pb-ad-78158” ).addService( googletag.pubads() ) ); } );

The post Understanding the Focus and Recompose Technique by Simon Ringsmuth appeared first on Digital Photography School.


Digital Photography School

 
Comments Off on Understanding the Focus and Recompose Technique

Posted in Photography


One Compositional Technique to Transform Your Landscape Photos

09 Nov

GreenRocks

Turning the corner from taking snapshots into taking actual compositions is a hard thing to do. It doesn’t come naturally, and it takes experience. Another reason it is difficult to learn composition is that there is no one, hard and fast rule. You can get caught up in looking for various shapes, patterns, leading lines, and other compositional elements until your head is spinning.

To avoid all of this, I want to share one concrete technique for you to use when you are out shooting landscape photos. It is one way to go about setting up your shot, that will give you a path to setting up a successful composition. Of course, it isn’t the only way to set up your shot, and you won’t use this all the time, but it is great for helping when you are stuck.

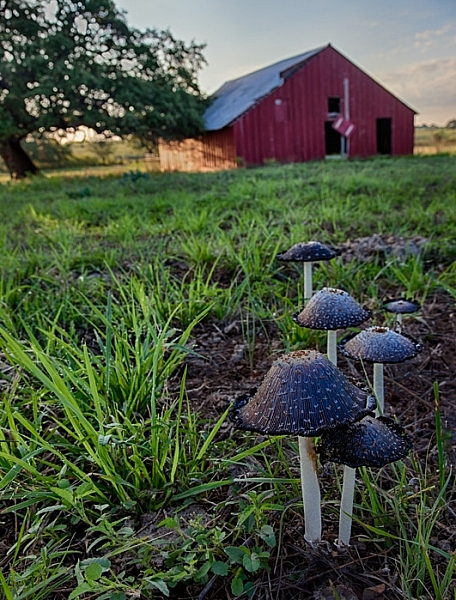
Mushrooms

And the tip is . . .

. . . the next time you are out shooting it a scenic location, just put on your widest angle lens and get right behind something on the ground to take the shot.

I mean right behind it. That something on the ground can be anything from a flower, to a rock, to a pattern in the sand. It does not matter. What matters is that you are down on your knees with your wide-angle lens right behind it.

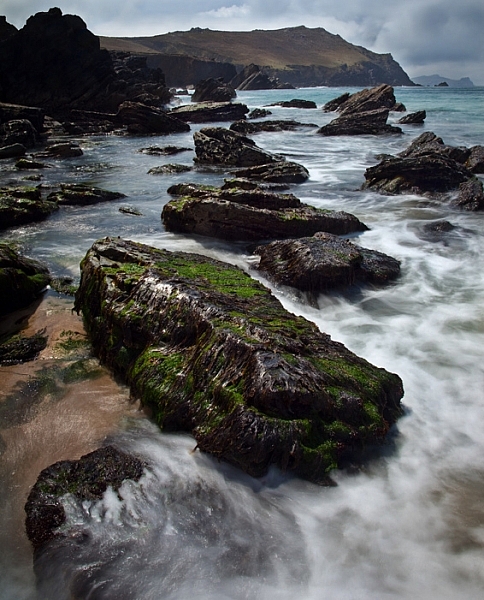
Clogher

Why it works

The wide-angle lens will give the foreground object an exaggerated sense of proportion, but will also pick up the background. By getting right behind something, you are adding a subject to your picture. You are creating a center of interest. You are going beyond just showing the general scenery. The background will still be in your picture as well, you just do not need to focus on that.

Another benefit is that it gives the viewer a sense that they can walk into the picture. It is providing a real foreground, that adds depth and interest to your photo.

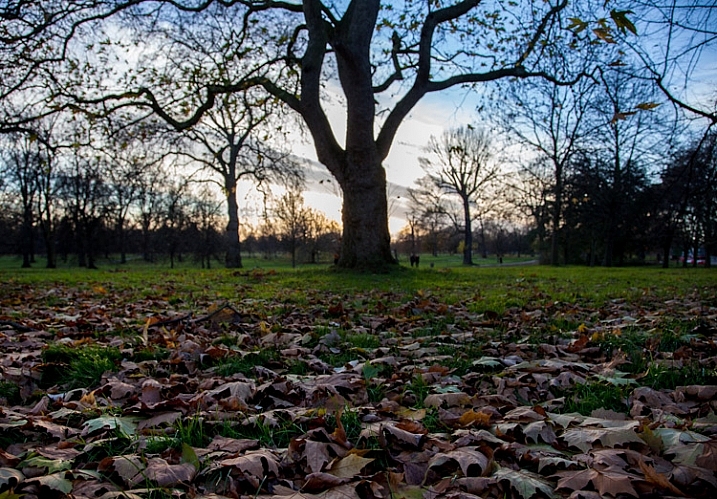
HydePark

What typifies a snapshot, is standing at eye level trying to capture the entire scene before you. For many of us when we are just starting with photography, that just intuitively seems like the way to take pictures. We want to capture the whole scene, and not have it blocked by something on the ground immediately in front of us. The problem is that there is no foreground, subject, or center of interest to speak of. In addition, you are presenting the world in the exact same way as the viewer is used to seeing it, which is bound to be rather boring to them.

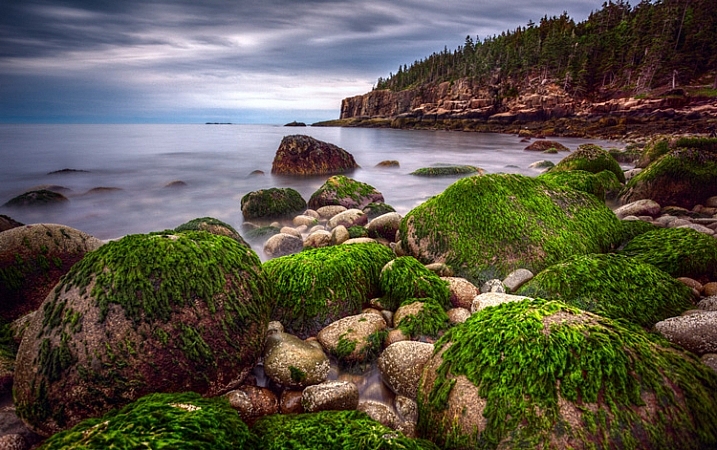
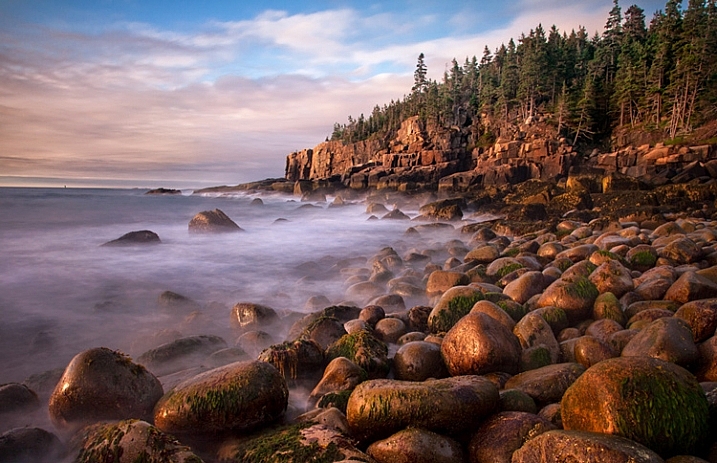
Acadia-low

Putting the tip into action

How you determine what items on the ground will work as your foreground elements, that is the hard part. There is no right answer. You will just have to look. In fact, it will not be obvious even when you are out in the field looking around. There are times when you might have to walk around while looking at the LCD in Live View mode, or with the viewfinder to your face to find something on the ground to use as a foreground.

BigBend

Here are some examples of things you can use as foregrounds in different contexts:

  • When photographing water – use a reflection in the water
  • When at the beach or desert – find a pattern in the sand
  • When photographing creeks or coasts – use rocks
  • At midday – use shadows
  • In the fall – use leaves

There are obviously a variety of subjects you can use. Go out and try it next time you are shooting, and if you come across a good item to use in the foreground, leave it in the comments and share your images with us.

googletag.cmd.push(function() {
tablet_slots.push( googletag.defineSlot( “/1005424/_dPSv4_tab-all-article-bottom_(300×250)”, [300, 250], “pb-ad-78623” ).addService( googletag.pubads() ) ); } );

googletag.cmd.push(function() {
mobile_slots.push( googletag.defineSlot( “/1005424/_dPSv4_mob-all-article-bottom_(300×250)”, [300, 250], “pb-ad-78158” ).addService( googletag.pubads() ) ); } );

The post One Compositional Technique to Transform Your Landscape Photos by Jim Hamel appeared first on Digital Photography School.


Digital Photography School

 
Comments Off on One Compositional Technique to Transform Your Landscape Photos

Posted in Photography


NASA employs 150-year-old photography technique to measure shock waves from supersonic flight

28 Aug

NASA has turned to a process devised in 1864 to help it measure shockwaves created by supersonic aircraft flight. The method, schlieren photography, was invented by German scientist August Toepler to observe the effect of objects moving through transparent media, such as water or air. Read more

Articles: Digital Photography Review (dpreview.com)

 
Comments Off on NASA employs 150-year-old photography technique to measure shock waves from supersonic flight

Posted in Uncategorized


How to use the Contrast Checker Technique to Give Your Images More Punch

13 Jul

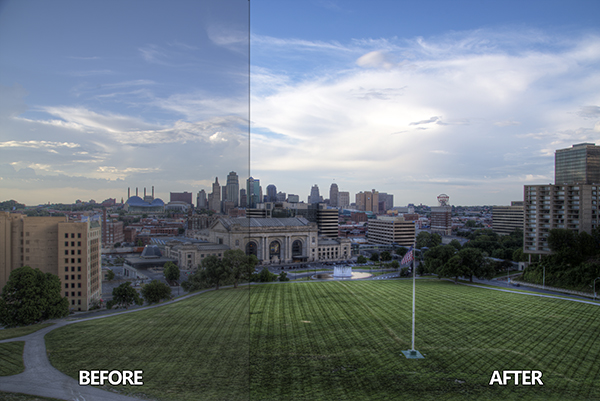
I am about to reveal a technique that will have your images looking awesome in seconds every time you use it. I am even going to share the Photoshop Action with you so you can edit in lazy mode, I mean efficiency mode! Before I bare all, I need to give you some background information, and I am pretty sure you have been in the exact same position at some point in your photography hobby or career.
DPS Tutorial Image 9

Not long ago, early 2010, I was horrible at photo editing. I was literally tossing my camera in a box and packing it away. My problem was that I was extremely frustrated with the quality of my images. Not necessarily the composition or the subject matter, but I couldn’t get my images to look “good” like all the photographers who were crushing views on Flickr. Thank goodness 500px was not around at the time, I really would have hated my photos.

Just before I sealed the tape on my box of photo gear I discovered High Dynamic Range imaging. Wait, before you judge me, I have been doing it long enough to know the process is not everyone’s cup of tea. However, the HDR process, from the brackets to the tone mapping, forced me to embrace new techniques I never would have dreamed of prior to stumbling upon it.

I started to understand my camera on a level that was foreign to me prior to that time. I also began to accept that it was not necessarily the camera making the great photos, but the person behind it and, more importantly, their post-processing techniques. Nonetheless, I became a tone mapping fool. I tone mapped everything, my car (for the record a Scion xD does not necessarily need to be HDR’ed), candid pictures of my wife, food, candid pictures of my wife eating food, I really tone mapped everything.

You have probably been there before as well, anyone new to HDR thinks it is the greatest thing on everything from the urban landscape to the selfie in the mirror. I would really shy away from the latter of the two! Through all of this understanding and acceptance came another realization, the HDR process can wreak havoc on the contrast in a good photo.

Through the HDR process you are mapping tones from multiple images to obtain one photograph that gets the best of both worlds with a vast amount of detail. The problem with this is that shadow areas lose their depth when too much detail is revealed, and areas that were specular highlights, or inviting highlight blowouts, tend to compress in ways that make them look dark, dingy and stale. Let’s not forget about the hideous over-saturation that can occur if you take the sliders too far.

So how do you combat this? How do you analyze a photograph, HDR or not, and tell what it needs to make it better?

It’s all about contrast

The answer, while simple, holds complexities that can take years to train your eye through trial and error. We are not about to let it take you years to understand. The secret is contrast which is the key to making better photographs right now.

You may know that the Contrast slider exists in nearly every post-processing program, but what is contrast? Simply stated, contrast is the ratio between light and dark in a photograph. If there is no contrast the image appears to look predominantly gray and dismal. On the flip side, an image can be too “contrasty” or devoid of gray (mid tones), a battle between white and black. It is difficult to see this on a color photograph since contrast typically deals with tone.

I studied Fine Art in college, I was a Printmaker (Woodcut, Etching, Screen Printing, and Lithography). I had a fabulous professor. She told me a piece of information once that changed my art forever during a one-on-one critique.

She said if I ever had a question about how harmonious my color print was that I should take a picture of it and convert it to gray scale. If it did not have strong black and white points with a smooth grayscale gradation somewhere in between, then it needed work.

Like any normal college kid, I did not understand her methodology at the time and I rarely took her advice. It was not until nearly ten years later that her advice finally clicked.

The Contrast Checker Technique

You can use this technique in every aspect of your workflow: beginning, middle, and end. It keeps your contrast in check throughout the process. Rightfully so, it is named “Contrast Checker”.

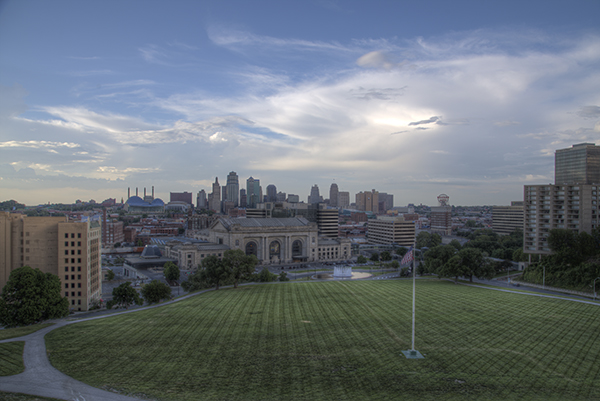
The photograph below is a tone mapped photo of Kansas City, straight from Photomatix Pro. You should always try to tone map your images so that they are not too dark, too light, too saturated, or too stylized.
DPS Tutorial Image 1

Let’s Check the Contrast you can download the image and follow along if you would like (there is also an Action and a video at the end if you learn better from video)

Step one

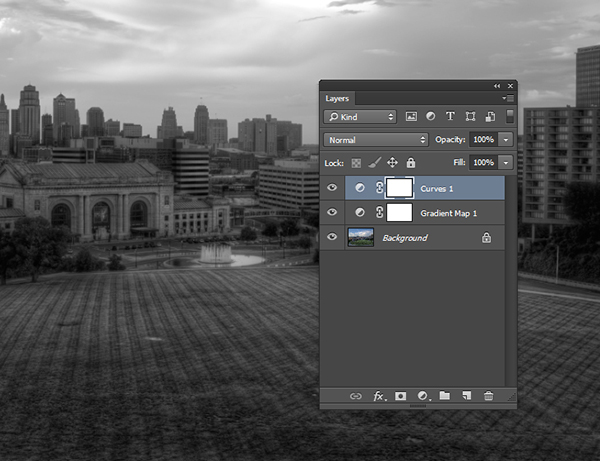
Create a new Gradient Map Adjustment Layer to create a Black and White photo.

Step two

Ensure that the Gradient Map is set to Black and White. By default the Gradient Map Adjustment Layer will pull from the colors that you have set as your foreground and background in the tool bar. To ensure they are set to Black and White press the “d” key to reset them to the defaults.

Step three

Make a new Curves Adjustment Layer above the Gradient Map. Your Layers Palette should look like this and your photo should be Black and White.
DPS Tutorial Image 2

Step four

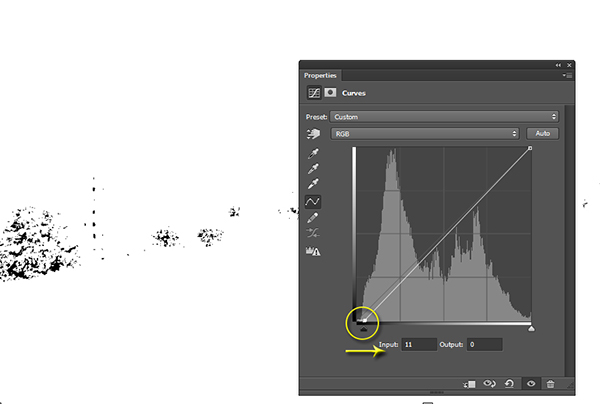
While in the Properties of the Curves Adjustment Layer press and hold “Alt” (Option on Mac) and click the Black triangle on the bottom of the Curve.

Step five

Your photo may turn all white with a little bit of black. This is telling you where black is present in your photo. If your photo is all white with no black specks then your photo currently contains no black point. Move it slightly to the right until more black starts to appear.
DPS Tutorial Image 3

Step six

This is called clipping (no detail). By clipping the blacks you are telling Photoshop what you want black to be in the photo. It is important that you do not take this too far, you want a solid black point in the photo, but you don’t want to destroy your shadows either.

Step seven

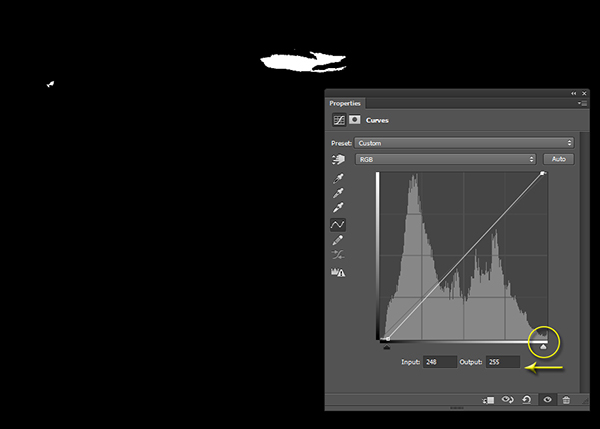
Now press and hold “Alt” (Option on Mac) and select the White Triangle.

Step eight

Your photo should turn all black with little specks of white. This is telling you where pure white is in your photo. If your photo is all black with no white specks then your photo currently contains no white point. Move it slightly to the left until more white starts to appear.
DPS Tutorial Image 4

Step nine

Just like the blacks it is important that you do not take this too far to the left as you will be clipping too much of the whites. You are going for just a bit of clipping beyond the specular highlights.

Step ten

The reason you are doing this on a grayscale photograph is to ensure that you are only seeing the clippings of the lights and darks. If you were to do the same thing on a color photograph you would see the clippings for all of the colors within their channels. This makes the process a bit more difficult.

Step eleven

At this point you should already be seeing more drama in your photograph, but you can take it a step further.

Step twelve

Click on the Targeted Adjustment Tool within the Properties of the Curves Adjustment Layer. This allows you to target specific areas of the photo and edit them independently on the tone curve.
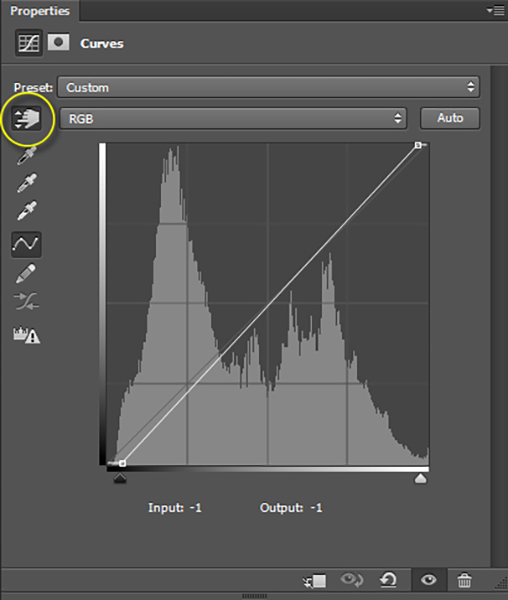
DPS Tutorial Image 5

Step thirteen

With the targeted adjustment tool selected, as you hover over the image you will see what is being effected on the tone curve. For this image I started with the lighter colored grass. I clicked on it and dragged the cursor up making it even lighter.
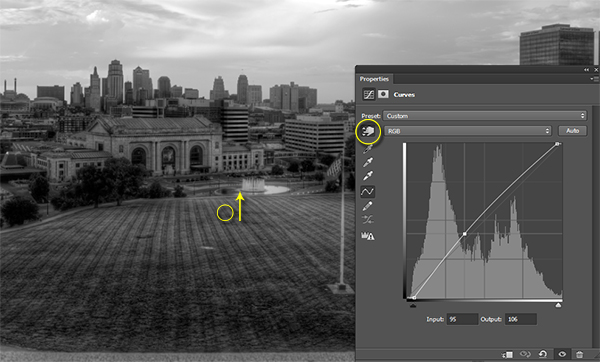
DPS Tutorial Image 6

Step fourteen

I also selected the darker colored grass and moved the cursor down to make it darker.
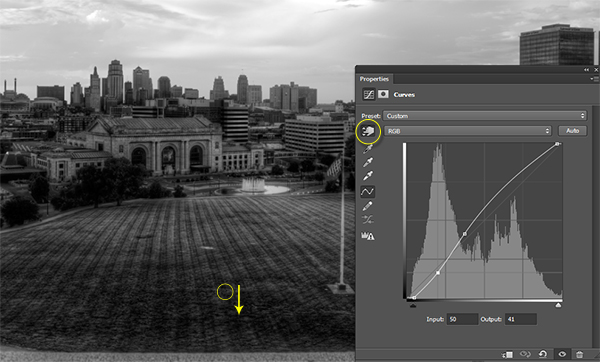
DPS Tutorial Image 7

Step fifteen

I then selected an area in the sky that was close to white, but contained a little bit of detail, and dragged the cursor up to make it brighter.
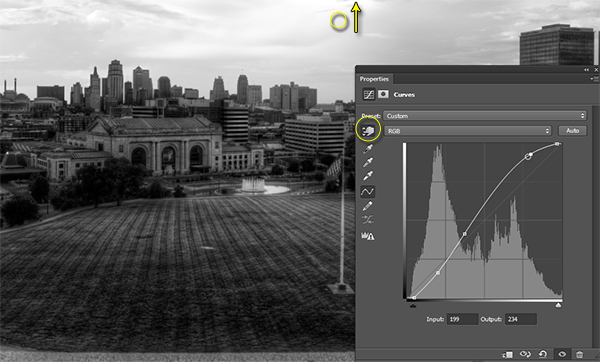
DPS Tutorial Image 8

Step sixteen

At this point you should be looking at a black and white photograph with much more contrast than you started with.

Step seventeen

The magic happens when you delete the Gradient Map layer to reveal the Curves effect on the original color photograph.
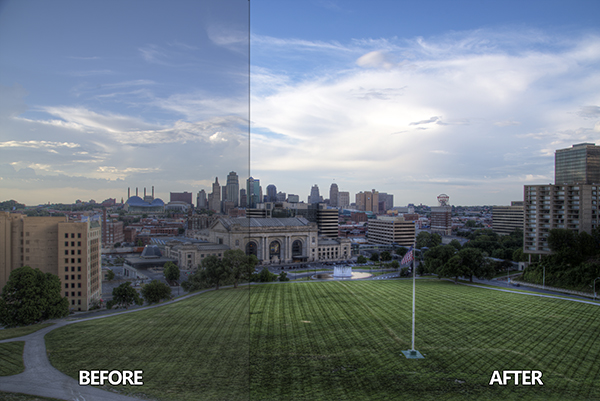
DPS Tutorial Image 9

Step eighteen

If you are not satisfied with the effect the Curve has on the colors in the photo you may change the Blending Option to Luminosity which will only allow it to effect the tones in the image, protecting the color saturation.

For more tips and tricks and to see how the downloadable action for this process works watch the video tutorial below.

The post How to use the Contrast Checker Technique to Give Your Images More Punch by Blake Rudis appeared first on Digital Photography School.


Digital Photography School

 
Comments Off on How to use the Contrast Checker Technique to Give Your Images More Punch

Posted in Photography


Single Image Star Trails – a Powerful Technique to Create Star Trails in Minutes Using Phototoshop

11 Jun

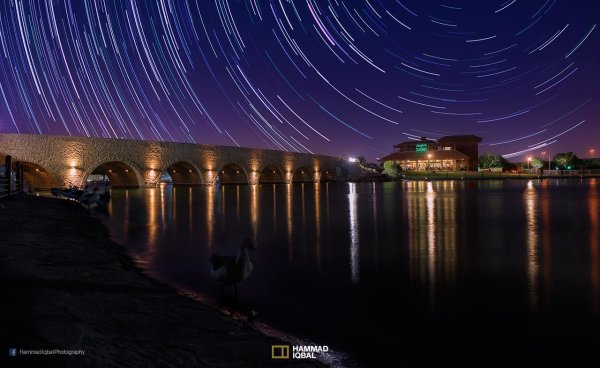
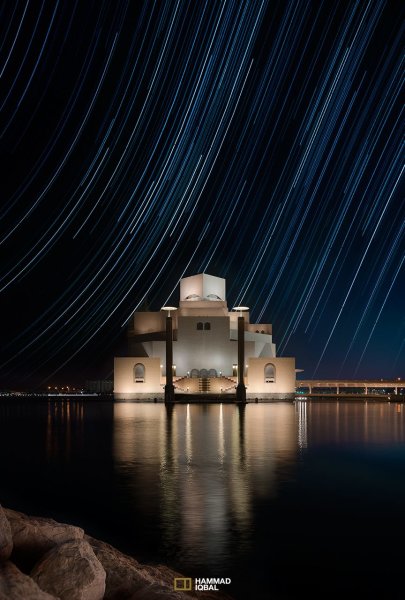
10258929_1466264890276738_7906982947618430010_o

If you are reading this, you must be among those who have a special place in their hearts for stars, galaxies and the wonders of the universe. With recent advancements in camera technology, many photographers have captured the beauty of the night sky in spectacular ways. The truth is that every photographer is fascinated by the glittering stars, and captivating night skies, that have the power to instantly teleport us to a world beyond our wildest imaginations. From a photographic perspective, star trails can add another dimension to an otherwise average shot and that is likely the primary reason for many photographers desire to learn how to capture star trails. If you are struggling to find out and learn about this rewarding effect, get your camera and computer ready. But before that, let me introduce you to star trails.

10373061_1472036406366253_4127720884282225109_oWhat are Star Trails?

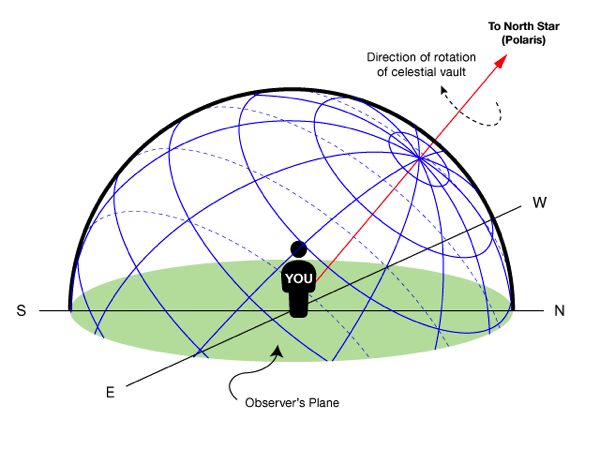
Star trails is a photographic effect that gives an illusion of motion to the stars along a circular or an elliptical path. Technically, stars do not move when we observe them. They are quite stationary very much like our Sun. In reality, the circular motion of the stars we see in star trail images is a result of rotation of the Earth along its axis. For better understanding, please refer to the ‘equatorial grid’ figure under “Understanding Star Trails” section below.

How are Star Trails captured?

Traditionally, star trails are captured by taking multiple shots of the sky in succession over a period of many hours. Modern DSLR cameras also allow you to take a single exposure of an extended length of 30 minutes or more but many photographers prefer to take multiple shots at 30 seconds each and stack them together. Doing it this way eliminates any chances of shaky exposures that can occur due to wind or bumping into the setup while the shutter is open. If you are attempting to make almost a full circle star trails, then the number of shots required to create it can go in hundreds. Later, all those shots are stacked together in Photoshop or a free software such as StarStax to create a single image that shows the circular paths of the stars.

Photographers have been using this method for years with great results. But if you do not have the option to return to the same location again, then the conventional method would feel limited, as it requires you to stay in one spot for hours, thereby limiting your options to take multiple shots and capture a variety of angles on location in one night.

Understanding Star Trails

Equatorial grid

Equatorial grid from observer’s point of view

Imagine that ‘YOU’ are inside a giant sphere (see above diagram). Now, depending on the direction you look at, the effect of the star trails will be as follows:

Facing North: Star trails effect will appear to be circular with some stretching of the circular lines at the far edges of the frame.

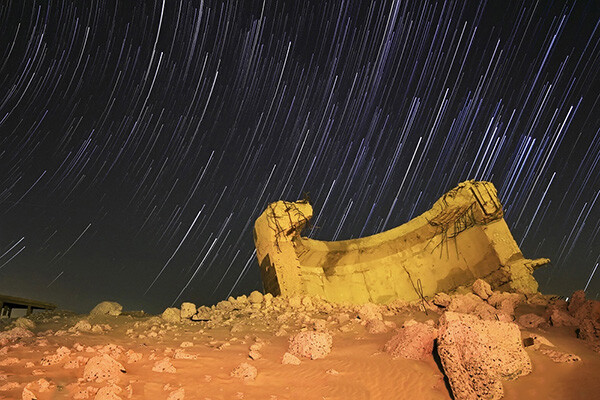
Facing East: The trails will appear to be straight in the middle moving diagonally in an upward direction from bottom center to top center. They will also appear to be converging at both top left and bottom right at the far sides of your frame. See image below:

East West Trails Umm ul Aish Kuwait

Umm-ul-Aish, Kuwait – image shows the upward motion of East star trails

Facing West: In this direction, the trails will appear to be the exact opposite of what you see when looking towards the South. Moving downwards and to the right from top to bottom in a diagonal line, they will also appear to be converging at both bottom left and top right at the far edges of your frame.

Facing South: If you are facing South head-on, the star trails will appear to be moving from left to right in an upward curve.

One-shot Star Trails – the Technique

I have been developing a new method to create star trails in Photoshop. Unlike the ‘Star Trails’ Photoshop action that you might already be familiar with, this technique is much more than that. It eliminates all limitations associated with the traditional method of capturing star trails. Unlike the conventional method, this technique only requires a single shot, that’s right, only ONE shot of the night sky to create realistic star trails. Since this technique is a result of a joint effort between me and my friend Mobeen Mazhar, who is a great landscape photographer from Pakistan, we have named it the “HM technique” or “HM star trails”.

When implemented correctly, this technique will open endless possibilities for you in your star trail adventures and is sure to spark new hope among photographers for all levels of expertise. Now, let’s take a look at different types of star trails and how you can use this new technique to create them in Photoshop with just one shot.

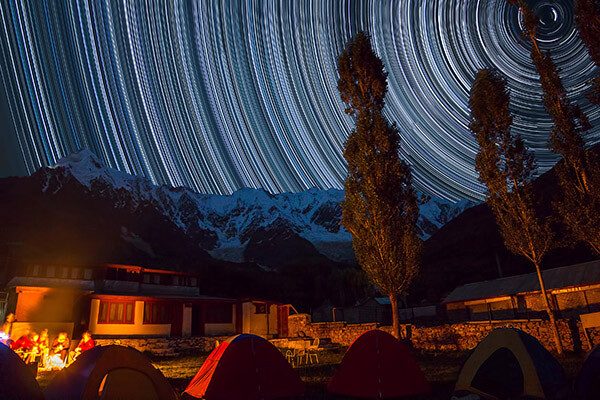
Creating North Star Trails

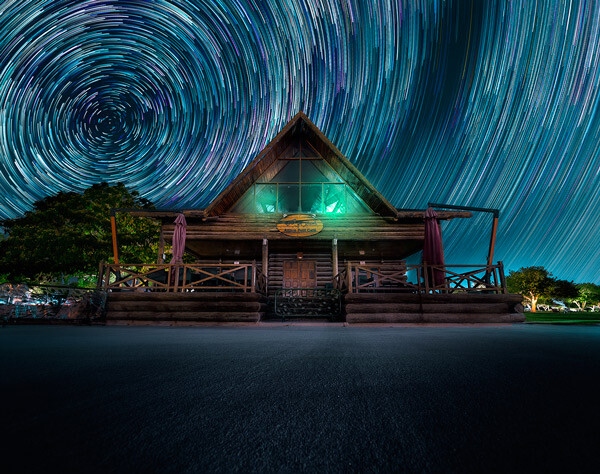
North Star Trails Nanga Parbat

Nanga Parbat-Trashing, Pakistan – North Star trails created with HM technique

This is the most common and simplest type of star trails. Traditionally, it can be achieved by pointing your camera towards North with the focus set to infinity and then taking consecutive long exposure shots (30 seconds) at high ISO settings. Since the North Star remains almost stationary, the final effect is circular with the stars seeming to revolve around a pivot point, which is the North Star. Then at the time of post-processing, all shots are stacked using Photoshop or StarStaX.

The downside to this approach is that it can take as many as 700 shots over a period of five to eight hours to get a full circle trail. Now watch the video below to learn to create North Star trails within minutes using just a single shot of the night sky.

Creating Meteor Shower Trails

Meteor shower AspirePark

Aspire Park, Doha – meteor shower trails created with HM technique

Meteor shower trails is by no means an official name. This is fundamentally a beautiful variation of the North Star trails. Instead of a long continuous streak of light, the trails seem to disappear at the origin which gives it depth and dimension. There is also another variation of the meteor shower trails in which the tip of the trail is thicker, brighter and looks like a blob or droplet.

The underlying technique of the meteor shower trails is the same as shooting the North Star trails. The only difference is in post-processing. The meteor or comet effect is achieved by using the ‘Comet mode’ in StarStaX as shown below.

‘Comet Mode’ feature in StarStax

But regardless, the traditional method still requires that you spend hours on a single spot to take hundreds of consecutive shots. Now watch the video below to see how you can create amazing meteor shower trails in minutes, and once again, all you need is a single shot of the night sky.

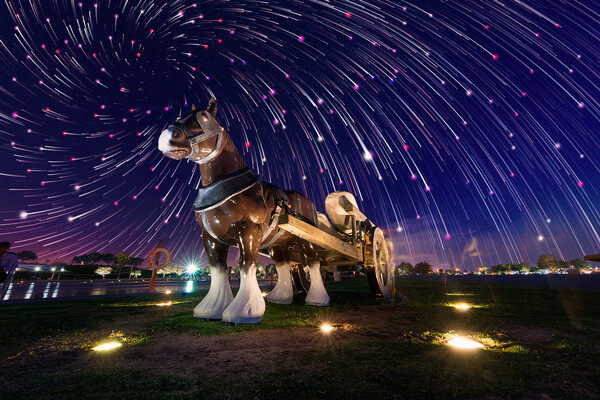
Creating Vortex Star Trails

Vortex Aspire Park Doha

Aspire park, Doha – Vortex star trails created with HM technique

This is by far my favorite kind of star trails and is quite complex to achieve. Unlike the previous two types of trails, vortex star trails require special equipment which can be costly and may prevent most photographers from trying it. The vortex effect is achieved by zooming in or out on the lens during the long exposure. It may sound simple at first but the trick is to avoid vibrations as you zoom during the 30-second long exposure. Hence it makes it extremely difficult, if not impossible, to do it with bare hands without shaking the whole setup.

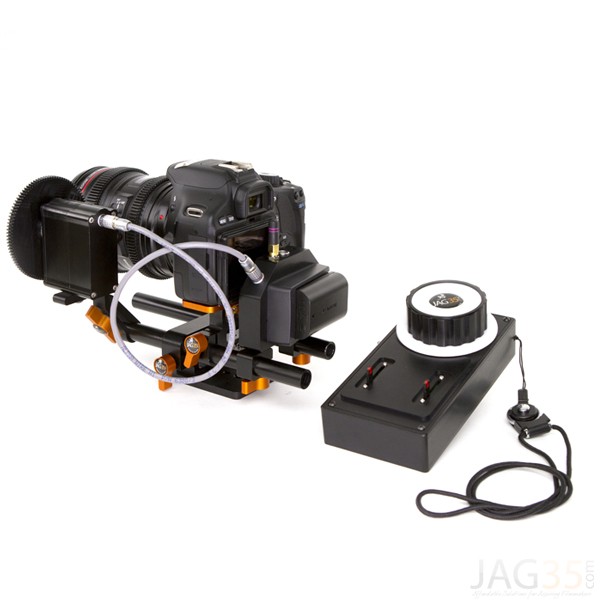
But if you have plenty of free cash to burn, you can get the tools which would include a geared ring that goes on the zoom ring of your lens, a motor and a wireless remote for controlling the motor. The setup is basically what DSLR filmmakers use for focus racking, that is a motorized follow focus system as shown below. The system is very useful if you shoot professional video with your DSLR but for photographers, the cost might not be justifiable.

Electronic follow focus

Wireless electronic follow focus kit v2 by Jag35

Do not worry because the following video will show you how to create vortex star trails in Photoshop. No cash required.

Conclusion

With the help of this powerful new technique, you will be able to maneuver on location, shift your focus towards making a variety of compositions, save countless hours, battery power and thousands of shutter actuations on your DSLR. Would you have thought that a single shot could give you such incredible flexibility in your star trail photography?

Tip: Just make a note of the direction your camera is facing to help you create star trails in relation to the reference direction.

I am sure that this tutorial will add a new skill to your photography arsenal. If you have any questions, post them in the comments below. Thank you.

Technique developed by Hammad Iqbal and Mobeen Mazhar

Mobeen Mazhar is a passionate traveler and has spent more than a decade exploring Pakistan and its natural beauty. Photography gives him a mode to express his love for nature and a medium to document his travel experiences. He is a landscape specialist, regular travelogue writer and travel expert for Pakistan. You can find his photographic work at Facebook, 500px and Flickr.

The post Single Image Star Trails – a Powerful Technique to Create Star Trails in Minutes Using Phototoshop by Hammad Iqbal appeared first on Digital Photography School.


Digital Photography School

 
Comments Off on Single Image Star Trails – a Powerful Technique to Create Star Trails in Minutes Using Phototoshop

Posted in Photography


Merge to 32 bit – HDR technique comparisons

04 Jul

HDR is an often discussed and debated subject in photography circles. There’s much talk about “bad” HDR, or a whether or not one should even do it in the first place. I think a lot of that stems from what I’d consider to be overdone, over-processed versions.

IS MERGE TO 32-BIT A SOLUTION FOR BAD HDR?

Depending on the software used to make your tone-mapped HDR images you may be given an option to view and/or save a 32-bit version. Prior to Lightroom 4 we there wasn’t really much we could do with such a file so most photographers never bothered saving it. Now that LR4 and PS can handle a 32bit file it has opened up a whole new set of options for HDR, one that is a lot simpler, more photo realistic, and many would venture to say – better.

The problem with most overdone HDR images is that they are often:

  • too overly saturated, way past surreal into unpleasant looking by many accounts
  • too flat, the blacks are grey and the highlights are grey and muddy looking
  • too far into the realm of “surreal” or “artistic” where the shadows are now brighter than some of the highlights, and the highlights are darker than some of the shadows. It seems unnatural and many people reject it because their brain’s can’t even register it.
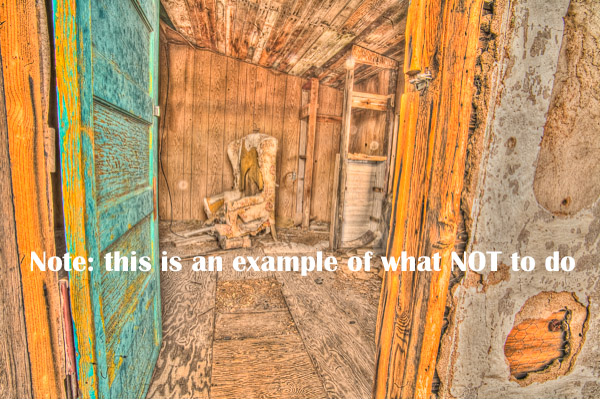
NOTE this is an example of what NOT to do, please do NOT make HDR that looks like this.

Please do NOT make HDR that looks like this!

WHO IS MERGE TO 32-BIT HDR FOR?

  • perhaps you’ve tried HDR and been unhappy with the results
  • maybe you vowed never to touch it for fear of producing something that falls into one of the above areas. If that is the case I urge you do take a second look and see if this is more to your tastes.
  • the process baffles you and you just want a good final result without having to learn yet another software

Photomatix Pro has been one of the front runners for HDR tone-mapping software since its creation. Now they offer a new plugin for using that 32-bit image. I’m not going to get into the step by step how to use shoot your bracketed images or use this plugin (they already have that on their site here), rather a comparison of a three different methods of making HDR images and the resulting images.

THE MERGE TO 32-BIT PROCESS

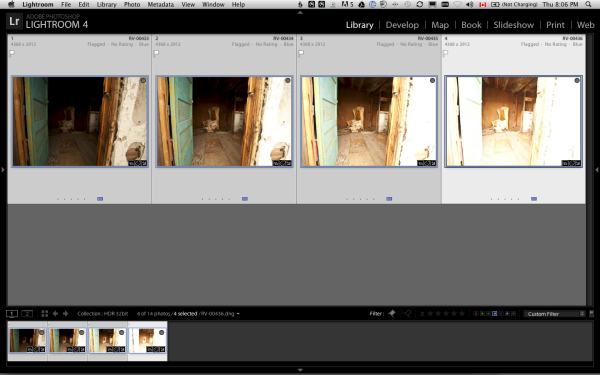
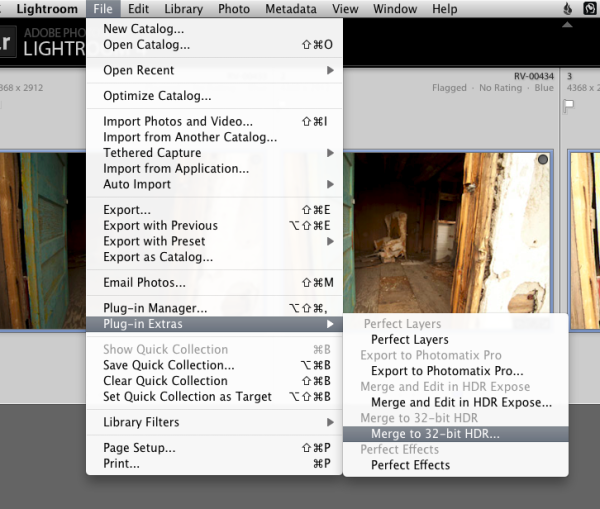
Okay in a nutshell, this is how the plugin works.

  1. select your bracketed images in LR or PS
  2. launch the 32-bit plug in (and select a couple options) and it does its thing in the background
  3. take the resulting 32-bit image and finish it in LR or PS
Screen shot 2013-06-27 at 8.06.37 PM

Select bracketed images

Screen shot 2013-06-27 at 8.07.20 PM

Launch the Merge to 32-bit HDR plugin

Screen shot 2013-06-27 at 8.41.07 PM

And away it goes! How easy right?

That’s it!  No sliders to play with, no presets, no way to muck it up – the software just merges them together into one massive file with a whole lot of exposure data. Then you work the magic on it in Lightroom or Photoshop (or your favorite image editor) to lighten where you want, and darken where you want – with no loss of image quality or detail.

AN EXAMPLE DONE TWO WAYS

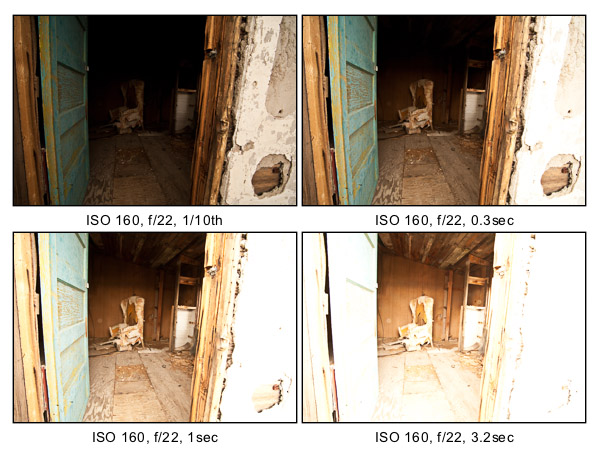
Below you see the four bracketed images I’m using for this example. Notice that the darkest image shows lots of detail in the white wall on the right of the doorway, and the lightest image has tons of detail on the ceiling inside the building. I use the histogram and shoot in manual to make sure I capture enough range and generally bracket 2 tops apart (these are about 1 and 2/3rds apart as it was enough to get the range I needed) – notice I only ever adjust the shutter speed, keep my ISO low and use a tripod whenever possible.

4-bracketed-images

Bracketed images shot in Manual mode on tripod

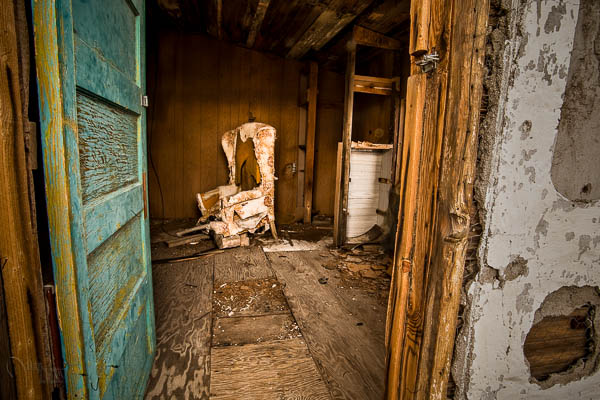
Below you see the 32-bit image as it first appears in Lightroom. It looks pretty contrasty (almost exactly like the second image above) but unlike using just a single image there is plenty of detail in ALL areas of this image, you just have to manipulate it out a bit!

RV-00433_4_5_6-32bitb-600px

Merge 32-bit image before Lightroom processing.

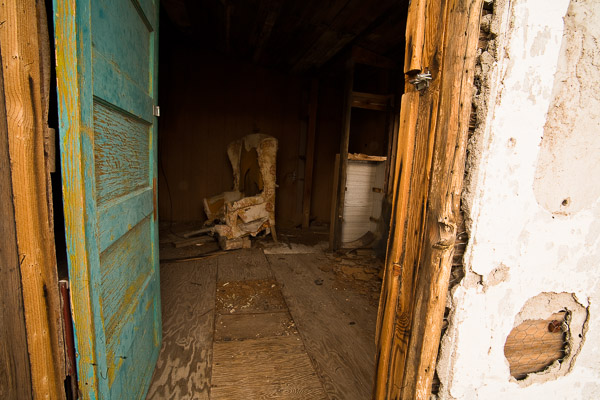
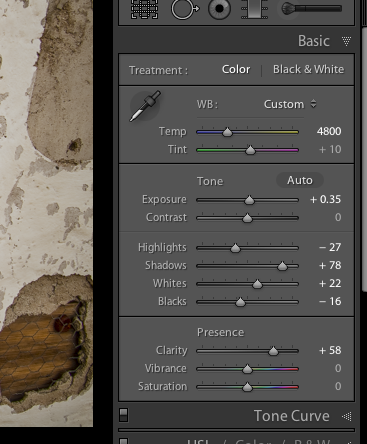
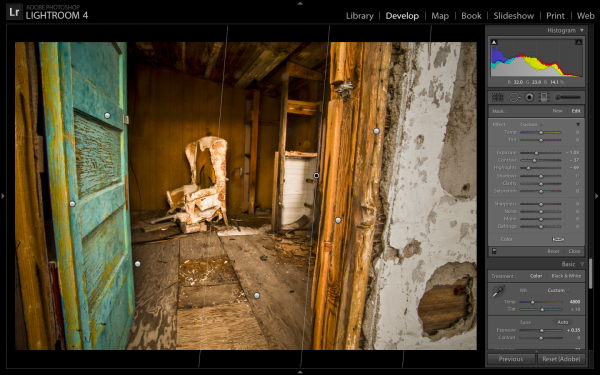
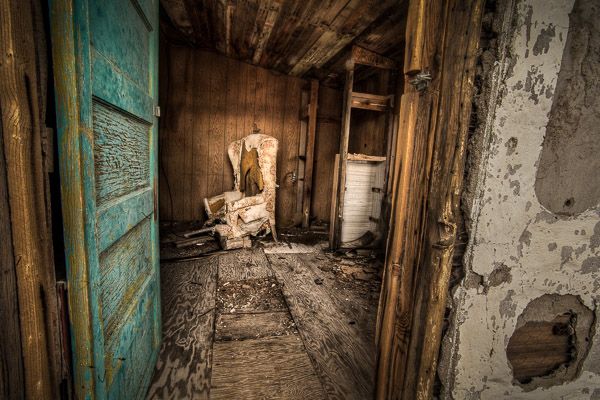
Here is the final version after doing some Lightroom magic.  I’ve used several of the sliders pulled to the max (see screen shot of my Basic panel below), as well as some Graduated filters on the edges (see screen shot below), a post-crop vignette, and several adjustment brushes to lighten and darken areas I wanted to control. Notice the white wall on the left is quite dark now, almost grey – however the highlights inside the house are still bright white. If you just darken all the highlights you end up with a flat, muddy looking mess. I’ve also darkened the wall outside intentionally to draw your eye inwards towards the brighter areas and the chair. If the wall was still pure white it would scream and draw your attention.  Notice how the image still has dark areas, light areas, and a good contrast range. All I’ve done is control the tonal values to retain detail where I wanted.

32bit-dps-01

Final image after Lightroom adjustments

Basic panel adjustments in LR

Basic panel adjustments in LR

Gradient filters used to darken the edges of the doorway

Gradient filters used to darken the edges of the doorway

Now have a look at another version of the same bracketed image set, but this time created using the full Photomatix Pro software and LR adjustments afterwards.  It’s a much grungier look, which some people dislike. Personally I like this look and it’s not going too far for my tastes. There’s still pure black, and pure white in the image and it has good contrast – the tones have just been adjusted in a different way.

HDR done by tonemapping in Photomatix Pro

HDR done by tonemapping in Photomatix Pro

One more version, also tone mapped in Photomatix then split toned in LR

One more version, also tone mapped in Photomatix then split toned in LR

CAN YOU GUESS HOW THESE WERE DONE?

Let’s look at two more images as examples. I’ve used three different processes to get the final results in each set:

  • using just Lightroom adjustments
  • using the regular Photomatix Pro tone-mapping process
  • using the merge to 32bit method

Can you guess which is which in each trio?  No fair peeking at the file names!   Look over the three versions of each scene and tell me in the comments below which was done with what process.  How can be first to get it all right?  GO!

32bit-LR2

32bit-merged

32bit-tonemapped

Hawaii2012-32bit-600px

Hawaii2012-LR-600px

Hawaii2012-TM-600px

SUMMARY

To revisit my original question – is merge to 32-bit the answer for better HDR? I think that’s probably still up for debate. It does however allow you to create a much more photo realistic result with relatively few easy steps, and less hassle. So if you fall into one of the categories at the top of the article I’d suggest you give it a try especially if you want to do tone control but not alter the look of the image beyond that of reality.

As always, give me your thoughts and opinions. There’s always many different options and opinions and no one solution is right for everyone.

Post originally from: Digital Photography Tips.

Check out our more Photography Tips at Photography Tips for Beginners, Portrait Photography Tips and Wedding Photography Tips.

Merge to 32 bit – HDR technique comparisons


Digital Photography School
 
Comments Off on Merge to 32 bit – HDR technique comparisons

Posted in Photography


Software technique: Photoshop Gradient Tool: Part 2 – Adjusting Images

27 May

CompositeWithAdjustments_2.jpg

In the second, concluding article of his 2-part tutorial explaining Photoshop’s Gradient tool, Jean Miele explains how to use linear, reflected and radial gradients in layer masks to improve your digital photographs. In this article Jean takes us through four clear, easy steps, and also includes more tips for making the most out of gradients in both Photoshop and Lightroom. Click through for links to the article. 

News: Digital Photography Review (dpreview.com)

 
Comments Off on Software technique: Photoshop Gradient Tool: Part 2 – Adjusting Images

Posted in Uncategorized


20 HDR Photography Tutorials to Learn This Technique in One Day

27 Apr

HDR photography is successfully used by amateur photo masters as well as professionals.There are 5 HDR video tutorials and 5 text tutorials with detailed screenshots.

The post 20 HDR Photography Tutorials to Learn This Technique in One Day appeared first on Photodoto.


Photodoto

 
Comments Off on 20 HDR Photography Tutorials to Learn This Technique in One Day

Posted in Photography


How to Backlight: Photography Technique – Backlighting Photo

22 Nov

Watch this free instructional photography tutorial to learn how to photograph using backlighting photography technique. More free tutorials at LearnMyShot.com

Diamond Digital Production www.diamonddigital.ca Photography and Videography With Diamond Digital Production, you can preserve your memories forever in a beautifully edited DVD without breaking the bank.
Video Rating: 5 / 5

 
Comments Off on How to Backlight: Photography Technique – Backlighting Photo

Posted in Photography Videos