RSS
 

Archive for November, 2010

5 HOT Lightroom Features

26 Nov

A Guest post by Christopher HC Brown

lightroom_3.jpgFirst off I should come right out and say that I think Lightroom is an amazing tool for photographers. Before I got my first copy of this application I was using Photoshop to do all of my image editing.

Don’t get me wrong, I know Photoshop is also a great application and is used by probably millions of photographers and graphic designers as the de rigueur standard. Unfortunately it is the comprehensive scope and vast number of features that is what makes it a problem for many photographers. Photoshop contains many features that are rarely or never used by photographers.

As a result the menu structure and basic interface is quite cluttered. Furthermore, the need to use layers to perform non-destructive editing is for many of us tedious. I must admit that prior to switching to Lightroom, I so much wanted to avoid having to create and manage layers that I created a copy of each raw image I created, then performed destructive edits on the copy. If I made a change that I could not undo, or that I decided I did not like after I had applied other edits, I had to create another copy and start all over again. Certainly not an efficient approach!

Fortunately somebody suggested that I might like to try Lightroom or Aperture as both of these applications are designed with the photographer in mind. This was in my “pre-Mac” days so Aperture was out; I got Lightroom 2.7, and recently upgraded to version 3. Since then I have become a devoted convert to this application, and now I need Photoshop only on the rare occasions that I want to perform some complex Cloneing, or if I want to do some kind of graphic editing that Lightroom, by definition, does not support.

So now that you know how I came to be be a fervent fan of Lightroom, here is the list of my 5 favorite features that make it such a great tool for photographers.

1. Non-Destructive Editing Without Layers

I hate layers! I don’t like creating them. I don’t like setting their properties. I don’t like merging them, flattening them, deleting them or moving them. When I am editing a digital image there are a lot of other things I would rather do than mess around with layers. The problem for me, before I started using Lightroom, was that using layers was the only robust method for making non-destructive edits to a digital image.

As I described above I had way of avoiding using layers, but it was not very efficient. Well fear no more. Lightroom lets us edit our RAW image files (or JPEG if you are not shooting RAW yet), preserves a history of every change we have made, and allows us to move forward and backward in the history. We can even save a snapshot of our images at any time and in this way preserve the edits performed, then make more edits. If we decide we don’t like subsequent changes, we can go back to the snapshot and start again.

If you are like me, your aesthetic is constantly changing and as a result you are re-editing images months after your initial attempt. For us this really is a paradigm change in digital image manipulation.

2. Library Integration

lightroomlibraryscreen.png

Prior to Lightroom we had to switch between separate applications to manage our ever expanding photo libraries and our editing software. Now we have a scrolling library across the left side of the window, and at the bottom a scrolling screen that allows us to quickly navigate between images.

The navigation bar on the left of the window, by default, includes all of the folders in our library, and the collections of our images. I find this really useful when I am publishing images to my Flickr page (which is supported by version 3), putting together slide shows, and publishing Flash or HTML galleries of my collections.

3. Graduated Filter

lightroom-tonemapped

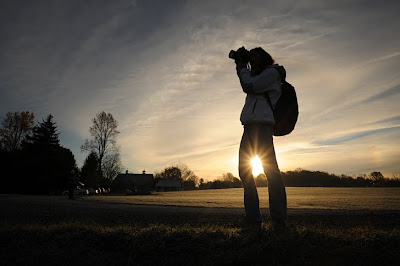
The Graduated Filter tool is excellent for adjusting exposure to bring life back to an overexposed sky or for darkening a foreground to place greater emphasis on the subject, as in the picture to the left. Simply click and drag the filter down over the region in the image that you wish to adjust.

Then, if you wish to tilt or change the size of the area covered by the filter, you can drag the area around with your mouse. You can use the graduated filter to apply heavy or light adjustments, and it always provides a smooth transition from the adjusted to the non-a dusted regions in your image. I use it mostly for exposure adjustments, but it can be used to adjust a number of properties such as contrast, brightness, clarity and sharpness.

Also, you can use it to apply a graduated colour effect just like we used to do with glass or plastic filters when shooting film.

4. Crop Overlay Tool

lightroomcrop.png

When clicked, the Crop Overlay Tool displays a grid overlaying your image. To change the region to be preserved after your crop, simply adjust the sides of the area by clicking and dragging. There are a couple of features that make cropping in Lightroom a breeze. First, you can choose from a number of standard formats (called the ‘aspect’) such as 8×10, 8.5×11, 1×1, 5×7, 4×6, etc…

This makes changing the format of your image quick and easy. Changes to the aspect is something that photographers should experiment with when processing their images as changing the format has the power to improve final product. Now it is very easy to do.

Furthermore, there is a little padlock symbol that when clicked toggles between locked aspect, and freeform cropping. The second cool feature is very simple, but really improves working with cropping; a preview. Provided that you have the Navigator at the top left of your Lightroom window expanded, the changes you make to the crop of the image will appear there. This makes trying different crops really easy and cuts down on a lot of the clicking through menus that some other applications make us go through.

Finally, if you make a crop, and later think you might like the image cropped differently, or not at all, all you have to do is click the Crop Overlay Tool and you can adjust or remove the crop at your whim!

5. Web Export

This is a feature that I have only recently started to use. Prior to building this website the export functions I used were to local disk, Flickr and Slide shows. I actually built a website using an on-line web tool that included HTML based galleries for my images. It lasted about two days once I figured out that I could use the built in functionality in Lightroom 3 to create slick Flash galleries!

There are something like 30 templates included with Lightroom. None of them are terribly fancy, but they provide a very simple and elegant presentation of your images. There is even a “Postcard” gallery included that spreads thumbnails of your images across the screen that enlarge for viewing when the user clicks on them. You can change the look and feel of the galleries by changing colour schemes, image and thumbnail sizes, and which metadata to display. Finally, publishing is a ‘one click’ excercise after you enter the address of the FTP server and sub-folder of your website.

Well there you have it, my favorite 5. Get to know Lightroom and I am sure you will find many more useful features for the top of your list.

See more from Chris at Christopher HC Brown Photography

Post from: Digital Photography School


Digital Photography School

 
Comments Off on 5 HOT Lightroom Features

Posted in Uncategorized


Canon updates firmware for EOS 7D & Rebel T2i

26 Nov

Canon has released firmware updates for its EOS 7D and  Rebel T2i/EOS 550D digital SLRs. Firmware v1.2.3 for the 7D and v1.0.9 for the 550D fix minor bugs in both cameras. The latest versions can be downloaded from Canon’s website.
News: Digital Photography Review (dpreview.com)

 
Comments Off on Canon updates firmware for EOS 7D & Rebel T2i

Posted in Uncategorized


Mozilla Firefox – Plugins and Extensions – Copy Page URL and Title to Clipboard, Configuring the Format

26 Nov

“My CopyFixer” allows you to copy the URL and/or title of the currently browsed webpage in Firefox to the clipboard.

Are you setting up a links page, do you write about websites, or do you often want to tell a few friends or coworkers about websites you visit via e-mail, Facebook, or Twitter? If so, don’t manually retype web page names or URLs when you can copy them to the clipboard and paste them into another application or webpage.

The “My CopyFixer” extension for Mozilla Firefox lets you copy the URL and/or title to the clipboard by pressing Ctrl+C when no text is selected. The format is customizable, so you can copy web addresses to the clipboard formatted as an <a href>, a comma-delimited text, a personal recommendation, or however else you wish….

Read more at MalekTips.
New Computer and Technology Help and Tips – MalekTips.Com

 
Comments Off on Mozilla Firefox – Plugins and Extensions – Copy Page URL and Title to Clipboard, Configuring the Format

Posted in Technology


Giving Thanks, Giving Back

26 Nov


It’s Thanksgiving Day here in the US. Which means that in addition to trotting out the traditional Strobist before-and-after turkey shot (courtesy the tryptophan-laced Paul Morton) we pause to think about giving thanks and helping others.

This year, a quick look at how some local photographers in Howard County, MD are using their cameras to give back to their community. And not to put the idea in your head, but it was a really fun day — and something anyone reading this blog could do, too.
__________


A few weeks ago, I posted a cryptic note looking for photographers to help out with a community project on November 2nd. Within an hour or two there were more than fifty photogs who were willing to sign up for a day-long volunteer shoot without even knowing what they would be doing.

As it happens, we could only use about 15 photographers for this shoot. So I chose them solely on the basis of proximity and availability for the day. Which is to say, (a) I did not cherry pick the group for pros or other hotshots, and (b) any group of enthusiasts in any city in the world could do the same type of project for any of a number of subjects.

Here’s what we did.

Instant Archive


The Howard County Conservancy is a 230+ acre plot of preserved land around a 300+ year-old farm house in Woodstock, MD. They educate over 6,000 school kids a year (via field trips) and provide events for the general public in addition to making accessible a wonder series of hiking paths through agricultural and wooded areas.

It is an amazing place with lots of nature and history, but without a ton of money. In fact, the nonprofit organization is trying to raise enough of the latter to create an endowment that will keep them going. And if you are going to be doing that sort of thing, it helps to have a photo library.

So that’s what the 15 volunteer photographers gave them. We arrived well before sunrise (gorgeous, with frost on the ground) and stayed throughout the day.

We were working off a subject list provided by Allison, our on-site contact, so the photos would be very useful to them. We approached team-coverage style, like back in the day at The Sun. List in hand, the photographers were also instructed to just go out waking with their cameras and seeing. And that brought back some of the best photos.

By the end of the day we had shot over 10,000 photos, which were then edited and toned down to a tight 250. Total cost, other than our time: About 0 for pizza, drinks and some chocolate. And we had a lot of fun. You can see some of the results of the shoot on HoCo360, my local photo blog.

Instant Results

As it happens, Howard County was also getting another gift this month. R.E.I., a kickass outdoor equipment and clothing store, was opening in nearby Columbia. Even if not in the US, you may know of them because of Chase Jarvis’ BTS vids — he shoots their lifestyle photos for catalogs, etc.

Among R.E.I.’s many admirable qualities is that a local store tends to push about 0,000.00 per year back into the immediate community. And the HoCo Conservancy is right up R.E.I.’s alley as a benefactor. R.E.I. not only wrote a check for ,000.00 to kick things off, but has pledged a buck for the conservancy each time someone checks into the store on Facebook.

And because the conservancy had a brand new picture archive, they were able to create a cool poster on very little notice to showcase themselves in the new store:


The photos in the poster are courtesy Jeff Snyder, Dave Kile and Erik Couse, all from the day’s shoot. You can see it bigger, here. The goal was to introduce any shopper in R.E.I. to the conservancy should they not already know about it.
__________

Anyone — ANYONE — reading this site right now has the ability to do the same thing for a deserving organization in their own community. And I think I speak for everyone involved on this project when I tell you that we had a lot of fun. It was work, but it was both creative and gratifying.

As the picture editor for the project (highly recommend a dedicated PicEd) I was very impressed with the stuff that came back from the shooters. Most were amateurs, but they worked hard and pressed themselves all day long.

If you are already meeting up socially with local photographers, I would like to invite you to consider moving past the typical Model Mayhem Meetup and into something with a little more of a purpose.

It is a chance to have fun, be creative, make a difference and give thanks with your camera. You won’t regret it.

If you find yourself in the R.E.I. store in Columbia, MD, check out the community involvement display in the back and our photos therein. And there are lots more where those came from.

__________

Related:

:: HoCo360: Barnstorm ::
:: The Howard County Conservancy ::
:: R.E.I., Columbia, MD ::


Strobist

 
Comments Off on Giving Thanks, Giving Back

Posted in Uncategorized


Harper’s Bazaar Arabia – Louis Vuitton

26 Nov

Shooting for the November Men’s Issue of Harper’s Bazaar Arabia

It’s such an incredible feeling when you really click with an art director or a fashion editor. It’s a rush, in fact. And that’s the way it feels when I work for Sally from Harper’s Bazaar Arabia. I am always excited for another opportunity to work with her again, we just have a mutual love for fashion and we are on the same page, aesthically! So when I got her email back in July about this men’s shoot, I was thrilled! There was about a 3 week lead in before she actually landed in LA so the first thing we started doing was looking for the perfect model and since we were also shooting the cover, the casting was very important!

There was a decent amount of prep work that went into this shoot and I’ll explain this to you now. While we were scouring LA for the perfect model, I set out to search  the perfect location for the shoot. Sally wanted something very “LA”, you know, sunny, and glossy and hip! But Harper’s was also doing this story to coincide with the Louis Vuitton Trophy, the sailing race set to take place in Dubai from November 12th through the 27th!  And  because the shoot was with Louis Vuitton clothing exclusively, their people had some input too and they wanted a nautical theme sort of enter-twined with the story to enhance the Trophy race. So I first reached out to rowing clubs or considered renting an actual rowing boat. We realized that since we had to get 6 pages and a cover in one day, maybe the rowing boat would be too limiting. I reached out to some Yacht clubs too, but there weren’t any that were really aesthetically interesting to shoot in Southern California. That’s when I thought of a pool located in the Hollywood Hills that I had shot at about 2 months before this shoot came up. Situated high above Hollywood Boulevard, this house had all the glamour of Hollywood and then some! It was modern, sleek and bright. But the main star of the house is it’s pool. Beautifully “poised” in the front yard, the pool looks out over the city of Los Angeles with lots of white concrete surrounding it and tons of shooting opportunities. I forwarded Sally some outtakes of the pool from my previous shoot and she approved the location. So the location was nailed down first. The casting took a bit longer. I emailed the top LA modeling agencies and gave them the job break down and started forwarding the packages once I got them to Sally in Dubai. We went back and forth for awhile until her and her staff decided that Dylan Griner from Photogenics Models was our “it” model for this shoot. With his “rugged” but still beautiful looks, he was the perfect model for this kind of shoot.

Harper's Bazaar Arabia Cover

So we had the location set and we had the model. The last thing we needed were some props to fill out the story. Because Sally picked up the samples in Paris from Louis Vuitton, we could have the model actually get in the pool with the clothing and get them wet. Originally I put together a shot list to include a lot of shots in the pool or just outside of it. But we needed something extra to read “Nautical!” While Sally was actually flying from Dubai to Paris to pick up the clothing from Vuitton, I was at Omega Cinema Props in Hollywood and photographing potential props for our shoot. Omega caters to the movie industry so they have football stadium sized buildings stocked full of everything you can possibly imagine in the way of props! They have them sorted by country or era. Or themes. When I called them to ask if they had a nautical section, the answer was yes, “yeah, sure, they’re all in building C”. It’s really awesome to visit there. SO many possibilities!! I drove down to Omega and took a bunch of pictures of different type of boating rope and buoys, different oars, just anything that looked interesting and Nautical.

Harper's Bazaar Arabia 1

When Sally arrived in LA, I met her at her hotel to take a look at the clothing and show her the pictures from Omega. She approved the ones she wanted and the shoot was set! This was 2 days before the shoot!

Our call time was 12 Noon because I didn’t want to start shooting in the middle of the day when the sun was directly overhead. Why? Because the light isn’t very attractive at that time of day. The morning of the shoot day, Tyler and I headed to Omega to pick up the props that I had put on hold.  We then headed over to the house to get our equipment unloaded and set up before the rest of the crew arrived. David picked up Sally from her hotel so she didn’t have to take a cab all the way from Santa Monica, which if you know LA, Santa Monica feels like it’s in a different time zone when you’re up in the Hollywood Hills!  By the time they arrived, the lighting was set up and Dylan, our model, was in make up. Sally used a guest room at the house to lay out the clothing and we had Dylan try on the clothing to see what worked best on him. Meanwhile, I was busy with Tyler working out the order of the shots and how the sun was going to move over the pool area we were shooting in. Because of the brightness of that summer sun in LA, I decided to use a neutral density filter. The main purpose of a ND filter is to cut down the amount of light that passes through the lens. So, in other words, I didn’t have to shoot at F16 to get my exposure. I own a ND 2 which has a filter factor of 2 stops. That means I have to open up 2 stops when I put that filter on. So I could shoot with a better aperture AND the ND filter also darkens the sky and helps keep colors saturated. So I knew the blue sky and pool water would really pop with an ND filter as well as being able to control my aperture. Meghan Stoll from AIM Artists was our men’s groomer for the day. She gave Dylan that “perfect” tousled hair look which looks like it wasn’t worked on but actually was. She also evened up his skin with a little foundation. Obviously we’re not going to slap on a ton of make up on a male model, especially for a pool shoot.

Harper's Bazaar Arabia 2

The day went really smoothly with zero drama. I want to reach out here and give a warm and sincere big thank you to Adam Press for letting us take over and invade his incredible home in the Hollywood Hills. We had our computers set up in the dining area, his living room became our grip room with all our gear laid out on the floor so we could run and grab an extra C-stand or whatever we needed. His guest bedroom, as mentioned, became the wardrobe room and the kitchen area was Meghan’s grooming domain. And then of course we shot the entire story in and around the pool. We we did indeed take over his house, if only for a few hours, but still. He was very gracious in letting us shoot there and I’m very grateful that he did because the shots turned out so lush and rich! And indeed the location had a lot to do with that.

Harper's Bazaar Arabia 3

Also a special thanks to Daniel Castro and his friend for the extra hand in assisting that day. Like I always say, it take a village to produce these shoots. There’s lighting issues to take into consideration and we have to trouble shoot constantly. One thing we decided to do on this particular shoot was to use our strobes as the sun and over power the sun. We were able to do this by positioning the lights at the angle the sun was coming in and then using a strong enough power of watts, we were able to trick the camera and sort of “over-ride” the sun. Slapping on the ND filter gave it some depth and saturation and there it is: our finished product!

Harper's Bazaar Arabia Cover 2
All Images ©2010 Melissa Rodwell Photography

And to add one more amazing aspect to an already great day, Matthew Wardenaar and Evan Matthews from EME Productions came out and shot our BTS video. These two are great guys who I met through one of my LA seminars and they’ve become like family! Not only are they some pretty handsome boys, they’re genuinely sweet. Oh and they’re pretty damn talented as well. Although, I think it’s a one sided love between us. I think they just love us because of our famous In and Out Burger’s catering on our shoots! LOL. Just kidding. That’s an inside joke. But  Check Out their VIDEO that they did for us, so we can share with you the day of the shoot!


Fashion Photography Blog – A Resource for Fashion Photographers, Created by One.

 
Comments Off on Harper’s Bazaar Arabia – Louis Vuitton

Posted in Uncategorized


[HD] NVIDIA 3D Vision Images – Require 3D Glasses! [Red][Blue]

26 Nov

Enjoy, Its a compilation of Screenshots posted by NVIDIA. You’ll need to have 3D Glasses with you in order to Enjoy this video 😀 Well.. My Audio Track Has Been Blocked So I Have No Choice But To Use Audio Swap I got my pair of 3D Glasses from Spy Kids 3D, Other than that you’ll prolly need to buy it from Ebay.
Video Rating: 4 / 5

As seen at Canwest 2008 Vancouver. A special thanks to Jean_Luc for providing me the replacement MC texture.
Video Rating: 4 / 5


Wedding Photography Tips from Wedding Photographer Anna Kuperberg

26 Nov

Go to SilberStudios.Tv for more info. Marc Silber interviews Anna Kuperberg, a San Francisco wedding photographer who has also been noted for her child and dog photography. She gives advice for amatuer photographers on how to approach your subjects with curiosity, and shares her techniques to capture those moments of intense emotion and love while doing so naturally. Her tip for taking better photos is to not let your equipment get in the way, which is why she recommends high capacity compact flash cards so as not to miss those decisive moments. Tune into this episode to get her inside story for taking photos that will be cherished for years to come. This year, Anna Kuperberg has been featured on the cover of Photo District News and PPA magazines, and was named one of the world’s top ten wedding photographers by American Photo magazine. Her work has appeared in InStyle, People, and Martha Stewart Weddings.
Video Rating: 5 / 5


Combining multiple images: Photoshop CS5 for Photographers from lynda.com

26 Nov

Watch the entire course at www.lynda.com PhotoshopCS5 for Photographers provides comprehensive Photoshop training targeting the needs of photographers. In this course, author Chris Orwig demonstrates the fundamental skills used to enhance digital photos, including managing and correcting color, sharpening, making selections and adjustments, retouching, and printing from Photoshop. In addition to teaching the techniques that enable photographers to refine and publish their photos, the course includes live-action segments that encourage thinking photographically, and shoot with Photoshops capabilities in mind.


Bunnies: Grindhouse

26 Nov

The Bunnies star in this action packed double feature. The first is filled with alien creatures and the second will blow you away with stunt bunny car moves. The 30-Second Bunnies is a troupe of bunnies parodies, a collection of movies by re-enacting them in 30 seconds, more or less. Watch them all at www.starzbunnies.com 30 Second Bunnies Animated Animation Flash Grindhouse Tarantino Rodriguez Horror

They say the Japanese version of this Thriller is the best. But make way for the Bunnies. The 30-Second Bunnies is a troupe of bunnies parodies, a collection of movies by re-enacting them in 30 seconds, more or less. Watch them all at www.starzbunnies.com 30 Second Bunnies Animated Animation Flash Horror Grudge Japanese


CalGal in 3D!!!

26 Nov

CalGal.info Today starring Jane Pear and Rosie Rebel IN 3D! You must wear anaglyph (red and blue) 3D glasses to see the effect! Photo Credits First photo is in the public domain and from here: en.wikipedia.org The city view is a 3D anaglyph image of Zagreb by Vedran V published under the GNU Free Documentation license, and available here: en.wikipedia.org The image of the plastic 3D glasses is public domain and available here: en.wikipedia.org Music by me (I forgot to ever credit myself for that). 3D made with Stereo Movie Maker (available free) and help from MCasual Jacques. Dedicated to Arch Obeler, who made 3D movies but couldn’t see the effect because he was blind in one eye.