RSS
 

Archive for October, 2013

Tactile Technology: 13 Off-Screen Touch Input Inventions

31 Oct

[ By Steph in Conceptual & Futuristic & Technology. ]

Touch Technology Main

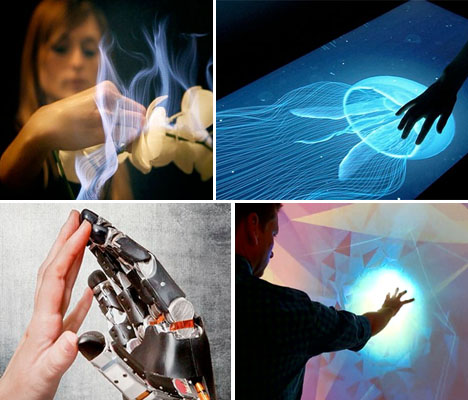
Touch input has already almost entirely eliminated the need for physical keyboards and mouses, but soon, it won’t even be confined to a screen. Researchers are developing systems that can register and translate hand movements in thin air, or even replicate the sensation of three-dimensional objects and textures. Here are 13 intriguing touch tech inventions.

Touch Tech for Artificial Limbs

Touch Technology Prosthetics

Prosthetics allow amputees to do all sorts of things they wouldn’t be able to do otherwise, but they’ve been missing one very crucial thing: the sense of touch. That could change, with experiments at the University of Chicago developing a moldable plastic material containing piezoelectric powder that can sense pressure at any point on a surface by turning it into an electric voltage. They were able to translate those electric signals to the human nervous system, so they can be interpreted by the brain as touch. The next challenge is adapting this touchscreen technology, borrowed from smartphones, to the soft and curved surfaces of prostheses.

Feeling Objects in Thin Air

Touch Technology Feeling Objects

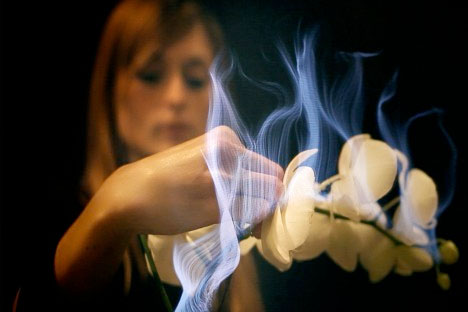
Imagine being able to touch something that’s not really there. A new kind of touch technology being developed by the research wing of the Walt Disney Company allows users to feel textures on a touchscreen as well as touching holographic objects projected into space, as through an Xbox Kinect. Called ‘haptic technology,’ it works by blowing small rings of air at a user to simulate texture, movement or collisions with objects. It could potentially revolutionize the gaming experience, and also be useful in medical settings.

Board Transforms Touch into Sound

Touch Technology TouchBoard

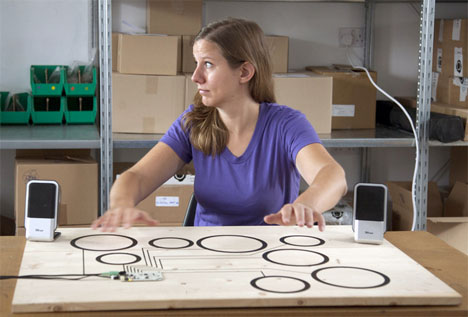
Developed by London-based studio Bare Conductive, the ‘Touch Board’ translates touch into sound. Any conductive material can be turned into an interface; in this case, electrically conductive paint is applied to a surface. You connect the touch board to a speaker, and plug it into a micro USB cable. Interaction with any of the electrodes cause an MP3 player to play an associated track from the card.

Transmit Audio Messages With the Touch of a Finger

Touch Technology Finger Messages

What if you could hear through someone’s finger? ‘Ishen-Den-Shin’ technology (named for a Japanese phrase meaning “what the mind thinks, the heart translates”) uses the human body as a sound transmitter. A handheld microphone connected to a computer records as soon as it hears a person speak and transforms it into a sound loop which is converted into a harmless high-voltage inaudible signal transmitted to the microphone’s conductive casing. That means whoever holds the microphone becomes a human sound emitter. If they touch an object or another person’s ear with their finger, the small sound vibrations can be heard.

Augmented Reality Touchscreen Interface

Touch Technology Augmented Reality

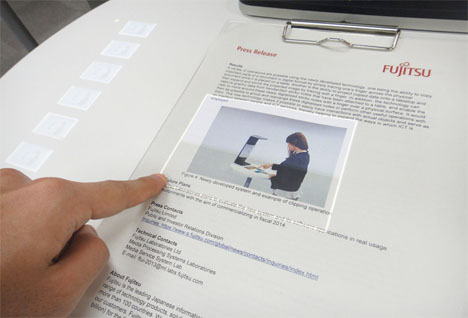
An augmented reality touchscreen interface from Fujitsu Laboratories can turn any surface into a touch screen using off-the-shelf cameras an projectors. Users can trace their fingers across a document on a table, copy it as digital data, and display it virtually. The camera measures irregularly shaped objects on a table, and automatically adjusts the coordinate systems that make it possible to match finger movements and touching of objects to the digital display projected onto physical objects.

Next Page:
Tactile Technology 13 Off Screen Touch Input Inventions

Share on Facebook


[ By Steph in Conceptual & Futuristic & Technology. ]

[ WebUrbanist | Archives | Galleries | Privacy | TOS ]


WebUrbanist

 
Comments Off on Tactile Technology: 13 Off-Screen Touch Input Inventions

Posted in Creativity


1 November, 2013 – Kevin and Michael’s Toy Shop

31 Oct

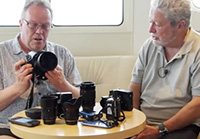
 A few months ago Michael, Kevin and Chris were part of the instructor team on a Phase One PODAS workshop in the Kimberley Region of Austrailia.  The trip took place on the True North, an amazing expedition ship with an onboard helicopter that allowed us to explore some incredible locations.  While on the cruise we did a number of video interviews as well as a video on the whole trip.  Watch for all of these soon.  In the mean time enjoy a video with Michael and Kevin discussing the gear they brought on the trip. Kevin and Michael’s Toy Shop 


The Luminous Landscape – What’s New

 
Comments Off on 1 November, 2013 – Kevin and Michael’s Toy Shop

Posted in News


Matching the Production Style to the Image – High Energy Means High Contrast

31 Oct

Introduction

The Following is an excerpt from the SLR Lounge Lightroom Preset System v5 and accompanying workshop from the Lightroom Workshop Collection v5.  The Lightroom Preset System is designed to take you from Ordinary to Extraordinary photos in just a few seconds and clicks within Lightroom 4 and Lightroom 5.

Overview

One thing that we like to do within our studio is match the post production style to the overall emotion and story within the image. We feel that doing so leads to a much stronger overall image.

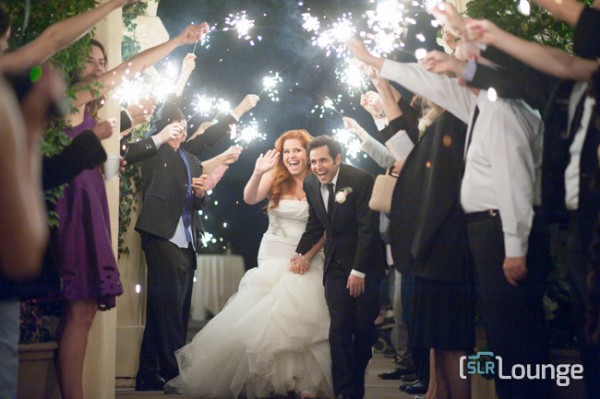
So in scenes that have a lot of energy, we want to emphasize the excitement with a colorful, high contrast production style. For this tutorial, we are using this sparkler exit photo which should be well complimented by the high contrast edit. The SLR Lounge Lightroom Preset System v5 has presets specifically for high contrast portraits which we are going to apply to this photo. Not to worry, we are going to demonstrate all of the settings below.

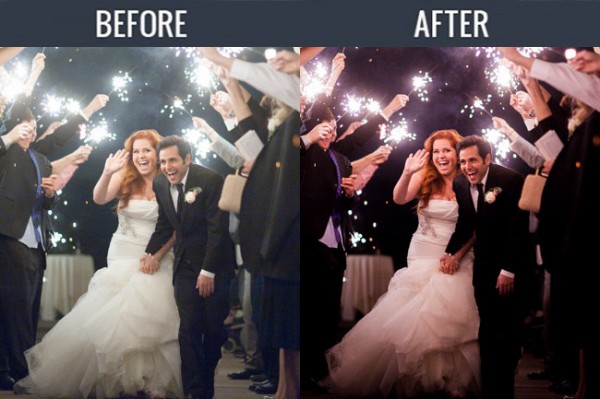
Here is what our image looks like before and after our presets are applied.

beforeandafter

Lightroom Preset System v5 Mixology

For those who have the Preset System, you can follow the Mixology Recipe below to get to the same results. If you don’t have the Preset System, please read the article or watch the video below to see exactly how this look was achieved.

Develop Mixology
01-10 BASE-SOFT: 14a. Heavy Crush – Skin Desat

Local Adjustment
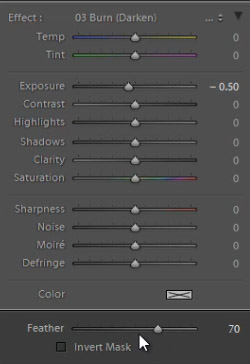
Radial Filter: 03 Burn (Darken) -0.5 Stop (watch video tutorial for reference)

Written Tutorial

Step 1: Checking the EXIF data

Screen-Shot-2013-08-12-at-3.40.04-PM

The first thing we generally do is take a look at how the image was shot. Doing so, gives us a lot of information on things we need to look out for when post producing. To check the EXIF data press ”i”.  This image was shot with a Nikon D700 at ISO 6400. This is important to keep in mind because Nikon cameras tend to shoot skin tones slightly green, and this high of an ISO might also present a noise issue.

Step 2: Apply Preset

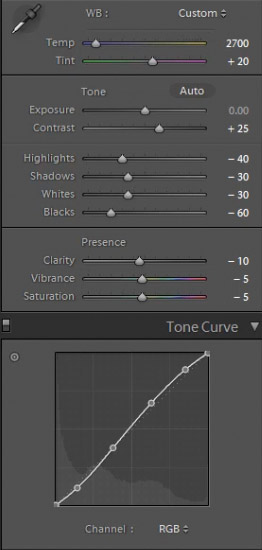
After we adjust Color Temperature and Tint to taste, we apply the “01-10 BASE-SOFT: 14a. Heavy Crush – Skin Desat” preset. This preset adds contrast to the photo and makes adjustments to desaturate skin tones.  The Contrast is being raised and the Shadows and Blacks are being dropped in order to boost overall image contrast. To flatten out the highlights over skin tones, we have dropped the Highlights and Whites.  In the Tone Curve we have a subtle “S” shaped contrast boosting tone curve to add a bit of contrast back specifically where we need it.

Here are the final Basic and Tone Curve Panel settings:

developpanal

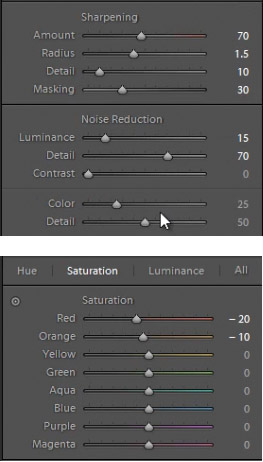
We have our standard Sharpening and Noise Reduction adjustments applied to this image. Even though this image was shot at a high ISO,the D700 takes such great photos at ISO 6400 that we don’t have to raise any of the Noise Reduction Luminance beyond what we already have.

In the HSL our Reds and Oranges are slightly dropped in order to desaturate heavy reds and oranges that can appear within skin tones when we are doing a high contrast edit.

developsettings1

Step 3: Add Radial Filter

The last thing we’re going to do is add a Radial Filter to this image. This filter is unique to Lightroom 5, but Lightroom 4 users can get the same effect by adjusting the vignette settings, or by using an Adjustment Brush and painting around the outside of the image.

radialfilter

We’re pairing the Radial Filter with our “03 Burn (Darken) -0.5 Stops” preset to get a nice vignette around our couple. We adjust the Feather to 70 to make the effect more subtle.

radialfiltersettings

Some people may comment that shadow details are being clipped, but that’s okay for this image. Remember, we edited this image to fit the mood and energy, not for it to be technically “color correct.” Making this high energy photo a high contrast one is a stylistic choice, and we love the way it looks. Here’s what our photo looks like before and after our edit.

Before

lightroom-5-tutorial-high-contrast-portrait-0001

After

lightroom-5-tutorial-high-contrast-portrait-0002

Watch the Video Tutorial

If you would like to see exactly how all of the settings and adjustments were applied, please watch the video from the SLRLounge youtube video channel.

Conclusion and Learn More

We hope you all enjoyed this tutorial. If you are interested in learning more or purchasing the SLR Lounge Lightroom Preset System v5 or the newly released Lightroom Workshop Collection v5, please click any of the links in this article.

Post originally from: Digital Photography Tips.

Check out our more Photography Tips at Photography Tips for Beginners, Portrait Photography Tips and Wedding Photography Tips.

Matching the Production Style to the Image – High Energy Means High Contrast

The post Matching the Production Style to the Image – High Energy Means High Contrast by Post Production Pye appeared first on Digital Photography School.


Digital Photography School

 
Comments Off on Matching the Production Style to the Image – High Energy Means High Contrast

Posted in Photography


Nokia shows off first Raw file samples from Lumia 1020

31 Oct

sunset_jpg.jpg

Nokia is sharing the first examples of its new Raw DNG file format, soon available on both its forthcoming Lumia 1520 phablet and the Lumia 1020 smartphone. Available for download from the company’s blog, Nokia promises that its DNG files are high quality. See for yourself on connect.dpreview.com.

News: Digital Photography Review (dpreview.com)

 
Comments Off on Nokia shows off first Raw file samples from Lumia 1020

Posted in Uncategorized


DIY: Geometric Wall Décor

31 Oct

Extra photos for bloggers: 1, 2, 3

What do the Pythagorean Theorum, protractors and high school students scratching their heads all have in common? Geometry!

Geometry isn’t always fun, but when you combine (or add) it with photos, the results are just fantastic.

Hang your photos in triangles for to create totally fun geometric wall décor that’ll really (math) class up your walls.

Even those of us who are less than stellar at geometry, need not fear. This project is easy as 3.14.

Create Your Own Geometric Wall Décor

Why It’s Cool

Traditional wall hangings can be really square.

That’s why we love the idea of hanging our photos in triangles.

Even if you’re not so handy with a protractor, they’re easy to make.

And, they make really great gifts. Who doesn’t love a good hexagon?

Ingredients:

  • Photos
  • Scissors
  • Surface to Cut on
  • Pen
  • Glue
  • Utility Knife
  • Mat Board (cardboard will work too)
  • Hot Glue Gun
  • Twine (fishing line or yarn will do too)
  • T-Square or Ruler

STEP 1: Cut the Board

before

On the cutting surface use your T-square and utility knife to cut strips of mat board (they’ll be the 3 sides of your triangles).

Remember to press firmly on the T-square and watch your fingers when cutting the board. Sometimes it takes a couple of slices with the utility knife to cut the board.

You can choose the size of your strips depending on how big you want your triangles to be.

We made 1 inch x 4 inch strips.

STEP 2: Let’s Get Triangular

before

Place one strip of mat board on your cutting surface and put hot glue on both ends.

Smoosh two more pieces of mat board into the hot glue to form a triangle.

Put a small stripe of hot glue on the top of the triangle to fasten it tight.

Let the glue dry for a couple of minutes.

STEP 3: Tracing Time

before

Place your (now dry) triangle on top of a photo and trace around the outside of the triangle.

STEP 4: Cut the Triangle

before

Cut out the triangle you just traced.

STEP 5: Fasten the Photo

before

Place a light layer of glue (non-hot kind) along the edges of your photo triangle.

Press your mat board triangle onto the glued photograph and let it sit for about 30 minutes to make sure it’s firmly attached.

STEP 6: Make a Hexagon

before

Using your hot glue gun, glue the sides of your triangles and join them together to form a hexagon.

STEP 7: Hang it High

before

Cut a strip of twine and glue it on to the back of your hexagon to make it hangable.

Then hang it. It looks so good up there on your wall!


Taking It Further

  • Make different sized triangles to create super large hexagons or really small hexagons to use as little ornaments.
  • Paint the mat board or cardboard with a color of your liking.
  • Experiment with different shapes to create a new polygon. Layer different sized shapes on top of one another to create a multidimensional piece.

Related posts:

  1. DIY: Turn Your Fridge into a Gallery Wall, Make Photo Magnet Mosaics! Extra photos for bloggers: 1, 2, 3 They say opposites…
  2. DIY: Craft Awesome Geometric Photo Mosaics! Extra photos for bloggers: 1, 2, 3 4×6, 5×7, 8×10:…
  3. DIY Jewel Case Frames: Wonderful Wall Art Faster than you can say Polar Bears! Come clean. Most of your walls are as bare as…


Photojojo

 
Comments Off on DIY: Geometric Wall Décor

Posted in Equipment


Im Gespräch mit Alain Laboile

31 Oct

Ein Beitrag von: Alain Laboile

Hallo Alain. Danke, dass Du Dir die Zeit für ein Interview nimmst. Zuerst, erzähl doch mal etwas über Dich: Wer bist Du und was machst Du?

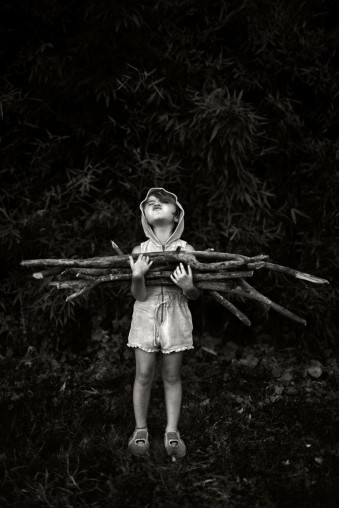
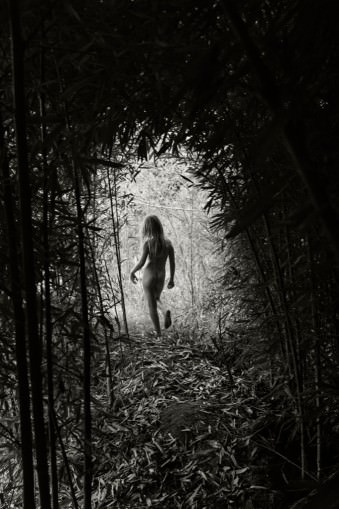
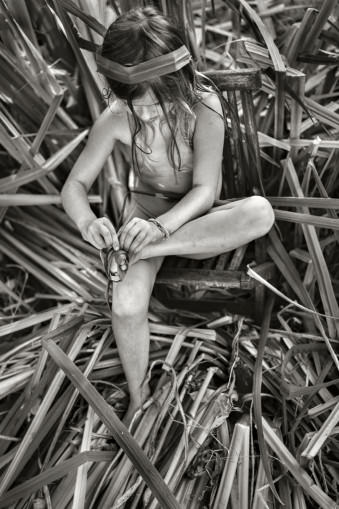
Ich bin ein französischer Bildhauer und Fotograf und wurde 1968 in der Nähe von Bordeaux geboren. Ich bin der Vater von sechs Kindern und seit 1992 mit meiner Frau Anne verheiratet. Wir leben ganz weit draußen auf dem Land, inmitten von Weinbergen, in einem alten Haus, das gesäumt ist von einem Bach und einem Bambuswald.

Wie bist Du mit der Fotografie in Kontakt gekommen und warum bist Du bei ihr geblieben?

Ich arbeite wie gesagt als Bildhauer. Im Jahr 2004 habe ich dann meine erste Kamera gekauft, um meine Skulpturen zu fotografieren. Meine Leidenschaft für Insekten hat dann dazu geführt, dass ich mich zuerst in der Makrofotografie geübt habe.

Nach der Geburt meiner letzten zwei Töchter habe ich die Linse dann Stück für Stück immer mehr auf meine Familie gerichtet. So war die Leidenschaft dafür geweckt und hat mich in den letzten neun Jahren auch einfach nicht mehr losgelassen.
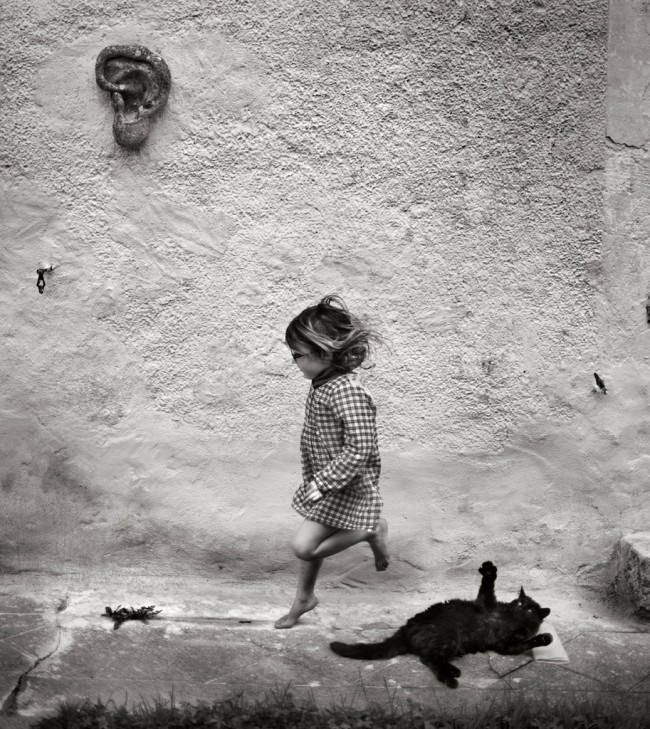
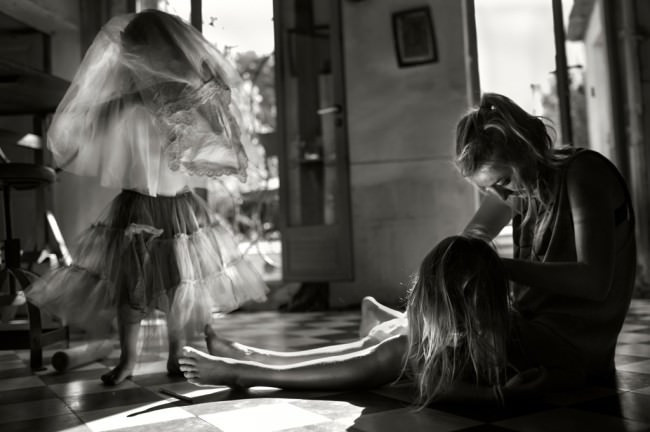
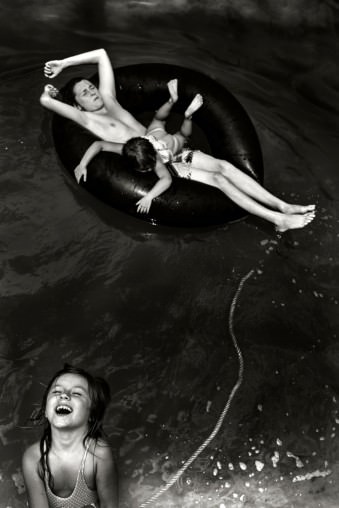
© Alain Laboile

© Alain Laboile© Alain Laboile

© Alain Laboile

Warum ist Deine Familie Dein Hauptthema, was möchtest Du festhalten und zeigen?

Mit jedem einzelnen Tag führe ich ein Familienalbum fort, das ein Erbe bildet, das ich an meine Kinder weitergeben werde. Meine Arbeit spiegelt unsere Art zu leben wider, die sich um ihre Kindheit dreht und meine Fotografien werden das Zeugnis davon sein. Man könnte sagen, dass mein Ansatz dem eines Ethnologen ähnlich ist.

In welchen Situationen machst Du Deine Fotos und wie erhältst Du die Spontanität dabei?

Ich fotografiere genau das, was wir leben. Ich arbeite zuhause und meine Frau ist nicht berufstätig, weshalb wir nie jemand anderen brauchten, um nach unseren Kindern zu sehen. Heute gehen sie auch alle schon zur Schule. Wir machen auch nicht den Trend mit, ein Überangebot von Nachmittagskursen für sie zu haben und unsere Kinder wissen, wie sie diese freie Zeit genießen können.

Durch diese Art der Erziehung entstehen Situationen mit Spielen und Szenen des täglichen Leben, die zu Aufnahmen werden können. Mein Platz zum Fotografieren ist begrenzt, weil das unsere Art zu leben ist. Wir fahren nicht in den Urlaub und sind meistens alle zusammen.

Das alte Haus, der Garten, der von uns selbst mit Schaufeln ausgehobene Pool, der Bambuswald, das Flüsschen, das hinten im Garten fließt und manchmal über die Ufer tritt – das ist unsere Welt. Hier gibt es unzählige Möglichkeiten für Spiele, die wiederum so viele Gelegenheiten bieten, diese Momente des Lebens für immer festzuhalten.
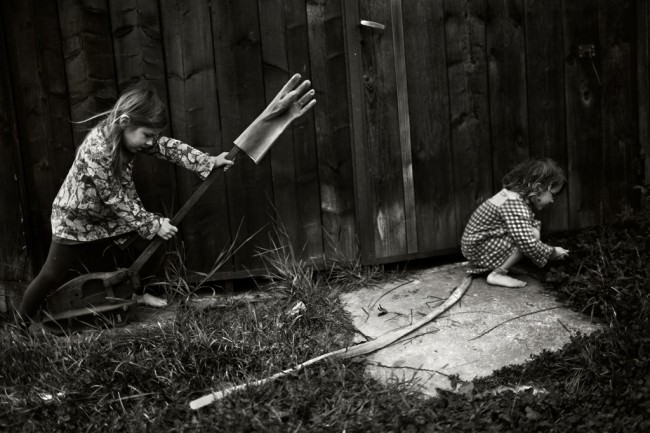
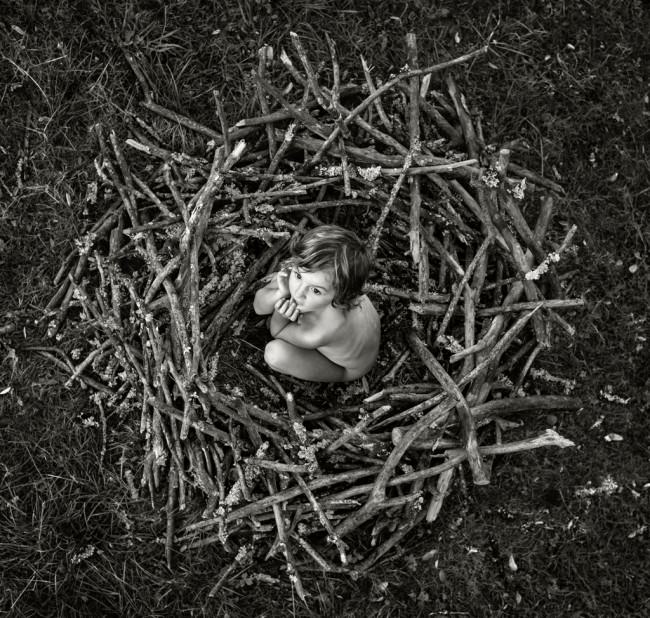
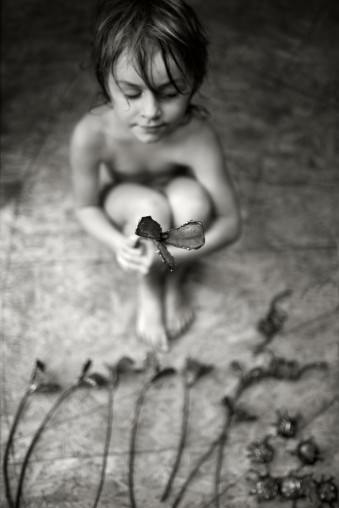
© Alain Laboile

© Alain Laboile© Alain Laboile

© Alain Laboile

Wir haben uns dafür entschieden, auf dem Land zu leben. In einem wirklich alten Haus ohne jeden unnötigen Komfort und ohne Fernseher. Mit unserem kleinen Universum drum herum. Ich habe diese natürliche Umgebung sehr genau kennengelernt. Ich weiß, wo ich stehen muss, um das Licht richtig einzufangen. Obwohl der Platz so beschränkt ist, gibt es ständig viel zu entdecken und die Erfindungsgabe der Kinder spielt dabei eine entscheidende Rolle.

Ich bin meinen Kindern gegenüber ständig anwesend. Ich bin da, wenn sie spielen und oft ist es gerade ihr Spiel, das die fotografische Idee liefert. Manchmal brauchen sie natürlich etwas Anschub. Dann tut es vielleicht eine Geste oder ein verbaler Fingerzeig wie „Mach das nochmal!“, „Noch etwas hoch!“ oder „Warte… geh mal da rüber!“.

Meistens beziehen sich meine „Anweisungen“ auf die Platzierung, ohne dass ich erkläre, was ich fotografieren möchte. Ich denke, sie haben sich daran gewöhnt, dass ich ihnen nur diese wenigen Worte hinwerfe. Das Wichtige dabei ist nur, es in der Bewegung zu tun und das Spiel nicht für eine Einsatzbesprechung zu unterbrechen. Alles passiert also in Echtzeit.

Die Serie „Reflections around the pool“ gibt ihnen die Möglichkeit, in eine Rolle zu schlüpfen, die innerhalb weniger Minuten improvisiert ist. Hierbei unterscheidet sich die Übung also von der Arbeitsweise meiner alltäglichen Fotografien, die die Spontanität des Moments festhalten sollen. In diesen kleinen Szenen nehmen sie bei einer Art Theater teil und das ist es, was sie mögen.
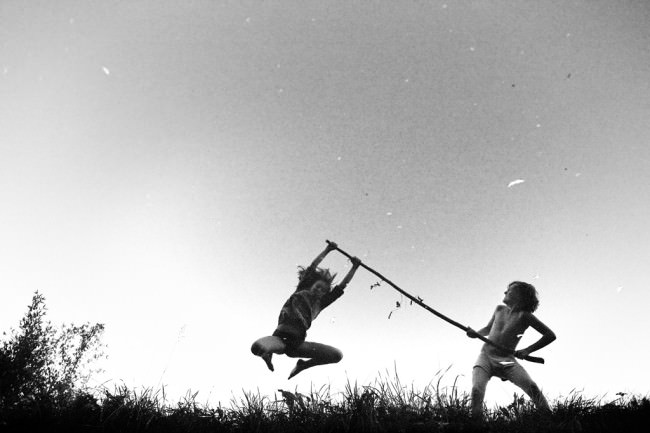
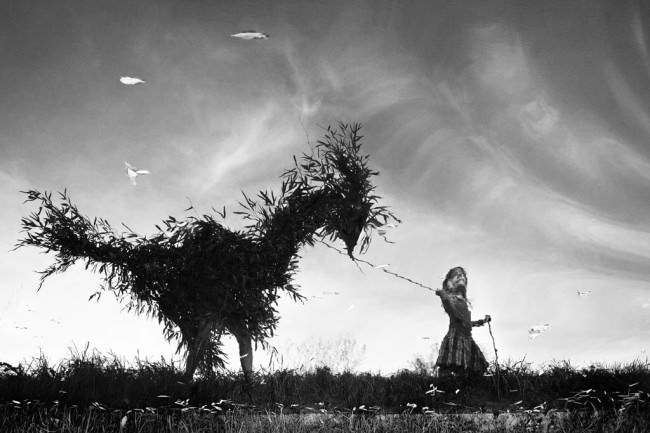
© Alain Laboile

© Alain Laboile

© Alain Laboile

Wie reagiert Deine Familie normalerweise auf die von ihr gemachten Portraits?

Wir haben sechs Kinder: Eliott ist 19, Olyana 17, Luna 15, Merlin 13, Dune 6 und Nil 5 Jahre alt. Die jüngsten achten gar nicht auf die Kamera und sind so einfach aufgrund ihrer Gleichgültigkeit ihr gegenüber freiwillig Mitwirkende. Die mittleren Alters spielen einfach herzlich mit und obwohl sie sich der fotografischen Arbeit, die da im Entstehen ist, bewusst sind, beeinflusst das nicht ihr Verhalten. Und für die älteren gilt, dass ihre Überbewusstheit gegenüber Bildern es schwerer macht, sie natürlich zu fotografieren.

Bekommst Du negative Rückmeldungen wegen der manchmal nackt gezeigten Kinder in Deinen Arbeiten?

Wir leben ja auf dem Land, an einem sehr isolierten Ort. Unsere Kinder entwickeln sich im Einklang mit der Natur. Die jüngsten ziehen sich also auch spontan aus, wenn das Wetter gut ist. Sie ziehen sich von selbst an, wenn sie älter werden und sich eine Vorstellung von Scham bei ihnen entwickelt.

Diese kindliche Nacktheit ist es, die manchmal zum Problem wird. Sie wird sexualisiert und dämonisiert und dann tritt auch Zensur auf. Ich akzeptiere das und lösche die Fotos einfach, über die sich beschwert wird.

Welche Ausrüstung benutzt Du und was denkst Du, wie wichtig sie für Deine Bilder ist?

Ich habe lange eine Canon 5D Mark II und III mit einem Canon 35mm f/1.4 benutzt. Kürzlich habe ich angefangen, mit der Leica M Monochrom und einem Leica 35mm f/1.4 zu fotografieren. Obwohl ich natürlich ein Glückspilz bin, dass Leica mir diese Kamera schenkt, damit ich verschiedene Modelle vergleichen kann, bleibt mein Arbeitsablauf gleich. Ich konzentriere mich nicht auf die Technik und war auch noch nie von mangelnder Technik eingeschüchtert. Das ist alles zweitrangig. Man muss seinen Instinkt sprechen lassen und Kritik akzeptieren.
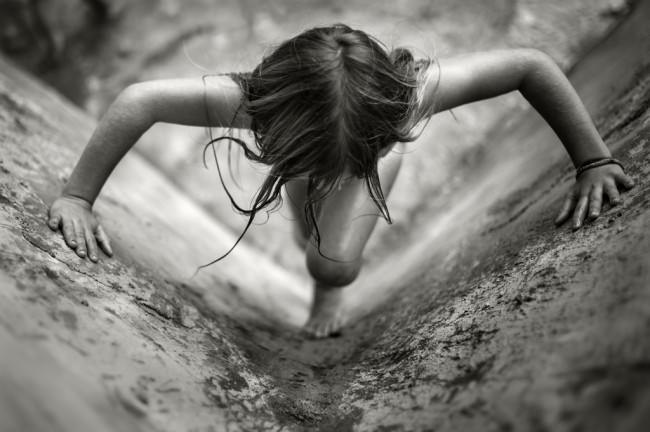
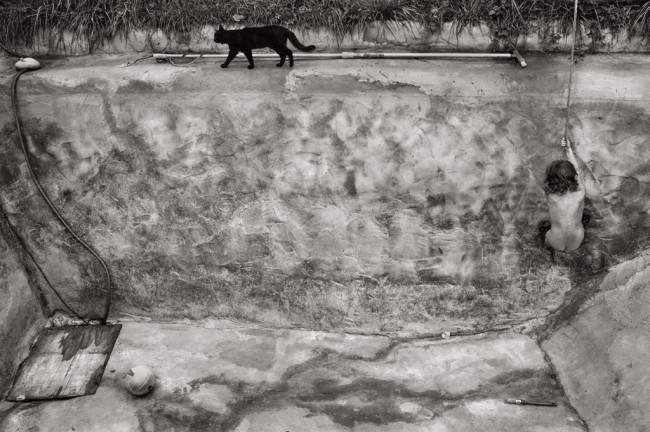
© Alain Laboile

© Alain Laboile

© Alain Laboile© Alain Laboile

Kann es sein, dass Du von Schwarzweiß besessen bist?

Ich teile diese Fotos, die ich mache, jeden Tag im Internet. Dabei habe ich die universelle und zeitlose Dimension meiner fotografischen Arbeit erkannt, als ich die Aussagen von anderen Menschen aus der ganzen Welt gelesen habe, die sie über meine Bilder machen.

Es ist fantastisch, alltägliche Stückchen unseres Familienlebens zu teilen und positive Antworten auf dieses einfache, naturnahe Leben zu erhalten. Jemanden durch Fotografie in seine Kindheit eintauchen zu lassen, ist sehr lohnend. Der Einsatz von Schwarzweiß verstärkt dieses Gefühl wahrscheinlich noch.

Ich kann die Geschichten von Menschen gar nicht mehr zählen, die sich durch die Bilder an Szenen ihrer eigenen Kindheit erinnern, etwa mit ihren Großeltern im Garten zu sein oder den Duft der Sommerferien wieder heraufzubeschwören. Ich mag die Idee, dass jemand sich wieder in sein eigenes Leben vertieft, weil er die Bilder eines zufälligen Fremden im Internet betrachtet.

Sicher ist jedenfalls, dass dieser fotografische Stil, der auf Familienbildern basiert, nicht Berechnung oder eine bewusste Entscheidung von meiner Seite aus war. Aber natürlich beeinflussen diese Kommentare aus aller Welt meine fotografische Arbeit.

Ich bin auch sehr auswählend, zögere also nicht, einfach alle Fotos zu löschen, mit denen ich nicht vollkommen zufrieden bin. Bei der Nachbearbeitung benutze ich Camera Raw und nur ein kleines bisschen Photoshop.
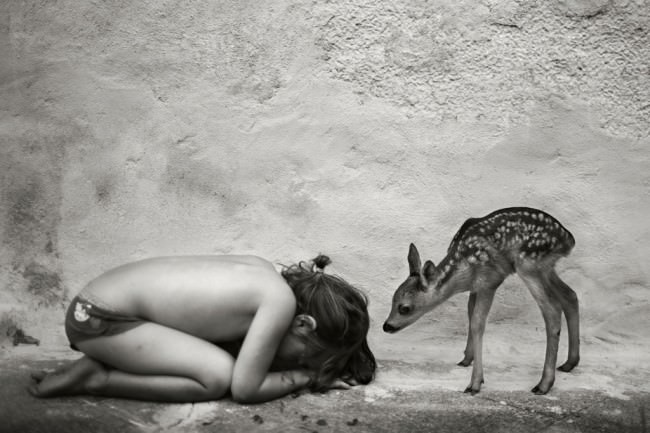
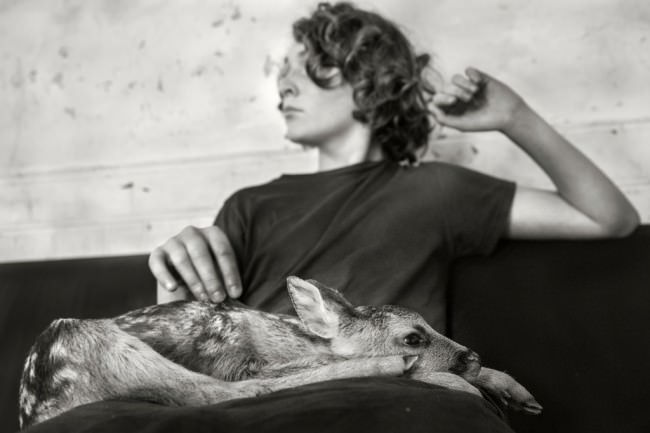
© Alain Laboile

© Alain Laboile

© Alain Laboile

Hast Du fotografische Vorbilder, denen Du folgst?

Als ich 2004 anfing, zu fotografieren, hatte ich eine fotografische Kultur nahe dem Nichts. Kommentare zu meinen Fotos, in denen manchmal andere Fotografen als Referenz genannt wurden, erweiterten dann mein Wissen. Sally Mann und Jock Sturges werden etwa regelmäßig genannt. Jock ist sogar zu einem engen Freund geworden, dem ich viel verdanke. Sally ist mit ihm befreundet und ich hoffe, sie eines Tages zu treffen!

Was sind Deine Pläne und Träume für die Zukunft?

Nächstes Jahr werde ich ein Buch im Steidl Verlag veröffentlichen, das ist ein wirklich aufregendes Projekt. In diesem Jahr hatte ich Ausstellungen in Japan, Indien und Kalifornien. Und jetzt träume ich von einer in New York in 2014!

Vielen Dank, Alain. Ich wünsche Dir und Deiner Familie alles Gute für die Zukunft!

Ich habe das Interview mit Alain auf Englisch geführt und anschließend ins Deutsche übersetzt.


kwerfeldein – Fotografie Magazin
 
Comments Off on Im Gespräch mit Alain Laboile

Posted in Equipment


RAF photos of the year gives glimpse of high-flyer life

31 Oct

Parade_parade-shun_.jpg

The Royal Air Force’s annual photographic competition invites photographers employed in the service of the RAF to submit photos in eleven categories. Winners are recognized in an awards ceremony and finalists’ photos are available for viewing online. Take a look at a selection of our favorites. The images are a captivating peek inside the RAF on the ground and in the sky. See gallery

News: Digital Photography Review (dpreview.com)

 
Comments Off on RAF photos of the year gives glimpse of high-flyer life

Posted in Uncategorized


The Winners of the NYIP Photography Courses Are…

31 Oct

NewImageA BIG thank you to everyone who entered our recent competition to win one of five photography courses from our friends at NYIP.
The response was terrific with over 400 entries. In fact, it was so great that the team at NYIP decided to offer a special $ 100 discount off any of the courses (details below).

But first – here are the 5 winners of the competition:

  • Ashley Smith wins the Complete Course in Professional Photography
  • Rebecca Cozart wins the Marketing for Photographers Course
  • Jayca (comment #354) wins the Photoshop for Photographers Course
  • Donna (comment #327) wins the Fundamentals of Photography Course
  • Dion V. (comment #253) wins the Complete Course in Video Making and Storytelling

A Message from NYIP (and a $ 100 discount)

Wow! Here at NYIP we were thrilled with the quality and the quantity of the responses we received for this contest. As always, the DPS community came out in full force looking for quality photography education. Unfortunately, not everyone can win. But for those of you who did not win, we’d like to extend a special discount on the NYIP course of your choice. ??The discount code ‘AD1′ can be used when you enroll online or by phone to save $ 100 off either payment plan on any of NYIP’s courses. Simply get started by visiting www.nyip.edu. *Offer ends November 30, 2013.

Thanks again for all the wonderful submissions,

The NYIP Team”

Winners will be emailed with details of how to collect their prize by the team at NYIP.

Thanks again to everyone for entering and to NYIP for sponsoring this competition.

Post originally from: Digital Photography Tips.

Check out our more Photography Tips at Photography Tips for Beginners, Portrait Photography Tips and Wedding Photography Tips.

The Winners of the NYIP Photography Courses Are…

The post The Winners of the NYIP Photography Courses Are… by Darren Rowse appeared first on Digital Photography School.


Digital Photography School

 
Comments Off on The Winners of the NYIP Photography Courses Are…

Posted in Photography


Canon EOS 70D review: The cutting-edge stalwart

31 Oct

newsimage2.jpg

We’ve just completed our review of Canon’s EOS 70D. With its Dual Pixel AF system and built-in Wi-Fi, it’s an unusually radical departure for a series that’s tended to progress fairly conservatively between generations. So how well does it work? Are these high-tech additions enough to fend of the competition from Nikon’s very capable D7100 or Olympus’s rather impressive E-M1? Read our review to find out.

News: Digital Photography Review (dpreview.com)

 
Comments Off on Canon EOS 70D review: The cutting-edge stalwart

Posted in Uncategorized


Weightless Space: Ghostly Floating Room Hovers in Midair

31 Oct

[ By WebUrbanist in Art & Installation & Sound. ]

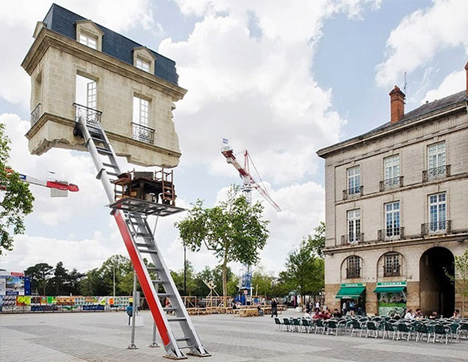
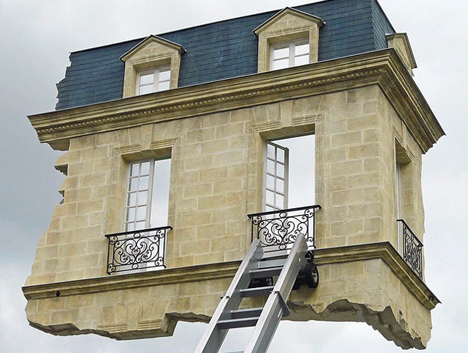
floating architectural installation project

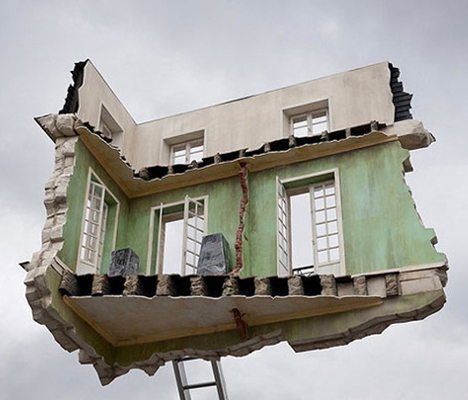
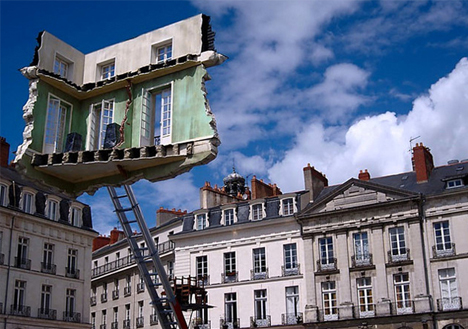
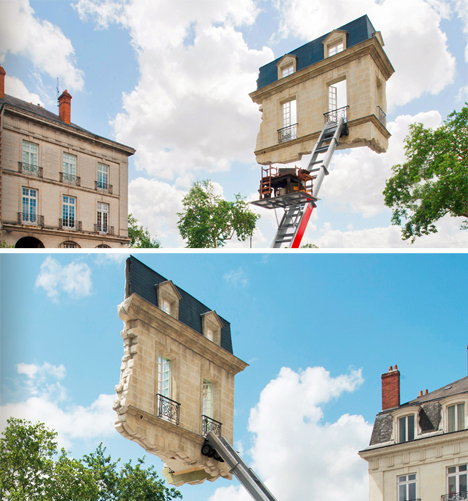
A fantastic feat of architectural trickery, this anti-gravity ant-room installation appears to hover in thin air and open up into nothingness. It sports a single point of contact with the ground below – a ladder propped against it, ostensibly placed to access the amazing space.

floating ghost building

floating room broken interior

The piece was designed by Leandro Erlich (some images by Martin Argyroglo) of Argentina for an annual art festival in France, but the artist is known elsewhere as well for his vertigo-inducing work.

floating building art installation

floating building in context

The ladder is the secret behind supporting this tenuous chunk of building, being much stronger than it first appears. A set of furniture stacked on it appears to be waiting to be taken to the top.

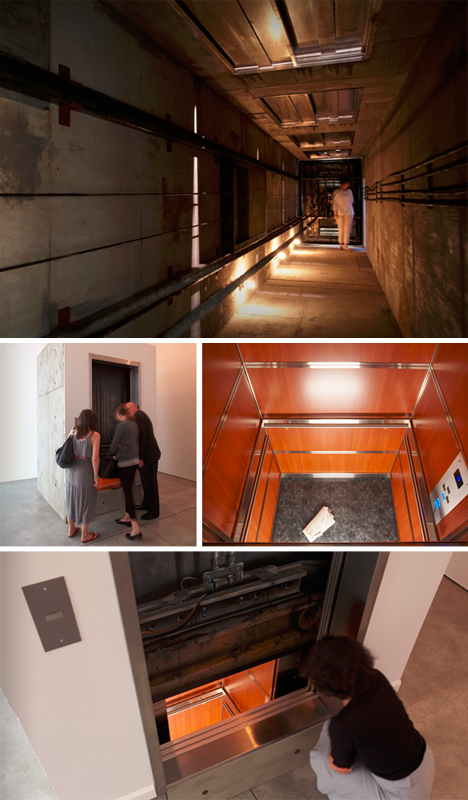
elevator art installation sideways

The Shaft was set in the Sean Kelly Gallery of New York and took visitors through a sideways version of an elevator void. Stuck Elevator at the same gallery gives one a peek at one of those jarring experiences one hopes to avoid for live.

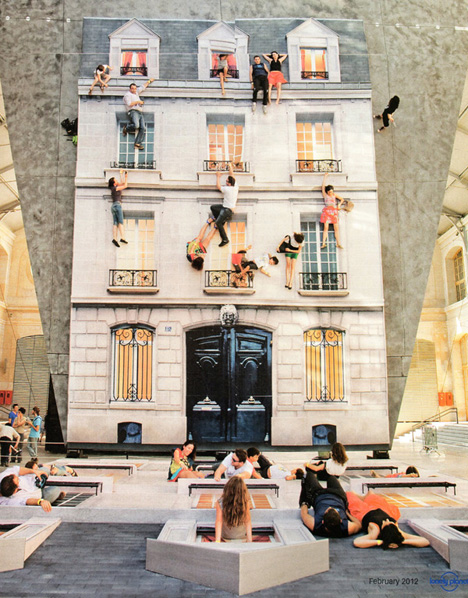
facade illusion urban art

Using mirrors, Erlich has also turned entire buildings on their side and made them into interactive urban playgrounds, as covered here previously and seen above.

Share on Facebook


[ By WebUrbanist in Art & Installation & Sound. ]

[ WebUrbanist | Archives | Galleries | Privacy | TOS ]


WebUrbanist

 
Comments Off on Weightless Space: Ghostly Floating Room Hovers in Midair

Posted in Creativity