RSS
 

Archive for June, 2017

Embracing the Lensbaby Velvet 85’s glow

30 Jun

I have to admit I was pretty excited when I heard about the newly-announced Lensbaby Velvet 85. When the Velvet 56 was released in 2015, I was convinced that I didn’t know how to shoot with it so I set my expectations low. I ultimately decided it was my 2015 Gear of the Year, largely because it forced me to let go of some of my self-imposed creative and photographic rules and shoot in a different way.

With the Velvet 85, I already know the potential of the soft glow, balanced by pleasing sharpness at higher apertures when I need the satisfaction of crisp focus. And offering someone who favors longer primes the Velvet effects in an 85mm focal length? Yes, please.

The obvious thing to do with the Velvet 85 would be to go out and shoot a bunch of velvety soft portraits with lovely compression and smooth bokeh. I didn’t do that. I was in the midst of experimenting with soft focus macros of flowers, so that’s what I shot. And then I took it with me on a street photography photo walk.

Despite using the Velvet 85 in situations that might not be considered typical for a manual focus creative portrait lens, I like it. Quite a bit. I still struggle with shooting wide open, but just stopping down to F2.0 is enough for me to find a balance between glowing edges and sharpness that I can work with. Using the whole range of apertures gives me an enormous amount of flexibility in shooting everything from ethereal flower petals to detailed freckles sprinkled across a child’s nose.

If you are still curious about how the Velvet 85 performs as a portrait lens, there are plenty of other photographers who are shooting portraits with it. In fact, Lensbaby partnered with photographer and educator Kevin Kubota to film a new video about shooting portraits with the Velvet 85 and other Lensbaby optics. (Note: You’ll need to register for Lensbaby University — it’s free — in order to watch the whole video.)

And don’t forget to check out our gallery and let us know what you think. But before you say that you could get the same effect with a filter smeared with Vaseline, know that I tried it. It’s not the same.

See our Lensbaby Velvet 85 sample gallery

$ (document).ready(function() { SampleGalleryStripV2({“galleryId”:”0266755850″}) })

Sample photoSample photoSample photoSample photoSample photo

Articles: Digital Photography Review (dpreview.com)

 
Comments Off on Embracing the Lensbaby Velvet 85’s glow

Posted in Uncategorized


Tips from a pro: photographing fireworks with John Cornicello

30 Jun

Photographing fireworks with John Cornicello

Seattle-based photographer John Cornicello specializes in portraits, but has been photographing fireworks for years. He’s presented a class on it for CreativeLive, and with the Fourth of July weekend upon us, we figured we’d take a look at some of the major takeaways from Cornicello’s class.

For the nitty gritty details, check out Cornicello’s blog post on the subject here. All images and content used with permission.

Location

Once the show starts, you’re not likely to spend much time running around for different vantage points, although this of course depends on the length of said show. If possible, scout in advance, and look for clean views without power lines or trees in the way.

Scouting in advance is particularly advisable because it’s harder to spot these distractions in the darkness, and if you’re not careful, you can have black silhouettes intruding in your otherwise perfect image.

Looking for establishing landmarks can give your photos a little more context, to “establish a setting and help tell a story,” Cornicello says.

Stability

Most obviously, a tripod is the best tool for the job here. If you don’t have one and can’t get one in time, other options – outdoor furniture, fenceposts, the roof of your car – can all work in a pinch, but you won’t have the flexibility a tripod offers.*

If you must use those other options, keep in mind you can adjust the height angle of your camera with whatever props you can find to wedge underneath it; a wallet and cell phone combination can be all you need to get your lens up to the correct height.

If you have the means, a remote trigger can help keep the camera from moving at all from a press of the shutter button. Lastly, since you’ll be focusing near infinity and likely not moving much, it’s best to stabilize your focus by locking it in manual focus if your camera allows that.


* It’s true that many cameras have extremely effective built-in image stabilizers these days, but few of them are up to multi-second shutter speeds, regardless of whether you’re zoomed out or in. The possible exception may be Olympus’ newer interchangeable lens models, but you’re still likely to get more keepers by stabilizing your camera externally.

Exposure

Now this is one that Cornicello says people tend to overthink. As he says, ‘Fireworks are bright!’ You don’t necessarily need to raise your ISO to astronomical levels or have a fast lens to get good results. So let’s switch into ‘Manual’ mode and get everything dialed in.

Keep your ISO around 100 or 200 and stop down the lens – F8 is a good starting point, though Cornicello notes that displays have been getting brighter, so F11 or F16 may be necessary. Start with a 1/2-second or 1-second shutter speed time, and adjust your shutter speed from there as necessary depending on how many bursts you want to capture in a single image.

Also, it’s okay to chimp here to check that your settings are working as intended – just don’t get too carried away and miss the whole show.

And please, if your camera has a built-in flash, make sure it’s disabled. “The flash won’t help with the fireworks… but it will tend to annoy the people around you,” Cornicello says.

Gear

You’ll need a camera of some sort; having a full-frame DSLR or high-end mirrorless camera is obviously great, but even an app offering manual control of your smartphone camera will get you some usable images.

Zoom lenses are great for fireworks, as they let you change up your framing without having to leave your carefully scouted location. And since we’re stopping down, even a kit lens with a basic interchangeable lens camera or fixed-lens camera will work fine.

Cornicello points out that a zoom lens not only allows you to zoom to change your composition between shots, but you can also experiment with zooming during your exposure; you can also play with the manual focus during your exposure to mix things up further. We’ve touched on this earlier, but if your camera or lens features in-camera stabilization, it’s best to shut it off as they are mostly meant for handheld applications.

A few other goodies to have on hand? Cornicello recommends a small flashlight to help you change settings in the failing light, as well as extra batteries and a large memory card. Earplugs are, of course, down to personal taste and requirements.

The wrap

Photographing fireworks can be a fun way to turn a social outing you were already planning for into a photo outing with relative ease. If you’re new to photography, or just got your first interchangeable lens camera or a pocket camera with manual controls, it’s a great way to experiment and become more comfortable with exposure settings.

Head on over to John Cornicello’s blog for, in particular, more details on exposure and useful gear to have for the occasion.

And of course, we mustn’t forget the most important piece of advice Cornicello has to offer: Have fun!

Do you have any other tips or tricks you use when photographing fireworks? Have some images of your own you’d like to share? Let us know in the comments!

Articles: Digital Photography Review (dpreview.com)

 
Comments Off on Tips from a pro: photographing fireworks with John Cornicello

Posted in Uncategorized


Metal Photo Print Stress Test

30 Jun

It turns out the Metal Prints we make from your photos over at Parabo Press are just too blessed to be stressed.

We put them up against water, fire, dirt, feet and A CAR.

Read along to see who won each match up.

Or, make a Metal Print of your very own.
(…)
Read the rest of Metal Photo Print Stress Test (276 words)


© laurel for Photojojo, 2017. |
Permalink |
No comment |
Add to
del.icio.us

Post tags:

The post Metal Photo Print Stress Test appeared first on Photojojo.


Photojojo

 
Comments Off on Metal Photo Print Stress Test

Posted in Equipment


Sony a9 banding issue: fact or fiction?

30 Jun

Recently, Jared Polin of Fro Knows Photo released a video showing images shot with the Sony a9 and 70-200mm F2.8 GM lens that displayed visible banding across parts of the image in 2% of his shots from a recent soccer match in Philadelphia.* Here’s what the banding looks like at 100%:

This is a 100% crop of the Sony a9 banding issues that Jared Polin noticed in a small portion of his shots of sideline players at a recent soccer match. The bands themselves are 84 pixels in height, each composed of 7 12-pixel bands. Read on to understand why those numbers are significant when it comes to explaining the phenomenon.

Photo: Jared Polin

Blame the electronic shutter?

Not so fast. Some commenters were quick to blame artificial stadium lighting, which can of course interfere with electronic shutters. However, the a9’s electronic shutter is no ordinary electronic shutter: it can scan across the entire sensor in a mere 1/160s (proven by our friend, and well-respected forum member, Jim Kasson here). What does that mean? Meanwhile, the a9’s mechanical shutter isn’t actually much faster – it takes 1/300s to sweep across the image plane.** That means that in typical artificial lighting, which tends to flicker at 60 or 120 Hz, the 1/160s shutter rate of the a9 is fast enough that it’ll only ever really see 1 or 1.3 pulses of the flickering light as the sensor is scanned. The a9’s electronic shutter is only one stop away from catching up to mechanical shutters.

This means that even in the worst artificially-lit scenarios, you might see one large diffuse band across your image at very high shutter speeds (remember: shutter speed determines the intensity of such bands), but generally you’re unlikely to notice if just a quarter of your image happens to have a slight roll-off to a dimmer – or brighter – exposure.

In other words, in the real-world, artifacts caused by the a9’s electronic shutter are rarely an issue under dominant artificial lighting. Furthermore, in this example the match was being played in a mixture of natural and artificial light, with natural light being dominant.

So what caused the banding?

A closer look at the LED advertising boards

Look closely at the image above at 100%, and you’ll see the larger bands themselves are composed of bands 12-pixels high. 12-pixels… rings a bell. Jim Kasson’s work suggested the a9 reads its sensor out in 12-row chunks, possibly by using 12 parallel ADCs (analog-to-digital converters). That’s how it can scan across its entire full-frame sensor so quickly. This suggests the sensor readout is somehow implicated – but how?

Take a close look at the LED advertising boards at 100%:

A shot of the LED advertising boards clearly implicate them as the source of the banding. Each one of those aliased bands are 12 pixels high, and we know from Jim Kasson’s studies that the a9 reads it sensor out in 12-row chunks, using 12 parallel ADCs.

Photo: Jared Polin

The one thing common to Jared’s 2% of images is that the players are at least partially lit by the LED advertising boards on the sidelines. Those panels create an image by rapidly pulsing their red, green, and blue LEDs to allow for different colors and brightness, and it’s the first type of light source we’ve seen that has caused the a9 any grief.

And by rapid switching we do mean rapid. The larger bands are 84 pixels in height, meaning there are about 48 of them across the entire 4000 pixel-high image. Since we know that full sensor readout takes 1/160s, that means those LEDs pulsed 48 cycles in 6.25 milliseconds, or at a frequency of ~7700 Hz.

Even a mechanical focal plane shutter will experience this kind of banding with a light source cycling 7700 times a second. However, the a9’s banding is worse for two reasons:

  1. A mechanical shutter would take half as much time traversing the image plane, which means half as many bands (probably 24 larger bands would show up in these sorts of images).
  2. The a9’s electronic shutter proceeds in 12-row chunks; a mechanical shutter is more analogous to an electronic shutter proceeding line by line, which would yield smoother bands. Not the more hard-edged, lower frequency (and therefore more readily identifiable) 12-row bands that are visually more distracting than if they had been gradual, single-pixel rows transitioning from one color or brightness to another.

This is the reason why Fro only sees banding in some of his photos, and why even in those it is limited to certain surfaces. The bands are most prominent wherever the LED boards were lending the most light to the subject.

Is it a big deal?

So does this matter? Is it as big a deal as some people are making it out to be?

That all depends on how often you expect to run into this situation. These types of LED lights are relatively rare—basically only appearing in scoreboards and ad boards of the kind you see at sporting events. And even when they’re present, the board has to be casting a significant amount of light on your subject for it to cause any problems.

Furthermore, your shutter speed has to be extremely high to make these bands prominent, and even mechanical shutters are likely not entirely immune to some effect from such LED boards.

Even at an image level, the 84-pixel wide bands can be visually distracting if the LED boards are a dominant source of illumination for your (sideline) subject.

Photo: Jared Polin

All those considerations taken together explain why Fro only found banding in about 50 of the 1,905 images he shot.

If you scrolled down here to the bottom to get the definitive answer to the source and cause of the banding, it’s this: very high frequency (>7000Hz) flickering LEDs combined with the 12-row parallel readout that allows the electronic shutter of the a9 to achieve almost mechanical shutter speeds.

Granted, as a camera designed (partly) to satisfy the needs of sports photographers, the a9 is probably going to be found shooting in situations with LED signboards around where, after-hours, they might account for a significant portion of light on your sideline subjects. If that describes the situations you’ll be routinely shooting under, and you’re concerned about the 2% banding rate in sideline action, this may be something to add to your ‘cons’ list when considering this camera.


*Note this is a different sort of banding than the rare striping we investigated in our full review (that results from the masked phase-detection rows of pixels).

**Compare that to the a7R II’s 1/14s, or the Fuji GFX 50S’ 1/4s, electronic or ‘silent’ shutters.

Articles: Digital Photography Review (dpreview.com)

 
Comments Off on Sony a9 banding issue: fact or fiction?

Posted in Uncategorized


Dream Deep: Trippy Maps Reenvisioned by Google’s Artificial Neural Network

29 Jun

[ By WebUrbanist in Art & Drawing & Digital. ]

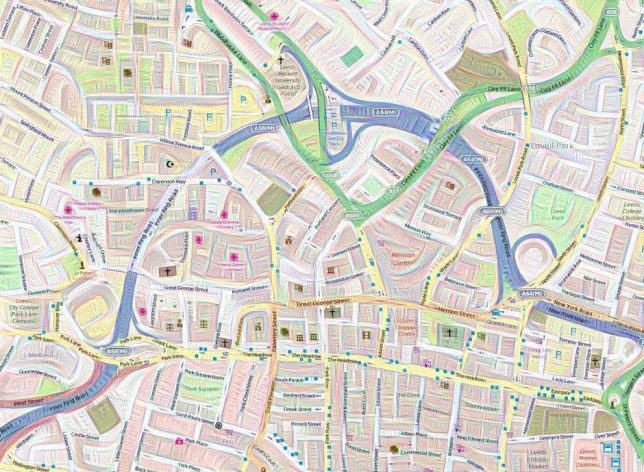
FaceApp and similar reality-warping applications are especially fun to use in ways their designers never intended. Along similar lines, Google’s DeepDream (designed for photo manipulation) creates fascinating results using photographs but is even more stunning when applied to representations of cityscapes.

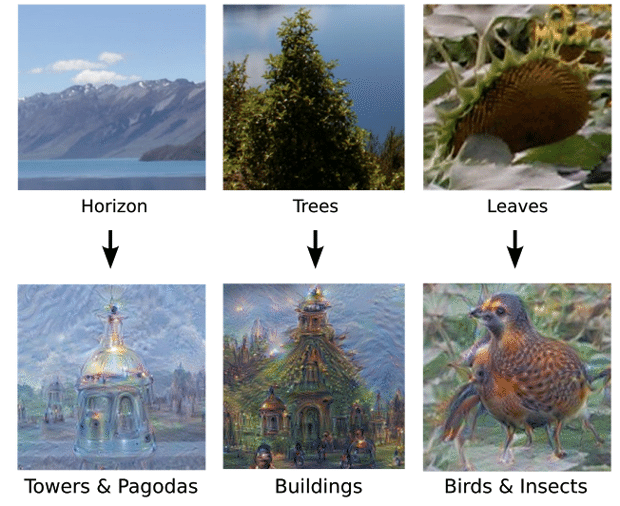
While training DeepDream (a neural network that adapts like a brain to new inputs) to identify, differentiate and understand images, Google researchers discovered it could “over-interpret” results as well. In short: it could start to “read into” images from previous experience, resulting in an array of beautiful (if disturbing) hybrids.

Once it went public, mapmakers were among those intrigued by the possibilities of geo-visualization, turning flat maps into seemingly living landscapes. Tim Waters, a geospatial developer, began taking OpenStreetMap data and running it through the system, generating these strangely psychedelic urban environments.

He discovered that a short run could create fractal and quilting effects, while longer and reiterated processing started to introduce faces and creatures to the mix.

Above: monkeys and frogs seem to emerge from the grid, while a coastal region forms the head of a bear, making the landscape look like a giant bearskin rug. Overall, the effects are quite beautiful, creating a sense of depth and adding character to what would otherwise be fairly generic representations.

Share on Facebook


[ By WebUrbanist in Art & Drawing & Digital. ]

[ WebUrbanist | Archives | Galleries | Privacy | TOS ]


WebUrbanist

 
Comments Off on Dream Deep: Trippy Maps Reenvisioned by Google’s Artificial Neural Network

Posted in Creativity


Video: First look at the Canon EOS 6D Mark II

29 Jun

Quite a lot has changed since Canon first debuted its budget-oriented full frame option, the EOS 6D, back in 2012. Five years later its successor, the 6D Mark II is here, and with a lot to offer including an updated AF system, vari-angle touchscreen and 1080/60p video capture. But is the update worth the wait? Watch our video to find out.

Articles: Digital Photography Review (dpreview.com)

 
Comments Off on Video: First look at the Canon EOS 6D Mark II

Posted in Uncategorized


Sony’s Mavica FD71 likes floppy disks, hates magnets

29 Jun

In the earliest days of consumer digital photography, back when the ‘smart’ in ‘smart phone’ was the same as the ‘smart’ in ‘a smart pair of pants’, almost every aspect of capturing, transferring, storing, sharing and printing digital images was so fraught with technical challenges and costly disappointments that it still amazes me that it ever took off at all. The secret to the eventual, inevitable, triumph over film were those most compelling of all disruptive drivers of change: convenience and immediacy.

No matter that back in the late 1990’s the pioneering digital photographer had to lay out thousands of dollars on a camera, a computer, a (color) monitor and the seemingly endless cables, cards and connectors needed to make it all work (and, it must be said, the time, expertise and patience required to tame all that technology).

We didn’t care that you could go get yourself a coffee between shots thanks to the painfully slow write speeds, or that we’d be lucky to get 20 minutes of shooting from a set of batteries or that transferring the images via serial cable took longer than the average Super Bowl, or that for the most part the end results looked like a VHS tape on pause and had the resolution of a watercolor painting.

The FD71 had an amazing (for the time) 1cm macro mode. Here, in all it’s VGA glory is the best you could hope to capture with 300,000 pixels and a decent subject.

We early adopters didn’t care about any of that, because the magic of taking a picture and seeing it appear (almost) immediately on the rear screen, and the freedom to shoot to our heart’s content without having to pay for film or processing (and without the need to scan images) was the most exciting thing to happen to photography since the Box Brownie.

And given that most early adopters of digital cameras were also early adopters of the home computer, our pain tolerance was higher to begin with. After all, we were used to spending hours fixing SCSI conflicts and trying to get onto bulletin boards using our screeching, temperamental modems.

For me, as a Mac user in the 1990’s, the biggest pain point by far was the supposedly simple process of getting the images off the camera and onto my hard drive, thanks to the lack of removal media (and the lack of card readers where there was removable media) and the horribly slow and Mac-unfriendly serial transfer process most cameras used for transfer.

And then, in late 1997, along comes Sony with the first Mavica digital stills cameras, the FD5 and FD7 (which added a rare 10x zoom), offering sophisticated feature sets and – critically – storage on the ubiquitous and universally available 3.5” floppy disk.

It may seem painfully archaic today, but back in 1996 when I first started seriously reviewing digital cameras I used to dream of a camera that shot directly onto floppies, which could be picked up for under a dollar each at any office supplier, and – critically – could be read without any additional equipment by almost every home and office PC on the planet.

The first DSC Mavicas sold incredibly well for this reason alone (and they continued to be used by schools and government agencies for years after they were discontinued). It didn’t matter that the results from the 320 x 240-pixel interlaced CCD looked like video stills or that the fixed-power flash was only usable if your subject was half a mile away (otherwise everything got washed out) or that it was agonizingly slow – it was immeasurably more convenient and made sharing (in a pre-internet era) as easy as handing over a floppy disk.

Above: it may seem run of the mill now, but in-camera effects like this were quite the novelty back in 1998.

Showing the wisdom of never buying version one of anything, it was only six months or so after the FD5 and FD7 were released that Sony launched replacements, in the shape of the FD51 and (yes, I finally got round to the subject of this week’s TBT) the 10x zoom FD71.

The FD71 brought a wealth of enhancements and fixes over its predecessor, including a faster floppy drive, faster processing, a new ‘true VGA’ progressive scan 640 x 480-pixel sensor, an improved LCD, a disk copy mode (making sharing even easier) and a new slimmer design. Even by 1998 standards though, it was still a monster, weighing in at around 1.3 lbs (590g) and roughly sharing the size and ergonomics of a full size hard disk drive.

Multi mode – 9 QVGA frames in 2.5 seconds. Great for catching the action (or in this case, inaction). A zoom lens and a sepia mode and I was an accomplished portraitist…

The FD71’s innovative feature set didn’t just solve the annoyance of slow serial transfer, it also sported a huge (for the time) 2.5” LCD screen (you could disable the back light and use reflectance to illuminate the image, meaning it could be – more or less – used in bright sunlight) and an InfoLithium battery that was capable of keeping the camera – and the power-hungry floppy drive inside – going for up to 2.5 hours or 2000 shots. (Sony even offered three different ‘strengths’ of battery.)

The FD71 also boasted a 10x zoom (this was at a time when a 3x zoom was still a big selling point), fast autofocus, a vari-power flash, full photographic controls and a selection of in-camera special effects including a ‘multi’ mode that captured 9 small images in about 2.5 seconds and combined them into a single collage. It’s hard to imagine today, but almost all of these features were unheard of on consumer level digital cameras.

At the wide end the image quality was pretty much what you’d expect for a VGA (0.3MP) camera in 1998… … but how about that zoom! 10x was pretty rare when the FD71 was launched.

All of this, including the fact that – despite having to save its images to a floppy disk – the FD71 was actually faster and more responsive than many of its competitors, made the FD71 a lot of fun to use, and despite the low resolution (most competitors were moving to 1 or 1.3 megapixels) it was a huge hit and a firm favorite in my office at the time.

Writing about the FD71 I said “I may not have much use for the small images, and I sure can’t fit it in my pocket, but… the FD71 is the most enjoyable digital camera I have ever used, and proves Sony can still teach the traditional camera manufacturers.”

A few more pictures for your, ahem, pleasure…

Articles: Digital Photography Review (dpreview.com)

 
Comments Off on Sony’s Mavica FD71 likes floppy disks, hates magnets

Posted in Uncategorized


Hands-on with Canon EOS Rebel SL2 / EOS 200D

29 Jun

Hands-on with Canon’s EOS Rebel SL2 / EOS 200D

Canon’s latest DSLR is one of its smallest ever. The new EOS Rebel SL2 (EOS 200D outside of North America) DSLR on the market. The SL1 was a likable, if rather limited camera in its day, and we’re pleased to see that Canon hasn’t abandoned the idea of an ultra-portable entry-level Rebel.

We had the chance recently to handle the SL2, and get a feel for what’s changed, and what remains the same.

Hands-on with Canon’s EOS Rebel SL2 / EOS 200D

One thing that hasn’t changed significantly is the SL2’s size, compared to its predecessor. Although the new camera is in fact slightly bigger, the difference is very subtle (122.4 x 92.6 x 69.8mm compared to 117 x 91 x 69mm, if you were curious). The SL2 is bundled with the same slower 18-55mm F4-5.6 kit zoom that was introduced alongside the Rebel T7i.

A more welcome change compared to the SL1 is the SL2’s sensor. We’re told that the 24MP APS-C sensor in the new camera is essentially the same as the one used in the EOS 77D. Capable of shooting from ISO 100-25,600 there’s no reason not to expect excellent low and medium ISO image quality from the SL2.

Hands-on with Canon’s EOS Rebel SL2 / EOS 200D

My hands are pretty average-sized. As you can see, the SL2 really is pretty tiny. This view shows off the minimal top-mounted controls, which include the standard Canon EOS exposure mode dial, and front control dial, just behind the shutter release. This dial has been redesigned, from the plastic ‘cog’ we’ve been used to for years, to a high-end PowerShot-style knurled metal finish. Also new is the combined movie mode / on / off toggle switch, just to the right of the exposure mode dial.

On the far left of the SL2’s top plate is a dedicated Wi-Fi button, which indicates Canon’s intended user base of smartphone and compact camera upgraders.

Hands-on with Canon’s EOS Rebel SL2 / EOS 200D

As we’d expect, the rear of the SL2 is dominated by a large, 3″ touch-sensitive LCD. Despite its entry-level positioning, Canon hasn’t skimped on specifications – this appears to be the same 1040k-dot display offered on the full-frame EOS 6D Mark II. Note the indent at the upper right, so you can get your finger in there to grab the screen.

The SL2’s viewfinder is unremarkable (it’s the typical lower cost pentamirror design, with 95% frame coverage) and its conventional autofocus system is pretty basic (9-points, covering the central portion of the frame). But impressively, in live view and movie modes the SL2 offers the same excellent Dual Pixel AF system as the EOS 80D. That means fast and accurate AF for still and moving subjects, with none of the ‘hunting’ typical of more basic contrast-detection live view AF systems.

Hands-on with Canon’s EOS Rebel SL2 / EOS 200D

This alone is a huge selling point over the original SL1, and made even mode useful by the fact that the Rebel SL2’s rear screen can be fully articulated for live view and movie shooting. Arguments will continue over whether a tilting screen or flip-out type is superior, but the flip-out design is certainly better when shooting vertically.

Like its close-relation the Rebel T7i, the SL2 features a simplified screen interface in PASM modes, intended to educate beginners about the effect of using certain exposure variables.

Hands-on with Canon’s EOS Rebel SL2 / EOS 200D

Another view of the top of the camera, highlighting again the small, compact body of the Rebel SL2. Despite its low-end positioning, the general fit and finish of control points is of a high standard.

The SL2 is predominantly made from polycarbonate, and Canon makes no claims about environmental sealing, but there’s no creak or give in the body seams.

Hands-on with Canon’s EOS Rebel SL2 / EOS 200D

Despite its entry-level positioning, the SL2 is an impressively fast camera. Claimed startup time is a respectable 0.2 sec (which is the same as the EOS 6D Mark II), and the SL2 features a maximum continuous shooting rate of 5 fps. It’s reasonably customizable, too. Although it (obviously) can’t hold a candle to Canon’s professional DSLRs, 11 custom functions do allow for a decent amount of fine-tuning of the camera’s operation.

A small built-in flash pops up when required in fully automatic shooting, and can be activated manually in PASM modes. You can expect 650 shots per charge from the LP-E17 with 50% flash use, increasing to more than 800 with no flash (CIPA).

Hands-on with Canon’s EOS Rebel SL2 / EOS 200D

A nice deep handgrip makes the SL2 easy and comfortable to hold and use, despite its small size.

What do you make of the new Rebel SL2? Let us know in the comments.

Articles: Digital Photography Review (dpreview.com)

 
Comments Off on Hands-on with Canon EOS Rebel SL2 / EOS 200D

Posted in Uncategorized


Meet the EOS 6D Mark II – Canon’s entry-level full-frame DSLR

29 Jun

Hands-on with Canon EOS 6D Mark II

Meet the new 6D – it looks a heck of a lot like the old 6D, but before you jump to the comments to complain about how nothing exciting ever happens in the camera industry anymore, read this article first.

Because appearances are deceptive…

Hands-on with Canon EOS 6D Mark II

One of the most notable upgrades compared to the original 6D is an entirely new 26.2MP full-frame CMOS sensor, with a native ISO sensitivity span of 100-40,000.

We haven’t been able to conduct any lab testing yet, but from our initial shooting it appears (unsurprisingly) to deliver better image quality than the 20MP sensor inside the 6D. The bump in resolution from 20 to 26 Megapixel won’t make as much difference to maximum print sizes as the bare number might suggest, but as a general rule, more pixels = better image quality.

Hands-on with Canon EOS 6D Mark II

Ergonomically, the 6D Mark II is exactly what you’d expect. Button layout is virtually identical to the original EOS 6D, and anyone with experience of a recent EOS-series DSLR will be able to find their way around without any trouble at all.

Hands-on with Canon EOS 6D Mark II

It’s the same story on the back of the Mark II, with one very obvious difference. The LCD is now touch-sensitive, and fully articulating.

Hands-on with Canon EOS 6D Mark II

Like so. Operationally, this makes the 6D Mark II behave very much like the APS-C format EOS 80D. It even shares the same 45-point phase detection autofocus system, with the same Dual Pixel AF implementation in live view and movie modes too, covering 80% of the frame both vertically and horizontally.

Speaking of movie mode, the EOS 6D Mark II offers a fairly standard (ahem – standard for Canon) video feature, with a maximum resolution of 1080/60p. If you want 4K, you’ll have to save up for an EOS 5D Mark IV, I’m afraid.

Hands-on with Canon EOS 6D Mark II

Spot the difference – externally, the 6D Mark II (on the left) is extremely similar to its predecessor. It’s basically the same weight, too – 685g (1.5 lb) compared to 680g.

Hands-on with Canon EOS 6D Mark II

And aside from the redesigned screen, it’s pretty much identical from the back, too. Which is fine – the 6D was a pleasant, intuitive camera, and aside from some very minor styling differences (the card access lamp is now above the memory card door, not below – tell all your friends!) the Mark II barely alters the basic recipe.

While the simultaneously announced EOS Rebel SL2 features a dedicated Wi-Fi button, setting up the 6D’s wireless system is all done through the camera’s menu system. The 6D II supports NFC for easy pairing with Android devices as well as Bluetooth for maintaining a constant connection with your mobile device. Like its predecessor, the EOS 6D Mark II also offers a built-in GPS for image geotagging.

Hands-on with Canon EOS 6D Mark II

Note the raised collar around the hotshoe. This forms a weatherproof seal when the 6D Mark II is used with one of Canon’s high-end flashguns.

As usual, Canon is coy when it comes to the extent of the EOS 6D Mark II’s weather-sealing, but I am in the unusual position of having been able to test a pre-production unit in moderately heavy rain. You’ll be reassured to know that while I got quite soggy, the camera didn’t stop working, explode or fall apart in my hands.

Hands-on with Canon EOS 6D Mark II

For almost 30 years, non-pro Canon SLRs have sported the same distinctive exposure mode dial. This is where you’ll find the standard PASM shooting modes, as well as auto exposure modes, including full-auto, custom shooting settings and scene modes (‘SCN’). The 6D Mark II’s main power switch is just below.

Hands-on with Canon EOS 6D Mark II

Some readers might be disappointed with the 6D Mark II’s single SD card slot (and lack of UHS-II support,) but a lot of enthusiasts and advanced amateurs probably won’t care. With card capacities of 64GB+ and built-in Wi-Fi, some 6D II users might find themselves swapping cards very rarely.

That said, with a maximum shooting rate of 6.5 fps, the 6D Mark II will rip through card space quicker than its predecessor (which maxed-out at 4.5 fps) especially in Raw mode.

Hands-on with Canon EOS 6D Mark II

The LP-E6N battery is compatible with most high-end Canon DSLRs, which is great news for anyone considering a 6D Mark II as a second camera alongside an original 6D or recent 5D-series body. Battery life is quoted as 1200 shots in viewfinder shooting mode, dropping to ~400 in live view.

Hands-on with Canon EOS 6D Mark II

Like the 5D and 1D-series bodies, the 6D Mark II is compatible with Canon’s Remote Switch RS-80N3, and the programmable TC-80N3. The remote switch socket is positioned at the front of the camera, safely out of the way of the handgrip.

Hands-on with Canon EOS 6D Mark II

Standard HDMI and USB I/O ports can be found on the side of the 6D Mark II, alongside a mic socket. We’re pleased to see that the mic socket is offset, which means that it shouldn’t snag the articulating screen during movie shooting.

You can read more about using the EOS 6D Mark II in my shooting experience.


What do you make of the EOS 6D Mark II? Let us know in the comments below.

Articles: Digital Photography Review (dpreview.com)

 
Comments Off on Meet the EOS 6D Mark II – Canon’s entry-level full-frame DSLR

Posted in Uncategorized


Canon EOS 6D Mark II pre-production sample gallery

29 Jun

Just shy of its fifth birthday, the Canon EOS 6D was ripe for replacement. Its successor will ship in August, but we had a chance just a few weeks ago to put it to work photographing some of the most stunning landscapes in the US.

Take a look at how the Canon EOS 6D Mark II fared on a recent Canon-organized trip to Yellowstone, and stay tuned for a full gallery once we’re able to get our hands on a full-production model.

See our Canon EOS 6D Mark II
pre-production sample gallery

Please note that the samples in this gallery were shot with a pre-production camera. As such, image quality may not be representative of final shipping cameras (although it is likely to be extremely close), and at Canon’s request, Raw files are not available for download.

Articles: Digital Photography Review (dpreview.com)

 
Comments Off on Canon EOS 6D Mark II pre-production sample gallery

Posted in Uncategorized