RSS
 

Archive for June, 2017

The same but different: Canon EOS 6D Mark II shooting experience

29 Jun
Spot the difference: on the outside, the Canon EOS 6D Mark II looks a lot like its predecessor, but it’s a considerably more powerful camera.

The Canon EOS 6D is something of an oddity in digital camera terms, having been in continuous production for almost five years. But finally, the time has come for an update to one of Canon’s most popular models, and it has arrived in the shape of the EOS 6D Mark II.

Unusually for a new Canon product, we had the chance earlier this month to use a late pre-production EOS 6D Mark II ahead of its official announcement. What follows is a first take on how the camera performs, based on a two-day shooting excursion, organized by Canon, to the Yellowstone National Park in Wyoming.

Detail is rendered well by the 6D Mark II’s new 26MP sensor, and Raw files sharpen up nicely.

EF 24-70mm F2.8 II | 1/400 sec | F8 | ISO 100

The first thing that struck me about the EOS 6D Mark II is how similar it feels to the original 6D. Ergonomically, Canon really hasn’t changed the basic recipe much. When the two cameras are compared side by side, it’s pretty hard to tell them apart from a moderate distance and even in use, there are more similarities between the models than there are differences.

Key specifications:

  • 26.2MP full-frame Dual Pixel CMOS sensor
  • 45-point PDAF autofocus system (all cross-type)
  • Dual Pixel live view / movie AF (80% coverage vertical / horizontal)
  • 7560-pixel RGB+IR metering sensor
  • ISO 100-40,000 (expandable between ISO 50-102,400)
  • 6.5fps continuous shooting
  • 1.04 million dot, 3″ fully-articulating touchscreen
  • 1080/60p video
  • Built in Wifi + NFC and GPS

The major operational difference is also the most obvious. The 6D Mark II’s rear LCD is fully articulating, and touch-sensitive, in line with recent Canon DSLRs like the EOS 80D. In fact, the 6D Mark II handles a lot like a slightly up-sized 80D in general. It also shares a lot of the same technology, in particular the same 45-point PDAF system and Dual Pixel autofocus in live view and movie modes.

The 6D Mark II handles a lot like a slightly up-sized EOS 80D

As such, for 80D users looking to make the jump into full-frame, the 6D Mark II would be a very sensible upgrade – aside from the lack of a built-in flash on the 6D, there’s virtually no learning curve.

From behind, you can see that the 6D Mark II offers almost exactly the same control layout as the original 6D. There’s no dedicated AF joystick, but the rear 8-way controller can be configured for direct control over AF point positioning via a custom function.

The 6D Mark II incorporates a latest-generation Digic 7 processor, which enables an impressively fast continuous shooting rate of 6.5 fps. I haven’t had a chance to shoot any action with the 6D II yet, but even during extended shooting of bracketed Raw images it didn’t keep me waiting. Canon claims a burst depth of 25 Raw + JPEG Fine shots at 6.5fps with a fast UHS-I card and this seems accurate, based on my experience.

The downside of adopting the 80D’s PDAF autofocus system is obvious when you put your eye to the viewfinder

The 6D Mark II’s viewfinder experience is pleasant, thanks to a magnification of 0.71x and 98% coverage vertically and laterally. Sub-100% viewfinder coverage is just one of several differentiators that Canon uses to distinguish its non-professional models (a single card slot being another) but the loss of that 2% is unlikely to cause any problems in normal photography.

Autofocus response in one-shot mode is fast and positive, but the downside of adopting the 80D’s PDAF autofocus system is obvious when you put your eye to the viewfinder. Because it is inherited from a cropped-sensor camera, the AF array occupies a comparatively small, central area of the 6D II’s frame. The relative lack of lateral AF coverage means that the 6D Mark II won’t be particularly versatile when it comes to off-center compositions or tracking, but to be quite honest, I suspect that most potential buyers won’t care.

If you really need super-accurate AF tracking from a Canon DSLR, you’ll need to save up for an EOS-1D X Mark II. But based on our experience of the closely-related 80D, the 6D II’s 45-point cross-type AF system, coupled with the 7560-pixel RGB+IR metering sensor is likely to be more than adequate for everyday shooting of mostly static subjects.

A handheld shot at the long end of Canon’s latest 100-400mm telezoom, straight out of the camera. At ISO 1250, some noise is visible, but it’s not problematic.

EF 100-400mm F4.5-5.6 II | 1/320 sec | F5.6 | ISO 1250

By contrast (no pun intended), autofocus in live view and movie modes is peerless, thanks to Canon’s Dual Pixel AF system. With 80% vertical and lateral coverage, and the option to set focus point by touch, the 6D II arguably offers better autofocus with the mirror locked up than it does in conventional viewfinder shooting mode.

Video: No 4K, and nothing flashy.

I didn’t shoot much video in Yellowstone (certainly nothing good enough to include in this article) but the 6D Mark II’s video mode is essentially the same as other recent non-professional Canon DSLRs. That means 1080/60p with a familiar, standard feature set. No 4K, and nothing flashy. Sorry, videographers – the 6D Mark II isn’t the low-cost 4K B-camera you might have been hoping for.

Some people will be largely ambivalent about this. After all, this isn’t 2009 anymore and following the arrival of Sony’s a7-series there are plenty of other options out there for enthusiast videographers that want to shoot 4K video with Canon EF lenses. It’s a shame though, because an affordable 4K-capable camera with Dual Pixel AF really would be a wonderful thing. Maybe one day…

At any rate, I have no doubt that several video-dedicated sites are typing furious blog posts about it even as we speak.

Despite the unexciting video specification, Dual Pixel AF does makes the 6D Mark II a very simple, relatively versatile movie-shooting camera, and certainly an enjoyable one, especially for casual hand-held shooting.

A big difference compared to the original 6D is the Mark II’s articulating screen. This is great for tripod-mounted shooting, and for grabbing low-angle stills. It’s useful in video mode, too, where setting focus by touch is especially handy. The 6D Mark II’s Dual Pixel AF system in live view and video is excellent.

Even for stills, the articulating touch-sensitive LCD is extremely handy. The majority of my dawn and dusk shooting in Yellowstone was conducted with the 6D Mark II on a tripod, in live view mode with exposure simulation turned on. Compared to a fixed screen, the 6D II’s articulating LCD is a lot more useful, as well as being a lot more comfortable to use from waist height. And while some people will always make the case for tilting, as opposed to side-articulating displays, I came to really appreciate the ability to pop the screen out for vertical compositions, too.

A tripod-mounted shot, taken at as long an exposure as I could manage without an ND filter. This image was composed vertically, in live view mode. Although the 6D Mark II doesn’t offer focus peaking, the magnification feature in live view mode provides a detailed enough on-screen image for accurate manual focus.

EF 24-70mm F2.8 II | 0.3 sec | F14 | ISO 100

Canon’s live view implementation is pretty mature at this point, and features like a real-time histogram, and powerful magnification for accurate manual focus are very useful. I wish the electronic horizon could be overlaid on the live view display, but it’s not hard to work around. I also wish the 6D Mark II offered focus peaking, but in practice the 10X magnified live view display offered enough contrast for accurate focus, even in pre-dawn light. And of course Dual Pixel AF is so good that there’s less need for manual focus anyway.

I don’t know what this insect is (perhaps a reader could tell me?)* but I think it enjoyed the 6D Mark II’s flip-out screen as much as I did.

The 1.04 million dot LCD features an anti-smudge coating, but not an anti-reflective coating. As such, dirt and fingerprints clean off the screen very easily, but I did find myself increasing screen brightness for live view work in bright conditions.

* UPDATE: A reader tells me that this is a Salmon Fly (Pteronarcys dorsata). That was quick!

While I wasn’t able to perform any controlled testing, the 6D Mark II’s newly developed 26MP sensor appears to deliver excellent results across its native ISO sensitivity span. In good light, at low / medium ISO sensitivities, images look exactly as I’d expect from a modern Canon DSLR. I don’t really care for Canon’s default JPEG rendition, which tends towards rather mushy detail at a pixel level, but the colors are great and there’s a lot of detail in Raw files.

Because of the current lack of 3rd-party Raw support (and to honor a request from Canon) my workflow up to now has been to perform a basic tonal conversion in Canon’s bundled DPP software, before outputting files as 16-bit TIFFs to Photoshop for sharpening. While I’d probably never find myself shooting in the ‘Landscape’ Picture Style except by accident, I did find that applying (and then modifying) this profile in DPP gave pleasantly bright, vibrant images of the Yellowstone springs.

The 6D Mark II is dust and weather-sealed (but only with a lens attached). This view shows the remote control port, to the lower right of the lens mount, covered with a rubber cap.

You’ll find plenty of images in our samples gallery, but I’m reserving judgement on exactly how well the files from the 6D Mark II compare to competitive cameras until we’ve received robust ACR support. According to Canon representatives, the 6D Mark II should outperform the original 6D (which it very evidently does) but may not offer the same kind of dynamic range and absolute resolution of the EOS 5D Mark IV.

When shadow areas are lifted by a couple of stops, there’s no obvious banding, but noise becomes prominent

I had the opportunity to accidentally run a kind of halfway test on the 6D Mark II’s shadow dynamic range when shooting bracketed images of a dawn eruption from Old Faithful, heavily backlit by the rising sun. When shadow areas are lifted by a couple of stops, there’s no obvious banding, but noise becomes prominent, suggesting that the 6D Mark II’s sensor probably isn’t ISO-invariant. This isn’t a surprise, but watch this space for confirmation from our lab testing once we receive a shipping sample.

This shot was deliberately exposed for the highlighted vapor cloud of Old Faithful’s eruption, lit from behind by the rising sun. I adjusted the exposure in Canon’s DPP software to recover midtones and shadows.

EF 24-70mm F2.8 II | 1/400 sec | F11 | ISO 100

Something that prospective 6D upgraders should be aware of is that the increase in resolution from 20MP to 26MP will show up flaws in cheaper lenses. I was mostly shooting with Canon’s excellent 16-35mm F4L and 24-70mm F2.8L II on the trip, both of which deliver very good edge-to-edge sharpness, but images from the cheaper 24-105mm F4L II don’t look great towards the edges. That said, I am probably more inclined towards pixel-peeping than the average 6D II buyer will be (certainly more than they should be) and at normal viewing distances, even a stickler like me wouldn’t know the difference.

In summary

Every new generation of cameras brings performance improvements, and after almost five years, it’s no surprise that the 6D Mark II is a considerably more powerful camera than its predecessor. It’s fast, very responsive, impressively easy to use, and offers a good balance of user-friendly ergonomics and customization options (28 in all), which should appeal to its intended user base.

Another tripod-mounted shot, taken at sunset. Although I rarely shoot in anything other than default JPEG Picture Style, I found that applying the Landscape style to Raw files in DPP and then modifying the tones gave a good starting point for sunrise and sunset shots.

EF 16-35mm F4 | 1/5 sec | F16 | ISO 100

Like the original 6D, the 6D Mark II is a solid, predictable, easy to use camera that appears to be capable of excellent image quality. It’s pretty compact, but impressively well built, too, including some degree of weather-sealing. As usual, we don’t know exactly what that means, but I can tell you that during the Yellowstone trip, my 6D II shrugged off a fairly good soaking in an unexpected downpour without any ill-effects.

The 6D Mark II makes an excellent lower-cost alternative for someone considering an EOS 5D Mark IV

The 6D II is unlikely to to be able to rival competitors like the venerable Nikon D750 when it comes to autofocus performance and Raw dynamic range, and I wish there was a dedicated AF positioning joystick, but for a lot of photographers these will count as minor complaints.

On the face of it then, the 6D Mark II makes an excellent lower-cost alternative for someone considering an EOS 5D Mark IV, and a sensible upgrade for 80D users looking to move up to full-frame.

Canon EOS 6D Mark II Samples (pre-production)

$ (document).ready(function() { SampleGalleryV2({“containerId”:”embeddedSampleGallery_1238315273″,”galleryId”:”1238315273″,”isEmbeddedWidget”:true,”standalone”:false,”selectedImageIndex”:0,”startInCommentsView”:false,”isMobile”:false}) });

Please note that the samples in this gallery were shot with a pre-production camera. As such, image quality may not be representative of final shipping cameras (although it is likely to be extremely close), and at Canon’s request, Raw files are not available for download.

Articles: Digital Photography Review (dpreview.com)
 
Comments Off on The same but different: Canon EOS 6D Mark II shooting experience

Posted in Uncategorized


Laptop/Rooftop: Chicago Apple Store is Crowned with a Giant MacBook

29 Jun

[ By SA Rogers in Architecture & Offices & Commercial. ]

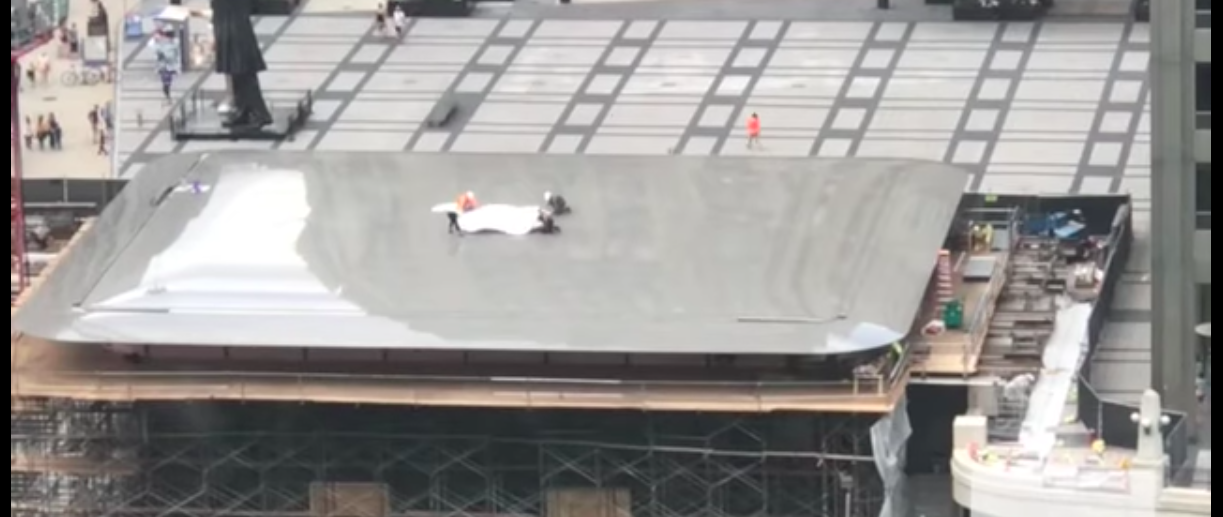
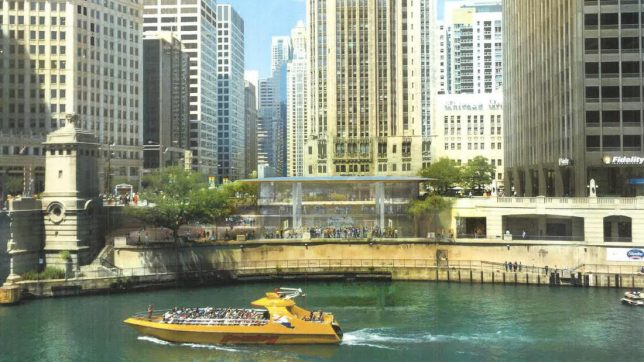
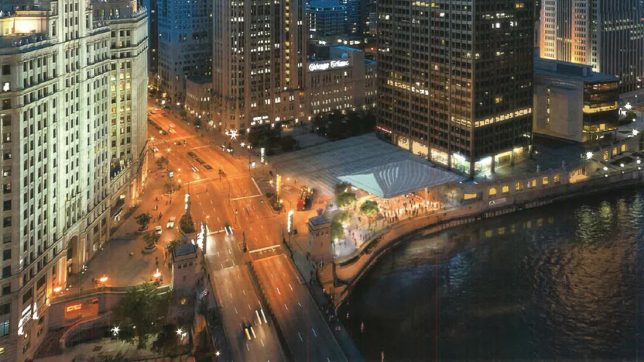
Construction is in full swing on Chicago’s new Apple store by Foster + Partners, revealing a surprise design feature that wasn’t visible in the firm’s early renderings: a gigantic MacBook for a roof. When the project was initially unveiled in 2015, the drawings depicted a sleek two-story structure with river views, glass walls and a slimline roof canopy that looks like it’s precariously balancing on slender supports. But construction crews recently added a shiny metallic silver finish to that canopy – and a familiar white Apple logo.

The store is a relocation of Apple’s Chicago flagship, and will measure about 20,000 square feet. The glass walls range from 14 to 32 feet in height, but there’s little danger of breakage, as they consist of four layers of half-inch-thick glass melded with additional layers of thicker laminated glass. The carbon fiber roof is made of a similar material as yacht hulls, which is what gives it that iconic sheen. It’s four feet thick in the center and just four inches thick at its tapered edges.

You can see this unexpected addition in action in the video above. DNA Chicago reports that crews affixed the logo and left it in place for no more than 60 minutes before removing it again, but it seems likely that it’ll return, especially since the Chicago Tribune reported back in March that the logo would be part of the design. The Tribune has more photos of the construction process.

Share on Facebook


[ By SA Rogers in Architecture & Offices & Commercial. ]

[ WebUrbanist | Archives | Galleries | Privacy | TOS ]


WebUrbanist

 
Comments Off on Laptop/Rooftop: Chicago Apple Store is Crowned with a Giant MacBook

Posted in Creativity


Video: Removing a stuck lens filter… with a band saw

29 Jun

What do you do when your cheap lens filter is so badly stuck on your very expensive Canon 24-70mm F2.8L II USM lens, that even a specially-designed filter wrench won’t get it off? If you are former MythBuster Adam Savage, you take that puppy to your band saw and scare the crap out of the lens owner.

That’s what he did for one of the latest videos on the Tested YouTube channel, when fellow host Norman Chan got yet another filter stuck (the second one in 6 months) on his $ 1,800 lens.

The footage is a bit terrifying for gear lovers, but have no fear: no lenses were hurt in the making of this video. What Savage does is cut two small notches into the rim of the lens filter, one on either side. Then, after expanding those notches with a file, he slots in a solid metal ruler and uses it to torque the filter clean off.

The moment of truth…

Watch the video up top to see the whole cringe-worthy process for yourself, and then send this video to the biggest Canon gear head on your mailing list. Nothing like a mild heart attack to really get you over that Wednesday hump…

Articles: Digital Photography Review (dpreview.com)

 
Comments Off on Video: Removing a stuck lens filter… with a band saw

Posted in Uncategorized


Architecture for Animals: 13 Structures Designed with Non-Human Use in Mind

29 Jun

[ By SA Rogers in Architecture & Public & Institutional. ]

If we’re going to keep animals in artificial environments to make money off gawking at them, you’d hope we’d at least design these structures sensitively, hiring top architects to give them the kind of loving care we’d give to our own homes. Whether building spacious zoo enclosures mimicking natural environments, bat-friendly bridges, stables to house horses in ultimate comfort or wildlife crossings over highways, this collection of animal-centric architecture aims to be the next best thing to leaving animals in the wild where they belong, and giving them plenty of space from human activity.

Panda House by Bjarke Ingels Group / BIG

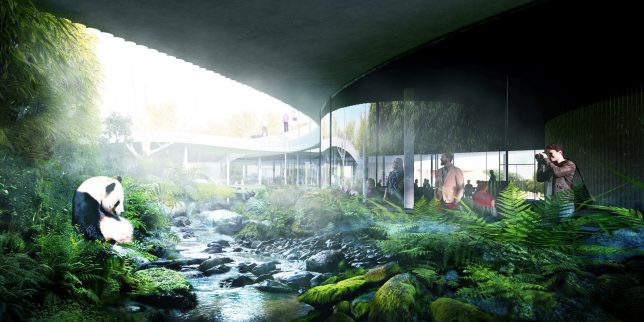
BIG designed a circular indoor/outdoor enclosure for giant pandas at the Copenhagen Zoo, set to open in 2018. The spacious and lushly planted structure will house two pandas relocated from Chengdu, China in a layout inspired by the Chinese yin-yang symbol, with each half tilting up at either end. There’s a bamboo forest on one side and a denser ‘misty’ forest on the other to represent the panda’s habitats in the wild.

Bat-Friendly Bridge by NEXT Architecture

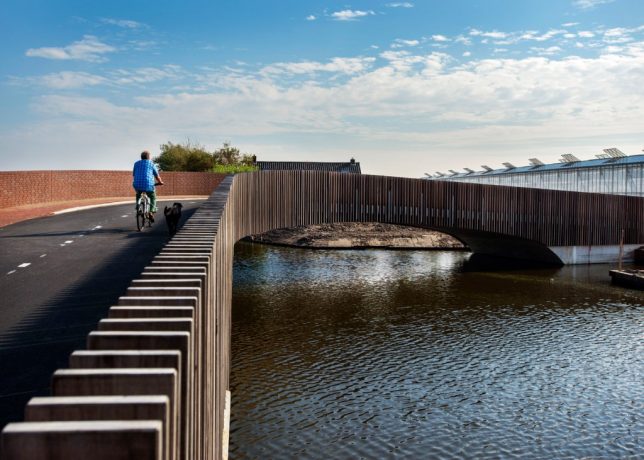
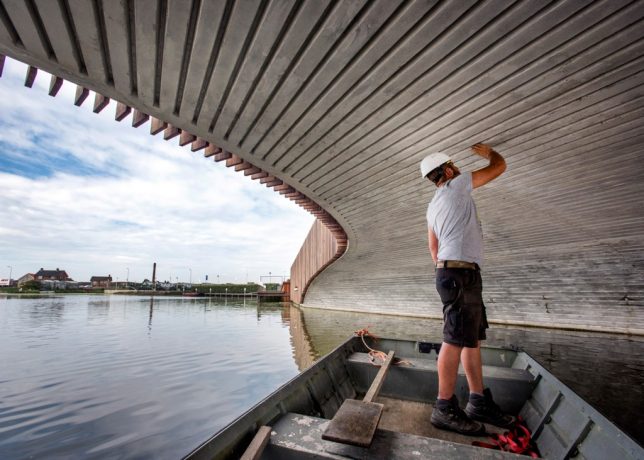
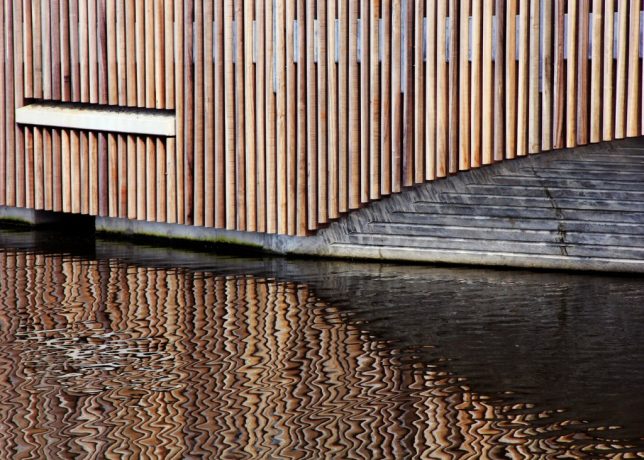
This bridge by Next Level Architecture in South Holland doubles as a bat habitat, with just a few modifications to a conventional bridge design, providing an example that could be replicated all over the world. Spanning a river that’s an important natural pathway for the local bat population, the bridge features extra-thick concrete to increase its thermal mass, making it warm for winter hibernation and a cool summer nesting spot.

Raven Enclosure at the Tower of London by Llowarch Llowarch Architects

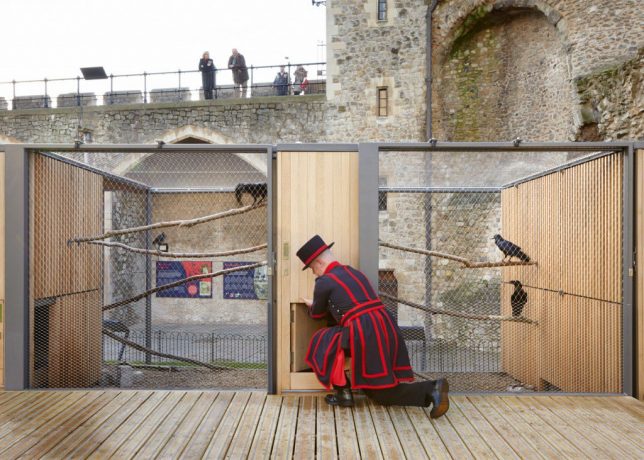
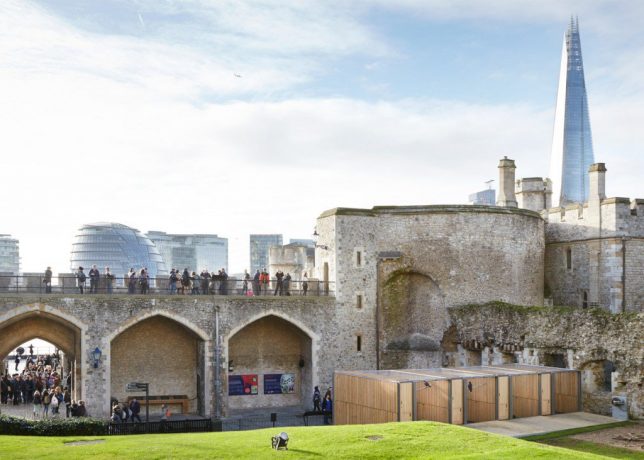
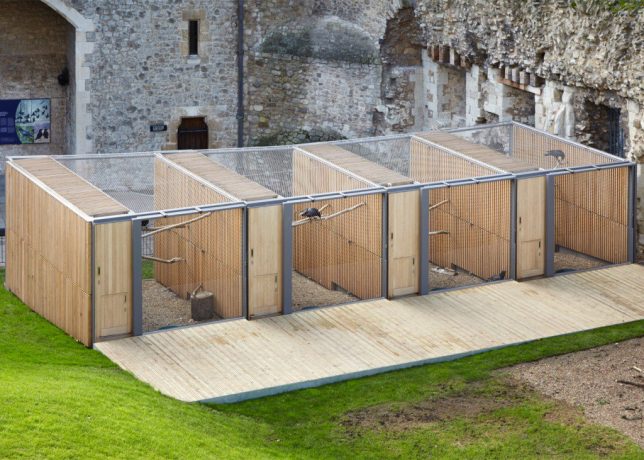
Five oak and mesh aviaries by Llowarch Llowarch Architects contrast with the ancient forms of the Tower of London, replacing the ‘ad hoc collection of sheds’ once used to house the complex’s famous resident ravens. According to English legend, if the ravens ever leave the Tower of London, the kingdom will fall – so the birds have been protected inhabitants of the historic palace, fortress and prison since the 17th century. Of course, different ravens have come and gone over the years.

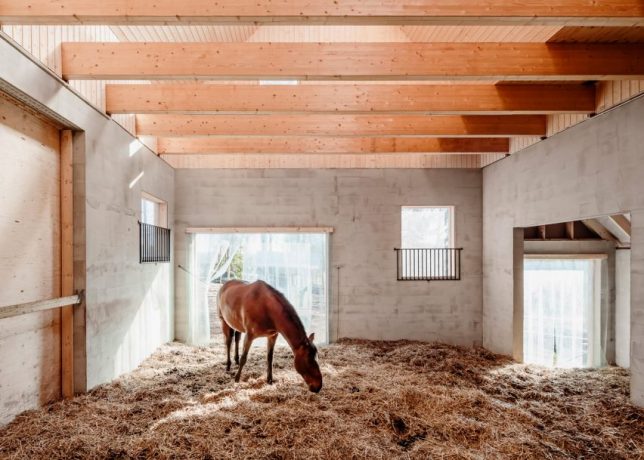
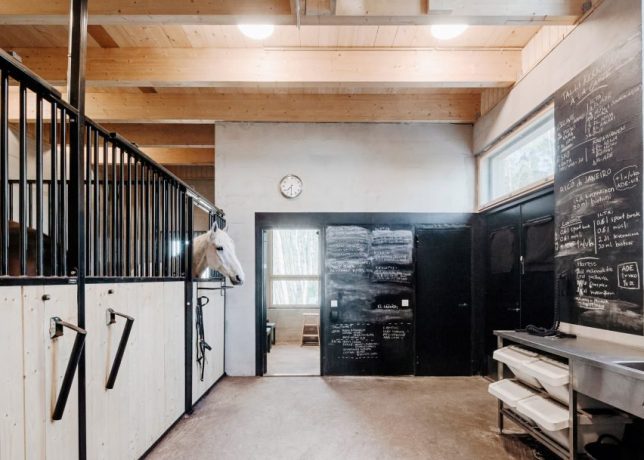
Finnish Stables by Pook

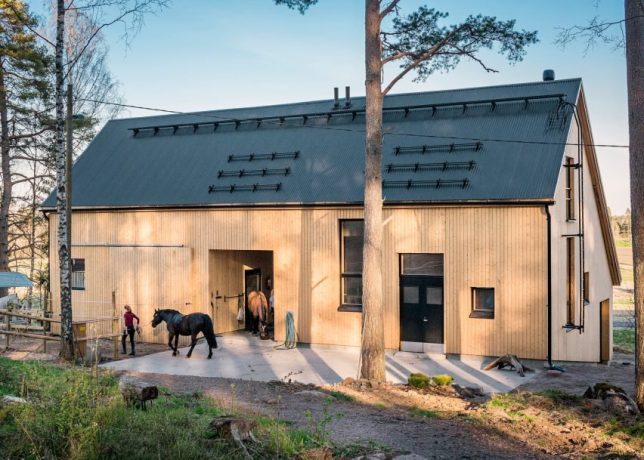
Local architecture studio Pook designed this stylish stable on the edge of a Finnish forest to blend in with the rural setting and complement the local architectural vernacular. The layout creates wind shelters in outdoor spaces to protect the horses against the southwestern winds. Inside, there’s an open room for feeding and walking the horses, storage for equipment and a barn for manure. The use of untreated pine in the cladding helps naturally control the humidity of the environment for the horses’ health.

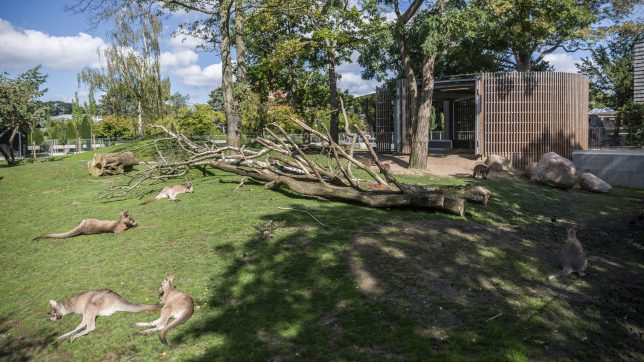
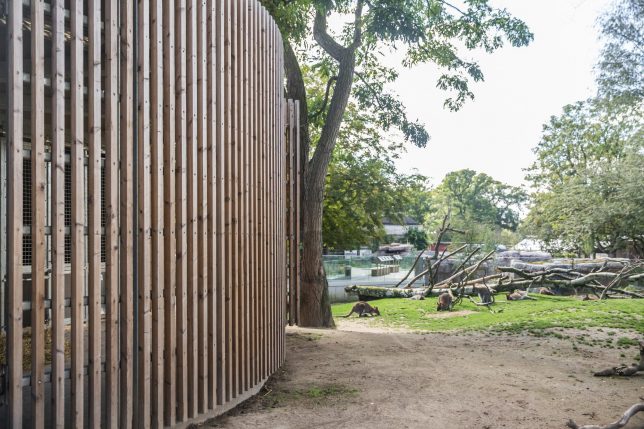
Kangaroo Enclosure by White Arkitekter

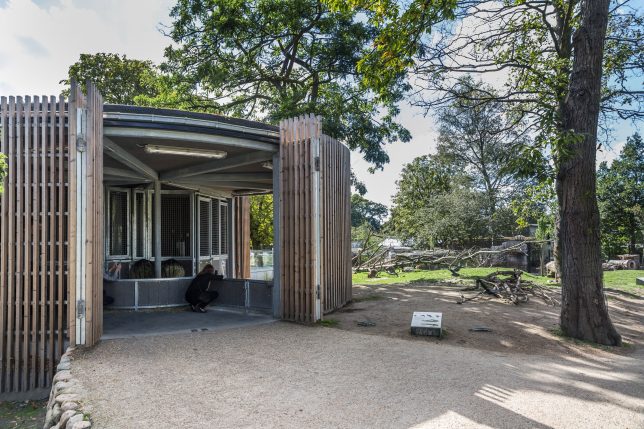
Another modern addition to the Copenhagen Zoo is this cylindrical house for Tasmanian kangaroos by White Arkitekter, which allows visitors to enter the kangaroos’ enclosure without stressing the animals. Part of the enclosure is for the kangaroos themselves, with a heated concrete floor to keep them warm in winter. The slatted timber doors can be folded back to open parts of the space to the wider enclosure, while others remain closed so shy kangaroos can have their privacy.

Next Page – Click Below to Read More:
Architecture For Animals 13 Structures Designed With Non Human Use In Mind

Share on Facebook


[ By SA Rogers in Architecture & Public & Institutional. ]

[ WebUrbanist | Archives | Galleries | Privacy | TOS ]


WebUrbanist

 
Comments Off on Architecture for Animals: 13 Structures Designed with Non-Human Use in Mind

Posted in Creativity


Hasselblad to open first own branded retail store

28 Jun

Camera manufacturer Hasselblad will be opening its first own retail store on 30th June. The store will be located at the Fotografiska center for contemporary photography in Stockhom, Sweden and carry the full range of Hasselblad cameras, lenses and accessories, encouraging visitors to explore the Hasselblad brand. Hasselblad and Fotografiska will also partner to host photography workshops for both amateur and professional photographers.

Johan Åhlén, Chief Marketing Officer of Hasselblad, said: “Our cameras were born from a love of photography and we are excited to partner with Fotografiska to spread our passion and inspire a more conscious world through the power of photography. Our new store and workshops represent our commitment to Hasselblad users and our desire to enhance the future of photography.”

Per Broman, founder of Fotografiska, said: “We are honoured to collaborate with an iconic Swedish camera brand like Hasselblad on the opening of its first store. We share the same values and devotion for photography and together with Hasselblad’s renowned technical excellence and creative vision, we aim to welcome photography enthusiasts around the world. It is a perfect match for our 535 000 guests who visit us every year for inspiration via the very inclusive art form of photography.”

The shop’s location at the entrance of Fotografiska looks like a perfect choice for Hasselblad. The center has an exhibition space of 2,500 square meters and features four major and between 15 and 20 minor exhibitions per year. Past highlights include exhibitions of the works of such renowned photo artists as Annie Leibovitz, David LaChapelle, Anton Corbijn as well as Hasselblad ambassador’s Erik Johansson, Hans Strand and Cooper & Gorfer.

Press Release:

2017-06-27

Hasselblad partners with Fotografiska in Stockholm to open its first Hasselblad branded store

On 30th June Hasselblad will be opening its first own retail store. The store will be located at Fotografiska in Stockholm, a centre for contemporary photography. The Hasselblad store will be home to a full range of Hasselblad cameras, lenses and products, while encouraging visitors to explore the Hasselblad brand.

Hasselblad and Fotografiska represent and showcase the world’s best photography. The collaboration will enable Hasselblad and Fotografiska to provide access to a full range of Hasselblad cameras, while also sharing their joint knowledge on the expertise and art of photography. The two companies will also partner to host inspirational photography workshops to help develop both amateur and professional photographers’ skills.

Johan Åhlén, Chief Marketing Officer of Hasselblad, said: “Our cameras were born from a love of photography and we are excited to partner with Fotografiska to spread our passion and inspire a more conscious world through the power of photography. Our new store and workshops represent our commitment to Hasselblad users and our desire to enhance the future of photography.”

Per Broman, founder of Fotografiska, said: “We are honoured to collaborate with an iconic Swedish camera brand like Hasselblad on the opening of its first store. We share the same values and devotion for photography and together with Hasselblad’s renowned technical excellence and creative vision, we aim to welcome photography enthusiasts around the world. It is a perfect match for our 535 000 guests who visit us every year for inspiration via the very inclusive art form of photography.”

The shop will be located at the entrance of Fotografiska, an international meeting place where everything revolves around photography. The museum has an exhibition space of 2,500 square meters, and features four major exhibitions per year and approximately 15-20 minor exhibitions. Past exhibitions have showcased the work of Annie Leibovitz, David LaChapelle, Anton Corbijn as well as Hasselblad ambassador’s Erik Johansson, Hans Strand and Cooper & Gorfer.

To discover more about the collaboration, visit fotografiska.eu/Hasselblad.

Articles: Digital Photography Review (dpreview.com)

 
Comments Off on Hasselblad to open first own branded retail store

Posted in Uncategorized


Announcing…our mid year sale! Starting with ebooks and posing guides for $9

28 Jun

If you’ve been eying off one of our photography eBooks, courses or presets packs – this week you’re in luck because today we kick off our mid year sale where we’ll be offering you some amazing discounts on dPS products as well as some special offers from our partners.

If you’re subscribed to our newsletter you’ll get notified of each of the deals as they come out but while you’re reading this – let me tell you about todays deal.

DEAL 1: All dPS eBook are just $ 9 USD

To get our mid year sale started, we’re offering all our ebooks and posing guides at just $ 9 each.

That’s up to 80% off what yo’d normally pay!

There are 23 eBooks and posing guides to choose from on everything from understanding the basics of your camera to portrait lighting as well as how to use natural light and improving your post production of your landscapes and much more.

Here are 3 of our most popular ebook guides:

  • Going Pro. Normally $ 49, get it today for just $ 9 (USD)
  • Living Landscapes. Normally $ 19, today just $ 9 (USD)
  • Portraits: Making the Shot. Normally $ 19, today just $ 9 (USD)

But that’s just scratching the surface of what is on offer – be sure to checkout all 23 titles here to find the guide that will take your photography to the next level.

Whether you pick up just one of our titles or pick the whole library – this is a fantastic way to invest in your photographing learning – but don’t wait long – this deal only lasts another 30 hours so don’t delay.

The post Announcing…our mid year sale! Starting with ebooks and posing guides for $ 9 by Darren Rowse appeared first on Digital Photography School.


Digital Photography School

 
Comments Off on Announcing…our mid year sale! Starting with ebooks and posing guides for $9

Posted in Photography


Samsung launches ISOCELL image sensor brand

28 Jun

Samsung Electronics has introduced its image sensor brand ISOCELL at the 2017 Mobile World Congress (MWC) Shanghai. Samsung originally launched the ISOCELL technology, which reduces crosstalk between pixels through physical barriers, in 2013 and has now decided to use the moniker as a brand name.

“Samsung ISOCELL is a brand that represents the essence of our leading pixel technologies. We expect the ISOCELL brand to help consumers easily acknowledge and confide in camera performance as well as overall quality of the device,” said Ben Hur, Vice President of System LSI marketing at Samsung Electronics. “With our advanced image sensor technologies, Samsung will continue to bring innovation to cameras used in smartphones and other applications.”

ISOCELL sensors comprises four sub-brands: Bright, Fast, Slim and Dual which are tailored to specific mobile device market demands:

  • ISOCELL Bright sensors deliver bright and sharp images with high color fidelity and reduced noise in low light environments
  • ISOCELL Fast sensors provide fast autofocus onto still or moving objects even when dark
  • ISOCELL Slim sensors adopt the smallest pixel sizes available in the market at 0.9-1.0um, yet produce high quality images for the slimmest devices
  • ISOCELL Dual sensors can be mixed and matched in various combinations on consumer devices to bring about features demanded in the latest dual camera trend

The latter works in a similar way to the dual-camera modules in more recent Huawei high-end phones. combining an RGB with a monochrome sensor. If the rumors are true we will see the ISOCELL Dual sensors for the first time in the upcoming Samsung Note 8 which is likely to be launched around the IFA trade show in Berlin at the beginning of September.

Articles: Digital Photography Review (dpreview.com)
 
Comments Off on Samsung launches ISOCELL image sensor brand

Posted in Uncategorized


4 Tips for Post-Processing Images on the Road

28 Jun

In this article I will share some of my tips for post-processing your images on the road or while traveling. That way you can share images and keep up on social media. Let’s see why that’s important.

Social media pressures

Much can be said about social media and its influence on photography. But the hard truth is that for many of us we live under a constant pressure to regularly release new content on various platforms, such as Instagram. Studies show that posting an average of one image per day is what will result in the highest engagement amongst current (and new) followers.

One can say that social media has become just as much about documenting as about presenting your finest work. But still, you do want to maintain a certain quality of your images.

Tips for Post-Processing Images on the Road

An image I processed from the back of our rented caravan on Iceland

In this article, I’ll share several tips on how you can keep up with the pressure of posting new content while being on the road and how you can make sure that the images you post during that period are still of a quality that reflects positively on your overall gallery.

Why Post on the Road

Before we get into the tips on how you can process your images on the road, let’s quickly look at why you want to keep posting new images when you’re traveling.

As I mentioned above, studies show that posting an average of one image per day is what will bring the highest engagement amongst current and new followers. If social media is a big part of your marketing strategy then you should attempt to maintain this average. Of course, there’s no big harm in missing a day or two every now and then but if you’re absent for a week, or even more, you quickly loose engagement with your followers.

Since most photographers follow a lot of people on social media (both friends and people who inspire them), it won’t take much to forget about you and your work, making it harder to regain their engagement on your images.

Tips for Post-Processing Images on the Road

I chose to quickly process this in Lightroom to share something on my Facebook page related to my current travels.

So, if you’re traveling for a week or longer, it’s a good idea to keep posting new content as often as you can in order not to lose too much engagement.

4 Tips for Post-Processing on the Road

The four tips I’ll be sharing will require that you have access to a laptop (or computer) with your preferred editing tool installed. Normally, when I travel I tend to always bring my laptop (except for shorter trips) so that I can quickly process some images on the road and document my current travels.

That being said, the images that I process on the road rarely become portfolio worthy shots and I will go back and reprocess them later on when I’m back at my desk and have access to the equipment I prefer working with.

#1 – Calibrate your Monitor

It’s most likely that your processing images on a laptop when you’re on the road. If you’re a serious photographer and you spend time fine tuning your images it’s also likely that at some point you’ve calibrated the monitor on which you’re working regularly. (If you haven’t calibrated your monitor before I strongly recommend investing in a tool such as Spyder 5 Elite and calibrating ASAP!)

Tips for Post-Processing Images on the Road

I use the Spyder 4 Elite to calibrate both my monitor and laptop (also my iPad when I had one).

However, it’s not only your main monitor that should be calibrated. If you spend time processing images on your laptop as well, it’s equally important that it is calibrated too. You don’t want to process an image and then later realize that the colors are all off, right?

#2 – Find the Time

Time is often limited when you’re on the road as most of the day is either spent traveling, exploring, scouting or photographing. Still, I recommend trying to find the time to process at least one image during the day. This could be while you’re having lunch at a cafeteria or even quickly before going to sleep.

When processing images on the road it’s not crucial to focus on the details. Instead, spend a few minutes in a software such as Adobe Lightroom and adjust the highlights, contrast, and white balance. Often, you don’t need to make big adjustments for an image to look okay.

Tips for Post-Processing Images on the Road

A quick edit done in Lightroom to show the amazing light we had that particular evening. I later reprocessed this image to better suit my style.

If you’re pressured to upload images on the road (this could even due to a client request) it’s better to have something to put out, and then reprocess it when you’re back home.

#3 – Find Balanced Light

If you’re like me and would rather spend a night in a tent or campervan than a hotel, finding a place to process your images isn’t always the easiest. Most places outside are challenging due to harsh light reflecting on your laptop, making it difficult to properly see how the adjustments are applying on the image.

Try looking for a shadowy area to work in, or if you can’t find one, make your own. This may sound (and look) stupid but using a jacket or something similar to cover yourself and the laptop will make it easier to view the screen and see how you’re processing the image.

#4 – Use Presets

To be quite honest, presets are something I very rarely use. In fact, I don’t think I’ve ever used them more than a handful of times. However, I do see the value of them when you need to quickly get content out and you have a certain style to your images.

Tips for Post-Processing Images on the Road

I used the dPS LR presets to process this image from Germany.

Presets are the quickest way to process your images and in many cases, they do a good job. Just make sure that the particular preset works well for the image you’re working on, and if needed, make some minor adjustments.

Last Words

As I’ve mentioned several times in this article, and I want to end with saying, that processing on the road should only be done in order to continuously upload new content on social media either to document, engage or to satisfy a client. The images you sell or include in your portfolio should be reprocessed, as you’ll most likely notice a few errors when you return back home and have more than a few minutes to process the image.

Love it or hate it but this is the world that we (or at least many of us) live in today! How do you work on the road? Do you have any other post-processing tips for when you’re away from home? Please share in the comments below.

The post 4 Tips for Post-Processing Images on the Road by Christian Hoiberg appeared first on Digital Photography School.


Digital Photography School

 
Comments Off on 4 Tips for Post-Processing Images on the Road

Posted in Photography


Analog revival rolls on: Rollei Vario Chrome slide film coming soon

28 Jun

Dear film photographers! Rollei Vario Chrome 135-36 is a medium to high-speed color reversal film that is intended for photography under low-level daylight illumination or under other light sources using proper filtration. Rollei Vario Chrome has a medium degree of sharpness, its image results are characterized by a slightly visible grain and a warmish image tone. As the name of the film suggests it has a broad exposure latitude from 200 to 400 ISO (DX coded at 320 ISO). If you intend to project the slides we suggest to shoot the film at 200 ISO whereas 320-400 ISO is preferable for scanning applications. Pre-sale will start next week on Monday July 3rd. We expect the supplies to arrive in week 28 so that we’ll be able to start shipping between July 10th and 14th. We hope you’ll like the film as much as we do and thank you all for the support.

A post shared by macodirect (@macodirect) on

Well this is some unexpected, but exciting news: German photography shop and producer of Rollei-branded film, Maco Direct, has announced Rollei Vario Chrome 135-36. It’s an ISO 320 color reversal film stock with medium sharpness and a warm tone, which sounds perfect for grey Seattle days.

That brings the count to four new, reformulated or resurrected film stocks that will become available this year. The others include: Kodak Ektachrome, Ferrania P30 b/w film, and a reformulation of LomoChrome Purple 400 film. Not to mention Lomography also announced three new single-use cameras and German film maker ADOX announced it will doubled the size of its film plant. All this means more options for analog diehards.

You can pre-order a roll (or more) of Rollei Vario Chrome come July 3rd, and orders will begin shipping as soon as the middle of the month. Of course, it makes some sense to wait and see what images from this new film look like, unless you’re the gambling type. In that case, please share your results as soon as possible.

Has this Rollei news whet your appetite for film? Here are 10 excellent, affordable film cameras that are easy to track down and get started with.

Articles: Digital Photography Review (dpreview.com)
 
Comments Off on Analog revival rolls on: Rollei Vario Chrome slide film coming soon

Posted in Uncategorized


10 Must-Have Photography Accessories

28 Jun

You finally have your new camera and after the first few weeks of taking it out, you begin to realize that there may be other things that you need. Sometimes it is hard to know what photography accessories are really necessary and which are more “nice to have” items. It’s certainly possible to spend a lot of money on extra photography gear so it pays to put a bit of thought into it.

Of course, what you need will depend on the kind of photography you will be doing. A landscape photographer will need lots more things than a city street photographer. A studio portrait shooter will have a whole shopping list of expensive lights and stands required (not to mention the studio space in which to put it all).

But let’s start at the beginning, what are the most basic and necessary photographic accessories.

1. Extra Camera Batteries

Having a spare camera battery is a lifesaver, especially if you have remembered to charge it in advance. There is nothing worse than running out of power for your camera when you are away from home. You can choose to buy the branded battery to suit your camera, but there are also more cost effective third party options. My preference is to stick with branded, I have found they perform better over the life of the battery.  Feel free to run your own experiments though.

For anyone shooting in very cold weather, it’s recommended that you have several batteries and some way of keeping them warm. Very cold weather chews through battery power, as do taking long exposures or lots of burst shooting.

Necessary Photography Accessories

2. Spare Memory Cards

Opinion is divided on whether you should have a few high capacity memory cards, or several smaller capacity ones. The theory is if a card gets corrupted, with a smaller capacity card you run the risk of losing less images. Check which memory cards are recommended or preferred for your camera as there are several brands available, but not all perform at the same level.

Check the speed of the card as well, if you are likely to do a lot of fast shooting. How well the card can process those bursts of images can have impact on the performance of your camera. If a card is too slow you will get buffer overuns as the card struggles to keep up saving all the frames.

Necessary Photography Accessories

Once you have several memory cards, it also makes sense to have some way of organizing and storing them. Some people have different systems to indicate when cards are full or empty. Come up with a plan so you know which cards are exposed and which are ready to go.

Necessary Photography Accessories

3. A Camera Bag

I am quite convinced that the perfect camera bag is like the Holy Grail – impossible to find. Everyone has different requirements which mean there is no one solution. Backpacks, roller bags, sling bags, waist packs, straps, clips, belts, and body harnesses are all available options.

Necessary Photography Accessories

My sling bag for walking around the city, or times I only want to take the very basics.

There are so many choices and it can be easy to get confused, here are a few things to keep in mind when shopping for a camera bag:

  • Look for good padding in the shoulder straps.
  • That the bag is the right length for your back (I am an average height woman and a lot of bags are too long for me).
  • It has enough pockets to keep useful stuff like filters and batteries and for them to be easily accessible
  • The bag is as light as possible.
  • How does it behave when you put it on the ground, does it tip over?
  • That it is waterproof (water resistant material, flaps over the zips and the best bags come with a built in rain cover).
  • There is enough room to store all your stuff safely with sufficient padding and dividers.
  • There are good cheststraps and waist belts on backpack style bags (they take up a surprising amount of the load off your shoulders if you use them).

Over time you will probably try several different styles of bag until you find an option that is the best compromise for what you want versus what you can find.

Necessary Photography Accessories

My main bag is a backpack, the F-stop Kashmir designed for women. This is the closed position.

Necessary Photography Accessories

Backpack in the open position. Different bags can be accessed in different ways.

4. Footwear

Pretty much everywhere you go with your camera will involve some form of walking for able bodied people. This means you need to have good supportive comfortable footwear which is suitable to your conditions. Don’t forget good quality socks as well (my preferred brand is Thorlo). When looking for shoes or boots take into consideration weight, fit, comfort, flexibility, waterproofness and of course the price.

Necessary Photography Accessories

These shoes are very light and breathable, however they are not very waterproof and the soles can be a bit slippery on wet rocks. But they are super comfortable to wear all day, which is the most important thing.

Heavy boots are really tiring to walk in for long periods but you might need them for really cold weather. Depending on the type of walking and situations you will encounter, you may even consider more than one set of footwear.

5. Jackets and Outer Layers

Modern technology has made outdoor clothing very light, and it is recommended that you build up layers to adjust to changing conditions. Being too hot and sweating in very cold conditions is uncomfortable but also may contribute to hypothermia, particularly if wind chill is a factor.

Necessary Photography Accessories

Hunters Element hunting jacket in green, and Kathmandu grey windproof jacket.

So build up a selection of light technical layers you can wear or carry easily in your bag or pocket. I have three jackets, the grey one is very light and warm and scrunches down into all the corners of my pack.  The green jacket is a heavier hunting jacket that has excellent wind protection, with huge pockets in the front. Not shown is a rain shell to layer over the grey jacket for added dryness protection.

6. Extra Protection

Hats and gloves are also a necessity to keep you warm and dry. Particularly if you are outside doing landscapes or nature photography and you are sitting still for long periods. Again, layering up is useful, pictured are my thin windproof but quite warm gloves, with some heavier gloves to put on over top. The heavier gloves make it difficult to use the camera, which is why two layers of protection help me to function and stay warm.

The bottom half also needs protection. These are rain trousers that are designed to pull on over top of your standard leg layers.

Necessary Photography Accessories

Your backpack and camera also deserve consideration for protection as well. Pictured below are my orange backpack rain cover and a rain cover for my camera that allows shooting in the rain.

Necessary Photography Accessories

7. Tripod

Unless you are a hardcore street photographer (needing to be light and mobile) then a tripod will likely be a requirement at some point. Necessary for sharp landscape images, long exposures, astrophotography, macro and all kinds of studio work.

A tripod requires two components to work – the legs and the head. Sometimes you can purchase them bundled together, or you may wish to purchase them separately to suit certain requirements. Here are some key things to look for in a tripod:

  • Are the legs tall enough for you? I was surprised to find many tripods too short for me at 5’6″ – having the right sized legs makes it easier on your neck and reduces the need to use the center pole.
  • Does the center pole adjust to horizontal mode? Very useful for doing still life and macro work.
  • Is it a clip or a twist-lock type of leg extension? People prefer different options – wildlife photographers often use twist-lock legs as they are quieter.
  • How heavy is it? Carbon fiber is the lightest option, but it is also very expensive and in comparison, not always that light. Plus a heavier tripod offers more stability when used outside.
  • Is there at least one leg wrapped? Carrying a bare metal pole on a cold frosty night is unpleasant.

Tripod head

Tripod heads come in many variations as well. Ball and socket are quite common but take two hands to utilize. A good quality head will be made out of solid material and be strong enough to hold your camera and its heaviest lens at a variety of angles. Do your research on weight tolerances and creep before purchasing.

Additional tripod accessories worth considering are L-plates for your camera body, and if you are into macro, nodal rails as well. Also learn how to take your tripod legs apart and clean, especially when used in water or in the ocean.  This will extend the life of your tripod and save you money.

Take time to invest in a good tripod/head combination and it will last you for many years.

Necessary Photography Accessories

Manfrotto legs with an Acratech head. My preference is for click adjustable legs.

8. Camera Manual

It’s small and light and easy to tuck into your camera bag and really handy to have when you need it. It may never get used, but it’s good to have on hand. Take your camera manual with you!

Necessary Photography Accessories

9. Card Reader

There are several different ways to transfer data from your camera to your computer. Some new camera bodies have wireless, or can be connected via a cable to the computer for data transfer. However, that tends to chew up battery power quite quickly on the camera.

My preference is to use a USB card reader. USB 3 or the newer USB-C provide fast data transfer for those in a hurry. Additionally having a small portable reader allows you to take it with you when traveling, allowing you to download on the road.

Card readers are cheap, light, easy to pack and come in really useful when traveling. Get one with lots of different ports to cover any requirements.

Necessary Photography Accessories

Necessary Photography Accessories

10. Other Useful Stuff

There are other non-photo things that are useful to have around as well such as; change for parking meters or entry fees, a compass, sunscreen (mine is on a carabiner clipped to the outside of my backpack for easy access), and a pen and paper is always useful.

Other items that may come in handy are; business cards, model release forms, snacks, your cell phone loaded with a variety of useful apps, and the list goes on.

Conclusion

What you need in terms of photography accessories will depend on the type of photography you do and where you do it. This list should cover the basics that any new photographer is likely to need, or at least might need to think about investing in at some point. Being aware of your options is important as good bags and tripods can be expensive, so you will need to budget for them.

Many people forget about their own personal comfort and think cheaper clothing options will be okay. For general purpose photography that may well be the case, but anyone heading into nature should be as prepared as they can be. Good quality outdoor clothing will last and be an investment. No one wants to miss a sunrise because they were cold and wet and in an unpleasant situation.

Remember to look after yourself as well as your camera gear.

The post 10 Must-Have Photography Accessories by Stacey Hill appeared first on Digital Photography School.


Digital Photography School

 
Comments Off on 10 Must-Have Photography Accessories

Posted in Photography