RSS
 

Archive for April, 2017

In praise of shooting monochrome landscapes

30 Apr

Taking color out of the equation forces the viewer to focus on shapes and textures

In an age of wide color gamut displays and HDR-everything, DPR regular Nicolas Alexander Otto urges his fellow landscape shooters to embrace shooting in black-and-white. Here are a few reasons why he embraces monochrome for landscape work – and thinks you should too.

Reducing imagery to its essentials, breaking it down to texture and shape, can help render the image more accessible to the eye. In this instance – a shot of the Iceland’s famous Vestrahorn – the patterns in the dunes leading the eye towards the mountain range in the distance are not visually overwritten by the color of the grass in the fore- and mid-ground thus stand out more and suffice to lend the foreground dynamism which might otherwise be not visible enough.

Taking color out of the equation forces the viewer to focus on shapes and textures

In this next example (above) the line work isn’t as important, but the different contrast areas with strong tonal differences are aided by the black and white treatment, enabling the small lighthouse to stand out as a visual anchor and helping to create a focus on the balance between the lighter slopes and dark areas on each side of the cliff.

You can emphasize what’s unique about the subject

I think an abundance of color can indeed sometimes distract from the motif in itself in regards to how it carves out the essence of a landscape. You may get sundown coloring or blue hour at every spot on earth, but a certain shape of rock might be unique to the place you’re shooting. If that’s what you want to capture, you may want to consider shooting black and white in order to prioritize forms over hues.

Pre-visualizing a scene in black and white can help you find better compositions

Pre-visualization is key. This means that photographers have to determine in field what the monochromatic image will look like after processing and decide on site how to compose and shoot accordingly. Subsequently, thinking in black and white may enable us to find better compositions; those which do not need color in the first place.

While I personally enjoy color as much as black and white, I often find myself trying to shut out color while composing, aiming to focus on the abstract rather than the concrete. This helps me to find my way around cluttered foregrounds or difficult light. It’s an approach I find helpful from time to time and would recommend trying, even though it may take some time to get used to (I guess everyone who has the option to use black and white directly in their live view is a lucky camper in this regard). Taking a picture and converting it in camera for a preview might be cumbersome but can be helpful as well.

Black and white promotes detachment from reality

A black and white image is always a departure from our inherent logical view of the world which is secondarily governed by color (primary is light and dark).

This entails certain freedoms such as to depart further from reality, which can be a liberating feeling as a photographer, opening up more creative possibilities. Often times a black and white image can simply ‘get away’ with more dramatic editing and capture technique since it is not regarded as a ‘authentic representation of reality’ as much as a color image.

You can be a bit more aggressive with processing

There’s a perception that editing images, in one way or another, deteriorates the character of the image. Black and white images however don’t seem to be subject to the same amount of critique because they are governed by a different frame of reference.

Take a look at more of Alex’s work and be sure to read our Readers’ Showcase Q&A with him.


Do you regularly shoot monochrome landscapes? Why do you embrace black-and-white? Let us know in the comments.

Articles: Digital Photography Review (dpreview.com)

 
Comments Off on In praise of shooting monochrome landscapes

Posted in Uncategorized


Celebrate International Dark Sky Week with a night sky time-lapse

29 Apr

A few months ago we featured the work of astrophotographer Matt Dieterich, whose iconic photo of star trails over Mt. Rainier was selected for a special series of U.S. postage stamps commemorating the 100th anniversary of the U.S. National Park Service. If you haven’t seen those photos, you should definitely check them out.

In honor of International Dark Sky Week, Dieterich has just released a time-lapse video called Pacific Northwest Nights, using photos shot while working at Mt. Rainier National Park. Of course, we love it because it highlights places in our own backyard, but even if you’ve never been to our part of the world it’s a beautiful video, and a reminder of why dark skies matter.

If you pay close attention at 0:50 and 2:45 you can even see the glow of headlamps as climbers ascend Mt. Rainier. You can find more of Dieterich’s work at his website and on Instagram.

Articles: Digital Photography Review (dpreview.com)

 
Comments Off on Celebrate International Dark Sky Week with a night sky time-lapse

Posted in Uncategorized


Canon releases firmware version 1.1.1 for EOS 7D Mark II

29 Apr

Canon has released new firmware for the Mark II generation of its EOS 7D APS-C DSLR. Version 1.1.1 includes all the improvements and fixes of previous updates and in addition addresses the following issues:  

  1. Enhanced reliability of communications when transferring images using Wireless File Transmitter WFT-E7 (A/B/C/D/E).
  2. Corrects the phenomenon of Err70 which occurs with certain combinations of settings.
  3. Corrects the phenomenon in which in very rare cases the shutter can no longer be released.
  4. Enhances reliability of operations for specific custom function settings.

Please note that if you are using a W-E1 Wi-Fi adapter the camera nickname will be reset to default when the new firmware is installed. You should therefore change the nickname before using the camera again. Firmware version 1.1.1 is now available for download from the Canon website. 

Articles: Digital Photography Review (dpreview.com)

 
Comments Off on Canon releases firmware version 1.1.1 for EOS 7D Mark II

Posted in Uncategorized


Acer unveils 31.5″ 4K display for image editors and other creative types

29 Apr

At its Acer Next event in New York City the Taiwanese electronics manufacturer has unveiled its new 31.5″ ProDesigner PE320QK display. The new monitor features super-thin bezels and, looking at the impressive specifications, is clearly targeted at image editors and other creatives. It offers 550 nits of brightness at 4K (3840 x 2160 pixels) resolution and has an enhanced color gamut, supporting 130 percent of the sRGB and 95 percent of the DCI-P3 color spaces. Response time of the display is 4 milliseconds, with a 100 million to 1 contrast ratio.

In terms of connectivity there are two HDMI 2.0 ports, audio out, a DisplayPort 1.2, a USB 3.1 type C input, and four USB 3.1 Type C outputs which are suitable for peripherals and support power delivery of up to 85W. The display also comes with a pair of 2W speakers and a removable anti-glare hood. Unfortunately Acer has not provided any information on pricing and availability yet. 

Articles: Digital Photography Review (dpreview.com)

 
Comments Off on Acer unveils 31.5″ 4K display for image editors and other creative types

Posted in Uncategorized


RotterZwam: Abandoned Water Park Turned Indoor Mushroom Farm

29 Apr

[ By SA Rogers in Abandoned Places & Architecture. ]

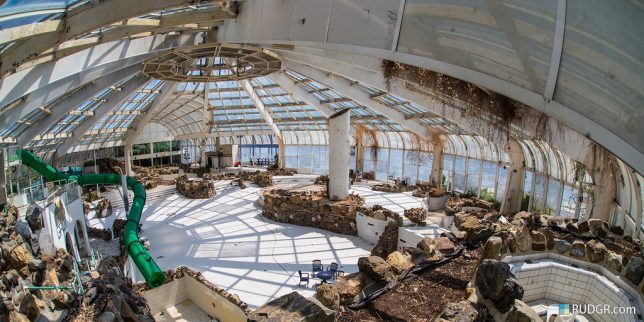
Bags of old coffee grounds hang in the dank dressing rooms of an abandoned Rotterdam water park, growing oyster mushrooms. Two men turned the former Tropicana space, an old teen hangout, into the perfect damp, dim environment for their business, making use of the structure while the city council decides what to do with it. ‘RotterZwam’ rents the building on an anti-squat lease and have transformed it into a fascinating example of adaptive reuse and urban farming.

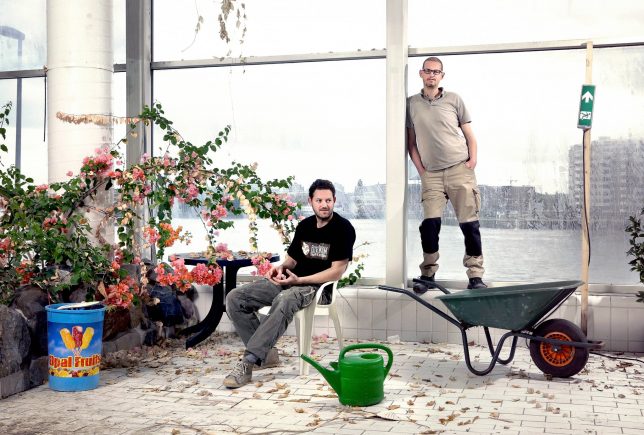
Tropicana is fairly infamous among Rotterdam locals, but closed after the former owner went bankrupt in 2010. The space had been plagued with problems, from hygiene to sexual assault. It sat empty until Siemen Cox and mark Slegers, RotteZwam’s owners, realized it looked like a giant greenhouse.

Though they hope that central glassed-in space – formerly the pool – will eventually become a greenhouse, for now, they’re making use of the dressing rooms and basement, which offer ideal conditions for fungal growth. The crew hangs bags of coffee grinds from the old Tropicana clothes hangers, and before long, they sprout oyster mushrooms.

They collect the coffee from local cafes, transport it in their carrier bicycle, and give the compost to worms to create an extremely low-waste operation. The produce about 20-50kg of mushrooms every week, and sell it to local restaurants, bakeries and food trucks. They also offer DIY mushroom-growing kits.

“Cities like Rotterdam produce nothing but waste and commuters,” they say in an interview with Vice’s Munchies. “This entertainment park represents that perfectly – we build things and, when we don’t want them anymore, we need others to clean it up, to sweep up our garbage. That’s not how nature works, though – in nature wast doesn’t exist. In this building we hardly ever buy a thing, because eery material or nail is already here.”

Share on Facebook


[ By SA Rogers in Abandoned Places & Architecture. ]

[ WebUrbanist | Archives | Galleries | Privacy | TOS ]


WebUrbanist

 
Comments Off on RotterZwam: Abandoned Water Park Turned Indoor Mushroom Farm

Posted in Creativity


Camera Bag Review – The Udee Backpack

29 Apr

As a photographer, amateur or professional, you know the value of good, reliable gear. It is often said that we photographers value good gear more than expensive material things like jewelry, designer watches, and/or expensive clothes. If you don’t agree with me, just ask my husband. He is still perplexed about my choice of buying a 20+-year-old film camera for what it would have cost him to buy an Apple watch for my birthday! But considering that I am the one who works most with my gear, carries it around, and takes care of it, I want to make the best buying decisions when it comes to my photography business. So when I had the opportunity to review the Udee backpack, I was excited to give it a test run.

Camera Bag Review - The Udee Backpack

Udee Backpack

As a somewhat petite female photographer who is generally lugging about 20+ lbs of gear, I am always on the lookout for a good, sturdy yet comfortable, camera bag that will last me a long time. I had the opportunity to test the Udee bag on several hiking trips with my family last month.

This is where I want a bag that is durable and can last the rough wear and tear I generally put my gear through when I am hiking. For my wedding photography business, I already have a bag that is tried and tested and something that I will likely not change as my needs for that part of my business are very different.

Camera Bag Review - The Udee Backpack

The Udee bag was really comfortable to carry around while hiking and walking in the mountains.

You can see the individual features of the Udee backpack on their Kickstarter project here.  My personal opinions of the Udee are based on a few factors that I feel are important to me when I am buying a camera bag.

Appearance

I have to say that when I first saw the Udee backpack I was very impressed with the appearance. It’s definitely one of the more stylish looking backpacks I have ever seen. The color combination of the gray flannel-type material with orange accents was attractive, and it appeared to be made of good and sturdy quality fabric. It did not feel like cheap construction and there were no telltale signs of poor workmanship in terms of loose threads, uneven seams, bad zippers, etc., at first glance.

Camera Bag Review - The Udee Backpack

The material felt strong and sturdy yet light-weight. The padding on the back of the pack also felt thick and soft. I prefer camera bags that don’t look and scream “here is a photographer with several thousand dollars worth of gear on their person” too much. On many occasions, I venture out on my own in a new place and I don’t want to attract too much attention.

Camera Bag Review - The Udee Backpack

Camera Bag Review - The Udee Backpack

Comfort

As per Udee, their bag touts a weight reduction system by improving weight distribution via an S-shaped buckle, and an X-shaped back support structure. I tested the bag when I went for a family hiking trip to Colorado and completely loved the weight reduction system. I hiked for a good two to three hours and did not feel the discomfort that I normally feel with other traditional backpacks.

The back support made carrying the bag super comfortable and the straps did not dig into my shoulders with the weight of the bag. The combination of the X-shaped back padding and stiff back support made it easy to carry the camera bag for an extended period of time. I did not have any odd shaped gear poking into my back making it unfordable to carry. The bag straps were also wide enough to comfortably fit on my shoulder.

Camera Bag Review - The Udee Backpack

My seven-year-old son also carried the bag for a short period of time (minus the camera, as I was holding it taking pictures) and he did not complain about the weight. At that time it contained a few snacks, a 50mm prime lens, a 70-200mm and a water bottle.

Camera Bag Review - The Udee Backpack

Of his own accord, my son volunteered to carry the bag for me…with slight adjustments to the straps, it fit his small frame quite comfortably.

Storage

I used to carry a lot of gear with me during my travels but over time I have narrowed down my options to only carrying lens and gear that I know I will use. I plan out my excursions ahead of time so I know exactly what I will be using and when. The Udee backpack fit the following comfortably:

  • 1 camera body
  • 2 zoom and prime lenses
  • My Canon 70-200mm (with the lens case)
  • Camera battery charger
  • Memory cards
  • 3 camera batteries
  • And a 15in MacBook laptop

I don’t carry additional bodies when I travel most of the time but sometimes I will carry an additional film camera body which is small enough to comfortably fit in the Udee.

Padding

Camera Bag Review - The Udee Backpack

The padding inside the bag is thick and soft. I am very particular with my gear and always travel with the lenses in the bags they come in. Sometimes I will put two or more lens in a smaller padded zip bag and then put it in my backpack. It might seem like overkill, but I would rather do this than have damaged gear when I reach my destination.

With the Udee backpack, I felt comfortable enough to just put my lenses in their bags directly into the bag. I did find it a little uncomfortable to fit my 70-200mm with its case in the bottom storage compartment but it fit perfectly in the top compartment. The main compartment of the Udee also had various smaller storage areas that hold traditional things like cards, a wallet, loose change and even had a padded place for sunglasses or eyeglasses.

Camera Bag Review - The Udee Backpack

On a side note, for those of you who travel on planes with the Udee, the dimensions are within the guidelines of the airlines and it actually fits perfectly in the flight overhead compartment.

Camera Bag Review - The Udee Backpack

Anti-theft device

I found this to be a very unique and interesting feature of the Udee backpack. Call me paranoid, but I never ever leave my gear unattended. If I am traveling alone, it comes with me wherever I go. If I am with family, then I have someone watch my gear if I have to step away. My gear is what keeps my business afloat and even though I have insurance, I still behave like I don’t when it comes to safety and security with my gear.

When I read about the anti-theft device in the Udee, I was intrigued. This is an interesting feature for travelers especially if you put your camera bag in an overhead rack when using public transportation or need to step away from your gear for a few minutes. The small, built-in combination lock and steel cable are long enough to keep your pack safe and the lock can also be used on some of the pack’s zippers.

Camera Bag Review - The Udee Backpack

Security pocket and luggage belt

I love bags that have a luggage belt. This small but important feature is invaluable to me as it helps maintain my sanity when I am rushed and traveling through an airport with my kids. Those of you who travel with young ones can likely relate. Somehow you suddenly become the luggage porter just minutes before walking through security. Especially when they swore that they would carry their own bags the whole trip if you just let them take that extra book or that extra game!

The luggage belt allowed me to hook the camera bag onto my carryon bag handle and gave me an extra hand to maneuver my kids through the crowded airport. I liked the security pocket too because it let me store and access my phone easily. However, I don’t see myself using this for anything other than a phone and maybe some money just in case I lose my wallet somewhere. It was easy to access even with both bag straps on my shoulder, which is a big plus in my mind.

Camera Bag Review - The Udee Backpack

LED Light

I really loved this feature of the bag. I found it particularly useful when I was hiking with my family. We tend to stay out past sunset (generally because I am photographing something and get carried away) and we always carry flashlights with us. We have headlamps, but the fact that the bag could light up and replace my headlamp was particularly impressive.

I can also see this as being very useful for people who walk along roadsides at night. With just the click of a button on each strap, the LED strips either blink slowly, blink quickly, or stay on continuously. The fact that each LED module can be removed from the strap and can be plugged into a standard micro-USB charger is also really practical as there are no batteries to replace.

Camera Bag Review - The Udee Backpack

Cons of the Udee backpack

But there were a few things about the Udee backpack that I personally did not like. These are just my opinion based on my time with the Udee!

No water bottle pocket

Now I am very conscious of the environment and try to practice sustainability in my everyday life. To that end, I always carry my own water bottle everywhere I go. This is especially important when I am out hiking and camping with my family. This was a huge con in my mind as there is no storage spot for me to keep my water bottle on the Udee bag.

I would have to use an external hook to clip the bottle to the shoulder straps, which I find extremely cumbersome and awkward as the bottle tends to hustle around when I am hiking. The other option would be to put the bottle inside the bag which makes me very nervous – liquid and electronic gear in close proximity is a disaster just waiting to happen!

Accessibility to the bottom storage compartment is difficult

I found accessibility to my camera very difficult when I stored it in the bottom compartment of the Udee backpack. This is the part of the bag that Udee calls the camera storage area. With the bag on both shoulders, it was impossible to reach the zipper of the bottom storage. I had to shift the bag onto one shoulder and even then, it was very challenging to open the zipper and take out the camera.

Camera Bag Review - The Udee Backpack

My arms could not reach the bottom storage while I was holding the bag. I had to put the bag down, take some stuff out of the top storage and then access the bottom camera storage area!

The bottom storage compartment was stiff and did not open wide enough to take the camera out, especially when there were extra lenses in the top compartment weighing it down. This may not be an issue if you don’t anticipate taking pictures while you are getting to and from your destination. I like to stop and take some pictures along the way when I am hiking and/or walking around town. I don’t necessarily want to have the camera around my neck for easy access.

Safety and security

Especially when I am hiking a difficult terrain, I like to be safe with my expensive gear. I did notice that it is possible to access the lower compartment from the interior of the backpack since the divider has a zipper around it. However, that’s not practical if the upper compartment is also full of stuff.

Camera Bag Review - The Udee Backpack

But what surprised me was that the bottom storage was accessible easily when the bag was worn on the back. My son wanted to store his jacket (5 minutes into the hike of course) and was easily able to do so. Not so good for the security of camera gear.

Quality of the zipper

Through out my time with the Udee bag, some of the zippers were very difficult to use. Now, this could be just my copy of the bag and not really a problem in general.

The orange zipper which opens to the compartment with the key hook (I kept the car keys and my wallet there) was particularly hard to operate. The key hook kept getting stuck in the zipper and it was hard to open. I had to press down on the front of the bag and then open it. So I could not open the bag and take my keys out super fast. I would have to try a couple of times before being able to get anything out. I did not have a problem with the other zippers so, as I said, it could be just an issue with my copy of the bag.

Camera Bag Review - The Udee Backpack

Overall thoughts on the Udee backpack

Overall I think the Udee backpack is a very good looking bag that is generally well-built. Its list of features includes some really innovative things like the LED lights, anti-theft device, and portable charging.

However, I feel that it also has some serious misses like the poorly designed lower-compartment in terms of accessibility and lack of beverage storage. I may be tempted to use this bag for light photography use and small day trips where I may not even take my camera or take just a point and shoot. I would not consider taking this on an extensive travel trip where I am constantly on the move, taking a lot of pictures along the way and need to take my camera out multiple times.

Camera Bag Review - The Udee Backpack

P.S. I really want to thank my kids for being such sports and testing out the Udee with me on our trip. The bribe of being photographed for an article really worked in my favor this time around!

The post Camera Bag Review – The Udee Backpack by Karthika Gupta appeared first on Digital Photography School.


Digital Photography School

 
Comments Off on Camera Bag Review – The Udee Backpack

Posted in Photography


EXIF.co uses smart watermarks and more to protect photographers’ images

29 Apr

EXIF.co is a new service offering photographers paid photo hosting that automatically applies smart watermarks and other protections to images uploaded to the platform. It aims to allow photographers freedom to embed and share their images on the web while limiting the risk of someone re-using their work without attribution – or flat-out stealing it.

EXIF.co enables customers to share their photos using an embed feature or to share it with others directly via a sharing tool. Anyone who tries to download the photo will be blocked, presented with copyright information, and/or a watermark will be automatically applied to the saved photo, depending on the photographer’s preferences.

Users can opt to apply ‘smart watermarks’ that appear when someone tries to download or screenshot an image, add photo credits, block embeds on websites, enable sharing with websites and track the number of online views each photo receives. The service appears simple to use, requiring customers to first upload their images, then add details to them such as credits. The user sets the permissions they want for each image, then saves it to their account.

You can see it in action below:


The service is free to sign up for, and it is priced on a per-thousand views basis. The rate for 10,000 to 99k views is $ 0.30 per 1,000 views, the 100k to 499k rate is $ 0.25 per 1,000 views, the 500K to 999K is $ 0.20 and the 1m or greater rate is $ 0.15. For example, EXIF.co says 10,000 views of a photograph will cost the subscriber $ 3. Individuals who sign up for the beta service will receive 1,000 credits for free.

The company acknowledged in a blog post yesterday that it’s service certainly isn’t foolproof. It stresses that its goal is to ‘add some friction’ to protect against casual theft. Would you find a service like this valuable? Let us know in the comments.

Via: PetaPixel

Articles: Digital Photography Review (dpreview.com)

 
Comments Off on EXIF.co uses smart watermarks and more to protect photographers’ images

Posted in Uncategorized


20 Tips for Getting People to Smile in Photos

29 Apr

One of the biggest challenges every photographer faces it getting people to smile naturally for a photo. Sure, you can ask someone to say “cheese!” and he or she will likely comply. But you’ll also probably end up with a cheesy smile that doesn’t look natural or attractive. After all, there’s a HUGE difference between a genuine smile and a fake one.

As a professional event photographer, spontaneously getting complete strangers to smile is a big part of my job, and I’ve picked up some proven techniques that I’ll share with you in this article. Note that I’ve broken up the sections into tips for photographing people by themselves, as couples, in groups, and children, but you can certainly mix and match. Also, be careful to always consider your audience and adjust your technique accordingly.

For Singles

1. Approach with a smile

A smile and friendly demeanor are contagious. Before you ask someone else to smile, make sure that you’re smiling yourself and approach with a friendly tone. If you want to get a real smile out of someone, you need to set the tone by approaching them with a giant, genuine smile on your face.

20 Tips for Getting People to Smile for a Photo

2. Offer a compliment

One of the quickest and easiest ways to get someone to smile is to boost their confidence. This is something you can easily do by offering a compliment based on a feature or quality you observe about them. Are they wearing an attractive outfit or an unusual piece of jewelry? Do they have a friendly smile or laugh? Offer a compliment!

3.  Smile with your eyes

How do you know if a smile is genuine or fake? It’s all in the eyes. A fake smile tends to only have the lower half of the face engaged, with the lips curled into a smile. But if the eyes aren’t squinting as well, you can tell the smile is forced and not very genuine. If your photo subject’s smile is looking a bit off and you can’t tell why, ask them to smile with their eyes, or “smize” as Tyra Banks would say.

4. Fake laugh!

To illicit a genuine smile, your photo subject needs to feel comfortable and relaxed. The best way to break the ice is to get them to laugh. Ask for a fake laugh, saying something like this, “Let’s see who’s got the biggest, loudest fake laugh! On the count of three, 1, 2, 3, LAUGH!” The whole point here is not to capture the fake laugh, but to get the resulting real laughs and smiles that you’ll get after the fact. It’s also important to note that your own enthusiasm for the activity and tone of voice is what makes this technique work.

20 Tips for Getting People to Smile for a Photo

5. Show me your happy face! Silly face! Sad face!

Most photo subjects respond the best if you give them specific instructions. Help them loosen up and feel less self-conscious by having them go through a series of facial poses. You might think this one only works with kids, but certain types of adults will totally get into this exercise.

6. Instead of “Say cheese,” say…

Most people expect to hear “say cheese” before getting a photo. Surprise them by saying something else, such as, “money” or “whiskey” for adults, or “pickles” or “chocolate” for children. Use your discretion and pick a word that suits your audience.

7. Tell them a joke (or ask them to tell you a joke)

One of the most obvious ways to get people to laugh or smile is to tell a joke. The trick is finding a joke that is appropriate for the audience. Personally, I use the joke below all the time for my corporate event photo shoots, and it almost always gets a laugh out of people. But I wouldn’t use this joke with children; I’d maybe use a knock knock joke instead.  You can also flip the tables and ask your photo subject to tell you a joke.

Q: “What’s the quickest way to make money as a photographer?”

A: “Sell your camera!”

20 Tips for Getting People to Smile for a Photo

For Groups

When photographing groups, you can use any of the above techniques for singles, but you can also add quite a few extra tricks to get creative, engaging shots.

8. Whisper a secret to the person standing next to you.

The idea is to get the people in your group engaging with each other. This technique can also elicit grins and giggles as people tend to whisper nonsensical noises to each other.

9. Everyone look at each other.

This works best for groups of at least three or more people. The reason why it works is that the instructions are vague. No one is really sure who to look at, and the resulting expressions tend to be smiles and laughs. This is great for capturing candid shots. Use it to loosen people up, and then move onto to the next few tips to work them into a more serious, smiling pose.

20 Tips for Getting People to Smile for a Photo

10. Everyone look at ____.

It’s essential to know everyone’s names or titles for this one to work. By calling out someone specifically in a group, you’re making them the center of attention and it’s often funny to the rest of the group to see how that person reacts.

11. Everyone look at me!

Follow this up after #8 or #9. After getting the group to engage with each other and laugh, they’ve loosened up. At this point, you can turn their full attention back to the camera and get everyone looking at you with a real smile on their faces. You can also take it a step further by saying something playful and silly like, “You guys don’t look happy enough! Make those smiles bigger!”

12. Action for a silly photo

Almost every single group photo will result in the group wanting to take a silly picture after the serious one. The problem is, most groups don’t know what to do for a silly photo. Help them out by throwing out some suggestions. My favorites for adults are:

  • Everyone clink your glasses together and say, “cheers!” if they’re holding drinks.
  • Hands in the air and raise the roof!
  • Point at the camera!
  • Thumbs up!
  • Give me your best impression of ____ (a celebrity, animal, etc)

20 Tips for Getting People to Smile for a Photo

For Couples

You can use many of the above group techniques for couples, but you’ll also want to have a few other tricks up your sleeve.

13. Tell me about how you met / first knew you were in love.

Talking about intimate, happy moments with couples is a great way to get them in-tune with each other and eliciting romantic smiles.

14. Give her a kiss on the cheek/forehead/nose.

Most happy couples will definitely smile when asked to be intimate with each other for the camera.

20 Tips for Getting People to Smile for a Photo

Photo by Jonathan Gipaya

15. Ask them to dance.

Get the couple moving and focus their attention away from the camera, especially if they are having a hard time relaxing. Almost any couple dancing together will be in good spirits. This also gives you a chance to grab some candid, action shots.

For Children

16. Stare at each other without laughing.

The minute you tell kids to be serious without laughing, you’re more likely to get the opposite effect. This is a simple, yet highly effective way to get kids to smile.

17. Play a game.

If you have the time and the space to get kids to play a game, take advantage of it! Have them play Simon Says, Duck Duck Goose, tag, or any other age-appropriate games that will get them engaged and having fun.

18. On the count of three, jump as high as you can!

Jump shots are always fun for kids and even certain types of adults. Make it more fun and engaging by turning it into a jumping contest to see who can jump the highest.

20 Tips for Getting People to Smile for a Photo

19. Stick your tongue out.

Admittedly, photos of kids sticking their tongues out often aren’t what you’re trying to achieve. But if you stick your tongue out at them or turn it into a game of who has the longest tongue, this can lead to laughs and smiles, which you definitely want to capture in photos.

20. Bunny ears.

You may not even have to ask kids to do this for you. Bunny ears seem to be a universal photo prank that even adults play on each other and seem to find funny.

In Conclusion

There you have it, 20 ideas to help people smile for a photo. Get out there and try some of these techniques and see how they go! But always be sure to gauge how your photo subjects are reacting to your suggestions. You might have to adjust your tone of voice and photo directions for different types of people.

Have any ideas to add to the list? Mention them in the comments below!

The post 20 Tips for Getting People to Smile in Photos by Suzi Pratt appeared first on Digital Photography School.


Digital Photography School

 
Comments Off on 20 Tips for Getting People to Smile in Photos

Posted in Photography


Nikon in legal tussle with ASML and Carl Zeiss over alleged patent infringements

29 Apr

On Monday this week Nikon initiated legal action against the Dutch company ASML Holding NV, which is one of the market leaders in the field of semiconductor lithography machines. Germany’s Carl Zeiss AG is ASML’s optical supplier. Nikon said both companies were using its lithography technology without permission and that it was seeking damages and to prevent ASML and Zeiss from selling the technology.

Nikon and ASML have contested IP rights for more than fifteen years, as ASML has come to dominate several aspects of the market for semiconductor manufacturing equipment previously divided up primarily between Nikon and Canon.

In first statements both companies called Nikon’s legal action unfounded and categorically denied any infringements. A spokesperson for ASML said the company had repeatedly attempted to negotiate an extension of a cross-license agreement with Nikon.

Now ASML and Carl Zeiss have teamed up to counter-sue Nikon and are both filing legal claims against Nikon for the infringement of more than 10 patents. Peter Wennink, ASML President and Chief Executive Officer, said the following in the company’s issued statement:

We have no choice but to file these countersuits. We have tried for many years to come to a cross-license agreement that reflects the increased strength of our patent portfolio. Unfortunately, Nikon has never seriously participated in negotiations. Now that Nikon has decided to take this dispute to court, we also have to enforce our patent portfolio, and we will do this as broadly as possible.

Both ASML and Carl Zeiss have issued press releases on the matter. It seems this is a legal dispute that could go on for quite some time, and not the first one involving these three parties either. According to Nikon, ASML and Carl Zeiss paid it $ 87 million and $ 58 million respectively in 2004. We’ll keep you updated on any future developments.

Articles: Digital Photography Review (dpreview.com)

 
Comments Off on Nikon in legal tussle with ASML and Carl Zeiss over alleged patent infringements

Posted in Uncategorized


Acer unveils 31.5″ 4K display for image editors and other creatives

28 Apr

At its Acer Next event in New York City the Taiwanese electronics manufacturer has unveiled its new 31.5″ ProDesigner PE320QK display. The new monitor features super-thin bezels and, looking at the impressive specifications, is clearly targeted at image editors and other creatives. It offers 550 nits of brightness at 4K (3840 x 2160 pixels) resolution and has an enhanced color gamut, supporting 130 percent of the sRGB and 95 percent of the DCI-P3 color spaces. Response time of the display is 4 milliseconds, with a 100 million to 1 contrast ratio.

In terms of connectivity there are two HDMI 2.0 ports, audio out, a DisplayPort 1.2, a USB 3.1 type C input, and four USB 3.1 Type C outputs which are suitable for peripherals and support power delivery of up to 85W. The display also comes with a pair of 2W speakers and a removable anti-glare hood. Unfortunately Acer has not provided any information on pricing and availability yet. 

Articles: Digital Photography Review (dpreview.com)

 
Comments Off on Acer unveils 31.5″ 4K display for image editors and other creatives

Posted in Uncategorized