RSS
 

Archive for March, 2016

Sleep with Sharks: 10 of the World’s Most Extreme AirBNBs

31 Mar

[ By Steph in Boutique & Art Hotels & Travel. ]

airbnb shark suite

After a long day of traveling and sightseeing, how does a relaxing evening sleeping in a shark tank, a subterranean vault filled with human skeletons or the trunk of a Tesla sound? Some of the weirdest and most unique listings to ever be offered on AirBNB.com include actual museums, stunning ruins, a three-dimensional recreation of a Van Gogh painting, a hippie paradise and a hotel where giraffes stick their necks through the windows to steal your breakfast.

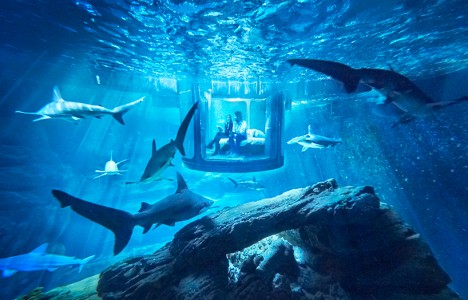
Glass Shark Suite, Paris
airbnb shark suite 2

airbnb shark suite 3

airbnb shark suite 4

airbnb shark suite 6

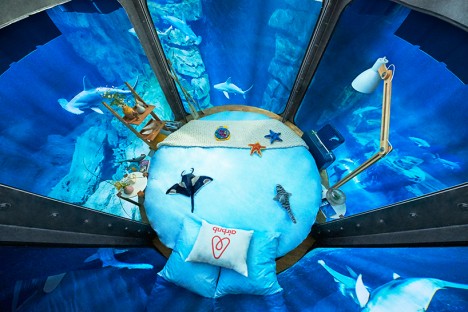
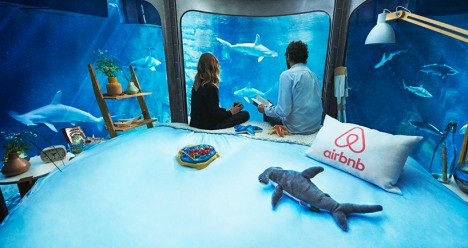
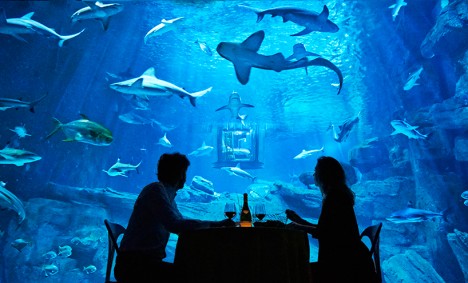
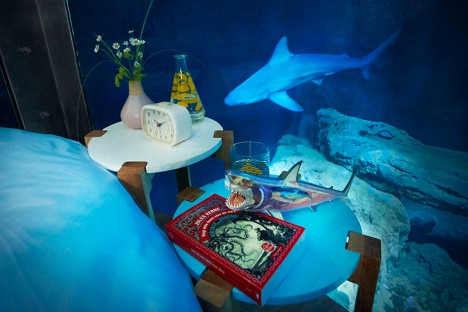
It’s probably best if you don’t have a shark phobia prior to renting this AirBNB room at the Paris Aquarium, since the marine predators are virtually all you’ll be able to see all night. Just large enough for a circular bed for two guests, this glass room suspended inside the tank provides 360 degree views of 35 live sharks. Guests will get an intimate education on the lives of the animals from fervid and underwater photographer Fred Boyle, and can even enjoy their meals from another vantage point outside the aquarium. It’s open for just three nights in April and will then serve as an observation area for biologists.

Paris Catacombs
air bnb paris catacombe 3

airbnb catacombe 2

airbnb catacombe

airbnb paris catacombes 4

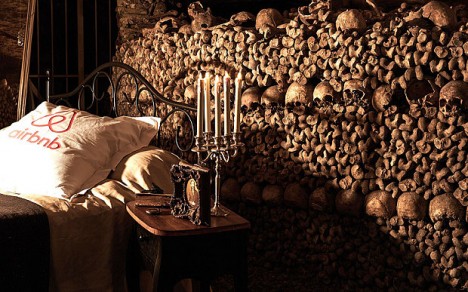
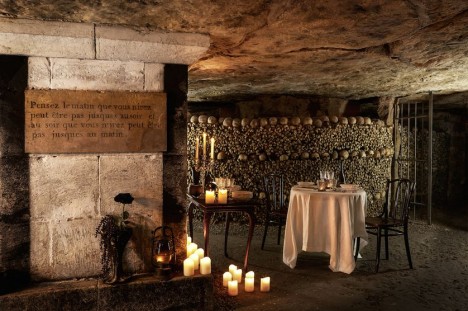
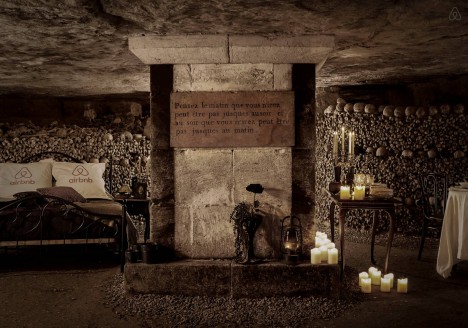
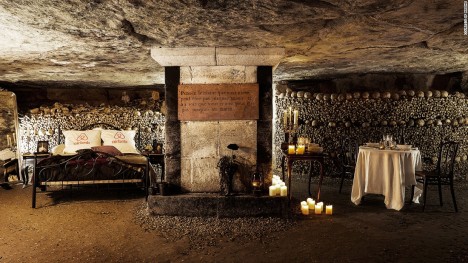
You’d have to be fairly free of superstitions to get a decent night’s sleep right beside a wall of human remains, but for those brave enough, a night in the bowels of Paris is surely an unforgettable experience. On Halloween night, some lucky AirBNB contest winners got to take a tour of the city’s famous catacombs, enjoy a gourmet meal and a private concert “in some of the most incredible acoustics under the earth,” listen to a storyteller’s frightening tales about this subterranean hall of the dead, and then become the only living people to wake up there.

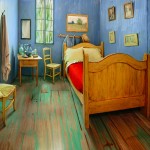
Van Gogh’s Bedroom, Chicago
airbnb van gogh 1

airbnb van gogh 2

air bnb van gogh 3

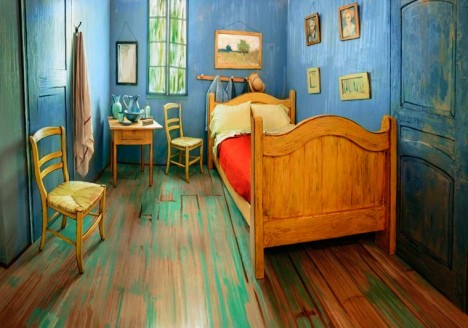
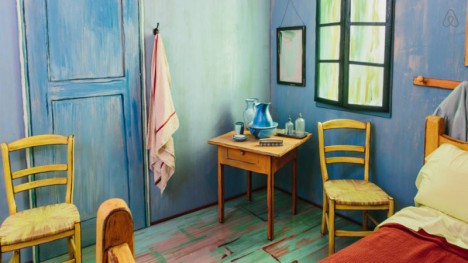
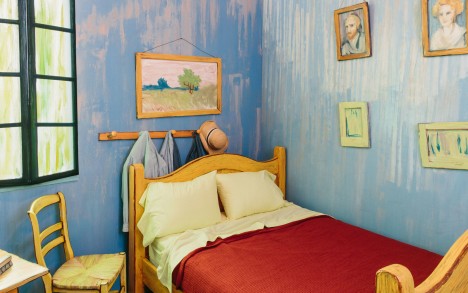
Step inside a Van Gogh painting, lay down in his slightly irregular bed and gaze at the walls and floors faithfully recreated in his own iconic brush strokes with this AirBNB offering from the Art Institute of Chicago. Recreating the Dutch artist’s famous ‘Bedroom,’ the exhibit rents for just $ 10 per night and aims to drum up interest in the original painting, which has long been an icon of the museum’s permanent collection. The nightly rate includes tickets to the museum.

Mirrored House, Pittsburgh
airbnb mirrored house

airbnb mirrored house 2

airbnb mirrored house 3

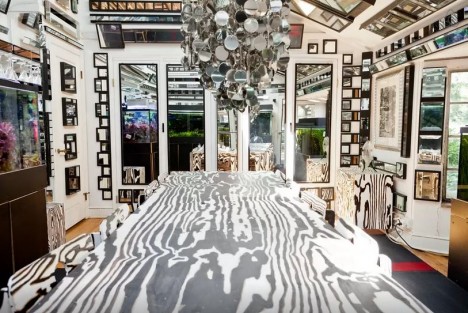
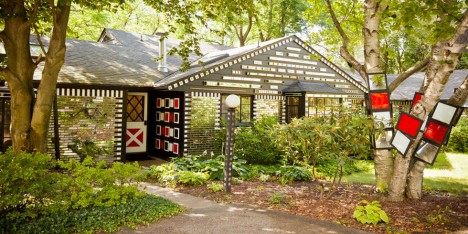
You kind of have to enjoy gazing at your own reflection to enjoy staying in this curious mirrored funhouse of a rental listing in the Pittsburgh suburb of Fox Chapel. Created by an artist, the house is like a giant habitable disco ball, with mirrors adhered to both the exterior and interior surfaces. The dining room is the crown jewel of the space, with a central aquarium reflected in all of the wall-mounted mirrors and chandeliers. The rental appears to no longer be available.

House of Collections, Brooklyn
airbnb collection

airbnb collections 2

airbnb collections 3

airbnb collections 4

airbnb collections 5

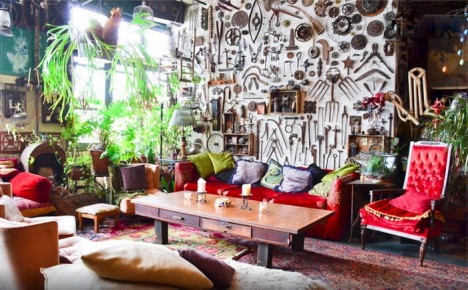
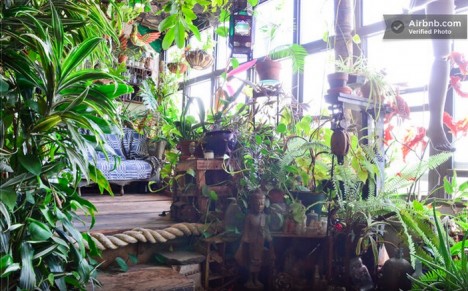
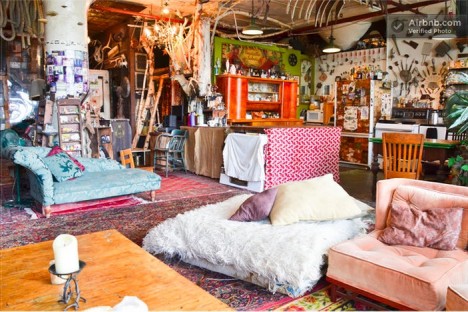
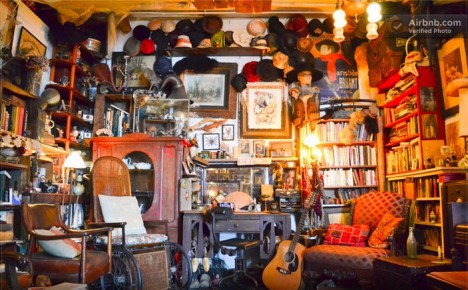
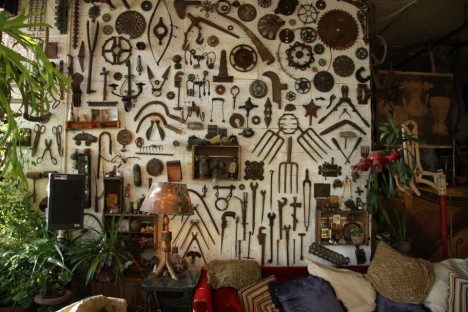
Like one big cabinet of curiosities, Brooklyn’s House of Collections features artfully arranged and carefully chosen objects on every imaginable surface, from patterns of rusted farm tools on the living room wall to cow bones hung beside historic local treasures. There are at least seventy house plants, exotic textiles, books, musical instruments, antique furniture and almost any kind of tchotchke you can imagine. Though it may look like an antique store, it’s a private residence, rented out occasionally to lucky AirBNB guests.

Next Page – Click Below to Read More:
Sleep With Sharks 10 Of The Worlds Craziest Airbnbs

Share on Facebook


[ By Steph in Boutique & Art Hotels & Travel. ]

[ WebUrbanist | Archives | Galleries | Privacy | TOS ]


WebUrbanist

 
Comments Off on Sleep with Sharks: 10 of the World’s Most Extreme AirBNBs

Posted in Creativity


First sample images from 20MP Sony Cyber-shot RX10 III

31 Mar

DPReview is in San Francisco checking out the new Cyber-shot RX10 III. The RX10 III maintains the ergonomics and key specifications of its predecessor, but incorporates a massive 24-600mm equivalent F2.4-4 lens. We’ve been doing some shooting with the camera in a range of different situations, and we’ve created a (JPEG only, for now) gallery. 

Articles: Digital Photography Review (dpreview.com)

 
Comments Off on First sample images from 20MP Sony Cyber-shot RX10 III

Posted in Uncategorized


Cairo’s Trash Capital Gets Colorful with Massive Anamorphic Mural

31 Mar

[ By Steph in Art & Street Art & Graffiti. ]

cairo street art

One of Cairo’s seven settlements of the Zabbaleen, garbage collectors who make their living picking through and efficiently recycling the city’s trash, has gotten a little brighter with the addition of a massive multi-building mural that only comes into focus from a particular perspective. ‘Calligraffiti’ artist eL Seed organized a community-wide effort to paint sections of the mural onto the walls of 50 structures, blending arabic calligraphy with contemporary graffiti style. The work spells out a quote by Saint Athanasius of Alexandria, who said “Anyone who wants to see the sunlight clearly needs to wipe his eye first.”

cairo street art 4

cairo street art 7

It’s not clear how many of the city’s inhabitants can actually access the spot on Mokattam Mountain where the various pieces of the mural actually come together into a cohesive whole, but it has certainly added some vibrancy to their neighborhood of Manshiyat Nasr. In photos of the mural, you can clearly see the trash bags piled high on the roof of virtually every building in the frame, and the streets look much the same.

cairo street art 3

cairo street art 5

‘Zabbaleen’ literally translates from Egyptian Arabic as ‘garbage people,’ and their community is known throughout the world as ‘Garbage City.’ Over 90 percent of their 20,000-30,000 population is Coptic Christian. They’ve supported themselves by processing Cairo’s trash for decades, using donkey carts and pickup trucks to transport it. Organic waste is fed to pigs and their recycling rate is an impressive 80 percent (compare that to the Western world’s average of 20 to 25 percent.) Their way of life is currently under threat due to Cairo authorities’ decision to transfer trash contracts to three multinational disposal companies.

cairo street art 2

“The Zaraeeb community welcomed my team and I as if we were family,” says eL Seed. “It was one of the most amazing human experiences I have ever had. They are generous, honest and strong people. They have been given the name of Zabbaleen (the garbage people,) but this is not how they call themselves. They don’t live in the garbage but from the garbage, and not their garbage, but the garbage of the whole city. They are the ones who clean the city of Cairo.”

Share on Facebook


[ By Steph in Art & Street Art & Graffiti. ]

[ WebUrbanist | Archives | Galleries | Privacy | TOS ]


WebUrbanist

 
Comments Off on Cairo’s Trash Capital Gets Colorful with Massive Anamorphic Mural

Posted in Creativity


Google Photos for Android updated with non-destructive editing

31 Mar

Google has launched version 1.17 of its Google Photos for Android app and the update brings an important improvement: non-destructive editing. Read more

Articles: Digital Photography Review (dpreview.com)

 
Comments Off on Google Photos for Android updated with non-destructive editing

Posted in Uncategorized


Fotodiox introduces extra large WonderPana Free Arc system for Canon EF 11-24mm wide zoom

31 Mar

$ (document).ready(function() { SampleGalleryV2({“containerId”:”embeddedSampleGallery_4391102760″,”galleryId”:”4391102760″,”isEmbeddedWidget”:true,”standalone”:false,”selectedImageIndex”:0,”startInCommentsView”:false,”isMobile”:false}) });

US accessory manufacturer Fotodiox has announced an XL version of its WonderPana Free Arc filter system for wide angle lenses that it says is designed specifically to allow users of the Canon EF 11-24mm F4L USM lens to use filters over the front element. The Canon super-wide zoom has no filter thread of its own and the front element is heavily convex, so fitting filters in the traditional way is impossible. The WonderPana Free Arc system positions a filter holder over the front of the lens that takes 186mm screw-in filters and/or 80mm rectangular filter sheets. The holder is enormous so that large filters can be used to avoid vignetting when the lens is used at its widest setting.

The Free Arc clamps the hood of the lens between its collar and the screw-on filter-holding cone, and provides a 186mm thread for the company’s screw-in filters. A set of brackets can also be attached to the cone that allow two square filters to be fitted as well. The system makes it possible to fit one round filter and one square filter at the same time, and the whole filter stage is rotatable so graduated filters can be positioned to suit the subject.

The Fotodiox WonderPana Free Arc XL costs $ 225.95 and the 183mm filters start at $ 99.95. For more information visit the Free Arc page on the Fotodiox website.


Wide? Ultra-wide? WonderPana has you covered.

Ultra wide-angle lenses are typically impossible to filter due to their bulbous front lens element, lack of filter threads and potential for severe vignetting. The ALL NEWWonderPana FreeArc XL, however, is the latest in our line of aluminum filter collars that let you to attach our massive 186mm filter options, like ND 4-1000 and circular polarizers, to wide and ultra wide-angle lenses.

Perfect for landscape and architectural photographers and filmmakers, we designed the WonderPana FreeArc XL to suit Canon’s new breed of 11-24mm lens. Durable and lightweight enough for hand-held shooting, it can be ready at a moment’s notice to answer any image challenge that requires filters. You can even keep it installed on your lens as a critical layer of lens protection. Just check out our video below to learn more:

Articles: Digital Photography Review (dpreview.com)

 
Comments Off on Fotodiox introduces extra large WonderPana Free Arc system for Canon EF 11-24mm wide zoom

Posted in Uncategorized


Blue Earth Alliance presents Collaborations for Cause 2016

31 Mar

Are you in Seattle in April? Come down to the Seattle Downtown Public Library, on Friday April 15th and Saturday April 16th 9 AM-4 PM, and join our friends the Blue Earth Alliance for Collaborations for Cause 2016.

This year’s Collaborations for Cause theme is “Innovations in Visual Storytelling for Impact.” It’s a rare opportunity for visual storytellers, writers, funders, non-profits, corporations and public agencies to join together as peers: to learn new strategies, tools and ideas to leverage the power of story and effect social change. As well as talks and seminars from photographers, filmmakers and activists, attendees can also pay for three one-on-one portfolio review sessions, at the show. Reserve your tickets from the link below.

Articles: Digital Photography Review (dpreview.com)

 
Comments Off on Blue Earth Alliance presents Collaborations for Cause 2016

Posted in Uncategorized


5 Tips to Take Better Sunset Photos – and Why Not to Photograph the Sunset Directly

31 Mar

As a landscape photographer, I participate in many online groups, and I also teach classes where I get the opportunity to see less experienced photographers’ work. I often see some very good work, but many times I also see missed opportunities. Newer photographers just getting started photographing landscapes often times become so enamored by the colors in the sky, that they neglect other areas of the image. I often see images with weak, underexposed foregrounds, and poor compositions that keep them from being good photos and relegates them to being just pretty snapshots.

Sunset in the background with a starburst

Don’t get the wrong idea. I often photograph at sunrise or sunset. But, the sun or sky is rarely the subject of the photo. It may be an element in the image, but the subject is generally something else. In many ways, it can be more difficult to make a great image at sunset or sunrise, because there is a tendency to be drawn to the pretty colors in the sky. But as photographers, we really need to pay attention to the other elements in the image to ensure we’re creating a complete composition. So below are a few tips to help improve your sunset or sunrise photos.

1- Put the sun in the background

This tip is the most obvious. Sunsets make great backgrounds, but rarely do they make great subjects. You need to find a good foreground. The gorgeous colors in the sky can be so vibrant that they really allow us to see our surroundings differently. The play of light and shadow over objects in the foreground, due to that great directional light given off when the sun is lower in the sky, helps create interest that might not be there in the middle of the day when the sun is higher.

A sunrise in the background adds interest

The best way to do this is to find something of interest right in front of you. Use a wide angle lens, such as the 16-35mm or something around that range, zoom out to as wide as you can, and put your foreground object a few feet in front of you. Stop down and set your aperture to f/11 or smaller, and focus on your foreground object to ensure that it’s sharp. If you want to add some extra interest, try stopping your lens down as far as you can. This will help create a starburst where the sun is, which will add a little extra interest in your scene.

One thing to keep in mind, is that the exposure for your foreground subject and the background exposure, are likely going to be very different. You have a few options here. The first would be to expose once for the foreground, and once for the background, and then blend them together in Photoshop. A great article on blending exposures is 5 Easy Steps To Exposure Blending for High Contrast Landscapes. Next, and generally my preferred method, is to use a graduated neutral density filter to try and darken the bright sky in the background, so that it is more balanced with the foreground subject. Read Using Graduated Neutral Density Filters for Landscape Photography for more on ND Grads.  The last, and easiest option, is to create a silhouette of the foreground objects, while properly exposing the colorful sky and sun in the background.  This works best with a singular object with a distinctive form, such as a bridge, a tree, a distinctive building, or a person in a distinctive pose.

2 – Photograph with the sun at your side

Photograph with the sun at the side

In this case, the sun itself won’t be in your scene at all. The magic of sunsets or sunrises is the soft, warm, directional light they offer. This light can create tremendous light and shadow play within the scene, making textures in your foreground especially desirable. Rocks, logs, trees, grasses, and undulations or patterns on the ground, will create interesting shadows and highlights that draw your viewer’s eye into the scene. In this case, it’s often best to put the sun to your side, so that it rakes across the scene, letting the shadows and highlights play from one side to the other.

Use-Textures-To-Catch-light

With a scene like this, a polarizing filter may help as well, as they are most effective when the camera is aimed 90° from the sun. This will help deepen blue areas of the sky, enhance other colors, and reduce any haze that may be in the scene. You may need to make some choices about exposure, if the contrast between highlight and shadow in the foreground is too great. A graduated neutral density filter can help keep the sky under control if it is still too bright against the foreground.

3 – Keep the sun at your back

Put the sun behind you

At sunrise or sunset, that soft warm light that I mentioned as being great from the side, is also great from behind you. This will help create a soft frontal light on your scene, illuminating all of the details. This is likely to be the easiest exposure of the three situations, in that the light will be very even, with no bright highlight or deep shadow areas in the scene. You’ll likely get soft, warm pastel colors if there are any clouds or haze in the sky to reflect the sun’s light.

Be careful when composing your image, as the sun behind you will cast a long shadow, and you may end up with your own shadow in the photo. To minimize this, try crouching down low, and setting your tripod as low as possible to help shorten the shadow. Also, if using filters for longer exposures, on DSLRs with optical viewfinders, the sun can enter the camera from the rear, affecting your exposure. Take care to cover your viewfinder in these instances.

Sun-At-Your-Back

4 – Arrive early, stay late

You’ll want to get there early for sunrise. The color in the sky can start half an hour, or more, before the sun actually rises, with clouds first showing subtle traces of pink and purple before the red, orange, and yellows appear as the sun breaks the horizon. You’ll want to be set up and ready when that happens, which means trekking through the dark to your location. Advance scouting can be helpful for this.

Stay Late

The same is true at sunset, but in reverse. Just because the sun has gone down, doesn’t mean that the show is over. Generally speaking, the sky will continue to light up, and colors will continue to change for about 30 minutes after the sun goes down. Many photographers have packed up and gone before this happens. Patience will reward you with more subtle color changes, such as reds going to purples and blues, rather than the vibrant yellows and oranges you get during the initial phases of the sunset.

5 – Shoot RAW

More than any other time to shoot, sunset or sunrise creates dramatic colors and fantastic play between light and shadow. Because of that, it can be difficult to try and capture the detail in the shadows or highlights, depending on which way you bias your exposure. A RAW file contains much more information than a JPEG, which will allow you to bring out the details in shadow and highlight areas that may be lost if shooting JPEG files. In addition, shooting RAW files allows you to adjust your white balance in processing to give you better control over the overall tone of the image.

For more on processing RAW files, check out Understanding the Basic Sliders in Adobe Camera RAW, and for more on why you might want to consider photographing in the RAW format, see 5 Reasons To Shoot Your Landscape Images in RAW.

What’s your favorite sunrise or sunset photography tip? Please post your tips and images in the comments below!

googletag.cmd.push(function() {
tablet_slots.push( googletag.defineSlot( “/1005424/_dPSv4_tab-all-article-bottom_(300×250)”, [300, 250], “pb-ad-78623” ).addService( googletag.pubads() ) ); } );

googletag.cmd.push(function() {
mobile_slots.push( googletag.defineSlot( “/1005424/_dPSv4_mob-all-article-bottom_(300×250)”, [300, 250], “pb-ad-78158” ).addService( googletag.pubads() ) ); } );

The post 5 Tips to Take Better Sunset Photos – and Why Not to Photograph the Sunset Directly by Rick Berk appeared first on Digital Photography School.


Digital Photography School

 
Comments Off on 5 Tips to Take Better Sunset Photos – and Why Not to Photograph the Sunset Directly

Posted in Photography


Cyber-shooting: Sony Cyber-shot RX10 III video overview

30 Mar

Sony’s new superzoom may look a lot like its predecessor, but an updated 24-600mm lens makes the Cyber-shot RX10 III a much more versatile camera – in theory. We’ve been able to spend a bit of time getting to know the camera’s new features and putting its long zoom range to work. Take a look at what’s new to the RX10 series in our video overview.

Articles: Digital Photography Review (dpreview.com)

 
Comments Off on Cyber-shooting: Sony Cyber-shot RX10 III video overview

Posted in Uncategorized


7 Fun Strategies to Maximize Your Enjoyment of Photography

30 Mar

Get 25% OFF James’ ebooks: Essentials of Street Photography & Street Photography Conversations eBook Bundle now for a limited time only at Snapndeals.

Williamsburg, Brooklyn.

If you are reading this, I assume that you enjoy photography enough already. You’re here, after all. However, you can always enjoy it more – so I wanted to create this list of somewhat uncommon practices, that have kept me going over the years, and kept me passionate about photography.

1. Start a three day a week, neighborhood project

365 day photo projects are a fantastic way to gain some consistency in your life with photography, which is a key to enjoying it to the fullest. However, I want to take the pressure off a little bit with the everyday. You don’t have to come up with a good photograph every single day, although if you are able to do so, more power to you. Set aside a handful of sessions during the week, as if you were going to the gym. Think about is as if it were the gym. At first it might take some getting used to, but eventually it will become second nature.

While you strive for some consistency in how often you photograph, seek out similarity in what, and where you photograph as well. Go back to the same areas over and over again, and you will find that you will start to notice new things. This commitment and consistency will help you achieve a level of imagery that is tough to reach otherwise. Photograph within your daily life, at the places that you are the most intimate with. Use photography as a way to escape and relax, without actually having to go anywhere.

2. Get lost and strike up a conversation

St . Marks Place

While photographing the areas that you are familiar with is very important, go even further. You do not need to have a set destination in mind, just pick a direction and go. Explore different routes each time. I consider photography to be an extension of walking. If there were no cameras, I’d probably still walk, and get lost sometimes. Having the camera to document what you see is just a bonus.

Don’t slink around, and make sure to say hello to people along the way. Tell them what you’re doing, and offer to take a photo of them. It’s fun, and most people will like the idea that you’re out getting lost and photographing. The camera is a great excuse to meet, connect with, and to photograph new people.

3. Don’t worry about people wondering what you’re doing

New York City

Have you ever stopped to photograph a reflection in a puddle, and then looked up to have someone staring at you quizzically, wondering what you could possibly be doing by photographing a puddle.

Forget that person. Some of the best, most beautiful, most interesting, and unique photographs are of things that can seem very mundane when you capture them. Embrace this, because it’s really fun, and keep yourself from worrying about what other people think when you are out there. Otherwise it can make you feel bad about taking images that are actually different from the norm and interesting.

Similarly, you should not worry about what people will think when they see your prints. You cannot be a good photographer without some people disliking some of your work. Do what interests you, without worry about other people’s perceptions, and you will be a better and happier photographer.

The image to the right is one that I personally enjoy. It is probably not the type of image that will stand out as much as the rest in Instagram, but there are a lot of interesting details, textures, and tones here. It’s unique. This is one that I have learned to expect not everyone to love – but some will, and I do.

4. Go to gallery shows, and get lost in the photography section of bookstores

Viewing the work of other artists will keep you inspired, and will renew your passion for photography. It will also give you a better idea of what you are capable of creating, particularly during times of frustration.

In addition to this, start a photography book collection. There are a lot of expensive photography books available, but there are just as many important ones that are affordable. Save a little money each month to build your collection, and it will help inspire you.

5. Light, light, light

Lower East Side Snowstorm

I am not referring to the light you look at, but the amount of equipment that you go out with. One, light lens is all you need. Get rid of the fear of missing out, or that you brought the wrong lens. Pick one, leave the huge bag at home, and have some fun. Use a camera phone sometimes. You will be able to go a lot farther with less gear, have a lot more spring in your step, which will lead to much better images and enjoyment.

6. Simplify your editing

Ugh… editing!

Editing can be exciting, but only when you do it the right way. I know a lot of people who have so much fun shooting, then they upload thousands of photos over months, and they get bogged down in the thought of editing. It causes them to procrastinate, and ruins the fun they had when shooting.

This is why I am a strong believer in having an efficient and organized Lightroom catalogue, but it is SO easy to do. Come back, upload a day of photos to Lightroom, and just give five-stars to your top five photos from the day. I go a little further than this, and give three, four, and five stars, but you don’t have to do that.

Even if you are the best photographer in the world, traveling in the most exotic place, you probably will not get more than five portfolio worthy pieces in a single day. So forget the middling stuff – you can come back later to search for diamonds in the rough. Just spend your time figuring out your favorite five.

Suddenly, your archive will be slimmed down so much, and this will make it much more fun to edit. Instead of looking at a mountain of thousands of images from a year, with just a small amount of work up front, you will have the top 100 images from a year, ready to go. Then grab a glass of wine (or your favorite beverage), and start making them look pretty.

7. Print!
Flower, East Village.

What’s the fun in photography if you don’t print? Take a day, get on the floor, and print out as many images as possible. If you don’t print yourself, use a service and go crazy. Force yourself to have some dedicated time to do this, or it can become so easy to procrastinate and forget about it. Printing is tough to do well in 30 minute increments, so that’s why I suggest taking half a day and having fun with it.

Then give the photos to friends! Don’t hoard them. You made them for people to enjoy, right? So give out 5x7s and 8x10s to people close to you. This is one of the hidden beauties of photography, creating something you love, and giving it to someone who will appreciate it.

Please make sure to comment below if you have some additional tips that you use, as I’m sure we would all like to hear about them.

Get 25% OFF James’ ebooks: Essentials of Street Photography & Street Photography Conversations eBook Bundle now for a limited time only at Snapndeals.

googletag.cmd.push(function() {
tablet_slots.push( googletag.defineSlot( “/1005424/_dPSv4_tab-all-article-bottom_(300×250)”, [300, 250], “pb-ad-78623” ).addService( googletag.pubads() ) ); } );

googletag.cmd.push(function() {
mobile_slots.push( googletag.defineSlot( “/1005424/_dPSv4_mob-all-article-bottom_(300×250)”, [300, 250], “pb-ad-78158” ).addService( googletag.pubads() ) ); } );

The post 7 Fun Strategies to Maximize Your Enjoyment of Photography by James Maher appeared first on Digital Photography School.


Digital Photography School

 
Comments Off on 7 Fun Strategies to Maximize Your Enjoyment of Photography

Posted in Photography


Hands on: Sony FE 50mm F1.8 and 70-300mm F4.5-5.6

30 Mar

Hands on: Sony FE 50mm F1.8 and 70-300mm F4.5-5.6

Sony’s already had a busy year, and it just got even busier with the announcement of an update to its RX10 series and two new FE lenses: the 50mm F1.8 and 70-300mm F4.5-5.6 OSS. We got to take a first look at them at a press event in San Francisco. 

Hands on: Sony FE 50mm F1.8 and 70-300mm F4.5-5.6

The FE 70-300mm F4.5-5.6 is the first full-frame E-mount lens to reach 300mm. It offers SteadyShot stabilization, as evidenced by the OSS on/of switch seen here. 

Hands on: Sony FE 50mm F1.8 and 70-300mm F4.5-5.6

The 70-300mm offers a minimum focus distance of 0.9m/2.9ft, a zoom locking mechanism and dust and moisture resistance. It’s fairly compact when used at the wide end…

Hands on: Sony FE 50mm F1.8 and 70-300mm F4.5-5.6

…and extends quite a bit to reach that 300mm mark. For the extremely curious, we noted that the lens maintains its widest F4.5 aperture until the 85mm mark, when F5 becomes the widest option. This changes again at 157mm, at which point it stops down to F5.6.

Hands on: Sony FE 50mm F1.8 and 70-300mm F4.5-5.6

Sony has posted MTF charts for the 70-300mm, and they show that this lens might be a cut above the typical telezoom. The 70-300 will go on sale in May for $ 1200.

Hands on: Sony FE 50mm F1.8 and 70-300mm F4.5-5.6

And now, something a little different: the Sony FE 50mm F1.8. At $ 250 it’s going to be a much more wallet-friendly option than its 55mm F1.8 Zeiss-branded counterpart.

Hands on: Sony FE 50mm F1.8 and 70-300mm F4.5-5.6

The 50mm features a 7-blade circular aperture and offers a 0.45m/1.45ft minimum focus distance. Sony emphasizes its compact and lightweight design and indeed, the lens weighs in at a svelte 186g/6.6oz.

Hands on: Sony FE 50mm F1.8 and 70-300mm F4.5-5.6

Here’s another view of that 7-blade aperture. The lens comprises six elements in five groups, including one aspherical element. Like the 70-300mm, it’s expected to ship in May. 

Articles: Digital Photography Review (dpreview.com)

 
Comments Off on Hands on: Sony FE 50mm F1.8 and 70-300mm F4.5-5.6

Posted in Uncategorized