RSS
 

Archive for June, 2017

Blackmagic Design slashes Video Assist prices

28 Jun

Blackmagic Design has dropped the prices of its Video Assist external monitor/recorders for a limited time. The smaller, 1080-capable model with its 5″ screen has $ 100 knocked off its price, taking it down to $ 395 while the 7″, Video Assist 4K drops $ 300 to a price of $ 595.

We recently took a look at the benefits of using an external monitor/recorder, and have been pretty impressed with our experiences of using the Video Assist 4K thus far.

The company has given no further details of the firmware update which promises the addition of Waveform and Vectorscopes, which was due to be released in June. We’ll be publishing a review once the update is available.

Press Release:

Blackmagic Design Announces Summer Special Price for Video Assist and Video Assist 4K

Fremont, California – June 27, 2017 – Blackmagic Design today announced a new summer special promotion for Blackmagic Video Assist and Blackmagic Video Assist 4K. During this promotion, customers can save US$ 100 on the purchase of a Blackmagic Video Assist, and US $ 300 on the purchase of a Blackmagic Video Assist 4K. That means Blackmagic Video Assist can now be purchased for only US $ 395 and Blackmagic Video Assist 4K can be purchased for US$ 595 from Blackmagic Design resellers worldwide while stocks last.

The Video Assist summer special makes it easier than ever for customers to add professional monitoring and broadcast quality recording to any SDI or HDMI camera. With the new summer special pricing for limited stock, customers will be able to buy a Video Assist for each of their cameras.

The Blackmagic Video Assist family of products gives customers better monitoring and higher quality recording than is available on many cameras. Older cameras often feature custom and hard to use file or tape formats, while lower cost consumer cameras often have poor quality file formats and small screens, limiting their professional use. Blackmagic Video Assist solves this problem because it works with every type of camera from DSLRs to older tape based camcorders, and even the latest digital film cameras. Customers get a large professional on set monitor, along with 10-bit broadcast quality ProRes and DNxHR recording.

In addition to professional monitoring and recording, the Blackmagic Video Assist 4K model will also support powerful built in scopes such as a waveform monitor, RGB parade, vectorscope and histogram in the upcoming Video Assist 2.5 Update, along with extremely high fidelity audio recording and microphone inputs.

“Video Assist is an incredibly versatile tool and has become an indispensable part of everyone’s production kit,” said Grant Petty, Blackmagic Design CEO. “It’s the perfect portable field monitor and recorder, and now customers can get them at an even lower price so they can add them to all of their cameras while stocks last!”

Blackmagic Video Assist 4K Key Features

  • 7 inch LCD touch screen with 1920 x 1200 high resolution monitor.
  • Professional 10-bit 4:2:2 ProRes or DNxHD recording up to Ultra HD 3840 x 2160p30
  • Dual high speed UHS-II SDHC card recorders use readily available, inexpensive SD card media.
  • Dual recorders allow non-stop recording and provide a backup if one fails.
  • 2 mini XLR connectors with 48V phantom power for connecting microphones.
  • -128dBV electrical noise floor for high quality audio recording.
  • LANC connection for remote control.
  • Auto start/stop recording using HDMI or SDI triggers.
  • Includes slots for 2 hot pluggable batteries as well as 12V DC power input.
  • Full compatibility with editing software such as DaVinci Resolve, Final Cut Pro X, Avid and Premier Pro.
  • All in one design, mount to cameras, hold in your hand or set up on a table with the included kickstand.
  • Includes 6G-SDI input allowing it to be used as an Ultra HD monitor.

Blackmagic Video Assist Key Features

  • 5 inch LCD touch screen with1080p high resolution monitor.
  • Professional 10-bit 4:2:2 ProRes and DNxHD recording in HD.
  • Includes slots for 2 hot pluggable batteries as well as 12V DC power input.
  • Full compatibility with editing software such as DaVinci Resolve, Final Cut Pro X, Avid and Premiere Pro.
  • All in one design, mount to cameras, hold in your hand or set up on a table with the included kickstand.
  • Includes 6G-SDI input with downconverter allowing it to be used as an Ultra HD monitor.

Availability and Price

Blackmagic Video Assist is available for US$ 395 and Blackmagic Video Assist 4K is available for US$ 595 during the Summer Special promotion, with limited stock now available from Blackmagic Design resellers worldwide.

Articles: Digital Photography Review (dpreview.com)

 
Comments Off on Blackmagic Design slashes Video Assist prices

Posted in Uncategorized


How To Shoot A Compelling Photo Essay

28 Jun

I frequently encourage people who attend my photography workshops to approach the day as though they have been assigned to shoot for a magazine editor and need to provide a strong series of images for a photo essay. One of the locations we visit is the local fresh market here in Chiang Mai, Thailand, so I’ll use images from this market to illustrate the point in this article.

How To Shoot A Compelling Photo Essay

The time it takes you to create a photo essay may be determined somewhat by your chosen subject. If you’re photographing your child’s birthday party, a social gathering at work, or a football match, you will have time constraints. With other subjects, you may have the luxury of being able to return many times over a period of days, weeks, or months to continue building your pictorial story. Whatever you choose as your subject you will be able to apply the points in this article to help you produce a strong series of photographs that a picture editor would welcome.

Approach to making photo essay

There are two main ways of approaching a photo essay – thematically or narratively.

How To Shoot A Compelling Photo Essay

I’ve chosen a series of images for my photo essay here with a thematic structure, showing the market as the overall theme. You may like to choose a narrative structure and tell a story with a beginning, middle, and end. To follow a narrative storyline at the markets I could choose to follow someone who arrives to do the buying for their restaurant, follow one of the porters who haul produce for shoppers or spend time with a vendor documenting their daily routine.

Whether you take a thematic or narrative approach, applying some basic guidelines to the way you shoot and how you make your final selection of photos will result in a strong series of images.

You want to look for three types of images; wide, medium, and close-up. By shooting these three image types you will build up a broader perspective on your subject.

Wide Shots

Photo essay tips 01

At a market, I’m always looking to capture a great wide shot showing the lively hustle and bustle and feel of the overall vibe of the market. This is difficult to capture because I have no control over what’s happening. It’s important in situations like this to take your time. Find a good location where the lighting and background are pleasing and you will not be obstructing anyone, and shoot a lot. Be observant.

Watch and see the flow of what’s happening and anticipate the best time to shoot. If your chosen subject is more static you might want to include a single prominent feature in some of your wide shots. For example, if you are making a photo essay of your local park, try including one of the park benches, a drinking fountain, or a flowerbed in your wide compositions rather than taking just a wide shot with no main focus.

Medium Shots

Medium shots are best composed with one main subject as the focus, and including relevant aspects of the location as well. These shots will show a more intimate view of your subject, draw the viewer deeper in, and help them connect with your story.

At the markets, I like to shoot environmental portraits, often of the people who work there. Including some of their surroundings supports the theme by developing the context of my story.

How To Shoot A Compelling Photo Essay

Showing the mango vendor with her cart, produce, scales, and umbrella helps build the essay more than if I was to crop in tight and to make a portrait of only her.

How To Shoot A Compelling Photo Essay

Including some action in these shots makes for interesting photos too, as with this photo (above) of the butcher sharpening his knife. Neither of these photos was posed, but sometimes it’s a good idea to take a little control of the situation and ask someone to pause so you can make a portrait.

How To Shoot A Compelling Photo Essay

I asked this fishmonger with the lovely smile tray of smoked mackerel to pose for me.

Close-Up Shots

Coming in close to capture the details will definitely add depth to your photo essay. Look for elements to include in your close-up compositions that others may overlook. Single colors, patterns, and textures all work well as close up shots.

How To Shoot A Compelling Photo Essay

How To Shoot A Compelling Photo Essay

How To Shoot A Compelling Photo Essay

How To Shoot A Compelling Photo Essay

The neatly stacked fish in the blue plastic tub, the basket of (live) frogs, the bundle of soup ingredients for 5 baht and the bunch of flowers made from pandan leaves all add variety and interest to my market photo essay.

If you’re photographing a birthday party your close-up shots may be of the detail on the cake, some of the wrapped or unwrapped gifts, or tightly cropped happy children’s faces. Look for detail shots which fit in with the overall feel of your photo essay.

Other Considerations

As you are shooting, consider how your images will fit in with your overall story. Think about the five “W” questions – who, what, where, when, and why. Answering them with your photos will build up a very good impression for someone viewing your photo essay or picture story.

How To Shoot A Compelling Photo Essay

How To Shoot A Compelling Photo Essay

Traditionally, this market is where the people of Chiang Mai have gotten food. The market is over 160 years old, so it has real character.

When you’re shooting your photo essay be aware of the overall tone and feeling of the situation you are photographing. Become a part of it, not an outsider with a camera, and you will produce more intimate, interesting photographs. If you have time on your side, even consider visiting the location where you’ll make your photo essay without a camera. Doing this will give you a different perspective and may help you connect with your subject more easily.

Choosing Your Photos

Once you’ve completed your shoot and have downloaded the photos to your computer, begin by discarding any that are technically inferior. You don’t want to include shots which are out of focus, poorly exposed, or your timing was off. Remember, you are aiming to please the photo editor of a magazine (just pretend this is the case, even if you are shooting just for yourself, it will help you to have this mindset) and they will reject any images not up to their technical standards.

Photo essay tips 13

Photo essay tips 14

Take your time to look over your photos. Grouping them into the three types, wide, medium and close-up will help your decision-making process. Compare your photos within these groups and look for the strongest pictures that support your overall story. Think about how they might be laid out on the pages of a magazine and what they will communicate to someone viewing them that is not familiar with the subject of your photo essay. Finally, you will want to choose one main shot to be the feature image. The one you are most happy with that best conveys your feeling for the story you are telling.

Conclusion

So even if you have no aspirations to shoot for a magazine, this is a good exercise to help you put together a better photo essay. Consider printing a book or your completed project for yourself or to share with friends or fellow travelers.

Please put your comments and questions in the space below, and share your photo essay images.


The post How To Shoot A Compelling Photo Essay by Kevin Landwer-Johan appeared first on Digital Photography School.


Digital Photography School

 
Comments Off on How To Shoot A Compelling Photo Essay

Posted in Photography


2017 iPhone Photography Award Winners Announced

28 Jun
The grand prize (left), first place (top right), and second place (bottom right) winners of the 2017 iPhone Photography Awards. Photos courtesy of IPPA, individual credits below.

When the iPhone Photography Awards were established in 2007, the first iPhone had just been released and its 2MP images were… well, they were nothing to write home about. Fast-forward to 2017, and the winners of this year’s 10th annual IPPAs are stunning, taking full advantage of a decade’s technological advancement.

This year’s winners were selected from ‘thousands’ of entries that poured in from over 140 countries around the world. Let’s take them one by one:

Grand Prize

This year’s grand prize and title of iPhone Photographer of the year went to Sebastian Tomada for his photograph titled ‘Children of Qayyarah’. Photo © Sebastian Tomada

The grand prize winner, titled ‘Children of Qayyarah’, was captured by Sebastian Tomada, a photojournalist based in New York City and the Middle East.

As the title suggests, the image was captured in Qayyarah, Iraq. It was shot on November 4th, 2016 after Islamic State militants set fire to oil wells in the city. The image was captured with an iPhone 6s.

1st Place

First place went to photographer Brendan O Se from Ireland, for her striking photograph titled ‘Dock Worker’. Photo © Brendan O Se

Photographer Brendan O Se—a university teacher/teacher trainer in Cork, Ireland—was awarded 1st place in the competition for his portrait of hands titled ‘Dock Worker’.

The photograph was taken on an early morning walk around the docks in Jakarta in April of 2016. “These were the hands of a dock worker who was taking a break,” says O Se. “I was struck by the texture created by the accumulated dirt on his hands.”

This photo was also taken with an iPhone 6s.

2nd Place

Second place was awarded to photographer Yeow-Kwang Yeo of Singapore for his portrait titled ‘The Performer’. Photo © Yeow-Kwang Yeo

Coming in 2nd behind O Se and Tomada is photographer Yeow-Kwang Yeo, formerly a Mechanical Engineer and Business Administrator who decided to change tracks and devoted himself entirely to photography in 2007.

His photograph, ‘The Performer’, was captured at a performance of traditional Chinese street opera.

“Instead of shooting their performance, I decided to go the back of the stage to capture the performers’ preparation activity,” says Yeo. “I spotted this experience performer who is taking a short rest and was waiting for his turn to perform. I was attracted by the lighting of the old plastic curtain, electric fan, and the overall calm atmosphere.”

The photo was captured with an iPhone 6 Plus.

3rd Place

Third place in the overall competition was awarded to photographer Kuanglong Zhang of Shenzhen, China for his image ‘The City Palace’. Photo © Kuanglong Zhang

The 3rd and final award handed out in the IPPA’s main Photographer of the Year category went to Chinese photographer Kuanglong Zhang, a freelance photographer living in Shenzhen city. This photograph was taken in Udaipur, a city Zhang calls ‘one of the most romantic in India.’

“In the City palace, I snapped a moment of one of the staff gazing out of the window,” says Zhang. “[It’s] as if he saw the slowly historic course of the palace’s construction, which was quite an attractive moment.”

The photo was taken with an iPhone 7.

To see more winning images from the other 19 categories the IPPA ran, or if you’d like to learn more about each of the photographers above, visit the IPPA website by clicking here.


All photos used with permission, courtesy of IPPA.

Articles: Digital Photography Review (dpreview.com)

 
Comments Off on 2017 iPhone Photography Award Winners Announced

Posted in Uncategorized


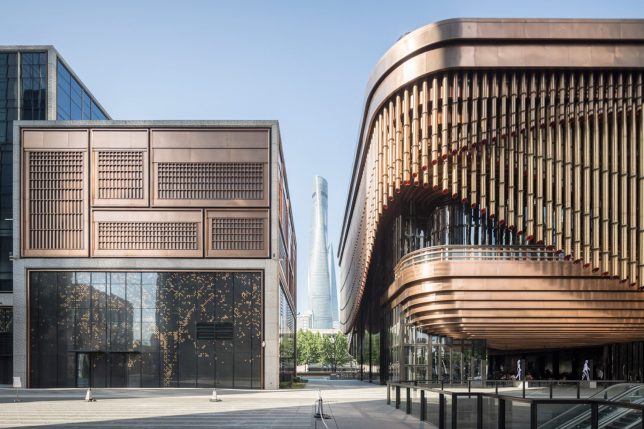
Behind the Curtain Wall: Theatrical Facade Rotates Around Cultural Center

28 Jun

[ By WebUrbanist in Architecture & Offices & Commercial. ]

This mesmerizing mobile facade is an aesthetic and engineering marvel, but one has to wonder: could the mechanisms behind it be appropriated for other architectural purposes, like: providing light and shade on demand or on a schedule?

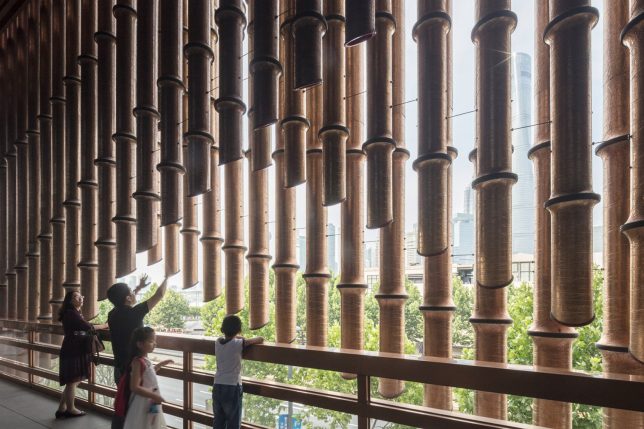
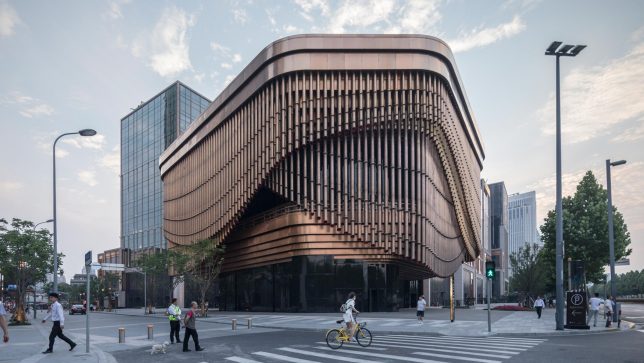
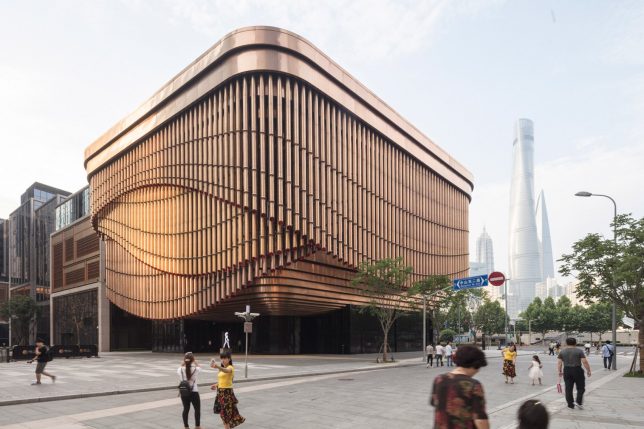
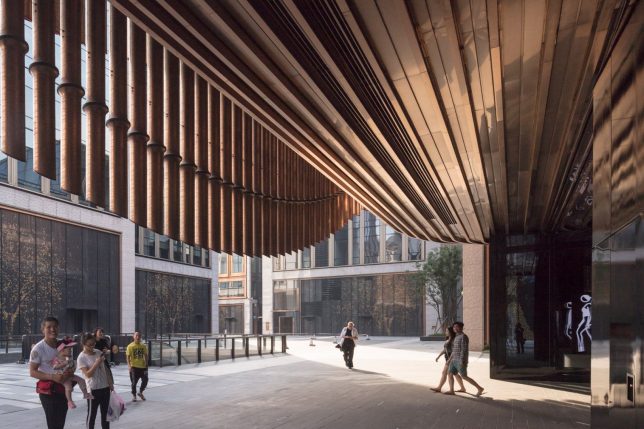
The dynamic design wraps a new cultural center in Shanghai, part of a 190,000-square-meter development by Foster + Partners in collaboration with Heatherwick Studio (images by Laurian Ghinitoiu).

It was inspired by Chinese theaters with bamboo-like bronze tubes set in three layers around the perimeter, constituting what the designers describe as “a moving veil, which adapts to the changing use of the building, and reveals the stage on the balcony and views towards Pudong.” The effect is certainly stunning, but despite the description, it seems to be mostly for show — an novelty experience for visitors and viewers.

The same kinds of systems, however, could be deployed more strategically, using other kinds of semi-opaque screens, for instance, that could automatically position themselves throughout the day to provide layers of shade. Such an application would have practical benefits, reducing cooling costs inside structures and increasing human comfort.

Alternatively, a similar screen system could be controllable by occupants, allowing building users to block off sections for things like meetings or film screenings requiring different amounts of natural light. For now, it remains a fascinating one-off work, but hopefully architects will consider adding this as a tool in their kit, applying similar technical sophistication to solve other site-specific design problems.

Share on Facebook


[ By WebUrbanist in Architecture & Offices & Commercial. ]

[ WebUrbanist | Archives | Galleries | Privacy | TOS ]


WebUrbanist

 
Comments Off on Behind the Curtain Wall: Theatrical Facade Rotates Around Cultural Center

Posted in Creativity


Metabones enables 10 fps shooting with AF for Canon glass on Sony a9

28 Jun

If you were disappointed by reports that the Sony a9 struggles with long adapted Canon lenses, you might be able to take some comfort from Metabones’ latest firmware update. The update for EF-E Smart Adapter Mark IV/V and EF-E Speed Booster Ultra adds autofocus support for medium and high burst modes on the Sony a9. However, since adapted lens support maxes out at 10 fps with AF, high burst mode simply runs at medium speeds (10 fps electronic, 5 fps mechanical).

We’ve have had a chance to give this update a go with a number of Canon mount lenses (including Sigma lenses), and are impressed with the results: with wider lenses (85mm and wider), you get phase-detect AF over most of the frame at 10 fps in Wide and Flexible Spot modes. With longer lenses (70-200/2.8, 100-400/4.5-5.6), focus starts to falter outside of the central region – something that doesn’t happen with native E-mount lenses. In L drive mode (3 fps), the camera opens up the aperture in between shots – both for adapted and E-mount lenses, allowing the camera to continue focusing beyond F11 (at frame rates higher than 3 fps, the camera reverts to manual focus at apertures smaller than F11 – with both adapted and native lenses).

In manual focus mode, you can shoot up to 20 fps with adapted lenses. This is quite an impressive update for the Metabones adapter, and we’ve confirmed it to function significantly better with the a9 than the Sigma adapter (which has yet to issue a firmware update for the a9).

The firmware is available for download now from Metabones.

Firmware upgrade for EF-E Smart AdapterTM MARK IV/V and EF-E Speed BoosterTM ULTRA

RELEVANT PRODUCTS

This information is for the following models:

  • EF-E Smart AdapterTM MARK IV/V (model number MB_EF-E-BM4 / MB_EF-E-BT4 / MB_EF-E-BT5)
  • EF-E Speed BoosterTM ULTRA (model number MB_SPEF-E-BM2 / MB_SPEF-E-BT2 / MB_SPEF-E-BT3)

ABOUT THIS DOWNLOAD

  • Name: Firmware update V0.57 for EF-E Smart AdapterTM MARK IV/V and EF-E Speed BoosterTM ULTRA
  • Release date: 26 Jun 2017
  • Benefits and improvements:
    – Added autofocus support during high speed and medium speed continuous drive (up to 10fps) on Sony A9 (“Green” mode only). Experiment with the “Priority Set in AF-C” setting for the best compromise between hit rate and frame rate for your shooting style. Overall performance depends on lens used. The camera does not use hunting while tracking is in operation. If subject movement exceeds the measurement range of the OSPDAF sensor, autofocus pauses. This is by design. The measurement range of the OSPDAF sensor decreases as the focal length increases. Except for the original Mark I Smart Adapter this feature is available for all subsequent Speed Boosters and Smart Adapters.
    – Enlarged PDAF area on supported cameras when adapter is in Advanced mode, with the advisory that AF performance may be unsatisfactory outside of the central portion of the frame.
    – Enabled AF illuminator (Advanced mode only).
    – There is an AF accuracy issue when using AF-S or DMF on Sony A9 and telephoto lenses with Metabones in “Advanced” mode, which affects this and all previous firmware versions. Green mode, which is set by default on Sony A9, is not affected (except for the original Smart Adapter Mark I, which does not support “Green” mode). A9 users are advised to not use “Advanced” mode but stick with the default “Green” mode. In addition, some telephoto lenses rarely exhibit this issue, such as EF 200/2.8L II USM, EF 400/5.6L USM and Tamron 150-600/5-6.3 VC USD A011. Investigation of this issue is still in progress.
    – Fixed AF issue with EF-S 10-18mm f/4.5-5.6 IS STM and EF-S 18-135/3.5-5.6 IS Nano USM lenses.
    – Fixed smooth iris support for 40/2.8 STM, 50/1.8 STM and Sigma 50-100/1.8 DC HSM Art 016.
    – Fixed CN-E 18-80 T4.4 L IS KAS S servo zoom used by the camera’s zoom rocker and the lens’ rocker in alternation.
    – Fixed CN-E 18-80 T4.4 L IS KAS S auto iris when adapter is in Green mode, where extremely bright conditions no longer causes the iris to close completely.
    – Fixed aperture display with Canon EF 300mm f/4L IS USM lens and Kenko Pro 300 teleconvertter.
    – Corrected W-T zoom scale display in “Advanced” mode for Speed Booster and Kenko Pro 300 teleconverter (except Mark I/II/III and original Speed Booster).
    – Faster aperture diaphragm for still photography in Advanced mode when Live Vide mode is set to Setting Effect OFF.
    – LED (if available) now shows solid magenta when adapter is connected to USB waiting for Metabones App to run.

Articles: Digital Photography Review (dpreview.com)

 
Comments Off on Metabones enables 10 fps shooting with AF for Canon glass on Sony a9

Posted in Uncategorized


How to Use the Star Walk 2 App for Milky Way Photography

28 Jun

Photographing the Milky Way is unlike any other kind of photography. The camera settings are completely different, as are the post-processing techniques, and there’s a lot more planning that goes into a successful outing than people (who haven’t done it before) realize.

How to Use the Star Walk 2 App for Milky Way Photography

The Milky Way over Half Dome in Yosemite NP, shot from Glacier Point.

The trick is how to find the Milky Way

You see, finding the location of the Milky Way in our sky is always changing. In the northern hemisphere the best time to photograph the Milky Way is in the late spring to early fall. It isn’t even visible during most of winter because it’s only above the horizon during the day when we can’t see the stars. And of course in the southern hemisphere, everything above is reversed.

How to Use the Star Walk 2 App for Milky Way Photography

The Milky Way over a group of oak trees in San Luis Obispo, California.

When the Milky Way is visible, it’s hard to know when it will be in peak position and in which direction (north, south, east, or west) it will be visible. Then there’s the question of whether or not it will be rising straight up from a certain direction or appear as an arc across the sky.

Plan your trip accordingly

All of the answers to these questions will, of course, determine what foreground subjects you can use at any given time of the year. For example, if you’re trying to shoot Half Dome in Yosemite National Park, you’ll need the Milky Way to be visible in the northeast sky. Plus, you need it there at a time of night when the moon is either beneath the horizon or during a moon phase where the light from the moon will be minimal. If it’s a full moon for example, the Milky Way and night sky will be considerably dimmer than say during a new or crescent moon.

How to Use the Star Walk 2 App for Milky Way Photography

The Milky Way over Delicate Arch in Arches National Park, Utah.

As you can see, there are a lot of variables. That’s where the app Star Walk 2 comes in.

I found this app years ago when it was in its first incarnation, and still use it today for most of my night sky photography planning. This app is beautifully designed and will let you know exactly when and where the Milky Way will be at any given time, along with every other star and constellation in the sky. It’s an incredible resource for photographers. I created a video showing how I use it.

Have a look below and let me know what you think.

Conclusion

I know there are other options and apps that do similar things available as well, so comment below and tell us what you use. I’m always open to trying new things and would love to hear them.

You can find the Star Walk 2 app in the Google Play Store for Android and on iTunes for Apple devices.

The post How to Use the Star Walk 2 App for Milky Way Photography by James Brandon appeared first on Digital Photography School.


Digital Photography School

 
Comments Off on How to Use the Star Walk 2 App for Milky Way Photography

Posted in Photography


18 Friendly Photos of Buddies Just Hanging Out

28 Jun

What better thing to do that to just hang out with your buddy this summer. Better yet get a photo together!

Here are 18 photos that show what it is all about to be friends.

By Lenneke Veerbeek

By Stew Stryker

By PicselPerfect

By Philip Brookes

By Trent McBride

By Sam Cox

By Leo Hidalgo

By Jay Melnick

By Chris Ford

By Art G.

By bunnysuicides

By Stefan

By Jarle Refsnes

By wolfgangfoto

By Stephanie Wallace

By Holly Occhipinti

By Theophilos Papadopoulos

By Julien Belli

The post 18 Friendly Photos of Buddies Just Hanging Out by Darlene Hildebrandt appeared first on Digital Photography School.


Digital Photography School

 
Comments Off on 18 Friendly Photos of Buddies Just Hanging Out

Posted in Photography


Sony announces new 20MP 1-inch sensor

27 Jun

Sony’s sensor division has announced a new 1-inch type sensor with an effective pixel count of 20.48MP. The new CMOS sensor is backside-illuminated and offers an all-pixel global reset function which should drastically reduce rolling shutter effect when panning. The chip can also record 4K 2160p video at up to 60 frames per second and output 12-bit full-resolution images at readout speeds approaching 22 frames per second.

The new sensor has similar specifications to the chips used in Sony’s RX100 line of high-end compact cameras and RX10 superzoom models but appears to be designed specifically for industrial and surveillance applications. Full specifications are available on the Sony Semiconductor website.

Articles: Digital Photography Review (dpreview.com)

 
Comments Off on Sony announces new 20MP 1-inch sensor

Posted in Uncategorized


Underwater Photography Tips from Aquapac

27 Jun

A wise crustacean once said that it’s better down where it’s wetter.

Singing crabs normally should not be trusted, but when it comes to photography, he does have a point.

So we turned to a more trust-worthy source, our pals at Aquapac – makers of the Underwater DSRL Case – for their top underwater photography tips.

So waterproof up your favorite cam and dive right in to this wonderful splashy world.
(…)
Read the rest of Underwater Photography Tips from Aquapac (449 words)


© laurel for Photojojo, 2017. |
Permalink |
No comment |
Add to
del.icio.us

Post tags:

The post Underwater Photography Tips from Aquapac appeared first on Photojojo.


Photojojo

 
Comments Off on Underwater Photography Tips from Aquapac

Posted in Equipment


Shoulderpod goes modular

27 Jun

Shoulderpod, the Spanish makers of the S1 smartphone camera grip and other high-quality mobile camera accessories, which are particularly popular with mobile journalists and videographers, has converted its offerings into a lego-like modular system by from now on offering all individual parts of existing products separately, allowing users to build exactly the rig they need for a specific project or simply replace a damaged part.

On top of the 4 existing products (G1 Grip, S2 Handle Grip, R2 Pocket Rig and X1 Pro Rig) there are now 9 new parts available for order individually, allowing for attachment of lights, microphones and other accessories:

  • P1 – The Long Plate
  • P2 – The Short Plate
  • H1 – The Handle
  • K1 – The Knob
  • Z1 – The Cold Shoe
  • W1 – The Wrist Strap
  • G1RP – Rubber Pad replacements for G1
  • H1RP – Rubber Pad replacements for H1 and K1
  • U1 – S2 to R2 Upgrade Kit

“Don´t get tied to a fixed solution” – says Enrique Frisancho, Co-Founder at Shoulderpod – “Start small with one of our basic configurations and grow from there with additional accessories. You can use the advantages of modularity also when travelling. Select only the parts you need before every trip and avoid carrying that heavy backpack full of unnecessary gear.” More information and pricing is available on the Shoulderpod website.

Articles: Digital Photography Review (dpreview.com)

 
Comments Off on Shoulderpod goes modular

Posted in Uncategorized