RSS
 

Posts Tagged ‘Give’

How to Give Your Images the Hollywood Treatment Step by Step

27 Mar

fig 1-1

Do you have an image that you would like to give the Hollywood treatment to, and really help make it pop? In this article, I’ll be showing you a method that you can use to give your images the blockbuster treatment, and take them to the next level. The best part about it is that you don’t have to be a Photoshop genius to do it!

The technique that we’ll be exploring is referred to as color-grading. The term color-grading is generally reserved for motion pictures where the editors would apply a creative color correction to films, but now it’s something that is appearing more and more in the vocabulary of still photographers. Color-grading is not to be confused with color correcting; it’s something quite different. Where color correcting is the process of ensuring that color casts are removed and colors are more accurate as a result, color grading is the process of altering and/or enhancing colors in specific areas in your image, such as shadows and highlights, to communicate a particular emotion or simply make the subject pop more, for example. If you have seen a movie then chances are extremely likely that you have seen color-grading at work.

The most common, and easiest color-grading, is the use of  complimentary colors; for example teal/blue tones in the shadows and the opposite color, yellow/orange, in the highlights. These two groups of colors sit opposite each other on the color wheel and being complimentary colors, they work harmoniously together and help the subject stand out more. See these other examples of complimentary colors in action. There are other types of color-grading using different color theory methods, such as analogous and triad, however complimentary is the simplest to learn and it can provide great results.

Before you begin, please ensure that the image you wish to work on has no color cast already, as this will affect the final result. Correcting your white balance is a great place to start. If you are unsure how to do that, 3 Ways to Change White Balance in Lightroom may help you.

In this article, I’ll be using curves in Photoshop to add the color-grading, so if you are unfamiliar with curves, How to do a Quick and Easy Curves Adjustment in Photoshop. As with many other things in Photoshop, there is always more than one way to get the job done, but for a straight forward process that gives fantastic results, you cannot beat curves! (Curves would have to be one of my favourite adjustments in Photoshop, as you can control so many aspects to your image with this function alone.) I won’t be giving you exact numbers to dial in with each adjustment, as your tastes may vary to mine, and you will also be working on an image different to mine, so what will work for my image will not necessarily work for yours.

Step 1: Add two adjustment layers
Base Image

I have the image that I would like to color-grade, and I want to add the teal/orange color combination, to give it that blockbuster look. I’ve ensured that there are no color casts already so I am good to go with this file. Get your image ready, and follow along.

The first step now is to add two curve adjustment layers; name the first one Luminosity and the other Color (I always like to name each of my layers as part of my workflow as it quickly helps me remember what each layer is doing). Now change the blend mode of the Luminosity layer to Luminosity. To do this, simply click on Normal in the layers panel; this should bring up a drop-down menu. Now scroll all the way to the bottom and select Luminosity.

Next, do a similar process with the Color layer selected; only instead of selecting Luminosity blend mode, you’ll be selecting Color. What these two steps are doing is very helpful when making adjustments to the curve in each layer. By changing one layer to a luminosity blend, you are effectively making only adjustments to the luminosity, or light levels of the image, and not adjusting color in any way. This is very help when increasing contrast, for example, as increasing contrast can alter the saturation of colors in the image.

Conversely, altering the blend mode of the Color layer to Color ensures that only color adjustments in the curve layer will be applied, and it will have no affect on the luminosity values of the image at all.

Step 2: Adjust the curve layers

Now that you have the two curve layers made and named, it’s time to adjust them and let the magic happen. Firstly, we want to increase the contrast of the image. So with the Luminosity curve layer selected, add a simple S-Curve to the curve layer. This is referring to a curve that is in the shape of an S, and this style of curve increases contrast.
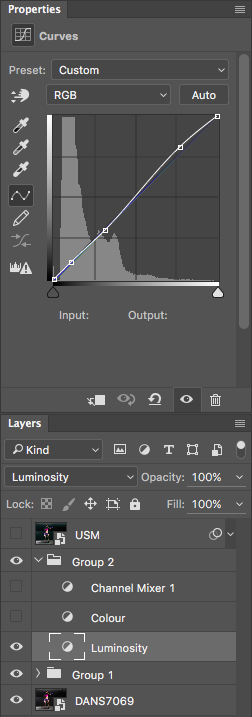
Contrast Curve Layer

As you can see, I have made a very slight adjustment with contrast here; the shadows have been darkened slightly and the highlights increase slightly. The image was already quite contrasty so I didn’t want to add too much more to it.

Contrast Curve

Here’s the effect of adjusting the contrast curve.

Step 3: Add color-grading

With the overall contrast of the image looking pretty good, it’s now time to move on to add the color-grading. To add teal to the shadows and yellow to the highlights, select the Color curve adjustment layer and click on the RGB drop down menu. First up is red. we need to remove red from the shadows, but add some to the highlights. If you click on the bottom left of the curve and drag the shadow anchor point to the right, you will see a drop in red from the shadows and green begins to appear. To add red in the highlights, simply click the anchor point at the top right and slide it toward the left.

Repeat this step for each of the green and blue colors in the drop-down menu.

There is no set amount as to how much each should be moved. Start off with small amounts and increase as, and if required. To prevent the skin tones from being affected, I added an anchor point to the middle of the curve. To do this, I simply clicked on the curve in the centre of each color curve. This will lock that specific part of the curve and skin tones are around the mid-tone area.
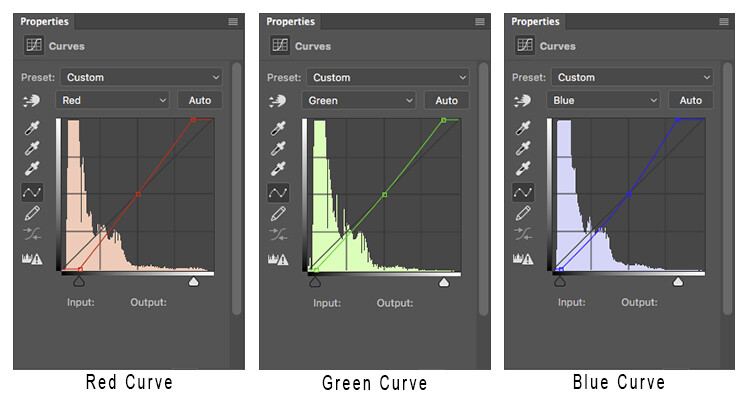
Curves

Here is how each of the color curves looks with this image.

If there are areas where you feel the color has been affected too much – perhaps you have too much red in the face, for example – clicking on the targeted adjust tool (TAT) will allow you to pinpoint the exact area on the curve that needs adjusting. Simply select the TAT and click in the image, on the area you want to target, and this will place an anchor point on the curve. You can now move that anchor up or down to suit. Using the keyboard keys to move up and down is most accurate.

Colour Curve

Now I have adjusted the colors in the curve to how I would like them to look. Switch this adjustment layer on/off to see what impact the adjustments have for you. You may need to revisit each of the color curves and readjust slightly.

Step 4: Add a Channel Mixer layer

The final step in this is to add a Channel Mixer adjustment layer. For this image, I selected the Black and White with Red Filter, but feel free to experiment with different options for your image. You want to use one that creates a nice amount of contrast in your subject and background. You can also adjust the RGB sliders to suit, and finally, reduce the opacity of this layer (I usse 34%).

Here is the final product.

fig 2

There is quite a difference when compared with the original image below.

Base Image

Let’s look at them side by side:

Before

Before

After

After

Where to now?

Now you have an introduction to color-grading using curves in Photoshop. With this example I showed you how to add a teal cast to the shadows, and a warmer orange tone to the highlights, but don’t feel that you are trapped with just this color combination. Experiment with moving the shadow and highlight anchor points in each color channel in a different direction; not just horizontally. Just remember that as a general rule, cooler colors such as greens and blues are more prevalent in shadow areas, and warmer colors such as reds and yellows should be in the brighter areas.

Here is a run down on the effects of moving the shadow and highlight anchor points for each color channel:

Table

If you ever forget what the opposite colors are, here is a handy color wheel.
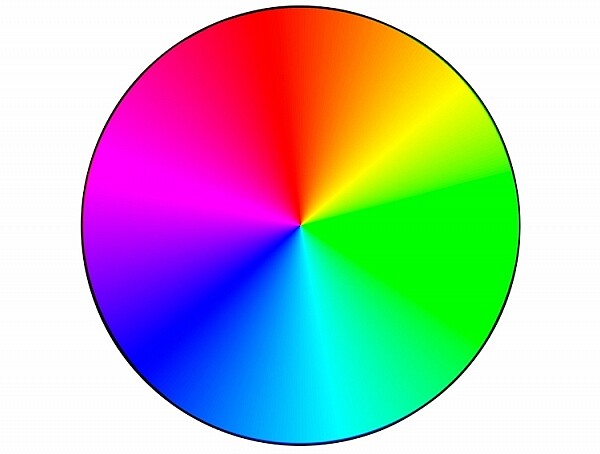
Color Wheel

googletag.cmd.push(function() {
tablet_slots.push( googletag.defineSlot( “/1005424/_dPSv4_tab-all-article-bottom_(300×250)”, [300, 250], “pb-ad-78623” ).addService( googletag.pubads() ) ); } );

googletag.cmd.push(function() {
mobile_slots.push( googletag.defineSlot( “/1005424/_dPSv4_mob-all-article-bottom_(300×250)”, [300, 250], “pb-ad-78158” ).addService( googletag.pubads() ) ); } );

The post How to Give Your Images the Hollywood Treatment Step by Step by Daniel Smith appeared first on Digital Photography School.

Digital Photography School

 
Comments Off on How to Give Your Images the Hollywood Treatment Step by Step

Posted in Photography


How to Give Your Macro Photography a Fine Art Touch in Post-Processing

21 May

Editor’s Note: This is part a series on macro photography this week. Look for a new one each day. The next newsletter will have them all if you miss any!

Macro photography is very popular and you will find lots of images, of all sorts of subjects on the internet. People spend a lot of time taking the photos, planning them, setting them up, and getting all the gear they need to get all the shots they want. Then the photos are loaded onto the computer and minimal processing is done to them.

With this tutorial we are going to look at how you can get your macro images from this:

1-fitzroy-gardens-succulent-marco-original

To this:

2-fitzroy-gardens-succulent-marco-fineart

There are many things you can do to your images; what I’m going to show you is only one way. You can try anything really as it’s up to you, it’s your image.

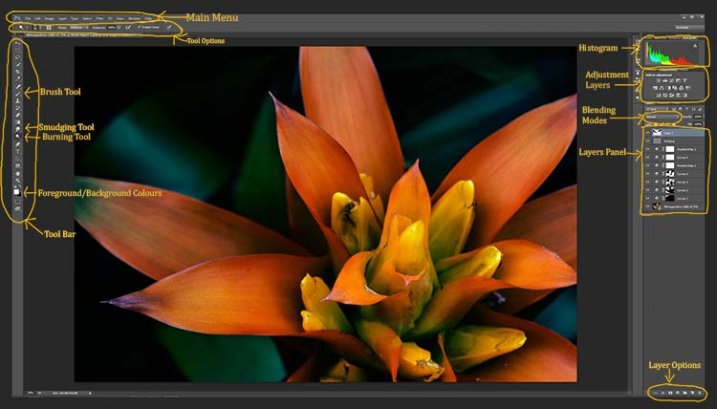
This image was first opened in Adobe Camera Raw and some processing was done to it, just to get the exposure right. From there the macro was opened in Photoshop CC (2014). To explain what some of the instructions are for Photoshop I am including an image below that has the various areas of the interface pointed out, especially the sections that we will be using for this tutorial.

Here is the screenshot of Photoshop with all the various places to find the tools, options, layers and adjustments that were used.

photoshop-setup-2

Step #1 – Curves

At this stage we are going to do several adjustment layers using Curves to change the lighting and bring the centre of the flower out more.

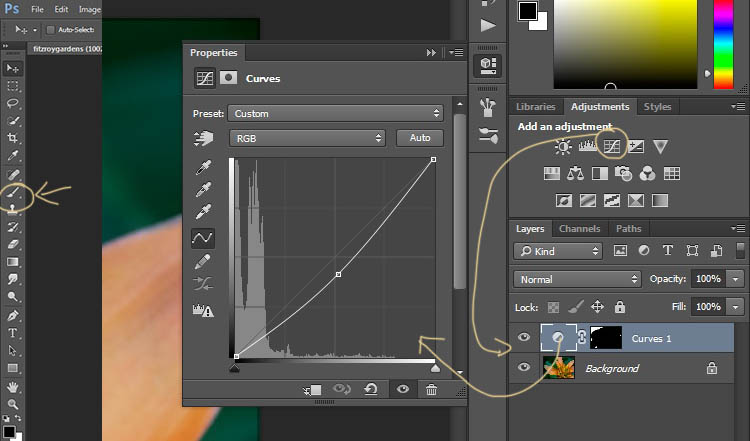
Work in adjustment layers so if you decide further down the track that you should have changed something you did earlier, then you still can go back and fix it, change it or delete the layer. The best way to do this is to use adjustment layers. The adjustment layers are often found above the layers panel on the right of your screen or in the layers menu at the top of the Photoshop window (if you don’t see them go to Window > Adjustments and place it above your layers panel). You will also need the brush tool for this, which is in the tool panel, usually found on the left of the window.

3-adjustment-layer-brush-tool

Once you know where each one of those are, you can start doing your layers for the image.

Click on the adjustment curves layer, as in the photo above. Then in the window that pops up, move the curve down to the dark area just a little, like the image above (just click on the straight line and hold the mouse button down while you drag to move it).

Grab your brush tool from the tool panel. Make it the size that you will need for your image. You can change the size by using the square bracket keys on your keyboard – [ or ] , or right click and in the pop-up window moving the slider for the size. The same changes can be made in the options bar for the tool at the top. Click on the second option from the left, the one that has the size of the brush, and you will get the same panel to change the size and hardness of the brush. For this tutorial a brush towards the soft end was chosen so the edges wouldn’t be too hard (Hardness set to 30% or lower).

You will need to click on the layer mask within the layer, it is the white rectangle in the curve layer. When the mask is white it means the adjustment is being applied to the image below, and when it is black it the change has been hidden. If you paint black onto the mask with the brush you are hiding the adjustment. Black on a mask conceals – white reveals. If you make a mistake and hide a bit you want, you can just paint it back in with the opposite color, white.

Start brushing the image, if nothing changes, then the foreground color (which the brush uses) is likely set to white. You will need to change that colour to black. You can also press X on your keyboard too, it will swap the foreground and background colours around.

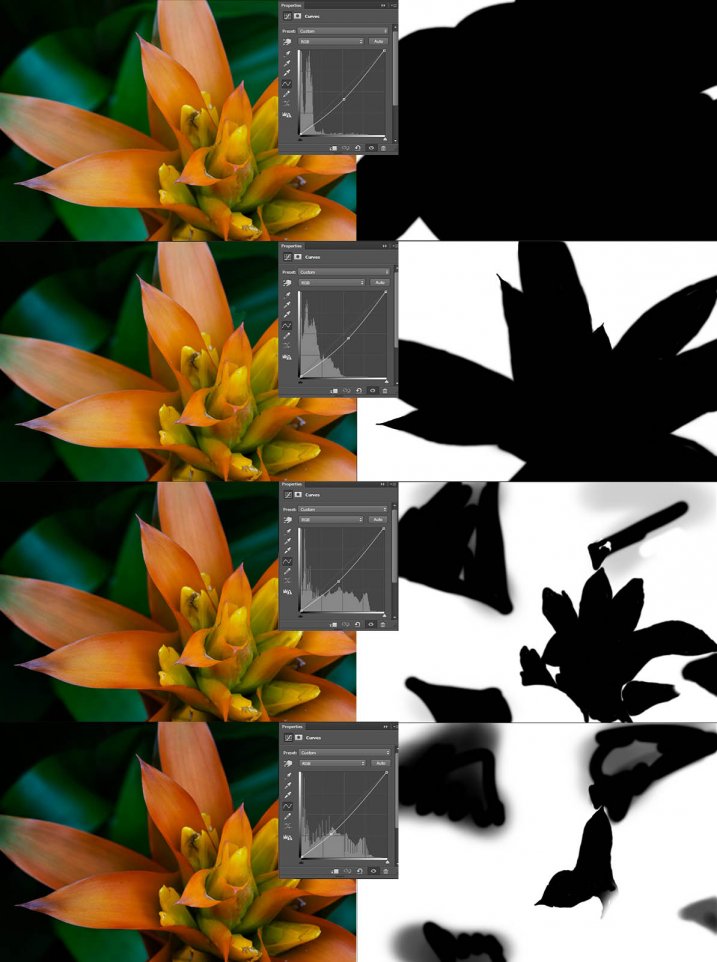
For each different curves layer I took less and less of the adjustment from the image. The following image will show you what I did to each layer. The white areas are where the curves layer still applies, and the black shows where it was hidden.

4-macro-curves-layer

This image was done with curves layers. You don’t have to use the same number of layers, it is up to the image. Some of the background leaves were brought back in the last couple of layers as they were getting too dark. It is something you should be aware of, take notice of what is happening in the background as well.

The centre of the flower is now the same as the original but everything else is darker. The changes should be subtle.

Step #2 – Gradient Map Adjustment Layer

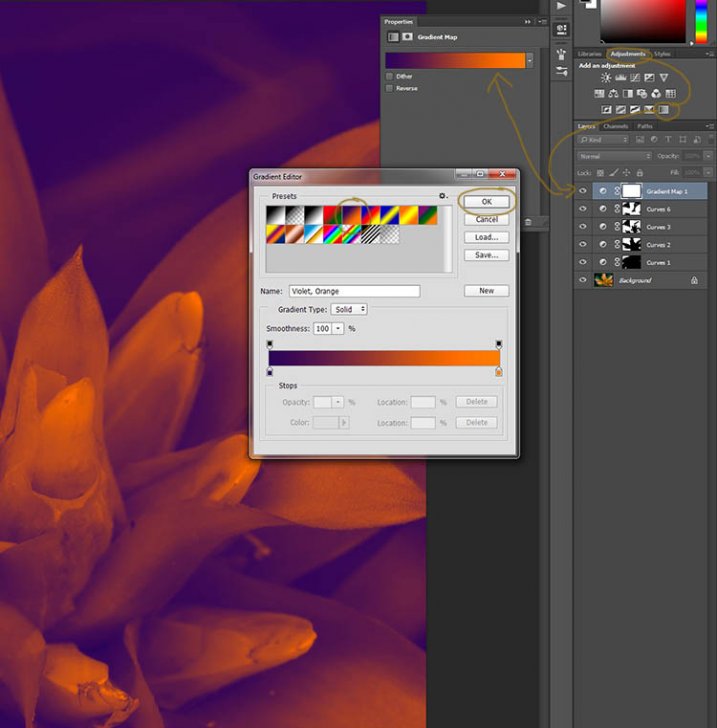
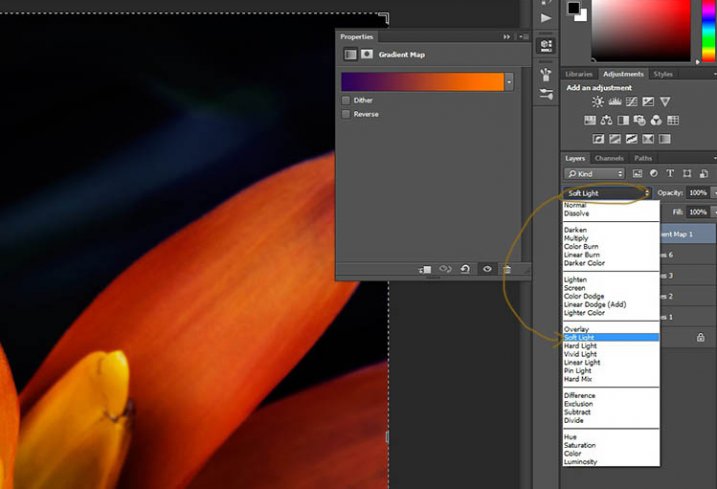
Once the curves were done a gradient adjustment layer was added. The gradient adjustment will change the highlights and shadows; you can decide what colours you want to use.

When you click on the gradient adjustment layer often the black and white gradient comes up and you will notice your image turns to monochrome. If you click on that bar in the window that comes up, you will get a lot more options for the gradient. For this tutorial I used the orange and purple gradient.

5-gradient-adjustment-layer-01

You will see all your highlights turn orange and the dark areas will go purple. You don’t want your image to remain like this, so now you need to blend it. In the image above you can see the blending modes that are above the layers, normal is the default. Click on that and go down to select Soft Light. You will notice the gradient layer is now blended and doesn’t look so horrible.

5-gradient-adjustment-layer-02

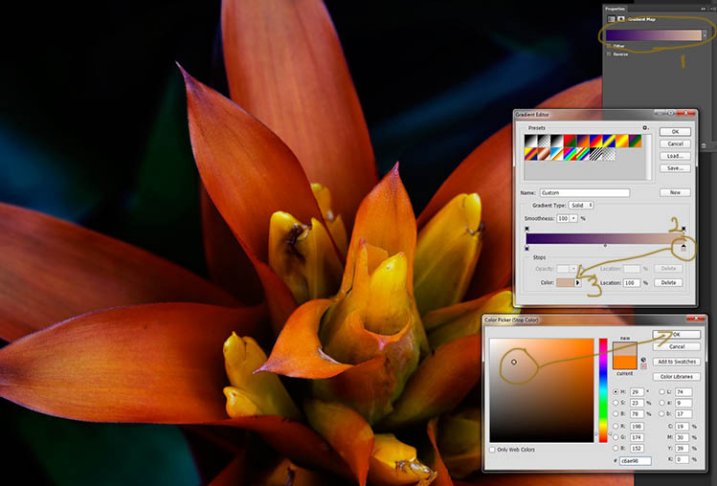
Just because that gradient has those colours, doesn’t mean you have to stick with them. They are easy to change them to give your highlights and shadows the tones you want.

In the bottom part of the gradient editor you can see the colour slider which is how the change goes from one colour to another, and directly underneath you can see little colours. If you click on one of those, the colour comes up at the bottom.

6-gradient-adjustment-layer-2b

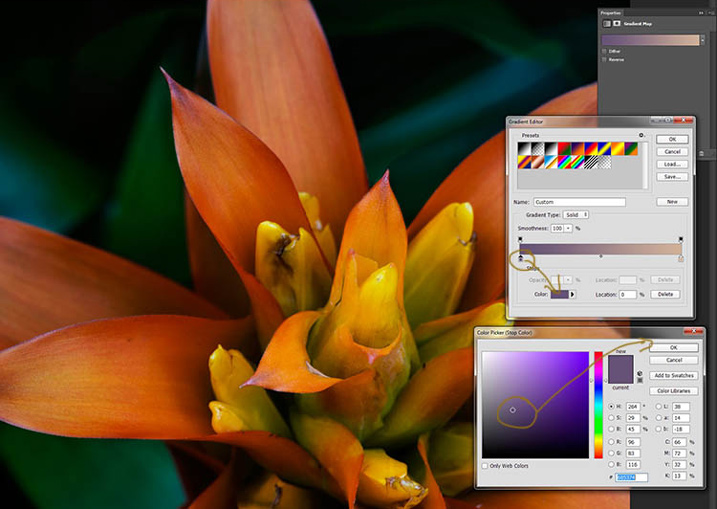
Click on that, you will see the Colour Picker window open up. You can change the colour to whatever you want, and as you do so you should be able to see the effect on your image straight away. If you can’t, then it is likely because you forgot to blend the layer. See the following image.

6-gradient-adjustment-layer-2c

You can see from the images what I changed the colours to; you don’t have to use the same ones. I would recommend trying a few colours to see which ones you like. Purple is my favourite colour, so I use it a lot.

The next step is not always necessary, but often nice to do. All the work that has been done can mean losing the highlights, so to help bring them back you can use a Curves Adjustment Layer.

Step #3 – Adjusting the Highlights

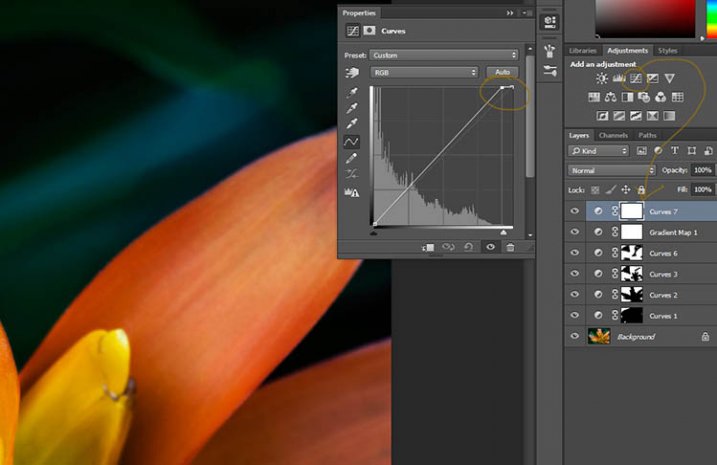
Open a new Curves Adjustment Layer. In the Curves window go to the top right corner and move the line across the top. Watch as you do it and notice if you can see the highlights changing. Sometimes it is good to go too far and then bring it back, just to see what it does. Just be careful not to blow the the highlights out, making them solid white with no detail. Check out the image before to see what to change.

7-curves-highlights

Step #4 – Adding Another Gradient Map Adjustment

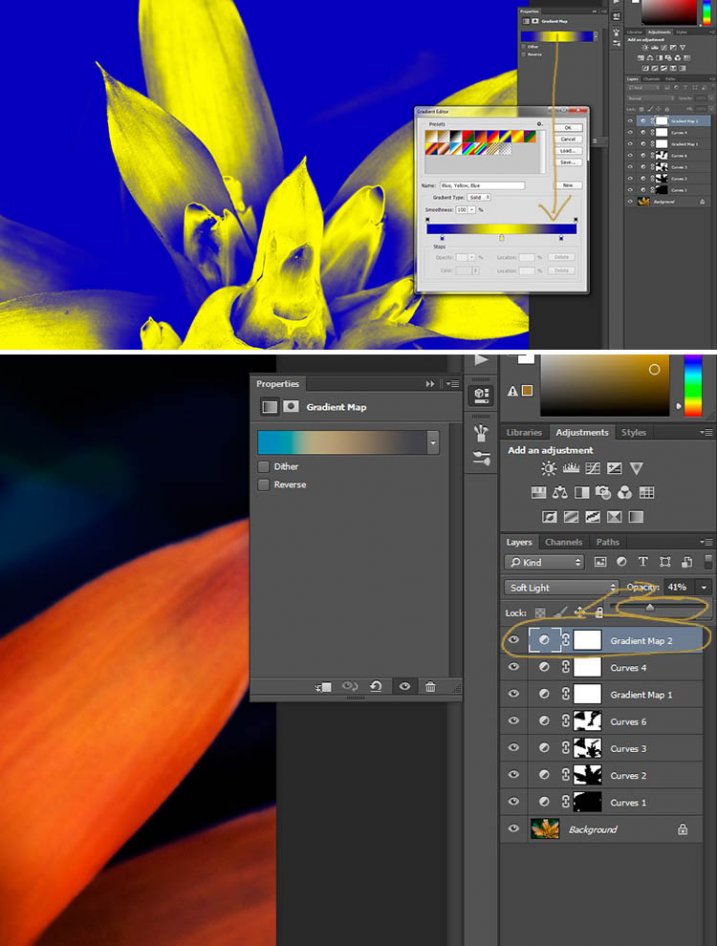
Next another gradient map adjustment layer was added, time time using a different one.

From the above image you should be able to see what colours I choose and follow along the same steps as previously. This time I chose a gradient that changed three areas.

8-gradient-adjustment-layer-3

Step #5 – Dodging the Highlights

One thing that I like to do on many of my images is to bring out the highlights, in small ways, with the dodging tool. The dodging tool is a touchy one, to be used carefully.

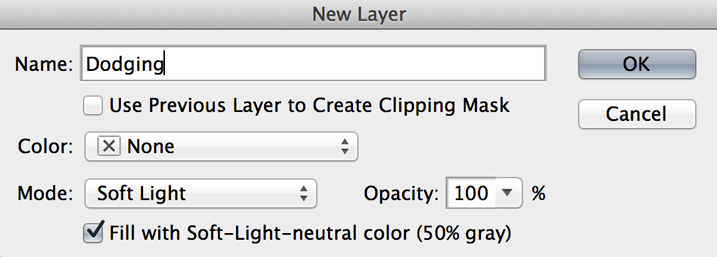
It is always best never to do anything straight onto your original image layer, so like with everything we have done so far it’s going to be on a separate layer. Go to the top menu and click layer, then new layer. When the window appears you can name the layer, if you want to, I called it “Dodging”.

Dodging

There are a couple of things you need to do so you can use this layer with the Dodge tool. First change the layer blend mode to Soft Light, then under the mode drop down menu you will see a box you can check to “Fill with Soft-Light Neutral Colour 50% Grey”, so check that, then press okay (see above)

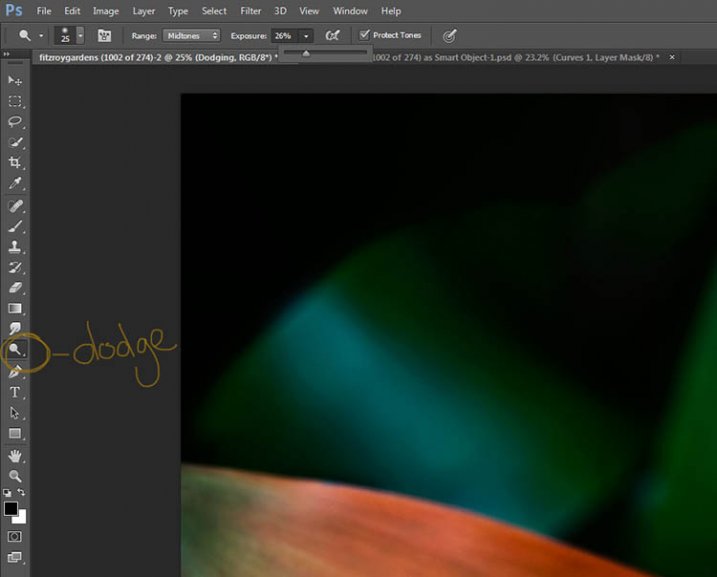
Over in the layers panel you will see what looks like a grey box, this is what you will do the dodging on. Go over to the tool bar on the left and select the dodge tool.

At the top under the main window you will see Exposure, I have set mine at 26% for this image, but you can set it to anything, it depends on how patient you are. In the options bar there is also a setting for the highlights, midtones and shadows, I tend to use midtones. The more you move over an area the more it will go white. In the days of the darkroom they would using dodging to stop the light from getting to certain parts of the area. In Photoshop you can use it to put a little of the highlights back into the image, or to make the highlight pop. It should not be obvious, again subtle is the way to go.

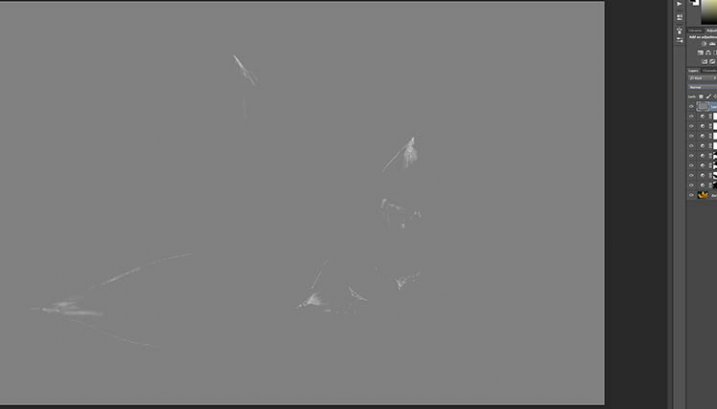
I have changed the layer back to normal mode so you can see what I worked on. Dodging shows up as white on the layer.

10-dodge-layer-2

You can see that I haven’t done a lot, except bring up some of the highlights a little more.11-dodge-layer-3

Step #6 – Smudging

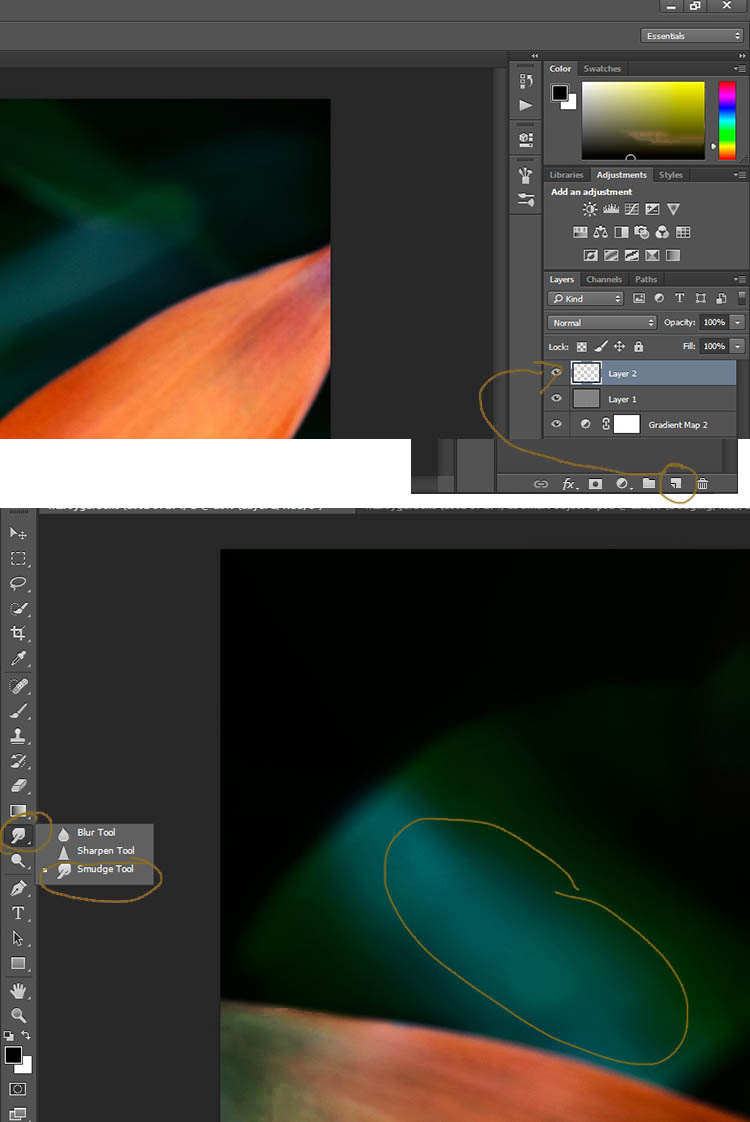
Finally I did a little smudging. Sometimes when you do a lot of work to images it can start to look pixelated, or you get some colour separation. I’ve found that the smudge tool can help get rid of that. You will find it in the tools panel.

I did this on a new transparent layer, again not working on the original image.

12-smudge-layer

Make sure you check the Sample all Layers in the options bar for the tool at the top, and for this tutorial I left the Strength at 50%. I went over the areas where I thought I had some colour separation to smudge them together. If it were a painting I would get my finger into it and smudge the colours together.

Here is the final image.

2-fitzroy-gardens-succulent-marco-fineart

It is all about personal taste, so you should do it to your own style. I like it like this, but other people might find it too much, and others may think it isn’t enough. I like the way the flower seems to be coming out of the darkness.

If you have any questions, please ask. I will do my best to answer them.


macro-coverWant to learn more about macro photography? Check out Ed Versosky’s Introduction to Close-Up & Macro Photography ebook – just $ 10 (over 30% off) this week with coupon code: DPS. You will need to enter the code to apply the discount.

googletag.cmd.push(function() {
tablet_slots.push( googletag.defineSlot( “/1005424/_dPSv4_tab-all-article-bottom_(300×250)”, [300, 250], “pb-ad-78623” ).addService( googletag.pubads() ) ); } );

googletag.cmd.push(function() {
mobile_slots.push( googletag.defineSlot( “/1005424/_dPSv4_mob-all-article-bottom_(300×250)”, [300, 250], “pb-ad-78158” ).addService( googletag.pubads() ) ); } );

The post How to Give Your Macro Photography a Fine Art Touch in Post-Processing by Leanne Cole appeared first on Digital Photography School.

Digital Photography School

 
Comments Off on How to Give Your Macro Photography a Fine Art Touch in Post-Processing

Posted in Photography


Constructive Photography Critique: How to Give and Receive with Grace

02 Apr

I’ve been in a funk lately. Just a little……off. Like I often hear other people do, I blamed it on the weather and assumed it would pass. A month later and it still hadn’t budged. This wasn’t the snow or the cold, yet completely normal, temperatures—it wasn’t even my kids who have been relatively low maintenance lately (all things considered).

There was only one thing left to do before I took complete stock of my life and started looking into some serious therapy or, dare I even consider, enroll in a yoga class, and that was to bug my husband about it: “What’s wrooooong with me? Why am I sooooooooo cranky? Why don’t you tell me I’m pretty and feed me cookies anymore?” His reply was: a) “I do tell you you’re pretty and you know where we keep the cookies”, and b) “well, you’ve taken some pretty harsh blows lately.”

lynseymattingly5

He was right. I have had more than a lions share of un-constructive criticism tossed my way these last few months. I consider myself to be fairly good at rolling with the punches. I accepted a long time ago that not everyone is going to like me; no matter how badly I want to invite them over to my house and tell them they are pretty and feed them cookies and convince them to. And not everyone is going to like my photography. I can deal with those things—I really can.

Like many of you, I saw early on that photography strikes so many chords with people, it’s very easy to get an internet debate going between total strangers about whether a random image is good or not. Whether or not it’s strong, if it’s beautiful, and the one that people seem to get hung-up on the most – if it’s correct or not. I have never heard talk of someone using the wrong paint strokes on a canvas. I’ve never walked into a debate over a songwriter using the wrong chords on his original music. I’ve never watched the internet get excited about the exact one proper way to throw pottery. But photography…photography is different with its mathematical magic and scientific reasoning. Photography is the one art that seems to have that one perfect right way.

lynseymattingly2

We will never all agree on that one right way though. It wasn’t long ago I was reading about a photography trend of the “in-between-shots”, which it turns out, I had been doing for years, I just had been calling them “out of focus shots.” So if even focus is subjective, how can we possibly come together on all the other pieces of our craft? We can’t. What we can do however, is be better for our peers and ourselves by being open to other viewpoints, and being better critics and brave receivers. This comes by giving and receiving constructive feedback, emphasis on the constructive part.

Kind criticisms can be helpful—both offering them to other photographers and being willing to hear them ourselves. I know the internet is never going to be a place where I can post an image and expect nothing but rainbows and sugarcanes of encouragement and praise to come my way, but I have to believe it can be better than what I have personally seen lately.

lynseymattingly8

Here are three questions I ask myself each time I get feedback, whether requested or not:

1) Am I really wanting other people’s opinions of this image?

Am I really? Because the truth is that there are some images we don’t need feedback on. Either they are just very special to us, are personal, or our client loved them, and for whatever reason, we don’t feel the need to hear what a friend or stranger may have to say about them.

If you find yourself in this situation where unrequested feedback has fallen in your lap over a photo you don’t need or want feedback for, move on. It’s not your job to validate the comment or engage in debate if you didn’t request it. They said what they needed to say, and what a wonderful gift you gave them of allowing them the space to say it.

If however, you have found yourself receiving feedback you asked for and decided that you actually don’t want, be honest! There is nothing wrong with saying, “I guess I wasn’t as ready to hear feedback as I thought I was.” There is no shame in not being interested in criticism, or in thinking others would enjoy your work more.

lynseymattingly3

2) Is it helpful?

One of the most frustrating things about photography is that there are no redos. You can reshoot anything until kingdom come, but it won’t be the exact moment it was before. So, while nitpicking over a single image, all things considered, will not likely help that photograph, hearing feedback about things in general can possibly help you the next time. Can you take what they are saying and apply it? Can you rework the image in post-production to be stronger? Is there a lesson somewhere to be had in the feedback you are getting?

“You asked for it, you got it!” moments can sometimes be humbling. Remember—it’s not a reflection of you, your character, or your very soul. For as passionate as we can be about photography, for as much as we live and breathe it, criticism is just words on a page or in the air, about a piece of paper or part of a screen that somehow came from your camera. These words cannot eat you, or make you spontaneously combust, even though sometimes it can feel that way.

lynseymattingly6

3) Is it really about my image?

Some people just need to share their opinion. I get that—I have a tendency to be an over-sharer myself. In this time of social media, we over-sharers forget that not everyone cares what we had for breakfast. Not everyone is interested in knowing that when I’m stressed, I get whiny and want to be fed cookies.

Really look at the feedback you received. If it feels off, or truly doesn’t make sense or seem helpful in any way, consider that it’s not about you. The feedback you received is maybe related to a battle you know nothing about, that somehow got caught-up in the vortex of sequences and ended up under your image because it needed a place to land.

I’m not a big fan of people saying, “it’s not personal, it’s business.” This “business” has taken from my personal life every chance it got. Photography has made me friends and taken my sleep. It’s taught me about beauty and kept me away from my family. You bet it’s personal! But that’s exactly the thing—the image is personal. It gets to be as personal as you want. The feedback however? That’s just business.

lynseymattingly4

A photographic community only works if people participate. There was a time when I was desperate for feedback of my work—a time when I truly wanted to learn and needed people more experienced to be willing to share their knowledge and skills with me. What power we are giving people when we ask for this! If I could do anything, besides teach the world to sing in perfect harmony, I would create a kinder internet. An internet that remains the most helpful source in the world, something that brings us all together, but isn’t so darn mean. I believe with all my unicorn believing ways that this is possible, and that being kind is the first step to being a respected member of any community. Giving constructive criticism is almost as hard as receiving it.

Here are three questions I ask myself before I offer feedback to another photographer:

1) Is it helpful?

It does no good for me to simply tell someone “nice image”. While a pat on the back is always great, enough of them and you’ll just push the person right over. If someone has truly asked for thoughts or a response to their image, is what I am about to tell them helpful? Can they use it going forward? Could it be taken as condescending or hurtful, or am I showing the proper respect? Just because someone asked for my opinion (or the opinion of the internet at large), doesn’t mean I have to be rude about it. Remember that it does take a bit of courage to share your very personal work with the world and though unspoken, I think a photographic community works best when the rule is – to above all else be kind.

lynseymattingly9

2) Is it balanced?

Does my comment also offer encouragement along with any negative elements I’ve mentioned? Have I pointed out something that was done well, so it’s clear that I invested more than a brief second before I spoke my thoughts for the world to see? I can hear some of you now saying, “it’s not my job to tell them it’s good—they wanted honesty!” To you I say, honesty can still be kind. You don’t have to reassure anyone or lie about your feelings to be honest. One of my all-time favorite quotes:

“Be an encourager. The world has plenty of critics already.” – Dave Willis

lynseymattingly7

3) Am I okay with this being the only thing someone has ever heard me say?

When you comment on the internet, it is usually read by people you don’t even know. Possibly hundreds or thousands of them. The world does not know that I try my hardest to be a decent human being, but sometimes my mouth gets away from me. The world doesn’t know that my passion can sometimes come across as overbearing. The person requesting feedback doesn’t likely even know who I am. So if what I am about to offer is the only thing anyone could ever attach to my name, am I okay with that? Have I been fair? Have I been helpful? Have I been kind? I would rather be completely forgotten than permanently attached to a unnecessary comment that I wrote in haste or worse yet, an unhelpful comment that I wrote out of spite.

lynseymattingly10

Do you leave comments on images? Do you post your images and ask for feedback? What are your thoughts?

googletag.cmd.push(function() {
tablet_slots.push( googletag.defineSlot( “/1005424/_dPSv4_tab-all-article-bottom_(300×250)”, [300, 250], “pb-ad-78623” ).addService( googletag.pubads() ) ); } );

googletag.cmd.push(function() {
mobile_slots.push( googletag.defineSlot( “/1005424/_dPSv4_mob-all-article-bottom_(300×250)”, [300, 250], “pb-ad-78158” ).addService( googletag.pubads() ) ); } );

The post Constructive Photography Critique: How to Give and Receive with Grace by Lynsey Mattingly appeared first on Digital Photography School.

Digital Photography School

 
Comments Off on Constructive Photography Critique: How to Give and Receive with Grace

Posted in Photography


23 December, 2014 – Give LuLa Video Subsc at 33% Off

23 Dec

If you are looking for a good gift for a photographer you know and are already a subscriber to our videos, here’s your chance to give that person an annual subscription for 33% off.

Contact Customer Service with your existing subscription name and e-mail and we will send you the 33% off coupon code.
Answers to questions about giving a digital gift can be found here.


The Luminous Landscape – What’s New

 
Comments Off on 23 December, 2014 – Give LuLa Video Subsc at 33% Off

Posted in News


FREE MONEY: Give Us a RT, We’ll Give You $$$

18 Nov

We’re giving away gift codes in the Photojojo Shop!

You can grab either $ 2, $ 5, $ 7 or $ 10 off anything in the shop, just by following us on Twitter and giving us a RT.

It’s a good ol’ fashion swap. Head to the Shop to get all the detailz. This only lasts one day, so get to it (and get some fun new gear).

Get a jump on things now and grab the stuff your friends and fam really want! Check out these top-notch goodies we’ve hand-picked to maximize your gift giving glory this year.


© laurel for Photojojo, 2014. |
Permalink |
No comment |
Add to
del.icio.us

Post tags:


Photojojo

 
Comments Off on FREE MONEY: Give Us a RT, We’ll Give You $$$

Posted in Equipment


Give Your Fave Gloves Touchscreen Power with Touch Tonic!

25 Oct

Extra photos for bloggers: 1, 2, 3

You want to keep your hands warm this winter, but those fuzzy fingers keep getting in the way of important photo-ops and text messages.

Add the magic touch to your gloves with Touch Tonic, the paint-on solution that lets you stay warm and connected to your touchscreen.

When the weather gets chilly, you’ll be able to use your touchscreen phone to snap snowy pics and share them online without ever taking off your favorite gloves.

Choose the Touch Tonic that matches your gloves’ fabric type, quickly apply to the fingertips and let dry.

Keep your personal style without losing the ability to stay connected (or freezing your fingers off).

Stay Connected in the Cold with Touch Tonic (for Gloves!)
$ 20 at the Photojojo Shop


© Britta for Photojojo, 2014. |
Permalink |
No comment |
Add to
del.icio.us

Post tags:


Photojojo

 
Comments Off on Give Your Fave Gloves Touchscreen Power with Touch Tonic!

Posted in Equipment


Give Your Photographs The Stage They Deserve – Make Sure Your Website is Mobile Ready

12 Oct

If you post amazing professional-quality photographs to your website and nobody can access them, are they really that amazing? Nobody will know. All that hard work, focus, determination, and artistic ability -POOF – all for nothing. This is exactly what is happening to many very talented photographers. They pour their heart and soul into their art form and then entrust it to outdated technology that doesn’t adequately display their work on mobile devices.

ResponsivePortfolioSite

How important is being mobile friendly?

With the proliferation of mobile devices, it’s no surprise that many people do most of their web browsing on the go. Consider the following eye-opening statistics found on visual.ly:

  • Mobile search queries have grown five times in the past two years.
  • Nine out of 10 mobile phone searches result in a purchase or visit.
  • Three out of every five searches are conducted on a mobile device.
  • 99% of Smartphone owners use their mobile browsers at least once a day.
  • 52% of all local searches are conducted on a mobile device.
Mobile Search Statistics

Those are startling numbers, especially if you’re not keeping up with the changing face of the web. Unfortunately, it seems that there has been a lag in photographers adopting the appropriate web technology to showcase their work in a way that accommodates mobile users. To ensure that your site and your photography work are presented in an impactful way, it must be optimized specifically for mobile viewing.

Desktops and mobile devices don’t always play nice

Just building a site for the desktop doesn’t guarantee that the results will transfer to phones and tablets, or even the new smart watches. You do not want interested viewers to open your site on a mobile device and find a helter-skelter layout with distorted or inaccessible images. If this happens, it puts you in a difficult spot – you’re left hoping that they remember and desire to seek out your site for a second time when they’re back at a desktop computer. That’s wishful thinking considering the deluge of distractions we all encounter every day and the somewhat shrinking attention spans of the high-definition, high-speed digital generation. Here today, gone tomorrow, or maybe sooner in the case of your hard work and aspirations.

One of the worst-case scenarios you could be in is with a portfolio site that is completely based on Adobe Flash, leaving you to lose a whole group of mobile users who will rapidly look elsewhere when your site doesn’t load on their device. No one likes seeing a blank screen or a message saying, “This content cannot be displayed on your device.”

FlashOnlySite

Mobile devices often will not play Flash websites

Making your work accessible

It’s vital to give your audience exactly what they want – fast, fluid access to your dazzling work anytime anywhere. If they can’t clearly navigate your web site, it raises questions in their minds about your professionalism and your commitment to viewers and to your art form. This is not a good place to be for a proud, ambitious photographer. The good news, however, is that there are readily available solutions that you could leverage whether you already have an existing site or are starting one from scratch.

The key to optimizing the mobile user’s experience is to have a site that uses responsive web design or adaptive web design. These are two types of site programming that ensure a seamless transition of your content from the desktop to all mobile devices, regardless of screen size. Anything less than that, and you’re severely limiting exposure for your work and jeopardizing your chance of making a significant first impression. Negative experiences can turn into negative reviews. These travel fast in the digital age, and it’s difficult to change those perceptions once they’re public.

Using an adaptive design, you get a site that is specifically designed for particular browser sizes found on most mobile devices. In a lot of cases, the mobile site almost looks like a native app. Problogger.net (also run by dPS owner Darren Rowse) is an example of such a site. With this type of design, the experience on a mobile device is a bit different than that of a desktop, but you could still access the content in a readable format. This results in a fast and easy to read site that is user-friendlier on small web browsers.

ProBlogger Adaptive

Example of an adaptive design

A Responsive site is even better in that it is flexible in displaying the same content across a large array of devices while keeping much of the same styles. It maintains a fluid layout by using elements that are automatically resizable and could be placed where they fit best on the screen. This even works great on desktops when you want to shrink the browser window.

A perfect example of a website with a responsive design is Digital Photography School’s own site. If you’re accessing the site from a desktop browser, notice how the site responds fluidly as you resize the window. If you’re reading this from a mobile device, you’re still able to read the content just fine without having to manipulate the browser by zooming in and out or doing a lot of horizontal scrolling.

ResponsivePhotoSite

dPS is a responsive site

Simple changes make a HUGE difference

Updating your site from a clunky old format is quite simple, and the tools are readily available. Most people who have a blog use a Content Management System (CMS) such as WordPress, Joomla, or Drupal. These systems allow you to change the overall look and feel of your site by offering different designs or themes. There are plenty of available themes that are already responsive or adaptive right out of the box. These range in cost from free up to $ 100. A simple web search will reveal many sites that specialize in offering a variety of this type of themes. I’ve had great success using Theme Forest.

In addition to themes that are optimized for mobile browsing, these CMSs also allow you to install plugins that display the same content in a mobile-only theme. In some cases, especially if you already have an existing site, this might be the easier route to take.

Rock the mobile web

At some point, we’ve all experienced the disconnect between the artistic or creative world and the technology world. But in the modern age, you really can’t draw a distinction without suffering the consequences. It’s much wiser to embrace the role of technology in displaying art – in this case photography – and use it to your advantage.

With just a bit of effort, you can make sure that you nail that vital first impression with your fans and give your work the digital stage that it deserves!

The post Give Your Photographs The Stage They Deserve – Make Sure Your Website is Mobile Ready by Jorge Hassan appeared first on Digital Photography School.

Digital Photography School

 
Comments Off on Give Your Photographs The Stage They Deserve – Make Sure Your Website is Mobile Ready

Posted in Photography


How to use the Contrast Checker Technique to Give Your Images More Punch

13 Jul

I am about to reveal a technique that will have your images looking awesome in seconds every time you use it. I am even going to share the Photoshop Action with you so you can edit in lazy mode, I mean efficiency mode! Before I bare all, I need to give you some background information, and I am pretty sure you have been in the exact same position at some point in your photography hobby or career.

DPS Tutorial Image 9

Not long ago, early 2010, I was horrible at photo editing. I was literally tossing my camera in a box and packing it away. My problem was that I was extremely frustrated with the quality of my images. Not necessarily the composition or the subject matter, but I couldn’t get my images to look “good” like all the photographers who were crushing views on Flickr. Thank goodness 500px was not around at the time, I really would have hated my photos.

Just before I sealed the tape on my box of photo gear I discovered High Dynamic Range imaging. Wait, before you judge me, I have been doing it long enough to know the process is not everyone’s cup of tea. However, the HDR process, from the brackets to the tone mapping, forced me to embrace new techniques I never would have dreamed of prior to stumbling upon it.

I started to understand my camera on a level that was foreign to me prior to that time. I also began to accept that it was not necessarily the camera making the great photos, but the person behind it and, more importantly, their post-processing techniques. Nonetheless, I became a tone mapping fool. I tone mapped everything, my car (for the record a Scion xD does not necessarily need to be HDR’ed), candid pictures of my wife, food, candid pictures of my wife eating food, I really tone mapped everything.

You have probably been there before as well, anyone new to HDR thinks it is the greatest thing on everything from the urban landscape to the selfie in the mirror. I would really shy away from the latter of the two! Through all of this understanding and acceptance came another realization, the HDR process can wreak havoc on the contrast in a good photo.

Through the HDR process you are mapping tones from multiple images to obtain one photograph that gets the best of both worlds with a vast amount of detail. The problem with this is that shadow areas lose their depth when too much detail is revealed, and areas that were specular highlights, or inviting highlight blowouts, tend to compress in ways that make them look dark, dingy and stale. Let’s not forget about the hideous over-saturation that can occur if you take the sliders too far.

So how do you combat this? How do you analyze a photograph, HDR or not, and tell what it needs to make it better?

It’s all about contrast

The answer, while simple, holds complexities that can take years to train your eye through trial and error. We are not about to let it take you years to understand. The secret is contrast which is the key to making better photographs right now.

You may know that the Contrast slider exists in nearly every post-processing program, but what is contrast? Simply stated, contrast is the ratio between light and dark in a photograph. If there is no contrast the image appears to look predominantly gray and dismal. On the flip side, an image can be too “contrasty” or devoid of gray (mid tones), a battle between white and black. It is difficult to see this on a color photograph since contrast typically deals with tone.

I studied Fine Art in college, I was a Printmaker (Woodcut, Etching, Screen Printing, and Lithography). I had a fabulous professor. She told me a piece of information once that changed my art forever during a one-on-one critique.

She said if I ever had a question about how harmonious my color print was that I should take a picture of it and convert it to gray scale. If it did not have strong black and white points with a smooth grayscale gradation somewhere in between, then it needed work.

Like any normal college kid, I did not understand her methodology at the time and I rarely took her advice. It was not until nearly ten years later that her advice finally clicked.

The Contrast Checker Technique

You can use this technique in every aspect of your workflow: beginning, middle, and end. It keeps your contrast in check throughout the process. Rightfully so, it is named “Contrast Checker”.

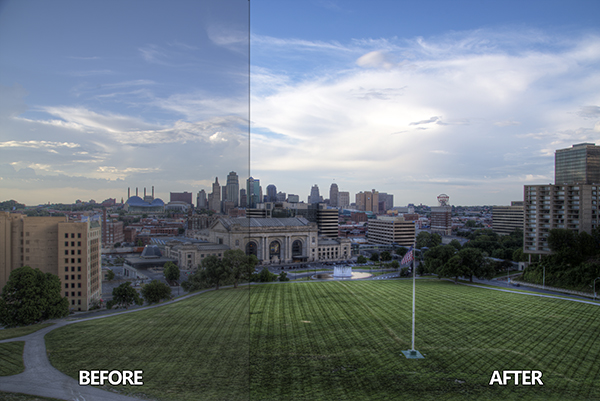
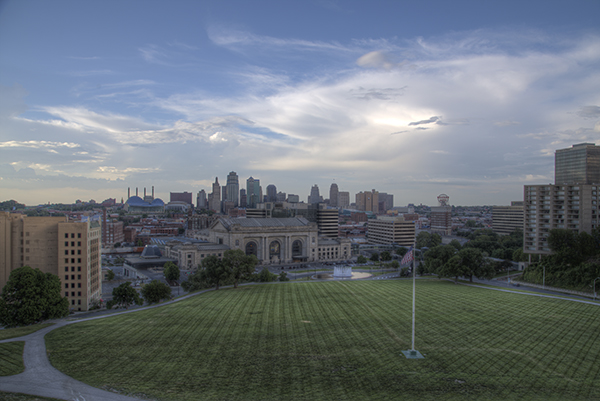
The photograph below is a tone mapped photo of Kansas City, straight from Photomatix Pro. You should always try to tone map your images so that they are not too dark, too light, too saturated, or too stylized.

DPS Tutorial Image 1

Let’s Check the Contrast you can download the image and follow along if you would like (there is also an Action and a video at the end if you learn better from video)

Step one

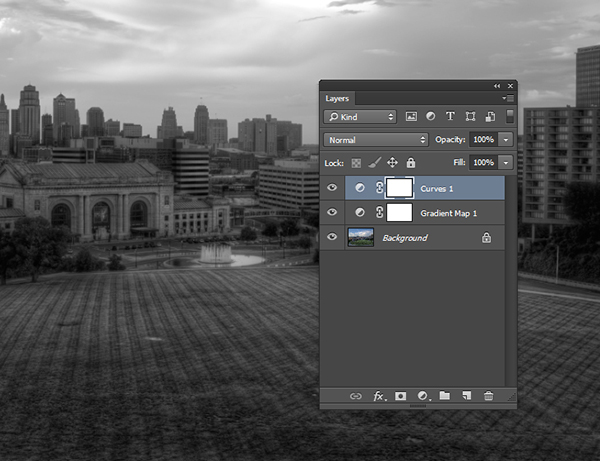
Create a new Gradient Map Adjustment Layer to create a Black and White photo.

Step two

Ensure that the Gradient Map is set to Black and White. By default the Gradient Map Adjustment Layer will pull from the colors that you have set as your foreground and background in the tool bar. To ensure they are set to Black and White press the “d” key to reset them to the defaults.

Step three

Make a new Curves Adjustment Layer above the Gradient Map. Your Layers Palette should look like this and your photo should be Black and White.

DPS Tutorial Image 2

Step four

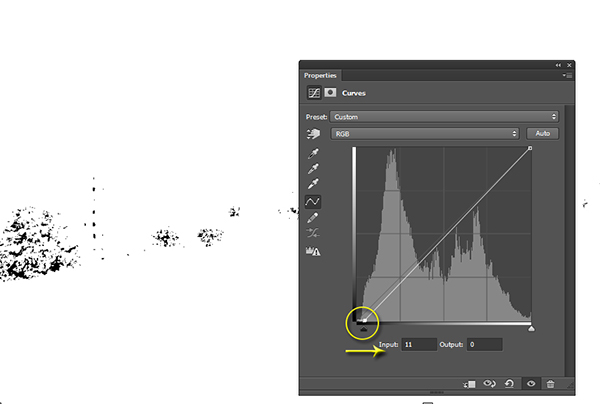
While in the Properties of the Curves Adjustment Layer press and hold “Alt” (Option on Mac) and click the Black triangle on the bottom of the Curve.

Step five

Your photo may turn all white with a little bit of black. This is telling you where black is present in your photo. If your photo is all white with no black specks then your photo currently contains no black point. Move it slightly to the right until more black starts to appear.

DPS Tutorial Image 3

Step six

This is called clipping (no detail). By clipping the blacks you are telling Photoshop what you want black to be in the photo. It is important that you do not take this too far, you want a solid black point in the photo, but you don’t want to destroy your shadows either.

Step seven

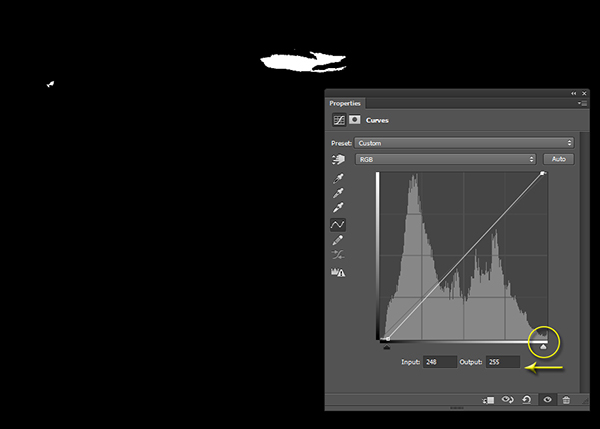
Now press and hold “Alt” (Option on Mac) and select the White Triangle.

Step eight

Your photo should turn all black with little specks of white. This is telling you where pure white is in your photo. If your photo is all black with no white specks then your photo currently contains no white point. Move it slightly to the left until more white starts to appear.

DPS Tutorial Image 4

Step nine

Just like the blacks it is important that you do not take this too far to the left as you will be clipping too much of the whites. You are going for just a bit of clipping beyond the specular highlights.

Step ten

The reason you are doing this on a grayscale photograph is to ensure that you are only seeing the clippings of the lights and darks. If you were to do the same thing on a color photograph you would see the clippings for all of the colors within their channels. This makes the process a bit more difficult.

Step eleven

At this point you should already be seeing more drama in your photograph, but you can take it a step further.

Step twelve

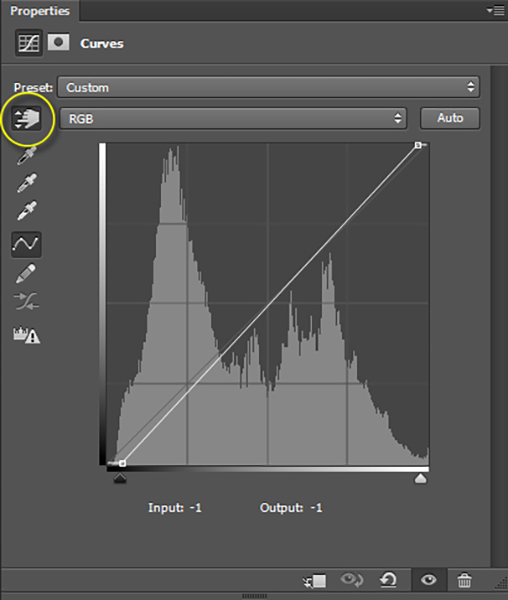
Click on the Targeted Adjustment Tool within the Properties of the Curves Adjustment Layer. This allows you to target specific areas of the photo and edit them independently on the tone curve.

DPS Tutorial Image 5

Step thirteen

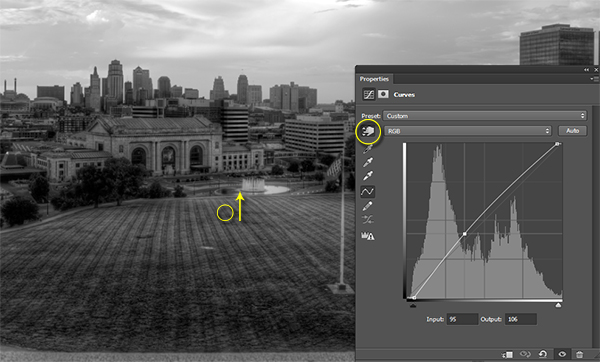
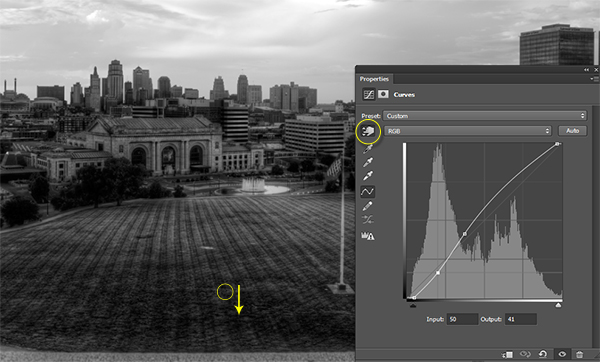
With the targeted adjustment tool selected, as you hover over the image you will see what is being effected on the tone curve. For this image I started with the lighter colored grass. I clicked on it and dragged the cursor up making it even lighter.

DPS Tutorial Image 6

Step fourteen

I also selected the darker colored grass and moved the cursor down to make it darker.

DPS Tutorial Image 7

Step fifteen

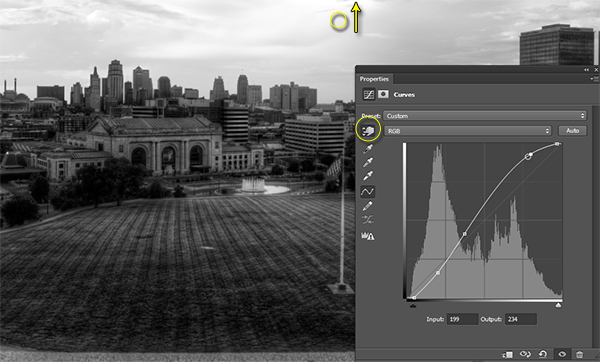
I then selected an area in the sky that was close to white, but contained a little bit of detail, and dragged the cursor up to make it brighter.

DPS Tutorial Image 8

Step sixteen

At this point you should be looking at a black and white photograph with much more contrast than you started with.

Step seventeen

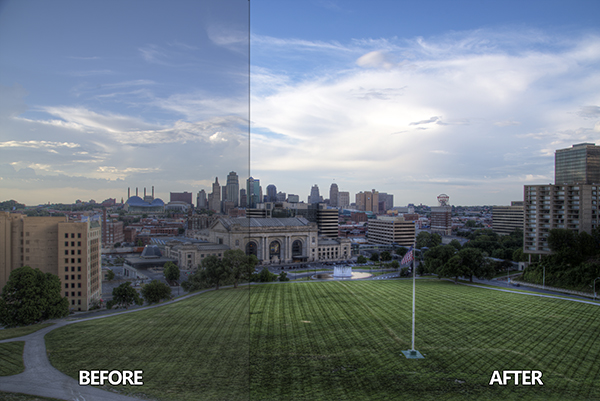
The magic happens when you delete the Gradient Map layer to reveal the Curves effect on the original color photograph.

DPS Tutorial Image 9

Step eighteen

If you are not satisfied with the effect the Curve has on the colors in the photo you may change the Blending Option to Luminosity which will only allow it to effect the tones in the image, protecting the color saturation.

For more tips and tricks and to see how the downloadable action for this process works watch the video tutorial below.

The post How to use the Contrast Checker Technique to Give Your Images More Punch by Blake Rudis appeared first on Digital Photography School.

Digital Photography School

 
Comments Off on How to use the Contrast Checker Technique to Give Your Images More Punch

Posted in Photography


16 Cap Redesigns Give 2nd Lives to 40,000 Used Cola Bottles

06 Jun

[ By WebUrbanist in Design & Guerilla Ads & Marketing. ]

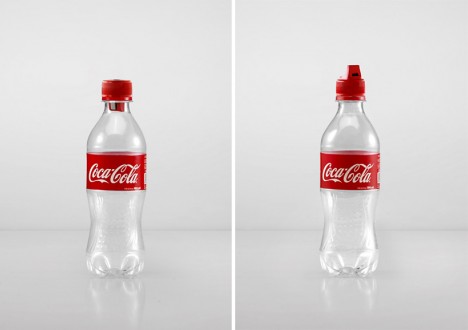
coke bottle cap reuse

Aimed at promoting the creative reuse of plastic bottles, Coca-Cola has launched a project to give away caps that convert discarded drink containers to fun and practical alternative functions.

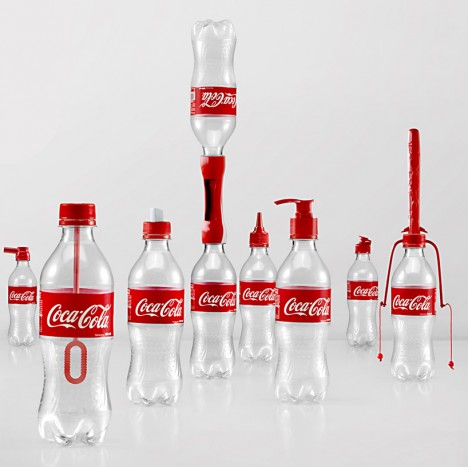
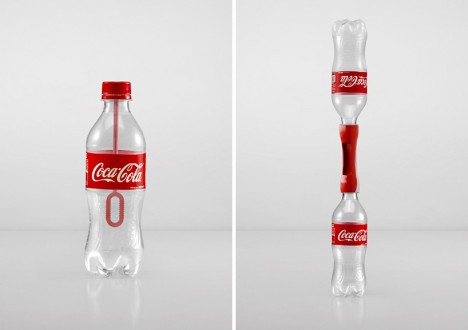
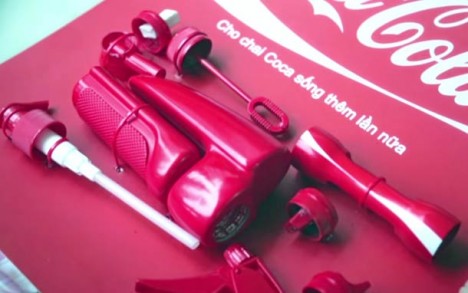
These so-called Second Lives adapters can turn waste vessels into everything from bubble blowers and squirt guns to night lights, shampoo dispensers, pencil sharpeners, paintbrushes and water-filled weights.

coke cap guerrilla marketing

The plan, hatched by Ogilvy & Mather China, is to distribute these caps for free in Thailand, Indonesia and Vietnam, with the company encouraging people to take off the Coke labels to avoid confusion. The larger idea is to inspire alternative uses for old plastic bottles, getting people to think outside of the box about what is disposable and what could, in fact, have some sort of second life waiting within it.

coke cap alternative examples

“We are always looking for better solutions to reduce the use of plastic and increase recycling around the world,” said Leonardo O’Grady, ASEAN Director Integrated Marketing Communications, Coca-Cola. “The variety of our ‘2nd Lives’ caps shows that there are many creative ways to re-use plastic simply and practically, and also supports our global sustainability program.” 

second lives cola project

The project was piloted in Ho Chi Minh City, Vietnam in March, with an expected 40,000 bottle caps to be gifted throughout the country this year. The campaign is set to launch in Thailand and Indonesia at a later date. Still, it is worth wondering whether adding more plastic to the world is worthwhile. As neat as some of these designs are, will they ultimately reduce waste or contribute to it?

Share on Facebook


[ By WebUrbanist in Design & Guerilla Ads & Marketing. ]

[ WebUrbanist | Archives | Galleries | Privacy | TOS ]


WebUrbanist

 
Comments Off on 16 Cap Redesigns Give 2nd Lives to 40,000 Used Cola Bottles

Posted in Creativity


Ricoh to give away cameras for ‘photojournalism’ competition

28 Mar

THETA-diagonalv2.jpg

Ricoh Imaging Company has announced an advertorial feature on cnn.com called ‘Spherical Report 360’, where 360 people will be selected to receive a free Ricoh Theta spherical camera to shoot local news and events. Images taken with the Theta will then be judged for a Pentax K-3 grand prize. To be considered for a free Theta camera visit the Spherical Report 360 website for application guidelines. Applications will be accepted between March 27, 2014 through April 10, 2014. Learn more

News: Digital Photography Review (dpreview.com)

 
Comments Off on Ricoh to give away cameras for ‘photojournalism’ competition

Posted in Uncategorized