Do you have an image that you would like to give the Hollywood treatment to, and really help make it pop? In this article, I’ll be showing you a method that you can use to give your images the blockbuster treatment, and take them to the next level. The best part about it is that you don’t have to be a Photoshop genius to do it!
The technique that we’ll be exploring is referred to as color-grading. The term color-grading is generally reserved for motion pictures where the editors would apply a creative color correction to films, but now it’s something that is appearing more and more in the vocabulary of still photographers. Color-grading is not to be confused with color correcting; it’s something quite different. Where color correcting is the process of ensuring that color casts are removed and colors are more accurate as a result, color grading is the process of altering and/or enhancing colors in specific areas in your image, such as shadows and highlights, to communicate a particular emotion or simply make the subject pop more, for example. If you have seen a movie then chances are extremely likely that you have seen color-grading at work.
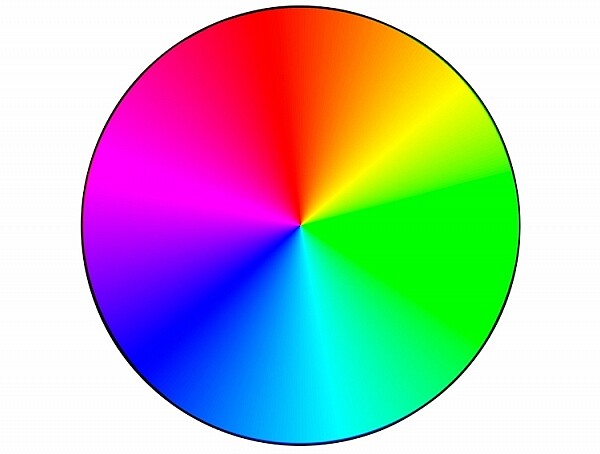
The most common, and easiest color-grading, is the use of complimentary colors; for example teal/blue tones in the shadows and the opposite color, yellow/orange, in the highlights. These two groups of colors sit opposite each other on the color wheel and being complimentary colors, they work harmoniously together and help the subject stand out more. See these other examples of complimentary colors in action. There are other types of color-grading using different color theory methods, such as analogous and triad, however complimentary is the simplest to learn and it can provide great results.
Before you begin, please ensure that the image you wish to work on has no color cast already, as this will affect the final result. Correcting your white balance is a great place to start. If you are unsure how to do that, 3 Ways to Change White Balance in Lightroom may help you.
In this article, I’ll be using curves in Photoshop to add the color-grading, so if you are unfamiliar with curves, How to do a Quick and Easy Curves Adjustment in Photoshop. As with many other things in Photoshop, there is always more than one way to get the job done, but for a straight forward process that gives fantastic results, you cannot beat curves! (Curves would have to be one of my favourite adjustments in Photoshop, as you can control so many aspects to your image with this function alone.) I won’t be giving you exact numbers to dial in with each adjustment, as your tastes may vary to mine, and you will also be working on an image different to mine, so what will work for my image will not necessarily work for yours.
Step 1: Add two adjustment layers

I have the image that I would like to color-grade, and I want to add the teal/orange color combination, to give it that blockbuster look. I’ve ensured that there are no color casts already so I am good to go with this file. Get your image ready, and follow along.
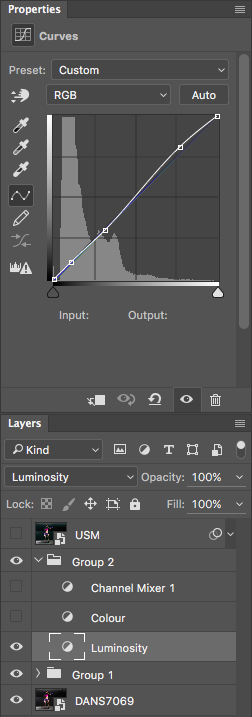
The first step now is to add two curve adjustment layers; name the first one Luminosity and the other Color (I always like to name each of my layers as part of my workflow as it quickly helps me remember what each layer is doing). Now change the blend mode of the Luminosity layer to Luminosity. To do this, simply click on Normal in the layers panel; this should bring up a drop-down menu. Now scroll all the way to the bottom and select Luminosity.
Next, do a similar process with the Color layer selected; only instead of selecting Luminosity blend mode, you’ll be selecting Color. What these two steps are doing is very helpful when making adjustments to the curve in each layer. By changing one layer to a luminosity blend, you are effectively making only adjustments to the luminosity, or light levels of the image, and not adjusting color in any way. This is very help when increasing contrast, for example, as increasing contrast can alter the saturation of colors in the image.
Conversely, altering the blend mode of the Color layer to Color ensures that only color adjustments in the curve layer will be applied, and it will have no affect on the luminosity values of the image at all.
Step 2: Adjust the curve layers
Now that you have the two curve layers made and named, it’s time to adjust them and let the magic happen. Firstly, we want to increase the contrast of the image. So with the Luminosity curve layer selected, add a simple S-Curve to the curve layer. This is referring to a curve that is in the shape of an S, and this style of curve increases contrast.

As you can see, I have made a very slight adjustment with contrast here; the shadows have been darkened slightly and the highlights increase slightly. The image was already quite contrasty so I didn’t want to add too much more to it.

Here’s the effect of adjusting the contrast curve.
Step 3: Add color-grading
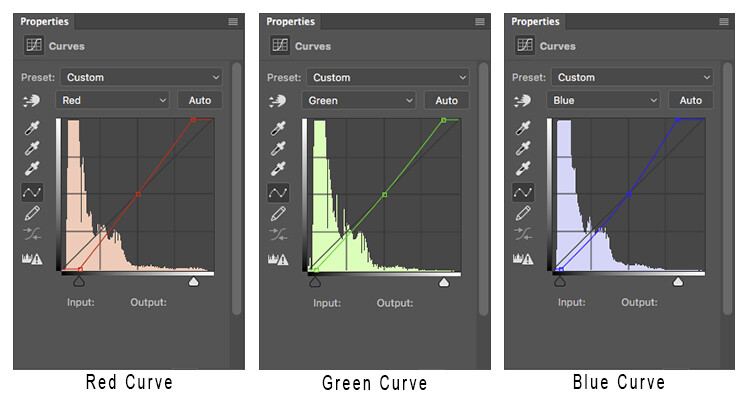
With the overall contrast of the image looking pretty good, it’s now time to move on to add the color-grading. To add teal to the shadows and yellow to the highlights, select the Color curve adjustment layer and click on the RGB drop down menu. First up is red. we need to remove red from the shadows, but add some to the highlights. If you click on the bottom left of the curve and drag the shadow anchor point to the right, you will see a drop in red from the shadows and green begins to appear. To add red in the highlights, simply click the anchor point at the top right and slide it toward the left.
Repeat this step for each of the green and blue colors in the drop-down menu.
There is no set amount as to how much each should be moved. Start off with small amounts and increase as, and if required. To prevent the skin tones from being affected, I added an anchor point to the middle of the curve. To do this, I simply clicked on the curve in the centre of each color curve. This will lock that specific part of the curve and skin tones are around the mid-tone area.

Here is how each of the color curves looks with this image.
If there are areas where you feel the color has been affected too much – perhaps you have too much red in the face, for example – clicking on the targeted adjust tool (TAT) will allow you to pinpoint the exact area on the curve that needs adjusting. Simply select the TAT and click in the image, on the area you want to target, and this will place an anchor point on the curve. You can now move that anchor up or down to suit. Using the keyboard keys to move up and down is most accurate.

Now I have adjusted the colors in the curve to how I would like them to look. Switch this adjustment layer on/off to see what impact the adjustments have for you. You may need to revisit each of the color curves and readjust slightly.
Step 4: Add a Channel Mixer layer
The final step in this is to add a Channel Mixer adjustment layer. For this image, I selected the Black and White with Red Filter, but feel free to experiment with different options for your image. You want to use one that creates a nice amount of contrast in your subject and background. You can also adjust the RGB sliders to suit, and finally, reduce the opacity of this layer (I usse 34%).
Here is the final product.

There is quite a difference when compared with the original image below.

Let’s look at them side by side:

Before |

After |
Where to now?
Now you have an introduction to color-grading using curves in Photoshop. With this example I showed you how to add a teal cast to the shadows, and a warmer orange tone to the highlights, but don’t feel that you are trapped with just this color combination. Experiment with moving the shadow and highlight anchor points in each color channel in a different direction; not just horizontally. Just remember that as a general rule, cooler colors such as greens and blues are more prevalent in shadow areas, and warmer colors such as reds and yellows should be in the brighter areas.
Here is a run down on the effects of moving the shadow and highlight anchor points for each color channel:

If you ever forget what the opposite colors are, here is a handy color wheel.

googletag.cmd.push(function() {
tablet_slots.push( googletag.defineSlot( “/1005424/_dPSv4_tab-all-article-bottom_(300×250)”, [300, 250], “pb-ad-78623” ).addService( googletag.pubads() ) ); } );
googletag.cmd.push(function() {
mobile_slots.push( googletag.defineSlot( “/1005424/_dPSv4_mob-all-article-bottom_(300×250)”, [300, 250], “pb-ad-78158” ).addService( googletag.pubads() ) ); } );
The post How to Give Your Images the Hollywood Treatment Step by Step by Daniel Smith appeared first on Digital Photography School.
You must be logged in to post a comment.