RSS
 

Posts Tagged ‘Hollywood’

Hollywood filmmaker claims Apple won’t let villains use iPhones in movies

28 Feb

Rian Johnson, the filmmaker best known for his work on Star Wars: The Last Jedi and Knives Out, recently discussed his work and some aspects of the filmmaking process with Vanity Fair. During the approximately 20-minute interview, Johnson revealed an interesting tidbit about Apple product placement: the company reportedly doesn’t allow the iPhone to be used on-screen by villains.

As Johnson points out in the video, this fact can function as a spoiler — if you see a character in a movie who may be the villain but they are visibly using an iPhone, then it is safe to assume they are not, in fact, the villain. That’s due to the product placement rules Apple has in place for filmmakers, which allows iPhones to be used, but only if they’re associated with ‘good’ characters.

It’s unclear whether the public awareness of this fact may influence future movies. Some filmmakers may choose to have their characters exclusively use Android phones to avoid ruining the surprise. If that happens, Apple may feel compelled to loosen this restriction in order to return its handset to the big screen. ‘Every single filmmaker who has a bad guy in their movie that’s supposed to be a secret wants to murder me right now,’ Johnson quipped.

Articles: Digital Photography Review (dpreview.com)

 
Comments Off on Hollywood filmmaker claims Apple won’t let villains use iPhones in movies

Posted in Uncategorized


How to Give Your Images the Hollywood Treatment Step by Step

27 Mar

fig 1-1

Do you have an image that you would like to give the Hollywood treatment to, and really help make it pop? In this article, I’ll be showing you a method that you can use to give your images the blockbuster treatment, and take them to the next level. The best part about it is that you don’t have to be a Photoshop genius to do it!

The technique that we’ll be exploring is referred to as color-grading. The term color-grading is generally reserved for motion pictures where the editors would apply a creative color correction to films, but now it’s something that is appearing more and more in the vocabulary of still photographers. Color-grading is not to be confused with color correcting; it’s something quite different. Where color correcting is the process of ensuring that color casts are removed and colors are more accurate as a result, color grading is the process of altering and/or enhancing colors in specific areas in your image, such as shadows and highlights, to communicate a particular emotion or simply make the subject pop more, for example. If you have seen a movie then chances are extremely likely that you have seen color-grading at work.

The most common, and easiest color-grading, is the use of  complimentary colors; for example teal/blue tones in the shadows and the opposite color, yellow/orange, in the highlights. These two groups of colors sit opposite each other on the color wheel and being complimentary colors, they work harmoniously together and help the subject stand out more. See these other examples of complimentary colors in action. There are other types of color-grading using different color theory methods, such as analogous and triad, however complimentary is the simplest to learn and it can provide great results.

Before you begin, please ensure that the image you wish to work on has no color cast already, as this will affect the final result. Correcting your white balance is a great place to start. If you are unsure how to do that, 3 Ways to Change White Balance in Lightroom may help you.

In this article, I’ll be using curves in Photoshop to add the color-grading, so if you are unfamiliar with curves, How to do a Quick and Easy Curves Adjustment in Photoshop. As with many other things in Photoshop, there is always more than one way to get the job done, but for a straight forward process that gives fantastic results, you cannot beat curves! (Curves would have to be one of my favourite adjustments in Photoshop, as you can control so many aspects to your image with this function alone.) I won’t be giving you exact numbers to dial in with each adjustment, as your tastes may vary to mine, and you will also be working on an image different to mine, so what will work for my image will not necessarily work for yours.

Step 1: Add two adjustment layers
Base Image

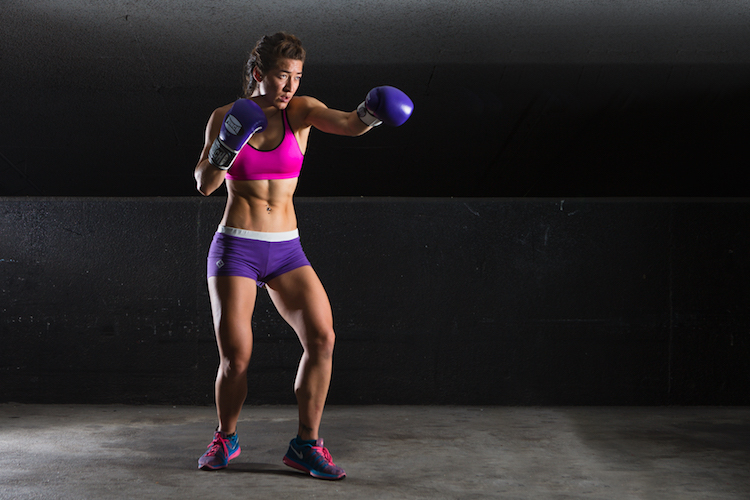
I have the image that I would like to color-grade, and I want to add the teal/orange color combination, to give it that blockbuster look. I’ve ensured that there are no color casts already so I am good to go with this file. Get your image ready, and follow along.

The first step now is to add two curve adjustment layers; name the first one Luminosity and the other Color (I always like to name each of my layers as part of my workflow as it quickly helps me remember what each layer is doing). Now change the blend mode of the Luminosity layer to Luminosity. To do this, simply click on Normal in the layers panel; this should bring up a drop-down menu. Now scroll all the way to the bottom and select Luminosity.

Next, do a similar process with the Color layer selected; only instead of selecting Luminosity blend mode, you’ll be selecting Color. What these two steps are doing is very helpful when making adjustments to the curve in each layer. By changing one layer to a luminosity blend, you are effectively making only adjustments to the luminosity, or light levels of the image, and not adjusting color in any way. This is very help when increasing contrast, for example, as increasing contrast can alter the saturation of colors in the image.

Conversely, altering the blend mode of the Color layer to Color ensures that only color adjustments in the curve layer will be applied, and it will have no affect on the luminosity values of the image at all.

Step 2: Adjust the curve layers

Now that you have the two curve layers made and named, it’s time to adjust them and let the magic happen. Firstly, we want to increase the contrast of the image. So with the Luminosity curve layer selected, add a simple S-Curve to the curve layer. This is referring to a curve that is in the shape of an S, and this style of curve increases contrast.
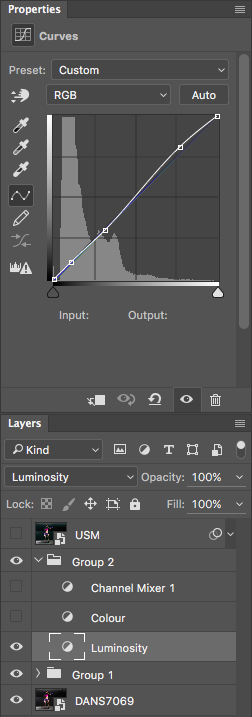
Contrast Curve Layer

As you can see, I have made a very slight adjustment with contrast here; the shadows have been darkened slightly and the highlights increase slightly. The image was already quite contrasty so I didn’t want to add too much more to it.

Contrast Curve

Here’s the effect of adjusting the contrast curve.

Step 3: Add color-grading

With the overall contrast of the image looking pretty good, it’s now time to move on to add the color-grading. To add teal to the shadows and yellow to the highlights, select the Color curve adjustment layer and click on the RGB drop down menu. First up is red. we need to remove red from the shadows, but add some to the highlights. If you click on the bottom left of the curve and drag the shadow anchor point to the right, you will see a drop in red from the shadows and green begins to appear. To add red in the highlights, simply click the anchor point at the top right and slide it toward the left.

Repeat this step for each of the green and blue colors in the drop-down menu.

There is no set amount as to how much each should be moved. Start off with small amounts and increase as, and if required. To prevent the skin tones from being affected, I added an anchor point to the middle of the curve. To do this, I simply clicked on the curve in the centre of each color curve. This will lock that specific part of the curve and skin tones are around the mid-tone area.
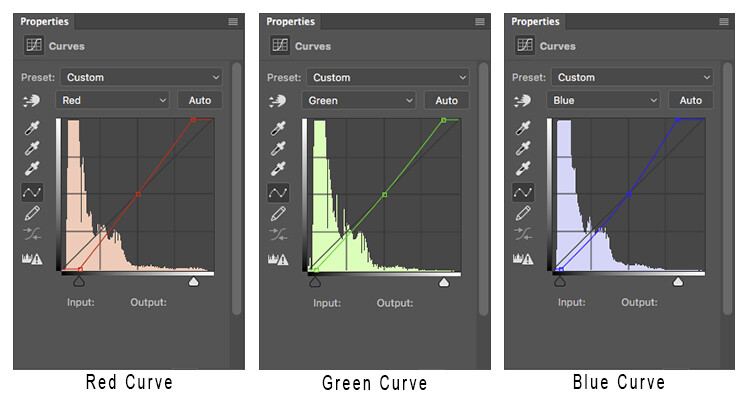
Curves

Here is how each of the color curves looks with this image.

If there are areas where you feel the color has been affected too much – perhaps you have too much red in the face, for example – clicking on the targeted adjust tool (TAT) will allow you to pinpoint the exact area on the curve that needs adjusting. Simply select the TAT and click in the image, on the area you want to target, and this will place an anchor point on the curve. You can now move that anchor up or down to suit. Using the keyboard keys to move up and down is most accurate.

Colour Curve

Now I have adjusted the colors in the curve to how I would like them to look. Switch this adjustment layer on/off to see what impact the adjustments have for you. You may need to revisit each of the color curves and readjust slightly.

Step 4: Add a Channel Mixer layer

The final step in this is to add a Channel Mixer adjustment layer. For this image, I selected the Black and White with Red Filter, but feel free to experiment with different options for your image. You want to use one that creates a nice amount of contrast in your subject and background. You can also adjust the RGB sliders to suit, and finally, reduce the opacity of this layer (I usse 34%).

Here is the final product.

fig 2

There is quite a difference when compared with the original image below.

Base Image

Let’s look at them side by side:

Before

Before

After

After

Where to now?

Now you have an introduction to color-grading using curves in Photoshop. With this example I showed you how to add a teal cast to the shadows, and a warmer orange tone to the highlights, but don’t feel that you are trapped with just this color combination. Experiment with moving the shadow and highlight anchor points in each color channel in a different direction; not just horizontally. Just remember that as a general rule, cooler colors such as greens and blues are more prevalent in shadow areas, and warmer colors such as reds and yellows should be in the brighter areas.

Here is a run down on the effects of moving the shadow and highlight anchor points for each color channel:

Table

If you ever forget what the opposite colors are, here is a handy color wheel.
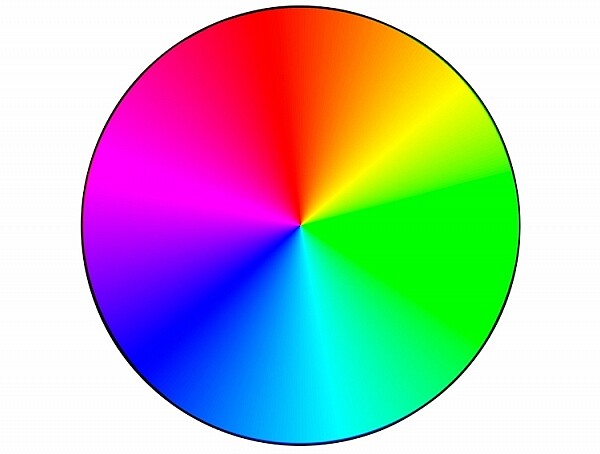
Color Wheel

googletag.cmd.push(function() {
tablet_slots.push( googletag.defineSlot( “/1005424/_dPSv4_tab-all-article-bottom_(300×250)”, [300, 250], “pb-ad-78623” ).addService( googletag.pubads() ) ); } );

googletag.cmd.push(function() {
mobile_slots.push( googletag.defineSlot( “/1005424/_dPSv4_mob-all-article-bottom_(300×250)”, [300, 250], “pb-ad-78158” ).addService( googletag.pubads() ) ); } );

The post How to Give Your Images the Hollywood Treatment Step by Step by Daniel Smith appeared first on Digital Photography School.


Digital Photography School

 
Comments Off on How to Give Your Images the Hollywood Treatment Step by Step

Posted in Photography


How to Create a Hollywood Film Noir Portrait

02 Nov

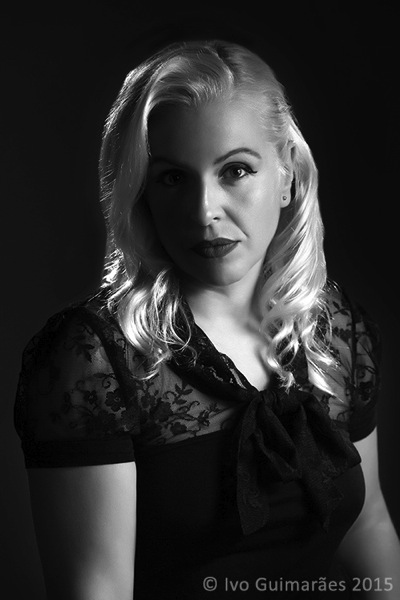
I have always had a soft spot for 1940s and 50s Film Noir, where there is always a gorgeous Femme Fatale, whose charms are most likely going to get you killed. The light in those movies is the key to the ambience of mystery and danger, and I love the way the scenes are composed with smoke, shadows, and the black and white high drama with dim light aesthetic.

These movies were mostly low-budget productions shot on location in city streets, with an abundance of night scenes, where crime is the main plot. Low-key lighting is the common thread of Film Noir, with harsh light that create deep shadows, resulting in a high contrast black and white.

As a photographer the actresses’ portraits that were used by the studios for promotion really fascinate me, and I guess it influences a lot of my portraiture work.

01b

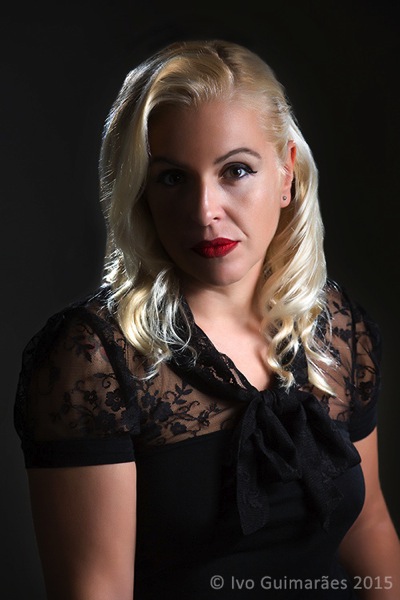
In this article I am going to follow the steps to create this image that is a recreation of a Hollywood Film Noir portrait, done with modern equipment, and digital post-production techniques.

Research

As for every photography work, it is always a good idea to do some research, and look for inspiration. Here I used references from one of my favorite movies of all time, “Touch of Evil”, directed by the great Orson Welles in 1958.

Camera and lens

The choice of equipment is an important starting point. In this particular case I used a Canon 5D III body with a Canon EF 85mm f/1.2L II USM lens. This is my favorite lens when it comes to portrait work, it offers the perfect combination of good sharpness and awesome bokeh.

Lighting equipment

These images were originally lit, in most cases, with incandescent high-power bulbs, and the quality and direction of the light was mostly controlled with barn doors and Fresnel spotlights.

I decided to use two Canon 600EX-RT Speedlites, controlled by a Canon ST-E3-RT Speedlite transmitter. This created a simple setup with a gridded softbox working as a hard key light on the model’s face, and a 20º grid as a hair light to separate the model from the background.

02

Exposure

Usually in studio portrait images, I try to decide the exposure based on the depth of field I want to create on the image. In this particular case, I chose to use f/8.0, as it gave me enough depth of field in the face area, with the 85mm focal length.

The shutter speed is the second important factor and I chose to use 1/125, as it blocked any possible ambient light, and only register the light from the flash.

The ISO 100 is enough for the flash power available, and offers me a clean and noiseless image.

Lighting diagram

Every time I have an idea for an image I try to put it on paper. Most of the time it is just doodles in my little black book, but it helps me to visualize the setup, and the light ambiance that I want to create. Here is the quick sketch I did for this image, which represents the lighting diagram and technical information for the photo shoot.

03

Light metering

After setting the starting point values for the camera, it’s time to calculate the light position and power, to create the desired effect.

The background was white so a distance to subject of seven feet was enough to turn it black, which works much better with a blonde model.

The idea was to have light on half of the model’s face, and a quick fall-off to the other side, creating a mysterious mood in the image. The gridded softbox was ideal for this effect. The 20º grid created a rim light on the hair and a ratio of 2:1 to the main light, so metering was f/8.0 for the main light and f/11 for the hair light.

04

The click time

Now that everything is set, it’s time to click. Even tough the final image was meant to be black and white, I captured it in color mode as it gives me better choices for conversion in post-production.

05b

Post-production

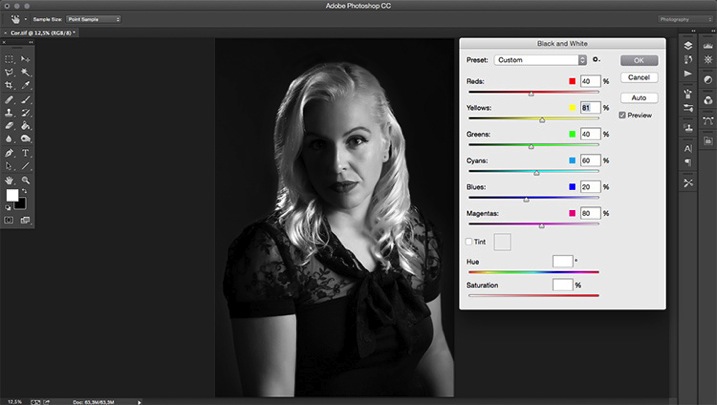
There are many tools and plugins for black and white image conversion. In this case I used the Photoshop’s black and white tool which is a simple but effective solution.

Image > Adjustments > Black & White

06b

A few adjustments to the red and yellow channel gave me the right contrast on the skin and overall image, creating the dramatic mood.

So, here is my approach to the Film Noir portrait. It sure was fun. If you give this technique a try, please share your results and images in the comments below.

googletag.cmd.push(function() {
tablet_slots.push( googletag.defineSlot( “/1005424/_dPSv4_tab-all-article-bottom_(300×250)”, [300, 250], “pb-ad-78623” ).addService( googletag.pubads() ) ); } );

googletag.cmd.push(function() {
mobile_slots.push( googletag.defineSlot( “/1005424/_dPSv4_mob-all-article-bottom_(300×250)”, [300, 250], “pb-ad-78158” ).addService( googletag.pubads() ) ); } );

The post How to Create a Hollywood Film Noir Portrait by Ivo Guimaraes appeared first on Digital Photography School.


Digital Photography School

 
Comments Off on How to Create a Hollywood Film Noir Portrait

Posted in Photography


Hollywood studios strike deal to keep Kodak movie film in production

31 Jul

A group of big name Hollywood directors has nudged studio executives into talks with Kodak, negotiating a deal that would keep the company’s movie film in production. With support from the likes of Quentin Tarantino, Christopher Nolan, and J.J. Abrams, the deal would see studios commit to buying a certain amount of film from Kodak for the next few years. Read more

Articles: Digital Photography Review (dpreview.com)

 
Comments Off on Hollywood studios strike deal to keep Kodak movie film in production

Posted in Uncategorized


Shoot Pro Quality Videos (Without a Hollywood Budget)

10 Mar

Extra photos for bloggers: 1, 2, 3

Whether the Oscars inspired you to shoot like the greats, or displeased you to the point of “I could do better,” NOW is the time to step up your video shootin’ game!

Take up your trusty DSLR, a Focus Shifter, the Oh! Wow. Ring Light and start writing that acceptance speech.

The Oh! Wow. Ring Light surrounds your lens in LEDs that provide even light at three brightness settings. It has a constant mode (perfect for videos) and also flash mode for stills.

The Focus Shifter fits snug on any lens, giving you a handle for max control of your focus ring and a marker board to set your focus points before you shoot.

Just don’t forget to thank the Academy, your mom and Photojojo. 🙂

See more example pix from our Ring Light
$ 99 at the Photojojo Shop

Learn More about the Focus Shifter
$ 49 at the Photojojo Shop


© laurel for Photojojo, 2014. |
Permalink |
No comment |
Add to
del.icio.us

Post tags:


Photojojo

 
Comments Off on Shoot Pro Quality Videos (Without a Hollywood Budget)

Posted in Equipment


Hollywood lighting secrets classic black & white photo videography lighting

02 Jan

Create that old time hollywood lighting effect. www.elitevideo.com has made it simple and easy with instructional videos for lighting called Digital Lighting Magic. This segment is just one of many from the 3 DVD set. Check out more at www.elitevideo.com
Video Rating: 4 / 5


Shahrukh Khan to host IIFA awards, Vicky Donor will apparently be remade in Hollywood, & more news

19 Nov

Aishwarya Rai’s wax statue gets a makeover! Anjana Sukhani talks about Ram Gopal Varma Anurag Kashyap has no time for Ranbir Kapoor’s ‘Bombay Velvet’ Chunky Pandey gets naughty on zoOm Shahrukh Khan to host IIFA awards Sonakshi Sinha turns photographer on-the-sets of ‘Rowdy Rathore’ ‘Vicky Donor’ will apparently be remade in Hollywood Will Shahrukh Khan skip the finale of the T-20 tournament? Your one stop destination for all the latest happenings,hot rumours and exclusive B-Town gossip… Subscribe NOW! www.youtube.com Follow us on twitter, facebook & Google+: www.twitter.com www.facebook.com gplus.to Also check out our website: www.zoomtv.in
Video Rating: 5 / 5

 
Comments Off on Shahrukh Khan to host IIFA awards, Vicky Donor will apparently be remade in Hollywood, & more news

Posted in Photography Videos


Earthquake! (3D) Universal Studio Tour at Universal Studios Hollywood

16 Nov

Experience “Earthquake: The Big One” in the world’s only multilevel sound stage during the tram tour through the Back Lot at Universal Studios Hollywood in California. 2D Video: www.youtube.com *3D Glasses Contest* To enter the contest to win a pair of 3D anaglyph glasses include “3D” in your comment. I will select 15 comments at random and send those people messages for their mailing addresses. You have two days after that to respond, if you don’t then someone else gets your glasses. If you don’t win, don’t worry, there will be more 3D glasses contests coming soon. Follow us on Twitter: Twitter.com Like us on Facebook: Facebook.com See more videos on our Channel: YouTube.com

 
Comments Off on Earthquake! (3D) Universal Studio Tour at Universal Studios Hollywood

Posted in 3D Videos


Animal Actors (3D) at Universal Studios Hollywood

12 Nov

Full Animal Actors show in 3D! *3D Glasses Contest* To enter the contest to win a pair of 3D anaglyph glasses include “3D” in your comment. I will select 10 comments at random and send those people messages for their mailing addresses. You have two days after that to respond, if you don’t then someone else gets your glasses. If you don’t win, don’t worry, there will be more 3D glasses contests coming soon. Note: I will contact winners via YouTube PM, if you have contact lock on I won’t be able to notify you if you win. Our photos from Universal: www.facebook.com Follow us on Twitter: Twitter.com Like us on Facebook: Facebook.com See more videos on our Channel: YouTube.com
Video Rating: 4 / 5

 
Comments Off on Animal Actors (3D) at Universal Studios Hollywood

Posted in 3D Videos


Eloise: Eloise Goes to Hollywood

17 Oct

When Eloise arrives in Tinseltown only to be asked to audition for a role in a major studio film, she thinks her glamorous dreams may actually be coming true. It’s an adventure full of famous actors, crazy directors and behind the scenes fun. But Eloise soon discovers making a movie isn’t always as exciting as it seems. Will she be able to pull off her secret plan to stop from becoming a huge Hollywood star and go back to being just plain fabulous Eloise? Imagination runs wild and being bored is never allowed in this fun-filled animated adventure featuring the talented voices of Lynn Redgrave, Tim Curry, Cynthia Nixon, Lacey Chabert, and more!
Video Rating: 0 / 5

 
Comments Off on Eloise: Eloise Goes to Hollywood

Posted in Animation Videos