RSS
 

Posts Tagged ‘Give’

Facebook Rights Manager updated to give photographers more control over their images

23 Sep

Facebook has announced a new rights management feature designed to give creators more control over their images. On Monday, Facebook product manager of the creator and publisher experience Dave Axelgard said, ‘We want to ensure Facebook is a safe and valuable place for creators to share their content.’ Key to that goal is the newly announced Rights Manager for Images.

Instagram is the dominant image-based social network at the moment, making it a valuable platform for creators…but it’s not without its controversy in the industry. Parent company Facebook is taking steps to address some of the criticism with its new Rights Manager for Images, which builds upon the existing Rights Manager to give photographers control over where their images appear on the social platform.

Rights Manager is a customizable tool found within the Facebook Creator Studio platform, which is built for creators to give them an element of control over their content across both Facebook and Instagram. The tool works by enabling users to add their content, after which Facebook will scan the two social platforms to find the content if it is posted on either.

Reposted content found on another user’s Page or profile can be removed or, in cases where it may be beneficial to the creator, the owner can either add an ownership link to the content or simply monitor the repost going forward. Creators have the option of adding exemptions for partners who have permission to share the content so that it isn’t flagged by the Rights Manager tool.

The newly announced Rights Manager for Images is described by Axelgard as a new version of the tool that is designed to offer management of photos ‘at scale.’ As with the original version of Rights Manager, Facebook requires creators to submit an application to get access to the tool.

The application includes selecting which Pages the user may want to protect, what type of rights owner they are (individual, publisher, etc.), the type of content that needs protected and similar details.

Facebook notes that this Rights Manager tool exists in addition to a number of other options creators have, including what it refers to as a ‘fast and effective’ intellectual property reporting system, as well as a policy for dealing with repeat copyright offenders and more. The tool ultimately gives creators the ability to prevent unauthorized sharing of copyrighted content, potentially bringing an end to reposts on Instagram.

It’s unclear how many creators have access to the Rights Manager, which addresses only one aspect of copyright issues on social media. Facebook has been criticized for failing to give Instagram users the ability to limit the sharing of public posts, something that was recently brought to public attention due to a couple of lawsuits earlier this year.

Facebook indicated earlier this summer that it may give Instagram users the ability to disable sharing or embedding posts, which would, for example, prevent media companies from embedding images to get around paying the photographer a licensing fee. The social media company complicated the matter in June when it clarified that its terms of service does not include sublicensing embedded content.

Though this may give creators more control over where their images are embedded, critics have said that it still places the burden on creators to find and police the use of their images due to Instagram’s readily available sharing and embedding tools. As well, the presence of these tools implies to users that they are allowed to embed public content on other websites without getting permission from the photographer first, potentially putting them at risk of unwittingly violating a photographer’s copyright.

Instagram told Ars Technica back in June that it was ‘exploring the possibility’ of offering users the option of disabling the embed tool. Such a feature remains unavailable at this time, however, meaning that Instagram users must make their images private if they don’t want users to have the option of sharing them.

Articles: Digital Photography Review (dpreview.com)

 
Comments Off on Facebook Rights Manager updated to give photographers more control over their images

Posted in Uncategorized


10,000 Headshots initiative saw 200 photographers give free headshots to unemployed workers

28 Jul

Photographers from across the United States joined together on July 22 to participate in the ‘10,000 Headshots’ initiative, a group effort that involved offering free professional headshots to unemployed workers with the goal of helping them secure new jobs. The initiative was coordinated by Headshot Booker, which explains on its website that these sessions were offered to anyone who was unemployed as of July 22 when the sessions took place.

The initiative was a success, according to Headshot Booker. Participants interested in getting headshots were required to pre-register for a 10-minute session and each location was limited to 50 total appointments. More than 200 photographers participated across 50 states and used Brookfield Properties retail locations with pop-ups as their studios.

The agency notes that every location used proper social distancing and safety measures to keep everyone safe, including contactless delivery of images and having photographers wear masks.

Headshots are an important aspect of finding work, the agency points out. Career-centric social platform LinkedIn claims that profiles featuring professional headshots are nine times as likely as other accounts to receive connection requests. Paying for a headshot while unemployed is particularly difficult, however, making it harder for those in need of a job to find one.

Professional photographer and Headshot Booker co-founder Peter Hurley explained:

Unfortunately, many job seekers underestimate the value of a professional headshot, instead opting for a snapshot taken by a friend or even worse a selfie. The headshot has become the cornerstone of one’s digital brand identity and we want to empower people as they go through the process of procuring a new job and getting back into the workforce.

The initiative was launched in partnership with Canon, MySpotPhotos and several other companies. Ultimately, every registered participant left the pop-up studios with a professional headshot for their resumes. Headshot Booker says this was the ‘largest, single-day photo initiative’ of its kind, one that comes amid widespread unemployment caused by the pandemic.

Articles: Digital Photography Review (dpreview.com)

 
Comments Off on 10,000 Headshots initiative saw 200 photographers give free headshots to unemployed workers

Posted in Uncategorized


How to Use Color in Your Photography to Give Your Photos the Wow Factor

17 Sep

The post How to Use Color in Your Photography to Give Your Photos the Wow Factor appeared first on Digital Photography School. It was authored by Jeremy Flint.

Photography is a wonderful art form that is enjoyed by people all around the world. It is a popular medium of expression, a fine art, a way of documenting our journeys and memories, and even a way to change views. Originally, when photography started it was all black and white, and historic photographers learned their craft in this way. Whilst this can be a great way to bring out textures and shapes, the introduction of color is a great way to attract attention and add impact to your images. Here are 5 tips to show you how to use color in your photography to give your photos the wow factor:

1. Find a colorful scene

Colour

St Nectain’s Glen waterfall, Cornwall, England

The first thing to do is to find a colorful scene. The way the countryside unfolds in the summer, for example, can be a wonderful way to show color in a landscape. Purple hues of lavender or golden wheat fields are all examples of where color can be captured to help your images stand out.

You could focus on one dominant color in a scene such as green. Alternatively, seek out a variety of tones like a cool blue sky mixed with a red field which can give your photos some impact and evoke different emotions. Blue can provide feelings of cold, whilst red can give warmth, energy, and excitement.

You can also use complementary colors in captivating ways. They refer to colors on opposite sides of the color wheel. For example, red and green or blue and orange. Other colors that work particularly well together include yellow, red and orange; and pink, purple and blue.

2. Look for details with color

Colour

Poppy field, England

Another way to use color in your photography is to look for details with color. You can photograph individual flowers in bloom such as bluebells or plant crops. As a part of a broader scene, you can photograph flowers like vibrant red poppies swaying in a field.

Think about the different colors and details you could photograph near you and experiment with a variety of color palettes to see what works well. Try and find details to photograph with single colors and combinations of colors to see which you prefer. Red is a strong color that attracts the viewer’s eye whilst yellow and orange can also command attention.

3. Change your white balance setting

how-to-use-color-in-your-photography

Stonehenge, England

One great advantage of the white balance setting is that your camera has the ability to change the color of your images simply by adjusting the white balance.

There are several different types of white balance which can be varied according to different lighting scenarios – auto white balance is the default setting for most cameras. Shade, cloudy and daylight can be selected for warmer and brighter colors, whilst tungsten and auto present cooler colors.

As the name suggests, a ‘shade’ white balance setting can work well in lighting conditions with shade and shadows, whilst ‘cloudy’ is a good choice when it is overcast. There is also an option to manually adjust your white balance to alter the color temperature to your taste.

4. Use a polariser to boost color and contrast

how-to-use-color-in-your-photography

Oxford, England

One of the greatest accessories you can have in your photography kit is a polarizing filter. A polarizer is usually placed at the front of your camera lens and is a versatile piece of equipment that can be brilliant to help darken skies, minimize reflections and manage glare from water sources such as lakes or the sea.

Polarizing filters are also a fantastic way to improve your images by instantly enhancing the color and contrast in your images. They don’t take up much space in your kit bag and are useful for making your images more distinct. Polarizing filters particularly work well in landscape photography by bringing out colors and reducing haze.

5. Boost colors in post-production

how-to-use-color-in-your-photography

Oxford, England

You can also add color to images in post-production. One way to boost the color of your photographs is to increase the saturation in post-production. You will find a saturation slider in most editing tools. Both photoshop and lightroom offer an adjustment slider where the color can be increased by moving it to the right. There is also the option to increase the saturation of individual colors to make certain parts of your images more vibrant.

Conclusion

Using color can be a great way to enhance your images. You can find colorful scenes, vibrant details, adjust your white balance, add a polariser or adjust the saturation in post-processing to give your photos more impact.

Try these techniques and share your images with us below. Also, if you have any other tips, feel free to share those too!


how-to-use-color-in-your-photography

The post How to Use Color in Your Photography to Give Your Photos the Wow Factor appeared first on Digital Photography School. It was authored by Jeremy Flint.


Digital Photography School

 
Comments Off on How to Use Color in Your Photography to Give Your Photos the Wow Factor

Posted in Photography


SD Express SDUC memory cards will give you 985MB/s transfer speeds and 128TB of storage

29 Jun

The SD Association has released the name and official specifications for SD Express, the latest Secure Digital (SD) memory card format, as part of its SD 7.0 specification. Created as a successor to UHS-III cards, SD Express is next-next-gen technology that will work alongside a new SDUC card to provide fast, high-capacity memory cards in a familiar package.

As the name suggests, SD Express cards are going to be fast. The SD Express format uses third-gen PCIe and NVMe transfer protocols on top of the dual-level pin layout interface to achieve a maximum transfer speed of 985MB per second—almost a gigabyte per second and roughly 1.5 times faster than UHS-III cards, which still haven’t hit the market yet.

In order to achieve the maximum transfer speed of SD Express cards, you’ll need a camera or device that supports the new format as well. If you end up sticking your brand new SD Express card inside your 5D Mark III, it’ll simply default back to the speed of UHS-I cards.

SD Express cards will be available in SDHC (High Capacity) and SDXC (Extended Capacity), as well as an all-new SDUC (Ultra Capacity) format. The new SDUC cards will have a maximum storage capacity of 128TB, a large leap from the maximum 2TB capacity of SDXC cards.

Infographic provided by the SD Association that details the various specs and classifications of different SD cards.

It also appears as though it’ll be possible for memory card manufacturers to make SDUC cards for slower SD bus interfaces. So, according to the above graphic, you could theoretically have a 128TB High Speed SD card. With a little back-of-the-napkin math, that means it would take 1,481 days to transfer all 128TB of the card based on the 25MB per second speeds of High Speed SD cards.

To find out more and read more details about the SD Express and SDUC formats, be sure to check out the SD Association’s press release. The SD Association has also released a white paper detailing the new capabilities and features found in the SD 7.0 specifications if you’re interested in really digging deep.

Articles: Digital Photography Review (dpreview.com)

 
Comments Off on SD Express SDUC memory cards will give you 985MB/s transfer speeds and 128TB of storage

Posted in Uncategorized


AI-powered Google Lens can identify types of flowers, give info about restaurants

19 May

At Google I/O 2017 the company showed off its new Google Lens technology. This AI-powered capability uses visual recognition to provide information about whatever your smartphone’s camera is pointed at. Examples given by the company include identifying a type of flower or providing reviews and other information about a restaurant.

You will also be able to point the camera at a concert sign and have the opportunity to buy tickets, or get connected to a Wi-Fi network by aiming at the router’s ID ‘setting sticker.’

Google Lens will be incorporated into the company’s Photos and Assistant apps, but specific release dates aren’t given.

Articles: Digital Photography Review (dpreview.com)

 
Comments Off on AI-powered Google Lens can identify types of flowers, give info about restaurants

Posted in Uncategorized


Adobe’s Lightroom Coffee Break videos give quick time-saving tips

11 May

It’s over ten years since Adobe’s Lightroom emerged from beta, and it’s evolved a lot since then. The company’s ‘Coffee break’ series of videos introduces features you might not know. For a minute of your time, these tips can help speed your workflow.

For instance, the video above (as highlighted on PetaPixel) shows you how to set the default processing applied to all your files. You can set it to a different preset per camera or even per ISO setting, if you have a preferred noise reduction and sharpening system.

In this video, Lightroom team member Benjamin Warde explains (in 46 seconds) how to define a new starting point for when you work with new files. That’s got to be worth a moment of your time, hasn’t it?

Click here to see the Coffee Break playlist of 34 sub-minute video.

Articles: Digital Photography Review (dpreview.com)

 
Comments Off on Adobe’s Lightroom Coffee Break videos give quick time-saving tips

Posted in Uncategorized


Microsoft’s HoloLens may give surgeons virtual help during spinal surgeries

06 May

Scopis, a maker of navigation tools for surgeons, has introduced a new platform that utilizes Microsoft’s HoloLens mixed-reality headset. The benefits are pretty obvious – useful information can be projected in onto a patient, hands-free, and virtual monitors can be displayed within view for quick reference. Take a look at a simulated demo in the video above.

Articles: Digital Photography Review (dpreview.com)

 
Comments Off on Microsoft’s HoloLens may give surgeons virtual help during spinal surgeries

Posted in Uncategorized


A Passion for Wrecks and Images Give a Photography Enthusiast a Second Career

21 Apr

photography-wrecks

Image: Pongsatorn Sukhum

Pongsatorn Sukhum was on his way to becoming a professional photographer. A long-time camera enthusiast, he took a year off college while studying in the UK to work in a studio that shot advertising photography. He then moved into editorial photography, shooting for travel magazines and building up a collection of underwater stock images that combined his love of photography with his passion for Scuba diving. In the mid-nineties, his work was shown in a group exhibition in his native Thailand. Today, Pongsatorn runs an engineering business in Bangkok but his continued work in underwater photography, and in particular, his images of World War II wrecks off the coast of Thailand are an example of how talented enthusiasts can keep their professions while maintaining their passion for image-making and even contributing to the preservation of the subjects they love to shoot.

Pongsatorn now produces fine art prints of his photography which he sells through his website. But publications call him whenever they need images to complement their editorials on wrecks in the region and he is still commissioned occasionally for advertising work. If he’s not working on an engineering project, he’ll dive one or two weekends each month and when he’s not on the water, he’ll find time each week to process images and research ships.

Artistry Meets Expertise

That demand for professional imagery from a photographer who only works in the profession part-time continues for a couple of reasons. The quality of Pongsatorn’s photographs is certainly one factor. Pongsatorn may not be a full-time photographer but his images are professional quality. He shoots in black and white to convey the sense of being in an environment in which color has been stripped away by the water, and to convey the mood at the depths where the ships rest.

“I feel that the characteristics of high-speed b/w film faithfully capture the light and ambiance at these great depths,” he told us by email. “I also believe that entering the water loaded with b/w film is a mindset.”

The result is a collection of atmospheric shots in which the fragility and graceful lines of the diver are set against the solidity of a slowly decaying steel hulk placed in front of a backdrop of silty grays.

But the continued demand among buyers for Pongsatorn’s skills can also be put down to his expertise. Underwater photography is demanding. Photographers have to be skilled in diving as well as in image-making. They need to understand their equipment and the environment as well as the subject of the shoot.

“Underwater, we can’t change lenses, add filters, or replace batteries so advanced planning is required,” says Pongsatorn. “Familiarity with the layout of the wreck is crucial to avoid delays associated with orientation.”

Pongsatorn keeps a collection of construction blueprints related to the wreck he’s about to shoot, as well as sketches that he updates regularly. Before the dive, those plans are transferred to a waterproof slate for use underwater so that he’s not trying to communicate a new idea to a co-diver or assistant while they’re swimming. The choice of shots, too, poses a range of different problems. Wide angle images mean keeping other divers and their bubbles away from the scene long enough for Pongsatorn to get his shots. That’s not usually an issue when shooting wrecks that aren’t popular dive sites but for well-known locations, Pongsatorn usually pleads for a ten-minute head start. Before some shoots, he’s even asked the Thai Navy to cordon off a wreck for a day.

While underwater photographers don’t have the same daylight worries as landscape photographers, they do have to cope with other challenges. Weather conditions can restrict accessibility to remote sites to certain times of the year, and sediment raised by the actions of a swimming photographer can reduce visibility.

“This happens frequently as the wrecks are naturally on the sea bed (with the exception of the so-called vertical wreck) where there is a great deal of sediment just waiting to be disturbed,” says Pongsatorn. “Diver buoyancy control and proper finning techniques need to be practiced.”

Learn How to Fin

Often, the constraints of time and the limitations of depth mean that Pongsatorn can only make one or two dives to a low-lying wreck on any given day. Some dive profiles, he says, are so deep that he’ll only be able to stay at the site for as little as five minutes.

“As you can imagine, deep wreck photography is a very low-yield activity. However, these challenges make it exciting and create opportunities for some truly creative work.”

For other photographers looking to specialize in underwater photography, Pongsatorn notes that while no official training is required, there are numerous basic courses and workshops available that will explain how light behaves underwater and how to set up and look after equipment. Photographers who happen to live in tropical areas can start by photographing clown fish, he recommends, as they’re easy to find and tend to stay in one place. Once they’ve mastered finning and have control over their stability, photographers can pick a subject and study its behavior.

Most important though is to respect the environment in which you’re shooting. On his blog, Pongsatorn has highlighted campaigns for shark preservation and attacked dive operators who remove artifacts from the wrecks they visit.

“There are several operators who specifically set out to loot. It’s in their literature. They abuse the legal loopholes and lack of enforcement. It’s sad to see all these artifacts being hauled up day after day. These people need to be educated.”

Similarly, divers who venture into a wreck exhale bubbles which can get trapped below decks and under bulkheads. In time, these air pockets corrode the metal and exert an upward pressure on the metal plates, causing them to collapse, Pongsatorn warns.

It’s that kind of knowledge and that level of concern that combines with creativity and artistry to produce images that are attractive to buyers — both of art prints and for commercial use. Find a subject for which you feel passionate enough to want to study and understand completely, bring to it your photography skills, and you also won’t need to give up the day job to earn money from your photography.


Photopreneur – Make Money Selling Your Photos

 
Comments Off on A Passion for Wrecks and Images Give a Photography Enthusiast a Second Career

Posted in Equipment


Olympus to give away OM-D E-M1 ll and 1M Yen in global competition

15 Nov

An Olympus OM-D E-M1 ll with a 12-40mm F2.8 Pro lens and ¥1M is up for grabs for the winner of the 2016-2017 Olympus Global Open Photo Contest. The competition is open to amateur and professional photographers alike, and the company has placed no restriction on the equipment used to take entered images saying ‘Any photographic device from a DSLR to smartphone may be used.’

There are four categories with these themes:

  • Power of life
  • Connections to Cherish
  • Places that Inspire
  • Perspectives Often Missed

There will be three prizes for each category with first place images winning an OM-D E-M5 ll with the 12-40mm F2.8 Pro lens, second placed winners getting an OM-D E-M10 ll with 14-42mm F3.5-5.6 EZ and those coming in third receiving a Pen E-PL8 with 12-42mm F3.5-5.6 EZ. The overall winner will get the OM-D E-M1 ll with the 12-40mm F2.8 Pro lens and the cash.

Entry is free and entrants may submit up to five pictures for each category until the closing date on January 10th 2017. Winners will be announced in April 2017. At current exchange rates 1,000,000 Japanese Yen is worth about $ 9200/£7400/€8600.

For more information visit the Olympus Global Open Photo Contest website.

Articles: Digital Photography Review (dpreview.com)

 
Comments Off on Olympus to give away OM-D E-M1 ll and 1M Yen in global competition

Posted in Uncategorized


How to Give Your Landscape Photos Extra Punch in One Easy Step

09 Nov

Have you ever felt that your landscape photography is missing a little punch? You look at other photographers’ images and their colours have a very appealing amount of contrast. But no matter how much you play around with HSL (Hue, Saturation, Luminance), Contrast, Vibrance or Saturation, your colours just don’t get the same depth and contrast and end up looking fake and oversaturated.

The quality of the lens being used affects color greatly (more expensive lenses generally give a much better colour contrast than entry-level lenses). But there is a step that you can do when post-processing your recent landscape photos to give the colours an extra little bit of punch and contrast and more importantly, keep them from looking overcooked.

before-after

Color space

You may be aware of a term Colour space which essentially determines how devices represent colour. The two most common colour spaces are Adobe RGB and sRGB. Adobe sRGB is used on the web and for many smart devices. Adobe RGB is a little bigger than sRGB and can show more colors. However, these are not the only colour spaces around. Lightroom, for example, uses one of the largest (able to produce a larger amount of colours) called ProPhoto RGB.

But enough about colour spaces! I can already see your eyes glazing over, mine are already as I type this. But knowing that there are different colour spaces can be helpful. Knowing exactly how they work isn’t necessarily all that important.

Convert to Lab Color

The colour space that you’ll want to recognize is LAB Color. How does it work? Doesn’t really matter. But how can you use it give your images that extra punch? In this article, I’ll explain how a very simple step (and I mean simple!) that will help give your images that extra punch using the LAB colour space in Photoshop.

Okay, so first up you’re going to want to bring your image into Photoshop. Before you do this, you may need to develop the image a little in Adobe Camera Raw or Lightroom. Fix up any exposure issues, correct the white balance, etc.

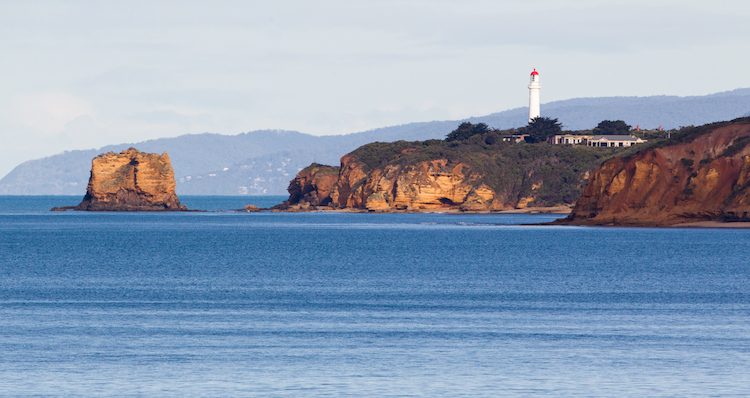
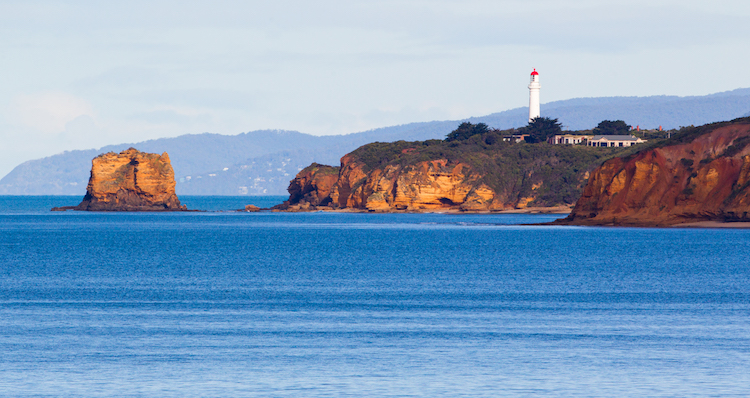
This is the image that I’ll use as an example.

before

This image has had very little done to it prior to Photoshop. A simple crop, general contrast and exposure correction were all that was applied.

Now that your images is open in Photoshop, the very first thing you need to do is convert it from Adobe RGB or sRGB (depending on what you have set as the working colour space in Photoshop) to LAB Color.

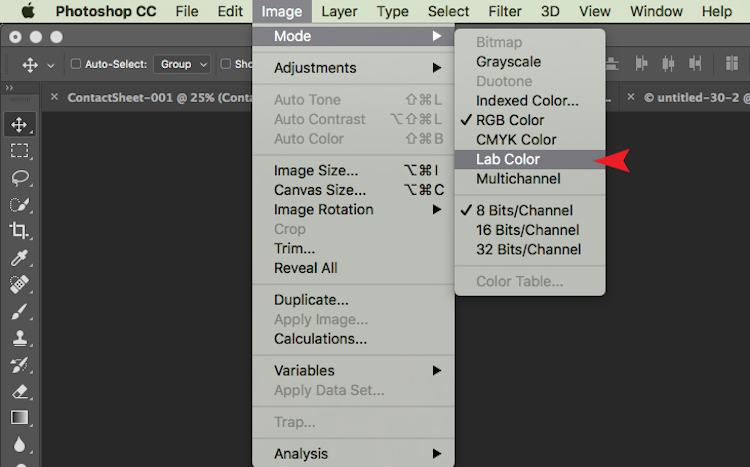
To do this, go to: Image > Mode > Lab Color.

The tick next to RGB Color means that Adobe RGB is currently being used.

The tick next to RGB Color means that Adobe RGB is currently being used.

Now Photoshop is using LAB instead. You won’t notice a change at all at this step because nothing has changed on your end. All you have simply done is tell Photoshop which method to use to display colours.

Add a Curves Adjustment Layer

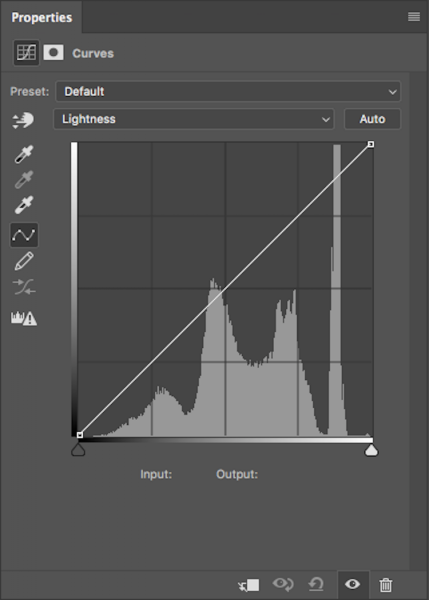
With your image in LAB Color, the next step is to create a Curves Adjustment Layer. Once this layer has been created, you should see something like this:

lab-curves1

Generally, this doesn’t look any different to any other Curves Adjustment Layer except for one thing. Instead of having RGB in the drop down menu, you will see Lightness.

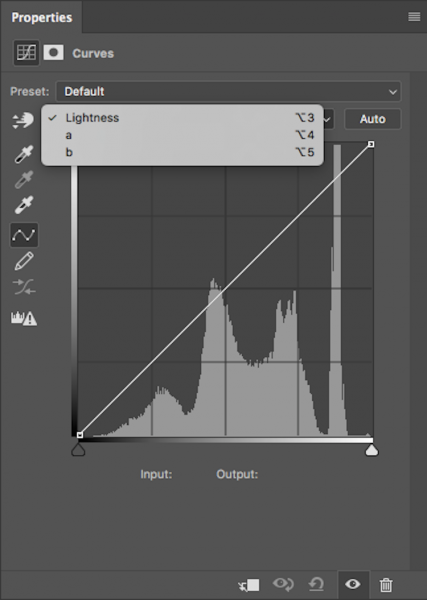
With this adjustment layer created, the next step is to click on the Lightness drop down menu. This brings up Lightness, A, B; which is what LAB is short for!

lab-curves

Adjust Channel A

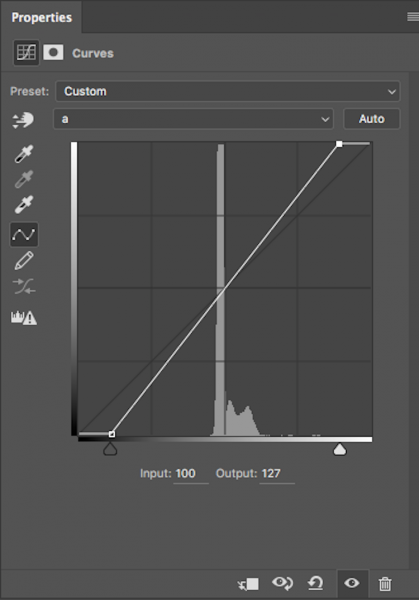
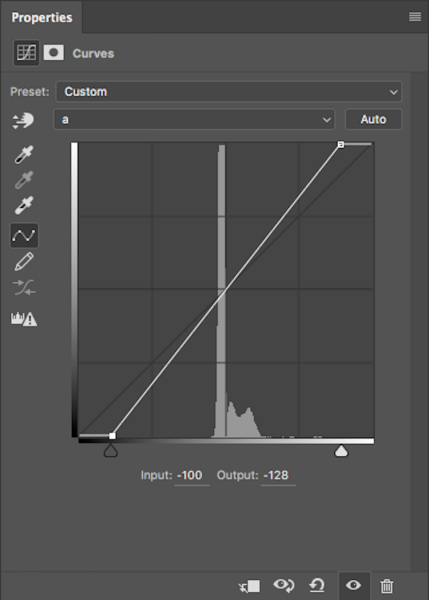
Now, you need to select the A-channel. With the A-channel selected, bring in the shadows anchor point at the bottom-left corner toward the bottom-centre. You will notice the Input numbers increasing from -128. As a starting point, I like to bring this value to -100. Now, find the highlight anchor point (top-right) and bring that toward the top-centre by the same value; for -100 set it to 100.

Notice the anchor points have moved toward the centre equally?

Notice the anchor points have moved toward the centre equally?

You’ll notice strange things happening to your colours as you slide the anchor points along. Don’t panic – this is supposed to happen.

Adjust Channel B

Now do the same steps by the same values for both shadows and highlights for the B-channel.

Same steps have been done for Channel B

Same steps have been done for Channel B

NOTE: make sure your Output value remains at -128 for the shadows and 127 for the highlights. If these numbers are altered it means that the anchor point is being lifted from the bottom for shadows and dropped from the top for highlights. You just want to drag the sliders along horizontally (not move them up or down).

With both A and B channels having been done now, the colour and colour contrast of your image should look different from the original. This is how my original image looks after these steps.

This is after setting A/B shadows to -100 and highlights to 100.

This is after setting A/B shadows to -100 and highlights to 100.

Fine tuning

For me, that is looking a little overdone. But no problem! To change this, all you have to do is reduce the amount you moved the anchor points in both A and B channels. I generally find going by increments of 10 is most helpful.
If you feel your image needs more punch, then you will want to bring the anchor points closer to the centre. Just remember to keep each value across the shadow/highlight, A/B channels the same.

After increasing the numbers in my images, I felt that -110/110 in A/B worked the best (see below).

after-110

Convert back to RBG

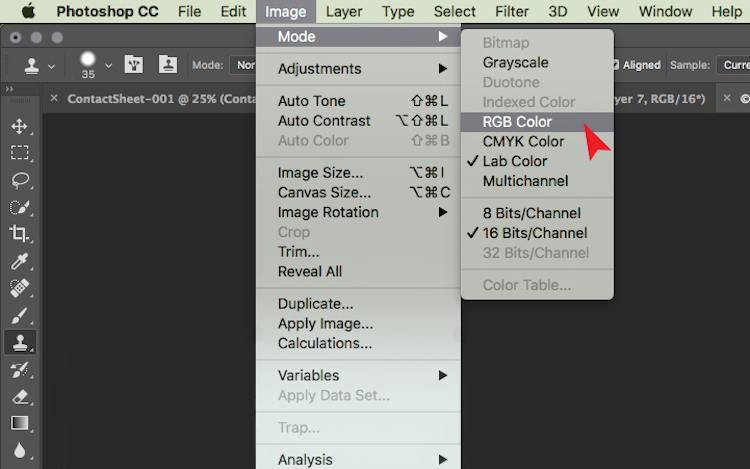
Once you are happy with how your image looks, it’s time to change it back to RGB. To change your image from LAB to RGB, go to: Image > Mode > RGB color.

change-to-rgb

You’ll be alerted that changing modes will discard adjustment layers, but that is fine. Select OK and you’ll be brought back into RGB. You’ll notice that the Curves Adjustment layer is now gone and that your image is now the background layer. However, the effect on the colours should remain. Now you’re free to go about editing the photo as much as you like.

So that’s a very simple technique to add more colour punch in your images. Just remember these two points:

  • This is something that you should do at the beginning of editing your image in Photoshop and not the end as you will lose all your adjustment layers when changing modes.
  • Remember to alter the anchors points from A/B b by the same value to eliminate strange things happening to your colours.

googletag.cmd.push(function() {
tablet_slots.push( googletag.defineSlot( “/1005424/_dPSv4_tab-all-article-bottom_(300×250)”, [300, 250], “pb-ad-78623” ).addService( googletag.pubads() ) ); } );

googletag.cmd.push(function() {
mobile_slots.push( googletag.defineSlot( “/1005424/_dPSv4_mob-all-article-bottom_(300×250)”, [300, 250], “pb-ad-78158” ).addService( googletag.pubads() ) ); } );

The post How to Give Your Landscape Photos Extra Punch in One Easy Step by Daniel Smith appeared first on Digital Photography School.


Digital Photography School

 
Comments Off on How to Give Your Landscape Photos Extra Punch in One Easy Step

Posted in Photography