RSS
 

Posts Tagged ‘button’

Exposure Lock Button – What is it and How to Use it?

07 May

Nestled quietly on the back of most cameras is a button that is often ignored or misunderstood, particularly by those who have recently upgraded to a DSLR or Mirrorless camera. It’s the Exposure Lock button, and it can be a tremendous asset to photographers who are looking for ways to get more control over their cameras and ultimately their photography in general.

students

Using the exposure lock button helped me get the correct exposure on this picture of two students studying for final exams.

To understand what this button does it’s helpful to know a bit about how your camera calculates the exposure using aperture, shutter speed, and ISO sensitivity.

In Full Automatic mode these are all handled by the camera itself, producing images that are often pretty nice but can sometimes turn out too dark, too bright, or otherwise not exactly how you intended. In Manual mode you are required to set all three parameters yourself, which can sound intimidating at first, but is quite easy once you get the hang of it. However if you shoot in one of the semi-automatic modes like Aperture Priority, Shutter Priority, or Program Auto you have a high degree of control while still letting your camera figure out a few things too.

In Aperture Priority you set the aperture and ISO, while your camera figures out the shutter speed to use for a properly exposed photo. But, in Shutter Priority you set the shutter speed and ISO to use, while letting your camera set the aperture. In these so-called Creative modes the automatic parameters (whichever settings are handled by your camera, not you) are constantly changing depending on what you point your camera at in order to get a nice, even overall exposure.

stairway

I didn’t have much time to get this shot, so using the Exposure Lock button was a quick way for me to get the image I was looking for.

This is where the Exposure Lock button comes in; it freezes whichever exposure parameter was set by your camera until you take a picture. At first this might sound like a silly thing to do but makes a bit more sense when you understand how it can be used.

I shot the picture below in Aperture Priority with my aperture set to f/2.8 while my camera selected a shutter speed of 1/500. Unfortunately my camera was looking at the entire scene, not just the subject, and chose a shutter speed that resulted in my subject being far too dark. The tradeoff was that the background was properly exposed, but my camera did not know that I was more concerned with the teddy bear than the scenery outside. To correct the problem I simply pointed my camera down at a darker spot in the foreground, pressed the Exposure Lock button, and held it down while recomposing my shot to the original framing. When I locked the exposure my camera selected a slower shutter speed of 1/30 which resulted in my subject being well lit even though the background elements were a bit too bright.

bear-underexposed

I shot this in Aperture Priority at f/2.8 but with the bright light through the window, my camera picked a shutter speed of 1/500 second. The outside looks great, but my subject is horribly underexposed.

Aperture Priority, f/2.8, 1/30, ISO 200.

By pointing my camera down, locking the exposure, and then recomposing the result was f/2.8 with a shutter speed of 1/30 second. Far too slow for the background to be properly exposed, but my subject looks just fine.

You might look at this photo and wonder where the background went, but remember what happened in the original when the background was visible – the subject was too dark. By locking the exposure such that my subject was well lit, the background ended up far too bright. It worked out just how I wanted, because it was the bear that mattered to me, and not the scenery outside the window. I could have also employed another method to get my subject properly exposed such as center-weighted metering or adjusting the Exposure Compensation, but in this case I found the Exposure Lock function to be quick and easy enough to get the job done. It’s a handy tool to have in your back pocket for those times when you need to quickly over or under expose your shot.

rooftop

The Exposure Lock button came in handy here as well, and helped me get both a background and foreground that are well lit.

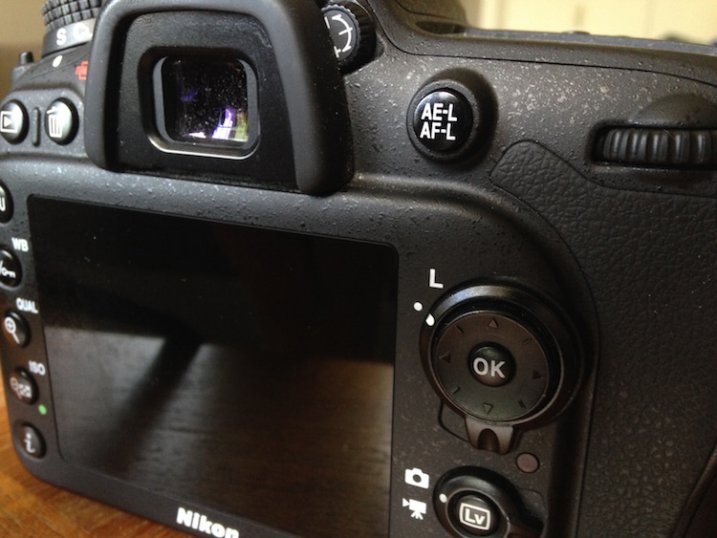
If you’re interested in trying your hand at Exposure Lock, most camera manufacturers make it fairly painless. On Nikon cameras the button says “AE-L/AF-L” and is located about an inch from the right-hand side of the camera (on the back), while Canon’s button is a bit smaller and marked with an asterisk. You can even customize it on some cameras so that exposure is locked until you take a picture or as long as you physically press the button. Sony, Pentax, Olympus, and others have this button too but its exact appearance and location varies depending on the manufacturer and model.
exposure-lock-button

Most Nikon bodies have the Exposure Lock button in the top-right corner, but the exact location on your camera may be a bit different.

The Exposure Lock button is a nice tool to have at your disposal, but it’s not quite the same as shooting in Manual mode while reading your light meter and histogram to make sure your exposure is nailed precisely how you want it. Still, it’s a fantastic way to adjust your exposure quickly, without changing any metering modes or other shooting parameters. I often find myself using it when I need to over or under expose the scene in a pinch, and once you get the hang of it you might find it useful in a similar fashion.

Are you a fan of the Exposure Lock button, or do you have any other photography tips to help your curious camera-owning counterparts get photos that are properly exposed? Leave your thoughts in the comment section below.

googletag.cmd.push(function() {
tablet_slots.push( googletag.defineSlot( “/1005424/_dPSv4_tab-all-article-bottom_(300×250)”, [300, 250], “pb-ad-78623” ).addService( googletag.pubads() ) ); } );

googletag.cmd.push(function() {
mobile_slots.push( googletag.defineSlot( “/1005424/_dPSv4_mob-all-article-bottom_(300×250)”, [300, 250], “pb-ad-78158” ).addService( googletag.pubads() ) ); } );

The post Exposure Lock Button – What is it and How to Use it? by Simon Ringsmuth appeared first on Digital Photography School.

Digital Photography School

 
Comments Off on Exposure Lock Button – What is it and How to Use it?

Posted in Photography


Back Button Focus: What is it and why should you try it?

04 Mar

What operation on a camera could possibly be more simple than pressing the shutter button to take a picture? There’s not much to it, really –  you look through the viewfinder (or at the LCD screen on the back of the camera), press a button with your index finger, wait for the camera to focus, and voilà! You’ve got a photo.

Well, as the popular saying goes, what if I told you there was a better way? Hidden deep within the settings of most cameras is a feature called Back Button Focusing, and enabling it can transform your approach to photography.

A Brief History

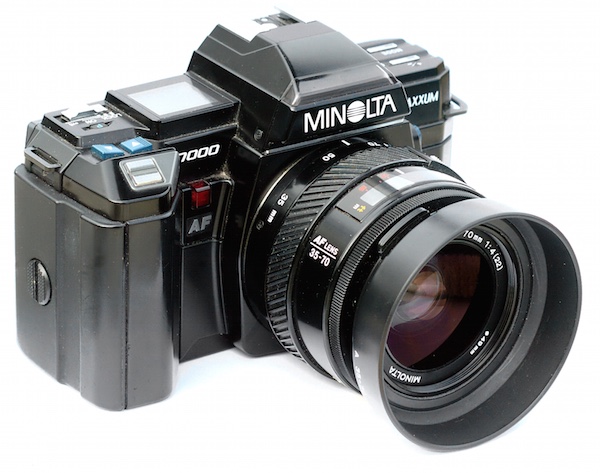
MinoltaMaxxum7000

The Minolta Maxxum 7000 was one of the first SLR cameras with autofocus capability in 1985.

To understand what Back Button Focusing is, it’s important to know a little about the history of the autofocus function on your camera. Until the mid-1980s, there was no such thing as autofocus on consumer-level film cameras. You had to hold your camera up to your eye and either turn a ring on the outside of the lens or adjust what’s known as a rangefinder in the top-left corner. It required a great deal of patience and practice, and there are many photographers today that still swear by this method.

In 1985 Minolta released the Maxxum 7000 which integrated the autofocus function into the shutter button, which seemed like a sensible choice because you would normally want to make sure the camera was focused before taking a photo. This implementation of autofocus worked well, but required a bit of maneuvering if the photographer wanted to focus on something other than what was in the center of the photo. To do that, he or she would have to aim the camera at the object to be in focus, carefully hold the shutter button down halfway to keep the focus locked while re-composing the shot, then pushing the button all the way when the picture was ready.

This system remains in place on most cameras today, and it’s probably how your own camera operates. At this point you might be wondering why you should bother to change something that has worked perfectly well for the past 30 years.

CanonEOS630

Canon’s EOS 630 was the first camera to give users the option of using a separate button for focusing instead of the shutter button.

The answer is because there really is a better way to focus your camera before you take a picture, and it was invented by Canon in 1989. On their EOS 630 camera they included an option within the camera’s custom settings menu to separate the actions of focusing and snapping the shutter. Users could tell the camera to use a separate button on the back of the camera to handle focusing duties, which left the shutter button to do one thing and one thing alone: take the picture. It was not an immediately obvious feature, and it never really caught on like Canon may have hoped, but the same capability is in every Canon DSLR today as well as virtually all cameras from other manufacturers like Nikon, Pentax, Sony, and the rest. If you have any sort of DSLR or mirrorless camera there is probably an option in your settings menu to enable Back Button Focus, and it’s something I highly recommend trying out.

Back Button Focus requires your thumb to press a button on the back of your camera (hence the name) and your index finger to press the shutter, which does take a few days to get used to, but soon becomes second nature. All this begs the question – why should you re-learn how to do something as basic as focusing your camera when the shutter half-press works perfectly fine? The answer lies in the overall concept of giving more control back to you, the photographer.

More Creative Freedom

Cameras today have a dizzying array of autofocus points – those little dots or squares that light up in the viewfinder when you press the shutter button down halfway. You also have a ton of options in how you use these points. You can select an individual point, you can have the camera select what it thinks is the best one, you can tell your camera to use some of them in conjunction with one another, and many cameras have modes such as automatic face detection as well. To be honest, all these options works really well. But just know that by decoupling the act of focusing from the shutter button, and moving it to a separate button, you will be able to do a lot more with your photography than you may realize.

NikonD200BackButton

If your camera has an AF-ON button, you can use it to focus instead of the shutter button. If your camera does not have this button, you can usually adjust the camera’s settings to make another button such as AE-L/AF-L perform this function.

By using a button on the back to focus, you will no longer have to hunt around for the specific autofocus point you want to use or wait for the camera to focus on what it thinks you want to before allowing you to take a picture. Trying to keep a moving subject in focus while deftly holding the shutter down halfway is a feat of dexterity that would keep Legolas himself at bay. This is easily remedied by using back button focus. With this method you can hold the back button down as long as you want, which keeps your camera continually focusing on your subject, until you are good and ready to snap a photo. This is incredibly useful when your subject is in motion, whether people, animals, mechanical objects, or simply a flower petal meandering across a meadow.

One of my favorite cameras is the Nikon D7100, which has 51 autofocus points that cover almost the entire frame. For a while I used all of them, frantically shifting from one to the next as I adjusted each shot or tried to track a moving subject. It worked fairly well, especially in conjunction with Nikon’s 3D subject tracking algorithm (variants of that can be found in most cameras today) which did a good job of keeping my subject in focus whether it moved or I altered my perspective. But I found that I often messed up some critical shots because I was either too busy changing the autofocus point, or letting my camera decide what it thought should be in focus. Switching to back button focus remedied all of this, and helped me gets shots that would have been much more difficult otherwise.

To get this shot I used the back button to focus on a different passer-by, and then waited for others to come down the sidewalk. I was then free to snap photos no matter where people were in the frame, because the shutter button was not also refocusing the picture.

To get this shot I used the back button to focus on a different passer-by, and then waited for others to come down the sidewalk. I was then free to snap photos no matter where people were in the frame, because the shutter button was not also refocusing the picture.

By using the back button to focus I will often just utilize the center focus point to get my subject in focus, and then release my thumb from the button while re-composing to frame the subject. It’s much faster than hunting for a specific autofocus point, and allows me to take the photo at the exact instant I want -not when the camera thinks the subject is in focus. This focus-and-recompose technique works great for a variety of situations, but there are certainly times when I like to utilize one of the built-in AF points. When that happens I just go through the motion of selecting one and then taking a picture like normal while using the back button to focus. In essence, using the back button to focus simply gives me more options when taking a photo, which allows me to think more about the pictures I’m taking instead of fiddling with the camera.

I was able to snap a few photos of this husky by holding my thumb down on the back button to continually adjust the focus, and pressing the shutter to snap photos whenever I wanted.

I was able to snap a few photos of this husky by holding my thumb down on the back button to continually adjust the focus, and pressing the shutter to snap photos whenever I wanted.

Taking the Power Back

Most cameras have a few common focusing modes: Single, Continuous, and Manual. In Single mode, the camera focuses once and then won’t re-focus again until after you take a picture. This is how many photographers use the focus-and-recompose method without using the back button, and it works fine in a variety of situations. The Continuous method forces your camera to constantly adjust focus while your finger is held down on the shutter button, and doesn’t stop until you snap a photo. Manual, as its name implies, leaves all the focusing duties to the photographer who must adjust a ring on the lens in order to nail the focus without any assistance from the camera. All three of these methods have their uses, and you will often encounter situations in which you need to switch from one to the other (for example, switching quickly from Single to Continuous). Doing this requires digging through menus or flipping a dial on your camera, and it can be a bit of a pain.

Using the back button combines all three focusing modes, giving an incredible amount of power and control to the photographer:

Manual: Take your thumb off the back button and focus by rotating your lens barrel. (Note: do not do this if your lens doesn’t have a “M/A” focus setting. If it is in fully autofocus you will be forcing the gears)

Single: Press your thumb on the back button until your camera is in focus, and then lift your thumb up to keep the focus locked until you press the button again.

Continuous: Hold your thumb on the back button as long as you want, forcing your camera to continually adjust the focus until you take a picture. (Note: you must be using Continuous focus mode for this to work).

Nailing this shot of falling water drops required a lot of switching between automatic and manual focus, and would have been virtually impossible if the shutter button was used for focusing instead of the back button.

Nailing this shot of falling water drops required a lot of switching between automatic and manual focus, and would have been virtually impossible if the shutter button was used for focusing instead of the back button.

You can effortlessly switch between all three methods without doing anything at all except moving your thumb away from the back button, which means you can spend far more of your effort on things like composition and framing, instead of digging through menus on your camera.

Finally, one of the most overlooked benefits of using the back button to focus is that it frees up your shutter half-press to do other functions like lock the exposure. You will have to enable this option using your camera’s settings menu, and you might not use it on every shot, but it’s yet another tool in your photographic arsenal that can help you get better photos. When your subject is in danger of being over or underexposed, you can quickly point your camera at something else to get a better exposure, press the shutter button down halfway to lock the shutter/aperture/ISO values, and then recompose to get the image you want. This trick, combined with back button focusing, has saved my proverbial bacon more times than I can count. Normally this exposure-locking function is handled by its own dedicated button, but I have found it to be far more useful to use the exposure-lock button for locking focus and the shutter for locking exposure – effectively reversing the default behaviours of both buttons, but making your camera much more versatile in the process.

All this talk of button-switching and extra finger-pressing might seem inordinately confusing, but it’s much easier than it sounds. Though it might seem counterintuitive at first the more you use the back button to focus the more it will make sense and help you unlock new creative possibilities with your camera.

If you can’t figure out how to set it up on your camera, try and quick YouTube search for “setting up back button focus on a _________” and fill in your camera model.

Do you like to use back button focus? What other tricks do you have up your sleeve to help you get better photos? Leave your feedback in the comments section below.

googletag.cmd.push(function() {
tablet_slots.push( googletag.defineSlot( “/1005424/_dPSv4_tab-all-article-bottom_(300×250)”, [300, 250], “pb-ad-78623” ).addService( googletag.pubads() ) ); } );

googletag.cmd.push(function() {
mobile_slots.push( googletag.defineSlot( “/1005424/_dPSv4_mob-all-article-bottom_(300×250)”, [300, 250], “pb-ad-78158” ).addService( googletag.pubads() ) ); } );

The post Back Button Focus: What is it and why should you try it? by Simon Ringsmuth appeared first on Digital Photography School.


Digital Photography School

 
Comments Off on Back Button Focus: What is it and why should you try it?

Posted in Photography


Moment phone case brings two-stage shutter button to iPhone 6

30 Jan

Moment, a Seattle-based company that is known for its high-quality smartphone accessory lenses has launched a Kickstarter campaign for its latest product idea, the Moment case. The Moment case is a case for the Apple iPhone 6 that offers a two-stage shutter button, allowing you to half-press to lock focus and exposure. The connection to the phone is electronic without any mechanical components. The grip links to the iPhone via a low-energy bluetooth connection. Read more at connect.dpreview.com

Articles: Digital Photography Review (dpreview.com)

 
Comments Off on Moment phone case brings two-stage shutter button to iPhone 6

Posted in Uncategorized


The Q Button – What Every Canon DSLR Photographer Needs to Know

09 Dec

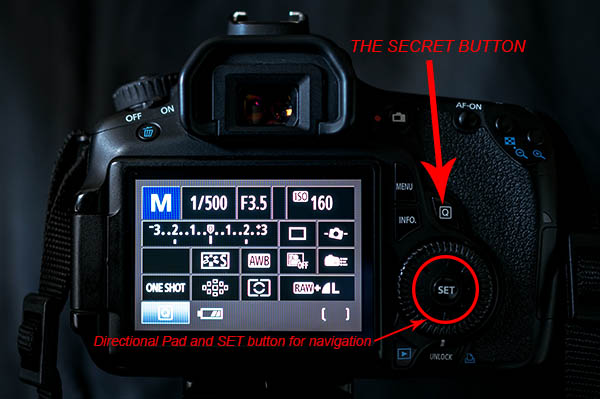
Cameras can be super complex these days. Buttons, knobs and switches are everywhere. How can you remember what all of them do and where to begin? Well, Canon has given you a secret button to use that allows you to access all of those most important functions within your complex machine. Perfect, where is this secret button you ask? It’s right on the back of your camera marked with the letter Q. It’s not really a secret, it’s just under utilized.

COVER IMAGE

The Q Button

What does Q stand for? Quick. The button makes navigating just that. Using the button gives you quick access to all of the major functions that you need. Let’s go through some of those functions so you can see how easy it is use your camera. Grab your Canon and let’s try it out.

How to use it

Go ahead, give the Q button a press while watching the LCD screen on the back of your camera. As you see it highlights one of your current settings. Depending on your Canon model this may light up the current selection in a blue/green color or it may outline it with an orange box. Next you can cycle through your settings by using the directional pad located around your SET button. Simply highlight the setting you want to change and then you have a couple of options.

First, and easiest, is to roll your settings dial while it is highlighted. This will cycle through your options for that particular setting. Your second choice is to push the SET button while a setting is highlighted. This will lead you to a more detailed screen showing all of your options for that setting.

The Secret Button

Canon also made things easy by providing a description of each option at the bottom of the LCD as you scroll through. At first it will be more beneficial to use the second option so you become familiar with what settings are available, and what the symbols mean. Once you get that down, using option one to zip through the settings is a breeze.

As a beginner it can be really helpful using the LCD screen and the Q button so you can see everything about the exposure and settings right in front of you. When you depress the shutter button half way the current exposure reading will be displayed on the meter on your LCD. This makes it really easy to adjust your settings while seeing how each element of exposure (aperture, shutter speed and ISO) is affecting the meter.

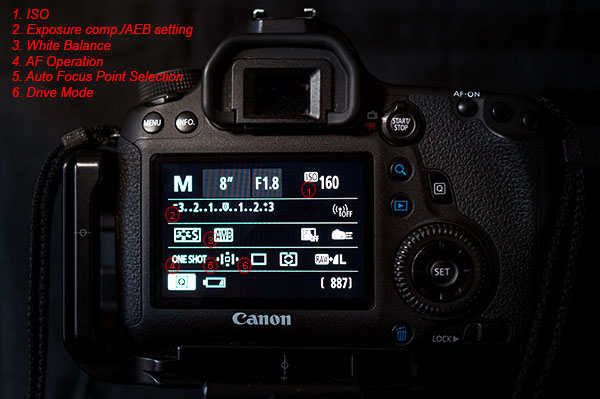
Some of the settings you will adjust most are ISO, exposure bracketing, white balance, focus type, focus point and drive mode. When you use these techniques they each can be adjusted in seconds!

Visual Guide

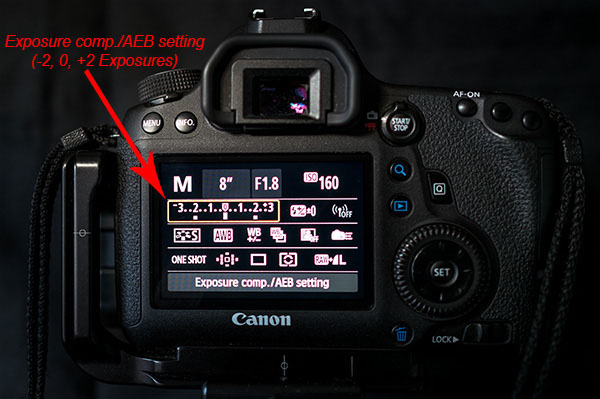
The Q button is particularly useful when you are bracketing exposures for HDR. Press it and highlight the Exposure Compensation/AEB setting. Now spin your settings dial to the right and watch as the light meter changes to three lines in lieu of the typical single line. Set the lines as far apart as you want your bracket to be (i.e. -1, 0, +1 or -2, 0, +2). Last, use the directional pad to highlight the Drive Mode setting. Again scroll to the right until you reach the Self-timer (2 seconds/remote setting). Now, once you fully press the shutter button your camera will wait two seconds and then take all three exposures that you set. It’s as simple as that.

Exposure comp

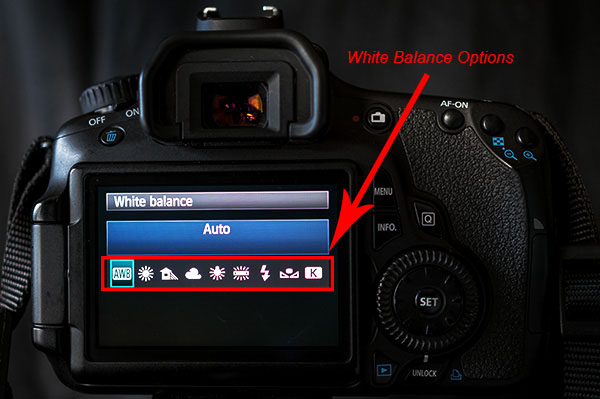
As the light, and your shooting situation, changes your white balance settings need to be adjusted. You typically don’t find a special button for this important setting. Once again the Q button makes your life easy. As you scroll through the options you will see some simple pictures for each WB setting. A sun for sunny, a cloud for cloudy, a lighting bolt for flash, etc. Sometimes it is easier to see what your options are by looking at a picture. If not, Canon still gives you the description of the WB setting.

White Balance

Next up is the Auto Focus Point Selection. This is seriously one of the hardest functions to find on most cameras. Again, made easy by Canon. Press the Q and then use the directional pad to navigate to the AF Point Selection. Spin that dial and watch as the points spiral around to each individual focus point at your will.

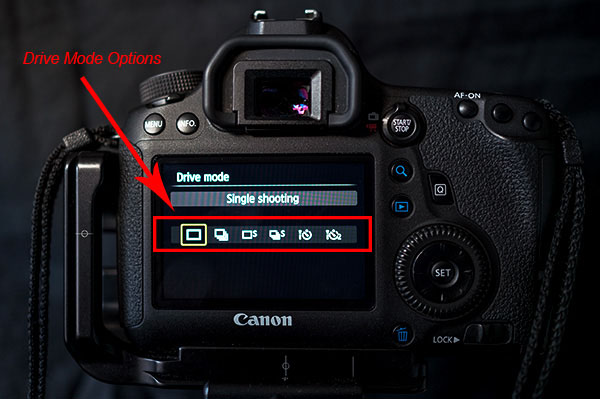
Do you switch between shooting action and still subjects often? If so you may find yourself digging through the menu to find your Single and AI Focus options and the Drive Modes. Simply press the Q button and move over to the AF Operation. Roll your dial and you can choose ONE SHOT, AI FOCUS or AI SERVO. Then you can navigate over a couple of settings to the Drive Mode and choose between Single, Continuous Shooting or Timer Mode.

Drive Mode

Some Canon models are equipped with an internal level that is accessible from the Q menu. This is really helpful when you are shooting landscapes on a tripod. When in the menu highlight the Electronic level. Press the set button and a level looking like it belongs in the cockpit of an airplane shows up on the LCD. Tilt your camera from side to side and watch how the level changes. When your camera is horizontally level the line will turn green. This can definitely save you some time and heartache in post-processing when trying to make your horizon lines straight. It takes the guess work out of it for you.

As you can see the Q button is the most powerful and useful button on your camera. Navigating through those complex menus are over. Once you use the secret button you will begin to wonder why any of the other buttons even exist, with the exception of the shutter of course. Go ahead and feel free to start spreading the secret. Have fun!!!

googletag.cmd.push(function() {
all_slots.push( googletag.defineSlot( “/1005424/_dPSv4_mob-all-article-bottom_(300×250)”, [300, 250], “pb-ad-78623” ).addService( googletag.pubads() ) );
} );

googletag.cmd.push(function() {
mobile_slots.push( googletag.defineSlot( “/1005424/_dPSv4_mob-all-article-bottom_(300×250)”, [300, 250], “pb-ad-78158” ).addService( googletag.pubads() ) );
} );

The post The Q Button – What Every Canon DSLR Photographer Needs to Know by Jack Thatcher appeared first on Digital Photography School.


Digital Photography School

 
Comments Off on The Q Button – What Every Canon DSLR Photographer Needs to Know

Posted in Photography


Rotating Rooms: Push a Button, Change Your House Layout

29 Jul

[ By Steph in Architecture & Houses & Residential. ]

Rotating Rooms 1

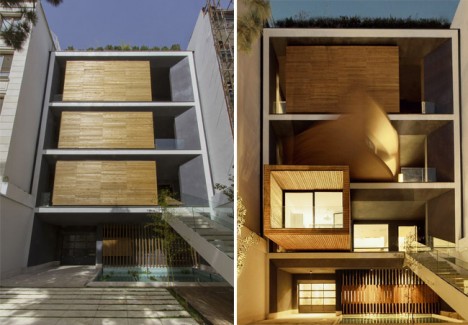
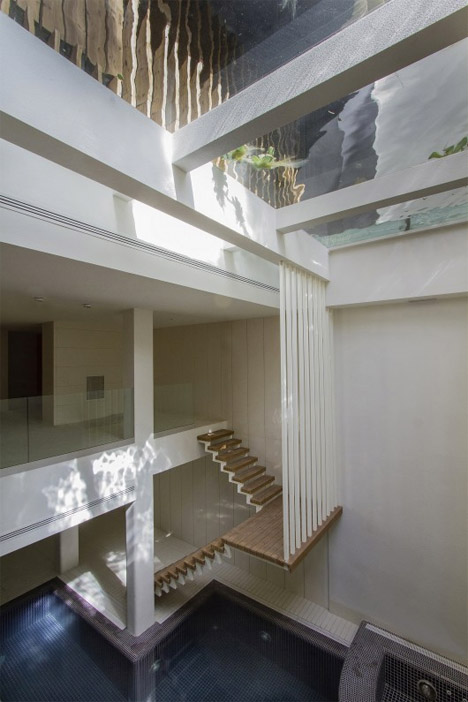
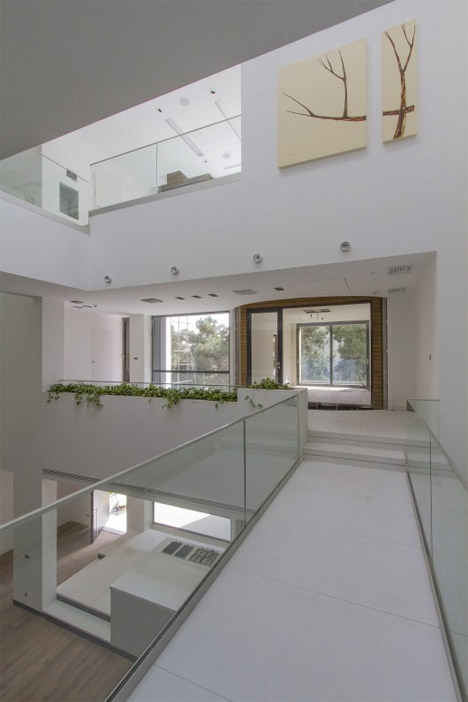
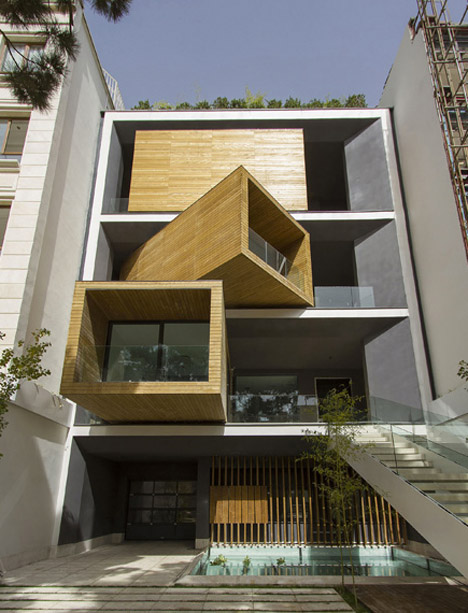
Maybe in the summer, you’d prefer cooler, shadier lodgings, and in the winter, you wish you could extend your living space out into the sun. The lucky people who live in the three-story Sharifi-Ha house in Tehran, by design firm nextoffice, can transform the layout of their house in various cool ways with the simple push of a button.

Rotating Rooms 2

Rotating Rooms 3

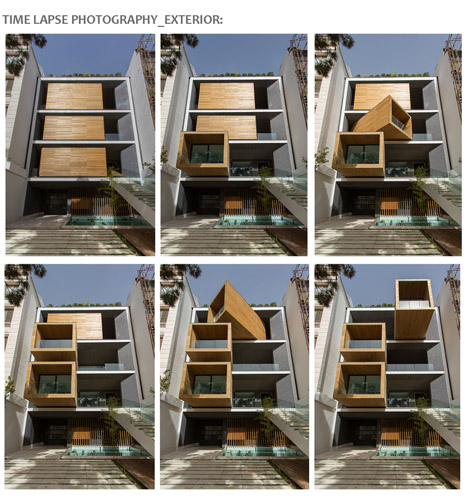
Three mobile wooden volumes containing different living spaces – a guest room, home office and dining room – can be aligned flush against the fixed part of the home, rotated so the glassed-in ends face a variety of angles, and extended in or out telescopically.

Rotating Rooms 4

Rotating Rooms 5

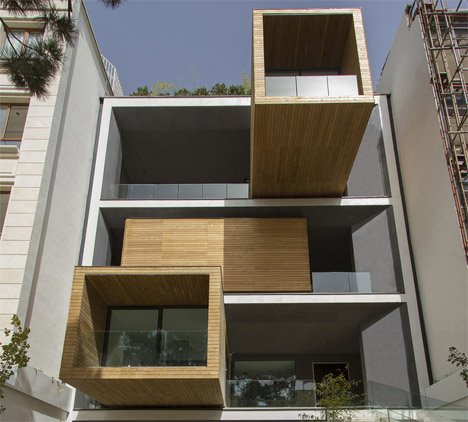
When the movable rooms are facing straight out, they open up terraces on each level, bringing more daylight into the rooms that are deeper within the home.

Rotating Rooms 6

When the occupants want more privacy and a sense of coziness, the home closes up, essentially going into either extroverted or introverted mode along with the humans who live there.

Share on Facebook


[ By Steph in Architecture & Houses & Residential. ]

[ WebUrbanist | Archives | Galleries | Privacy | TOS ]


WebUrbanist

 
Comments Off on Rotating Rooms: Push a Button, Change Your House Layout

Posted in Creativity


Pressy gives your Android phone an extra button

02 May

Screen_Shot_2014-04-30_at_11.41.29_AM.png

The power button and volume rocker are typically the only physical controls you’ll find on a smartphone as almost all functions are accessed via soft-buttons on the touchscreen these days. The Pressy button is a new accessory that adds an additional programmable hard button to your Android device. It slots into your smartphone’s headphone socket and once inserted is hardly visible. Learn more

News: Digital Photography Review (dpreview.com)

 
Comments Off on Pressy gives your Android phone an extra button

Posted in Uncategorized


[MODIFIED] Google Chrome – Add Button to Scroll to Top of Long Web Pages

15 Apr

Access the menu and search boxes at the top of long webpages browsed in Google Chrome with this shortcut button.

When browsing a large web page such as a Wikipedia article or a list of Facebook posts in Google Chrome, if you need to jump back to the top of the page to use the site’s menu, search features, or sign-in boxes, does scrolling take too much time?

While pressing Ctrl + Home immediately jumps to the top of the current web page, not everyone remembers this keyboard shortcut. With the “Scroll to Top” extension, you can add to Google Chrome’s toolbar a red up-arrow that performs this same feat….

Read more at MalekTips.
New Computer and Technology Help and Tips – MalekTips.Com

 
Comments Off on [MODIFIED] Google Chrome – Add Button to Scroll to Top of Long Web Pages

Posted in Technology


Nikon D40x Dies – Error. Press shutter release button again.

27 Dec

So my Nikon D40x decided to die on me while covering an event. Luckily the main pieces of the night were captures by this point. I get a message reading : Error. Press shutter release button again. After several google searches I saw that it means the shutter must be replaced. If anyone has an easy fix, please let me know
Video Rating: 5 / 5


The Second Most Important Button On Your DSLR

19 Nov

Todays tutorial is about using your digital SLR. People have been asking about my process for taking photos so I wanted to go over some of the basics of how to use digital SLRs first. I focus on how to use the Auto Exposure Lock and Auto Focus Lock button. It is a really powerful little button that helps you compose a better shot and fix problem scenes. Check out greyscalegorilla for more tutorials. greyscalegorilla.com
Video Rating: 4 / 5

I got an idea of making a movie and I got it. So here it is.
Video Rating: 0 / 5

 
Comments Off on The Second Most Important Button On Your DSLR

Posted in Nikon Videos


Microsoft Word 2010 – Prevent Paste Options Button from Appearing

20 May

When pasting text into a Word 2010 document, hide the Paste Options button that tends to appear.

For the most part, when you paste text into a Microsoft Word 2010 document (unless the text has no formatting information), you will see a Paste Options button appear, labeled with “(Ctrl)”. Press the Ctrl key or click this button to access formatting options such as keeping the source formatting, merging the formatting, pasting only the text, and setting the default paste options.

If you do not frequently have to make formatting changes to pasted text, you might find this button annoying and wish it disabled. To do so:…

Read more at MalekTips.
New Computer and Technology Help and Tips – MalekTips.Com

 
Comments Off on Microsoft Word 2010 – Prevent Paste Options Button from Appearing

Posted in Technology