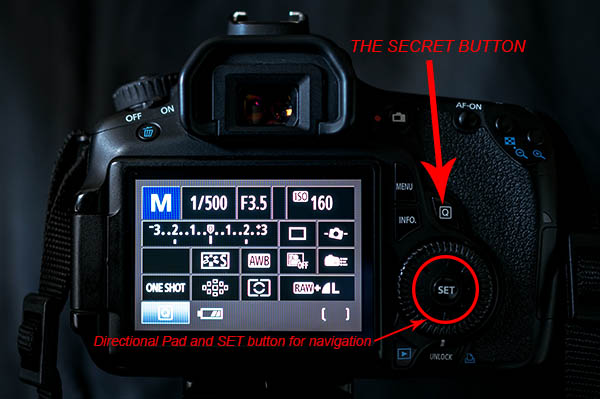
Cameras can be super complex these days. Buttons, knobs and switches are everywhere. How can you remember what all of them do and where to begin? Well, Canon has given you a secret button to use that allows you to access all of those most important functions within your complex machine. Perfect, where is this secret button you ask? It’s right on the back of your camera marked with the letter Q. It’s not really a secret, it’s just under utilized.

The Q Button
What does Q stand for? Quick. The button makes navigating just that. Using the button gives you quick access to all of the major functions that you need. Let’s go through some of those functions so you can see how easy it is use your camera. Grab your Canon and let’s try it out.
How to use it
Go ahead, give the Q button a press while watching the LCD screen on the back of your camera. As you see it highlights one of your current settings. Depending on your Canon model this may light up the current selection in a blue/green color or it may outline it with an orange box. Next you can cycle through your settings by using the directional pad located around your SET button. Simply highlight the setting you want to change and then you have a couple of options.
First, and easiest, is to roll your settings dial while it is highlighted. This will cycle through your options for that particular setting. Your second choice is to push the SET button while a setting is highlighted. This will lead you to a more detailed screen showing all of your options for that setting.
Canon also made things easy by providing a description of each option at the bottom of the LCD as you scroll through. At first it will be more beneficial to use the second option so you become familiar with what settings are available, and what the symbols mean. Once you get that down, using option one to zip through the settings is a breeze.
As a beginner it can be really helpful using the LCD screen and the Q button so you can see everything about the exposure and settings right in front of you. When you depress the shutter button half way the current exposure reading will be displayed on the meter on your LCD. This makes it really easy to adjust your settings while seeing how each element of exposure (aperture, shutter speed and ISO) is affecting the meter.
Some of the settings you will adjust most are ISO, exposure bracketing, white balance, focus type, focus point and drive mode. When you use these techniques they each can be adjusted in seconds!
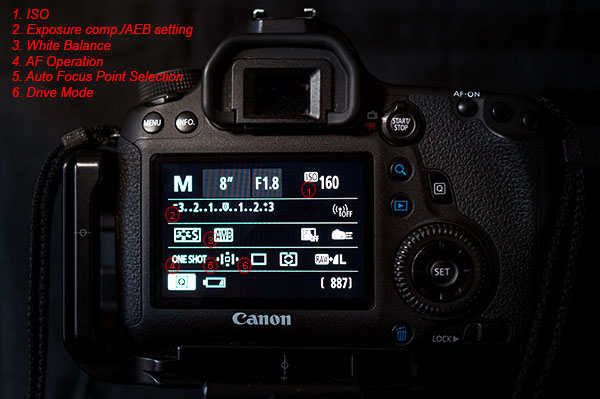
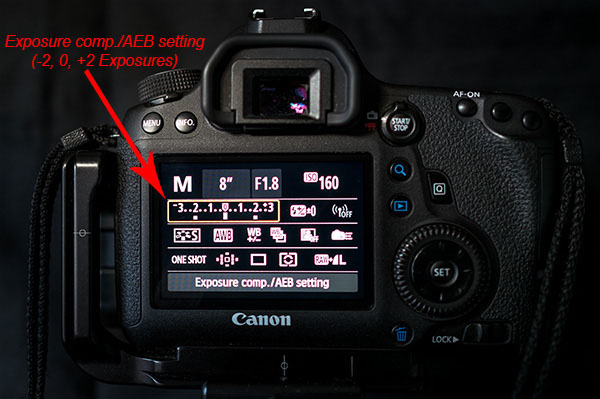
The Q button is particularly useful when you are bracketing exposures for HDR. Press it and highlight the Exposure Compensation/AEB setting. Now spin your settings dial to the right and watch as the light meter changes to three lines in lieu of the typical single line. Set the lines as far apart as you want your bracket to be (i.e. -1, 0, +1 or -2, 0, +2). Last, use the directional pad to highlight the Drive Mode setting. Again scroll to the right until you reach the Self-timer (2 seconds/remote setting). Now, once you fully press the shutter button your camera will wait two seconds and then take all three exposures that you set. It’s as simple as that.
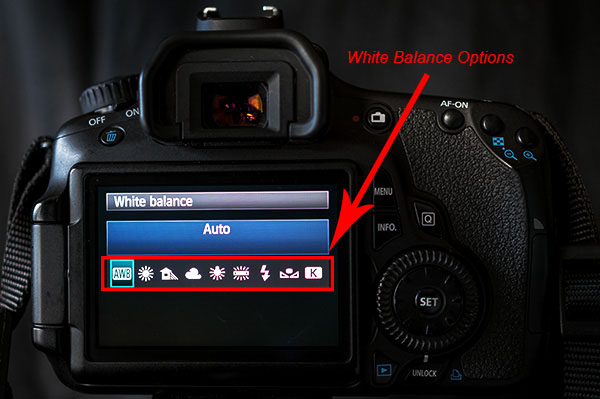
As the light, and your shooting situation, changes your white balance settings need to be adjusted. You typically don’t find a special button for this important setting. Once again the Q button makes your life easy. As you scroll through the options you will see some simple pictures for each WB setting. A sun for sunny, a cloud for cloudy, a lighting bolt for flash, etc. Sometimes it is easier to see what your options are by looking at a picture. If not, Canon still gives you the description of the WB setting.
Next up is the Auto Focus Point Selection. This is seriously one of the hardest functions to find on most cameras. Again, made easy by Canon. Press the Q and then use the directional pad to navigate to the AF Point Selection. Spin that dial and watch as the points spiral around to each individual focus point at your will.
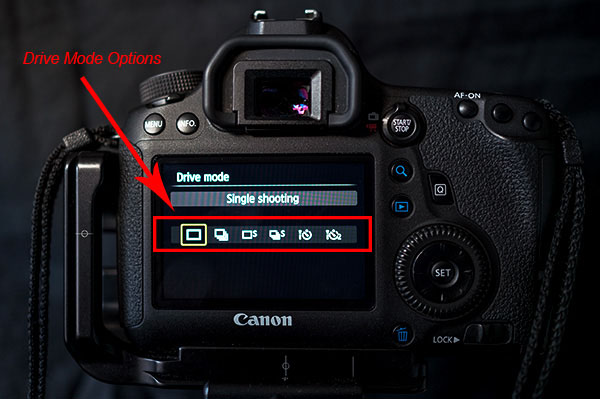
Do you switch between shooting action and still subjects often? If so you may find yourself digging through the menu to find your Single and AI Focus options and the Drive Modes. Simply press the Q button and move over to the AF Operation. Roll your dial and you can choose ONE SHOT, AI FOCUS or AI SERVO. Then you can navigate over a couple of settings to the Drive Mode and choose between Single, Continuous Shooting or Timer Mode.
Some Canon models are equipped with an internal level that is accessible from the Q menu. This is really helpful when you are shooting landscapes on a tripod. When in the menu highlight the Electronic level. Press the set button and a level looking like it belongs in the cockpit of an airplane shows up on the LCD. Tilt your camera from side to side and watch how the level changes. When your camera is horizontally level the line will turn green. This can definitely save you some time and heartache in post-processing when trying to make your horizon lines straight. It takes the guess work out of it for you.
As you can see the Q button is the most powerful and useful button on your camera. Navigating through those complex menus are over. Once you use the secret button you will begin to wonder why any of the other buttons even exist, with the exception of the shutter of course. Go ahead and feel free to start spreading the secret. Have fun!!!
googletag.cmd.push(function() {
all_slots.push( googletag.defineSlot( “/1005424/_dPSv4_mob-all-article-bottom_(300×250)”, [300, 250], “pb-ad-78623” ).addService( googletag.pubads() ) );
} );
googletag.cmd.push(function() {
mobile_slots.push( googletag.defineSlot( “/1005424/_dPSv4_mob-all-article-bottom_(300×250)”, [300, 250], “pb-ad-78158” ).addService( googletag.pubads() ) );
} );
The post The Q Button – What Every Canon DSLR Photographer Needs to Know by Jack Thatcher appeared first on Digital Photography School.