Introduction
This tutorial has been transcribed from the SLR Lounge Lightroom 4 Workshop on DVD, a 14 hour Lightroom 4 A – Z guide with over 130 tutorials for mastering Lightroom from start to finish. The Digital download can be purchased from SLR Lounge while the physical copy is available through Amazon Prime.
Overview
This quick article will go over 10 shortcuts of the commonly used features in the Library Module of Lightroom 4. Knowing these simple shortcuts can greatly speed up your workflow!
(Note: Apple users, just pretend that “CTRL” is “CMD”. 😉
1. Lightroom 4 Module Shortcuts
There are a total of 7 Modules in Lightroom 4 and each corresponds with numbers 1-7. To switch to a Module, hit “Ctrl + Alt + 1-7.”
“1” is the Library Module, “2” is the Develop Module, “3” is the Map Module, and so forth. For example, if you want to go to the Develop Module, hit “Ctrl + Alt + 2.”
![]()
Another quick way to get to the Develop Module is by simply hitting “D.” You can also get to the Library Module through the different Library View Modes, which brings us to our next shortcut.
2. Library View Modes
There are 4 Library View Modes in Lightroom 4: Grid View Mode, Loupe View Mode, Compare View Mode, and Survey View Mode. To access the Grid View, hit “G.” To get to the Loupe View, hit “E.” Hit “C” for Compare View and “N” for Survey View. If you are in a module other than the Library Module, hitting any 4 of these Library View Mode shortcuts will bring you back to the Library Module.
3. Import/Export Shortcuts
To import images into Lightroom, hit “Ctrl + Shift + I.” This will bring up the Import Dialogue Box. Hit “Ctrl + Shift + E” to bring up the Export Dialogue Box to export your images out of Lightroom.
4. Photoshop Shortcut
Sometimes we need to finish editing our images in Photoshop. We can take our images from Lightroom into Photoshop by selecting the image and then hitting “Ctrl + E.” Once you are done with your image in Photoshop, hit “Ctrl + W.” This will bring you back into Lightroom, where you will see both your Photoshop copy and Lightroom copy of your image in your Lightroom catalog.
5. Left/Right Panels Shortcuts
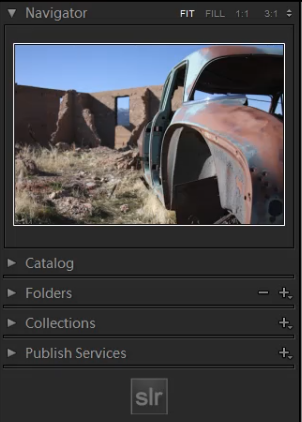
The boxes on the right and left sides of Lightroom 4 are referred to as Panels. Like the Modules, the Panels also correspond to a number. The Left Panels correspond with the numbers “0-4” and include the Navigator Panel, the Catalog Panel, the Folders Panel, the Collections Panel, and the Publish Services Panel.
To expand or collapse a Left Panel, hit “Ctrl + Shift + 0-4.” The Navigator Panel is “0,” the Catalog Panel is “1,” the Folders Panel is “2,” and so on. Below, you can see that only the Navigator Panel is expanded and the remaining Panels are collapsed.
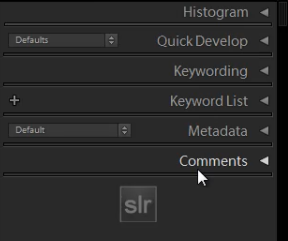
The Right Panels correspond with the numbers “0-5.” To expand or collapse a Right Panel, hit “Ctrl + 0-5.” The Right Panel includes the Histogram Panel, the Quick Develop Panel, the Keywording Panel, the Keyword List Panel, the Metadata Panel, and the Comments Panel. The Histogram Panel is “0,” the Quick Develop Panel is “1,” the Keywording Panel is “2,” and so forth. As you can see below, none of the Panels have been expanded.
6. Target Collection Shortcuts
Since we just discussed the Panels shortcuts, we will go over a Target Collection, which can be found in the Collections Panel (“Ctrl + Shift + 3”) in the Left Panel. A Target Collection is a useful tool because it helps us organize our photos quickly by using a hotkey. You can set a previous collection as the Target Collection, or you can create a new collection and set it as the Target Collection.
To create a new collection, click on the “+” sign next to Collections in the Left Panel. Select “Create Collection.”
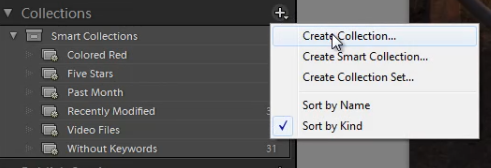
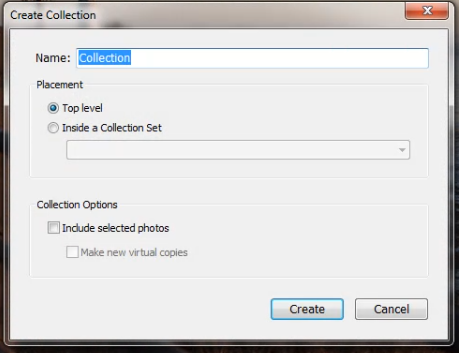
Once you have hit “Create Collection,” the Create Collection Dialogue Box will appear. Once you have named your collection, hit “Create.”
Right-click on a collection and hit “Set as Target Collection” to set the collection as your Target Collection.
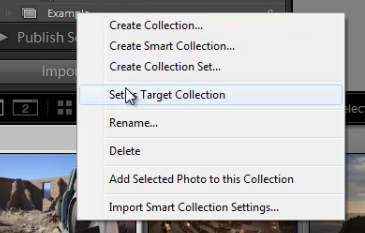
Once you have selected a collection to be your Target Collection, a “+” sign will appear next to the collection you have selected to remind you which collection is your “target” for the Collection hotkey. Now, simply hit “B” to add any image to your Target Collection!
For example, you might have created a collection for your portfolio images. Set that collection as your Target Collection, and then whenever you are looking through your latest photo shoot and you see one that is portfolio worthy, just hit “B” to add it to your portfolio!
7. Rotate Left/Right Shortcuts
To rotate multiple images at once, go to the Grid View (“G”). Once you are in the Grid View, select your images by holding down “Ctrl” while clicking on your images. To rotate your images to the left, hit “Ctrl + [.” To rotate your images to the right, hit “Ctrl + ].” You can also rotate individual images by using the same shortcuts.
8. Flag Shortcuts
Some people use flags as their culling system. For example, selecting an image as a pick means that we will deliver the image. Rejecting an image means that we will not deliver the image. Simply hit “P” to flag an image as a “pick.” If you want to remove the flag, hit “U.” To reject an image, hit “X.”
Or, to simply increase or decrease the flag status of an image, just hit Ctrl and either the up or down arrow. This is by far the fastest way to go go from image to image and flag keepers (with just one hand!) by using the left and right arrows to navigate and the Ctrl-up/down key combination to pick or reject your images…
9. Star Rating Shortcuts
The following are the shortcuts for the Star Rating in Lightroom 4.
- “1” = 1 star
- “2” = 2 stars
- “3” = 3 stars
- “4” = 4 stars
- “5” = 5 stars
Simply select an image and hit “1-5” to give the image a star rating. To reset Star Ratings on your images, hit “0.”
10. Color Label Shortcuts
The Color Labels in Lightroom 4 correspond with the numbers six thru nine. Red is “6,” Yellow is “7,” Green is “8” and Blue is “9.” There is also a Purple Color Label but to label an image Purple, you need to go into the Edit Menu, as shown below.
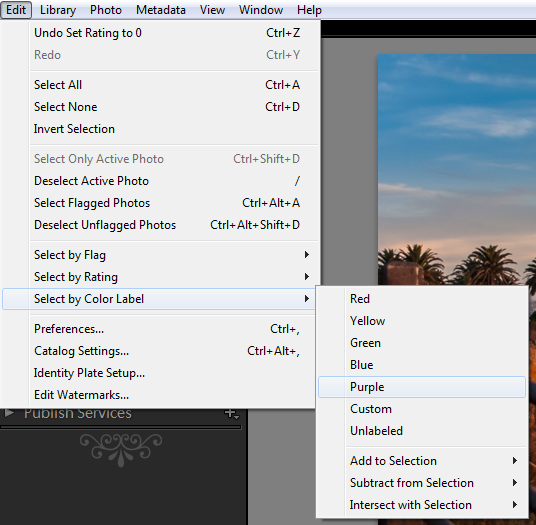
If you want to remove a Color Label, hit the corresponding number again. So for example, if your image is already color labeled Green, hit “8” again to remove this Green Color Label.
Learn More with the Lightroom 4 Workshop Collection!
This was a sample tutorial from the Lightroom 4 A to Z DVD which is one of the DVDs in the Lightroom 4 Workshop Collection. A collection of nearly 30 hours of video education teaching everything from Lightroom basics to advanced raw processing techniques.
The LR4 Workshop Collection also includes the critically acclaimed Lightroom 4 Preset System which is designed to enable users to achieve virtually any look and effect within 3-5 simple clicks. From basic color correction, vintage fades, black & white effects, tilt-shift effects, faux HDR, retouching, detail enhancing, and so much more. Click the links above to learn more.
Post originally from: Digital Photography Tips.
Check out our more Photography Tips at Photography Tips for Beginners, Portrait Photography Tips and Wedding Photography Tips.
10 Shortcuts of the Commonly Used Features in the Library Module of Lightroom 4
You must be logged in to post a comment.