RSS
 

Posts Tagged ‘Commonly’

How to Shoot in Low Light – 9 Commonly Asked Questions

24 Nov

The post How to Shoot in Low Light – 9 Commonly Asked Questions appeared first on Digital Photography School. It was authored by Bruce Wunderlich.

low light photography moon rise
This image of a moonrise over Marietta, Ohio was taken 20 minutes after sunset during the blue hour; the sun had set and the sky was a dark blue. The city lights create a great warm glow over the city.

According to British photojournalist Donald McCullin, “There is no such thing as bad light, just misunderstood light.” Yet many photographers still consider low light to be bad light.

The purpose of this article is to encourage you to not consider low light as inferior or unusable, but to instead look for subjects that work well with the available low light. Shooting in low light can often be a struggle, however, which is why I’ll answer nine of the most frequently asked questions about low light photography.

Keep in mind that low light photography is not exclusively night photography. Low light photography opportunities may appear at any time of the day.

For instance, shooting waterfalls in low light allows you to use a slow shutter speed, prevents overexposure of the white water of the falls, and helps you create a beautiful silky effect (by blurring the moving water).

Using a flash will light up any subject, of course, but let’s take a look at how to improve your photography in naturally-occurring low light.

Low light photography FAQs

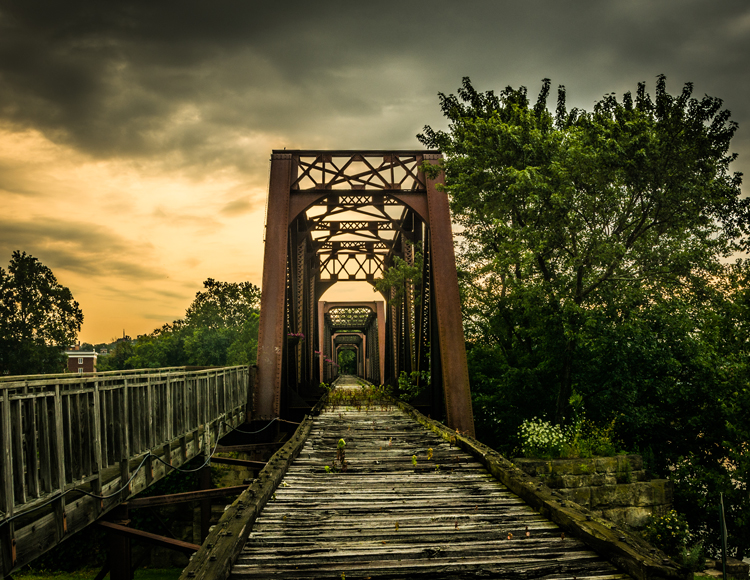
low light photography bridge
Low light creates very dramatic scenes. Dark storm clouds turned this potential sunrise into a great low light opportunity.

1. My low light images are blurry. Would a better lens alleviate the blur?

The short answer to this question is, “Yes.” A fast lens with a maximum f-stop of f/1.8, for instance, will give you better results than a kit lens with a maximum f-stop of f/3.5 or f/5.6. 

But even the faster, more expensive lenses will give you undesirable results if you’re using the wrong settings. You see, the wider aperture opening on fast lenses allows you to use a faster shutter speed, which helps you capture a sharper image – but unless you dial in the correct shutter speed, your shots will often turn out blurry anyway!

Lenses with larger maximum apertures are called “fast” because they allow you to shoot with faster shutter speeds, thanks to the additional light that enters your camera through the bigger aperture opening.

2. What are the best camera settings for shooting in low light?

These are the best low light camera settings:

Manual mode

Shooting in Manual mode is essential for successful low light photography, as it allows you to control every functional aspect of your camera.

Once in Manual mode, you basically have three ways to get more light onto your camera sensor:

  • Shutter speed
  • Aperture
  • ISO

These three controls are together called the exposure triangle, and each of the settings can have a positive or negative result on your image’s exposure.

Therefore, learning how to use shutter speed, aperture, and ISO for the best result is the key to low light photography.

Note that your in-camera light meter will reveal where adjustments should be made to the camera settings, and well-exposed images will be the result.

Shutter speed

If you are shooting handheld, a good rule of thumb is to set your shutter speed to match the reciprocal of your focal length.

For example, if you are shooting at 50mm, your shutter speed shouldn’t be any slower than 1/50s. Of course, if the subject of your photo is moving, then you will need to increase your shutter speed to freeze the action. Because while choosing a slower shutter speed will allow more light into your camera, you’ll also risk getting a blurry result.

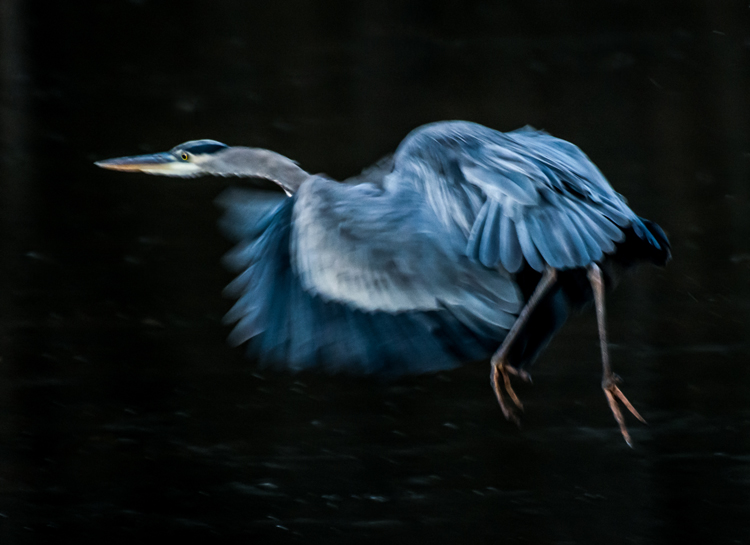
low light photography great blue heron
A great blue heron in a fight was the subject of this low light image. I shot this at 1/250s, f/5.6, and ISO 1250. Using a combination of a slower shutter speed and a higher ISO, I was able to create the blurry wings while panning to match the speed of the fight.

Aperture

In most low light situations, you will probably need to shoot with your aperture wide open.

But if there is enough light to shoot with a smaller f-stop, you’ll get an increased depth of field.

So here’s what to consider:

Choosing a wider aperture will let more light into your camera, but will decrease your depth of field. And this could lead to an important part of your image being out of focus.

So what should you do?

Generally, it’s better to risk an out-of-focus shot than to guarantee a blurry one – so, if necessary, widen that aperture!

ISO

The higher the ISO, the brighter the resulting shot.

But there’s an important trade-off here:

The higher the ISO, the more digital noise you’ll be adding to your image.

So keep your ISO as low as possible, and only increase your ISO after you have decreased your shutter speed and widened your aperture.

Shoot in RAW

For the best results, shooting in RAW is recommended.

This is for one simple reason: Your camera will save more shadow detail in RAW format compared to the compressed JPEG format.

Also, it is very helpful to learn how to check your histogram; that way, you don’t have to just rely on what you see on your camera’s LCD screen. Use the histogram to check your exposure, and avoid clipping the highlights and shadows.

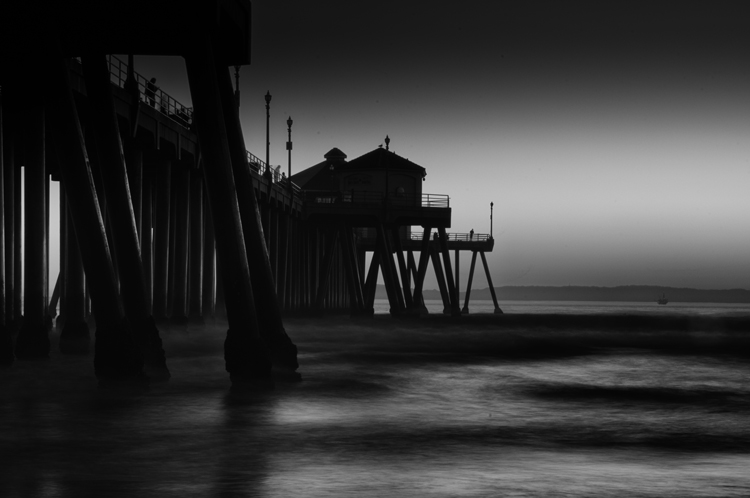
black and white beach house
I used the low light at Huntington Beach, California to create this black and white image with a five-second exposure.

3. How do I take low light action shots?

Shooting action in low light can be very challenging, and it is almost always going to require you to shoot with your aperture at its widest setting.

Once your aperture is set, adjust your shutter speed to match the action you are trying to freeze. Of course, depending on the situation, there may simply not be enough light. If that is the case, adjust the ISO to a higher setting until a good exposure is set. If your ISO setting is so high that you are getting an unacceptable amount of digital noise, you have two options:

Either add light with a flash or some other source, or live with the noise and try to remove some of it in post-processing.

Sometimes, with the noise issue, it comes down to getting the shot with noise versus not taking the shot at all.

4. How do I reduce the digital noise level in low light images?

The simple answer to this question is to shoot at the lowest ISO that you can. But it is also a good idea to know the ISO at which your camera produces noise that you consider unacceptable.

And always make sure your exposure is correct. Even at a low ISO, if your image is underexposed, you will have some noise in the shadow areas.

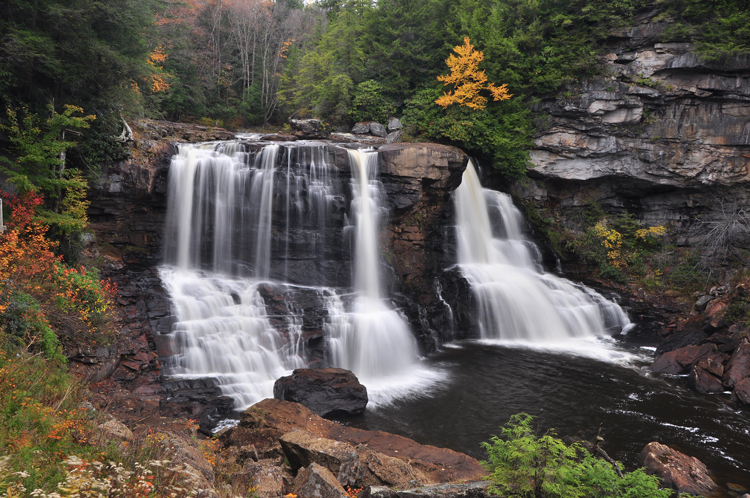
long exposure waterfall
A cloudy day at Blackwater Falls, West Virginia allowed for a long exposure without blowing out the highlights.

5. How do I focus in low light?

Another reason for blurry images in low light is the fact that some cameras just aren’t manufactured to focus properly with less light.

So what should you do?

Try shining a light on your subject to give your camera enough light to focus. You can also use your lens’s focusing ring to fine-tune your focus.

Focusing via the central AF point may also help, as it usually focuses faster and more accurately than surrounding AF points.

6. How can I take pro-like images in low light?

Here are four things that most pros do in low light:

  1. Use a tripod
  2. Shoot in RAW
  3. Shoot in Manual mode
  4. Use the histogram
low light photography silhouette
Low light makes for great silhouettes!

7. How do I choose the best white balance for low light?

Set your white balance to match your environment:

  • Tungsten for photographing indoors with light from a regular lightbulb
  • Fluorescent for light from fluorescent bulbs
  • Cloudy for low light created by an overcast day
  • Shade for shooting in a shaded or shadowy area

One thing to remember:

If you are shooting in RAW, you can adjust your white balance later in post-processing.

But if you are shooting JPEGs, it is very important to get your white balance correct in-camera. For this reason, if your camera is set to capture JPEGs, you should not use the automatic white balance function. White balance is hard, and sometimes impossible, to correct later in a JPEG.

8. Should I raise my ISO or lower my shutter speed in low light?

Assuming that you are shooting with your aperture wide open, in most situations this is an easy one to answer:

Adjust your shutter speed!

And only raise your ISO as a last resort.

Remember that raising your ISO is going to add more noise into the image.

Now, most new DSLRs do a much better job with noise levels at higher ISO settings. But as I mentioned earlier, it is a good idea to know what noise levels are unacceptable, and what ISOs these correspond to. In situations where your subject is moving, it may become necessary to boost the ISO to keep your shutter speed fast enough to freeze the action.

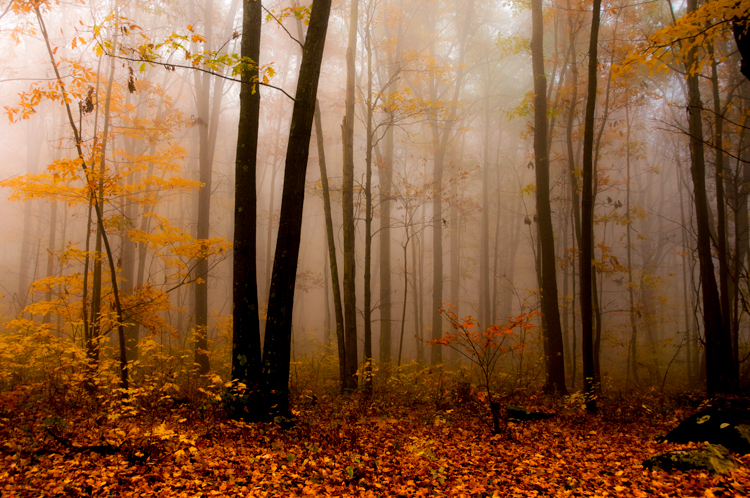
fall scene with fog
Fog created the low light conditions in this fall image.

9. Why aren’t my low light shots sharp even when I use a tripod?

Remember that, in most low light, you will be shooting with your aperture wide open (or nearly so).

Hence, your depth of field will be very shallow (which can lead to blurry results).

So be extra careful to lock your focus (you can even try back-button focus) on the part of your scene that needs to be in sharp focus.

Case in point:

When shooting a low light portrait, it is important to have the subject’s eyes in focus. So focus on the eyes!

Also, if your subject is moving, increase your shutter speed until the subject is frozen by your camera. And when shooting with a tripod, make sure your camera’s image stabilization is turned off, because it can actually create blur!

10. A bonus tip

In low light, the LCD screen on the back of your camera is going to look very bright – and this will give you an inaccurate sense of your photo’s exposure.

So if your camera has an adjustment for the brightness of your LCD screen, turn it down. You want to ensure your image will not seem overly bright when you view it!

low light photography

How to shoot in low light: conclusion

The trick to low light photography is to take control of your camera, and know that every action or setting will have a reaction.

Now, how is that different from photography in any other type of light?

It’s not, really. Just consider photography in low light as an opportunity to be creative.

Now over to you:

What subjects do you like to shoot in low light? And do you have any low light shooting tips? Share your thoughts in the comments!

The post How to Shoot in Low Light – 9 Commonly Asked Questions appeared first on Digital Photography School. It was authored by Bruce Wunderlich.
Digital Photography School

 
Comments Off on How to Shoot in Low Light – 9 Commonly Asked Questions

Posted in Photography


7 Commonly Accepted Photography Beliefs Debunked

02 Jun

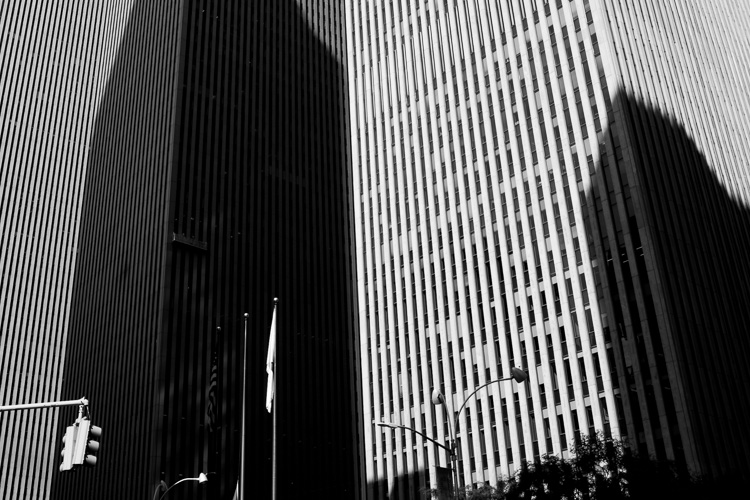
Midtown, NYC

Over the last handful of years, working with photographers of all types, I have come to learn that there are many commonly accepted thoughts about photography that just aren’t true.

Here is my attempt to dispel some of the most common misunderstandings that many photographers have, and to explain why they are a bit misguided.

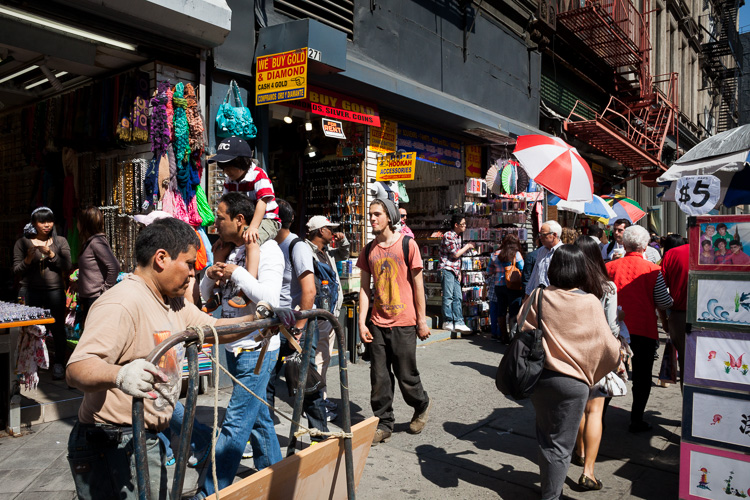
1. You need to use as low an ISO as possible

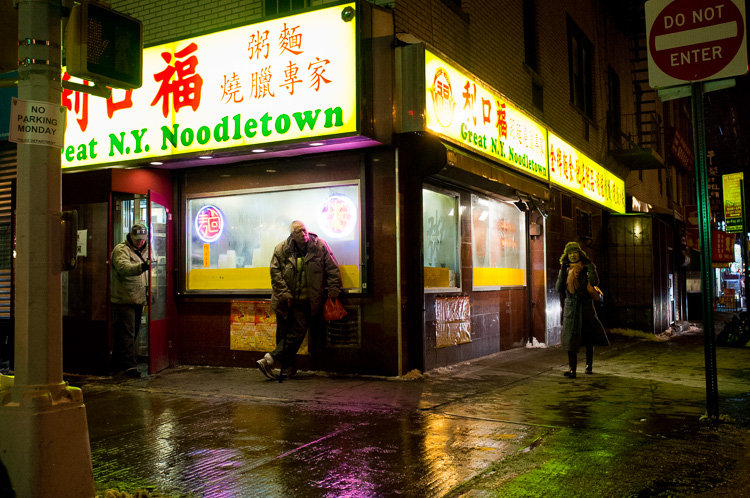
Noodletown, Chinatown

Fuji X100 at ISO 3200

Back in the early and mid-2000s, mainstream digital cameras were in their infancy, and one of the worst aspects about them was their ability to work well at high ISOs. The digital noise, above ISO 400, in so many of those cameras was terrible. This was the heyday of noise reduction software such as Noise Ninja, and because of all of this, it was rightfully taught that using the lowest ISO possible was always better.

In the last seven years, I would argue that the greatest improvement that digital cameras have made has been in their ISO capability. You can now shoot with ISOs of 1600, 3200, 6400, and even beyond, with great quality. Even significant noise in many digital cameras has an exquisite quality to it.

Unfortunately, the low-ISO stigma has continued. On a tripod, for landscape photography, or studio photography, a low ISO is usually better. The rest of the time, raise it up. This will allow you to use more ideal shutter and aperture settings, and you will notice that the technical qualities of your images will actually turn out better.

You think all of those gorgeous wedding photographs were done at ISO 200? So many of them were taken at 3200. I will walk around at night shooting handheld with ISOs of 3200 and 6400 on my small Fuji X100S, and the quality of the photographs is incredible.

2. You need a tripod

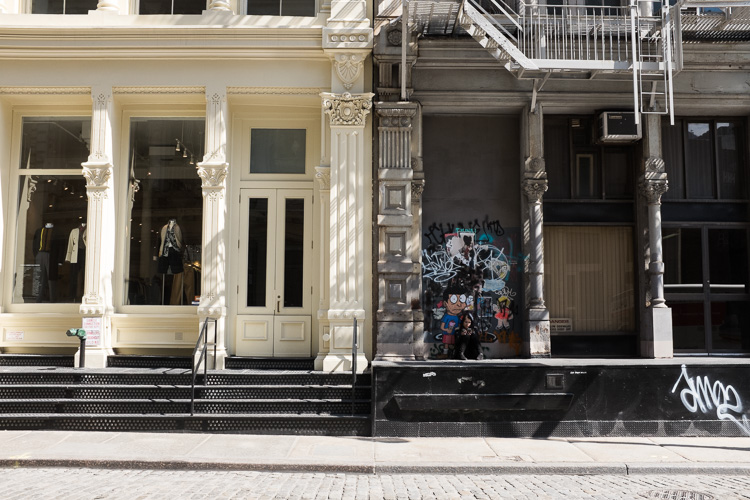
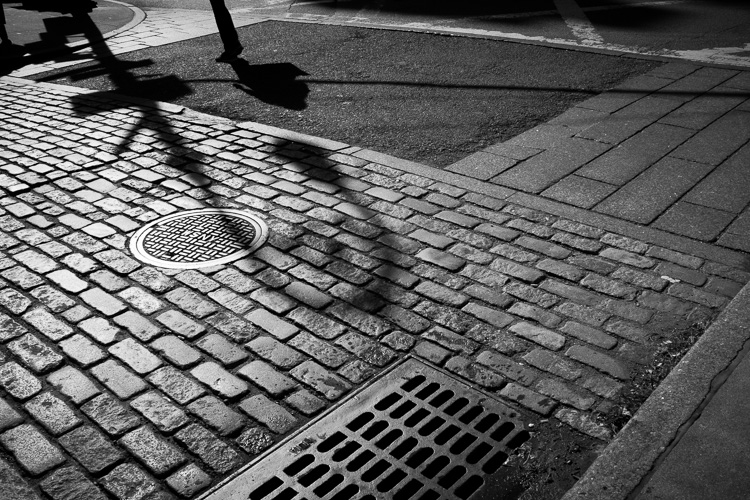
Cobblestone, SoHo, NYC.

For night and dusk landscape photography, a tripod is very important. But you usually don’t need that tripod during the day, and you can even shoot at dusk or night without one, depending on the specific situation. This tip goes hand in hand with point number one, because the improved high ISO capability in cameras has allowed us the ability to shoot handheld, when we otherwise would have wanted to use a tripod.

How you plan to display the work should be a big factor in your tripod use. Are these travel photographs that you will put in a book or not print larger than 12×18? Consider putting away the tripod and saving your back from the added weight. You will have more energy, and will take even more good photographs. Is it a 40×60 print of a foreground, middleground, background landscape taken at dusk? A tripod will still be necessary for that.

3. A shallow depth of field makes a photo better

Canal Street, NYC.

One of the most exciting times for any photographer is when they jump from that f/3.5-5.6 lens to their first f/2.8 (or below) lens. The ability to create portraits and images with beautiful bokeh for the first time is a great feeling.

However, not every image needs to have bokeh. There is a time and a place for f/2.8 and a time for f/16. Keeping your camera on f/2.8 all of the time is typically not a great practice. There are images where a large depth of field is vital. It’s one thing to have a strong subject, sharp and separated from the background. Those images can be beautiful, but there are times when the background and surrounding elements can be just as important as the main subject, and they will need to be sharp.

Don’t get tunnel vision from shooting at f/2.8 all of the time. After you locate your main subject, see if the surroundings can add to the photo. If they don’t, then you’re free to bokeh them away.

4. Aperture Priority is always the best mode

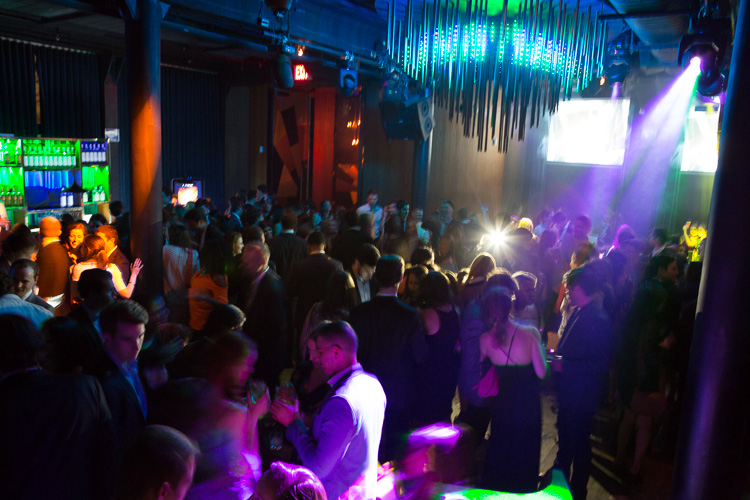
Club, NYC.

A subtle flash with a 1/2 second shutter to achieve motion blur and stronger ambient light.

When I teach, I’d estimate that 75 percent of photographers pop their camera on Aperture Priority and that is it. This percentage does not include the ones that shoot in Auto.

Aperture Priority has its time and place, but there are many situations where Shutter or Manual can be ideal. I prefer Shutter Priority for any times that subjects are in motion, such as sports, kids running around, images where you want motion blur or motion in water, or street photography. I will even use shutter priority sometimes in event photography with up to a half second shutter, and mixed with flash, so I can add both a sharp aspect and an element of motion.

Manual mode is ideal for studio photography, on a tripod, or in any situation where the lighting is completely consistent. This allows you to dial in the exact exposure, and not leave anything up to chance or the camera’s light meter.

In addition, by shooting in Aperture Priority all of the time, I have noticed that photographers do not develop the ability to pay attention to the shutter speed as much as they should. Because of this, while their exposure will always look good, many images will be taken with too slow of a shutter speed leading to slightly blurry photographs. This will not be noticeable on the back of the camera however, and the image will appear sharp until loaded onto the computer.

5. My photograph is bad because no one likes it on Instagram

The edge, SoHo, NYC.

I love Instagram, but it has had the unfortunate effect of homogenizing photography. As we share photographs and receive likes, we learn to see our work in terms of what other people respond to best. This is a trap. If we create photographs for the purpose of appealing to the masses, then every photographer will end up shooting in the same way. This is why trends like overly designed images or over-saturated colors, which grab attention very well on screens, become the norm.

Being a good photographer is about being a little different. You want to always pay attention to how people relate to you work, and what they like and dislike, but you also want to take that with a grain of salt. Always try to remember how much you liked the photograph before you showed it to anyone else, and keep that feeling. Unique and interesting photographs are ultimately what you want to create, and you don’t want to let Instagram discourage you from taking them.

6. Photographs always tell the truth

I love candid photography because it shows a real moment. However, no matter how true they look, photographs can easily distort reality. The better they distort reality, the more people will believe it to be true.

A photographer’s biases can shine through in their photographs. A person can be captured with an expression that is completely the opposite of the norm for them, and you would have no idea. In addition, photographers are constantly playing a game of what to include and what to exclude. You do not know what is happening around the camera, and it is often significantly different from what you might imagine.

Photographs can lie, they can hide the truth, or they can be ambiguous. This is very important to remember. It will both help you understand the nature of what you are photographing, but it will also allow you to play with this idea, to create more interesting work.

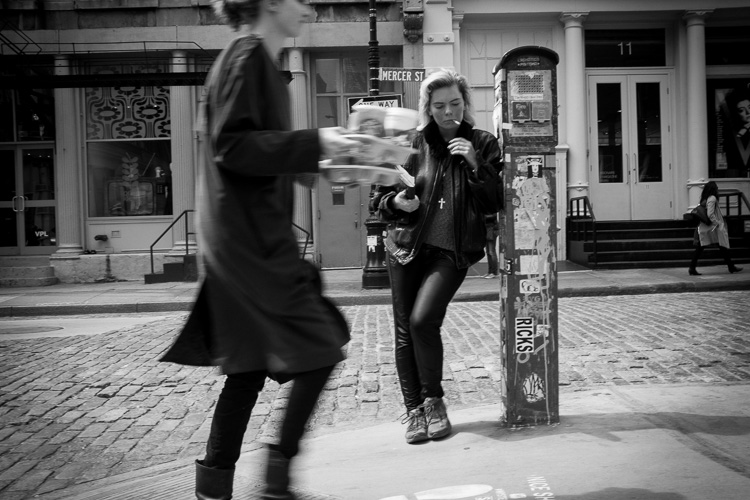
7. A photograph has to be technically perfect to be good

Youth, SoHo, NYC.

One of the noticeable aspects of many old photographs is the lack of technical quality, when compared to today’s standards. This was usually due to the early camera technology that was used. We just have a lot more available to us these days.

What stands out in many of these prints however, is that despite their technical deficiencies, the images still look beautiful. They are still interesting. They are still fantastic. Think Cartier-Bresson, Doissneau, Stieglitz.

Light, sharpness, composition, and image quality are very important to master, but just know that they do not always have to be perfect to create a great photograph. Some images have glaring deficiencies and yet they’re wonderful. Figure out how to take an interesting image and don’t discard every photo that isn’t sharp enough. Sometimes an underexposed or overexposed photograph will look great. Often an unorthodox composition will be just what was needed. Pixel peeping is important to train your eye, but you can sometimes do too much of it.


Editor’s Note: This is the first in a series of articles this week that are Open for Discussion. We want to get the conversation going, hear your voice and opinions, and talk about some possibly controversial topics in photography.

Let’s get it started here – do you agree or disagree with the points in the article above? Do you have any others to add? Give us your thoughts below, and watch for more discussion topics each day this week.

googletag.cmd.push(function() {
tablet_slots.push( googletag.defineSlot( “/1005424/_dPSv4_tab-all-article-bottom_(300×250)”, [300, 250], “pb-ad-78623” ).addService( googletag.pubads() ) ); } );

googletag.cmd.push(function() {
mobile_slots.push( googletag.defineSlot( “/1005424/_dPSv4_mob-all-article-bottom_(300×250)”, [300, 250], “pb-ad-78158” ).addService( googletag.pubads() ) ); } );

The post 7 Commonly Accepted Photography Beliefs Debunked by James Maher appeared first on Digital Photography School.


Digital Photography School

 
Comments Off on 7 Commonly Accepted Photography Beliefs Debunked

Posted in Photography


How to Shoot in Low Light – 9 Commonly Asked Questions

03 Jun
DSC_4289-Edit-Edit

This image of Moon Rise over Marietta, Ohio was taken 20 minutes after sunset during the Blue Hour when the sun had set and the sky was a dark blue. Here the city lights make a great warm glow over the city.

According to British photojournalist Donald McCullin, “There is no such thing as bad light, just misunderstood light.” Many photographers consider low light to be bad light. The purpose of this article is to encourage you to not consider low light as inferior or unusable, but rather to look for subjects to photograph that react well to the available light.

Keep in mind that low light photography is not exclusively night photography. Low light photography opportunities may appear any time of the day as well. For instance, shooting waterfalls in low light allows you to shoot with a slow shutter speed, prevents over-exposure of the white water of the falls, and thereby creates a beautiful silky effect capturing the moving water. Using a flash will light up any subject, of course, but let’s take a look at how to improve your photography in naturally occurring low light. Some frequently asked questions about low light photography are addressed below.

Low Light Photography FAQs

14595250669_30c342a792_o

Low light create very dramatic scenes. Dark storm clouds turned this potential sunrise into a great low light opportunity

My low light images are blurry. Would a better lens alleviate the blur?

The short answer to this question is YES, a fast lens with maximum f-stop of 1.8 for instance, will give you better results than a kit lens with a maximum f-stop of 3.5 or 5.6. But even the faster, more expensive lens, will give you undesired results with the wrong settings. The wider aperture opening will allow you to use a faster shutter speed resulting in a sharper image. These lenses with larger maximum apertures are called “fast” because they allow you to shoot with faster shutter speeds, due to more light that is entering your camera through the bigger opening.

What are the best camera settings for shooting in low light?

Manual Mode

Shooting in manual mode is paramount to successful low light photography as it allows you to control every functional aspect of your camera. You basically have three ways to get more light on your camera sensor: Shutter speed, Aperture and ISO. These three controls are called The Exposure Triangle, and each of these can have a positive or negative result to your image’s exposure. Therefore, learning how to use them for the best result is the key to low light photography. Your in-camera light meter will reveal where adjustments should be made to the camera settings, and well-exposed images will be the result.

Shutter Speed

If you are shooting handheld, a good rule of thumb is to set your shutter speed to match your focal length. For example, if you are shooting at 50mm your shutter speed shouldn’t be any slower than 1/50th of a second. Of course, if the subject of your photo is moving, then you will need to increase your shutter speed to be fast enough to freeze the action. Therefore, choosing a slower shutter speed will allow more light into your camera, but with that setting, the possibility of a blurry picture occurs.

Great Blue Heron in Fight was the subject of this low light image. Exposure 1/250 of a second, f/5.6, ISO 1250. Here using the combination of slower shutter speed and a higher ISO to create the blur of the wings and panning to match the speed of the fight of the heron.

Great Blue Heron in fight was the subject of this low light image. Exposure 1/250 of a second, f/5.6, ISO 1250. Using the combination of slower shutter speed and a higher ISO to create the blur of the wings and panning to match the speed of the fight of the heron.

Aperture

In most low light situations you will probably need to shoot with your aperture wide open. But if there is enough light to allow you to shoot with a smaller f-stop, it will increase your depth of field. The principle to consider: choosing a wider aperture will let more light into your camera, but will decrease your depth of field, which could lead to an important portion of your image being out of focus.

ISO

The higher the ISO number the more light your camera will record. The trade-off here is, the higher the ISO, the more digital noise you are adding to your image. Keep your ISO as low as possible and only increase your ISO after you have maxed out your shutter speed and aperture.

Shoot in RAW

For best results, shooting in RAW is recommended, for the simple reason that your camera will save more shadow detail in RAW format compared to the compressed format of jpg.

It is very helpful to learn how to check your histogram, and not just rely of what you see on your camera’s LCD screen. Use the histogram to check your exposure, and avoid clipping the highlights and shadows.

11943436386_0912d70961_o

Using the low light at Huntington Beach California to create this black and white image with a five second exposure.

How do I take low light action shots?

Shooting action in low light can be very challenging and is almost always going to require you to shoot with your aperture at its widest setting. When your aperture is set, then your shutter speed should be adjusted to match the action that you are trying to freeze. Of course, depending on how low of a light situation you are shooting within, there may simply not be enough light. If this is the case, adjust the ISO to a higher setting until a good exposure is set. If your ISO setting is so high that you are getting an unacceptable amount of digital noise, you have two options: either add light with a flash or some other source, or live with the noise and try to remove some of it in post processing. Sometimes with the noise issue, it comes down to getting the shot with noise, or not taking the shot at all.

How do I reduce the digital noise level in low light images?

The simple answer to this question is to shoot at the lowest ISO that you can. But it is also a good idea to know the ISO at which your camera produces noise that you consider unacceptable. Always make sure that your exposure is correct. Even at a low ISO, if your image is underexposed you will have some noise in the shadowed areas.

4016735972_59e71999ac_o

An over casted  cloudy day at Blackwater Falls West Virginia allowed for this long exposure without blowing out the highlight.

How do I focus in low light?

Another reason for blurry images in low light is the fact that some cameras just aren’t manufactured to focus properly with less light. Try shining a light on your subject to give your camera enough light to focus. You also may use you manual focus ring to fine-tune your focus. Using the center focus dot may also help as it is usually a cross-point type which focus faster and more accurately than others.

How can I take pro-like images in low light?

Four things that most pros are going to do in low light:

  1. Use a tripod
  2. Shoot in RAW
  3. Shoot in Manual Mode
  4. Use the histogram
8038775792_361ab83c88_o

Low light makes great silhouettes.

How do I choose the best white balance for low light?

Set your white balance to match you environment –  Tungsten for indoors with light from a regular lightbulb, Fluorescent for light from fluorescent bulbs, Cloudy for low light created by an overcast day, and Shade for shooting in a shaded or shadowy area. But, one thing to remember if you are shooting in RAW format is that you can adjust your white balance later in post-processing. But if you are shooting JPGs it is very important to get your white balance correct in-camera. For this reason you should not shoot Auto white balance, it’s very hard, sometimes impossible, to correct later from a JPG.

Should I raise my ISO or lower my shutter speed in low-light?

Assuming that you are shooting with your aperture wide open, in most situations this is an easy one to answer. Adjust your shutter speed and raise your ISO as a last resort. Remember that raising your ISO is going to add more noise into the image. Most new DSLRs do a much better job with the noise levels in their higher ISO settings, but as mentioned earlier, it is a good idea to know at what noise level you are unwilling to accept, and what ISO that is for your camera. In situations where your subject is moving, it may become necessary to adjust the ISO to keep your shutter speed fast enough to freeze the action.

DSC_0101-Edit

Fog created the low light in this fall image.

Why aren’t my low light shots sharp even when I shoot using a tripod?

Remember in most low light you will be shooting with your aperture wide open (or nearly so), hence your depth of field will be very shallow. Be extra careful to lock your focus (even try back-button focus) on the part of your image that needs to be in sharp focus. Case in point: when shooting a low light portrait, it is important to have the subject’s eyes in focus. If your subject is in motion, increase your shutter speed until it freezes the motion of the image. Also, make sure your camera’s vibration reduction is turned off, as this can actually create blur in your image even if shooting with a tripod.

Bonus tip

In low light the LCD screen on the back of your camera is going to look much brighter than the actual conditions. So, if your camera has an adjustment for the brightness of your LCD screen, turn it down so that your image will not appear to be overly bright when you view it, even if it is underexposed.

7496092624_15c8de2ffe_o

Conclusion

The trick to low light photography is to take control of your camera, and know that every action or setting will have a reaction. So, how is that different than photography in any light? It’s not, really. Just consider photography in low light as an opportunity to be creative. What subjects do you like to shoot in low light?

googletag.cmd.push(function() {
tablet_slots.push( googletag.defineSlot( “/1005424/_dPSv4_tab-all-article-bottom_(300×250)”, [300, 250], “pb-ad-78623” ).addService( googletag.pubads() ) ); } );

googletag.cmd.push(function() {
mobile_slots.push( googletag.defineSlot( “/1005424/_dPSv4_mob-all-article-bottom_(300×250)”, [300, 250], “pb-ad-78158” ).addService( googletag.pubads() ) ); } );

The post How to Shoot in Low Light – 9 Commonly Asked Questions by Bruce Wunderlich appeared first on Digital Photography School.


Digital Photography School

 
Comments Off on How to Shoot in Low Light – 9 Commonly Asked Questions

Posted in Photography


6 Commonly Used and Confused Tools in Photoshop Explained

11 Aug

There are lots of tools in Photoshop that are sometimes a bit confusing due to the similar nature of their functionality. With subtle differences, these tools have been a topic of confusion between a lot of Photoshop enthusiasts. In this article I am going to share a distinction between Fill and Opacity, the Healing brush and Stamp tool, and “Merge Visible” and “Flatten image”. I hope it will help you one understand these tool a little better.

Distinction

Fill versus Opacity

Both Fill and Opacity control the transparency of a layer. They work exactly same except for the layer styles. When you reduce the percentage of opacity the layer starts to get transparent and at 0 % the layer is completely invisible, even if layer styles likes drop shadow, stroke, inner glow etc., are applied. Where as, if you reduce the fill, the layer starts to get transparent, but layer style stay the same. Keeping it simpler:

Opacity = Takes away both layer content + layer style

Fill= Takes away only layer content – but leaves the layer style as it is

Additionally there are eight blending modes that react differently with Fill and Opacity. These are called special eight groups. These 8 blending modes are Color Burn, Linear Burn, Color Dodge, Linear Dodge, Vivid Light, Linear Light, Hard Mix, and Difference. When these blending modes are applied, the 50% Fill will have different effect than 50% Opacity.

The below images should help you understand the concept better.

Opactiy 100 fill 100

I added text and then applied two layer effects, outer glow and a drop shadow. Opacity and Fill both are both at 100%

Opacity 3 fill 100

Now I have reduced the opacity to 3 percent, you can see the layer is almost invisible. If I reduce the percent to 0%, the layer would be completely invisible.

Fill 0 opacity 100

Now, I have changed the Opacity back to 100% and reduced the Fill to 0%. You will see, the layer content became transparent, but the layer style remains the same.

Healing Brush versus the Stamp Tool

Healing brush captures the texture of the area you sampled and blends with the color tone of the area you are painting. Another option: Spot-healing brush is more like content aware. It analyzes the texture around the brush and fills in the center, blending with the color tone.

Stamp tool is more like a copy and paste. It copies the area you sampled and pastes over the area you are healing.

So when is each tool will be most appropriate to use?

I mostly use the Healing Brush whenever I have to remove the blemishes of the skin, remove the mark or any texture (pimples, wrinkles) but like to have the same natural skin color tone. This helps my image remain evenly colored.

I use Stamp tool, when I want to remove something from image. For example, if I want to remove the hanging clock on the wall, light bulb or anything whose both texture and color both need to be removed.

Below is an immage of skin with blemishes. I used Healing Brush to remove the pimple by sampling a clean area and painting over the blemish.

Pimple2 copy

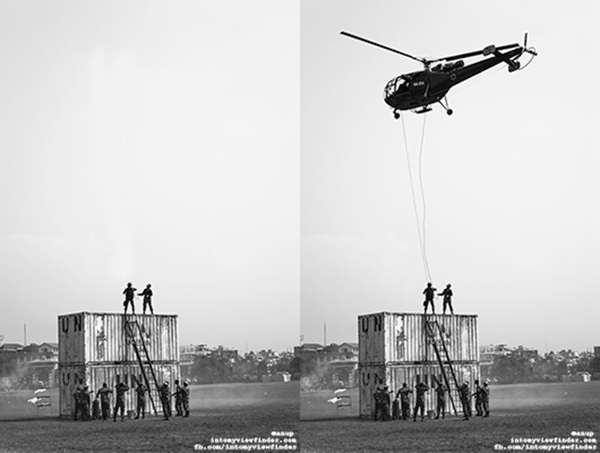
Here in the image below I have used the Stamp Tool to remove the helicopter. This is the after and before version of an image.

Compositional balance

Merge Visible versus Flatten Image

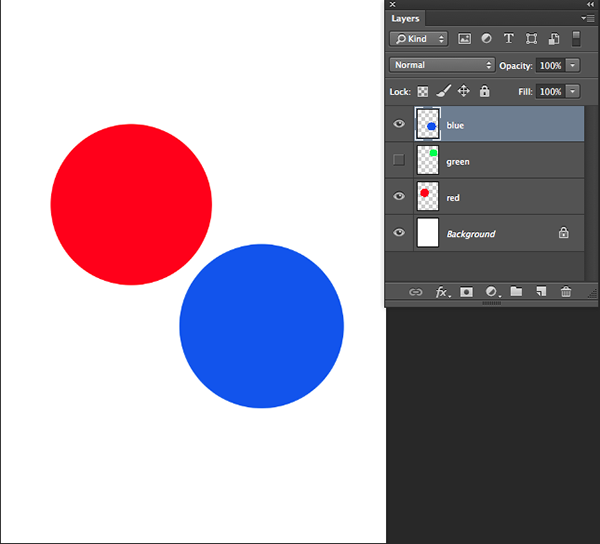
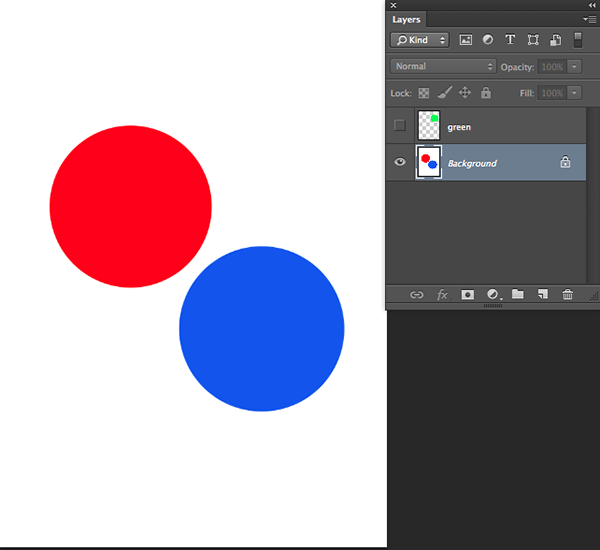
This is a very simple technique we regularly use whenever we work in layers, but a lot of photographers are still confused about the distinction between these two options. If you are working with multiples layers and apply Merge Visible, only layers will be merged which are visible or with eye icon turned onon. Where as Flatten Image merges all layers together, discarding the invisible layers.

The images below should help you understand better:

3 layer with one hidden

I created three layers with only two currently visible (blue and red)

Merge visible

Apply Merge Visible by going to: Layer> Merge Visible

Merge visible applied

You can see that only the visible layers have been merged, leaving the hidden layer alone. Now we will apply Flatten Image.

Flatten image

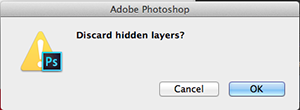
If there are any hidden layers when you apply Flatten Image, you will get this dialog box:

Discard hidden image

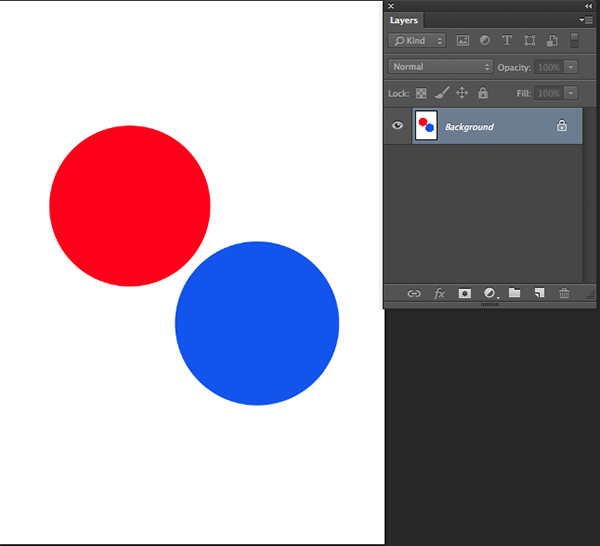
Now if I click OK in the dialog box, the hidden layer will be deleted and all visible layers will be merged like this:

Flattened image applied

Have you used these tools before? If you’ve had some confusion over the subtle differences I hope that has helped clear that up. Please share if have any questions or comments on these tools.

For more Photoshop tips and tutorials see here.

The post 6 Commonly Used and Confused Tools in Photoshop Explained by Anup Ghimire appeared first on Digital Photography School.


Digital Photography School

 
Comments Off on 6 Commonly Used and Confused Tools in Photoshop Explained

Posted in Photography


10 Shortcuts of the Commonly Used Features in the Library Module of Lightroom 4

02 May

Introduction

This tutorial has been transcribed from the SLR Lounge Lightroom 4 Workshop on DVD, a 14 hour Lightroom 4 A – Z guide with over 130 tutorials for mastering Lightroom from start to finish. The Digital download can be purchased from SLR Lounge while the physical copy is available through Amazon Prime.

Overview

This quick article will go over 10 shortcuts of the commonly used features in the Library Module of Lightroom 4. Knowing these simple shortcuts can greatly speed up your workflow!

(Note:  Apple users, just pretend that “CTRL” is “CMD”.  😉

1. Lightroom 4 Module Shortcuts

There are a total of 7 Modules in Lightroom 4 and each corresponds with numbers 1-7. To switch to a Module, hit “Ctrl + Alt + 1-7.”

“1” is the Library Module, “2” is the Develop Module, “3” is the Map Module, and so forth. For example, if you want to go to the Develop Module, hit “Ctrl + Alt + 2.”

01_lightroom-module-shortcuts

Another quick way to get to the Develop Module is by simply hitting “D.” You can also get to the Library Module through the different Library View Modes, which brings us to our next shortcut.

2. Library View Modes

There are 4 Library View Modes in Lightroom 4: Grid View Mode, Loupe View Mode, Compare View Mode, and Survey View Mode. To access the Grid View, hit “G.” To get to the Loupe View, hit “E.” Hit “C” for Compare View and “N” for Survey View. If you are in a module other than the Library Module, hitting any 4 of these Library View Mode shortcuts will bring you back to the Library Module.

3. Import/Export Shortcuts

To import images into Lightroom, hit “Ctrl + Shift + I.” This will bring up the Import Dialogue Box. Hit “Ctrl + Shift + E” to bring up the Export Dialogue Box to export your images out of Lightroom.

4. Photoshop Shortcut

Sometimes we need to finish editing our images in Photoshop. We can take our images from Lightroom into Photoshop by selecting the image and then hitting “Ctrl + E.” Once you are done with your image in Photoshop, hit “Ctrl + W.” This will bring you back into Lightroom, where you will see both your Photoshop copy and Lightroom copy of your image in your Lightroom catalog.

5. Left/Right Panels Shortcuts

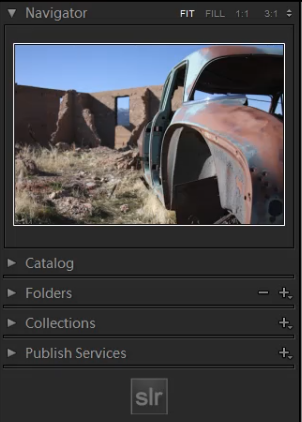
The boxes on the right and left sides of Lightroom 4 are referred to as Panels. Like the Modules, the Panels also correspond to a number. The Left Panels correspond with the numbers “0-4” and include the Navigator Panel, the Catalog Panel, the Folders Panel, the Collections Panel, and the Publish Services Panel.

To expand or collapse a Left Panel, hit “Ctrl + Shift + 0-4.” The Navigator Panel is “0,” the Catalog Panel is “1,” the Folders Panel is “2,” and so on. Below, you can see that only the Navigator Panel is expanded and the remaining Panels are collapsed.

02_lightroom-left-side-panels-shortcuts

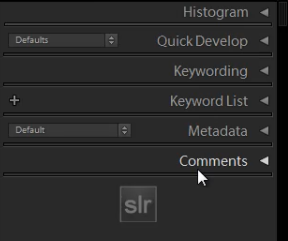
The Right Panels correspond with the numbers “0-5.” To expand or collapse a Right Panel, hit “Ctrl + 0-5.” The Right Panel includes the Histogram Panel, the Quick Develop Panel, the Keywording Panel, the Keyword List Panel, the Metadata Panel, and the Comments Panel. The Histogram Panel is “0,” the Quick Develop Panel is “1,” the Keywording Panel is “2,” and so forth. As you can see below, none of the Panels have been expanded.

03_lightroom-right-side-panels-shortcuts

6. Target Collection Shortcuts

Since we just discussed the Panels shortcuts, we will go over a Target Collection, which can be found in the Collections Panel (“Ctrl + Shift + 3”) in the Left Panel. A Target Collection is a useful tool because it helps us organize our photos quickly by using a hotkey. You can set a previous collection as the Target Collection, or you can create a new collection and set it  as the Target Collection.

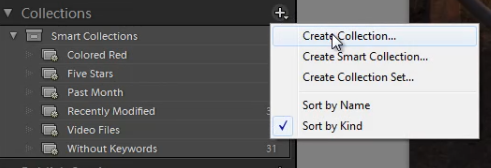
To create a new collection, click on the “+” sign next to Collections in the Left Panel. Select “Create Collection.”

04_create-new-collection

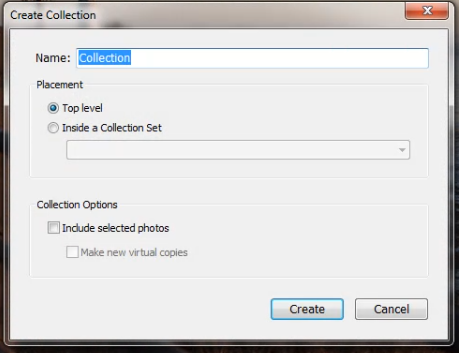
Once you have hit “Create Collection,” the Create Collection Dialogue Box will appear. Once you have named your collection, hit “Create.”

05_create-collection-dialogue-box

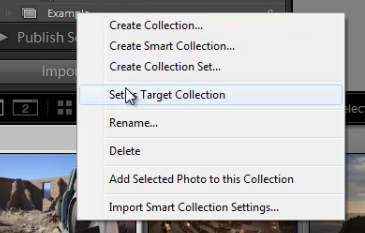
Right-click on a collection and hit “Set as Target Collection” to set the collection as your Target Collection.

06_set-as-target-collection

Once you have selected a collection to be your Target Collection, a “+” sign will appear next to the collection you have selected to remind you which collection is your “target” for the Collection hotkey. Now, simply hit “B” to add any image to your Target Collection!

For example, you might have created a collection for your portfolio images. Set that collection as your Target Collection, and then whenever you are looking through your latest photo shoot and you see one that is portfolio worthy, just hit “B” to add it to your portfolio!

7. Rotate Left/Right Shortcuts

To rotate multiple images at once, go to the Grid View (“G”). Once you are in the Grid View, select your images by holding down “Ctrl” while clicking on your images. To rotate your images to the left, hit “Ctrl + [.” To rotate your images to the right, hit “Ctrl + ].” You can also rotate individual images by using the same shortcuts.

8. Flag Shortcuts

Some people use flags as their culling system. For example, selecting an image as a pick means that we will deliver the image. Rejecting an image means that we will not deliver the image. Simply hit “P” to flag an image as a “pick.” If you want to remove the flag, hit “U.” To reject an image, hit “X.”

Or, to simply increase or decrease the flag status of an image, just hit Ctrl and either the up or down arrow.  This is by far the fastest way to go go from image to image and flag keepers (with just one hand!) by using the left and right arrows to navigate and the Ctrl-up/down key combination to pick or reject your images…

9. Star Rating Shortcuts

The following are the shortcuts for the Star Rating in Lightroom 4.

  • “1” = 1 star
  • “2” = 2 stars
  • “3” = 3 stars
  • “4” = 4 stars
  • “5” = 5 stars

Simply select an image and hit “1-5” to give the image a star rating. To reset Star Ratings on your images, hit “0.”

10. Color Label Shortcuts

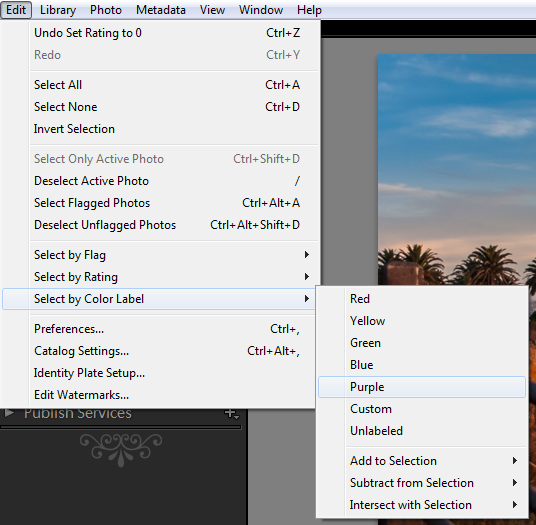
The Color Labels in Lightroom 4 correspond with the numbers six thru nine. Red is “6,” Yellow is “7,” Green is “8” and Blue is “9.” There is also a Purple Color Label but to label an image Purple, you need to go into the Edit Menu, as shown below.

07_lightroom-purple-color-label

If you want to remove a Color Label, hit the corresponding number again. So for example, if your image is already color labeled Green, hit “8” again to remove this Green Color Label.

Learn More with the Lightroom 4 Workshop Collection!

This was a sample tutorial from the Lightroom 4 A to Z DVD which is one of the DVDs in the Lightroom 4 Workshop Collection. A collection of nearly 30 hours of video education teaching everything from Lightroom basics to advanced raw processing techniques.

The LR4 Workshop Collection also includes the critically acclaimed Lightroom 4 Preset System which is designed to enable users to achieve virtually any look and effect within 3-5 simple clicks. From basic color correction, vintage fades, black & white effects, tilt-shift effects, faux HDR, retouching, detail enhancing, and so much more. Click the links above to learn more.

Post originally from: Digital Photography Tips.

Check out our more Photography Tips at Photography Tips for Beginners, Portrait Photography Tips and Wedding Photography Tips.

10 Shortcuts of the Commonly Used Features in the Library Module of Lightroom 4


Digital Photography School

 
Comments Off on 10 Shortcuts of the Commonly Used Features in the Library Module of Lightroom 4

Posted in Photography