RSS
 

Posts Tagged ‘Shortcuts’

10 of the Most Useful Photoshop CC Shortcuts

20 Oct

The post 10 of the Most Useful Photoshop CC Shortcuts appeared first on Digital Photography School. It was authored by Kevin Landwer-Johan.

photoshop-cc-shortcuts-list

Learning photography well requires a lot of study and practice. Figuring out what the dials and buttons on your camera do takes time and focus. Choosing what to photograph and how you want it to look is challenging for many photographers.

Once you’ve taken some photos, another challenge to face is how to get them looking their best. This is where you need to learn a whole new set of computer skills. The more particular you are about the way your photos end up, the better post processor you need to become.

photoshop-cc-shortcuts-list

Adobe makes two of the most popular photography post-processing programs. Lightroom and Photoshop have been industry standards for many years. As the software develops, it becomes more and more complex. There are many built-in tools to make the user experience more fun. But to make use of them you will need to study and practice.

Photoshop CC Shortcuts

Making the most of your keyboard is about the best way to ensure not only greater speed, but more enjoyment when using Photoshop. The software has many cool shortcut keys that speed up your workflow. They also help you maintain unbroken concentration when you are working on a photograph.

With so many shortcuts, it’s not practical to sit down and learn them all at once. Looking at them in the software does little to inspire. This is why I’ve come up with a list of ten Photoshop CC shortcuts that I think you will find helpful.

From time to time, I make a point of learning a few more. I’ll search for five to ten shortcuts and make a list. I place this next to my computer monitor and refer to it when Photoshopping.

If you’re not used to using keyboard shortcuts with Photoshop, they might seem a bit fiddly at first. Like learning to touch type, the more you practice, the easier it becomes, and the less you have to think about where you are putting your fingers. Learning to use shortcut keys in Photoshop is a similar experience, but you can easily break it down and learn a few at a time.

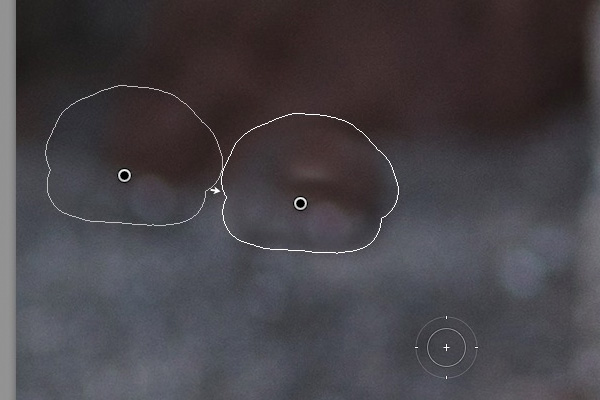
1. Clone Stamp Tweaks

The clone stamp is one of the most used tools in Photoshop. It’s powerful and flexible to do everything from removing small blemishes to recreating whole portions of a composition. Here’s a couple of keyboard shortcuts that make it even more useful.

Use Alt+Shift+arrows (Opt+Shift+arrows on Mac) to offset the selection area.

Alt+Shift+<> (Opt+Shift+<> on Mac) rotates the selection

Using [] scales the source.

These shortcuts only work when you have a North American keyboard selected in your operating system.

photoshop-cc-shortcuts-list

2. Last-Used Filter

When you’re processing batches of images, you’ll often want to repeatedly use the same filter. To apply the previously used filter, use Ctrl+F (Cmd+F on Mac). Reapply the last filter used, but display dialog box to alter settings use Ctrl–Alt–F (Cmd+Opt+F on Mac)

photoshop-cc-shortcuts-list

3. Lock Transparent Pixels

In Photoshop, using the / key locks transparent pixels. This is helpful when painting or compositing. Working on a layer with transparent pixels, you will avoid affecting them using the keyboard shortcut.

10 of the Most Useful Photoshop CC Shortcuts

4. Color Fills

Use Shift+Alt+Backspace (Shift+Opt+Backspace on Mac). This fills opaque pixels on a layer with the foreground color. Shift+Ctrl+Backspace (Shift+Cmd+Backspace on Mac) fills with the background color.

photoshop-cc-shortcuts-list

5. Marquee Tool Tweak

Drawing a marquee by default happens from the edge. To draw a marquee selection from center Alt+drag (Opt+drag on Mac)selection.

10 of the Most Useful Photoshop CC Shortcuts

6. Selection Help

To bring back a selection you deselected, use Ctrl+Shift+D (Cmd+Shift+D on Mac). This will restore the last active selection. It is super helpful if you deselect and then notice something else you need to alter.

photoshop-cc-shortcuts-list

7. Layer Mask Speed

Ctrl+\ (Cmd+\ on Mac) switches between Layer and Layer Mask Ctrl+2 (Cmd+2 on Mac) to switch back. This is a pure workflow time saver. It allows you to keep your mouse active on the image rather than dragging it back and forth to the layers panel.

10 of the Most Useful Photoshop CC Shortcuts

8. Brush Tool Cursor

With the Brush Tool selected hitting the Caps Lock shows only the cross-hair cursor. This allows you to position your cursor more precisely. It’s also a good shortcut to know how to undo. If you’ve inadvertently turned caps lock on while using the Brush Tool, you may wonder why you can only see a crosshair. Hit the caps lock again, and your normal cursor will reappear.

photoshop-cc-shortcuts-list

9. Revert to Last Saved

F12 reverts the file to the last saved instance of it. This is a quick and easy way to review changes you are making to an image.

10 of the Most Useful Photoshop CC Shortcuts

10. Screen Space Savers

F keys to show/Hide panels. Memorizing these keyboard shortcuts will give you so much more screen space to use. If you are confined to a single monitor, making use of these shortcuts can change the way you use Photoshop.

F5 – Show/Hide Brushes panel

F6 – Show/Hide Color panel

F7 – Show/Hide Layers panel

F8 – Show/Hide Info panel

Alt–F9 – Show/Hide Actions panel

10 of the Most Useful Photoshop CC Shortcuts

Conclusion

I suggest you use this list as a starting point. Not all these shortcuts will be helpful for everyone. Think about the actions you use repetitively when using Photoshop and search to discover if there are keyboard shortcuts to make your life simpler.

Making a note and keeping it near your computer will help you commit these shortcuts to memory. Once you have them, do some more research and make another list of shortcuts you’d like to learn. Making a concerted effort and being consistent with using these shortcuts, you will learn them quickly.

There are over 500 keyboard shortcuts for Photoshop. Master these, and then you can also customize your own.

If you’ve got a few favorite shortcuts you think others may not be aware of, please share them in the comments below.


The post 10 of the Most Useful Photoshop CC Shortcuts appeared first on Digital Photography School. It was authored by Kevin Landwer-Johan.


Digital Photography School

 
Comments Off on 10 of the Most Useful Photoshop CC Shortcuts

Posted in Photography


Instagram’s redesigned Explore tab is now live: Stories, shortcuts and more

17 May

Instagram has launched a redesigned Explore tab that adds Stories, topic shortcuts, and direct access to ‘more immersive’ IGTV and Shopping experiences. With the update, Explore now provides users with direct access to Stories, a feature utilized by more than 500 million users daily. Users will now see personalized Stories recommendations in the Explore grid.

Explore recommendations include Stories that are relevant to each user’s interests based on topics they interact with. Users will start seeing these personalized Stories recommendations in Explore in the near future; Instagram says it will be rolling out the addition ‘over the coming weeks.’

Additionally, the redesigned Explore tab features shortcuts in the navigation bar that direct users to topic channels, such as Travel and Art. Users will also now see shortcuts that take them directly to IGTV and ‘Shop,’ the latter of which will produce category filters for specific product types directly in the navigation bar. The IGTV link directs users to the recently updated video home page with a personalized feed of suggested video content.

The redesigned Explore tab is intended to help users find new content they’re interested in viewing, and will likewise help photographers gain exposure to potential new followers interested in the types of content they share.

Articles: Digital Photography Review (dpreview.com)

 
Comments Off on Instagram’s redesigned Explore tab is now live: Stories, shortcuts and more

Posted in Uncategorized


Video: 15 actually useful Photoshop shortcuts to help speed up your workflow

16 Mar

Photoshop Training Channel on YouTube has published a video detailing 15 useful, relatively unknown Photoshop keyboard shortcuts for power users. Unlike many similar videos, this channel’s video digs into actually useful shortcuts that many users are unlikely to know, including how to resize and rotate cloned content using keyboard keys, improving Puppet Warp tool control, and more.

The video is applicable to North American keyboards and includes both Windows and macOS shortcuts. Most tips build upon commonly known tools and shortcuts, offering ways for professionals to reduce the amount of time they spend clicking and sliding. Adobe maintains a large list of Photoshop shortcuts for Windows and Mac users here.

Articles: Digital Photography Review (dpreview.com)

 
Comments Off on Video: 15 actually useful Photoshop shortcuts to help speed up your workflow

Posted in Uncategorized


Lightroom Shortcuts Every Photographer Needs to Know [video]

15 Mar

The post Lightroom Shortcuts Every Photographer Needs to Know appeared first on Digital Photography School. It was authored by Caz Nowaczyk.

In this awesome video by Lucy Martin, you’ll learn Lightroom shortcuts every photographer needs to know to make their editing workflow faster and more efficient.

?


The Lightroom shortcuts every photographer needs to know

Help make your editing process be more efficient and fast-paced so you can deliver your photos much quicker by knowing these shortcuts:

G – Grid view
E –  Loupeview
L –  Lights Out – (isolates your image against a black background for previewing)
P –  Pick (Flag)
x –  Reject
Caps Lock –  auto next
Cmd+Delete –  delete rejected
D –  Go to Develop
\ –  Before/After
Y –  Before/After Side by Side Comparison
V –  Black and White
R –  Resize and Rotate
Q –  Spot Removal Tool
H –  Hide adjustment Pins
Cmd+Z –  Undo last action
Cmd+C –  Copy Settings
Cmd+P –  Paste Settings
Cmd+/ –  Show all shortcuts

You may also find the following helpful:

Lightroom CC and Photoshop CC Keyboard Shortcut Cheat Sheets

How to Use Lightroom Star Ratings to Improve Your Editing Workflow

How to Customize Your Lightroom Workspace for Better Workflow

10 Tips to Make Lightroom Classic CC Run Faster

5 Adobe Lightroom Plugins That Will Make Your Life Easier

How to Find Your Photos in the Lightroom Catalog Using Filters


The post Lightroom Shortcuts Every Photographer Needs to Know appeared first on Digital Photography School. It was authored by Caz Nowaczyk.


Digital Photography School

 
Comments Off on Lightroom Shortcuts Every Photographer Needs to Know [video]

Posted in Photography


Obscura 2 app updates interface, adds new histogram visualizer and keyboard shortcuts

08 Feb

Obscura 2, an iOS camera app developed by Ben McCarthy, has released an update that adds a histogram visualizer, iPad keyboard shortcuts, a redesigned image viewer and more.

The most obvious change in the updated is the new image viewer interface. Now, the various settings, controls and filters are organized into card-style dialogs within the interface. While this does take up more real estate for each setting, it provides a cleaner look and helps to compartmentalize the various settings.

The new histogram integration provides real-time exposure data by overlaying bars on the bottom of the the the app, behind the buttons. It’s nice the histogram is subtle, but it’d be nice to have an option to change the color/opacity on the bars, because the dark grey on black can sometimes be difficult to see.

On iPads, the update adds keyboard shortcuts for taking photos, switching between camera and library modes, applying filters, and navigating through photos that have been captured. Sure, the iPad isn’t a camera-first device in any sense, but it’s nice to see McCarthy add this sort of functionality.

Overall, it’s a solid update with a cleaner UI and a number of functional improvements. Obscura 2 is available on the iOS App Store for $ 4.99.

Articles: Digital Photography Review (dpreview.com)

 
Comments Off on Obscura 2 app updates interface, adds new histogram visualizer and keyboard shortcuts

Posted in Uncategorized


4 Incredible Photoshop Shortcuts in Six Minutes

18 Jan

I’m a bit of a post-processing shortcut addict. I’m always looking for more efficient ways of getting through my workflow in programs like Adobe Lightroom, Adobe Photoshop, ON1 Photo RAW, etc. When I find a new shortcut, even if requires a bit of practice, I feel like I just leveled up. It’s weird, I know, but it’s true.

Four Photoshop Shortcuts in Six Minutes

I’ve been using Photoshop on a near daily basis for the better part of a decade now. Over the years, I’ve picked up a ton of shortcuts but I wanted to share some of my all-time favorites with you. These are the ones that rocked my world when I learned them, and if they’re new to you, I’m confident they’ll have the same effect!

?

  1. Make a stamp layer
  2. Brush opacity
  3. Brush resize trick
  4. Zoom trick

Correction from the video: For the brush resizing trick, the PC instructions I gave didn’t seem to be working for most users. The correct translation (this is for PC users only) is to hold down the ALT key, then click and drag using the right mouse key. If you’re on a pen tablet, use whatever button you have set for right click.

Conclusion

Well? Is your mind blown!? The brush resize and zoom shortcuts seriously changed my life when I learned them! I can’t tell you how many years I spent right clicking to change brush hardness and fumbling with bracket keys to resize the brush. Let me know what you think in the comments and if you have any incredible shortcuts to share, I’m all ears!

The post 4 Incredible Photoshop Shortcuts in Six Minutes by James Brandon appeared first on Digital Photography School.


Digital Photography School

 
Comments Off on 4 Incredible Photoshop Shortcuts in Six Minutes

Posted in Photography


18 useful Lightroom shortcuts for beginners

16 Jan

Adventure and lifestyle photographer Lucy Martin put together this useful little video that goes over her favorite Lightroom shortcuts. There are 18 in all, and while they’re all probably a little basic for the power users out there—L = lights out, X = reject, etc.—the beginners reading this will definitely pick up a few new shortcuts to add to their repertoire.

We’ve listed all 18 below, just like Martin did in the video’s description, but check out the video to see all of the min action:

  • G – Go to Grid (Library Mode)
  • E – Enter Loupe View
  • L – Lights Out
  • P – Pick/Flag Photo
  • X – Reject Photo
  • CAPS LOCK – Auto Next Photo
  • CMD + DELETE – Delete all Rejects
  • D – Go to Develop Module
  • \ – Before & After Shortcut Key Lightroom
  • Y – Before & After Side-by-Side
  • V – Black& White
  • R – Resize & Rotate (Crop)
  • Q – Spot Removal Tool
  • H – Hide Adjustment Pins
  • CMD + Z – Undo Last Action
  • CMD + C – Copy Develop Settings
  • CMD + P – Paste Develop Settings
  • CMD + / – Show All Shortcuts

If you have any favorites you want to add to this list, drop them in the comments. And if you found the video helpful, you can check out more from Martin on her YouTube channel.

Articles: Digital Photography Review (dpreview.com)

 
Comments Off on 18 useful Lightroom shortcuts for beginners

Posted in Uncategorized


Five Useful Lightroom Keyboard Shortcuts

16 Apr

Lightroom shortcuts

Adobe makes life easier for Lightroom users by building in keyboard shortcuts. You probably know some of the more important ones by heart (e.g.: T to reveal or hide the Toolbar, \ to toggle between before and after views, and O to reveal the Adjustment Brush overlay). But I’m also betting there are quite a few shortcuts you didn’t even know existed. Here are some of the more useful, lesser known ones.

1. Reveal all Shortcuts

Keyboard shortcuts are difficult to remember, especially if you don’t use them that often. But if you press Ctrl + / (PC) or Cmd + / (Mac), Lightroom displays a list of the shortcuts available in the current module. When you’re done, click anywhere on the shortcut list to hide it.

Lightroom shortcuts

Library module shortcuts.

Lightroom shortcuts

Develop module shortcuts.

Note: The rest of these keyboard shortcuts are for the Develop module. Not all of them are shown on the shortcuts list.

2. Rotate the Crop Overlay

If you’ve ever tried to make a portrait crop from a landscape image you’ll have experienced the frustration of trying to rotate the Crop Overlay (press R to go straight to that tool).

Lightroom automatically gives the Crop Overlay the same orientation as the photo, with no immediately obvious way of rotating it. To do so, simply press X.

Lightroom shortcuts

By default the Crop Overlay is automatically given the same size and orientation as the original frame.

Lightroom shortcuts

Press X to rotate the Crop Overlay and make an extreme crop.

3. Resample Spot Removal Tool

The good thing about the Spot Removal Tool (which you can activate by pressing Q) is that Lightroom is quite good at guessing which part of the image it should sample, in order to heal the selected area. But it doesn’t get it right all the time. If you don’t like the result, press the / key and Lightroom will choose a different area to sample. Repeat as often as you like.

Lightroom shortcuts

In this example I wanted to get rid of this dark blob in the background because it’s a distraction.

Lightroom shortcuts

Lightroom’s first guess doesn’t really work.

Lightroom shortcuts

But the second one is much better. You can of course fine-tune it by moving the pin indicating the sampled area manually.

4. Automatic White and Black points

If you double-click on the Whites and Blacks sliders in the Basic panel, Lightroom resets them to zero. If you hold the Shift key down while you do it, Lightroom calculates the best settings, working out where to position both sliders so that the histogram stretches all the way from the left side of the graph (shadows) to the right (highlights) without any gaps. This quick fix makes most photos look better right away. The flatter the original photo, the more extreme the settings required.

Lightroom shortcuts

Double-click the Whites and Blacks sliders while holding the Shift key down. Make sure you double-click the words and not the slider itself.

5. Flip a Graduated Filter

Press the apostrophe key to flip (invert) a Graduated Filter. One practical use for this is as follows:

  • Create a Graduated Filter over the sky of a landscape image (hold the Shift key down while you do so to keep the Graduated Filter straight) and move the Exposure slider left to darken that area.
  • Right-click on the Graduated Filter’s pin and select Duplicate. This creates a new Graduated Filter with exactly the same settings as the first.
  • Press the apostrophe key to flip the Graduated Filter. Now the minus Exposure setting is applied to the foreground. We don’t want to make the foreground darker, so double-click the Exposure slider to return it to zero. Now we are ready to use this new Graduated Filter to enhance the foreground.
  • Move the Clarity slider right to emphasise the texture in the foreground. You may also need to move the Exposure slider left if this brightens the foreground too much.

The net result is that you have applied two Graduated Filters, one to the sky, and the other to the foreground.

***By the way, the apostrophe shortcut also works with the Radial Filter.

Lightroom shortcuts

(A) Original photo. (B) Graduated Filter with minus Exposure applied to sky. (C) Duplicated and flipped Graduated Filter applied to foreground, with plus Clarity and minus Exposure. (D) Final result.

Your turn

What keyboard shortcuts do you use in Lightroom and why? Please let us know in the comments.


The Mastering Lightroom Collection

Mastering Lightroom ebooksMy Mastering Lightroom ebooks will help you get the most out of Lightroom 4 and Lightroom 5. They cover every aspect of the software from the Library module through to creating beautiful images in the Develop module. Click the link to learn more or buy.

googletag.cmd.push(function() {
tablet_slots.push( googletag.defineSlot( “/1005424/_dPSv4_tab-all-article-bottom_(300×250)”, [300, 250], “pb-ad-78623” ).addService( googletag.pubads() ) ); } );

googletag.cmd.push(function() {
mobile_slots.push( googletag.defineSlot( “/1005424/_dPSv4_mob-all-article-bottom_(300×250)”, [300, 250], “pb-ad-78158” ).addService( googletag.pubads() ) ); } );

The post Five Useful Lightroom Keyboard Shortcuts by Andrew S. Gibson appeared first on Digital Photography School.


Digital Photography School

 
Comments Off on Five Useful Lightroom Keyboard Shortcuts

Posted in Photography


10 Quick Lightroom Tips and Shortcuts

21 Mar

Lightroom is a powerful and complex program. It’s great to have shortcuts and fast ways to do things you do often. Here are ten Lightroom tips to help you out:

#1 Check RBG values

Did you know that you can check the RGB value of the pixels for an selected image in Lightroom? When you are working in the Develop module press S on the keyboard which will show you the soft proofing for the image. Hover the cursor over the image area, and it will display the RGB values (not percentages) of the pixel where your mouse is being located, look just below the histogram. (See the screenshot below)

Smarttips Lightroom 01

#2 Full screen mode

2. Making a clutter free workspace will not only provide you more working area but it will be distraction free as well. To enable full screen (without even the menu bar and the window frame )- press Shift+F (in LR4 and earlier just hit F). Pressing that combination repeatedly will give you another two options. Try it out for yourself. I use this all the time.

Smarttips Lightroom 02

#3 Preview effects by panel

You can turn off one particular sub-panel’s effect on the image. Click that little button to see the effect of that particular panel on the image toggle off and on.

Smarttips Lightroom 03

#4 Work with the histogram

4. If you are person who works based on the histogram, you can work directly on the image’s histogram itself inside Lightroom. Once hover your cursor over on the histogram, it will change into a double-sided arrow on specific areas. Then you only have to click and drag to the right or left, as you wish based on what values you want to change (Black, Shadows, Exposure or mid tones, Highlights, or Whites).

Smarttips Lightroom 04

#5 View file properties

If, while working on your photograph, for whatever reason you want to check the image’s properties including size, format, you can do so by pressing I (it will display the size of the file, file type, date taken, lens model). Pressing I one more time will provide you another set of properties, clicking I again will remove all the details from displaying.

Smarttips Lightroom 05

If you do not see all of those options go to View > View Options (Cmd+J) where you can customize what is displayed in the Louse overlay mode using this pop-up dialog box.

Screen Shot 2015 03 14 at 5 35 25 PM

#6 Clipping warnings

To avoid processing outside of your image’s dynamic range, while working in develop module clicking J (keyboard shortcut) will activate the clipping warnings for highlights and shadows. If you push exposure towards the right far more, a red colour warning will be displayed on the region of the photograph where it is overexposed, Conversely if you bring down the exposure (for whatsoever reason) a blue colour warning will be displayed on the region of the photograph where it is underexposed. (Below screenshot is an example of overexposure)

Smarttips Lightroom 06

#7 Unflagging

In Library module, when you are flagging photographs for sorting purposes, if you mistakenly press pick (p) instead of rejecting (x), stay calm and press (u) for unpick or unflag. It will remove the flag, now you can mark it as you originally wished.

#8 Lesser known Develop keyboard shortcuts

If you are in the habit of using your keyboard, in Develop module the complete basic panel can be controlled by keyboard. Press period (.) or comma (,) for selecting a slider (e.g., Exposure) and then press plus (+) to increase the value and press minus (-) to decrease the value of the same. Now press period (.) to go the next. Repeat, enjoy.

#9 Shift key to lock

While applying a graduated filter, if you want to make it straight – press and hold Shift the key to make the filter locked into perfectly horizontal or vertical position. You can also hold Shift when applying the crop tool on your image (if required), to avoid changing the image proportions.

#10 Saving local adjustment tool presets

You can save any of the local adjustment tool settings as a preset which can be used for any of the tools. For example, if you are a portrait retoucher, you may want to save your favorite skin-softening settinsg as a preset. You can do that by clicking save as a preset at the bottom of the local correction tool set. Likewise you can save any kind of settings which you may use often.

Smarttips Lightroom 10

Do you have any others you’d like to add to this list of Lightroom quick tips?

googletag.cmd.push(function() {
tablet_slots.push( googletag.defineSlot( “/1005424/_dPSv4_tab-all-article-bottom_(300×250)”, [300, 250], “pb-ad-78623” ).addService( googletag.pubads() ) ); } );

googletag.cmd.push(function() {
mobile_slots.push( googletag.defineSlot( “/1005424/_dPSv4_mob-all-article-bottom_(300×250)”, [300, 250], “pb-ad-78158” ).addService( googletag.pubads() ) ); } );

The post 10 Quick Lightroom Tips and Shortcuts by Navan Viswa appeared first on Digital Photography School.


Digital Photography School

 
Comments Off on 10 Quick Lightroom Tips and Shortcuts

Posted in Photography


Top 5 Shortcuts for Better Photos

05 Feb

Having taught photography for several years I’ve noticed most students find the following 5 tips provide the biggest ‘aha!’ moments. These are the quickest and easiest techniques for improving your photography.

Top five shortcuts for better photos

1. Switch to aperture priority

Aperture priority

The main dial on top of your camera will have an option called ‘Av’ or ‘A’, depending on the make of your camera. It’s known as ‘aperture priority’. This mode gives you the perfect combination of a decent exposure (in most situations) and creative control. The only time this setting doesn’t give the right exposure is when a scene is particularly bright (like a snow scene), or dark (like a black Labrador).

Exposure compensation

If you’re not happy with the exposure you can use your camera’s exposure compensation setting to make it brighter or darker. This is usually controlled using a +/- button or a large rotary wheel, but check your manual for instructions on how to do this for your make and model of camera. Cameras tend to make very bright scenes too dark and dark scenes too bright.

A large part of the creativity in photography is adjusting the aperture to ensure more or less of the photo is in focus. The beauty of aperture priority is that you can select the aperture you want, and the camera will select the appropriate shutter speed to get the right exposure. Even if the light changes while you’re composing the photo the aperture won’t change, only the shutter speed will. This means your creative vision won’t change either.

All you need to remember is the lower the aperture number (f/4 for example), the less of the image that will be in focus. Cameras can be overwhelming and even have different ways of doing the same thing. When you’re starting out in photography it’s important to keep things simple. This means understanding what you don’t need to worry about yet. Sticking with aperture priority means you have one less knob to worry about, which always comes as a huge relief to my students.

2. How to avoid blurred photos

One of the most common problems suffered by new photographers is blurry photos caused by having a slow shutter speed. There’s a simple rule to help.

Your shutter speed needs to be faster than the focal length of your lens. So, if you’re using a 17-70mm lens and you set your lens to 70mm, then you need a shutter speed of at least 1/70th second. If you zoom out to 17mm then you’d need a shutter speed of 1/17th second. Note that this is the absolute slowest shutter speed you could use and the rule assumes that you and your subject are both still.

Blurred photos

Obviously your shutter speed can be as long as you like if you use a tripod, unless your subject is moving. You can create lovely effects by using a tripod for landscape photos where part of the landscape is moving. For example: flowing water, trees in the wind, car headlights, clouds etc.

If your shutter speed is too slow then you can make the aperture larger to let more light into the camera. Select a smaller ‘f number’ (f/4 instead of f/8 for example). If you’re already on the smallest f number you can get, or you don’t want to lower it because less of your photo will be in focus, then you have another option. Choose a higher ISO number and keep the same aperture as before. Again, aperture priority will ensure the exposure remains correct unless the scene is overall very dark or very bright.

3. Get closer and remove clutter

Almost every photographer starts out photographing things from too far away. They’ll create portraits where the person has a big area of nothingness around them. Maybe this is because most people are uncomfortable being photographed, and most new photographers are nervous about standing near them to take their picture. A longer lens can really help. 100mm or more allows you to stand outside someone’s personal space and still get a tightly composed image.

Just before you press the shutter button remember to check for unwanted items and consider whether your main subject is nice and bold in the frame. Our brain often deceives us because when it’s excited by something, it makes it seem bigger than it really is. Look at the background and consider whether it could be less cluttered. If you’re unable to move yourself or your subject to create a cleaner background then use a lower F stop (f/5 or lower, for example) to blur it out.

Uncluttered

4. Look for geometric shapes

If you look at your favourite photos you’ll notice the composition is often made up of quite defined shapes. Triangles, diamonds, circles, squares, parallelograms and trapezoids all slot together to create a pleasing jigsaw. Our brains like things to be ordered. Think about the calming effect of a nicely appointed hotel room. It’s made up of uncluttered geometric shapes, from the neatly stacked towels to the folded triangle of toilet paper and the round mint on the fold of your bed sheet.

Geometric shapes 2

5. Get in touch with your feelings

Whenever you have the urge to create a photo, think about why you’re picking your camera up in the first place. What was it that inspired you to grab your camera in this instant? If you’re photographing a person, then what are their physical and personality traits that you’d like your photo to convey?

Feelings

Imagine looking over a rocky coastal bay as the sun sets to your right. There’s a lighthouse straight ahead on the far side of the cove and storm clouds are rolling in behind it. Frothy waves are pummelling the rocks below. Most people would get out their wide angle lens and try and capture the whole scene in one go. The trouble is, the sunset would be distant, and the waves, rocks and lighthouse would be almost imperceptible.

Feelings 2

In this situation I’d recommend you create more than one photo. First you could walk to the rocky shore and get down low so the spray of the waves would be majestically backlit against the sunset. Then you could create a stark, bold silhouette of the lighthouse against the inky storm clouds. By creating two photos your message is much clearer.

So, before you press that shutter button consider if you’ve composed your photo in a way that makes your message clear.

Do you disagree with any of these tips, or have some better ones? Leave a comment below so we can see who has the best ninja photography techniques.

The post Top 5 Shortcuts for Better Photos by Dan Waters appeared first on Digital Photography School.


Digital Photography School

 
Comments Off on Top 5 Shortcuts for Better Photos

Posted in Photography