RSS
 

Posts Tagged ‘Shortcuts’

Photoshop Keyboard Shortcuts

01 Oct

By Lori Peterson

Recently I was helping a photographer who had just switched from Elements to Photoshop 6. She was looking to streamline her editing and asked about keyboard shortcuts. At that moment it dawned on me that not everyone knew about keyboard shortcuts, what the most commonly used ones are, and even why you should teach yourself to use them.

Once you learn the keyboard shortcuts that you use most, you will be able to do them without really thinking. It will speed up what you are doing in Photoshop and enable you to move effortlessly through your editing processes. There are shortcuts for virtually everything you could want to do in Photoshop.

The most used shortcut I use is one of the simplest. When you click X on your keyboard it switches your foreground and background colors. When you are working with masks this shortcut is invaluable. If you are using a mask and want to make sure that you aren’t going outside the area you want to be or want to clean it up more you can click on the mouse and hit your ALT button and that will show you where you are working and how it looks. Just click it again to go back.

Another common shortcut is for duplicating your layer and that is CTRL +J. This simply duplicates the layer you are working on. There is not a shortcut for adding a layer mask but you can easily create your own by going to Edit > Keyboard Shortcuts > Layer Mask > Reveal All and then assigning a shortcut for your layer masks to be added.
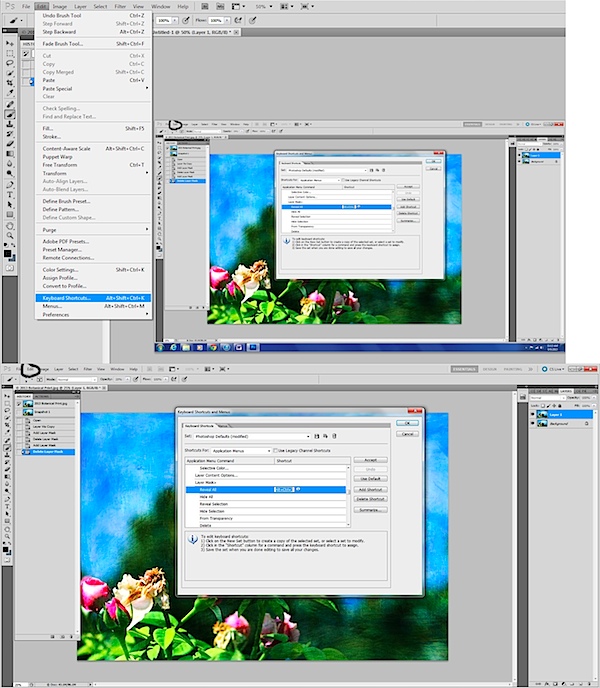
layer mask.jpg

If you hit the B on your keyboard it will take you to your brushes and then you can use your number pad to pick the opacity of the brush. If you hit the number 1 it makes your opacity 10%, if you hit 2 it makes it 20%, and so on.

When using brushes you sometimes need to fine tune them and make them larger and smaller and that’s when you use your brackets. The brackets are located just above your enter key. [ makes your brush smaller and ] makes your brush larger. You can toggle back and forth between them to keep changing the size of your brush. If you need to zoom in or out to look at what you are doing then you simply hit CTRL + to zoom in or CTRL – to zoom out.
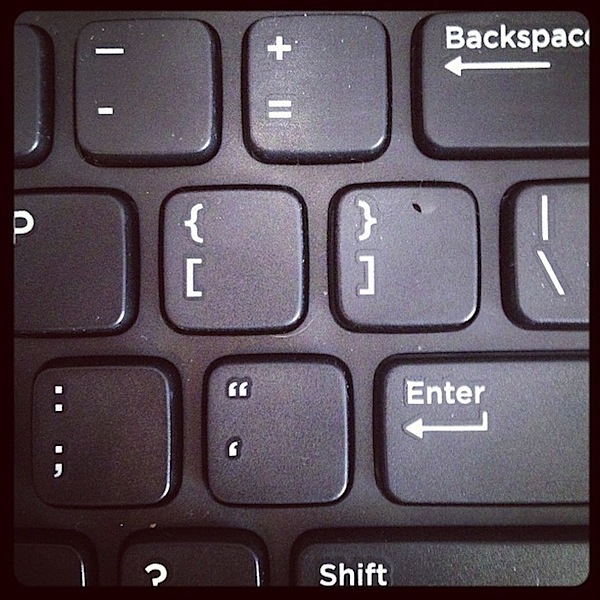
brackets.jpg

If you make a mistake while editing you can use CTRL + Z to undo what you just did. If you need to go back multiple times then using CRTL +ALT + Z will help you undo multiple changes that you have done.

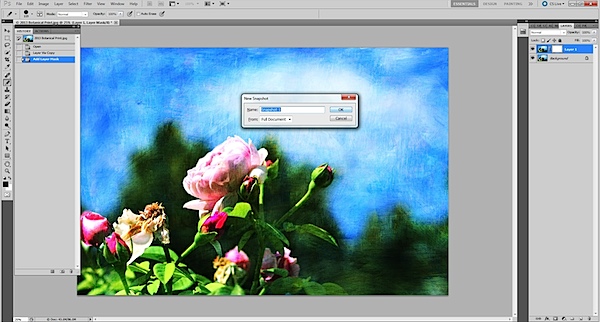
I use my history folder and take snapshots of my work as I am doing things so that if I need to go back to a point before I did a certain part of an edit that it’s easier. Using your history folder and taking a snapshot is simple and an easy way to make sure that you can get back to the point where you were happy with your image. There is a default number of history states that you can revert back to. If you want to increase those numbers just go to Edit > Preferences > Performance and then change the number of history states to fit what you want. (This is not a shortcut, but oh so helpful!)
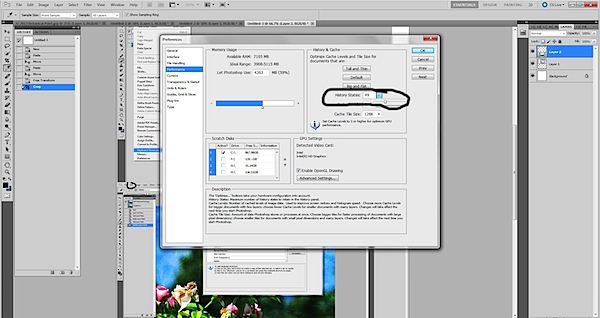
image states.jpg

You can easily just go to your history and take a snapshot by clicking the little camera icon. But if you hold down ALT and then click the camera icon you can name the snapshot of the image that you just took. That makes it easier than going back and having to click around to figure out which image was the one you liked. It’s like learning to change the names of your Layers as you are working. It sometimes seems pointless, but when you need to know which one to go to, it’s very important!
alt and new snapshot.jpg

Photoshop is not something you can learn in one sitting. There are so many pieces and components to it that it requires a lot more than that. Finding the pieces that you need and the ones that work for you are what counts. If you don’t do any 3D animation then the tools for that particular part of Photoshop are not going to be of any interest to you. Learn your basic shortcuts and take it from there. Don’t overwhelm yourself with trying to learn everything at once. You can find links to shortcuts from Adobe and from many other places. You can even post the ones you think you will use at your desk and practice using them. Once you add a few to your editing, then learn a few more. Keeping everything short and simple and easy is sometimes what works best.

Lori Peterson is an award winning photographer based out of the St. Louis Metro Area. Her dynamic work ranges from creative portraits to very unique fine art photography. Lori’s work can be seen at www.loripetersonphotography.com and also on her blog at www.loripetersonphotographyblog.com. You can follow her on Facebook at https://www.facebook.com/LoriPetersonPhotography.

Post originally from: Digital Photography Tips.

Check out our more Photography Tips at Photography Tips for Beginners, Portrait Photography Tips and Wedding Photography Tips.

Photoshop Keyboard Shortcuts

Digital Photography School

 
Comments Off on Photoshop Keyboard Shortcuts

Posted in Photography


10 Shortcuts of the Commonly Used Features in the Library Module of Lightroom 4

02 May

Introduction

This tutorial has been transcribed from the SLR Lounge Lightroom 4 Workshop on DVD, a 14 hour Lightroom 4 A – Z guide with over 130 tutorials for mastering Lightroom from start to finish. The Digital download can be purchased from SLR Lounge while the physical copy is available through Amazon Prime.

Overview

This quick article will go over 10 shortcuts of the commonly used features in the Library Module of Lightroom 4. Knowing these simple shortcuts can greatly speed up your workflow!

(Note:  Apple users, just pretend that “CTRL” is “CMD”.  😉

1. Lightroom 4 Module Shortcuts

There are a total of 7 Modules in Lightroom 4 and each corresponds with numbers 1-7. To switch to a Module, hit “Ctrl + Alt + 1-7.”

“1” is the Library Module, “2” is the Develop Module, “3” is the Map Module, and so forth. For example, if you want to go to the Develop Module, hit “Ctrl + Alt + 2.”

01_lightroom-module-shortcuts

Another quick way to get to the Develop Module is by simply hitting “D.” You can also get to the Library Module through the different Library View Modes, which brings us to our next shortcut.

2. Library View Modes

There are 4 Library View Modes in Lightroom 4: Grid View Mode, Loupe View Mode, Compare View Mode, and Survey View Mode. To access the Grid View, hit “G.” To get to the Loupe View, hit “E.” Hit “C” for Compare View and “N” for Survey View. If you are in a module other than the Library Module, hitting any 4 of these Library View Mode shortcuts will bring you back to the Library Module.

3. Import/Export Shortcuts

To import images into Lightroom, hit “Ctrl + Shift + I.” This will bring up the Import Dialogue Box. Hit “Ctrl + Shift + E” to bring up the Export Dialogue Box to export your images out of Lightroom.

4. Photoshop Shortcut

Sometimes we need to finish editing our images in Photoshop. We can take our images from Lightroom into Photoshop by selecting the image and then hitting “Ctrl + E.” Once you are done with your image in Photoshop, hit “Ctrl + W.” This will bring you back into Lightroom, where you will see both your Photoshop copy and Lightroom copy of your image in your Lightroom catalog.

5. Left/Right Panels Shortcuts

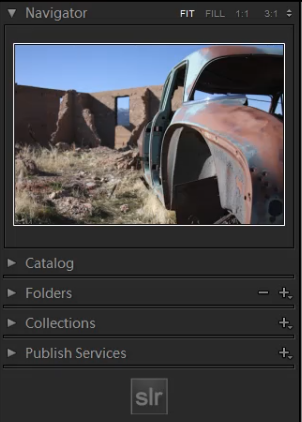
The boxes on the right and left sides of Lightroom 4 are referred to as Panels. Like the Modules, the Panels also correspond to a number. The Left Panels correspond with the numbers “0-4” and include the Navigator Panel, the Catalog Panel, the Folders Panel, the Collections Panel, and the Publish Services Panel.

To expand or collapse a Left Panel, hit “Ctrl + Shift + 0-4.” The Navigator Panel is “0,” the Catalog Panel is “1,” the Folders Panel is “2,” and so on. Below, you can see that only the Navigator Panel is expanded and the remaining Panels are collapsed.

02_lightroom-left-side-panels-shortcuts

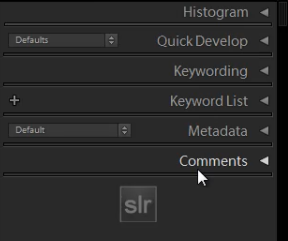
The Right Panels correspond with the numbers “0-5.” To expand or collapse a Right Panel, hit “Ctrl + 0-5.” The Right Panel includes the Histogram Panel, the Quick Develop Panel, the Keywording Panel, the Keyword List Panel, the Metadata Panel, and the Comments Panel. The Histogram Panel is “0,” the Quick Develop Panel is “1,” the Keywording Panel is “2,” and so forth. As you can see below, none of the Panels have been expanded.

03_lightroom-right-side-panels-shortcuts

6. Target Collection Shortcuts

Since we just discussed the Panels shortcuts, we will go over a Target Collection, which can be found in the Collections Panel (“Ctrl + Shift + 3”) in the Left Panel. A Target Collection is a useful tool because it helps us organize our photos quickly by using a hotkey. You can set a previous collection as the Target Collection, or you can create a new collection and set it  as the Target Collection.

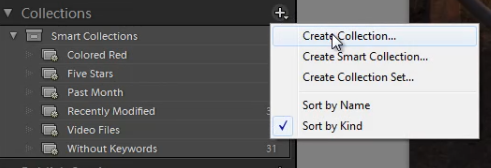
To create a new collection, click on the “+” sign next to Collections in the Left Panel. Select “Create Collection.”

04_create-new-collection

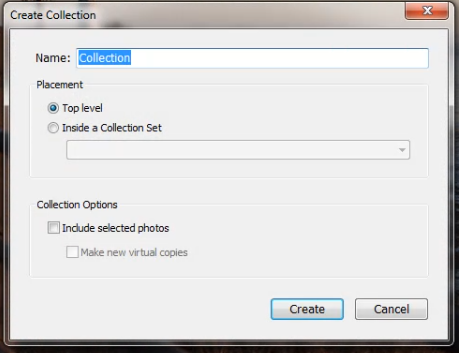
Once you have hit “Create Collection,” the Create Collection Dialogue Box will appear. Once you have named your collection, hit “Create.”

05_create-collection-dialogue-box

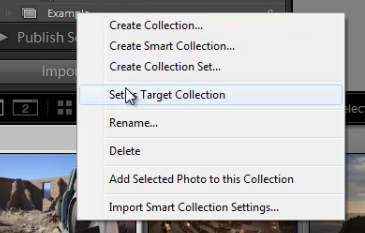
Right-click on a collection and hit “Set as Target Collection” to set the collection as your Target Collection.

06_set-as-target-collection

Once you have selected a collection to be your Target Collection, a “+” sign will appear next to the collection you have selected to remind you which collection is your “target” for the Collection hotkey. Now, simply hit “B” to add any image to your Target Collection!

For example, you might have created a collection for your portfolio images. Set that collection as your Target Collection, and then whenever you are looking through your latest photo shoot and you see one that is portfolio worthy, just hit “B” to add it to your portfolio!

7. Rotate Left/Right Shortcuts

To rotate multiple images at once, go to the Grid View (“G”). Once you are in the Grid View, select your images by holding down “Ctrl” while clicking on your images. To rotate your images to the left, hit “Ctrl + [.” To rotate your images to the right, hit “Ctrl + ].” You can also rotate individual images by using the same shortcuts.

8. Flag Shortcuts

Some people use flags as their culling system. For example, selecting an image as a pick means that we will deliver the image. Rejecting an image means that we will not deliver the image. Simply hit “P” to flag an image as a “pick.” If you want to remove the flag, hit “U.” To reject an image, hit “X.”

Or, to simply increase or decrease the flag status of an image, just hit Ctrl and either the up or down arrow.  This is by far the fastest way to go go from image to image and flag keepers (with just one hand!) by using the left and right arrows to navigate and the Ctrl-up/down key combination to pick or reject your images…

9. Star Rating Shortcuts

The following are the shortcuts for the Star Rating in Lightroom 4.

  • “1” = 1 star
  • “2” = 2 stars
  • “3” = 3 stars
  • “4” = 4 stars
  • “5” = 5 stars

Simply select an image and hit “1-5” to give the image a star rating. To reset Star Ratings on your images, hit “0.”

10. Color Label Shortcuts

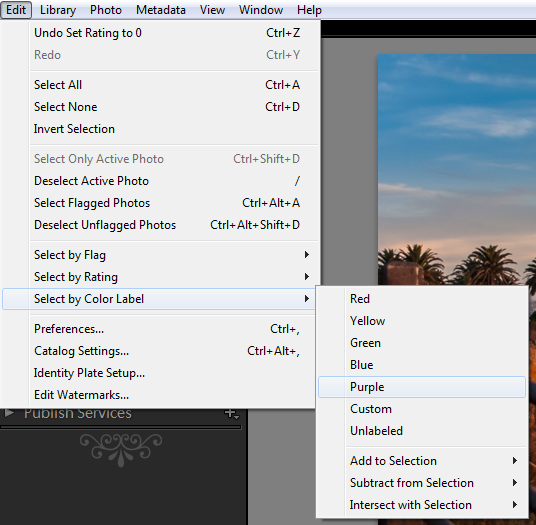
The Color Labels in Lightroom 4 correspond with the numbers six thru nine. Red is “6,” Yellow is “7,” Green is “8” and Blue is “9.” There is also a Purple Color Label but to label an image Purple, you need to go into the Edit Menu, as shown below.

07_lightroom-purple-color-label

If you want to remove a Color Label, hit the corresponding number again. So for example, if your image is already color labeled Green, hit “8” again to remove this Green Color Label.

Learn More with the Lightroom 4 Workshop Collection!

This was a sample tutorial from the Lightroom 4 A to Z DVD which is one of the DVDs in the Lightroom 4 Workshop Collection. A collection of nearly 30 hours of video education teaching everything from Lightroom basics to advanced raw processing techniques.

The LR4 Workshop Collection also includes the critically acclaimed Lightroom 4 Preset System which is designed to enable users to achieve virtually any look and effect within 3-5 simple clicks. From basic color correction, vintage fades, black & white effects, tilt-shift effects, faux HDR, retouching, detail enhancing, and so much more. Click the links above to learn more.

Post originally from: Digital Photography Tips.

Check out our more Photography Tips at Photography Tips for Beginners, Portrait Photography Tips and Wedding Photography Tips.

10 Shortcuts of the Commonly Used Features in the Library Module of Lightroom 4


Digital Photography School

 
Comments Off on 10 Shortcuts of the Commonly Used Features in the Library Module of Lightroom 4

Posted in Photography


Microsoft PowerPoint 2010 – Don’t Use Keyboard Shortcuts? Remove Them From ScreenTips

16 Oct

If you prefer not to use keyboard shortcuts in PowerPoint 2010, stop showing them in the pop-up ScreenTip help.

As you move your mouse pointer over various on-screen icons and other elements in Microsoft PowerPoint 2010 and see popup ScreenTips appear, you may have noticed keyboard shortcuts shown occasionally. If you’re used to pressing CTRL + S to save a document or CTRL + P to print one, you may find these reminders useful.

However, some people rarely venture far from the mouse, preferring to click buttons, navigate menus, and never worry about memorizing combinations of letters and modifier keys. If you fall in this latter category, you may wish to ditch these shortcut reminders….

Read more at MalekTips.
New Computer and Technology Help and Tips – MalekTips.Com

 
Comments Off on Microsoft PowerPoint 2010 – Don’t Use Keyboard Shortcuts? Remove Them From ScreenTips

Posted in Technology


[MODIFIED] Google Chrome – View Web Pages in Full Screen Mode and Switch Between Tabs with Keyboard Shortcuts

30 Aug

Toggle full screen mode in the Google Chrome web browser. While tabs are hidden, switch between pages with keyboard shortcuts.

This is a simple Google Chrome tip, but beginners may find it useful. Others still may learn a keyboard shortcut or two.

When browsing a web page that you plan on staying at for awhile, such as a web-based electronic mail service such as Gmail, you might wish to temporarily hide everything else onscreen including Chrome’s address bar to view more of the page. …

Read more at MalekTips.
New Computer and Technology Help and Tips – MalekTips.Com

 
Comments Off on [MODIFIED] Google Chrome – View Web Pages in Full Screen Mode and Switch Between Tabs with Keyboard Shortcuts

Posted in Technology


Windows 7 – Title Bar Tricks and Tips Including Keyboard Shortcuts

25 Aug

Other ways to maximize windows and bring up window options in Windows 7.

Here are a couple of tricks with window title bars in Windows 7 – some of these tips may work in other Windows versions:

* Double-click the title bar of a window to maximize it (if the current window supports maximizing). Double-click the title bar again to restore the window to its previous size. …

Read more at MalekTips.
New Computer and Technology Help and Tips – MalekTips.Com

 
Comments Off on Windows 7 – Title Bar Tricks and Tips Including Keyboard Shortcuts

Posted in Technology