RSS
 

Posts Tagged ‘Library’

Library of Congress launches AI-powered, image-based Newspaper Navigator tool

26 Sep

The Library of Congress has launched a new AI-powered image-based tool for searching through old newspapers, enabling anyone to find historic images from more than 16 million scanned newspaper pages. Newspaper Navigator builds upon the LOC’s existing Chronicling America project, the result being a visual content recognition model capable of finding a variety of images in digitized newspapers, including maps, comics, photographs, illustrations, advertisements and more.

The Chronicling America project is the LOC’s historic newspaper archive. With this tool, anyone can use optical recognition technology (OCR) to search through a vast archive of digitized newspapers dating back to the late 1700s. Newspaper Navigator builds upon this, introducing the ability to search for images rather than text. The object detection model was trained using annotated newspaper pages from the Chronicling America project, enabling it to extract the visual content from 16,358,041 newspaper pages.

The new tool was created by LOC 2020 Innovator in Residence Benjamin Charles Germain Lee who detailed the project in a new video. In addition to offering a search tool online, the LOC has released the extracted visual content as prepackaged datasets available to download from Github. This prepackaged content is split up by year and includes a variety of metadata alongside the images.

Users can search through more than 1.6 million images sourced from newspapers dated from the year 1900 to 1963. The results are fairly accurate, though the use of optical character recognition for extracting descriptions of the content can be lackluster if the quality of the scanned newspaper text is poor.

The interface includes some useful options, including links for downloading the images, viewing the full newspaper issues, learning more about the newspapers and getting citations for images. This assumes one is using the online search tool and not the prepackaged downloadable image datasets available on Github, of course.

Newspaper Navigator is ultimately the largest single dataset of extracted visual content sourced from historic newspapers that has ever been assembled, according to the full study. Machine learning technology has produced an unprecedented way to rapidly sort through digitized materials that would otherwise be far too expansive to search manually.

As for using the images found through Newspaper Navigator, the rights and reproduction terms are found under the wider Chronicling America project. According to the project’s About page, the LOC:

…believes that the newspapers in Chronicling America are in the public domain or have no known copyright restrictions. Newspapers published in the United States more than 95 years ago are in the public domain in their entirety. Any newspapers in Chronicling America that were published less than 95 years ago are also believed to be in the public domain, but may contain some copyrighted third party materials. Researchers using newspapers published less than 95 years ago should be alert for modern content (for example, registered and renewed for copyright and published with notice) that may be copyrighted.

This new tool joins the LOC’s vast digitized archive of photographs, prints and drawings, all of which are readily accessible through the LOC website. The Library provides a considerable amount of information on most of the digitized images, including everything from photo medium and genre to dates, photographers, location and image descriptions.

Via: PetaPixel

Articles: Digital Photography Review (dpreview.com)

 
Comments Off on Library of Congress launches AI-powered, image-based Newspaper Navigator tool

Posted in Uncategorized


Library of Congress asks Flickr users in US to submit their pandemic-related images

11 Sep

The United States Library of Congress (LOC) is seeking COVID-19 pandemic-related images from photographers based in the United States, it has announced through the photo-sharing website Flickr. The LOC has teamed with Flickr to launch a new group dedicated to these images; anyone can add their images of pandemic life in the US to this group, which will be evaluated by Library curators. Some images will become part of permanent collections.

The opportunity to submit images is open to all photographers — both pro and amateur — located in the US or its territories, according to Flickr, which is home to the new ‘COVID-19 American Experiences’ group. Flickr users must join this group in order to submit their images for the LOC’s consideration.

Library curators will decide which images get added to the Flickr group photo pool and which go on to become preserved in permanent collections. Photographers seeking this distinction should assign a Creative Commons license to their images that will allow the LOC to display the photos on its website if selected, Flickr notes.

Participants are allowed to submit up to five ‘graphic artworks’ or photographs for consideration. The curators are looking for content specifically related to the COVID-19 pandemic, with Flickr noting that photographers can submit ‘photos that depict your experiences of the pandemic’ on a variety of topics, including things like street scenes, panic buying, elder care and similar things.

The photos can also depict emotions in relation to the pandemic, such as sorrow, grief or joy. There are a couple of big requirements, however, including that the images must be appropriate for viewers of all ages and that they must meet Flickr’s ‘safe’ guidelines, which means ‘acceptable to a global, public audience.’

The LOC explains that its goal is to expand how much documentation it has on the current pandemic, doing so by tapping the wider public community spanning many more aspects and parts of the US than the photographers and artists already higher for special projects.

As of September 10, the COVID-19 photo group has around 160 images featuring a variety of subjects, including pandemic-inspired graffiti, images of masks for sale, empty parks and restaurants, protesters, close theaters, people wearing masks, medical workers and more.

The Library of Congress is home to vast photo archives, including a large number of photos showing the last major pandemic to impact the world: the 1918 flu that claimed around 50 million lives. The public can view the Library of Congress photo archives on its digital collections website. The photos are joined by collections ranging from archived websites to old newspapers, audio recordings and maps.

Articles: Digital Photography Review (dpreview.com)

 
Comments Off on Library of Congress asks Flickr users in US to submit their pandemic-related images

Posted in Uncategorized


The Canadian Internet Registration Authority has created a free and funny stock photo library

20 Jan
A lumberjack checking out a hockey player is a Canadian take on the ‘distracted boyfriend’ meme. Photo courtesy of CIRA/.CA.

The Canadian Internet Registration Authority (CIRA), the organization in charge of Canada’s ‘.ca’ top-level domain, has published a series of stock photos that poke fun at Canadien stereotypes. In a bid to get more people to add something ‘uniquely Canadian’ to their projects, they’re offering up their library of stock images for free.

Photo courtesy of CIRA/.CA

Anyone can use small, medium, large or extra-large sized images from the library, though they ask for an email address to access the extra-large 4K files. All CIRA asks, in return, is that a credit along the lines of ‘photo by CIRA/.CA,’ along with a link back to their website, is included.

Photo courtesy of CIRA/.CA. Also, no, this is not long-lost relative of Jordan—so far as we’re aware.

CIRA has their own version of the popular ‘distracted boyfriend’ meme, featuring a hockey player, and other distinct nods to Canadian culture including a moose interacting with backpackers and a lumberjack taking a swig of maple syrup. Anyone with the desire to add to this collection of images is encouraged to contact CIRA.

Articles: Digital Photography Review (dpreview.com)

 
Comments Off on The Canadian Internet Registration Authority has created a free and funny stock photo library

Posted in Uncategorized


How to Move Your Lightroom Library to an External Drive

19 Feb

The post How to Move Your Lightroom Library to an External Drive appeared first on Digital Photography School. It was authored by Simon Ringsmuth.

Many photographers put their pictures on their computer’s internal hard drive. This can be a great solution since even laptops now have fairly generous storage options compared to their counterparts in days gone by. It may take you a while to fill up a 1TB or larger internal drive even if you shoot in RAW, but at some point, you’re going to run out of space, and you’ll have to address this problem. Cloud storage is a good solution but often involves a monthly or yearly fee, and upgrading your internal drive can be expensive and time-consuming. One perfect solution is to migrate your entire Lightroom library to an external drive. While this might sound difficult and intimidating, it’s quite simple and is something that anyone can easily do.

Choosing your storage

Storage space is fairly inexpensive, but not infinite. There are always going to be physical limitations when it comes to how many images you can store on a single piece of media. This is true whether it’s a traditional hard drive, a solid-state drive, or a mix of both such as Apple’s Fusion Drives.

Thankfully, external drives can offer vast amounts of storage space for relatively little money. With the fast transfer speeds of USB-3, which is common on most computers today, you won’t lose anything in terms of editing efficiency by having your pictures stored externally.

The first step in migrating your pictures to an external drive is to buy an external drive, and you have several options:

Traditional hard drive made with spinning platters. If you take this route, I recommend one with a transfer rate of 150mb/sec (megabytes per second) and an RPM speed of 7200. As I write this in early 2019, a four-terabyte drive, which can hold around 200,000 RAW files or half a million JPG files without breaking a sweat, can be found for US$ 100 to US$ 150.

Storage is inexpensive and prices are falling all the time. This 4 terabyte hard drive was only $ 90 when I bought it in the spring of 2019. (Guitar pick shown for scale.)

Solid-state drive with no moving parts. These aren’t as cheap as traditional drives, and they don’t hold quite as much data. However, with prices falling all the time, it won’t be long until solid-state drives are the norm and traditional spinning platters become redundant. Transfer rates on these drives are going to be plenty fast enough for any photo editing.

RAID array or Drobo. These are much more expensive than traditional storage options but offer redundancy in case of data failures, but they might be overkill for non-professional photographers. Besides, no matter what external storage solution you use, you should always have at least one off-site backup even if you do use a RAID array.

For most people, I recommend a simple USB-3 external drive, as it’s the most cost-effective solution and easy to backup onto another drive as well.

Once you have an external drive, there are two methods for getting your photos in Lightroom copied over to it. I’ll walk you through each of these methods as well as the positive and negative aspects of each so you can decide which is right for you.

Method 1: Use Lightroom

This process works well if you don’t have a large photo library. It doesn’t involve a lot of heavy lifting on your part because you can do everything within Lightroom. If you have a lot of images (a few thousand or more), I’d recommend against this because I’ve read reports that it can become a little unreliable when working with that many files. Your mileage may vary though, but know that you ought to proceed with a bit of caution when using this method.

First, locate your Folders pane on the left side of the Library module of Lightroom. Then click the + button in the top-right corner and choose “Add Folder…” This is going to let you create a new folder for storing your images. In this case, navigate to your external drive and create a new folder at that location.

Navigate to your external drive and create a folder on it that you can use to store your pictures. In the screenshot below my external drive is called “Untitled” and my folder is called “Lightroom Pictures.”

Once done, you should see the new folder show up in Lightroom, but it will be empty. This action also creates a new folder on your external drive, which you can see if you navigate to the external drive using Finder or Windows Explorer.

The final step in moving your images from the internal drive to an external drive is to drag-and-drop them from Lightroom. From the Folders panel, click on a folder that you want to put on the external drive and drag it from your internal drive to the new folder you just created.

Click the Move button and Lightroom transfers everything over to the external drive, with no extra effort required on your part. If you have thousands of pictures, this could take a while. So be patient. In the end, your images will be on the external drive and also removed from your internal drive.

Method 2: Copy files manually

If you don’t mind doing a little bit of work yourself using Windows File Explorer or the Macintosh Finder, this is the option I generally recommend. That’s because it not only gives you the most control over the copying operation but helps you understand exactly where to locate your pictures. This method also lets you decide when to delete the original images on your internal drive because you copy them to your external drive instead of moving them. The first thing you need to do is navigate to your Library module within Lightroom and look for the Folders pane. This module tells you where to locate your image files on your computer.

I’ve got images in Lightroom going back to 2013, and each year’s pictures are stored in a separate folder on my hard drive.

Right-click, or control-click on a Mac, on the name of one of the folders in your Folders pane and choose the option that says “Show in Finder.” If you are using Windows, this says “Show in Explorer.” This takes you to the location on your computer where your images are stored.

If you have multiple folders with images in them, do this operation one at a time for each folder. In this example, I started with the 2013 folder in Lightroom, and selected “Show in Finder.” Then it brought up the actual folder on my computer labeled 2013 that contains my images from that year.

When you get to this step, right-click (or control-click) the folder and choose Copy. Then navigate to your external drive and choose Paste. This makes an exact duplicate of the folder on your external drive which might seem redundant, but this is only temporary. A bit later in the process, you can delete the original folder on your internal hard drive once you are sure that everything worked with the copy operation.

Repeat this copy/paste process for every folder listed in your Lightroom Folders pane. After you are finished copying everything to your external drive, rename the original folders by giving them a suffix such as “2013-Original” or “2013-Old.” Again, this is only temporary, and you end up just deleting these folders entirely. But for now, you don’t want to get ahead of yourself and start deleting folders before you are confident that everything has worked properly.

Locating your missing folders

After you rename the original folders, Lightroom may have a bit of a fit because it suddenly won’t be able to locate all your images! With the folder names changed, it won’t know where to look for your pictures even though they are all still intact. The next step is to tell Lightroom where to find your images on the external hard drive instead of looking on your original internal hard drive. As soon as you rename the original folder, the icon in Lightroom changes to a question mark since it no longer knows where to locate your pictures.

Right-click on the folder with a question mark and choose “Find Missing Folder” to rectify the situation.

In the screen that pops up next, navigate to the folder on your external hard drive where your pictures are. This is the folder you copied over at the start of this whole process, and its name should be unchanged. Select it, to make it show up in Lightroom. All your photos should be fully intact.

Repeat this process with all your folders. When finished, your images will have successfully migrated to the external drive. You can verify this by scrolling through your Lightroom library and looking for any images with a question mark. If you don’t see any, then everything is fine. If you do, then Lightroom is having trouble locating the original image, and you might need to double check that all your pictures have copied to the external drive successfully.

When you are satisfied that you have completed the operation without error, you are free to delete the original images on your internal drive. However, I’d recommend keeping a backup of them just in case. When it comes to photos, you can never have too many backups!

Catalog vs. Photos

It’s important to know that your Lightroom pictures are not the same as your Lightroom Catalog. The latter is a reference file which keeps track of all your edits to your pictures, leaving the originals fully intact and unchanged. I recommend keeping your Catalog on your internal hard drive since Lightroom uses this for all your editing operations and internal drives are likely to be faster than external drives. However, it’s up to you. If you’re not sure what to do, just don’t even think about it, since moving your Catalog to an external drive is an entirely separate operation altogether.

The Catalog stores all the changes to your images and only takes up a few gigabytes of space. Your actual images can take up hundreds or even thousands of gigabytes.

Remember to Backup

A final step in moving your pictures to an external drive is to make sure you have a good backup plan in place. If you are on a Mac and have your computer backed up via Time Machine, it will not automatically back up your external hard drives, and you might also find yourself quickly running out of space on your Time Machine backup drive. I recommend keeping a separate backup of your external hard drive and using a program like Carbon Copy Cloner to make sure you sync everything correctly.

Windows has options available as well, but the bottom line here is that you can never be too safe when it comes to backing up your images. Hopefully, this tutorial helps you understand how to go about reclaiming some of the space on your internal drive and setting yourself up for success in the long run when it comes to external storage options. However, all will be for naught if your images aren’t properly backed up and your computer fails.

Once you have all these pieces in place, it’s time to get off your computer, start shooting photos, and know that you’ve got plenty of storage space for years to come!

The post How to Move Your Lightroom Library to an External Drive appeared first on Digital Photography School. It was authored by Simon Ringsmuth.


Digital Photography School

 
Comments Off on How to Move Your Lightroom Library to an External Drive

Posted in Photography


This macOS app creates HTML galleries from your Photos library

19 Dec

A new macOS app called photos2webgallery lets you create HTML web galleries from your Photos library. The resulting HTML output can be shared in many ways, including via upload to your own web server or shared via USB-drive.

Thanks to HTML5 support photos2webgallery works with all modern browsers. An integrated HEIC to JPG image format converter makes sure even images captured in the Apple-specific format will be displayed. Videos are embedded as well.

Alongside the images and videos the output galleries also display metadata information, such as date and time as well as the capture location with a Google Maps link. In the user interface users can select the albums they want to share and a range of slideshow effects is available, too.

The app is now available for download at the photos2webgallery website for a reduced price of $ 31.99.

Articles: Digital Photography Review (dpreview.com)

 
Comments Off on This macOS app creates HTML galleries from your Photos library

Posted in Uncategorized


Adobe’s Lightroom Downloader lets you rescue your image library from the cloud

17 Nov

Adobe has released Lightroom Downloader app, an application that pulls original image and video files from the cloud and stores them locally in a folder.

The Lightroom Downloader app is available for both Windows 10 and macOS High Sierra, and requires users to log in with their Lightroom account. Once the login is complete, users are prompted to choose a hard drive location to which the cloud content will be downloaded.

As Adobe explains on its help site, Lightroom Downloader pulls all of the cloud video and image files and parks them in a date-based folder in a user-specific hard drive location. Any edits made to these original, raw files will be written into XMP sidecar files alongside the raw files.

In instances where only a Smart Preview is cloud synced, Adobe says its app will download the DNG Smart Previews for those photos.

Articles: Digital Photography Review (dpreview.com)

 
Comments Off on Adobe’s Lightroom Downloader lets you rescue your image library from the cloud

Posted in Uncategorized


Mobile Micro-Lending: 17th-Century Book-Shaped Library Hides 50 Tiny Books

10 Sep

[ By WebUrbanist in Technology & Vintage & Retro. ]

Back in the 1600s, long before science fiction authors dreamed up digital e-readers, this Jacobean traveling library was making the rounds, housing dozens of small books in a larger book-shaped case. Bound in leather like a large folio volume, it is thought to be one of the first of its kind.

The handcrafted wooden shell was purpose-built to house a collection of littler volumes that could in theory be swapped out for different journeys, much like loading up a modern device with novels (or torrents).

Located at the University of Leeds Library, this case is presumed to have been commissioned by a lawyer and politician named William Hakewell in 1617 as a holiday gift (as the recipient’s and giver’s coats of arms are both found on the case). The case is quite compelling — it looks a lot like a book upon casual inspection — while the contents are neatly arranged in similar-looking bindings.

The gift included classics by Ovid, Virgil and Cicero among others, spanning a range of philosophical and theological subjects. Hakewell commissioned several similar cases over the years, which would also have facilitated trades across collections of friends if they were so inclined. Each case also contained a list of original books that came with the commission, which in turn have numbers corresponding to the list

Share on Facebook


[ By WebUrbanist in Technology & Vintage & Retro. ]

[ WebUrbanist | Archives | Galleries | Privacy | TOS ]


WebUrbanist

 
Comments Off on Mobile Micro-Lending: 17th-Century Book-Shaped Library Hides 50 Tiny Books

Posted in Creativity


The Library of Congress has acquired photographer Bob Adelman’s archives

01 Apr
Prints and Photographs Division, Library of Congress (004.00.00) © Bob Adelman

On March 20, the Library of Congress announced that it has acquired photographer Bob Adelman’s archives, a massive collection containing 575,000 images. An anonymous donor gifted the collection, which now resides with the Library’s Prints and Photographs Division. According to the Library’s announcement, the collection contains 50,000 printed photos, while the rest of the archives are composed of slides and film negatives.

Adelman, who was born in 1930 and passed away last March, was an award-winning American photographer well known for his iconic photos of the Civil Rights Movement. Adelman’s work spans approximately forty years, documenting topics including racial issues, poverty, immigrant experiences, mental illnesses, addictions, and more. Perhaps best known from Adelman’s work are his photos of the March on Washington and Martin Luther King.

Via: Library of Congress

Articles: Digital Photography Review (dpreview.com)

 
Comments Off on The Library of Congress has acquired photographer Bob Adelman’s archives

Posted in Uncategorized


Book and Bed Hostel: Your Dream to Sleep in a Library Came True

27 Dec

[ By SA Rogers in Boutique & Art Hotels & Travel. ]

book-and-bed-hostel-7

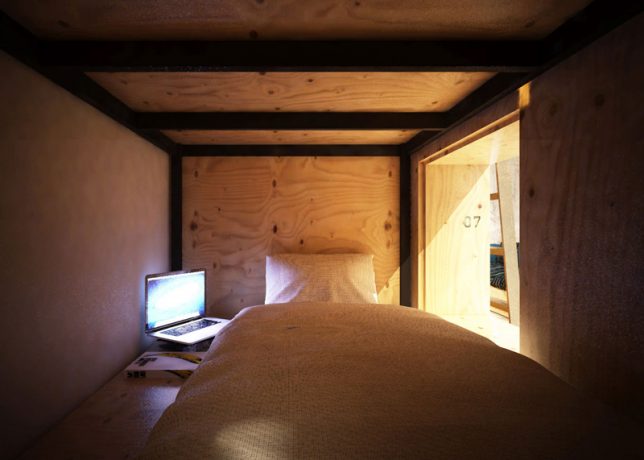
Every true bibliophile has gazed up at the seemingly endless shelves of books in a good bookstore or library and imagined gathering up a stack, finding a quiet nook and turning in for the night. In Japan (where else?) you can actually do just that in a library-themed hostel, though you might be too excited about your reading materials to get much sleep. The Book and Bed Hostel by Suppose Design Office features semi-private sleeping nooks built right into the bookshelves, so you can climb out and look for more books as often as you want.

book-and-bed-hostel-3

book-and-bed-hostel-6

The hostel has two locations – Tokyo and Kyoto – with rates starting at just $ 40 (4,445 yen) per night. In the true spirit of a hostel, everything is set up dorm style with shared bathrooms and nothing but curtains separating you from your neighbors, but considering the theme of the place, you probably don’t care. Book and Bed isn’t really about enjoying privacy or getting a good night’s sleep.

book-and-bed-hostel-1

The Tokyo location features over 1,700 titles to choose from, stacked on floor-to-ceiling shelves. Climb the library ladders to reach the highest ones, and check out the featured books that have been hung from the ceiling as decor. Each sleeping nook is fitted with a backlight and an outlet, and there’s wifi, though you’ll probably be too busy reading to use it.

book-and-bed-hostel-2

The Kyoto hostel is located just steps from many popular local attractions, like the Yasaka Shrine and the Nanzenji Temple. There’s a special selection of Kyoto-centric books in both English and Japanese. Both hostels offer striped robes and totes reading ‘Have a Book Day’ for purchase as souvenirs. You can see more photos on the Book and Bed Tokyo Instagram account.

book-and-bed-hostel-4

“Book and Bed is an ‘accommodation bookshop.’ The perfect setting for a good nights sleep is something you will not find here. There are no comfortable mattresses, fluffy pillows nor lightweight and warm down duvets. What we do offer is an experience while reading a book (or comic book.) An experience shared by everyone at least once: the blissful ‘instant of falling asleep.’ It is already 2am but you think just a little more… with heavy drooping eye lids you continue reading only to realize you have fallen asleep.”

book-and-bed-hostel-9

“Dozing off obliviously during your treasured pastime is the finest ‘moment of sleep,’ don’t you agree?”

Share on Facebook


[ By SA Rogers in Boutique & Art Hotels & Travel. ]

[ WebUrbanist | Archives | Galleries | Privacy | TOS ]


WebUrbanist

 
Comments Off on Book and Bed Hostel: Your Dream to Sleep in a Library Came True

Posted in Creativity


4 of the Most Important Elements of the Lightroom Library Module

11 Oct

When I read through photography forums or talk to other photographers the topic of image editors often comes up. People give various opinions and thoughts about which one they prefer. Photoshop, Lightroom, Apple Photos, Capture One, GIMP, and a host of other options from companies like ON1 and MacPhun are all capable of doing various types of small and large edits to your images.

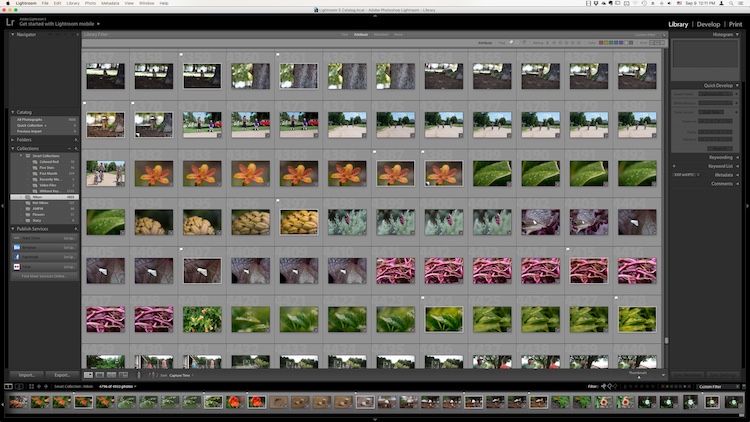
However, one advantage Lightroom has over some other programs is that it not only lets you edit your pictures but categorize them, sort them, tag them, even compare different pictures to see which one you prefer. All this happens in the Library module which is a key part of Lightroom’s workflow. It is essential to understand the Lightroom Library module if you want to get the most out of this program.

The Library module. No late fees here, just lots of ways to manage your images.

The Library module. No late fees here (library pun), just lots of ways to manage your images.

While the Library module does many different things, to get an understanding of the basics it’s good to narrow your focus down a bit. There are a few key areas of the photographer’s workflow that are served by this part of Lightroom; organizing, sorting and viewing…with a dash of editing thrown in just for fun. Let’s look at each one by one.

Organization of images in Lightroom

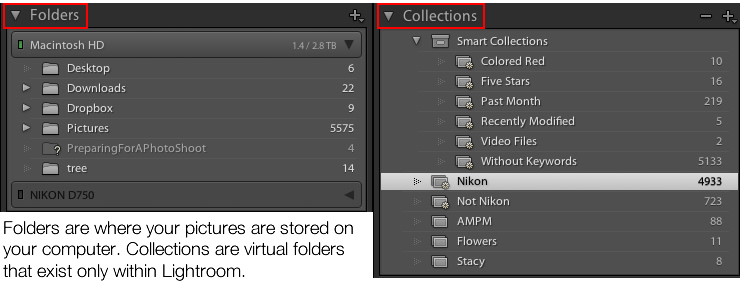
One aspect of Lightroom that is often misunderstood is how it handles your actual picture files, whether JPG, RAW, DNG, or any other format. Contrary to what some people think, it doesn’t actually do anything with your files whether you are categorizing them, sorting them, or editing them. Wherever your pictures are stored on your computer, that is precisely where they will remain when you import them into Lightroom. What you can do, however, is use the Library module to organize and manage your pictures within the program itself. The best way to do this is to put your pictures into what’s known as Collections, or virtual folders that contain sets of images.

Collections are a powerful and efficient method of sorting and organizing your pictures in Lightroom, while leaving them fully intact and untouched on your hard drive.

Collections are a powerful and efficient method of sorting and organizing your pictures in Lightroom while leaving them fully intact and untouched on your hard drive.

How Lightroom sees your pictures

When you import your pictures into Lightroom you are essentially just telling Lightroom where to look for the images that are sitting on your hard drive. Remember back in the days of using the card catalog in a public library? The books weren’t stored in the massive grids of tiny filing cabinet drawers. But those thousands of little cards did tell you where to locate each book as well as a bit of information about each one. That’s sort of how the Collections feature works in the Library module. You can use it to create virtual filing cabinets to organize the images on your hard drive without actually moving, renaming, or otherwise altering your original images.

For example, let’s say you shoot a wedding for your friends Jim and Pam Halpert and come back to your computer with over a thousand images to edit. You can copy all their images to your computer into one folder, and then use Collections in Lightroom to organize them in a way that makes sense to you. Then you can create a Collection Set called “Halpert Wedding” and then within that create additional collections such as “Ceremony,” “Reception,” and “Candids.” Because you are not actually moving the images into different folders on your computer or duplicating the actual picture files, you can put the same picture into multiple collections. You could have the same shot of Jim’s buddy Dwight in both the Reception and Candids folder.

This picture of a periwinkle flower could go into a collection called "Flowers," another one called "Nature," and another one with only pictures of periwinkles. All at the same time.

This picture of a periwinkle flower could go into a collection called “Flowers,” another one called “Nature,” and another one with only pictures of periwinkles. All at the same time.

Smart Collections

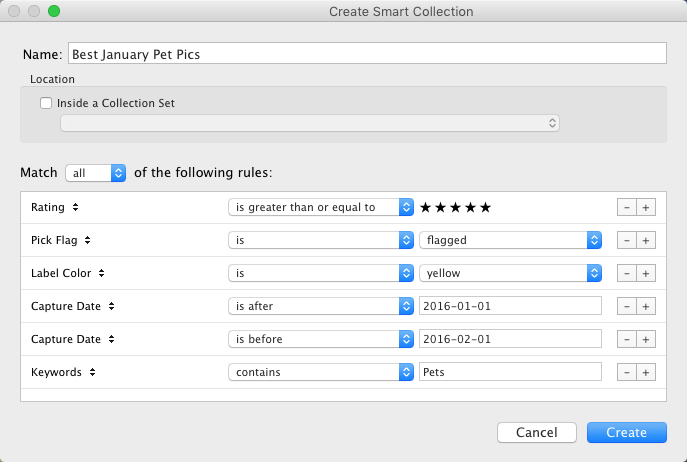
While Collections themselves are quite flexible, you can go a step further by utilizing Smart Collections which is a way of automatically putting pictures in various collections based on criteria that you specify. There are a staggering number of criteria at your disposal, and you can choose whether the Smart Collection should meet any, all, or none of them. These collections are updated dynamically so as soon as a picture in your Library meets the specifications for a given Smart Collection it is automatically inserted into that Collection.

lightroom-library-module-smart-collection


Collections remain one of the hallmark features of the Library module and serve to make Lightroom far more versatile than other programs that simply let you edit your pictures. They work hand-in-hand with the many sorting options as well to give you even greater control over your images.

Sorting images in Lightroom

Have you ever gone through your closet and wished that you could snap your fingers and instantly see all your red shirts, tan pants, or gym shorts that still fit? Better yet, what about immediately seeing only the red shirts you actually like? The Library module allows you to do just that. With the click of a button or press of a keystroke, you can hone and filter your images to see precisely the ones you want, then easily reset everything back the way it was. Pressing the “\” key (while in the Library module), or going to “View > Show Filter Bar” brings up a bar at the top of your screen that allows you to dynamically sort your images based on criteria you specify at will.

lightroom-library-module-filter-bar

Using the filter bar tools

The Filter Bar lets you sort by criteria such as whether photos are marked as Picks or Rejects, have a color or star rating, or are associated with specific keywords. Click any of the icons in the Filter Bar to see the results in real-time, and your images will be immediately pared down to reflect the criteria you want.

To remove any of the filtering criteria just click the button again and Lightroom turns it off. You can also change the type of filtering by clicking the “Text/Attribute/Metadata” options in the middle of the top of your screen which will give you additional parameters. If you don’t want to constantly turn the Filter Bar on and off there is also a persistent mini Filter Bar at the bottom of your screen with many of the options as the full-featured one. I use these filters constantly to sort through my images and find the ones I need for any given project.

Using Keywords to sort your images

lightroom-library-module-keywords

Keywords are a handy way to add sorting criteria to your photos.

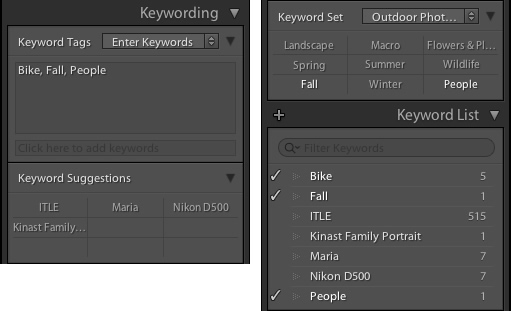
The Keywords feature is another aspect of Lightroom that allows you to sort through your images. On the right side of the Library module is a panel that you can use to assign keywords to images such as “Birthday,” “Nature”, “Summer”, “Uncle Mike”, or any other words you want. To assign a keyword, or multiple keywords, to a picture, just start typing them in the Keyword box or select them from the Keyword Suggestions or Keyword Bank frames. To assign keywords to multiple images at the same time, select them first and then enter your keywords in the box.

Whether you have dozens, hundreds, or thousands of pictures to sort, the options in the Library module can help.

Whether you have dozens, hundreds, or thousands of pictures to sort, the options in the Library module can help.

Viewing images in the Library module

As your photo collection grows larger it’s essential that you have a way to actually view and manage all of the images. Thankfully Lightroom has a robust system in place to let you do exactly that. Of course, you can use collections and sorting criteria, but you also have some useful tools at your disposal to actually view the pictures too. The icons at the bottom-left of your screen let you change between four different views; Grid, Loupe, Compare, and Survey.

View modes

Click Grid to see a bird’s-eye view of all the pictures in the Collection you are currently viewing. Use the Thumbnail slider in the bottom-right (if it’s not visible tap the T key to hide/show the tools bar) to change the size of the thumbnails depending on your preference.

Grid, Loupe, Compare, and Survey let you view your pictures in useful and creative ways.

Grid, Loupe, Compare, and Survey let you view your pictures in useful and creative ways.

Loupe is a term borrowed from the days of developing pictures in a darkroom. It refers to the small glass viewer, sort of like a magnifying glass without a handle, that a technician would use to see a given image in greater detail. Click the Loupe view to see one image at a time and then click anywhere on the image with your cursor (which has now turned into a magnifying glass with a + inside) to zoom in closer. Hold [alt] or [option] on a Mac to click and zoom out, and use the zoom level options in the top-left corner of your screen to change the magnification level. This is particularly useful if you want to check if a given picture is sharp and in focus.

Compare and Survey view modes are related in that they let you see two or more pictures at a time in order to choose the one you prefer. These modes are especially handy if you have multiple similar images, such as after a portrait session, and are trying to pick the best one out of a bunch.

I had about two dozen nearly identical shots, but Lightroom's view and sorting options helped me find just the photographic needle in the memory card haystack.

I had about two dozen nearly identical shots, but Lightroom’s view and sorting options helped me find just the photographic needle in the memory card haystack.

Quick Develop in the Library module

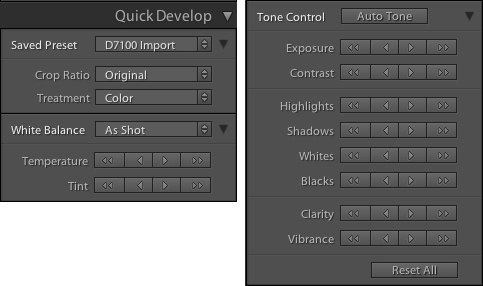
I like to think of the Library’s Quick Develop options as extra credit for a class assignment. They are an added touch that lets you do a bit of editing with your pictures without going to the full-fledged Develop module, and will often give you just the right amount of editing that a picture needs. Nestled on the right-hand side of the Library module is a little toolbar called Quick Develop which does exactly what you might think. It allows you to quickly and easily adjust a few essential parameters such as White Balance, Exposure, Highlights, Shadows, and a few other settings.

lightroom-library-module-quick-develop

Clicking on the single arrow for any given parameter adjusts things just a little bit. While clicking the double arrow adjusts things a lot. For example, the single right-facing arrow for Exposure will increase the value by 1/3 stop, whereas the double arrows will increase the value by a full stop. You don’t get anywhere near the fine-grain control that you do in the actual Develop module, but if you need to quickly make some basic edits to an image you might find Quick Develop to be quite handy.

lightroom-library-module-rainbow

Conclusion

These four elements aren’t all that the Library module has to offer, but learning them will give you plenty to work with as you begin to expand your knowledge of this powerful program. Do you have any favorite tips you’d like to share? Are there features you think I missed that others should know about? Please leave your thoughts in the comments below.

googletag.cmd.push(function() {
tablet_slots.push( googletag.defineSlot( “/1005424/_dPSv4_tab-all-article-bottom_(300×250)”, [300, 250], “pb-ad-78623” ).addService( googletag.pubads() ) ); } );

googletag.cmd.push(function() {
mobile_slots.push( googletag.defineSlot( “/1005424/_dPSv4_mob-all-article-bottom_(300×250)”, [300, 250], “pb-ad-78158” ).addService( googletag.pubads() ) ); } );

The post 4 of the Most Important Elements of the Lightroom Library Module by Simon Ringsmuth appeared first on Digital Photography School.


Digital Photography School

 
Comments Off on 4 of the Most Important Elements of the Lightroom Library Module

Posted in Photography