When I read through photography forums or talk to other photographers the topic of image editors often comes up. People give various opinions and thoughts about which one they prefer. Photoshop, Lightroom, Apple Photos, Capture One, GIMP, and a host of other options from companies like ON1 and MacPhun are all capable of doing various types of small and large edits to your images.
However, one advantage Lightroom has over some other programs is that it not only lets you edit your pictures but categorize them, sort them, tag them, even compare different pictures to see which one you prefer. All this happens in the Library module which is a key part of Lightroom’s workflow. It is essential to understand the Lightroom Library module if you want to get the most out of this program.
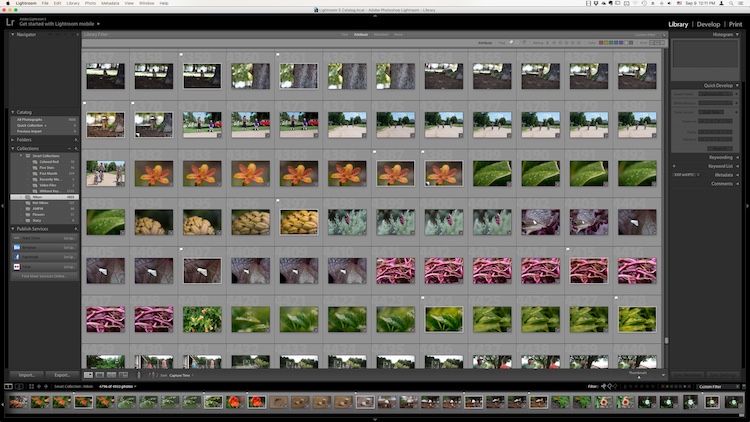
The Library module. No late fees here (library pun), just lots of ways to manage your images.
While the Library module does many different things, to get an understanding of the basics it’s good to narrow your focus down a bit. There are a few key areas of the photographer’s workflow that are served by this part of Lightroom; organizing, sorting and viewing…with a dash of editing thrown in just for fun. Let’s look at each one by one.
Organization of images in Lightroom
One aspect of Lightroom that is often misunderstood is how it handles your actual picture files, whether JPG, RAW, DNG, or any other format. Contrary to what some people think, it doesn’t actually do anything with your files whether you are categorizing them, sorting them, or editing them. Wherever your pictures are stored on your computer, that is precisely where they will remain when you import them into Lightroom. What you can do, however, is use the Library module to organize and manage your pictures within the program itself. The best way to do this is to put your pictures into what’s known as Collections, or virtual folders that contain sets of images.
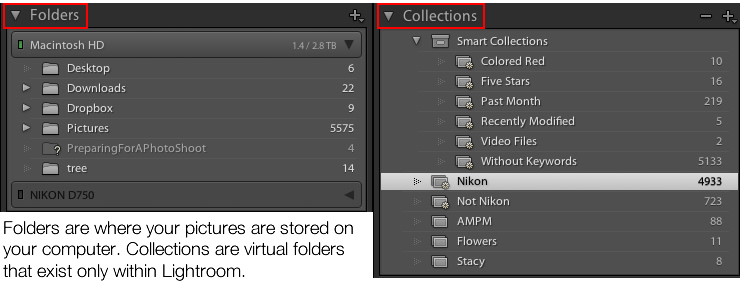
Collections are a powerful and efficient method of sorting and organizing your pictures in Lightroom while leaving them fully intact and untouched on your hard drive.
How Lightroom sees your pictures
When you import your pictures into Lightroom you are essentially just telling Lightroom where to look for the images that are sitting on your hard drive. Remember back in the days of using the card catalog in a public library? The books weren’t stored in the massive grids of tiny filing cabinet drawers. But those thousands of little cards did tell you where to locate each book as well as a bit of information about each one. That’s sort of how the Collections feature works in the Library module. You can use it to create virtual filing cabinets to organize the images on your hard drive without actually moving, renaming, or otherwise altering your original images.
For example, let’s say you shoot a wedding for your friends Jim and Pam Halpert and come back to your computer with over a thousand images to edit. You can copy all their images to your computer into one folder, and then use Collections in Lightroom to organize them in a way that makes sense to you. Then you can create a Collection Set called “Halpert Wedding” and then within that create additional collections such as “Ceremony,” “Reception,” and “Candids.” Because you are not actually moving the images into different folders on your computer or duplicating the actual picture files, you can put the same picture into multiple collections. You could have the same shot of Jim’s buddy Dwight in both the Reception and Candids folder.

This picture of a periwinkle flower could go into a collection called “Flowers,” another one called “Nature,” and another one with only pictures of periwinkles. All at the same time.
Smart Collections
While Collections themselves are quite flexible, you can go a step further by utilizing Smart Collections which is a way of automatically putting pictures in various collections based on criteria that you specify. There are a staggering number of criteria at your disposal, and you can choose whether the Smart Collection should meet any, all, or none of them. These collections are updated dynamically so as soon as a picture in your Library meets the specifications for a given Smart Collection it is automatically inserted into that Collection.
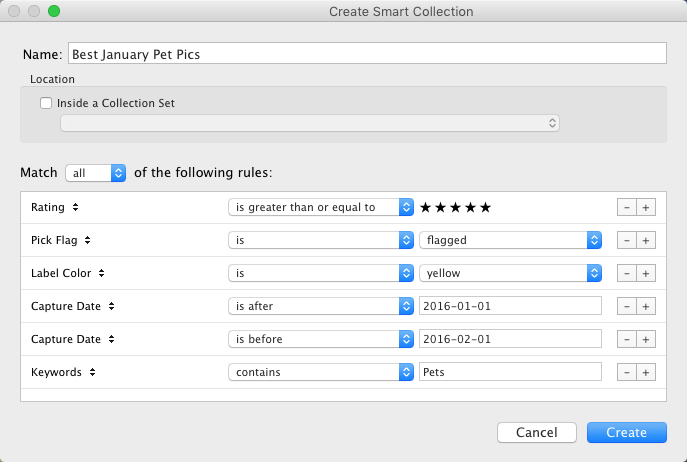
Collections remain one of the hallmark features of the Library module and serve to make Lightroom far more versatile than other programs that simply let you edit your pictures. They work hand-in-hand with the many sorting options as well to give you even greater control over your images.
Sorting images in Lightroom
Have you ever gone through your closet and wished that you could snap your fingers and instantly see all your red shirts, tan pants, or gym shorts that still fit? Better yet, what about immediately seeing only the red shirts you actually like? The Library module allows you to do just that. With the click of a button or press of a keystroke, you can hone and filter your images to see precisely the ones you want, then easily reset everything back the way it was. Pressing the “\” key (while in the Library module), or going to “View > Show Filter Bar” brings up a bar at the top of your screen that allows you to dynamically sort your images based on criteria you specify at will.

Using the filter bar tools
The Filter Bar lets you sort by criteria such as whether photos are marked as Picks or Rejects, have a color or star rating, or are associated with specific keywords. Click any of the icons in the Filter Bar to see the results in real-time, and your images will be immediately pared down to reflect the criteria you want.
To remove any of the filtering criteria just click the button again and Lightroom turns it off. You can also change the type of filtering by clicking the “Text/Attribute/Metadata” options in the middle of the top of your screen which will give you additional parameters. If you don’t want to constantly turn the Filter Bar on and off there is also a persistent mini Filter Bar at the bottom of your screen with many of the options as the full-featured one. I use these filters constantly to sort through my images and find the ones I need for any given project.
Using Keywords to sort your images
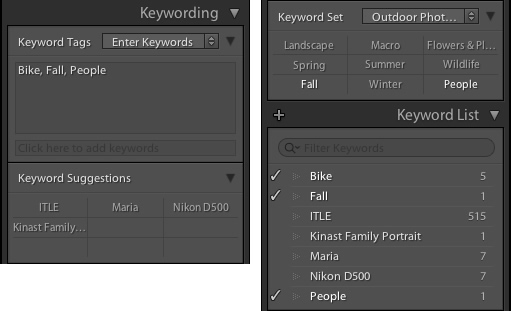
Keywords are a handy way to add sorting criteria to your photos.
The Keywords feature is another aspect of Lightroom that allows you to sort through your images. On the right side of the Library module is a panel that you can use to assign keywords to images such as “Birthday,” “Nature”, “Summer”, “Uncle Mike”, or any other words you want. To assign a keyword, or multiple keywords, to a picture, just start typing them in the Keyword box or select them from the Keyword Suggestions or Keyword Bank frames. To assign keywords to multiple images at the same time, select them first and then enter your keywords in the box.

Whether you have dozens, hundreds, or thousands of pictures to sort, the options in the Library module can help.
Viewing images in the Library module
As your photo collection grows larger it’s essential that you have a way to actually view and manage all of the images. Thankfully Lightroom has a robust system in place to let you do exactly that. Of course, you can use collections and sorting criteria, but you also have some useful tools at your disposal to actually view the pictures too. The icons at the bottom-left of your screen let you change between four different views; Grid, Loupe, Compare, and Survey.
View modes
Click Grid to see a bird’s-eye view of all the pictures in the Collection you are currently viewing. Use the Thumbnail slider in the bottom-right (if it’s not visible tap the T key to hide/show the tools bar) to change the size of the thumbnails depending on your preference.

Grid, Loupe, Compare, and Survey let you view your pictures in useful and creative ways.
Loupe is a term borrowed from the days of developing pictures in a darkroom. It refers to the small glass viewer, sort of like a magnifying glass without a handle, that a technician would use to see a given image in greater detail. Click the Loupe view to see one image at a time and then click anywhere on the image with your cursor (which has now turned into a magnifying glass with a + inside) to zoom in closer. Hold [alt] or [option] on a Mac to click and zoom out, and use the zoom level options in the top-left corner of your screen to change the magnification level. This is particularly useful if you want to check if a given picture is sharp and in focus.
Compare and Survey view modes are related in that they let you see two or more pictures at a time in order to choose the one you prefer. These modes are especially handy if you have multiple similar images, such as after a portrait session, and are trying to pick the best one out of a bunch.

I had about two dozen nearly identical shots, but Lightroom’s view and sorting options helped me find just the photographic needle in the memory card haystack.
Quick Develop in the Library module
I like to think of the Library’s Quick Develop options as extra credit for a class assignment. They are an added touch that lets you do a bit of editing with your pictures without going to the full-fledged Develop module, and will often give you just the right amount of editing that a picture needs. Nestled on the right-hand side of the Library module is a little toolbar called Quick Develop which does exactly what you might think. It allows you to quickly and easily adjust a few essential parameters such as White Balance, Exposure, Highlights, Shadows, and a few other settings.
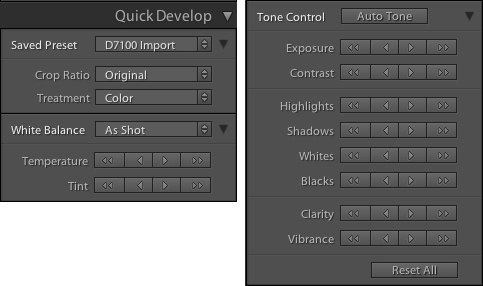
Clicking on the single arrow for any given parameter adjusts things just a little bit. While clicking the double arrow adjusts things a lot. For example, the single right-facing arrow for Exposure will increase the value by 1/3 stop, whereas the double arrows will increase the value by a full stop. You don’t get anywhere near the fine-grain control that you do in the actual Develop module, but if you need to quickly make some basic edits to an image you might find Quick Develop to be quite handy.

Conclusion
These four elements aren’t all that the Library module has to offer, but learning them will give you plenty to work with as you begin to expand your knowledge of this powerful program. Do you have any favorite tips you’d like to share? Are there features you think I missed that others should know about? Please leave your thoughts in the comments below.
googletag.cmd.push(function() {
tablet_slots.push( googletag.defineSlot( “/1005424/_dPSv4_tab-all-article-bottom_(300×250)”, [300, 250], “pb-ad-78623” ).addService( googletag.pubads() ) ); } );
googletag.cmd.push(function() {
mobile_slots.push( googletag.defineSlot( “/1005424/_dPSv4_mob-all-article-bottom_(300×250)”, [300, 250], “pb-ad-78158” ).addService( googletag.pubads() ) ); } );
The post 4 of the Most Important Elements of the Lightroom Library Module by Simon Ringsmuth appeared first on Digital Photography School.
You must be logged in to post a comment.