RSS
 

Posts Tagged ‘Trails’

Weekly Photography Challenge – Light Trails

31 Oct

This week since it is the week of goblins and ghouls and spooky things, let’s do some photography in the dark! You can check out these image of light trails to get some ideas.

Vida Dimovska

By Vida Dimovska

Weekly Photography Challenge – Light trails

Light trails is about long exposures in the dark, capturing something that is illuminated and moving. The result is a trail of light through your image, without seeing the original subject.

Nicolas Michaud

By nicolas michaud

That could be cars moving along a darkened city street, sparklers, a flashlight, or anything that lights up. You could even get creative and try moving the camera to create light trails from a stationary object.

Here are some articles to help you out:

  • How to do Long Exposure Photography and Light Trails at Night
  • 5 Advanced Tips for Light Trail Photography
  • Photographing Light Trails
  • How to Make Unique Portraits Using Light Painting
  • 13 Great Subjects for Urban Night Photography
  • A Fun Light Painting Project – Parabolas
Caffeinatrix

By Caffeinatrix

Darlene Hildebrandt

By Darlene Hildebrandt (I made this image by rotating my tripod side to side during the exposure)

William Greene

By William Greene

I Am Dabe

By i am dabe

Share your images below:

Simply upload your shot into the comment field (look for the little camera icon in the Disqus comments section) and they’ll get embedded for us all to see or if you’d prefer upload them to your favourite photo sharing site and leave the link to them. Show me your best images in this week’s challenge. Sometimes it takes a while for an image to appear so be patient and try not to post the same image twice.

googletag.cmd.push(function() {
tablet_slots.push( googletag.defineSlot( “/1005424/_dPSv4_tab-all-article-bottom_(300×250)”, [300, 250], “pb-ad-78623” ).addService( googletag.pubads() ) ); } );

googletag.cmd.push(function() {
mobile_slots.push( googletag.defineSlot( “/1005424/_dPSv4_mob-all-article-bottom_(300×250)”, [300, 250], “pb-ad-78158” ).addService( googletag.pubads() ) ); } );

The post Weekly Photography Challenge – Light Trails by Darlene Hildebrandt appeared first on Digital Photography School.


Digital Photography School

 
Comments Off on Weekly Photography Challenge – Light Trails

Posted in Photography


24 Magical Images of Light Trails

30 Oct

Capturing light trails of something moving, often a vehicle, is somewhat magical because it’s something you cannot see with the naked eye. So only through the use of a camera and the right exposure techniques can this be possible.

Remember that light painting is just that if you show the light source – capturing the light trail.

Let’s look at a few images of light trails and see how these photographers captured the magic:

X_tine

By x_tine

JamesHarrison_

By JamesHarrison_

Howard Ignatius

By Howard Ignatius

Paulius Malinovskis

By Paulius Malinovskis

Cabrera Photo

By Cabrera Photo

Sam DeLong

By Sam DeLong

Todd Blaisdell

By Todd Blaisdell

VFS Digital Design

By VFS Digital Design

Katie Inglis

By Katie Inglis

Keith

By Keith

Jthornett

By jthornett

Jamie McCaffrey

By Jamie McCaffrey

Tom Roeleveld

By Tom Roeleveld

Alex Lin

By Alex Lin

Mike Boening Photography

By Mike Boening Photography

These * Are * My * Photons

By These * Are * My * Photons

Altug Karakoc

By Altug Karakoc

Wilson Lam

By Wilson Lam

Thomas Renken

By Thomas Renken

William Warby

By William Warby

Luc Mercelis

By Luc Mercelis

Aaronisnotcool

By aaronisnotcool

Alan Newman - An1.uk

By Alan Newman – an1.uk

Scott Griggs

By Scott Griggs

googletag.cmd.push(function() {
tablet_slots.push( googletag.defineSlot( “/1005424/_dPSv4_tab-all-article-bottom_(300×250)”, [300, 250], “pb-ad-78623” ).addService( googletag.pubads() ) ); } );

googletag.cmd.push(function() {
mobile_slots.push( googletag.defineSlot( “/1005424/_dPSv4_mob-all-article-bottom_(300×250)”, [300, 250], “pb-ad-78158” ).addService( googletag.pubads() ) ); } );

The post 24 Magical Images of Light Trails by Darlene Hildebrandt appeared first on Digital Photography School.


Digital Photography School

 
Comments Off on 24 Magical Images of Light Trails

Posted in Photography


Two Methods for Shooting Star Trails Made Easy

23 Oct

As a landscape photographer, it can be easy to find stunning subject matter to photograph during the day. At night, things become more difficult as the sun goes down, but there is still plenty to photograph. With some patience, you can create stunning images featuring the stars as your backdrop, or even your subject.

star trails, night, photography, sky, astrophotography

This image is a composite of 156 separate exposures, merged using StarStax software. Each exposure was ISO 400, f/2.8, 30 seconds. The red glow inside the bus was done by shining a red LED flashlight inside the bus from the other side, during one of the exposures.

Equipment list

Before you get started, you’re going to need a few things:

  • A good sturdy tripod is absolutely essential, I’m using an Induro GTT204M2.
  • A wired remote for your camera is also a necessity. Which model you use will depend on the camera you have.
  • A fully charged battery is a must. The vertical grips that are available for some cameras, allowing you to use two batteries at once for longer life, can also be helpful.
  • A flashlight can come in handy, both for finding your way to the location, and for light painting in the foreground.
  • Finally, a large memory card, or two if your camera has dual slots, will be needed.

#1 – The One-Shot Method

There are two ways to photograph star trails. The first is the old-fashioned way, using a single exposure.

For this method, exposures can range anywhere from several minutes, to several hours. This method was the only way to photograph star trails in the days before digital cameras. When using the single exposure method, your camera needs to be in manual mode, with the shutter speed set to Bulb. Some cameras have a separate mode for Bulb. It is like manual mode, but the shutter stays open for as long as the release button is depressed. A time controller such as the Nikon MC-36A, or Canon TC-80N3 can make things easier by allowing you to lock the shutter button down, or program a set amount of time for the exposure.

ISO should be set to 400. You’ll want to set your aperture somewhere around f/4. The wider the aperture is open, the brighter the star trails will be. If you are photographing in a completely dark setting, with no moonlight, the stars will likely be the brightest object in your scene. Once you’ve set your aperture, you need to decide how long a star trail you want. The longer the exposure, the longer the trails.  The image below was a 30 minute exposure.

This image was created as a single exposure. Exposure time was 30 minutes, ISO 100, f/5.6. The star trails are dimmer due to the smaller aperture, the fact that the moon was still in the sky, and light pollution from the city in the distance, seen as the glow to the right.

This image was created as a single exposure. Exposure time was 30 minutes, ISO 100, f/5.6. The star trails are dimmer due to the smaller aperture, the fact that the moon was still in the sky, and light pollution from the city in the distance, seen as the glow to the right. The street in the foreground was painted with an LED flashlight for several seconds during the exposure.

One thing you need to be concerned with when using a single long exposure is Long Exposure Noise Reduction. If you choose to photograph star trails using a single exposure, the heat generated on the imaging sensor adds noise to the image. Turning on Long Exposure Noise Reduction reduces that noise by using a method known as dark frame subtraction. I previously discussed dark frame subtraction in the article The Night Sky In Landscape Photography. Long Exposure Noise Reduction doubles the length of time needed to make an image. The camera first takes the exposure. In this case, let’s say the exposure is one minute.Long Exposure Noise Reduction then requires another minute to reduce the noise created by the long exposure. That means if you make a star trail exposure for 15 minutes, your camera will be unavailable to take another picture for 30 minutes. You’ll need to make sure you have enough battery to keep the camera powered while it carries out Long Exposure Noise Reduction.

This is a single exposure of 10 minutes, ISO 400, f/5.6.

This is a single exposure of 10 minutes, ISO 400, f/5.6.

In addition to Long Exposure Noise Reduction, another consideration is the length of the exposure itself. There is nothing worse than standing next to your camera while it makes a 30 or 45 minute exposure, and two-thirds of the way through the exposure, a car goes past, shining its headlights across the scene and ruining the exposure. It’s happened to the best of us.

#2 – Merging Multiple Exposures

This is where the second method for photographing star trails comes in. With the advancement of digital imaging, stacking multiple exposures has become possible, and has made creating star trail images easier than ever. By taking a series of drastically shorter exposures, then stacking them in software such as StarStaX, you can increase your flexibility as a photographer, because there are two benefits to this method. The first is that since the exposure are shorter, you can turn off Long Exposure Noise Reduction. The second benefit is that even if a car drives by to ruin the exposure, it’s only one small piece of the sequence, so you can just delete the one frame that was ruined.

StarStaX works by blending a series of images, allowing you to capture the motion of stars in the sky, similar to a single exposure. The one drawback to using software like StarStaX is if clouds are also moving across the sky, it has a tendency to create a stepped shape with them that doesn’t look natural. Better Star Trails Photographs with StarStax is an excellent tutorial for using StarStaX.

Camera settings

To use the stacking method for shooting star trails, set your camera to Manual mode and your camera’s drive to Continuous. Start with your aperture set to f/4. This setting can be adjusted, but the wider the aperture, the brighter the trails. However, be careful to ensure you have enough depth of field, and aren’t overexposing the stars. Shutter speed will be 30 seconds. ISO should be set to 400. Using the time controller or remote for your camera, release the shutter, and use the locking mechanism to keep the shutter button on the remote depressed. With the camera in continuous drive mode, as each exposure ends, another will begin until you stop it. This also minimizes the pause between each exposure, which can cause small breaks in the star trails when the exposures are merged. Alternatively you can use an intervalometer feature if you camera has that, or similar type of remote.

star trails, night, photography, sky, astrophotography

This image is a combination of 121 exposures merged in StarStaX. Each exposure was 15 seconds, ISO 400, f/1.4. To keep the lighthouse from being so bright that it would overpower the star trails, a 3-stop soft-edged graduated neutral density filter was used.

It can be easy to forget the rules of composition when photographing star trails, so don’t get so fixated on the stars that you forget to look at the foreground as well. Chances are your foreground will be shrouded in darkness. A flashlight can come in handy for painting the foreground object with light to make it stand out in the darkness. Colored gels can allow you to get creative with the light painting. When stacking images, you’ll only need to illuminate your foreground for a single frame, as StarStax will use the illuminated exposure for that foreground object.

By the same token, there may be a time where your foreground object is brightly illuminated, as with the lighthouse image above. So I carry a set of graduated neutral density filters, even when shooting at night. For the lighthouse image, I mounted a Vü filters 3-stop soft-edged ND grad on my lens, so that the dark side of the filter was over the bottom half of the frame. This allowed me to keep the lighthouse exposure dim enough to still allow the stars to register in the exposure as well.

This image was created by merging 116 separate exposures in StarStax software in comet mode. Each exposure was 30 seconds, ISO 400 at f/2.8. A red LED flashlight was shone inside the bus for the first exposure.

This image was created by merging 116 separate exposures in StarStax software in comet mode. Each exposure was 30 seconds, ISO 400 at f/2.8. A red LED flashlight was shone inside the bus for the first exposure.

Once you’ve found your foreground, think about the direction you are facing. When facing north, star trails will form concentric circles. When facing away from the north, star trails will simply be slanted lines or arcs in the sky. Both can create interesting and awe-inspiring images.

Now that you know you don’t have to put your camera away when the sun goes down, you need to find some dark sky to get the best results with star trails. The International Dark Sky Association has a great tool on their website to help you find the best places for night sky photography.

Show some of your best star trail images below!

googletag.cmd.push(function() {
tablet_slots.push( googletag.defineSlot( “/1005424/_dPSv4_tab-all-article-bottom_(300×250)”, [300, 250], “pb-ad-78623” ).addService( googletag.pubads() ) ); } );

googletag.cmd.push(function() {
mobile_slots.push( googletag.defineSlot( “/1005424/_dPSv4_mob-all-article-bottom_(300×250)”, [300, 250], “pb-ad-78158” ).addService( googletag.pubads() ) ); } );

The post Two Methods for Shooting Star Trails Made Easy by Rick Berk appeared first on Digital Photography School.


Digital Photography School

 
Comments Off on Two Methods for Shooting Star Trails Made Easy

Posted in Photography


How to Shoot a Star Trails Selfie

20 Apr

How I shot the star trails selfie

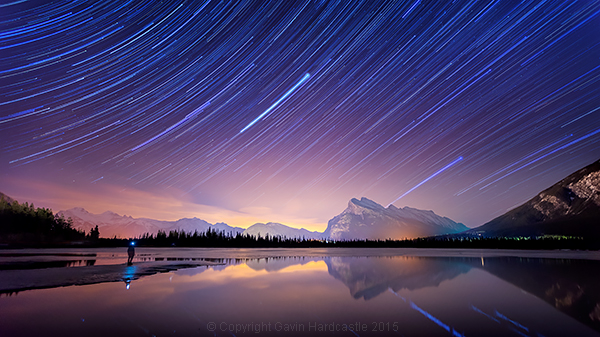
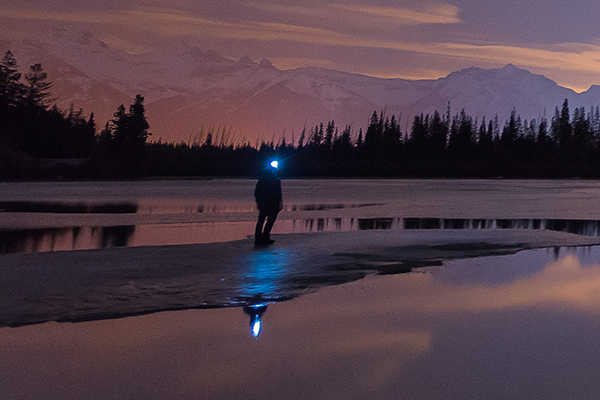
There are times when planning and patience can result in a killer shot. This nighttime star trails selfie (above) that I captured in the Canadian Rockies was one of those times. I’d planned to shoot star trails over Mount Rundle and the town of Banff, Alberta while hopefully capturing reflections in Vermillion Lake, surrounded by melting ice.

My initial vision was for a completely cloudless sky, but the small yet persistent low clouds ended up adding an ethereal quality to the shot I hadn’t expected.

When I looked back at my first 30 second exposure, I knew right away that this shot had some potential. All I had to do was set things up properly and then play the waiting game.

I’d like to share with you exactly how I shot and processed this image so that you too can try your hand at star trails, and maybe even a selfie like I did.

Required Gear

  • A digital camera with and intervalometer app
  • A sturdy tripod

Capturing the Shot

Step 1 – Location and conditions

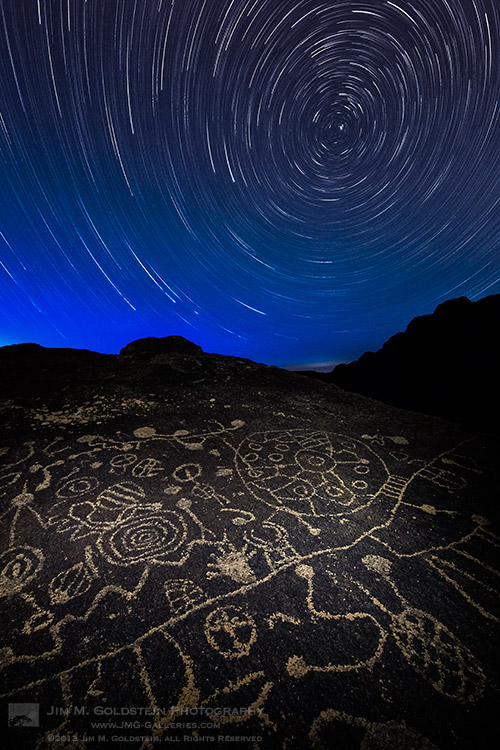
In this case, my location was already set because I wanted Mount Rundle to be central in the composition. I needed a relatively clear night with good visibility of the stars. If it had been cloudy, I would have just stayed home. When planning a location, check the weather forecast and figure out which direction you’ll be facing to get an idea of the direction of the star trails. For more info on the movement of the earth and the direction of star trails read this article.

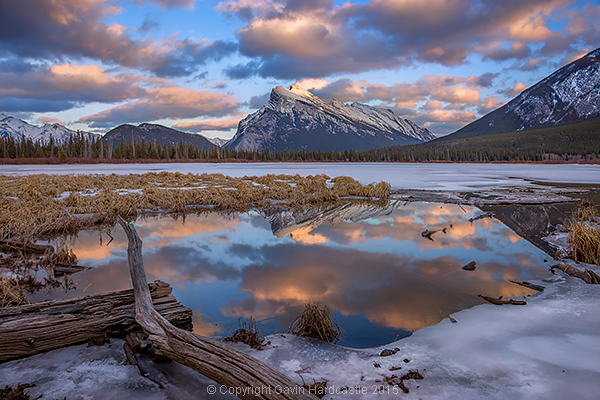
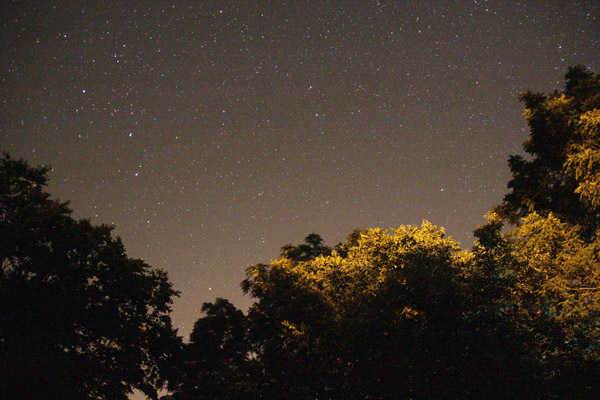
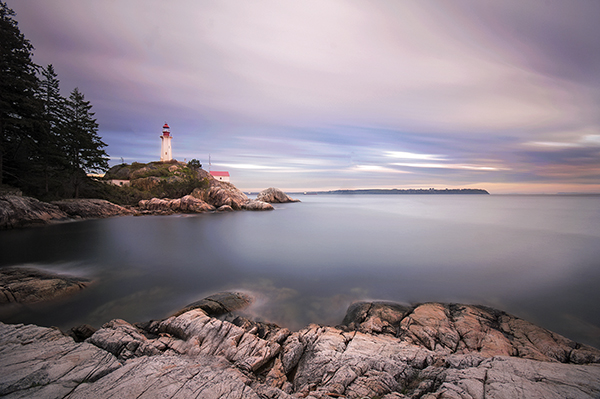
I was shooting the sunset earlier that evening so I had a good idea of how things were going to turn out. Here’s the bonus shot I captured while waiting for the stars to arrive.

Vermillion Lakes, Banff - Mirror World by Gavin Hardcastle

Step 2 – Composing the shot

Whenever I shoot star trails it’s important to remember that I’ll need roughly 60-70% of the frame dedicated to a sky that probably isn’t doing much. I can’t see the star trails until I’ve finished processing your images and that means I have to imagine the trails and frame the composition accordingly.

Step 3 – Setting aperture, exposure and ISO

Night photography demands that we use much higher ISO settings than we would during daylight hours. It’s how we increase the cameras sensitivity to light. With this shot I was able to get away with ISO 2000 because there was a lot of light pollution from the towns of Banff and Canmore.

Using an aperture of f/2.8 meant that my lens was pulling in as much light as it could and with a 30 second exposure. I was happy with the brightness of the image, especially the stars.

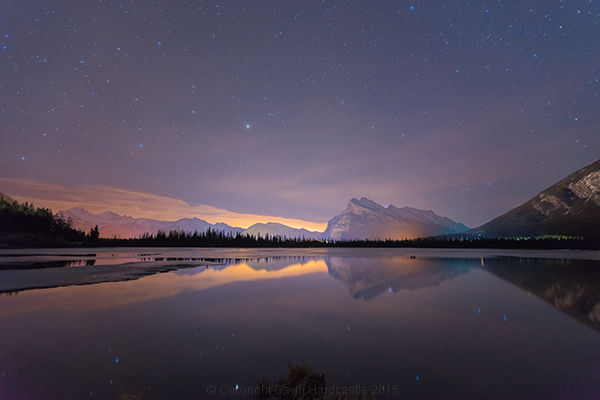
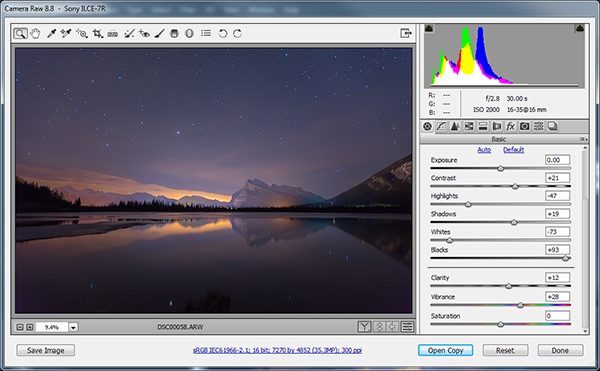
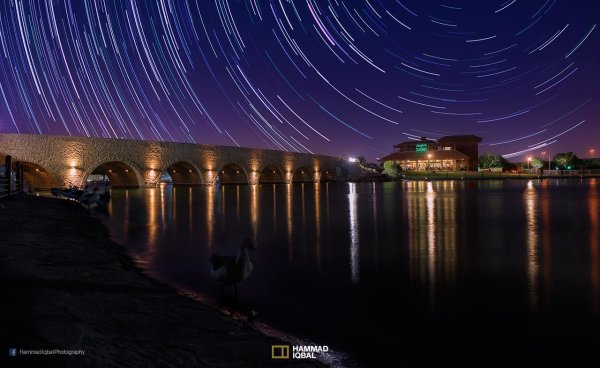
Here’s one of the RAW frames before processing. Even with the haze and light pollution from Banff I could see that the stars were plenty bright enough to capture trails. You can even see a couple of amorous geese in the shot just in the reflection of Mount Rundle.

Star Trails RAW frame

Step 4 – Setting up my timelapse intervalometer

I shoot with the Sony A7R camera which has a cool timelapse app. This basically works the same way as a hardware intervalometer which you can get for pretty much any DSLR. It works by taking continuous shots at an interval that I set. I tell the app/intervalometer to take 120 exposures, and that I want them all to be 30 seconds long. I don’t want any gap between shots so that means the camera immediately takes one shot after another with no rest period.

When doing this, I make sure to switch off the cameras built-in noise reduction as this can mess up the timing of the intervalometer. In-camera noise reduction can take a long time to process so I don’t want my cameras memory buffer locked up and busy when it’s supposed to be taking the next exposure.

I’ll also want to use the fastest memory card I can afford.

Sony Play Timelapse App

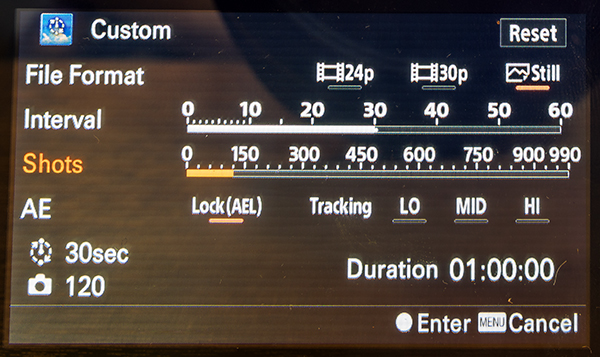
The Sony Timelapse App

Canon DSLR users will be delighted to learn that Magic Lantern has an intervalometer for timelapse shooting.

Step 5 – Final check and off we go

Before I commence shooting a lengthy timelapse I’ll do a final check of focus, make sure I’ve got plenty of battery power left, lots of memory, and that the tripod is stable and not likely to move during shooting. I’ve learned the hard way that these things can ruin an otherwise perfectly executed timelapse.

Step 6 – Begin shooting and ……. pose

Once you’ve started your timelapse you’ve now got to come to terms with your boredom. I didn’t plan to do a selfie, I actually wandered into the frame of my shot because I was just looking around at stuff. If you do plan on doing a selfie, just be sure to stand in place long enough for at least one of the exposures to capture you. To be on the safe side, try and stay in position for a full minute.

It might even be really cool if you stand in multiple positions to make it look like a crowd of identical models.

Posing for a selfie in Banff

Top Tip for shooting Star Trails or Timelapse

I highly recommend bringing a second camera so that you can carry on shooting while your A camera is tied up shooting the star trails. Not only does this alleviate crushing boredom, but it’s also great practice. You do practice right?

Step 7 – Check your shots before leaving

Once my timelapse has finished, I check the images on the camera before packing up and leaving. I have my camera set to play my images as I spin the jog wheel, kind of like a flip book animation. It’s great for checking how the movement of the stars worked out and I’m always amazed at the things the camera picked up that I didn’t see. I had lots of frisky geese swimming in and out of my shots as they went about their noisy geese business.

If I spot a disaster in the playback (let’s say a bug camped out on my lens) it’s time to start all over again. After an hour or so of waiting, I’ll be loath to start again, but sometimes you’ve just got to grin and bear it if you want that killer shot.

Processing the Shots

To process star trail images with this shooting technique, I used Adobe Bridge, Camera RAW and Photoshop.

Adobe Bridge lets us quickly preview our star trails timelapse.

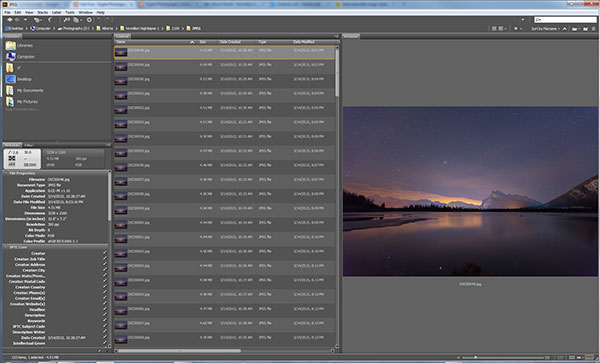
Adobe Bridge lets us quickly preview our star trails timelapse. Just hold down the bottom cursor key to flip through all of the frames and watch a rough animation.

Step 1 – Tweak the RAW files

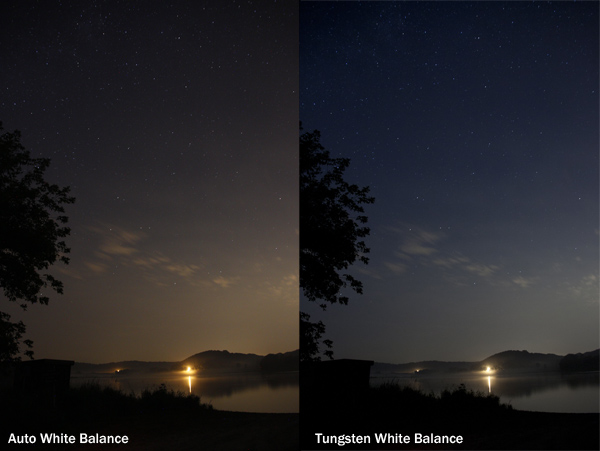
In Adobe Bridge, I’ll select all 120 of my images, then right click and choose Open in Camera RAW. This loads the images into Adobe Camera RAW where I can reduce the noise, change the white balance and make any colour tweaks that I want. Here’s a list of what I tweaked.

  • Added sharpening
  • Changed White Balance to Auto
  • Added slight noise reduction
  • Increased Contrast
  • Boosted Shadows and Blacks
  • Increased Clarity and Vibrance
  • Reduced Highlights and Whites
  • Used Straighten Tool to fix horizon line

When I’m finished tweaking, I hit Select All, then click Synchronize so that the tweaks I made to my first RAW file get applied to all 120 images. Next I hit the Done button to take me back to Adobe Bridge where I can now see those ACR tweaks applied to all 120 image thumbnails.

Adobe Camera Raw for processing star trails in Photoshop

I used Adobe Camera to make image corrections and then apply the same corrections to ALL of the frames.

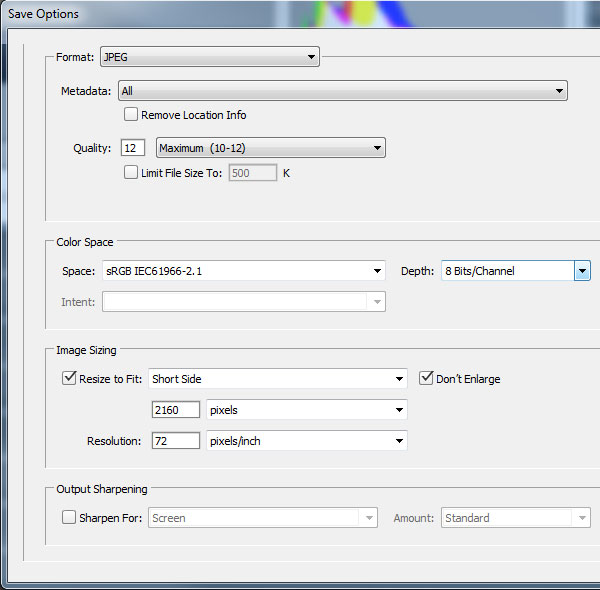
Step 2 – Save as low resolution JPGs

This next step requires a lot of computer resources. My current PC only has 16 GB of RAM so I knew I’d have to make some low resolution versions of my RAW files in order to be able to load all 120 images into Photoshop layers. If I ever print this image, I’ll need to reprocess this image at full resolution which will require some major processing, but for web use I know I can get away with using smaller resolution JPEGS to create my final image.

To do this, I select all of my newly tweaked RAW files in Adobe Bridge once again. I then right click and choose Open in Camera RAW. I hit Select All, then choose Save Images in the bottom left. This opens a dialog box where I can specify a location, file format and most importantly, image resolution and size.

I choose JPEG and then specify a resolution of 72 pixels per inch and tell it to resize my images to a much smaller resolution that I know Photoshop can handle but will still look great for web use. Finally I click Save and go make some coffee while I wait for all 120 images to process.

Adobe Camera Raw Save Options

Step 3 – Load the JPEGs into Photoshop layers

Back in Adobe Bridge I navigate to where I saved my low resolution JPEGs. It’s best to export these to a separate folder to keep things to tidy. Once again, I select all my JPEGs and then choose Tools > Photoshop > Load Files into Photoshop Layers.

This will take even longer than it took to export the JPEG’s so I’ll go downstairs and watch an episode of House of Cards.

Step 4 – Can you feel the magic?

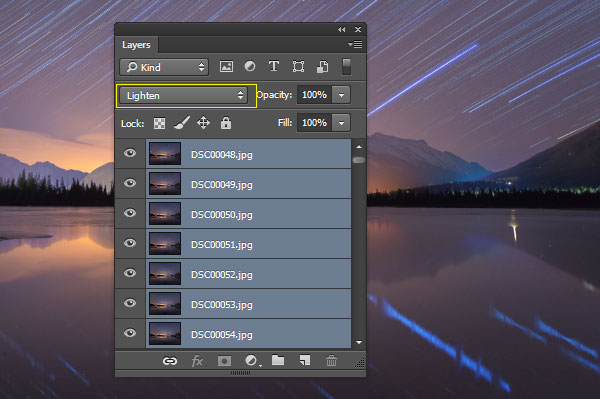
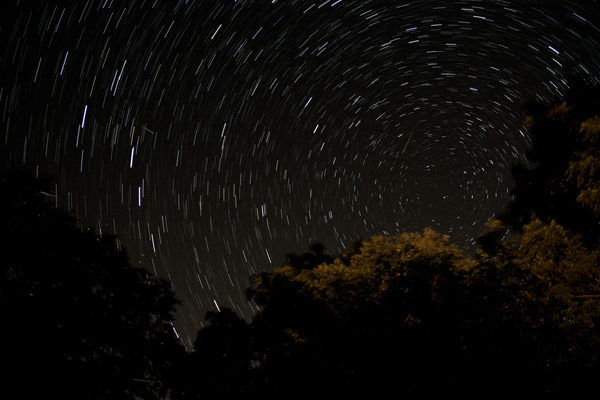
This is where the magic happens and I finally get to see my star trails. With all of the 120 images loaded into Photoshop Layers, I go to the Layers panel to select ALL of my layers. This can be done by clicking on the top layer so that it’s highlighted in light blue, holding down shift and then clicking on the bottom layer – I need to scroll down to see all 120 layers.

With my 120 layers selected, I now change the Layer Blend Mode to Lighten and BAM – Star Trails!

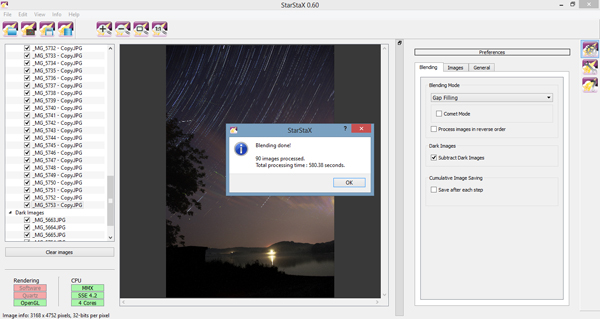
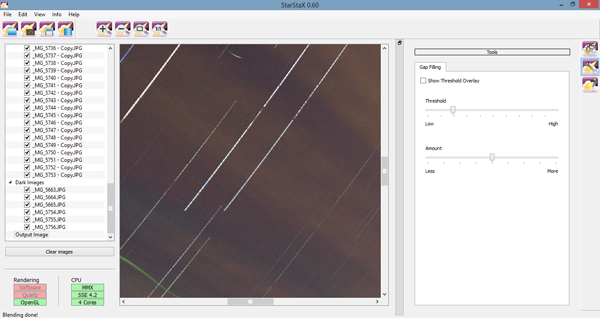
Note: You could also use a free program like StarStax to put the trails together if you don’t have Photoshop.

Make Star Trails with the Lighten Blend Mode

From this point on I can process the image with some final tweaks in Photoshop. To do that I’ll merge all layers down to one by pressing ctrl+E. Then I can change contrast, colour balance, crop, add a vignette and whatever else I think suites the composition.

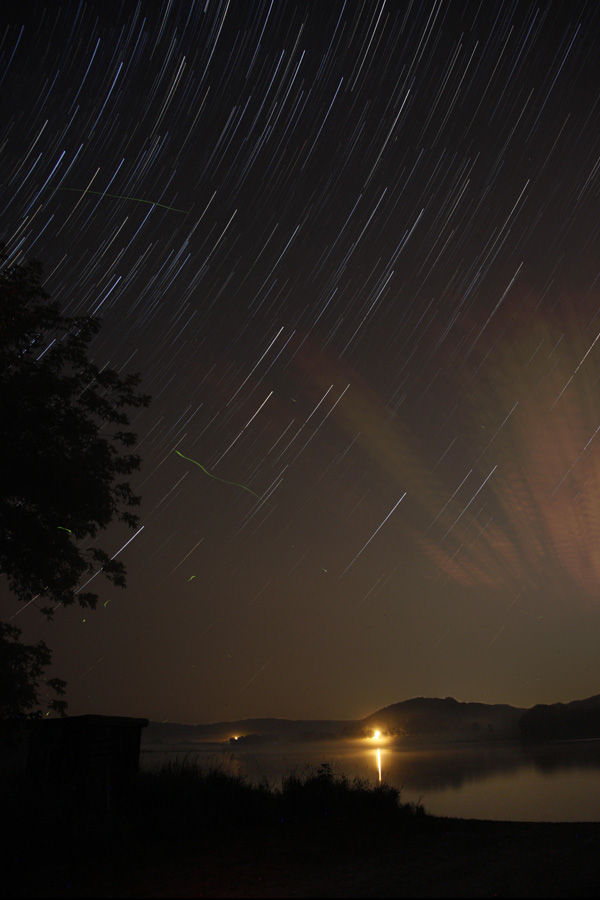
My finished star trails selfie is done and ready to share with the world. I hope you like it.

How I shot and Processed a Star Trails Selfie

Why don’t you give it a try?

There is a much easier but somewhat less controlled method of getting a shot like this. Follow steps one to three and then simply use a remote shutter release while your camera is set to Bulb mode and take a very long exposure. You could leave the shutter open for an hour or two to capture the same effect. Just be careful that your lens doesn’t fog up while the camera heats up.

You won’t have the same pinpoint control over each exposure with this simpler method, but it’s a great way to get into shooting star trails if you don’t have the time to go through all of these post processing steps.

Editor’s note: caution – long exposures of this nature will cause your sensor to heat up potentially causing damage to it like stuck pixels or worse. Please do so at your own risk. 

If you prefer the more long winded method that I used, you’ll get the maximum image quality possible and if you do decide to do some selfie modelling, you can pick the exact exposure that captures you at your best. In my case, it was the back of my head.

googletag.cmd.push(function() {
tablet_slots.push( googletag.defineSlot( “/1005424/_dPSv4_tab-all-article-bottom_(300×250)”, [300, 250], “pb-ad-78623” ).addService( googletag.pubads() ) ); } );

googletag.cmd.push(function() {
mobile_slots.push( googletag.defineSlot( “/1005424/_dPSv4_mob-all-article-bottom_(300×250)”, [300, 250], “pb-ad-78158” ).addService( googletag.pubads() ) ); } );

The post How to Shoot a Star Trails Selfie by Gavin Hardcastle appeared first on Digital Photography School.


Digital Photography School

 
Comments Off on How to Shoot a Star Trails Selfie

Posted in Photography


Better Star Trails Photographs with StarStaX

28 Oct

Long, swirling star trail photography is on the bucket list of many photographers. In the film days, this required leaving your shutter open for one continuous exposure on the order of hours and hoping that everything would turn out just right. In the digital era, many photographers rely on a process known as stacking to take a large number of individual frames and combine them into the final image. This article will lay out how to capture incredible star trail photographs and combine them using the free program StarStaX.

StarStax, star photography, stacking, star trails, how to, astrophotography

Shooting Your Individual Star Trails Photographs

Many detailed posts have been written about how to capture individual photographs for star trails stacking, so this article will only provide a quick overview. Check out the linked posts at the end of this article for additional details.

For equipment, you will need your camera, a fast wide angle lens, a sturdy tripod, a remote shutter release, and a full battery or two. A red headlamp or flashlight as well as a folding chair can also come in handy. I recommend a wide angle lens, like 18 mm (or wider), so that you can capture a larger expanse of the sky. A fast lens (one with a wide aperture, like f/1.8) is also preferred so that you can capture more light with each frame. (Most of the photographs in this article were shot at 18 mm and f/3.5 on my Tamron 18-270 mm lens.)

dark sky finder, star trails, astrophotography

Choose your location and timing carefully. Capturing star trails around the time of the new moon is preferable, so that bright moonlight does not wash out all the stars from the sky. You also want to get as far from artificial lights as possible. You can use the web site Dark Sky Finder to look for possible dark sky locations near you. Once you have chosen a location, you can use the web site Clear Dark Sky to check their 48 hour forecasts about the potential for clear sky in a given location.

Once you are on location, spend some time choosing your final composition. Think about a position that will provide an interesting foreground – an unique tree, a geologic formation, or a body of water – as well as an expansive view of the night sky. If you want an image of the stars swirling around a complete circle, then be sure to include the North Star in your viewfinder (in the Northern Hemisphere). If you want extremely long swirls in less time, then compose for a view farther away from the North Star.

star photography, star trails, astrophotography

Shoot one photograph with your widest aperture and a fairly high ISO value for 30 seconds. (The image above was shot at 30 seconds, f/3.5, and ISO 6400.) Your image will be quite noisy, but you should get a strong sense for your overall composition.

Once you have your composition nailed down, you want to dial in your final settings using manual mode. Choose your widest aperture (like f/1.8 or f/3.5), a 30 second shutter speed, and a mid-range ISO like 800-1600. (Newer cameras have less noise at higher ISO values, but you may want to use an ISO of 400 or 800 with an older or entry-level camera.) Turn off the autofocus and use manual focus to focus on infinity.

Before you start shooting, cover your lens with a lens cap or piece of black paper and shoot a few frames. These will be your dark frames when you process the images in StarStaX. Dark frames allow the program to subtract digital noise and hot pixels from your final image.

star photography, star trails, astrophotography

This image is a stack of 26 images shot with 18mm, 30 seconds, f/3.5, ISO 800. The green squiggles are fireflies.

Use your remote shutter release to lock down your shutter. As soon as your camera finishes taking the first 30 second picture, it will start taking the next, and so on. Then pull out your folding chair, sit back, and enjoy the wait. An hour’s worth of shots is a good goal to aim for. The more photographs that you take for your stack, the longer and more defined your final star trails will be.

Once you have finished capturing your shots, remember to take a few dark frames again at the end. Leave your settings the same but cover the lens with the lens cap and shoot a couple more frames.

Preparing Photographs for Stacking

Depending on your photographs and the end result you are envisioning, you may want to do some post-processing on your individual frames before loading them into StarStaX. Whether you use Lightroom, Photoshop, or another post-processing software, you will want to apply a similar treatment to all your images if you choose to do any corrections, such as adjusting the white balance or fixing the colors.

star photography, star trails, how to, astrophotography

You may also need to do some quick editing of individual shots, especially if you were shooting at a location with unwanted stray light. In the photographs below, you can see that this frame captured the light from passing cars on the far side of the lake. The quickest solution to problems like these is to open these individual frames in Photoshop, set the brush tool to black, and paint over any unwanted light.

star photography, star trails, how to, astrophotography

You can see a big difference in the foreground between these two stacks of the same individual star trails. Painting out the stray light trails in those few individual pictures allows for a more seamless and less distracting foreground, once you stack all the photographs together.

star photography, star trails, how to, astrophotography, StarStax, stacking

Alternatively, you can choose one frame in Lightroom or Photoshop and make any adjustments needed until the non-sky portions of your image are just right. Then, after creating your star trails in StarStaX, you can combine your ideal foreground with your stacked sky using layers and masks in Photoshop.

Stacking Your Star Trails Photographs Using StarStaX

StarStaX was developed by Markus Enzweiler and is available as a free download for Windows, Mac, and Linux computers. (Screen shots courtesy of the Windows 0.60 version.) After downloading and opening the program, the first thing you need to do is load your individual photographs by going to File -> Open Images or hitting the Open Images button. You may select JPEG, TIFF, bitmap, or PNG file types. After selecting your star trails shots, you need to load your dark frames by going to File -> Open Dark Frames or hitting the Open Dark Frames button.

StarStax, star photography, stacking, star trails, how to

Once you have both types of files loaded, it is time to run your first stack. The default options are a good starting point: try lighten mode and check the button for subtract dark frames, if you have uploaded some. Click Edit -> Start Processing or the Start Processing button. The amount of time it will take the program to complete the stacking will vary based on your computer and the number of individual photographs, but it should be on the order of a few minutes at most.

After the program has finished stacking your images, click File -> Save As or the Save button and save your stacked image. Stacks will not save automatically. You can use the zoom tools to look more closely at your stack and see if the results match your expectations.

StarStax, star photography, stacking, star trails, how to, astrophotography

You may notice that there are some gaps in your star trails, which result from the time between one photograph ending and another beginning. In that case, you may want to run the stack again. Your individual photographs and dark frames are still loaded, so just change the blending mode to Gap Filling and start processing your files again.

After your gap filling version has finished processing, there are a few options you can use to adjust the amount of gap filling applied. Click the Images tab and experiment with the different sliders to minimize the appearance of any gaps. Click the 1:1 button to zoom into the pixel level, as in the image below, to see the impact of the Gap Filing sliders.

StarStax, star photography, stacking, star trails, how to, astrophotography

Want a really unique shot? Run the stack again in either Lighten or Gap Filling and click the checkbox for Comet Mode. Your final star trails will each take on the appearance of a streaking comet.

star photography, star trails, how to, starstaX, astrophotography

Stack of 90 images including six dark frames, each shot at 18 mm, 30 seconds., f/3.5, and ISO 800.

Now You Try

Now that you have the basic idea, you need to find a great location and give it a try! Do not feel discouraged if you are far from any suitable dark sky locations. You might be surprised at what you can capture even under less than ideal settings.

StarStax, star photography, stacking, star trails, how to, astrophotography

Thus photo was taken just outside a city in North Carolina and was a stack of 78 images and seven dark frames, each taken at 30 seconds, f/3.5, and ISO 800.

Have you used StarStaX to capture star trails? Share your thoughts or favorite images in the comments below!

Need more help for shooting your star trails images, try these articles:

  • Tips for Photographing Star Trails
  • How To Photograph Star Trails
  • Photography Under the Stars

The post Better Star Trails Photographs with StarStaX by Katie McEnaney appeared first on Digital Photography School.


Digital Photography School

 
Comments Off on Better Star Trails Photographs with StarStaX

Posted in Photography


Celestial Influences: Petroglyphs and Star Trails

23 Aug

Celestial Influences: Petroglyphs and Star Trails

Standing out in the middle of no where at night in the presence of ancient petroglyphs unleashes ones imagination in more than one way. When not thinking about what wild life could be sneaking up on me (cougars, coyotes, mice… as it turns out mostly mice) my mind wandered to the source of inspiration for these ancient drawings. Was the person(s) that made these drawing bored, doodling, documenting, ancient life or gathering inspiration from the night sky? I personally made the connection between the circles & spirals on this rock with the movement of the stars.  Looking back at my photos from this night my curiosity again is piqued. I suppose the fact no one has a firm answer is what makes these petroglyphs so attractive & intriguing. What do you think?

Copyright Jim M. Goldstein, All Rights Reserved

Celestial Influences: Petroglyphs and Star Trails

The post Celestial Influences: Petroglyphs and Star Trails appeared first on JMG-Galleries – Landscape, Nature & Travel Photography.


JMG-Galleries

 
Comments Off on Celestial Influences: Petroglyphs and Star Trails

Posted in Equipment


Single Image Star Trails – a Powerful Technique to Create Star Trails in Minutes Using Phototoshop

11 Jun

10258929_1466264890276738_7906982947618430010_o

If you are reading this, you must be among those who have a special place in their hearts for stars, galaxies and the wonders of the universe. With recent advancements in camera technology, many photographers have captured the beauty of the night sky in spectacular ways. The truth is that every photographer is fascinated by the glittering stars, and captivating night skies, that have the power to instantly teleport us to a world beyond our wildest imaginations. From a photographic perspective, star trails can add another dimension to an otherwise average shot and that is likely the primary reason for many photographers desire to learn how to capture star trails. If you are struggling to find out and learn about this rewarding effect, get your camera and computer ready. But before that, let me introduce you to star trails.

10373061_1472036406366253_4127720884282225109_o
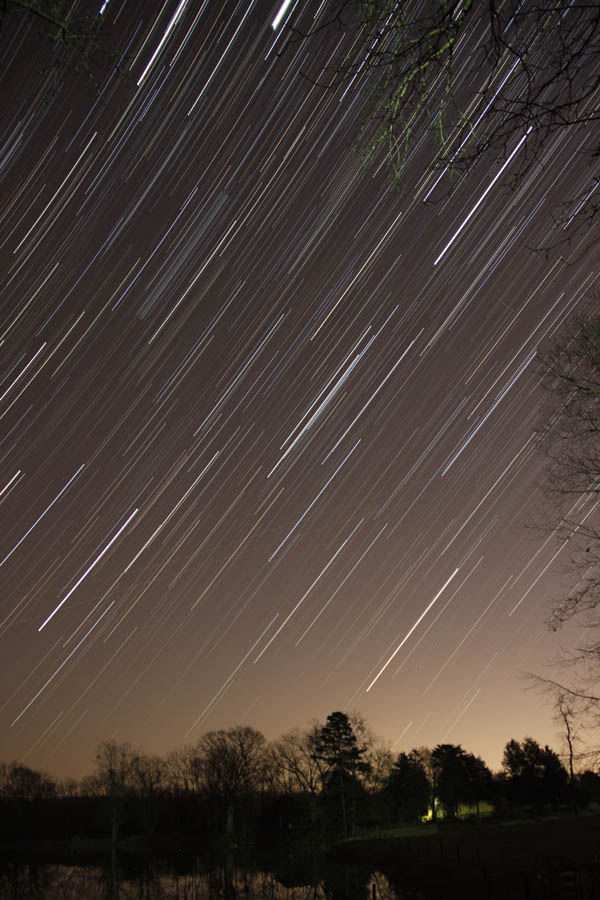
What are Star Trails?

Star trails is a photographic effect that gives an illusion of motion to the stars along a circular or an elliptical path. Technically, stars do not move when we observe them. They are quite stationary very much like our Sun. In reality, the circular motion of the stars we see in star trail images is a result of rotation of the Earth along its axis. For better understanding, please refer to the ‘equatorial grid’ figure under “Understanding Star Trails” section below.

How are Star Trails captured?

Traditionally, star trails are captured by taking multiple shots of the sky in succession over a period of many hours. Modern DSLR cameras also allow you to take a single exposure of an extended length of 30 minutes or more but many photographers prefer to take multiple shots at 30 seconds each and stack them together. Doing it this way eliminates any chances of shaky exposures that can occur due to wind or bumping into the setup while the shutter is open. If you are attempting to make almost a full circle star trails, then the number of shots required to create it can go in hundreds. Later, all those shots are stacked together in Photoshop or a free software such as StarStax to create a single image that shows the circular paths of the stars.

Photographers have been using this method for years with great results. But if you do not have the option to return to the same location again, then the conventional method would feel limited, as it requires you to stay in one spot for hours, thereby limiting your options to take multiple shots and capture a variety of angles on location in one night.

Understanding Star Trails

Equatorial grid

Equatorial grid from observer’s point of view

Imagine that ‘YOU’ are inside a giant sphere (see above diagram). Now, depending on the direction you look at, the effect of the star trails will be as follows:

Facing North: Star trails effect will appear to be circular with some stretching of the circular lines at the far edges of the frame.

Facing East: The trails will appear to be straight in the middle moving diagonally in an upward direction from bottom center to top center. They will also appear to be converging at both top left and bottom right at the far sides of your frame. See image below:

East West Trails Umm ul Aish Kuwait

Umm-ul-Aish, Kuwait – image shows the upward motion of East star trails

Facing West: In this direction, the trails will appear to be the exact opposite of what you see when looking towards the South. Moving downwards and to the right from top to bottom in a diagonal line, they will also appear to be converging at both bottom left and top right at the far edges of your frame.

Facing South: If you are facing South head-on, the star trails will appear to be moving from left to right in an upward curve.

One-shot Star Trails – the Technique

I have been developing a new method to create star trails in Photoshop. Unlike the ‘Star Trails’ Photoshop action that you might already be familiar with, this technique is much more than that. It eliminates all limitations associated with the traditional method of capturing star trails. Unlike the conventional method, this technique only requires a single shot, that’s right, only ONE shot of the night sky to create realistic star trails. Since this technique is a result of a joint effort between me and my friend Mobeen Mazhar, who is a great landscape photographer from Pakistan, we have named it the “HM technique” or “HM star trails”.

When implemented correctly, this technique will open endless possibilities for you in your star trail adventures and is sure to spark new hope among photographers for all levels of expertise. Now, let’s take a look at different types of star trails and how you can use this new technique to create them in Photoshop with just one shot.

Creating North Star Trails

North Star Trails Nanga Parbat

Nanga Parbat-Trashing, Pakistan – North Star trails created with HM technique

This is the most common and simplest type of star trails. Traditionally, it can be achieved by pointing your camera towards North with the focus set to infinity and then taking consecutive long exposure shots (30 seconds) at high ISO settings. Since the North Star remains almost stationary, the final effect is circular with the stars seeming to revolve around a pivot point, which is the North Star. Then at the time of post-processing, all shots are stacked using Photoshop or StarStaX.

The downside to this approach is that it can take as many as 700 shots over a period of five to eight hours to get a full circle trail. Now watch the video below to learn to create North Star trails within minutes using just a single shot of the night sky.

Creating Meteor Shower Trails

Meteor shower AspirePark

Aspire Park, Doha – meteor shower trails created with HM technique

Meteor shower trails is by no means an official name. This is fundamentally a beautiful variation of the North Star trails. Instead of a long continuous streak of light, the trails seem to disappear at the origin which gives it depth and dimension. There is also another variation of the meteor shower trails in which the tip of the trail is thicker, brighter and looks like a blob or droplet.

The underlying technique of the meteor shower trails is the same as shooting the North Star trails. The only difference is in post-processing. The meteor or comet effect is achieved by using the ‘Comet mode’ in StarStaX as shown below.

‘Comet Mode’ feature in StarStax

But regardless, the traditional method still requires that you spend hours on a single spot to take hundreds of consecutive shots. Now watch the video below to see how you can create amazing meteor shower trails in minutes, and once again, all you need is a single shot of the night sky.

Creating Vortex Star Trails

Vortex Aspire Park Doha

Aspire park, Doha – Vortex star trails created with HM technique

This is by far my favorite kind of star trails and is quite complex to achieve. Unlike the previous two types of trails, vortex star trails require special equipment which can be costly and may prevent most photographers from trying it. The vortex effect is achieved by zooming in or out on the lens during the long exposure. It may sound simple at first but the trick is to avoid vibrations as you zoom during the 30-second long exposure. Hence it makes it extremely difficult, if not impossible, to do it with bare hands without shaking the whole setup.

But if you have plenty of free cash to burn, you can get the tools which would include a geared ring that goes on the zoom ring of your lens, a motor and a wireless remote for controlling the motor. The setup is basically what DSLR filmmakers use for focus racking, that is a motorized follow focus system as shown below. The system is very useful if you shoot professional video with your DSLR but for photographers, the cost might not be justifiable.

Electronic follow focus

Wireless electronic follow focus kit v2 by Jag35

Do not worry because the following video will show you how to create vortex star trails in Photoshop. No cash required.

Conclusion

With the help of this powerful new technique, you will be able to maneuver on location, shift your focus towards making a variety of compositions, save countless hours, battery power and thousands of shutter actuations on your DSLR. Would you have thought that a single shot could give you such incredible flexibility in your star trail photography?

Tip: Just make a note of the direction your camera is facing to help you create star trails in relation to the reference direction.

I am sure that this tutorial will add a new skill to your photography arsenal. If you have any questions, post them in the comments below. Thank you.

Technique developed by Hammad Iqbal and Mobeen Mazhar

Mobeen Mazhar is a passionate traveler and has spent more than a decade exploring Pakistan and its natural beauty. Photography gives him a mode to express his love for nature and a medium to document his travel experiences. He is a landscape specialist, regular travelogue writer and travel expert for Pakistan. You can find his photographic work at Facebook, 500px and Flickr.

The post Single Image Star Trails – a Powerful Technique to Create Star Trails in Minutes Using Phototoshop by Hammad Iqbal appeared first on Digital Photography School.


Digital Photography School

 
Comments Off on Single Image Star Trails – a Powerful Technique to Create Star Trails in Minutes Using Phototoshop

Posted in Photography


How to do Long Exposure Photography and Light Trails at Night

03 Jun
Gastown Light Trails

Gastown light trails, Vancouver, Canada

Before I understood how photography worked, I was always intrigued by light trails in images. I never understood how that happened. When I began to study photography, one of the first assignments I did was an advanced course on night photography. I decided I would try and capture some light trails. I set up my camera, made sure the settings were correct and waited. A few cars went past, but my timing was off and the shots were not great. I continued to wait. After about an hour of trying and experimenting, I got the shot I was looking for. It was like magic to me. The car was not in the shot but the lights seemed to float in mid air. I was hooked. This was something that mystified me for a long time and, I had managed to get it right.

What was so mesmerizing for me was that the image I saw on my LCD screen was not what I saw in real life. The camera had managed to capture a scene that my eyes could not capture in the same way. This seemed amazing to me. I soon realized that the camera was able to “see” things differently to the way my eyes saw them. I spent many nights trying to capture light trails in various locations. I was also doing lots of reading and research and came across a technique called long exposures. This too was amazing. It had the ability to alter a scene in such away that it looked totally different to the way our eyes normally see it. Again I was hooked and still, to this day, long exposures and light trails are some of my favourite techniques in photography.

Long exposure photography and light trails have similar techniques, it is the subject matter that differs, so I will discuss each technique separately and tell you how to get the best results in both.

How to do long exposure photography

Shooting long exposures effectively requires that you should be shooting in Manual mode as much as possible. If you are not sure how to shoot in Manual, take a look at Getting off Auto – Manual, Aperture and Shutter Priority modes explained to learn more about these modes. To be able to get sharp and effective long exposure images, here is a checklist of item you will need.

1. What equipment is needed to shoot long exposures?

  • A tripod – this is a good piece of equipment to have in most instance, but is a critical piece of equipment for shooting long exposures. Make sure your camera is properly mounted onto the tripod before you start shooting.
  • A camera – obviously you will need a camera, but many people assume you can only do this type of photography with an SLR. Some advanced point-and-shoot cameras can also do long exposures if they have a Shutter Priority function. Take a look in your camera’s manual to see if it has this function, you may be surprised.
  • Cable release – your camera will be on a tripod, so it should be very still, however, sometimes the action of pressing the shutter release button can cause the camera to move slightly and this movement can cause your image to blur very slightly. You may not notice this on the LCD screen, but when you open the image on your computer, it will be evident. I recommend getting a cable release (also called a remote trigger). It is simply a cable that attaches to your camera and acts as a shutter release button. Using a cable release means you can set up your camera, step away from the tripod and press the button without touching the camera. Cable releases can be wireless too. If you don’t have a cable release or don’t want to buy one, you could use your camera’s self-timer function to trigger the shutter.
  • Warm clothes and comfortable shoes – depending where you live, and the time of year you plan to be shooting, you may need to dress warmly. Long exposures work well after dark and it may get cold, so be sure to wear warm clothes. Be sure that you have comfortable footwear too as you may be standing for a few hours.

2. What subjects are best for long exposure photography?

Long exposures work well for certain types of subjects like seascapes, landscapes and cityscapes. The key to getting a successful long exposure image is to have something in your image that is perfectly still and something that is moving. Water, clouds and trees blowing in the wind all work well if the rest of the scene is stationary. This difference between the elements in the scene will create drama and will add significant value to your image. The viewer will be seeing something that cannot be seen with the naked eye. The reason why long exposure images are so compelling is that they warp time. Water looks like a soft mist, trees look like a dull blur and clouds become long and streaky. This is what makes a familiar scene more compelling.

Long Exposure scene in Vancouver BC

Long exposure scene in Vancouver, Canada

3. What camera settings should be used?

Long exposures are ideally shot on Manual mode. If you are not sure how to shoot in Manual mode, you can use one of the other semi-manual modes such as Aperture priority or Shutter priority. Here are some quick pointers on the settings:

  • Shutter speed – depending on the light in your scene, your shutter time will need to be at least a 10 to 15 seconds, or longer if necessary. If you are doing a seascape and the water is moving quickly, then a few seconds may be long enough to make the water look misty.
  • Aperture – you will want to have your aperture set at anywhere between f/8 and f/16. This again, will be determined by how much light is in the scene and how long you want to expose for.
  • ISO – keep your ISO settings as low as possible, ISO 100 is what I use for long exposures.

4. When is the best time of day to shoot long exposures?

It’s normally a good idea to shoot long exposures as the sun is setting, or just after sunset. My suggestion is to be on the scene an hour before sunset. That way you can test some shots, make sure your composition is good and be sure all your settings are correct. Then wait. Personally, sometimes I will simply sit there and enjoy the scene, other times I may listen to some music, but I like to be relaxed and ready for when the light starts to work. Normally you will want to start shooting about 15 minutes before the sun has completely set and up to an hour after it is below the horizon.

The important part is to be willing to experiment. Each time you decide to shoot long exposures will be a little different. The light may be brighter than you think, the sunset may not be as dramatic as you hoped, or the shot may not be just as you imagined. Be patient and experiment. I will sometimes go back to a location two or three times to try and get the shot I am looking for. Once I have it though, the sense of reward is fantastic and the patience and effort is paid off!

Long Exposure of Science World in Vancouver

Long exposure of Science World in Vancouver

How to shoot light trails

Much of the advice for shooting light trails is very similar to the tips above. The key difference is in the timing and location of your shoot.

1. What equipment is needed to shoot light trails?

  • Same as above 

2. What subjects are best for light trails?

For light trails to work, you need to have something with lights moving through your scene. A car, a bus, a train and even an aircraft can work. Be sure to be out of the direction of the vehicle you are photographing. Please do not stand in the middle of the road, or on train tracks. Position yourself in a safe place to make this work. Always be aware of your surroundings. It is easy to become immersed in what you are shooting and lose sight of where you are standing. Be safe, first and foremost!

A moving bus in the scene made this shot more dynamic

A moving bus in the scene made this shot more dynamic

3. What camera settings should be used?

Light trials, like long exposures are ideally shot in Manual mode.

  • Shutter speed – depending on the light in your scene, your shutter time will need to be at least 10 to 15 seconds, or longer if necessary. Make sure that your shutter speed is long enough to capture longish light trails. You don’t want to cut them off too soon as you will have some short trails in your image that may look strange.
  • Aperture – you will want to have your aperture set at anywhere between f/5 and f/11. This again, will be determined by how much light is in the scene and how long you want the exposure.
  • ISO – keep your ISO settings as low as possible, ISO 100 is what I use for light trails. If your ISO is set to 500 or higher, your exposure will be shorter and you run the risk of overexposing the highlights ESPECIALLY when shooting car headlights.

4. When is the best time of day to shoot light trails?

Light trails can be shot in the early evening, or after the sun has set. Each scene will be different, but sometimes it is too light to get effective light trails just after sunset. You may need to wait until 30 minutes after the sun has set to get longer light trials.

The important part, once again, is to be willing to experiment. Try different times after sunset and see what works for you. Spend time behind your camera perfecting your timing. Scout locations during the day that you will think will work for light trails and then go and try it out.

Steam Clock in Gastown, light trails on the road

Steam Clock in Gastown, light trails on the road

Photographing after dark can be very rewarding. It is worth the effort to learn how to use these techniques to bring new images into your portfolio, and to have new skills which will enable you to shoot under any lighting conditions. Experiment and enjoy! Happy shooting.

The post How to do Long Exposure Photography and Light Trails at Night by Barry J Brady appeared first on Digital Photography School.


Digital Photography School

 
Comments Off on How to do Long Exposure Photography and Light Trails at Night

Posted in Photography


Celestial Influences: Petroglyphs and Star Trails

18 Mar

Celestial Influences: Petroglyphs and Star Trails

Standing out in the middle of no where at night in the presence of ancient petroglyphs unleashes ones imagination in more than one way. When not thinking about what wild life could be sneaking up on me (cougars, coyotes, mice… as it turns out mostly mice) my mind wandered to the source of inspiration for these ancient drawings. Was the person(s) that made these drawing bored, doodling, documenting, ancient life or gathering inspiration from the night sky? I personally made the connection between the circles & spirals on this rock with the movement of the stars.  Looking back at my photos from this night my curiosity again is piqued. I suppose the fact no one has a firm answer is what makes these petroglyphs so attractive & intriguing. What do you think?

Copyright Jim M. Goldstein, All Rights Reserved

Celestial Influences: Petroglyphs and Star Trails

The post Celestial Influences: Petroglyphs and Star Trails appeared first on JMG-Galleries – Landscape, Nature & Travel Photography.


Related Stories

  • Celestial Influences: Petroglyphs and Star Trails – Enclosure
  • In Defense of Pretty Pictures – Enclosure
  • In Defense of Pretty Pictures
Feed Ads by FeedBlitz
powered by ad choices


JMG-Galleries

 
Comments Off on Celestial Influences: Petroglyphs and Star Trails

Posted in Equipment


Tips for Photographing Star Trails

03 Dec

Photography is a fantastic tool to explore the world around you, especially in ways normally invisible to our eyes. Landscapes at night often reveal untold treasures in the sky, and the stars can be made to swirl around like a dream. The process for photographing the movement of the stars isn’t nearly as difficult as it once was; star trails can be easily captured by any camera with a wired shutter release cable!

Enjoy these tips for photographing star trails at night! 

Star trail open

Composition comes first

There are a few things to consider when making a star trail image; the first is composition. As with any good landscape photograph, you should be able to visually navigate through the image. A foreground element is very helpful, and having water in the scene is a bonus – the stars can reflect off the surface of the water. The image shouldn’t only be about the stars, but how they interact with the landscape.

You should try to shoot with the widest lens you have. This offers more stars to fill the night sky, and also a greater potential to have the North Star somewhere in the frame. Most of my star trail images are photographed with a fisheye lens, because of the 180 degree field of view. The wider the field of view, the more star trails your image can contain.

As the Earth spins around its axis, the North Star is the only star that doesn’t move (much). All of the other stars appear to spinning around this central location, which can add a visual anchor point in your composition. If you’re not familiar with the exact position of the North Star, simply set your camera to bulb mode and take an extra-long exposure in the neighbourhood of 4-5 minutes. This should give enough of a “spin” so the stars to help you pinpoint the center of the celestial circle.

Camera settings

The goal for your final image however, requires a different exposure. Start with the following, set on manual mode:

  • Shutter speed: 30 seconds
  • Aperture: F/3.5
  • ISO: 3200

Take a test shot and see what you get. If the exposure is too bright, decrease the ISO or choose a smaller aperture (higher F-number). If the image is too dark, try increasing the ISO to compensate. Always leave the shutter speed at 30 seconds. When you get an exposure that looks good on the back of your camera, you’re set. Just make sure the camera is set to continuous shooting mode with long-exposure noise reduction turned OFF.

Also be sure to set the camera or lens to manual focus. The focus can’t shift from one image to the next, so dial it in manually. I find that focusing on distant light sources using Live View allows for the best depth of field while still keeping the stars sharp. Foreground objects may appear blurry, so going the “extra mile” would be to focus on the foreground and focus-stack the landscape.

With a wired remote shutter release, press and lock the shutter control. When one exposure ends, the next one will automatically begin. Let the camera continue this way for roughly an hour, and stop it whenever you’re ready to leave. If you left the camera for one hour, it should have recorded 120 separate 30-second exposures. These images can then be combined very easily in Photoshop.

Forgot your remote shutter release, or haven’t purchased one yet? I’ve found myself ready to make a star trail image and digging around in my camera bag offered me no cable release – it was somewhere at home, far far away. In a rare moment of creativity, I grabbed some tape (always keep some Gaffer’s tape in your camera bag!) and a small pebble from the ground. Simply taping the pebble over the camera’s shutter button with enough force to fully depress the shutter, the camera happily clicked away until the tape was removed. The below image was created this this “rock and tape” trick.

Rock tape trick

Post-processing workflow

Combining 120 images may seem like a daunting task, but the process is fairly straightforward – start by editing one image. In Adobe Lightroom, edit your image to your liking. Common adjustments would usually include shadows and whites, white balance, clarity, and noise reduction.

Single frame

Make this one frame as perfect as you can make it, and copy the development settings. Right-click on the image in Lightroom and choose “Settings > Copy Settings” and make sure all of the settings you’ve adjusted are selected.

You’ll need to paste these settings across the entire range of images. To do this, select all of the images you want to use in the filmstrip, and right-click on any of the selected thumbnails in the filmstrip. Now, choose “Develop Settings > Paste Settings” and your adjustments will appear on all of your images.

Alternate method to paste settings

There are a few ways inside Lightroom to copy and paste develop settings. Another way, which is particularly helpful when sharing settings over many images, is to use the “sync” feature. To do a Sync make sure the image you’ve worked on it selected in the filmstrip and visible on screen. Do a “select all” by holding “command+a” on a Mac or control+a on PC. That will select all the images in the folder. Next click the “sync” button in the lower right of the develop side panel. Choose all the settings you adjusted (as above) and click “synchronize”.

Putting them all together in Photoshop

You now need to send all of the images over to Photoshop in a single layer. With all of the frames still selected, right-click on any image and choose “Edit In > Open as Layers in Photoshop” and wait. This will take some time as Photoshop loads each frame into the same workspace as layers.

When all of the layers are finished loading, the next step is simple for users of Photoshop CS6 and beyond. Simply select all of the layers in the layers panel, and switch the blending mode from “normal” to “lighten”. Voila! The path of the stars through the sky will be revealed. This blending mode works by comparing pixels of all layers and displaying the brightest pixel. If the landscape remains static, there won’t be any change there, avoiding the additive effects of light pollution. The stars are moving, and as their position in the image changes the new location will contain brighter pixels.

Stacked frames

For users of Photoshop CS5 or previous, this can still be done but it will take some time. You cannot select multiple layers and change the blending mode on them all at once, it must be done one at a time.

When you’re done, flatten the image and save it. Continue to edit as you see fit, but the star trail is complete!

An alternative to Photoshop

Another option if you do not use Lightroom or Photoshop is to use a free program call StarStaX. It’s easy to use, just drop your images in and it does all the magic for you, AND even fills in the tiny gaps between each of the exposures.

Post originally from: Digital Photography Tips.

Check out our more Photography Tips at Photography Tips for Beginners, Portrait Photography Tips and Wedding Photography Tips.

Tips for Photographing Star Trails

The post Tips for Photographing Star Trails by Don Komarechka appeared first on Digital Photography School.


Digital Photography School

 
Comments Off on Tips for Photographing Star Trails

Posted in Photography