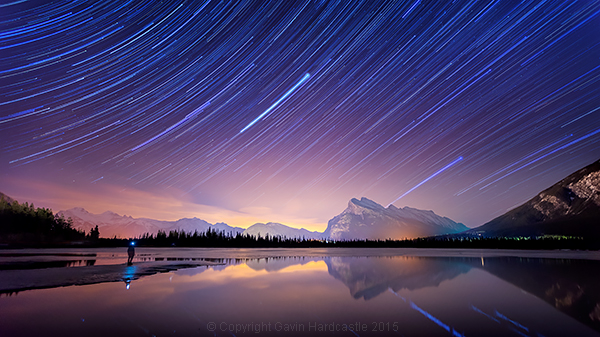
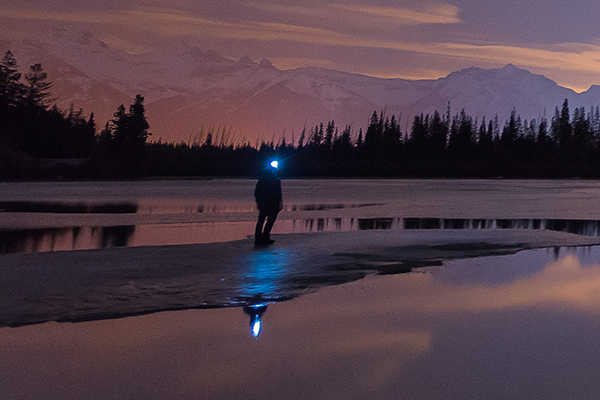
There are times when planning and patience can result in a killer shot. This nighttime star trails selfie (above) that I captured in the Canadian Rockies was one of those times. I’d planned to shoot star trails over Mount Rundle and the town of Banff, Alberta while hopefully capturing reflections in Vermillion Lake, surrounded by melting ice.
My initial vision was for a completely cloudless sky, but the small yet persistent low clouds ended up adding an ethereal quality to the shot I hadn’t expected.
When I looked back at my first 30 second exposure, I knew right away that this shot had some potential. All I had to do was set things up properly and then play the waiting game.
I’d like to share with you exactly how I shot and processed this image so that you too can try your hand at star trails, and maybe even a selfie like I did.
Required Gear
- A digital camera with and intervalometer app
- A sturdy tripod
Capturing the Shot
Step 1 – Location and conditions
In this case, my location was already set because I wanted Mount Rundle to be central in the composition. I needed a relatively clear night with good visibility of the stars. If it had been cloudy, I would have just stayed home. When planning a location, check the weather forecast and figure out which direction you’ll be facing to get an idea of the direction of the star trails. For more info on the movement of the earth and the direction of star trails read this article.
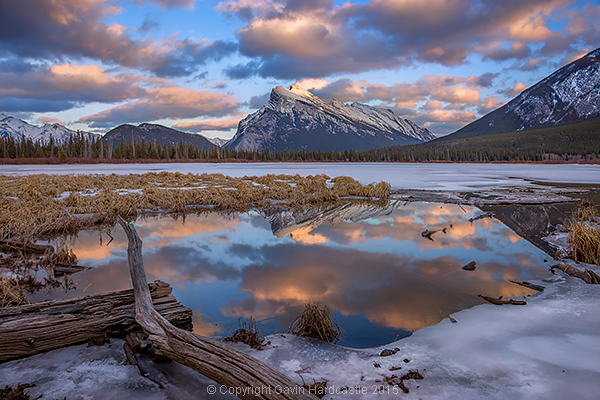
I was shooting the sunset earlier that evening so I had a good idea of how things were going to turn out. Here’s the bonus shot I captured while waiting for the stars to arrive.
Step 2 – Composing the shot
Whenever I shoot star trails it’s important to remember that I’ll need roughly 60-70% of the frame dedicated to a sky that probably isn’t doing much. I can’t see the star trails until I’ve finished processing your images and that means I have to imagine the trails and frame the composition accordingly.
Step 3 – Setting aperture, exposure and ISO
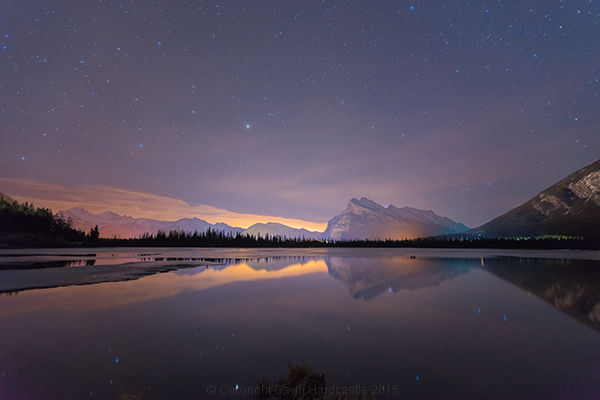
Night photography demands that we use much higher ISO settings than we would during daylight hours. It’s how we increase the cameras sensitivity to light. With this shot I was able to get away with ISO 2000 because there was a lot of light pollution from the towns of Banff and Canmore.
Using an aperture of f/2.8 meant that my lens was pulling in as much light as it could and with a 30 second exposure. I was happy with the brightness of the image, especially the stars.
Here’s one of the RAW frames before processing. Even with the haze and light pollution from Banff I could see that the stars were plenty bright enough to capture trails. You can even see a couple of amorous geese in the shot just in the reflection of Mount Rundle.
Step 4 – Setting up my timelapse intervalometer
I shoot with the Sony A7R camera which has a cool timelapse app. This basically works the same way as a hardware intervalometer which you can get for pretty much any DSLR. It works by taking continuous shots at an interval that I set. I tell the app/intervalometer to take 120 exposures, and that I want them all to be 30 seconds long. I don’t want any gap between shots so that means the camera immediately takes one shot after another with no rest period.
When doing this, I make sure to switch off the cameras built-in noise reduction as this can mess up the timing of the intervalometer. In-camera noise reduction can take a long time to process so I don’t want my cameras memory buffer locked up and busy when it’s supposed to be taking the next exposure.
I’ll also want to use the fastest memory card I can afford.
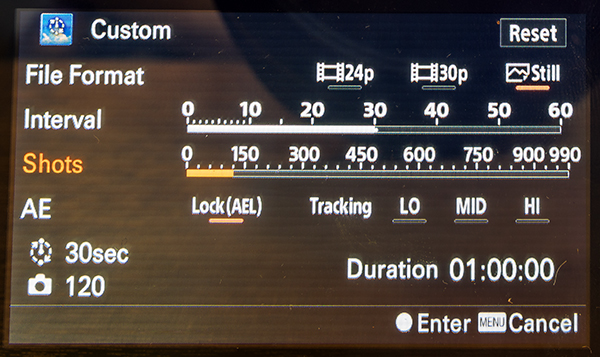
The Sony Timelapse App
Canon DSLR users will be delighted to learn that Magic Lantern has an intervalometer for timelapse shooting.
Step 5 – Final check and off we go
Before I commence shooting a lengthy timelapse I’ll do a final check of focus, make sure I’ve got plenty of battery power left, lots of memory, and that the tripod is stable and not likely to move during shooting. I’ve learned the hard way that these things can ruin an otherwise perfectly executed timelapse.
Step 6 – Begin shooting and ……. pose
Once you’ve started your timelapse you’ve now got to come to terms with your boredom. I didn’t plan to do a selfie, I actually wandered into the frame of my shot because I was just looking around at stuff. If you do plan on doing a selfie, just be sure to stand in place long enough for at least one of the exposures to capture you. To be on the safe side, try and stay in position for a full minute.
It might even be really cool if you stand in multiple positions to make it look like a crowd of identical models.
Top Tip for shooting Star Trails or Timelapse
I highly recommend bringing a second camera so that you can carry on shooting while your A camera is tied up shooting the star trails. Not only does this alleviate crushing boredom, but it’s also great practice. You do practice right?
Step 7 – Check your shots before leaving
Once my timelapse has finished, I check the images on the camera before packing up and leaving. I have my camera set to play my images as I spin the jog wheel, kind of like a flip book animation. It’s great for checking how the movement of the stars worked out and I’m always amazed at the things the camera picked up that I didn’t see. I had lots of frisky geese swimming in and out of my shots as they went about their noisy geese business.
If I spot a disaster in the playback (let’s say a bug camped out on my lens) it’s time to start all over again. After an hour or so of waiting, I’ll be loath to start again, but sometimes you’ve just got to grin and bear it if you want that killer shot.
Processing the Shots
To process star trail images with this shooting technique, I used Adobe Bridge, Camera RAW and Photoshop.
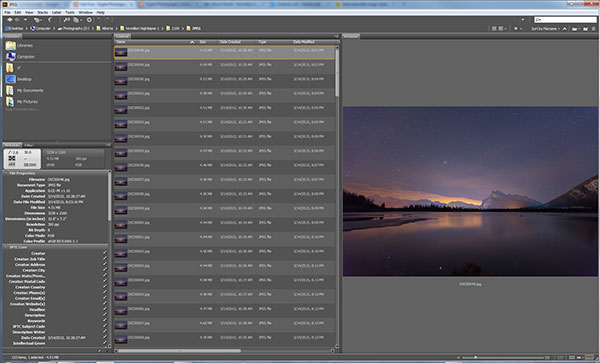
Adobe Bridge lets us quickly preview our star trails timelapse. Just hold down the bottom cursor key to flip through all of the frames and watch a rough animation.
Step 1 – Tweak the RAW files
In Adobe Bridge, I’ll select all 120 of my images, then right click and choose Open in Camera RAW. This loads the images into Adobe Camera RAW where I can reduce the noise, change the white balance and make any colour tweaks that I want. Here’s a list of what I tweaked.
- Added sharpening
- Changed White Balance to Auto
- Added slight noise reduction
- Increased Contrast
- Boosted Shadows and Blacks
- Increased Clarity and Vibrance
- Reduced Highlights and Whites
- Used Straighten Tool to fix horizon line
When I’m finished tweaking, I hit Select All, then click Synchronize so that the tweaks I made to my first RAW file get applied to all 120 images. Next I hit the Done button to take me back to Adobe Bridge where I can now see those ACR tweaks applied to all 120 image thumbnails.
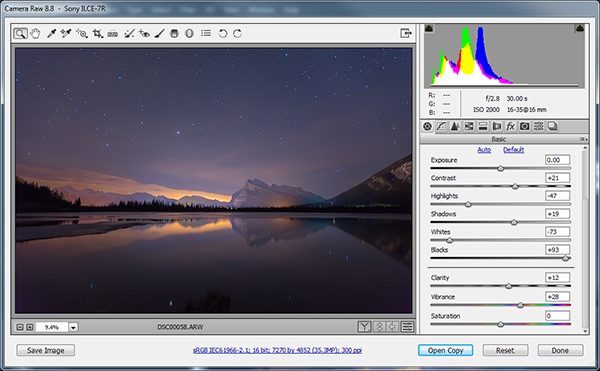
I used Adobe Camera to make image corrections and then apply the same corrections to ALL of the frames.
Step 2 – Save as low resolution JPGs
This next step requires a lot of computer resources. My current PC only has 16 GB of RAM so I knew I’d have to make some low resolution versions of my RAW files in order to be able to load all 120 images into Photoshop layers. If I ever print this image, I’ll need to reprocess this image at full resolution which will require some major processing, but for web use I know I can get away with using smaller resolution JPEGS to create my final image.
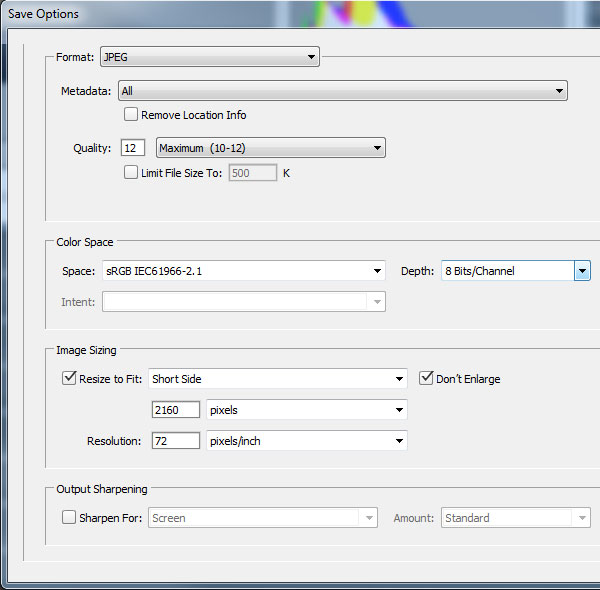
To do this, I select all of my newly tweaked RAW files in Adobe Bridge once again. I then right click and choose Open in Camera RAW. I hit Select All, then choose Save Images in the bottom left. This opens a dialog box where I can specify a location, file format and most importantly, image resolution and size.
I choose JPEG and then specify a resolution of 72 pixels per inch and tell it to resize my images to a much smaller resolution that I know Photoshop can handle but will still look great for web use. Finally I click Save and go make some coffee while I wait for all 120 images to process.
Step 3 – Load the JPEGs into Photoshop layers
Back in Adobe Bridge I navigate to where I saved my low resolution JPEGs. It’s best to export these to a separate folder to keep things to tidy. Once again, I select all my JPEGs and then choose Tools > Photoshop > Load Files into Photoshop Layers.
This will take even longer than it took to export the JPEG’s so I’ll go downstairs and watch an episode of House of Cards.
Step 4 – Can you feel the magic?
This is where the magic happens and I finally get to see my star trails. With all of the 120 images loaded into Photoshop Layers, I go to the Layers panel to select ALL of my layers. This can be done by clicking on the top layer so that it’s highlighted in light blue, holding down shift and then clicking on the bottom layer – I need to scroll down to see all 120 layers.
With my 120 layers selected, I now change the Layer Blend Mode to Lighten and BAM – Star Trails!
Note: You could also use a free program like StarStax to put the trails together if you don’t have Photoshop.
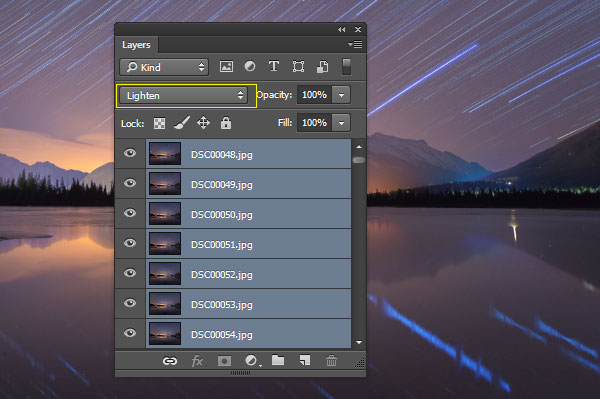
From this point on I can process the image with some final tweaks in Photoshop. To do that I’ll merge all layers down to one by pressing ctrl+E. Then I can change contrast, colour balance, crop, add a vignette and whatever else I think suites the composition.
My finished star trails selfie is done and ready to share with the world. I hope you like it.

Why don’t you give it a try?
There is a much easier but somewhat less controlled method of getting a shot like this. Follow steps one to three and then simply use a remote shutter release while your camera is set to Bulb mode and take a very long exposure. You could leave the shutter open for an hour or two to capture the same effect. Just be careful that your lens doesn’t fog up while the camera heats up.
You won’t have the same pinpoint control over each exposure with this simpler method, but it’s a great way to get into shooting star trails if you don’t have the time to go through all of these post processing steps.
Editor’s note: caution – long exposures of this nature will cause your sensor to heat up potentially causing damage to it like stuck pixels or worse. Please do so at your own risk.
If you prefer the more long winded method that I used, you’ll get the maximum image quality possible and if you do decide to do some selfie modelling, you can pick the exact exposure that captures you at your best. In my case, it was the back of my head.
googletag.cmd.push(function() {
tablet_slots.push( googletag.defineSlot( “/1005424/_dPSv4_tab-all-article-bottom_(300×250)”, [300, 250], “pb-ad-78623” ).addService( googletag.pubads() ) ); } );
googletag.cmd.push(function() {
mobile_slots.push( googletag.defineSlot( “/1005424/_dPSv4_mob-all-article-bottom_(300×250)”, [300, 250], “pb-ad-78158” ).addService( googletag.pubads() ) ); } );
The post How to Shoot a Star Trails Selfie by Gavin Hardcastle appeared first on Digital Photography School.
You must be logged in to post a comment.