RSS
 

Posts Tagged ‘Library’

Modernized Monument: Crumbling Medieval Tower Turned Library

06 Jun

[ By Steph in Architecture & Public & Institutional. ]

torre del borgo 1

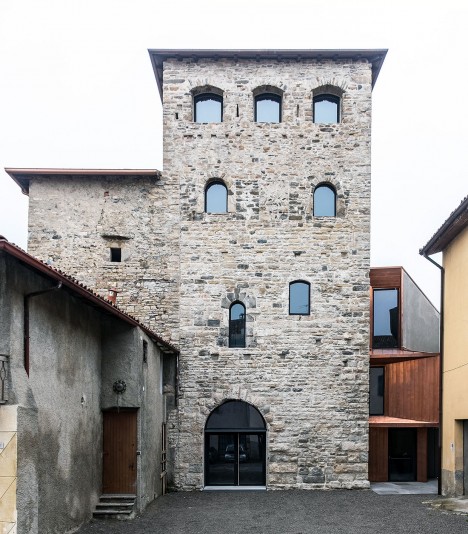
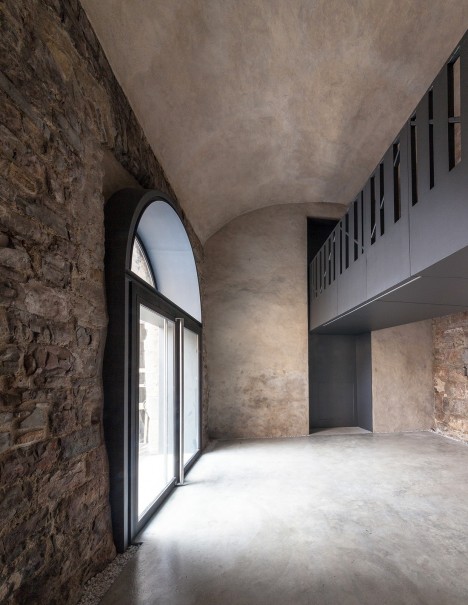
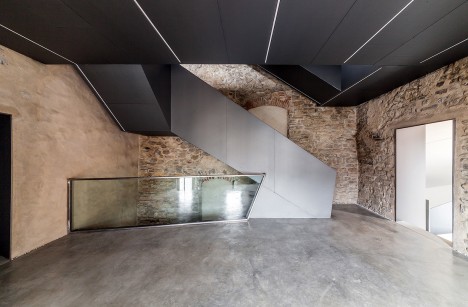
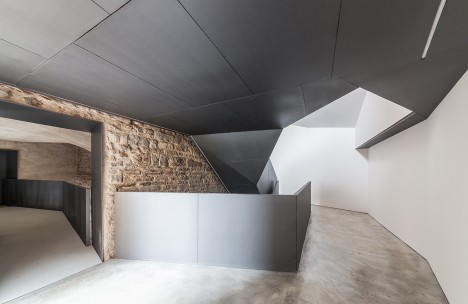
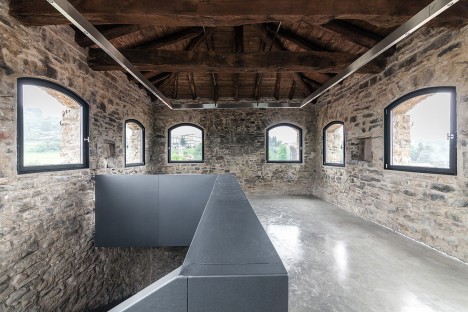
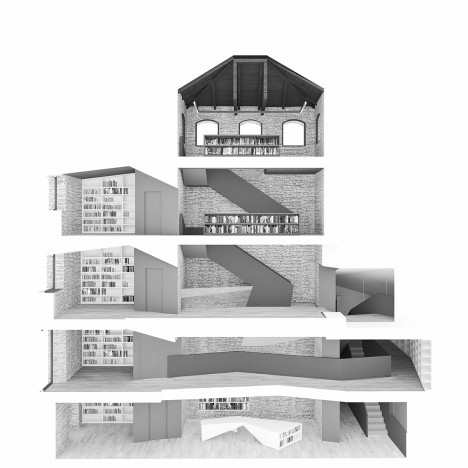
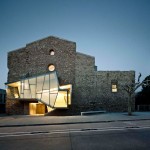
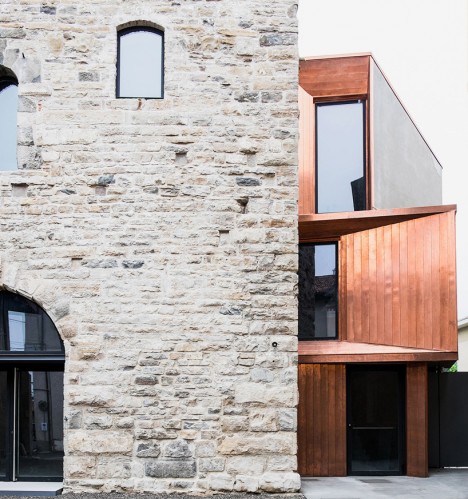
Matte black steel and timber-clad stacked volumes fill in empty spaces throughout the medieval Torre del Borgo in northern Italy, a recent renovation stabilizing the crumbling stone walls and connecting the four stories together for transformation into a public library. Still strong after all these centuries, the stone shell of the fortified building works in concert with modern materials to create a space that provides an important function to the community, and helps preserve its history.

torre del borgo 3

torre del borgo 4

Before it was re-designed, the Torre was not only falling apart piece by piece, it lacked adequate means of passage from one floor to the next, and the interiors were unfinished. It needed structural support, extra space and additional windows to make it usable for the city of Bergamo.

torre del borgo 9

torre del borgo 7

torre del borgo 5

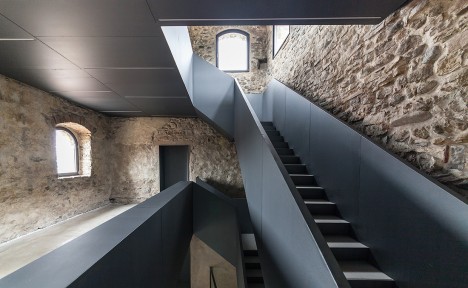
Architect Gianluca Gemini came up with “an architectonic and functional reinterpretation of the building” that identifies solutions to the degradation. Black iron ramps and walkways cut across the four main halls, making them fully accessible and highlighting a contrast between the smooth steel and glass and the rough, mottled stone. This solution is visually striking, invisible from outside and leaves plenty of room for library patrons to read and browse.

torre del borgo 8

torre del borgo 2

torre del borgo 10

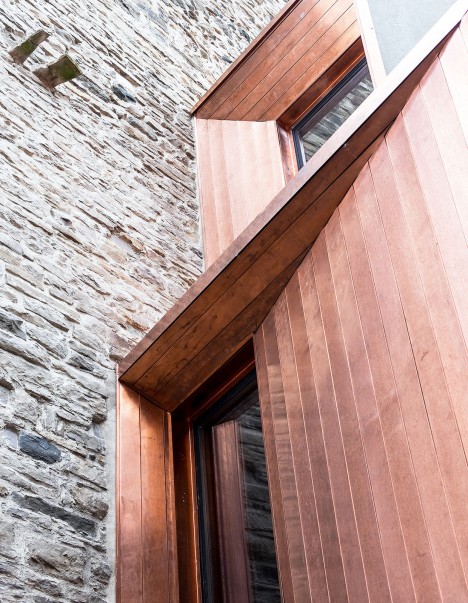
The timber and concrete addition features floor-to-ceiling glazing to bring more natural light to the interior, and adds floor space, without significantly altering the original stone structure.

Share on Facebook


[ By Steph in Architecture & Public & Institutional. ]

[ WebUrbanist | Archives | Galleries | Privacy | TOS ]


WebUrbanist

 
Comments Off on Modernized Monument: Crumbling Medieval Tower Turned Library

Posted in Creativity


Big Free Library: Public Pavillion Built of 50,000 Stacked Books

09 May

[ By WebUrbanist in Architecture & Public & Institutional. ]

lacuna large volume art

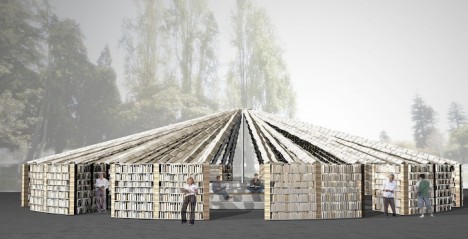
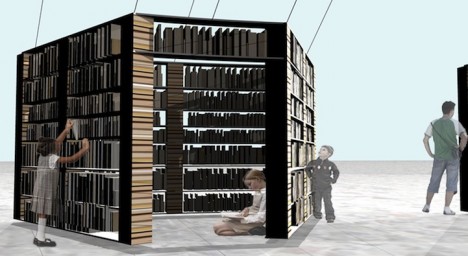
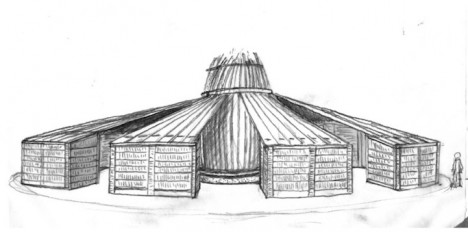
Stacked books form the structural columns of this remarkable structure while support beams in between serve as shelves for even more volumes that can be borrowed, all scanned and donated by the Internet Archive. Even the roof is formed of reading material, featuring fluttering book pages suspended from support wires. Like Free Little Libraries, this huge book repository offers its wares to anyone who wants to take a novel to read and (optionally) return, in turn letting each person who interacts with it to permanently shift its shape.

lacuna building structural books

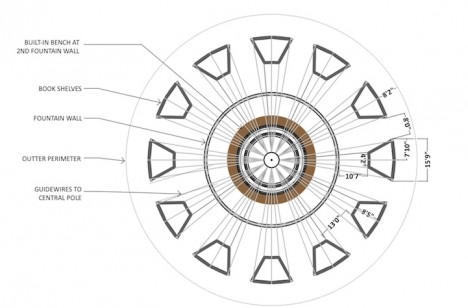
Opening in one month at the Bay Area Book Festival, this temporary building is made to dissolve – the act of removing books from its shelves will change the way it looks and how light passes through its emptying walls. Reading benches in and around its twelve alcoves provide spaces for retreat or interaction.

lacuna structural design diagram

The title of this project, Lacuna, is also an obscure word referring to missing pages or sections of a book. Its creators FLUX Foundation have a great deal of experience building robust but interactive public art and architecture, including large-scale projects for Black Rock City (as part of the Burning Man festival). Over 200,000 books were actually donated by the Internet Archive, but the remaining 150,000 volumes will be saved for future similar projects.

lacuna project sketch

The Book Festival will also feature talks and readings by hundreds of authors as well as other structures and exhibits. More on the design and its inspiration: “Lacuna is a temple to books. Each of the twelve alcoves of Lacuna are formed by pillars created out of stacked books. Connecting these pillars are shelves filled with books. Above, fluttering book pages attached to guy-wires create a thatch-like roof, creating a space in which visitors literally, and figuratively, inhabit the interiority of books and their contents. “

Share on Facebook


[ By WebUrbanist in Architecture & Public & Institutional. ]

[ WebUrbanist | Archives | Galleries | Privacy | TOS ]


WebUrbanist

 
Comments Off on Big Free Library: Public Pavillion Built of 50,000 Stacked Books

Posted in Creativity


How to Use the Filter in Lightroom’s Library Module

26 Sep

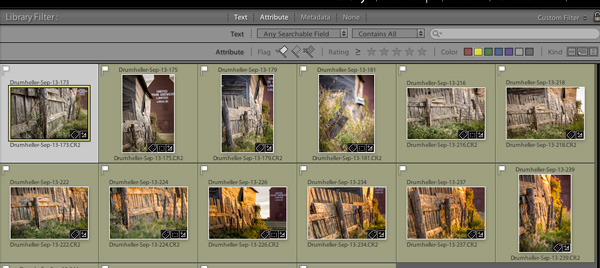
Once you enable the filter in Lightroom’s library module, you are able to search your images in three ways – text, attributes and metadata. To activate the filter bar, the keyboard shortcut is backslash (\). The filter bar will be activated and displayed on top of the workspace (see the screenshot below), only if you press the backslash key in the Library module. If you press the same backslash key in Develop, you will be see the before version of the selected image, provided you have made some corrections to your image.

Lightroom FilterBar None 01

Filter by text

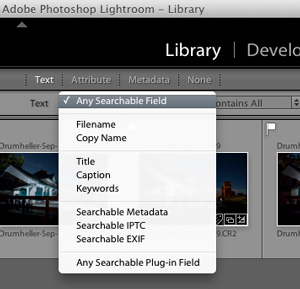
The first option, Text mode allows you to search your images by the images’ text fields, from title, caption, keywords, searchable metadata, searchable IPTC, searchable EXIF, to any searchable plugin field. The field box comes as a drop down menu, where you can pick the text your search should be based upon.

Lightroom FilterBar Text 02

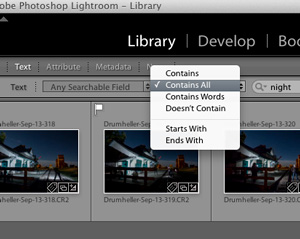
In the next box you can pick either one of the following parameters – contains all, contains, contains words, or doesn’t contain. You can select starts with or ends with as well. In the last box you can enter your text, the text which you want your search should be based upon.

Searchable Contains all

Filter by image attributes

The next option to filter is based upon the Image attributes. This section is further divided into flag status, ratings, color ratings and kind of file. In flag status, you can either pick flagged, unflagged, or rejected ones as well as a combination of two of those choices by clicking the flag symbols. Once you filter your images, the selected ones will be highlighted in white (use Ctrl/Cmd+A to select all).

Lightroom FilterBar Attribute 03

Filter by rating

Lightroom FilterBar Rating 03a

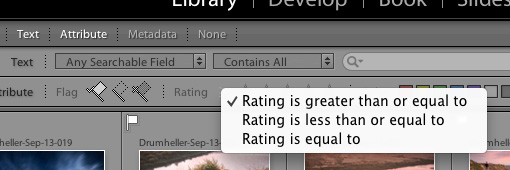
The next option in this section is star rating; you can filter photographs based on the number ratings you have applied to them. You can click the third star if you want to filter the photographs which have three stars exactly. You can also select less than or greater than by clicking the greater than symbol (>), where you will be prompted to select one of the following:

Greater than

Filter by color label

The next option in this section is filter by color label; you might have applied color labels based on your own methods of flagging images. For example green for web upload, red for yet to process, or something like that. Imagine you want to view only the red ones which you wish to process now. You can do that by clicking the red color box alone or you can add yellow along with it by clicking that box as well. In this way you can combine all the color labels, or only the ones you want. If one color label is selected, that particular box will be brighter than the other, which means it is active.

Color filter

Filter by kind of file

The last option in this sub-section is to filter by kind; which in this instance means the kind of file. In Lightroom you can have three kinds of files; master image files, virtual copies, and video files. If you want only the virtual copies you can select that particular icon alone. Like the other filters here, you can also combine more than one choice.

Filter by metadata

The most powerful option to filter your photographs is by metadata – the options are endless.

Lightroom FilterBar Metadata 04

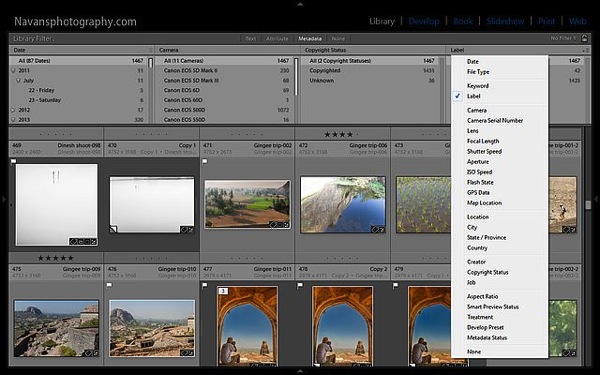
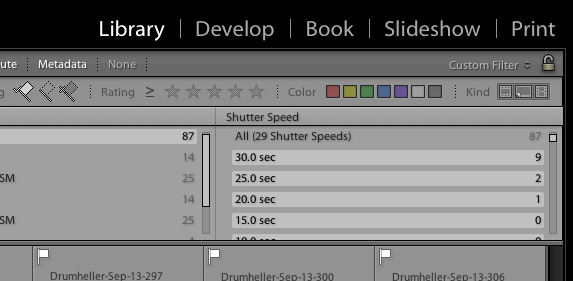
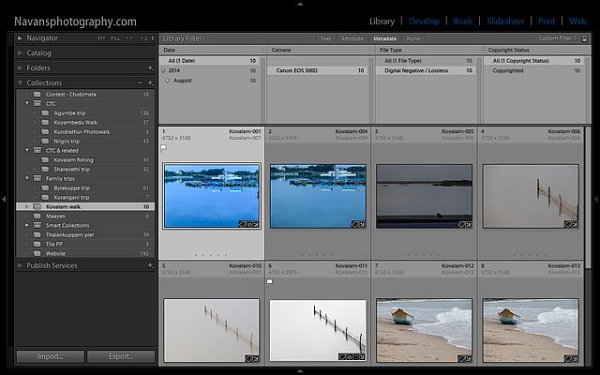
You have the option to filter your photographs by all of the metadata in your files, you can get an idea by looking at the screenshot above. You can combine multiple metadata together to work for you by adding more filter columns. Click the right side of the title for an option to add more columns with other criteria. Click the filter title itself to change it to something else. In the screenshot, I have clicked the title Label; and you can see the pull-down menu of options that appeared.

Lightroom FilterBar Metadata 05

Miscellaneous other filtering tips

The filtered photographs based on your criteria will be instantly displayed on the below workspace. You can also combine multiple filter sections from Text to Attributes to Metadata or all together, the options are almost endless.

You can create presets if you have a particular way of filtering your photographs, provided you have managed your library in that way. Have you noticed the lock symbol on the right end of the filter bar? The drop down menu next to the lock symbol has an option to save your search as a preset, so next time you just have to select that preset. Easy right?

Save filter

The lock symbol at the right end of the filter bar will lock the filter criteria (if you click it) and the same filter can be applied to all your collections or folders one by one as you select the folders and collections.

Lightroom-FilterBar-Metadata-05a

I hope this article helps you work smarter with Lightroom and saves you lots of time and resources.

Cheers and happy photographing.

The post How to Use the Filter in Lightroom’s Library Module by Navan Viswa appeared first on Digital Photography School.


Digital Photography School

 
Comments Off on How to Use the Filter in Lightroom’s Library Module

Posted in Photography


In Photos: Cincinnati’s impressive ‘Old Main’ public library

13 Jul

Cincinnati, Ohio’s current downtown public library is grand in its own right as one of the busiest branches in the country. But its predecessor, demolished in 1955, was nothing short of stunning. Built in 1874, the ‘Old Main’ library was originally intended to be an opera house, with a towering atrium that instead became home to five tiers of stacked bookshelves. These photos capture the grandeur of the library and its popularity in its own time. See gallery

Articles: Digital Photography Review (dpreview.com)

 
Comments Off on In Photos: Cincinnati’s impressive ‘Old Main’ public library

Posted in Uncategorized


The Photodoto Library: Your One-Stop Shop for Pure Photography Awesomeness

24 Jun

Are you sick and tired of photography sites claiming that they can provide you with a wealth of photography resources that’ll make you a much better photographer…only to be lied to and disappointed each and every time? We hear you and feel your pain, too! That’s why we at Photodoto have come up with something that’s bound to turn your Continue Reading

The post The Photodoto Library: Your One-Stop Shop for Pure Photography Awesomeness appeared first on Photodoto.


Photodoto

 
Comments Off on The Photodoto Library: Your One-Stop Shop for Pure Photography Awesomeness

Posted in Photography


Large Library Management with Lightroom and Daminion [for Advanced LR Users]

13 Apr

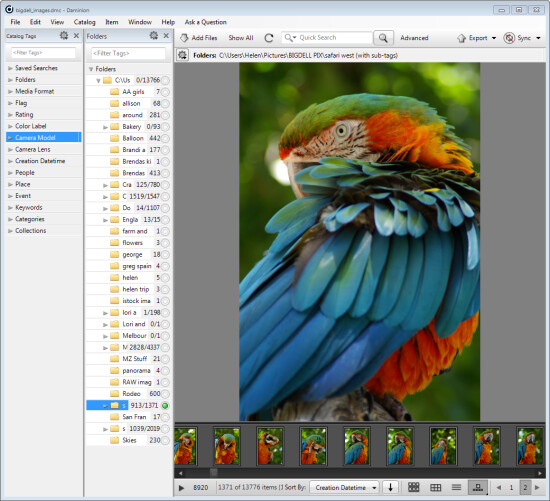
daminion-opener

If you have Lightroom you might assume that you have all you need for managing your images. That may not be the case and many professional and keen amateur photographers benefit from combining Lightroom with the image management software Daminion.

Daminion is an image management solution which helps you do large library management with Lightroom. You can think of it as being the rough equivalent of the Lightroom Library module operating on steroids. Daminion’s biggest advantage is that it is true multiuser software so, with Daminion server installed, multiple users can access a single catalog. This is something that Lightroom is notoriously poor at doing and which Adobe has so far failed to address despite multi-user/multi-computer access being one of the top ten feature requests for Lightroom.

You can download a version of Daminion here using the Download link. At the time of writing the current release version is 2.5 and version 3 is still in beta. Daminion comes as both a standalone and a server version. The Daminion standalone Free version handles up to 15,000 images per catalog. The paid versions are Basic, Standard and Pro which give you 25,000, 75,000 and unlimited images in a catalog respectively. There are also multiple Daminion server versions, one for non-commercial use and others for individual professionals and small teams.

NOTE: Daminion is available for PC only and not currently available for Mac.

You can install both the server and client versions on the same computer – the server version will run faster than the client version so it has value when you have a lot of images in a catalog. When you consider that some Daminion users have catalogs of a million or more images, speed of accessing and filtering these images becomes important.

Setting up Daminion

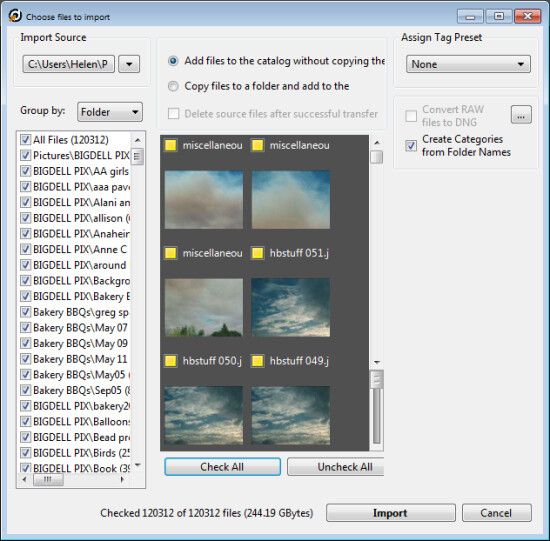
Once you have downloaded and installed Daminion, launch it and you can create a catalog. Like Lightroom you must import the images you want to manage with Daminion into the catalog. If the Add Files dialog doesn’t open automatically you can find it by choosing File > Add Files and then select the folders to import from.

daminion-import

While you can create and manage multiple catalogs in Daminion, like Lightroom, you can’t search across multiple catalogs so you should be careful about how you organize your images in catalogs. What makes sense in terms of catalog organization will depend on how you work with your images and if it makes sense to have them all in one catalog or in separate ones.

Daminion will recognize and manage a wide range of file types including common raster and vector formats as well as camera RAW images, video, music, and PDF formats. This gives it a broader scope as a management tool for digital media collections than Lightroom which is limited to photo and video formats only.

You can copy the images to another location on import or import them from their current locations. You can also group images by folder, date or file type on import. As the images are being imported you can begin to work with those already imported.

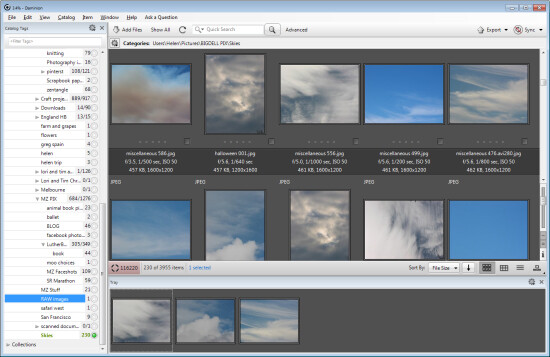
daminion-work-while-importing

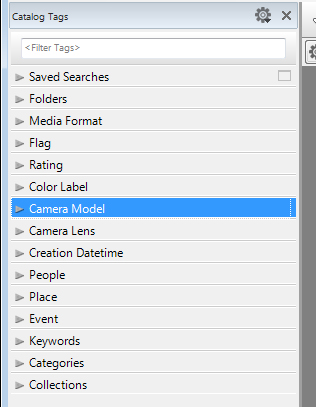
daminion-catalog-tags

Organizing and tagging

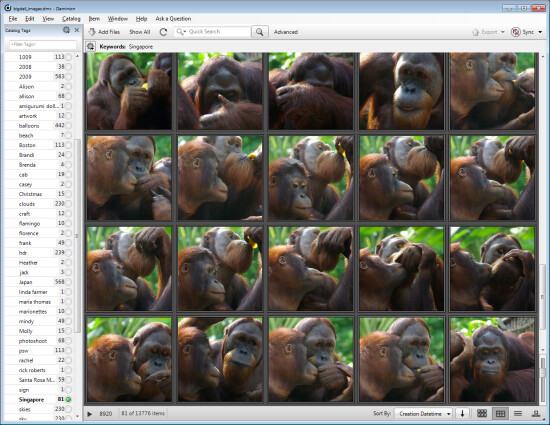
When you have some images imported into Daminion you can investigate the tools you have for managing and organizing them. The Catalog Tags panel on the left of the screen (see image on the right) is pre-populated with tags. Some of these are created from the image metadata, such as Camera lens and Camera Model, and others are those that you may have applied to the images in other programs such as keywords, ratings and color labels.

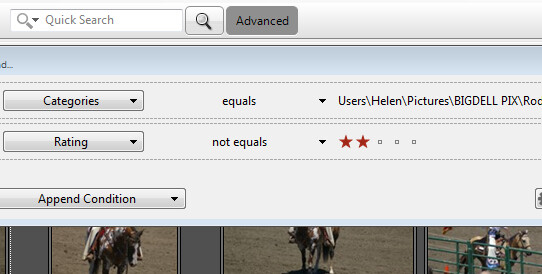
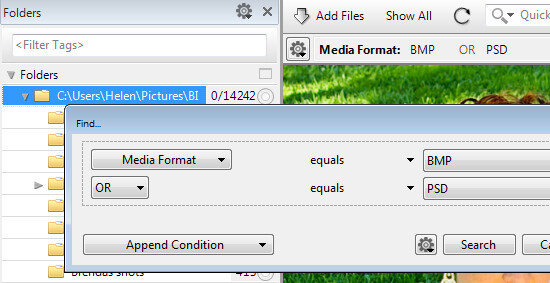
To filter the images by any catalog tag click the tag group and the tag to view and click the circle icon to view images that match that tag. You can perform AND and OR filtering using the Find dialog which you can find by clicking the Advanced link immediately to the right of the search box on the toolbar (see image below).

daminion-searches

You can also add tags and keywords to your images using the Catalog Tags panel. These can be written to the image XMP metadata so they will be accessible not only within Daminion but also in other applications such as Lightroom and Bridge.

There are benefits to using Daminion for image management and filtering in preference to Lightroom. Daminion provides multiple ways to categorize your images including Categories, Collections, Events, Places, People and more. It also supports hierarchical tags, with no limitation on nesting levels. So you can configure hierarchical tags for categories, people, places, keywords, events and so on whereas in Lightroom you can create hierarchical keywords only. You can also create your own custom user defined tags in Daminion to categorize images by criteria that are meaningful to you. Daminion can write metadata directly into the RAW images rather than needing to do so to sidecar .xmp files, and it makes it easy for you to filter your image collection by writing complex searches using Boolean (AND/OR) operators.

daminion-boolean

Viewing your images

You can view your filtered images in one of a number of ways. You can sort them using a range of sort options including by shutter speed, file size, file name and so on. You can also view the images as thumbnails, using a compact view, details or filmstrip view.

daminion-compact

In Thumbnail view you can customize the information displayed above and below the image so it is easy to see the image properties that are meaningful to you. At any time you can view an image full screen by pressing Enter or click View.

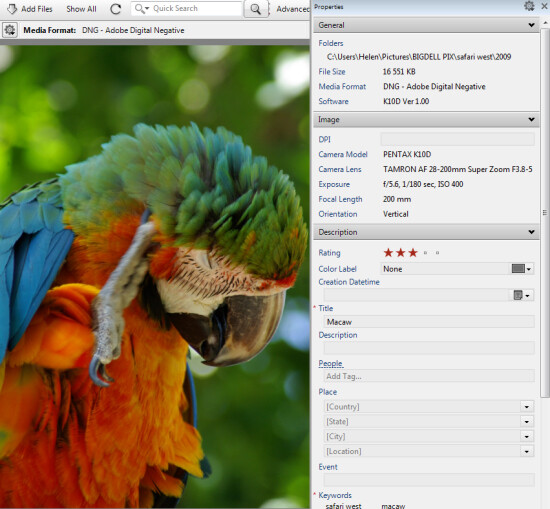
You can select any image and view and edit its properties using the Properties panel. While Daminion is not an editor you can use it to rotate your images.

daminion-properties

As you work through your images you can drag images you want to do something with into the Tray. The Tray stores these images until you are ready to work with them such as by sending them to an external editor or using the multiuser checkout feature. The checkout feature helps you manage multiple people working with the same catalog, it maintains an audit history and gives you the ability to undo changes if, for example, a newer version of an image is replaced by an older version.

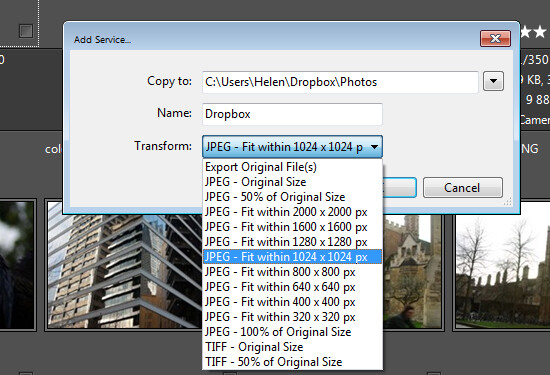
One handy feature of Daminion is the ability for you to publish images from Daminion direct to Dropbox so they are viewable on your iPad or other device. The Publish panel can be set up to convert and resize images including raw format images and then export them to a Dropbox folder on your computer. When this folder syncs to Dropbox the uploaded images can then be viewed on other devices.

daminion-publish

Is Daminion for you?

If you’re looking for a way to allow multi-user access to your image collection then Daminion is a great tool. It can be used along-side Lightroom for managing and organizing images which you then develop in Lightroom. The metadata changes made in either program can be easily viewed in the other program and the two work in tandem very well.

Do you also need some Lightroom organizational help? Try these:

  • Use Lightroom Collections to Improve your Workflow
  • 8 Important Things to know about Lightroom Collections
  • Why Lazy Photographers Should Use Lightroom Smart Collections
  • Organizing Images in Lightroom 5
  • Seven Pieces of Advice for New Lightroom Users

The post Large Library Management with Lightroom and Daminion [for Advanced LR Users] by Helen Bradley appeared first on Digital Photography School.


Digital Photography School

 
Comments Off on Large Library Management with Lightroom and Daminion [for Advanced LR Users]

Posted in Photography


Secular Conversion: Historic Chapel Turned Modern Library

22 Nov

[ By Steph in Architecture & Public & Institutional. ]

Historic Chapel Modern Library Renovation
A beautiful old chapel in the Italian town of Lonate Ceppino has been transformed into a modern library with a  perforated aluminum tower that adds to the building without compromising its historic character. Italian architects DAP studio restored the traditional architectural features of the Oratory of San Michele before converting it for a new use with the sleek white extension.

Historic Chapel Modern Library Renovation 2

Historic Chapel Modern Library Renovation 4

The new two-story volume stands off to one side of the original structure, connected via stairways. The top part tapers inward to allow for the preservation of the chapel’s overhang. The new volume contains bathrooms, archives and technical systems, while the bright open spaces of the church hold the books.

Historic Chapel Modern Library Renovation 5

Where one building is solid and opaque, the other is translucent, shimmering in the sunlight. The small volume connecting the chapel and the extension features a glazed roof to let in more sunlight without substantially altering the architecture of the historic structure.

Historic Chapel Modern Library Renovation 3

This library is hardly alone in making creative use of old churches, monasteries and temples. Check out the incredibly grand ‘Waanders In de Broeren’ 15th-century Dominican church-turned-library, and many other religious-to-secular conversions.

Share on Facebook


[ By Steph in Architecture & Public & Institutional. ]

[ WebUrbanist | Archives | Galleries | Privacy | TOS ]


WebUrbanist

 
Comments Off on Secular Conversion: Historic Chapel Turned Modern Library

Posted in Creativity


Light that Fire: A Guide to Finding Photo Inspiration at the Library

01 Aug

Dear Mr. Dewey,

Please point me in the direction of the photography books.

Thank you.

Love, A photographer in need of a little inspiration.

If dust is settling on your camera and your creative juices need some stirring, the library is a great place to explore photographers and books on photography that’ll light that photo bug inside you. It’s always in there… sometimes it just needs a a little push in the right direction.

Learn some super simple tips on finding the photo books in your library and what to do once you’ve found them.

If you’ve got yourself a free afternoon, strap on your sneakers and head to the library to peruse the photo books and get inspired!

Find Photo Inspiration at the Library

p.s. We’re looking to re-invent what/how/where we publish online, and we’re seeking one amazing Editorial & Community Lead to lead the charge.

GETTING STARTED

Find your local library.
before
This is a handy website to discover where to locate the library in your hood.

Walk into the library and breath in the musty and awesome smell that is special only to a public library.

Lots of people have been in this institution and many of them have come out of it knowing something they didn’t when they walked in. Or they went in, used the restroom, and left.

But not you! You are going in to be inspired by photography and all of the wonder that comes along with looking at a photograph in print.

What’s great about the library is that you have access to all kinds of photo catalogs that aren’t available online.

You are part of this storied piece of public learning now.

Go forth brave photographer. Inspiration is now shooting out of your fingertips.

DO A LITTLE DIGGING

before

Thanks to Melvil Dewey and his Dewey Decimal System there is a super simple way to find the photo books in most libraries.

When at the library head straight to the stacks labeled 770.

All nonfiction books have a 3 digit number in front of them that corresponds with their subject matter. The 700 section of the library is The Arts section. All photo books start in the 770 section of the library. Anything with the numbers 770-779 on the binding is a photography book.

If you happen to be in a library that uses the Library of Congress system, then you’ll find the arts in section N.

Once at the photo stacks it’s pretty darn fun to run your hand over the books and see a name or binding that strikes your fancy.

Pull some books off of the shelf and find a cozy place to peruse what you just picked out.

A GOOD PLACE TO START

before

If you like to have a little more direction when you are searching for books here are some awesome books to look for.

Names of Photographers to Look for at the Library

  • Wegee (aka Arthur Fellig)
    Scandal! Intrigue! Awesome black and white photographs from a man who beat the police to the scene of many a crime!
  • Lee Friedlander
    Magic street photographs, idiosyncratic landscape photos, and bizarrely awesome self-portraits.
  • Francesca Woodman
    Beautiful and sad stories told through images of the artist herself. If you love taking self-portraits, take a look at Ms. Woodman’s poignant images.
  • Since there are so many amazing photographers out there, here’s a starting list of 100 of the most influential photographers of all time.

 Books on Photography

  • The Photographer’s Eye by John Szarkowski
    A formative guide to the visual language of photography.
  • The Flame of Recognition by Edward Weston
    A fascinating glimpse into the life of a photographer who was constantly on the lookout.
  • The Education of a Photographer edited by Charles T. Traub, Steven Heller, and Adam B. Bell
    A great collection of essays about what it means to be a photographer now.

How-to Photo Books

  • Photography by Barbara London, John Upton, and Jim Stone
    This book guides you to be your own photo teacher!
  • The Art of Photography: An Approach to Personal Expression by Bruce Barnbaum
    Barnbaum explains photography in a way that won’t leave you saying “what?!!”
  • Image Transfer Workshop: Mixed Media Techniques for Successful Transfers  by Darlene Olivia McElroy and Sandra Duran Wilson
    Learn how to turn your photos into fun mixed media pieces.
  • Photojojo!: Insanely Great Photo Projects and DIY Ideas  by Amit Gupta and Kelly Jensen
    Lots of DIY ideas to help you inspire yourself and others with photo projects. From your favorite photo people: us!

Magazines Have Photos, Too!

Books aren’t the only sources for your photo research.

Magazines are full photos, and the amazing thing about the library is that they’re subscribed to basically every magazine ever.

Exploring magazines will introduce you to photography besides the kind you’ll find in the Arts section of the book stacks. You’ll see nature photography, fashion photography, interior design, and portraiture.

Magazines are also a great place to discover emerging photographers. PDN Magazine in particular does a fantastic job of featuring up and coming photogs.

Some more awesome magazines to check out: National Geographic, PDN, Vogue, American Photo, Kinfolk Magazine, Popular Photography, B&W, Wallpaper, Time, Vanity Fair.

TAKE NOTE

beforeBring a notebook, sketchbook or your phone to the library with you.

While you are joyfully perusing the books you’ve picked off the shelves take notes on photographers, photo tips, or quotes.

Write down words that come to you while looking at photographs. You don’t have to get crazy or put pressure on yourself… free associate as you flip pages. This is all for the joy of photography.

If a photo really grabs your attention write down what you are feeling as you look at the photo. Why did this one photo jump off of the page and into your heart?

Remember how you felt when you looked at the specific image while you are out taking your own beautiful photographs.

When you find you are in need of a little inspirational kick in the pants you can look through your notes and see what inspired you.

YOU CAN TAKE IT WITH YOU

Start  an inspiration archive by designating a folder or binder for all things photography.

We feel it important to note that this is a compilation of things you love and is only for personal reference. We don’t believe in stealing artwork or infringing on copyrights.

Once you’ve found something that strikes your fancy make some photocopies of images that you really love and put them in your binder. You can categorize them into sections, like street photography, portraiture, or landscape. Think of it as a Pinterest board, but for your eyes only.

You can also put the notes you have taken in the binder as well.

Organize the images by photographer’s name, subject matter, however you like to look at later and get inspired whenever you are feeling a creative lull.

Related posts:

  1. World Photography Day — Ideas & Inspiration to Celebrate All Things Photo Do you remember the first time you held a camera?…
  2. DIY: Make Crazy Detailed Light Paintings with Photo Light Stencils Extra photos for bloggers: 1, 2, 3 Ever tried painting…
  3. A Healthy Dose of Photo Inspiration — George Lange’s 2006 Photo Flipbook Every so often, we run across photos that make us…


Photojojo

 
Comments Off on Light that Fire: A Guide to Finding Photo Inspiration at the Library

Posted in Equipment


Little & Local: Staircase Cinema & Sidewalk Library Projects

25 Jun

[ By WebUrbanist in Art & Installation & Sound. ]

small local installation projects

Public art used to be synonymous with huge and impersonal and location-agnostic sculptures made of metal and marble. Countering that classic Modernist trend are installations like this pair: a set small, site-specific and community-oriented design-build projects located in Auckland, New Zealand, and New York City, New York, respectively.

small sidewalk stairway cinema

First, from Oh No Sumo (images by Simon Devitt), the Stairway Cinema, a sheltered spot for watching movies on steps rising right off the sidewalk and open to pedestrians passing by. Public participants are invited to curate the collection of films shown on the screen.

small movie theater stall

About its creators and inspiration: “Our ongoing goal is to experiment with architecture and the way it can engage with the public in unique and exciting ways. This project takes inspiration from the site and its inhabitants. The intersection of Symonds Street and Mount Street is a place of ‘hard waiting’. Bus stops and laundromats create a hard-scape of poor space for social interaction.”

Next Page:
Little Local Staircase Cinema Sidewalk Library Projects

Share on Facebook


[ By WebUrbanist in Art & Installation & Sound. ]

[ WebUrbanist | Archives | Galleries | Privacy | TOS ]


WebUrbanist

 
Comments Off on Little & Local: Staircase Cinema & Sidewalk Library Projects

Posted in Creativity


10 Shortcuts of the Commonly Used Features in the Library Module of Lightroom 4

02 May

Introduction

This tutorial has been transcribed from the SLR Lounge Lightroom 4 Workshop on DVD, a 14 hour Lightroom 4 A – Z guide with over 130 tutorials for mastering Lightroom from start to finish. The Digital download can be purchased from SLR Lounge while the physical copy is available through Amazon Prime.

Overview

This quick article will go over 10 shortcuts of the commonly used features in the Library Module of Lightroom 4. Knowing these simple shortcuts can greatly speed up your workflow!

(Note:  Apple users, just pretend that “CTRL” is “CMD”.  😉

1. Lightroom 4 Module Shortcuts

There are a total of 7 Modules in Lightroom 4 and each corresponds with numbers 1-7. To switch to a Module, hit “Ctrl + Alt + 1-7.”

“1” is the Library Module, “2” is the Develop Module, “3” is the Map Module, and so forth. For example, if you want to go to the Develop Module, hit “Ctrl + Alt + 2.”

01_lightroom-module-shortcuts

Another quick way to get to the Develop Module is by simply hitting “D.” You can also get to the Library Module through the different Library View Modes, which brings us to our next shortcut.

2. Library View Modes

There are 4 Library View Modes in Lightroom 4: Grid View Mode, Loupe View Mode, Compare View Mode, and Survey View Mode. To access the Grid View, hit “G.” To get to the Loupe View, hit “E.” Hit “C” for Compare View and “N” for Survey View. If you are in a module other than the Library Module, hitting any 4 of these Library View Mode shortcuts will bring you back to the Library Module.

3. Import/Export Shortcuts

To import images into Lightroom, hit “Ctrl + Shift + I.” This will bring up the Import Dialogue Box. Hit “Ctrl + Shift + E” to bring up the Export Dialogue Box to export your images out of Lightroom.

4. Photoshop Shortcut

Sometimes we need to finish editing our images in Photoshop. We can take our images from Lightroom into Photoshop by selecting the image and then hitting “Ctrl + E.” Once you are done with your image in Photoshop, hit “Ctrl + W.” This will bring you back into Lightroom, where you will see both your Photoshop copy and Lightroom copy of your image in your Lightroom catalog.

5. Left/Right Panels Shortcuts

The boxes on the right and left sides of Lightroom 4 are referred to as Panels. Like the Modules, the Panels also correspond to a number. The Left Panels correspond with the numbers “0-4” and include the Navigator Panel, the Catalog Panel, the Folders Panel, the Collections Panel, and the Publish Services Panel.

To expand or collapse a Left Panel, hit “Ctrl + Shift + 0-4.” The Navigator Panel is “0,” the Catalog Panel is “1,” the Folders Panel is “2,” and so on. Below, you can see that only the Navigator Panel is expanded and the remaining Panels are collapsed.
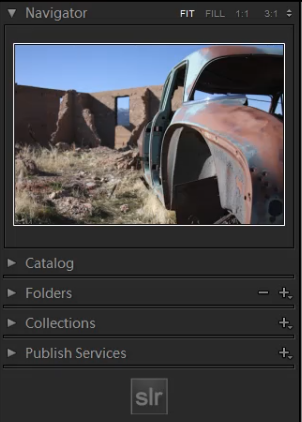
02_lightroom-left-side-panels-shortcuts

The Right Panels correspond with the numbers “0-5.” To expand or collapse a Right Panel, hit “Ctrl + 0-5.” The Right Panel includes the Histogram Panel, the Quick Develop Panel, the Keywording Panel, the Keyword List Panel, the Metadata Panel, and the Comments Panel. The Histogram Panel is “0,” the Quick Develop Panel is “1,” the Keywording Panel is “2,” and so forth. As you can see below, none of the Panels have been expanded.
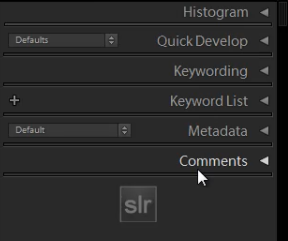
03_lightroom-right-side-panels-shortcuts

6. Target Collection Shortcuts

Since we just discussed the Panels shortcuts, we will go over a Target Collection, which can be found in the Collections Panel (“Ctrl + Shift + 3”) in the Left Panel. A Target Collection is a useful tool because it helps us organize our photos quickly by using a hotkey. You can set a previous collection as the Target Collection, or you can create a new collection and set it  as the Target Collection.

To create a new collection, click on the “+” sign next to Collections in the Left Panel. Select “Create Collection.”
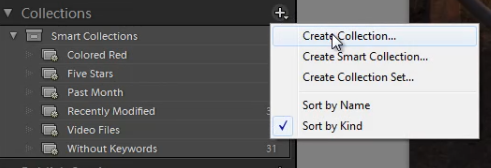
04_create-new-collection

Once you have hit “Create Collection,” the Create Collection Dialogue Box will appear. Once you have named your collection, hit “Create.”
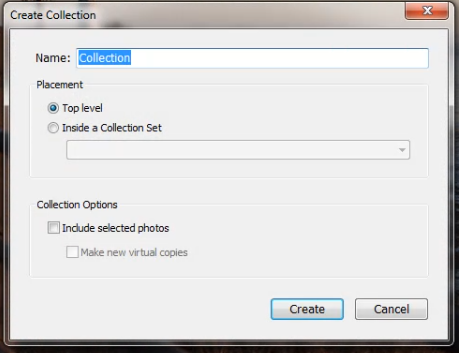
05_create-collection-dialogue-box

Right-click on a collection and hit “Set as Target Collection” to set the collection as your Target Collection.
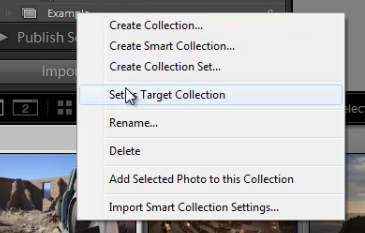
06_set-as-target-collection

Once you have selected a collection to be your Target Collection, a “+” sign will appear next to the collection you have selected to remind you which collection is your “target” for the Collection hotkey. Now, simply hit “B” to add any image to your Target Collection!

For example, you might have created a collection for your portfolio images. Set that collection as your Target Collection, and then whenever you are looking through your latest photo shoot and you see one that is portfolio worthy, just hit “B” to add it to your portfolio!

7. Rotate Left/Right Shortcuts

To rotate multiple images at once, go to the Grid View (“G”). Once you are in the Grid View, select your images by holding down “Ctrl” while clicking on your images. To rotate your images to the left, hit “Ctrl + [.” To rotate your images to the right, hit “Ctrl + ].” You can also rotate individual images by using the same shortcuts.

8. Flag Shortcuts

Some people use flags as their culling system. For example, selecting an image as a pick means that we will deliver the image. Rejecting an image means that we will not deliver the image. Simply hit “P” to flag an image as a “pick.” If you want to remove the flag, hit “U.” To reject an image, hit “X.”

Or, to simply increase or decrease the flag status of an image, just hit Ctrl and either the up or down arrow.  This is by far the fastest way to go go from image to image and flag keepers (with just one hand!) by using the left and right arrows to navigate and the Ctrl-up/down key combination to pick or reject your images…

9. Star Rating Shortcuts

The following are the shortcuts for the Star Rating in Lightroom 4.

  • “1” = 1 star
  • “2” = 2 stars
  • “3” = 3 stars
  • “4” = 4 stars
  • “5” = 5 stars

Simply select an image and hit “1-5” to give the image a star rating. To reset Star Ratings on your images, hit “0.”

10. Color Label Shortcuts

The Color Labels in Lightroom 4 correspond with the numbers six thru nine. Red is “6,” Yellow is “7,” Green is “8” and Blue is “9.” There is also a Purple Color Label but to label an image Purple, you need to go into the Edit Menu, as shown below.
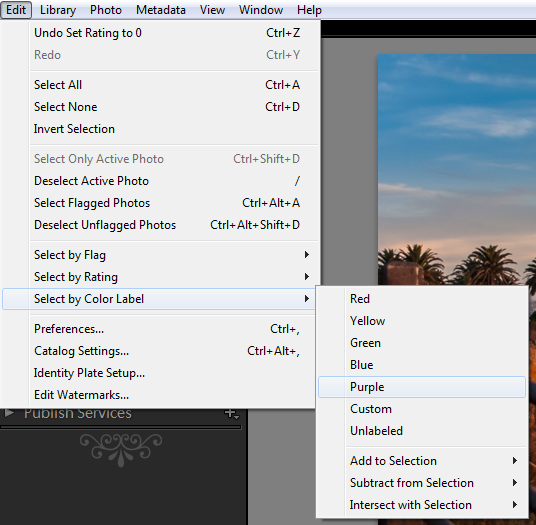
07_lightroom-purple-color-label

If you want to remove a Color Label, hit the corresponding number again. So for example, if your image is already color labeled Green, hit “8” again to remove this Green Color Label.

Learn More with the Lightroom 4 Workshop Collection!

This was a sample tutorial from the Lightroom 4 A to Z DVD which is one of the DVDs in the Lightroom 4 Workshop Collection. A collection of nearly 30 hours of video education teaching everything from Lightroom basics to advanced raw processing techniques.

The LR4 Workshop Collection also includes the critically acclaimed Lightroom 4 Preset System which is designed to enable users to achieve virtually any look and effect within 3-5 simple clicks. From basic color correction, vintage fades, black & white effects, tilt-shift effects, faux HDR, retouching, detail enhancing, and so much more. Click the links above to learn more.

Post originally from: Digital Photography Tips.

Check out our more Photography Tips at Photography Tips for Beginners, Portrait Photography Tips and Wedding Photography Tips.

10 Shortcuts of the Commonly Used Features in the Library Module of Lightroom 4


Digital Photography School
 
Comments Off on 10 Shortcuts of the Commonly Used Features in the Library Module of Lightroom 4

Posted in Photography