RSS
 

Posts Tagged ‘High’

The High Life: 12 Incredible Residential Tree House Designs

25 Feb

[ By Steph in Architecture & Houses & Residential. ]

residential treehouses

We’ve seen tree houses that function as oversized sculptures, play structures for kids, sky-high tea houses and elevated retreats for work or meditation, but how many tree house designs actually fulfill dreams of living in the forest canopy full-time? These 12 residential tree houses range from traditional huts built over a hundred feet above the forest floor to a stunning ultramodern cylindrical glass house that envelops an entire tree.

Amazing Cylindrical Glass Treehouse

cylindrical glass treehouse 1

cylyndrical glass treehouse 2

cylindrical glass treehouse 4

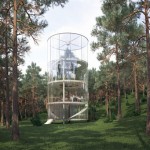
This ultramodern, all-glass cylindrical house isn’t just in the trees, it contains one. ‘Tree in the House’ by Masov Aibek is a four-story residence in the woods of Almaty City, Kazakhstan with a spiraling staircase leading to each completely transparent level. A few plasterboard walls provide privacy for the bathroom and sleeping areas. The house will be available for rent, and though it may seem like it’s only suitable for exhibitionists, its location deep in the forest makes privacy less of a concern.

Traditional Residential Treehouses of Asia

traditional treehouse

korowai treehouse

traditional treehouses 2

Papua New Guinea’s Korowai Tribe is just one example of people who have traditionally built their homes in the canopies of trees, some as high as 115 feet off the ground. The houses are typically built in a single sturdy Banyan tree, with poles added for extra support. Each house accommodates as many as a dozen people. Elevated houses can also be found in flood-prone areas of India, Cambodia and other Asian nations.

Finca Bellavista Treehouse Community, Costa Rica

finca bellavista treehouses 1

finca bellavista treehouse 2

finca vellavista treehouse 3

A couple went to Costa Rica in search of a small plot of land and ended up saving 600 acres of rainforest from the chopping block. Uncertain at first what to do with all that acreage, they began to envision a network of tree houses that soon became ‘Finca Bellavista,’ a sustainable treehouse community with individual residences connected by zippiness and suspension bridges. The self-sustaining complex includes a dining hall, open-air lounge, campfire, bath house and ‘wedding garden.’

4Treehouse by Lukas Kos

4treehouse

4treehouse 2

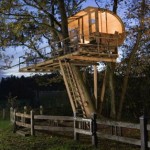
Looking a bit like a Japanese lantern when it’s illuminated at night, the 4Treehouse by Toronto designer Lukasz Kos is a modern take on the classic wooden tree house with a facade of slats that provide shade and privacy. A semi-detached staircase on casters provides a stable, steady entrance to the home no matter how much the structure itself may be rocking in the wind.

Next Page – Click Below to Read More:
The High Life 12 Incredible Residential Tree House Designs

Share on Facebook


[ By Steph in Architecture & Houses & Residential. ]

[ WebUrbanist | Archives | Galleries | Privacy | TOS ]


WebUrbanist

 
Comments Off on The High Life: 12 Incredible Residential Tree House Designs

Posted in Creativity


Olympus announces OM-D E-M5 II with 40MP high resolution mode

05 Feb

Olympus has unveiled the OM-D E-M5 II. Picking up where its successor left off, the E-M5 II continues to offer weather sealing and 5-axis IS while adding a redesigned 16MP Four Thirds sensor and 5-axis image stabilization. The E-M5 II also boasts a 40MP high resolution shot mode, achieved by shifting the sensor in half-pixel steps and capturing eight images over a period of one second. Read more

Articles: Digital Photography Review (dpreview.com)

 
Comments Off on Olympus announces OM-D E-M5 II with 40MP high resolution mode

Posted in Uncategorized


Venus Optics 60mm macro 2x lens promises high magnification on a budget

15 Jan

Anhui ChangGeng Optical Technology Company Limited, a new Chinese lens manufacturer, has introduced a 60mm lens under the Venus Optics brand name that it says can deliver 2x magnification macro photography. The f/2.8 manual focus lens is designed to cover both full frame and APS-C sensors for macro work, but will introduce vignetting when used at normal focus distances with the larger format. Read more

Articles: Digital Photography Review (dpreview.com)

 
Comments Off on Venus Optics 60mm macro 2x lens promises high magnification on a budget

Posted in Uncategorized


7 Ways to Handle High Contrast Scenes

02 Dec

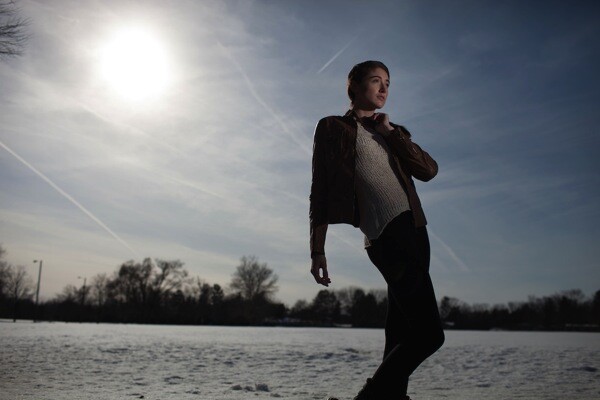
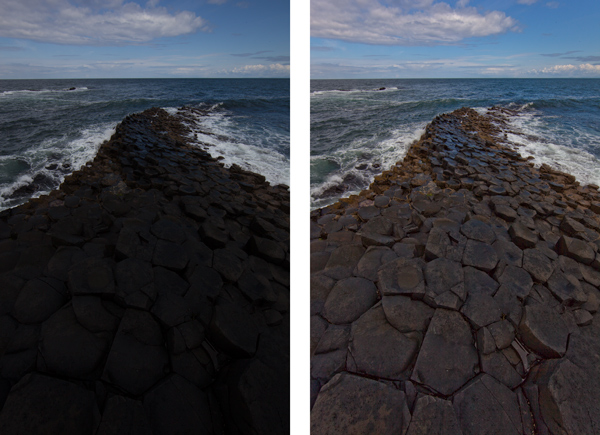
Perhaps the greatest challenge you will face in outdoor photography is the high contrast created by the sun and the bright sky versus a darker foreground. That is one of the reason photographers try very hard to shoot at dawn or sunset. Otherwise, the sky is virtually always so much brighter than anything on the ground that it is hard for your camera to deal with the contrast. Either your camera exposes the sky correctly, which makes everything on the ground look black, or the camera exposes the foreground correctly resulting in a blown out (or pure white) sky. If you try to expose in the middle, you will have problems with both highlights and shadows.

The challenge is constant and great, but there are some things you can do to create great pictures no matter what the light. This article will walk you through some ideas for doing that.

1. Fix it in Post-Production
GiantsCauseway

The first thing you can do is try to fix the problem in post-processing. Both Lightroom and Adobe Camera Raw (used in Photoshop and Photoshop Elements) have sliders that can help bring your sky back or add detail to a dark foreground. They won’t bring back a truly blown out sky or pitch black foreground, but you might be surprised at what they can do.

For an overly bright sky, try pulling the Highlights slider down (in other words, pull it to the left). That will usually add detail. If you have blue portions of your sky, another trick is to target the blue portion and make that darker, while keeping the clouds white.  To do that, go to the HSL/Color/B&W panel in Lightroom, or the HSL/Greyscale tab in ACR, and find the Blue slider.  Click on the Luminance tab, and pull the Blue slider down (to the left). That will preserve good highlight tones in the clouds but darken the blue tones to make the sky look much better.

If your foreground is too dark, you can brighten it up using the Shadows slider in the Basic tab of Lightroom or ACR. Pull that slider up (to the right). That will brighten up the darker tones.  You may find, however, that lightening the shadows in this fashion makes the foreground look too flat or washed out. There is a simple cure for that though. Find the Blacks slider, which is just below the Shadows slider, and pull the Blacks slider down (to the left) a little bit. It may seem counter-intuitive to darken the Blacks since you just lightened the Shadows, but this adds contrast back to your foreground. So the foregound will be lighter due to the increase you made to the Shadows, but will still have contrast because of the decrease you made to the Blacks.

2. Consider Converting to Black and White

Horse

The problem you’ll encounter most of the time when you convert your pictures to black and white is a lack of contrast. Very often, photographers convert their pictures to black-and-white only to find that they look dull and flat. You want tones ranging from pure white all the way to pure black. The high contrast you are combating can actually be an asset in black and white photography.

One problem with shooting with a bright sky or at midday, of course, is usually the high contrast. In addition, people are just plain used to seeing the middle of the day, so when they see a picture taken at midday viewers can find it uninteresting. Converting to black and white can solve both of these problems. As mentioned above, the high contrast can be an asset in black and white. Further, black and white is not how people are used to seeing the world, so the photo may look more interesting to them. Of course, this is not a cure-all, and a blown out sky is still a blown out sky, but converting to black and white can occasionally save a really high contrast picture. So, try converting toblack and white if your picture is overly contrasty.

3. Use Fill Flash

People often think about using a flash only in low-light situations. But perhaps a better use for flash is in very bright situations like those we are talking about here. It doesn’t seem to make sense at first, but what you are doing is letting the flash fill in some of the harsh shadows and thereby deal with your high contrast problem.

If you use fill flash, set your camera’s exposure settings so that the sky is properly exposed. You might take a shot or two without the flash to make sure you have it set properly. Then add the flash to brighten up the foreground and keep it from being black. Dial back on the power of the flash unit or the flash exposure compensation to make it look more natural. That should result in a properly lit subject with a sky or background that looks good as well.

4. Use a Graduated Neutral Density Filter
MarinCo

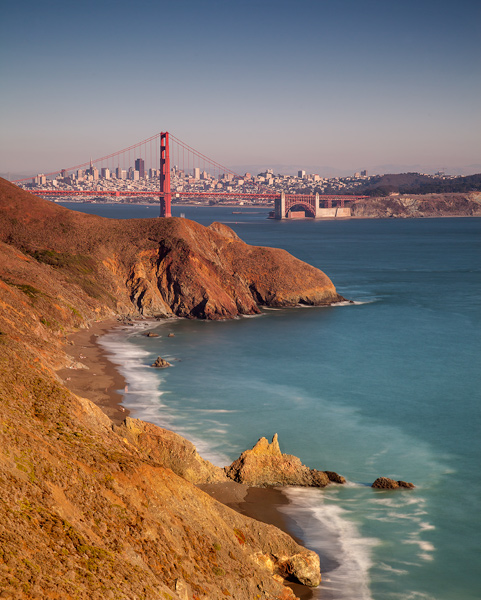
The scenes we are talking about in this article stem from an overly bright background and a dark foreground. The previous tip addressed a way for you to brighten the foreground. Now let’s reverse that and talk about a way to darken the sky so that it is roughly the same exposure as your foreground.

To do that to, you will want to buy a graduated neutral density filter. These are square filters that fit in holders attached to the front of your lens. The top portion of the filter is dark, and it fades to clear glass at the bottom. That way it darkens the sky while having no effect on the foreground. Use one to darken the sky and keep the brightness values within the dynamic range of your camera.

5. Blend Your Exposures
GrandCanyonAll

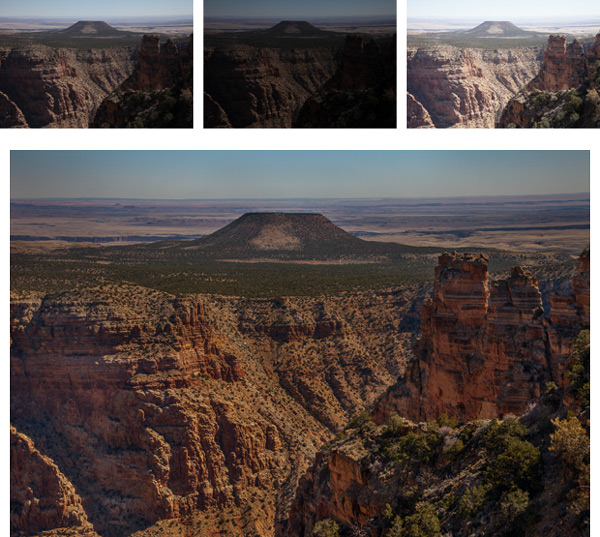
Another way to deal with contrast that goes beyond the dynamic range of your camera is to bracket your pictures and blend them later. Most cameras have a function in the menu that allows you to set the amount you would like to overexpose or underexpose your pictures. That way when you press the shutter button it will take three pictures: One at normal exposure, one underexposed, and one overexposed. Some cameras will actually allow you to take five or even seven photos.

You can blend these three pictures later in Photoshop by using parts of each exposure for your final photo. For example, you may want to use the sky from the darker, underexposed photo. You may want to use the foreground from the brighter, overexposed photo. There may be elements of each that you want to take from the normally exposed picture. By blending them all together in Photoshop, you will have a picture that is properly exposed across the board.

To accomplish the blending, here’s a quick primer on the process:

  1. Open all your files as layers in the same picture. You can accomplish this in Lightroom by selecting your photos, and then going to Open as Layers in Photoshop (either Photo > Edit In > Open as Layers in Photoshop or right-click and select Open as Layers in Photoshop).  If you don’t have Lightroom, there is a similar function using Adobe Bridge. In addition, in Photoshop you can select photos and open them as layers by choosing File > Scripts > Load Files into Stack, and then using the resulting dialogue box to select the photos you want.
  2. From there, add a layer mask to your top layer (Layer > Layer Mask > Reveal All). The white layer mask you just created does not change anything, and all of this top layer will still show up in your picture. But you have created a mechanism to change that.
  3. To have Photoshop apply portions of the layer below, select your brush tool and set the color to black. Then just brush in where you want the layer below to appear. Remember, anywhere the mask shows white the top layer will show; anywhere the mask shows black it will reveal the layer underneath.
  4. If you want to combine a little of each layer, reduce the opacity of your brush to a lower percentage. Often this process works best by  setting the opacity very low (under 10%) and brushing in the layer below where you want it gradually with a large brush.
  5. When you are done with that process and the photo looks the way you want, merge these layers (Layer > Merge Down). Then repeat the process for the layer below, revealing whatever portions of that layer you want in your final picture.

6. Blend into an HDR File

Thus far, I’ve avoided the option of using High Dynamic Range (HDR) software to deal with the dynamic range problem you face. Of course, you can bracket your photos (as set forth above) and process them using Photomatic Pro, HDR Efex Pro, Photoshop, or other HDR software. That is a topic in and of itself.

For purposes of this article, consider using an HDR file as part of the blending process discussed above. In other words, first bracket your exposures. When you are in front of your computer, create an HDR file using your preferred method. Now, bring your original three exposures and the HDR image into Photoshop using the method outlined above. When you bring them all in, you should have four layers showing.

Then just do the blending process described above. Put the file you think looks the best on top. Next, follow the process set forth above for blending in each of the other layers. If it turns out you don’t want to use one of the layers you can just delete or hide it. Using this method, you should have complete control over the exposure levels in your picture. In addition, this process will provide you the benefit of HDR software without that HDR-look that many photographers try to avoid.

7. Work with it

Tree

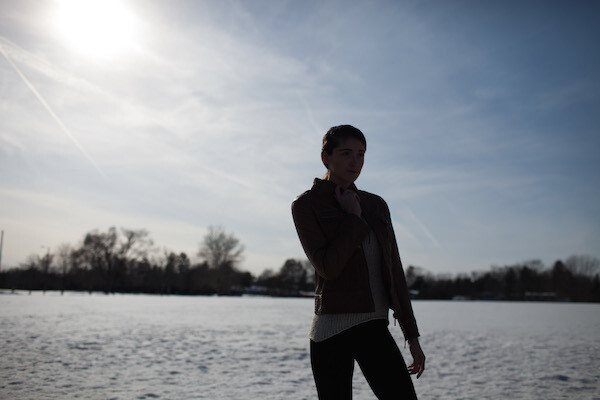
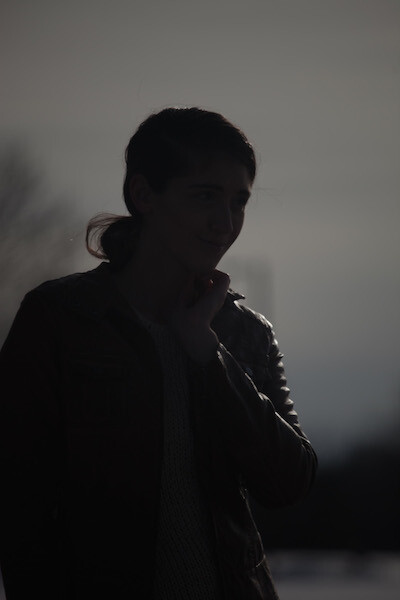
This might sound like giving up, but you might consider using the high contrast for effect. For example, you can use the brightness by adding sun’s rays into the picture. You can use the darkness by creating a sillouette. Think about effects like these at the time you are shooting. Sometimes you can turn a problem into an interesting feature of your photograph.

Or, if there is no way to use the high contrast as an effect, you can sometimes minimize it by shooting away from the sun. Not having the sun in your picture will keep the sky from being too bright.  If you are lucky, the sun will lighten up the foreground enough to keep it within the dynamic range of your camera without creating any harsh shadows.

Your Greatest Challenge

Dealing with this problem of dynamic range is perhaps the greatest challenge of the digital photographer. Unless you have thousands of dollars to buy a medium format camera and get the increased dynamic range that the larger sensor size offers, you will need to take steps such as those above when you are shooting outside. Use these tips to overcome this obstacle and make your photos stand out.

The post 7 Ways to Handle High Contrast Scenes by Jim Hamel appeared first on Digital Photography School.


Digital Photography School

 
Comments Off on 7 Ways to Handle High Contrast Scenes

Posted in Photography


High pixel-density camera displays and wide-gamut Cinema 4K panel technology on the way

04 Nov

Reports from Japan’s Display Innovation 2014 exhibition highlight a number of advancements and prototypes in camera LCDs. Included are a high-pixel-density 3.2″ display using WhiteMagic technology, a high-resolution touch screen with in-cell touch sensors and a 31″ cinema 4K wide-gamut display with 99.5% AdobeRGB coverage from LG. Learn more

Articles: Digital Photography Review (dpreview.com)

 
Comments Off on High pixel-density camera displays and wide-gamut Cinema 4K panel technology on the way

Posted in Uncategorized


5 Easy Steps to Exposure Blending for High Contrast Landscapes

27 Oct
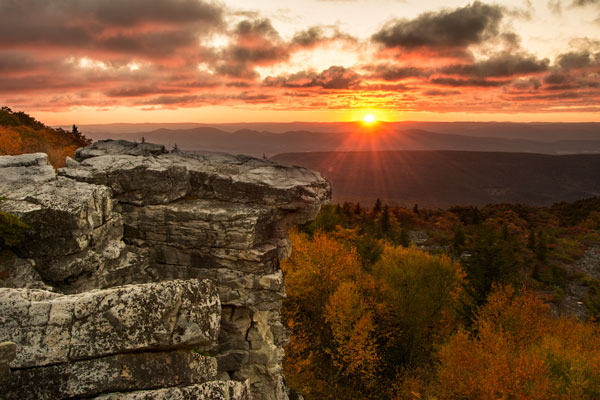
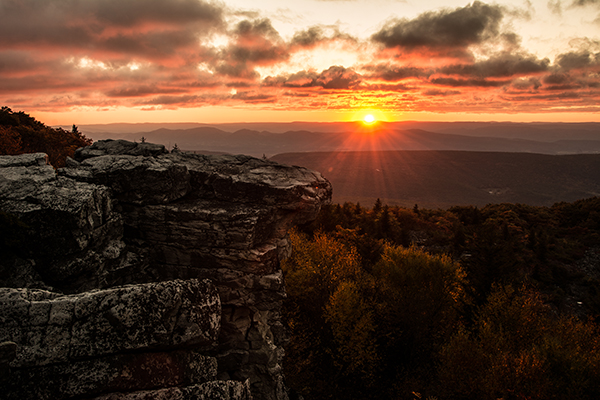
Final Image  Bear Rock, Dolly Sod Wilderness Area, West Virginia

Final Image: Bear Rock, Dolly Sod Wilderness Area, West Virginia. Sunrise and Sunsets can be extremely contrasting and very challenging to capture the wide exposure range.

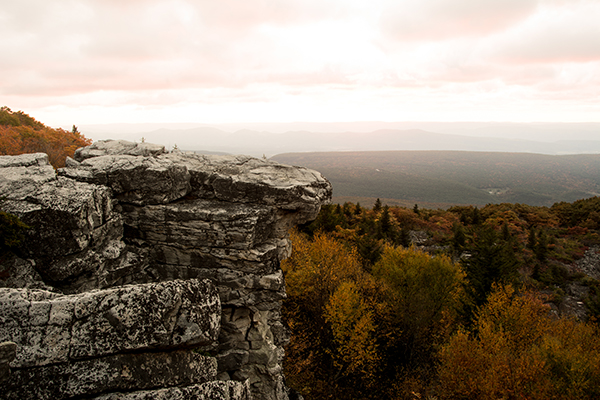
Here’s a problem I am sure you have encountered, instances where you try to photograph an image that has a greater range of light and dark than your camera can accurately capture. In the example above, when we set our exposure to expose the sky correctly, the foreground objects are severely under-exposed. Likewise, if we set our exposure to correctly expose the foreground, the sky is blown out and loses almost all detail. One solution to this dilemma might be to use HDR software to combine several bracketed exposures into one image. However, this method can be overwhelming and time-consuming to do correctly for a pleasing result. Another solution to this problem could be to use graduated neutral density filters. Unfortunately, a good set of filters can be quite expensive and a cheap set can harm the quality of your image.

A simple solution to this problem scenario may be as easy as taking two exposures, one correctly exposed for the dark areas (in this case the foreground) and the other correctly exposed for the lighter area (in this case the sky). Place your camera on a tripod so that both images will be composed exactly the same.

image correctly exposed for the sky 1/10 of a second @ f/10. ISO 100

Image exposed for the sky: 1/10th of a second @ f/10, ISO 100

Image exposed for the foreground: 1 second @ f/10, ISO 100

Image exposed for the foreground: 1 second @ f/10, ISO 100

Now, let’s look at a simple five step exposure blending process, performed in Photoshop, to resolve this contrast issue.

Step 1: Open your images

Open the two exposures in Photoshop as layers. This can be simply done with the following script. In Photoshop, select: File/Scripts/Load files into stacks (if you use Lightroom just select both thumbnails, right click and choose “Edit in>Open as Layers in PS). Then select your two exposure files. Label the layers for identification. (In this case we label one layer “Sky” and the other “Foreground”). Drag the Sky to the top layer if not already in that position.

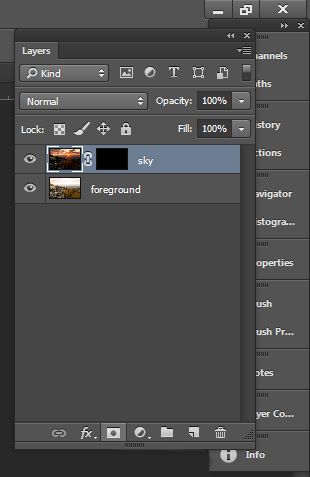
Step 2: Add a layer mask

Add layer mask filled with black to top layer.

Add layer mask filled with black to the top layer.

Add a layer mask, as shown below, to the highlighted Sky layer. While holding down the ALT (opt) key, select the Add layer mask button located at the bottom of the layer palette. This will add a layer mask to the Sky layer and automatically fill it with black. The black-filled layer will mask out all of the Sky layer and reveal all of the Foreground layer.

Step 3: Paint over sky

Click on the black layer mask and select the paintbrush tool. Set your paintbrush to paint with white, and set the size of your brush as needed. Set the hardness of your brush to a low number to give it a soft edge while you paint. Paint over the sky area of the image, which will reveal the Sky layer. By adjusting the opacity, size and hardness of the brush as you paint, blend the two exposures together.

Paint with white on your layer mask to reveal the sky in the top image. use different opacities and hardness to make the blending look natural.

Paint with white on your layer mask to reveal the sky in the top image. Use different opacities and brush hardness to make the blending look natural. This is what the mask might look like.

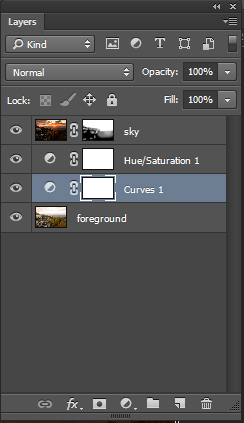
Step 4: Add finishing touches

Add adjustment layers (see below) as needed to adjust colors and contrast of the layers to make the image look natural.

Final layer palette

Final layer palette

Step 5: Save your file

Save your file as a Photoshop document (.PSD). This will preserve your image with layers which you can return to if you need to make further adjustments to improve the image.  You can now can flatten the layers (Layer/ Flatten Image) and Save As a single layer file such as a JPG.

This image was created from three files using Exposure blending. Exposure #1 was exposed for the light green area above the falls and exposure #2 was exposed for the shadow area below the falls. The light was hitting the rock on the left  very hard so a third exposure was need just for that rock.

This image was created from three files using exposure blending. Exposure #1 was exposed for the light green area above the falls and exposure #2 was for the shadow area below the falls. The light was hitting the rock on the left very hard so exposure #3 was needed just for just that rock.

So next time you are faced with an extremely contrasting scene, try this easy exposure blending process to extend the exposure range of your image. Do you have any exposure blending tricks that you use? Post samples of your images.

The post 5 Easy Steps to Exposure Blending for High Contrast Landscapes by Bruce Wunderlich appeared first on Digital Photography School.


Digital Photography School

 
Comments Off on 5 Easy Steps to Exposure Blending for High Contrast Landscapes

Posted in Photography


High Flyer? DJI Phantom 2 Vision+ Drone Review

14 Oct

The DJI Phantom 2 Vision+ is the company’s newest flagship consumer drone, outfitted with a 3-axis gimbal, Adobe DNG RAW capture in addition to HD video recording, and operated by the DJI Vision smartphone application. It’s capable of producing 14MP JPEGs and Raw images, and could be an ideal tool for a real estate photographer or independent filmmaker looking for b-roll. Does it rise to the occasion? Read our review

Articles: Digital Photography Review (dpreview.com)

 
Comments Off on High Flyer? DJI Phantom 2 Vision+ Drone Review

Posted in Uncategorized


High Speed Sync Versus a Neutral Density Filter to Overcome Bright Sunlight in Portraits

11 Sep

ND3

For several years now I have used high speed sync (HSS) in order to light portraits in full sunlight at a wide aperture. If you’re unfamiliar with HSS, it allows you to shoot at shutter speeds that are higher than the native sync speed of your camera (usually 1/200 or 1/250 of a second, read your camera and flash manual to find yours) while still using speedlights. The reason this ability is so enticing is that you can shoot flash-lit images at wide open apertures in full sunlight, allowing for a shallow depth of field. Normally if you were using a flash, your maximum shutter speed would be at 1/200 or slower, meaning that you would need to close your aperture down in order to get a proper exposure in the sun.

ApertureOnly

Raw image shot at f/29

How HSS works is that the flash will begin pulsing light, just before the shutter opens, since the exposure is so short. The problem with this is that much of the output of the light is lost in the pulsing process, meaning that you need more flash units to achieve a decent output. For example, when I am shooting at 1/8000th of a second, I need to combine four flashes, on one stand, in order to light a subject that is about five feet away. And that is without any modifiers, like an umbrella or soft box. The other issue with HSS is that not just any flash and trigger system will do the trick. You need to have gear that will communicate information from the camera to the flash.

A couple systems that can do that are the PocketWizard Flex TT5 and Mini TT1, or the RadioPopper PX system. Since most photographers don’t already own one of these triggers systems, this means starting from scratch, which isn’t cheap. I personally opted for the RadioPopper system, since the PocketWizard Flex system for Canon was super glitchy. The RadioPopper system wasn’t perfect either. Just the amount of batteries alone, for four Canon Speedlites with triggers, including a ST-E2 transmitter for the camera, required 27 batteries. Even though they were mostly all rechargeable (the ST-E2 required the hard to find 2CR5 battery), imagine trying to troubleshoot a misfire. Did the batteries need changed in one of the transceivers or was the speedlite misaligned, obscuring the sensor? Or imagine that one of the speedlites’ batteries may be slightly more drained than another, causing only three of four lights to fire. This made the overall exposure fluctuate with every frame.

HSS1

Raw image unlit

HSS2

Raw image, 1/8000 @ f/2.8

I recently decided to compare HSS against using a variable neutral density (ND) filter. ND filters screw on to your lens and cut down the light that hits the sensor, thus allowing for a wider aperture in bright light. This allowed my shutter speed to stay at or below the sync speed cutoff, allowing the full strength of the Speedlite to light my subject. This meant that I wouldn’t need to transmit ETTL information (sell the RadioPoppers) and it meant that I would need fewer Speedlites (less batteries).

After setting my ISO as low as it would go (50), my shutter speed as high as was allowed (1/200th on the Canon 5D MarkII), and my Speedlites at their full output, I dialled down the variable ND until the ambient light perfectly balanced with the light from the flash.

ND1

Raw image unlit

ND2

Raw image, 1/200 @ f/4

Some people have pointed out that there could be the issue of a color cast with certain brands of ND filters. I have not experienced any issues with the ProMaster brand. However, it’s important to keep in mind that if you are shooting directly in to the sun, there will likely be glare in your image, causing a possible color cast or the image to appear washed out.

Note that this experiment was done using Canon 430EX Speedlites with RadioPopper PX triggers. I’ve since sold them all, opting for the cheaper, sturdier and more powerful LumoPro LP180 with PocketWizard PlusX triggers. Now with one bare bulb flash, and a variable ND filter, I can effectively cut the ambient light while fully lighting a subject at f/1.4 in full sunlight.

The post High Speed Sync Versus a Neutral Density Filter to Overcome Bright Sunlight in Portraits by Nick Fancher appeared first on Digital Photography School.


Digital Photography School

 
Comments Off on High Speed Sync Versus a Neutral Density Filter to Overcome Bright Sunlight in Portraits

Posted in Photography


Frozen in Motion: 24 Stunning High Speed Photographs

14 Aug

[ By Steph in Art & Photography & Video. ]

High Speed Reugels 1
Spectacular forms that come together and dissipate far too quickly for human eyes to perceive are captured permanently using high-speed photography techniques. The elusive and temporary shapes created when liquid is thrown into the air or pellets are shot at strawberries become momentarily sculptural.

Floating Sculptures by Floto + Warner
High Speed Floating Sculptures 1

High Speed Floating Sculptures 2

High Speed Floating Sculptures 3

Ephemeral sculptural forms that shift and change by the nanosecond are captured against stark landscapes in particular chaotic arrangements that will never be seen again. The final theatrical photographs in this series by Floto + Warner momentarily make elusive forms within colored liquid seem three-dimensional and static. Getting these dramatic images just right is no easy task; many attempts are made to toss the fluid into the air so that it looks just right against the hills and desert of northern Nevada.

Liquid Orchids: Paint Splash Flowers
High Speed Liquid Orchids 1

High Speed Liquid Orchids 2

High Speed Liquid Orchids 3

Colorfully streaked, blossom-like forms come into being just for a split second when artist Fabian Oefner drops a sphere directly into a tank filed with layers of acrylic paint in various shades. The explosion that results from the impact of the object in the tank, which often happens too quickly for our eye sot properly take it in, is permanently preserved via high-speed photography.

Exploding Food by Alan Sailer
High Speed Exploding Food 1

High Speed Exploding Food 2

High Speed Exploding Food 3

Avocados, popsicles, strawberries and chocolate bunnies are ripped apart in spectacular patterns and forms when photographed just at the instant of an impact from a pellet or marble. Photographer Alan Sailer uses a micro-second guided spark flash to get the images, and a PVC or copper cannon to launch the food-destroying objects.

Black Hole: A Visual Demonstration of Centripetal Force
High Speed Black Hole 1

High Speed Black Hole 2

High Speed Black Hole 3

High Speed Black Hole 4

Physics and art come together in another project by Swiss artist Fabian Oefner, appropriately titled ‘Black Hole’ for the visual effect that’s achieved. The images are created using a drill and a high-speed camera that can create flashes as brief as 1/400000 of a second; a sensor connected to the drill sends an impulse to the flashes to freeze the paint in motion.

Next Page – Click Below to Read More:
Frozen In Motion 24 Stunning High Speed Photographs

Share on Facebook


[ By Steph in Art & Photography & Video. ]

[ WebUrbanist | Archives | Galleries | Privacy | TOS ]


WebUrbanist

 
Comments Off on Frozen in Motion: 24 Stunning High Speed Photographs

Posted in Creativity


WTF Is Street Art? Poster Boy Hacks NYC Sign by High Line

23 Jul

[ By WebUrbanist in Drawing & Digital. ]

wtf is street art

If you have spent any time along the High Line Park in Chelsea, you will recognize this extremely prominent billboard that one artist had the audacity to climb and hack.

wtf street art dynamic

The original message (WTF is alternate side of the street parking anyway?) was selectively deleted to make way for a replacement question.

wtf street art gif

Working at night, Poster Boy risked discovery by people parking and picking up their cars in the directly adjacent lot, not to mention being highly visible from the street.

high line amphitheater view

During the day, visitors sitting in the over-street theater seats within the elevated park have a direct view of this huge black-on-yellow poster. It is doubtful the change will survive long, so check it out while it lasts!

halloween pumpkin carved cone

wolverine movie subway ad

movie poster ad hack

Known for his creative edits of local signage and hacked infrastructure, Poster Boy has a huge collection of photos you can browse of his work, ranging from small stickers added in unusual contexts to whole-billboard transformations.

Share on Facebook


[ By WebUrbanist in Drawing & Digital. ]

[ WebUrbanist | Archives | Galleries | Privacy | TOS ]


WebUrbanist

 
Comments Off on WTF Is Street Art? Poster Boy Hacks NYC Sign by High Line

Posted in Creativity