RSS
 

Posts Tagged ‘Graduated’

How to Use Graduated Neutral Density Filters for Landscape Photography

03 Jan

The post How to Use Graduated Neutral Density Filters for Landscape Photography appeared first on Digital Photography School. It was authored by Francesco Gola.

graduated neutral density filters landscape photography

If you want to create stunning landscape photos without significant post-processing, then you need a graduated neutral density filter.

But why are GND filters so important? What do they do? And how do you use them?

That’s what this article is all about.

So if you’re ready to discover how you can capture beautiful landscape images with GND filters, let’s get started!

Dynamic range

Since the camera was invented, we have tried to copy one of the greatest wonders of our body: the human eye. Unfortunately, while it’s been nearly 200 years since we first captured light with the camera, we are still far from overcoming Mother Nature.

Why?

Because the eye sees much better than the camera.

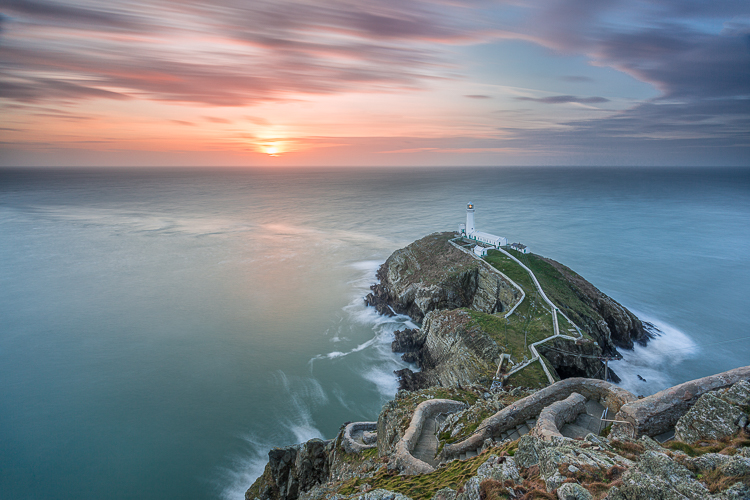
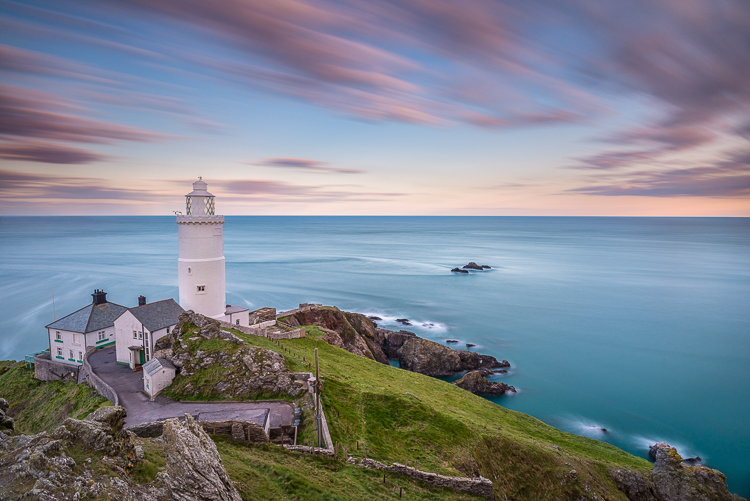
beautiful lighthouse at sunset

The parameter that describes this behavior is called dynamic range. It basically defines the difference between the minimum and maximum value of brightness that a device (like your eye or the sensor of your camera) is able to record. From a practical perspective, dynamic range defines the ability of your camera to see details in very dark areas and very bright areas of a scene.

If you’re wondering how much more your eye sees compared to your camera, the answer is staggering. Your eye can see about twice as much dynamic range as older cameras (though camera technology has come a long way in recent years!).

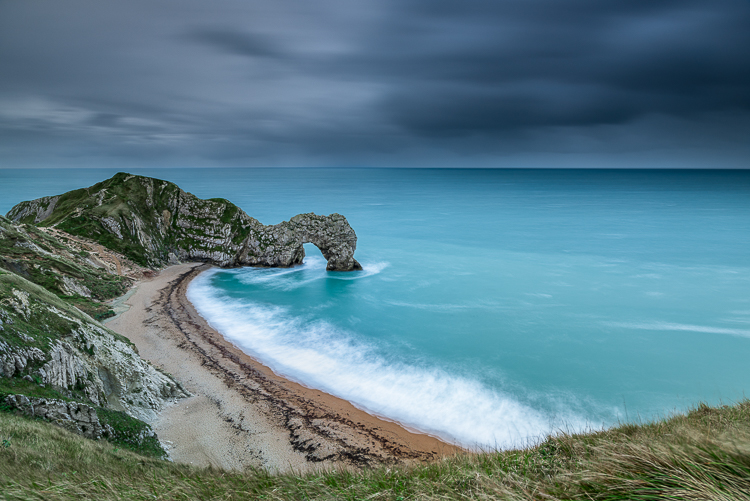
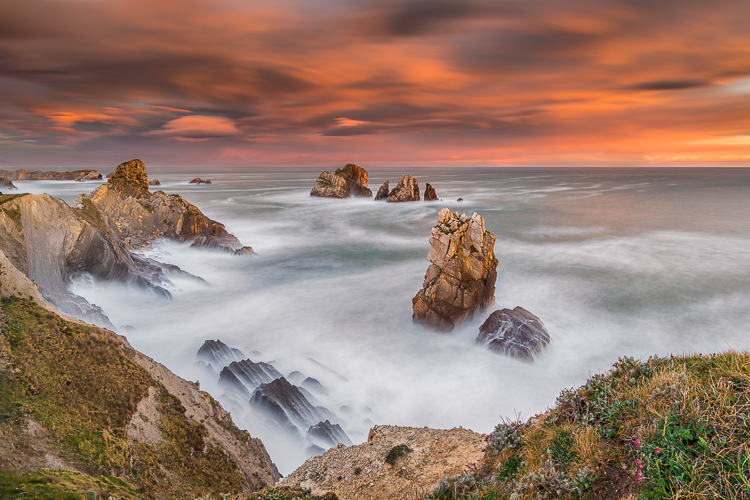
long exposure seascape

The problem

Thanks to the eye’s massive dynamic range, when you look at a marvelous sunset, you’re able to see all the details in the scene (in both the sky and the land).

But as soon as you try to capture the scene with your camera, you’ll get an overexposed sky or an underexposed foreground. The dynamic range of your camera is limited, and can therefore capture detail in only one of these areas, so you have to choose.

Given that limitation, how can we hope to shoot a beautiful sunset or a wonderful sunrise and capture all the marvelous details, both in the sky and on the land?

There are different methods to overcome this problem, but my favorite is the use of graduated neutral density filters (also known as GNDs).

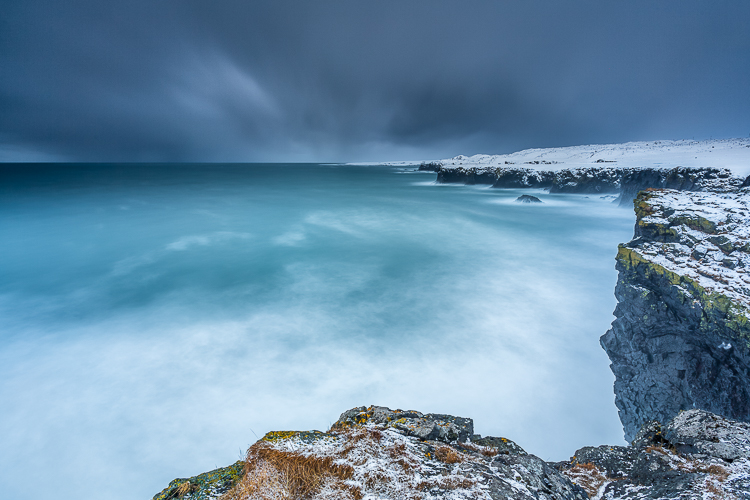
stormy seascape

What is a graduated neutral density filter?

A graduated neutral density filter is a piece of glass made up of two distinct parts:

A completely transparent area, and a darker section.

Now, by positioning the darkest part of the filter to correspond with the brightest portion of the scene you’re photographing, you can reduce the exposure difference (dynamic range) in the frame.

In other words, by positioning the dark part of a graduated neutral density filter over a bright sky, you can reduce the difference in brightness between the sky and the land for a much more even exposure.

To reduce the exposure difference is to reduce the dynamic range of the scene – so your camera can simultaneously capture detail in both bright and dark areas of the scene. GND filters are like sunglasses for your camera – except that the sunglasses are only applied to a portion of the image, rather than the entire shot.

Types of graduated neutral density filters

Graduated neutral density filters are typically distinguished by the type of transition between the transparent and dark areas of the filter. There are three main families of GNDs:

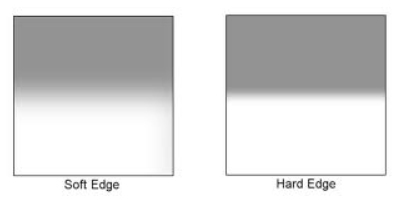
  1. Hard-edge filters are characterized by a clear boundary between the transparent and dark areas. You use a hard-edge GND when the separation between the bright and dark areas of your scene is very defined, such as when photographing a seascape with a flat horizon.
  2. Soft-edge filters are characterized by a soft transition (they change from light to dark more gradually), and are therefore used when the transition between light and dark areas is less distinct. A classic example is a mountainous scene, where the mountains intersect with the sky.
  3. Reverse filters are nothing more than hard-edge GNDs with a dark area that fades away as you move from the line of separation to the upper border of the filter (so the filter is darker in the middle than on the edge). Reverse GNDs were invented to better manage sunrises and sunsets, where the light is more intense on the horizon line (in the middle of the scene). If you love seascapes (like me!), this filter will be your best friend forever.
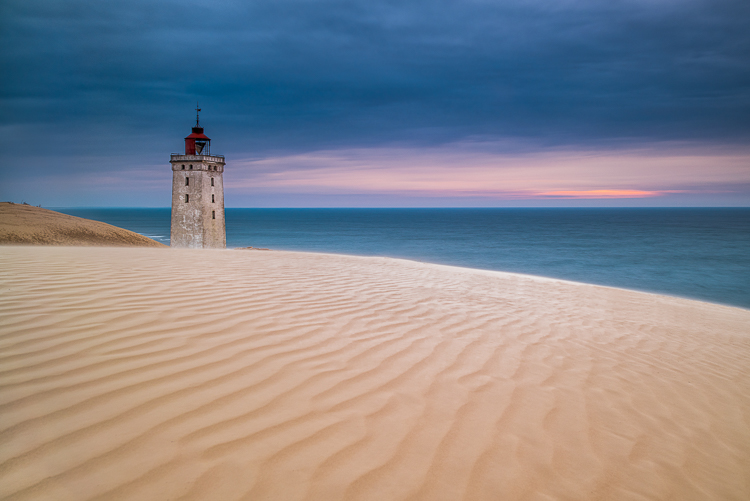
beach and castle at sunset

Another difference between filters is the material. Higher-quality filters are made of optical glass. Putting an inexpensive resin filter in front of a lens worth hundreds (or thousands) of dollars is not a great idea.

Finally, GND filters are distinguished by their ability to block light. In other words, how dark are they at their most extreme?

In landscape photography, you generally need one to four stops of darkness during sunrise and sunset, depending on the weather conditions. This is the reason why most filters on the market offer these gradations.

You can shop for graduated neutral density filters on Amazon or at B&H Photo Video (they ship worldwide).

How to use a GND filter in the field

Using graduated neutral density filters in the field is very simple.

First, try to take exposure readings off the darkest and brightest areas of the scene (usually the foreground and the sky, respectively). The difference in exposure will indicate the intensity of the filter you’ll need.

For instance, if the meter reading for the sky is 1/250s and the meter reading for the foreground is 1/30s, then the difference between those readings is three stops (1/250s > 1/125s > 1/60s > 1/30s), so to balance the exposure you should use a 0.9 (3-stop) GND.

At this point, just mount the filter with its dark side over the brightest part of the scene. This is why a GND screw-in filter doesn’t make sense. You would not be able to align the transition area with the scene, whereas a drop-in filter lets you position the transition area perfectly.

sea stacks long exposure GND filter

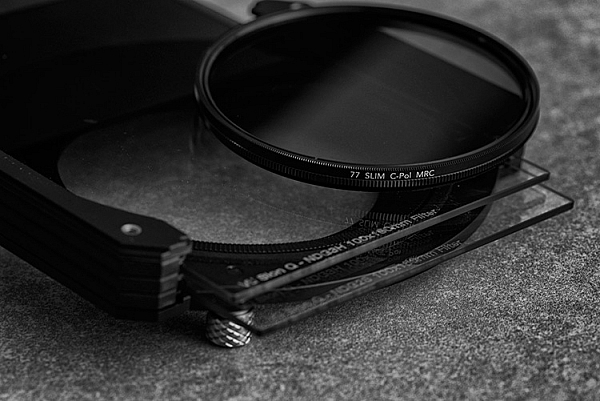
To avoid holding the filter with your hands, you can buy a filter holder. Once the holder is mounted in front of your lens, it will hold your filters in place. (Note that you can stack multiple filters this way.)

There are many nice holders on the market, but the best one (in my opinion) is the V6 Holder by NiSi filters. It’s the only filter holder that lets you simultaneously install three different filters and a polarizer without any vignetting issues (plus, it works as wide as 16mm on full-frame cameras).

Graduated neutral density filters in landscape photography: Conclusion

Without graduated neutral density filters, capturing sunrise and sunset scenes will be hard – and sometimes impossible.

That’s why I recommend you always have at least one GND in your bag.

And the limited dynamic range of your camera will just be a bad memory!

How to Use Graduated Neutral Density Filters for Landscape Photography

The post How to Use Graduated Neutral Density Filters for Landscape Photography appeared first on Digital Photography School. It was authored by Francesco Gola.


Digital Photography School

 
Comments Off on How to Use Graduated Neutral Density Filters for Landscape Photography

Posted in Photography


How to Use the Lightroom Graduated Filter

19 Jan

The post How to Use the Lightroom Graduated Filter appeared first on Digital Photography School. It was authored by Christian Hoiberg.

Adobe Photoshop has always been my software of choice when it comes to landscape photography and post-processing. However, Adobe Lightroom is constantly getting better and I’m able to do a lot of the things I could only do in Photoshop several years ago.

The Lightroom Graduated Filter isn’t a new feature but it’s one that I’ve begun to use more and more during the last years. It’s a tool that can make a huge difference to an image and it’s fairly easy to use. The big benefit is that you can add several graduated filters to one single image. You don’t have to only use one. This gives you more flexibility.

Let me show you how to use the Lightroom Graduated Filter.

Soft transitions vs. hard transitions

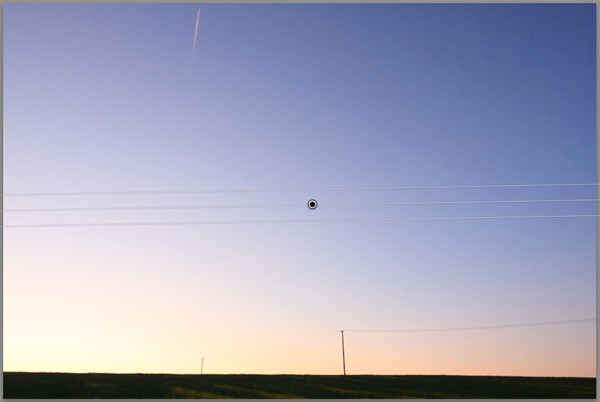
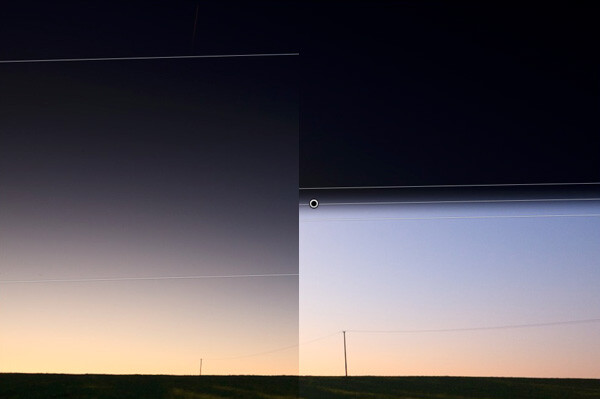
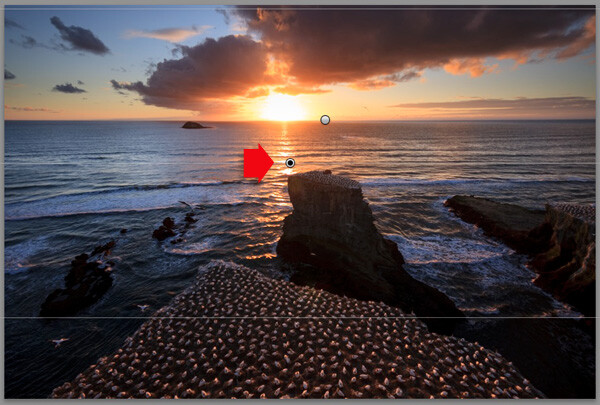
The very first thing you need to know about how I use the Graduated Filter is that I never use a hard transition. That means that I don’t drag the filter down and include the top part of the transition. (If you’re not familiar with this tool, any adjustment you make is visible at a 100-50 percent opacity transitioning from the top to middle line and 50-0 percent from the middle to the bottom line)

1 - How to Use the Lightroom Graduated Filter

You don’t want there to be a hard, visible transition that obviously shows the adjustment made to a particular area. Instead, you want a long and smooth transition.
This is done by dragging the graduated filter from top to bottom, then moving it up so that the middle line is at the upper edge of the frame. You can then click and drag the lower line up or down depending on how much of the image you want to affect.

Keep in mind that when you’re using an adjustment as smooth as this, you’ll need to increase the values of the adjustments you’re making. For example, instead of exposure -0.2 you might need an exposure of -1.0 to darken an area.

Darkening the sky

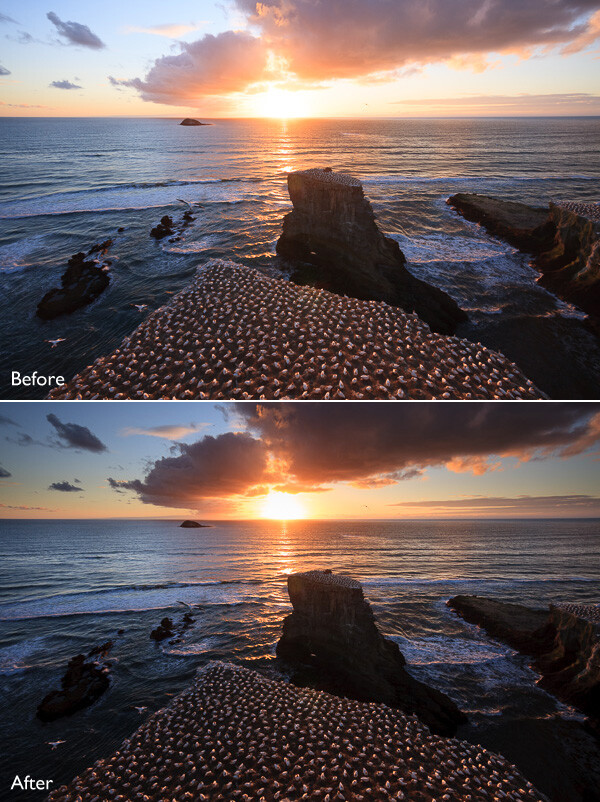
The main purpose of Graduated Neutral Density filters is to darken the sky in order to capture a well-balanced exposure. This is also the most common use of Lightroom’s Graduated Filter.

2 - How to Use the Lightroom Graduated Filter

I tend to darken the sky a lot in my photography. This helps me guide the viewers’ eyes towards the important part of the image and strengthens the composition. This is quite easy to do and by using soft graduation such as explained above, it can be applied even when there are mountains or other subjects projecting the horizon, without looking strange.

Click and drag the graduated filter such as explained above, and place the middle transition line at the top of the frame. Adjust the bottom line in such a way that the adjustment is added only to the parts you want. Then lower the exposure. Since the transition is so smooth, I often lower the exposure down to -4.0 without it being too dark. Of course, this depends on how dark the original file is; you don’t want it to be completely black afterward.

Add a cold tone to foreground and sky

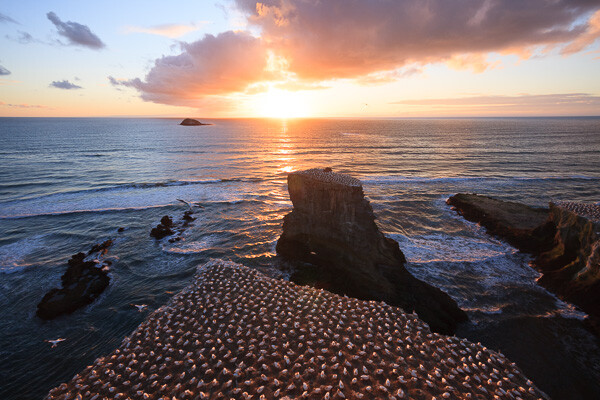
Color is an important part of the composition and that’s something that many tend to forget. Our eyes are naturally drawn towards the warmer tones but, unfortunately, nature doesn’t always let us capture that in the file. So to further enhance the main subject, I often add a cold tone and desaturate certain areas of the image. These areas quite often include the lower and upper part of the frame.

3 - How to Use the Lightroom Graduated Filter

Using the graduated filter the opposite way works quite similar. The only difference is that you drag from the bottom up instead of top down. Then, just as before, adjust the filter to your likings. I tend to only desaturate and add a cold tone to the very bottom of the frame.

Sharpen & increase Clarity

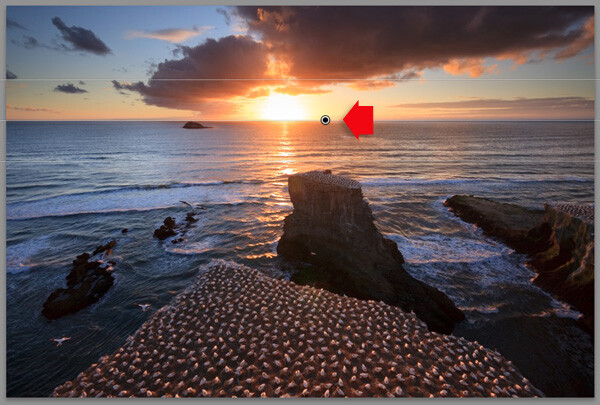
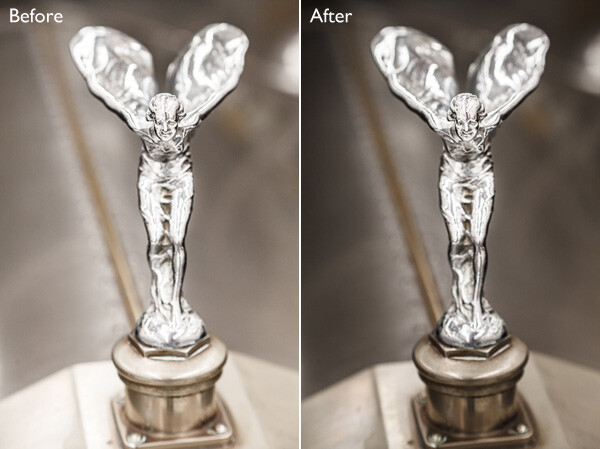
The fourth and final feature is sharpening and increasing the clarity by using the graduated tool. This could be done either to bring out details in a nice cloudy sky or to increase clarity in a vibrant foreground.

4 - How to Use the Lightroom Graduated Filter

I’m generally not a big fan of the Clarity slider so even though I’m still using a soft transition I gently increase the slider; I don’t want to add +100 clarity regardless of how soft the transition is. Increase the clarity gradually by clicking on the number next to the slider and holding shift plus tapping the up arrow until you’re satisfied with the result.

Last words

There are many ways to use Lightroom’s Graduated Tool. The examples above are just a handful of ideas what you can use it for.

Truth be told, I use several Graduated Tools at the same time. It’s not uncommon that I use one or two for the sky, another couple for the foreground and perhaps a few more to create a small vignette. In the end, it depends on what you want to do with the image!

The post How to Use the Lightroom Graduated Filter appeared first on Digital Photography School. It was authored by Christian Hoiberg.


Digital Photography School

 
Comments Off on How to Use the Lightroom Graduated Filter

Posted in Photography


This is the world’s first variable graduated ND filter

21 Jan

Aurora Aperture has just introduced a very interesting little piece of photography gear: the world’s first variable graduated neutral density filter. Variable NDs are fairly common, as are graduated NDs, but until now nobody had thought to (or at least managed to) mix the two ideas into one.

Enter the Aurora PowerGXND: a variable hard transition graduated neutral density filter with continuously variable range of up to 5 stops (ND 0 – 1.5). Here’s a quick intro video to get you familiar with the new filter family:

And a 4K demo video that shows the filter in action:

Aurora has introduced, and is funding, this filter family through Kickstarter, where the PowerGXND is being offered in three sizes and with a variety of mounting accessories. You can get the filters in Large (105mm), Medium (82mm), or Small (62mm) sizes, which can be mounted onto a camera using either a “slim lens adapter” or a square filter holder adapter plate.

The filter also features hard stops at either end of the scale, multi-layer nano coatings to repel water, oil and dust, and a direct reading scale to help you dial in the exact stop value you’re looking for.

$ (document).ready(function() { SampleGalleryV2({“containerId”:”embeddedSampleGallery_5924674119″,”galleryId”:”5924674119″,”isEmbeddedWidget”:true,”selectedImageIndex”:0,”isMobile”:false}) });

To learn more about the Aurora PowerGXND, head over to the Kickstarter campaign where you can reserve your own (the project is already fully funded) for anywhere between $ 95 for the 62mm ‘slim’ kit to $ 340 for the 105mm w/ 130mm holder kit.

Press Release

Aurora Aperture Introduces World’s First Variable GND Filter Family

Irvine, California, January 15th, 2018 – Aurora Aperture Inc., a Southern California company specialized in photography filters, today has introduced the world’s first variable graduated neutral density (GND) filter family, the Aurora PowerGXND.

The PowerGXND family is an hard transition GND filter with a continuous range up to 5 stops (ND 0 – 1.5). GND filters are widely used in photography and videography for balancing a high contrast scene for proper exposure.

“The Aurora PowerGXND family is the world’s first variable GND filter,” said Jeff Chen, founder and CEO of Aurora Aperture Inc. “offering a wide range of light balancing capability for both photographers and videographers. Until now users need to carry multiple fixed stop GND filters with light reduction values of one, two, and three stop with no fractional stop value. With our variable GND filters, all you need is one filter and just rotate the filter until you see the desired result, it is truly that easy.”

The Aurora PowerGXND filter is based on the innovative Aurora PowerXND variable ND filter introduced in 2016. While keeping the original thin frame profile, a new hard stop feature is added to limit the filter rotation within the minimum and maximum settings. Another new feature is a direct reading scale so users can quickly dial the filter to a stop value easily.

Designed in California by Aurora Aperture, the Aurora PowerND filters are made from Schott B 270® i Ultra-White Glass. Filter surfaces are applied with PFPE hydrophobic and oleophobic coatings to repel water, soil, and dirt. With these multi-layer nano coatings, the Aurora PowerGNXD filters are capable of answering the demands of 4k videos and modern high density sensors.

There are three sizes available, S (62mm), M (82mm), and L (105mm) to cover lens filter thread size from 37mm to 82mm. Adaption plates and square filter systems (75mm, 100mm, and 130mm) are available for using the variable GND filters on different lenses.

Availability and Pricing

The Aurora PowerND family will be available through Kickstarter starting in January

2018. Dealers and general availability will start in May 2018. List price starts from US$ 149 to $ 329, depending on filter sizes.

Articles: Digital Photography Review (dpreview.com)

 
Comments Off on This is the world’s first variable graduated ND filter

Posted in Uncategorized


How to Use Graduated Neutral Density Filters for Landscape Photography

01 Feb

Since the camera was invented, we have tried to copy one of the greatest wonders of our body; the human eye. Unfortunately, despite being over 100 years since the first time that we captured light, we are still far from overcoming Mother Nature.

Why? Because in the visible spectrum your eye sees much better than your camera.

How to Use Graduated Neutral Density Filters for Landscape Photography

Dynamic Range

The parameter that describes this behavior is called Dynamic Range. This basically defines the difference between the minimum and maximum value of brightness that a device (like your eye or the sensor of your camera) is able to record. In the real world, Dynamic Range defines the ability of your camera to see details in very dark areas and very clear (bright) areas of the scene.

If you’re wondering how much more your eye sees, the answer is staggering. Your eyes have about twice as much range that they can see and capture.

How to Use Graduated Neutral Density Filters for Landscape Photography

The problem

That’s why when you look at a marvelous sunset with your eyes you’re able to see all the details in the scene (in both the sky and the land). But as soon as you try to capture it with your camera, you’ll get an overexposed sky or a underexposed foreground. The Dynamic Range of your camera is only able to capture detail in one of those areas so you have to choose.

But if even the best cameras have a Dynamic Range which is only half that of the human eye. So how can we hope to shoot a beautiful sunset or a wonderful sunrise and capture all the marvelous details?

There are different methods to overcome this problem, but my favorite is the use of Graduated Neutral Density filters (GND).

graduated neutral density filters

What is a Graduated Neutral Density Filter?

A Graduated Neutral Density Filter is one made of two distinct parts; a completely transparent area, and a darker section. By setting the darkest part of the filter to correspond with the brightest portion of the scene, you can reduce the exposure difference (dynamic range) in the frame.

To reduce the exposure difference is to reduce the dynamic range of the scene, and thus allow your camera to simultaneously capture detail in both bright and dark areas of the scene. Basically, to make an analogy, GND filters are like a kind of sunglasses for your camera.

Types of GND filters

Graduated Neutral Density Filters are typically distinguished by the type of transition that exists between the transparent and dark areas of the filter. For this reason, we can identify three families of GNDs:

  1. Hard-edge filters, which are characterized by a clear boundary (it’s obvious where one begins and the other ends) between the transparent and dark areas. They are therefore used when the separation between the bright and dark areas of your scene is very defined, such as the horizon at sea.
  2. Soft-edge filters are characterized by a soft transition (they change from light to dark more gradually) and are therefore used when the transition between light and dark areas is not so clear. A classic example is a shot in a mountainous area.
  3. Reverse filters, which are nothing more than hard-edge GNDs with the dark area that fades away the more you move from the line of separation to the upper border of the filter (meaning it’s darker in the middle than on the edge). Basically, they were invented to better manage sunrises and sunsets, where the light is more intense on the horizon line (middle). If you love seascapes like me, this filter will be one of your best friends forever!

How to Use Graduated Neutral Density Filters for Landscape Photography

Which to buy?

Another distinction is between filters is the construction material. Higher quality filters are made of optical glass. Putting an inexpensive resin filter in front of a lens worth hundreds (or thousands) of dollars is not a great idea.

Finally, GND filters are distinguished by graduation, or their ability to block light through the darkest area. Essentially how dark they are at the extreme. Normally in landscape photography, this difference is between one and four stops during sunset and sunrise, depending on weather conditions. This is the reason why you will find these gradations almost exclusively on the market.

Shop for Graduated Neutral Density filters on Amazon.com or on B&H Photo Video’s site (they ship worldwide).

How to use a GND filter in the field

The use of GND filters in the field is very simple; try to take exposure readings in the darkest and in the brightest areas of the scene (usually the sky). The exposure difference will indicate the intensity of the filter to be used. Let’s assume that the light meter reading for the sky is 1/250th, and the one for the rocks in the foreground is 1/30th. The difference between those readings is three stops (250th > 125th > 60th > 30th), so to balance the exposure you must use a 0.9 (3-stop) GND.

At this point, just mount the filter with its dark side over the brightest part of the scene. This is why a GND screw-in filter does not make sense. You would not have the possibility to align the dark area in accordance with the scene as well as a drop-in style filter.

How to Use Graduated Neutral Density Filters for Landscape Photography

To avoid having to hold the filter with your hands (that could be a problem if you are going to use them together with other filters) you can buy a holder, that once mounted in front of your lens will do the job for you. There are many valid solutions on the market, but the best one (in my opinion) is the V5 Pro Holder by NiSi filters. This is the only one that lets you simultaneously install three different filters and a polarizer without any vignetting issues (as wide as 16mm on full frame cameras).

At this point, the limited Dynamic Range of your image will be just a bad memory!

How to Use Graduated Neutral Density Filters for Landscape Photography

googletag.cmd.push(function() {
tablet_slots.push( googletag.defineSlot( “/1005424/_dPSv4_tab-all-article-bottom_(300×250)”, [300, 250], “pb-ad-78623” ).addService( googletag.pubads() ) ); } );

googletag.cmd.push(function() {
mobile_slots.push( googletag.defineSlot( “/1005424/_dPSv4_mob-all-article-bottom_(300×250)”, [300, 250], “pb-ad-78158” ).addService( googletag.pubads() ) ); } );

The post How to Use Graduated Neutral Density Filters for Landscape Photography by Francesco Gola appeared first on Digital Photography School.


Digital Photography School

 
Comments Off on How to Use Graduated Neutral Density Filters for Landscape Photography

Posted in Photography


Circular Polarizers Versus Graduated Neutral Density Filters for Landscape Photography

22 Aug

Whether you’re a professional or hobby photographer, odds are you’ve come across a beautiful, scenic landscape, that you absolutely had to photograph. Unless you’re an experienced landscape photographer, there’s a good chance the color in that photo wasn’t as saturated, or balanced as you were expecting. That’s because there’s generally a wide disparity in the dynamic range between the foreground and background of landscapes, as well as between the upper (sky) and lower (earth) halves of the frame. Thanks to a couple of lens filters, this hurdle can easily be overcome without having to spend hours of post-processing in Photoshop.

Drop-in and screw-in filters

What are lens filters?

Lens filters are lightweight pieces of glass that screw onto the front of most camera lenses (or drop-in using a holder system) in order to offer additional protection of your lens while also improving image quality. There are a variety of filter sizes that must match up to the size of the thread on your camera lens, so it is very important to make sure you get the correct size for the lens you plan to use it on (tip look on the back of your lens cap).

In addition to varying sizes, lens filters can also serve several different purposes. Most basic lens filters are ultra-violet (UV) reducing filters (also known as haze filters) that come with an anti-reflective coating to cut through the effects of atmospheric haze, thereby improving overall image quality. Besides UV/haze filters, there are two others that are particularly useful for landscape and outdoor photography – polarizers and graduated neutral density filters.

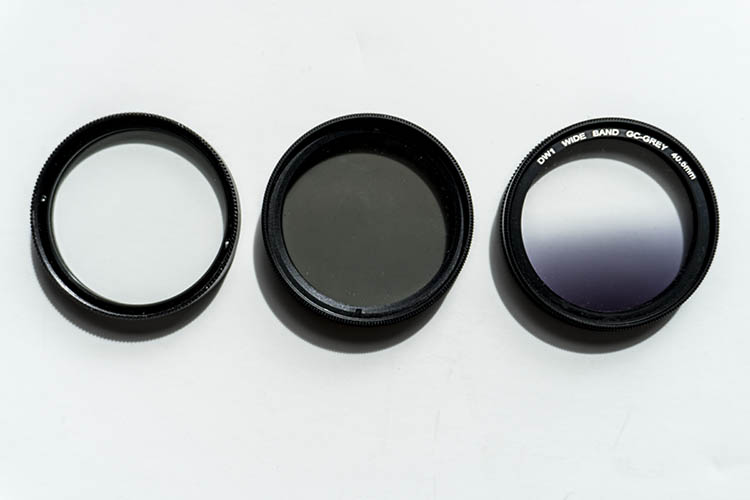
From left to right: A clear UV filter, a polarizing filter, and a Graduated Neutral Density filter.

From left to right: A clear UV filter, a polarizing filter, and a Graduated Neutral Density filter.

What is a polarizing filter?

The next filter we’ll discuss is the polarizing (usually circular) filter, which attaches to the front of a lens and can be spun around to produce varying degrees of saturation throughout an image. This quality of the polarizing filter is important to pay attention to, because it’s easy to produce uneven shades of saturation if the polarizer is even slightly off, such as in the example below.

Circular polarizer versus ND grad filter

Landscape photo with uneven polarization. Notice how the sky is very uneven in color.

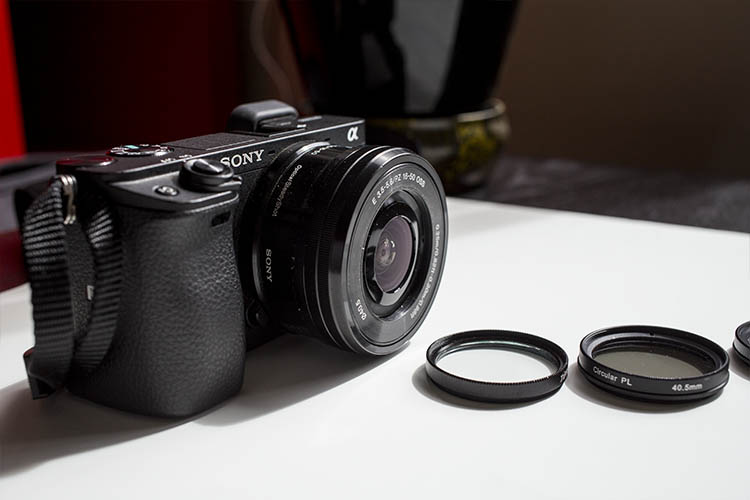
Sony a6300 camera with bare kit lens - no filter applied. UV and Polarizing filters on the table.

Sony a6300 camera with bare kit lens – no filter applied. UV and Polarizing filters on the table.

Polarizing filters do two things: first, they help reduce glare or reflections cast by non-metallic reflective surfaces such as glass or water. Second, they saturates colors and enhances image clarity by reducing the overall exposure of an image. The benefits of the polarizing filters are best seen when you are shooting at a 90-degree angle to the sun.

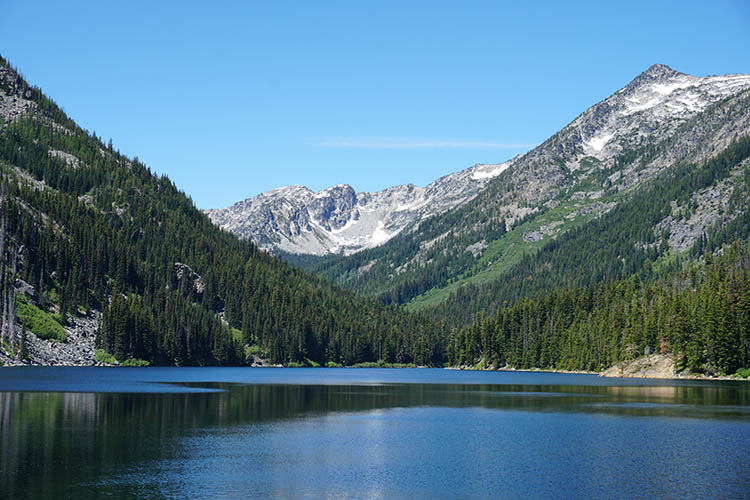
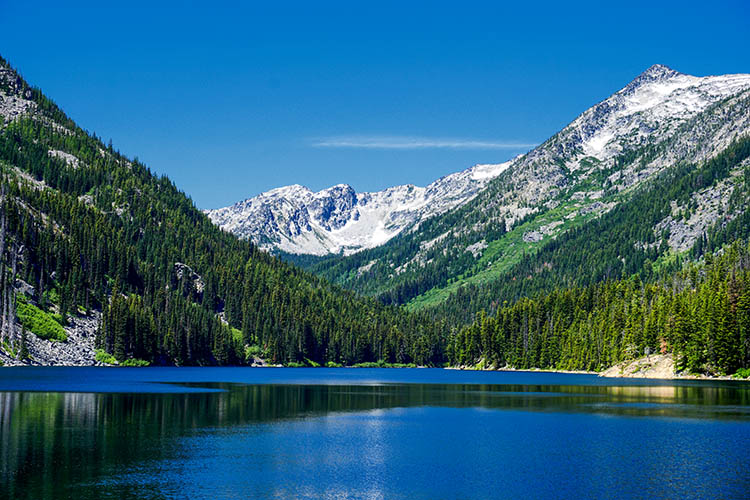
Take a look at the landscape photo below that was taken with no filter, the colors are muted and not very exciting. However, once the polarizing filter is added, you can see a huge boost in overall color saturation. It’s a pretty dramatic difference without even post-processing the photo.

Circular polarizer versus ND grad filter

Landscape photo with no filter.

Circular polarizer versus ND grad filter

Landscape photo with a circular polarizing filter. Notice how overall the colors are intensified.

What is a neutral density filter?

Another effective filter for landscape photography is a neutral density (ND) filter, which reduces the overall exposure of an image. ND filters are uniformly dark in color and they come in different strengths depending on density.

The best use of ND filters is in situations where you wish to use a long exposure or wide aperture to capture an image, without risking overexposure. Some example scenarios when a ND filter would be effective include:

  • Producing a smooth, blurred movement of water in a waterfall, lake, or the sea.
  • Blurring moving subjects to convey movement or motion (such as panning).
  • Reducing diffraction by using a large aperture.
  • Shooting with a shallow depth of field in bright lighting.

What is a graduated neutral density filter?

ND filters also come in a graduated form, also known as a split ND filter. The top half of the filter appears dark, while the bottom half is clear. Similar to the circular polarizer, the graduated ND filter can also be spun around to produce varying degrees of saturation, so it’s important to be careful when using it to avoid unevenly saturating your image.

The best scenarios for a graduated ND filter to shine are when you wish to reduce light, or darken just part of your image. Think landscape photos where the earth is balanced, but the sky is blown out. This would be an ideal time to use a graduated ND filter to darken the sky.

Circular polarizer versus ND grad filter

The above landscape photo with a soft edge ND grad filter. Notice how the sky is darker and more saturated, while the water hasn’t changed.

There are two types of ND grad filters: hard edge, and soft edge. You’ll want to use a hard edge filter when the light and dark sections are very clearly separated, while a soft edge filter is best used when the light and dark sections are not distinctly separated.

Circular polarizer versus ND grad filter

Landscape photo with no filter.

Circular polarizer versus ND grad filter

Landscape photo with a circular polarizer.

Circular polarizer versus ND grad filter

Landscape photo with a graduated ND filter.

Over to you

Do you use polarizers or neutral density filters with frequency in your photography? Please share your thoughts and images in the comments below.

googletag.cmd.push(function() {
tablet_slots.push( googletag.defineSlot( “/1005424/_dPSv4_tab-all-article-bottom_(300×250)”, [300, 250], “pb-ad-78623” ).addService( googletag.pubads() ) ); } );

googletag.cmd.push(function() {
mobile_slots.push( googletag.defineSlot( “/1005424/_dPSv4_mob-all-article-bottom_(300×250)”, [300, 250], “pb-ad-78158” ).addService( googletag.pubads() ) ); } );

The post Circular Polarizers Versus Graduated Neutral Density Filters for Landscape Photography by Suzi Pratt appeared first on Digital Photography School.


Digital Photography School

 
Comments Off on Circular Polarizers Versus Graduated Neutral Density Filters for Landscape Photography

Posted in Photography


Sony’s new Sky HDR app mimics the effect of a graduated ND filter

19 Dec

Sony has released Sky HDR, a new PlayMemories app for capturing landscape scenes that have wide ranging levels of brightness. Sky HDR aims to replace a graduated ND filter, with various adjustment ‘themes’ along with control over exposure and white balance of sky and landscape areas separately.

Sky HDR works by capturing two different exposures of the same scene and combing them into a single image. The interface, demonstrated in the video above, is tailored to landscape photography, and resulting photos can be saved as JPEG or Raw files. The app is available for $ 10, and is compatible with the following cameras:

  • Sony NEX-5R
  • Sony NEX-6
  • Sony NEX-5T
  • Sony a7
  • Sony a7R
  • Sony a6000
  • Sony Cyber-shot DSC-RX100 III 
  • Sony a7S
  • Sony a5100
  • Sony a7 II
  • Sony Cyber-shot DSC-RX100 IV
  • Sony Cyber-shot DSC-RX10 II
  • Sony a7R II
  • Sony a7S II
  • Sony Cyber-shot DSC-RX1R II.

Sky HDR can be purchased from Sony’s PlayMemories website.

Articles: Digital Photography Review (dpreview.com)

 
Comments Off on Sony’s new Sky HDR app mimics the effect of a graduated ND filter

Posted in Uncategorized


Quick Lightroom Tip Using the Graduated Filter

29 Aug

This video tip is courtesy of Anthony Morganti and shows us what you can do using the Graduated Filter tool in Lightroom. What if you’ve maxed out your basic adjustments and want to go farther? This little tip might do the trick for you, check it out:

Learn more about using the Graduated Filter in LR here.

A very cool tip, had you thought of that or done this before? Do you have any other Lightroom tips and tricks? Please share in the comments below.

googletag.cmd.push(function() {
tablet_slots.push( googletag.defineSlot( “/1005424/_dPSv4_tab-all-article-bottom_(300×250)”, [300, 250], “pb-ad-78623” ).addService( googletag.pubads() ) ); } );

googletag.cmd.push(function() {
mobile_slots.push( googletag.defineSlot( “/1005424/_dPSv4_mob-all-article-bottom_(300×250)”, [300, 250], “pb-ad-78158” ).addService( googletag.pubads() ) ); } );

The post Quick Lightroom Tip Using the Graduated Filter by Darlene Hildebrandt appeared first on Digital Photography School.


Digital Photography School

 
Comments Off on Quick Lightroom Tip Using the Graduated Filter

Posted in Photography


New Graduated and Radial Filter Features in Lightroom 6

30 May

Lightroom 6 graduated radial filter adjustments

Every time a new version of Lightroom comes out the first thing I look for are features that make the Develop module better, or easier to use. The ones I like best in Lightroom 6/CC are the improvements to the Graduated and Radial Filters. Let’s take a look at them.

Addition of mask overlay

In earlier versions of Lightroom you couldn’t tell with any precision which parts of the image were affected by the Graduated and Radial filters.

In Lightroom 6 you can toggle the mask overlay with the O keyboard shortcut, or by ticking the Show Selected Mask Overlay box in the Toolbar. Previously this was only available in the Adjustment Brush, it has now been added to both the Graduated and Radial Filters.

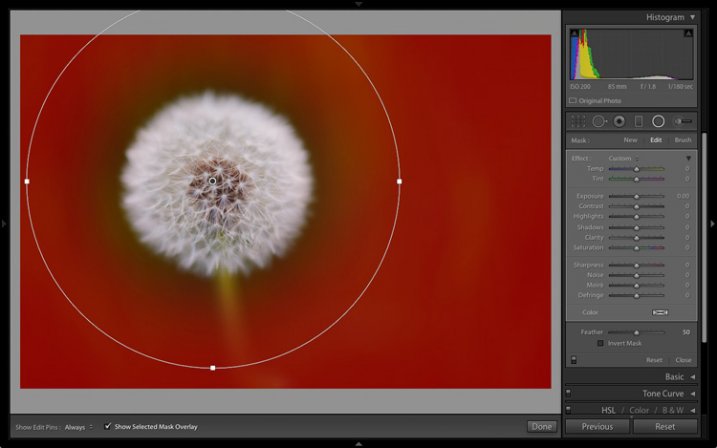
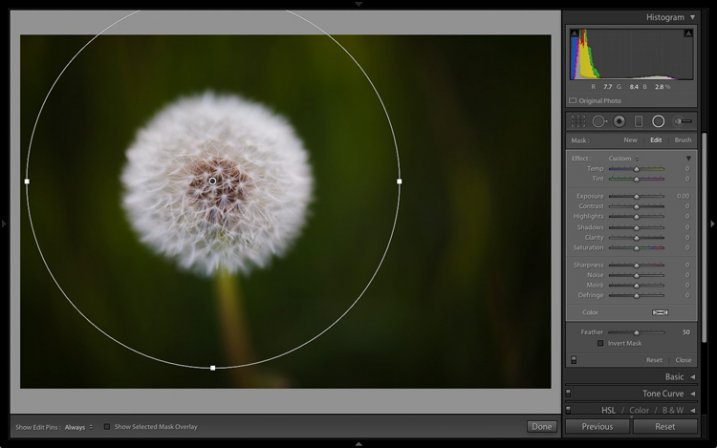
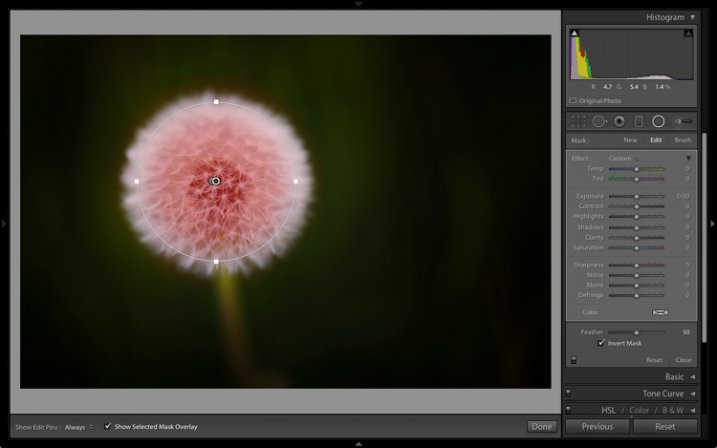
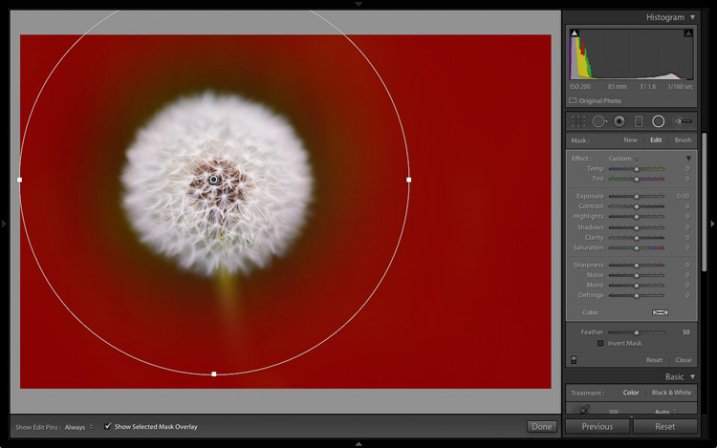
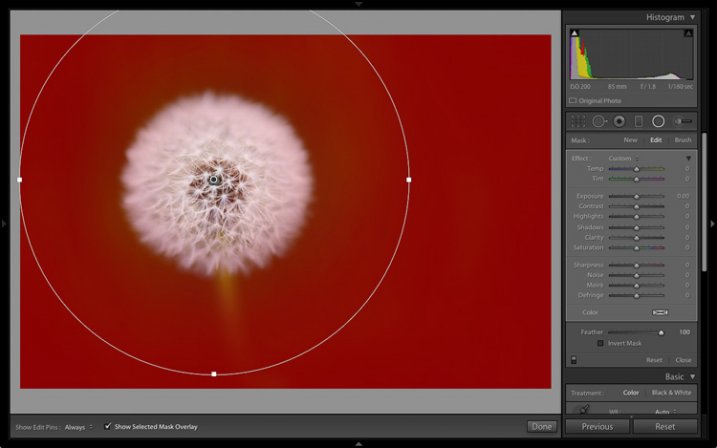
This screenshot below shows how it works. I wanted to make the background darker without affecting the dandelion head. The best tool to use for this is the Radial filter, but you need to be able to place it precisely. The mask overlay makes this easy.

As you can see, the effect of feathering meant that I needed to create a much bigger Radial filter than you might at first think.

Note: The Radial Filter was introduced in Lightroom 5 and is not available in earlier versions.

Lightroom 6 graduated radial filter adjustments

Mask overlay enabled.

Lightroom 6 graduated radial filter adjustments

Mask overlay disabled.

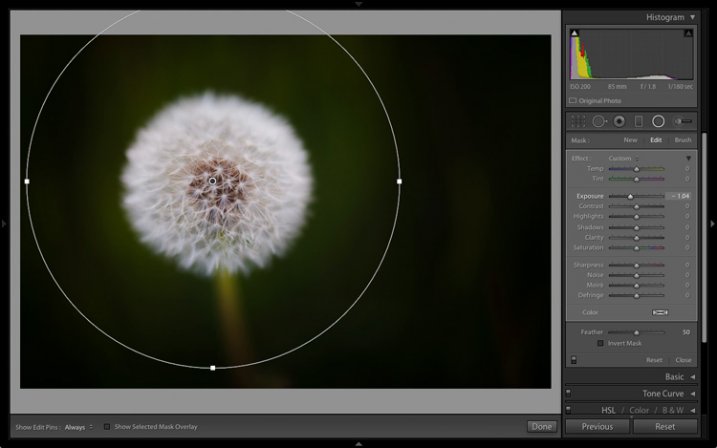
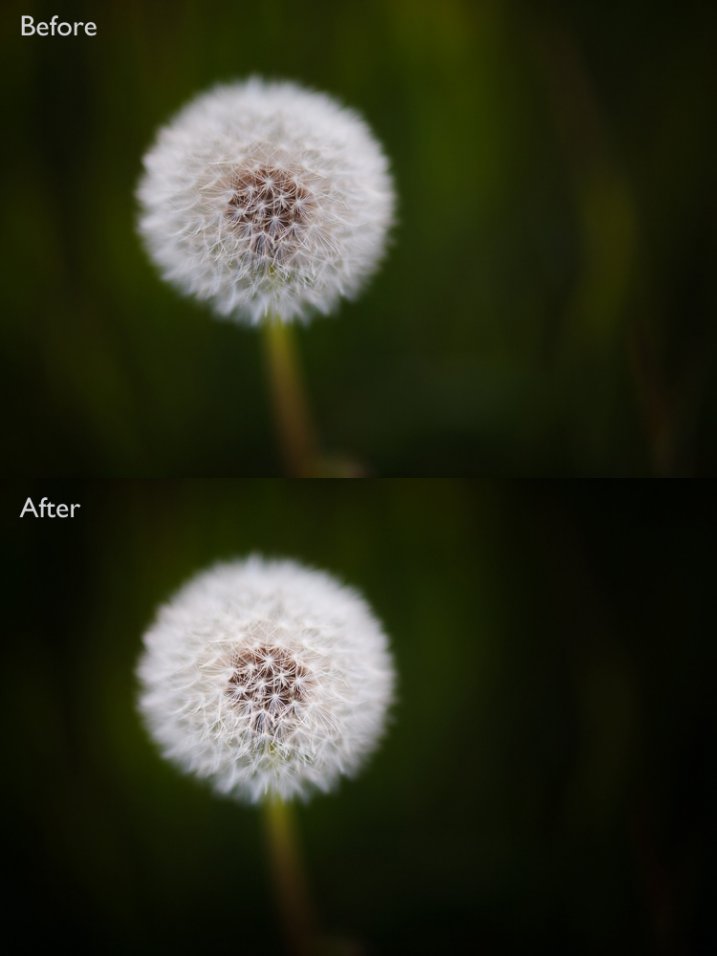
With the Radial filter in place, it is easy to make the required local adjustment. I moved the Exposure slider left to make the background darker.

Lightroom 6 graduated radial filter adjustments

This also works when you tick the Invert Mask box to apply the effect inside the Radial filter. In this situation the effect of feathering means you need to make the filter smaller than the area you want to cover. With the mask overlay enabled it is easy to place it precisely.

Lightroom 6 graduated radial filter adjustments

Then I increased Clarity and Exposure to bring out the texture of the dandelion head and make it brighter.

Lightroom 6 graduated radial filter adjustments

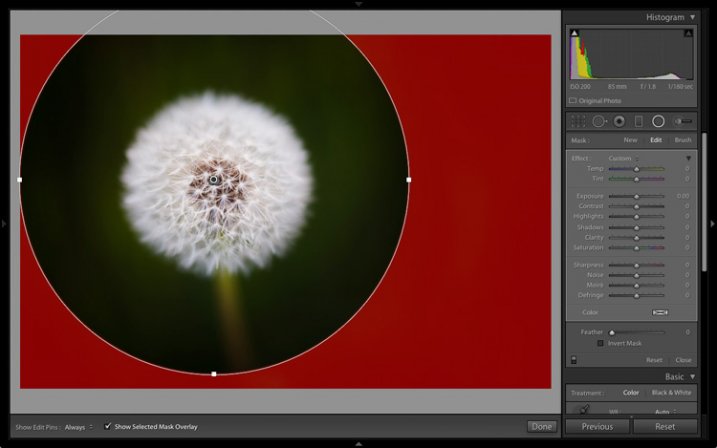
The other benefit of adding the mask overlay to the Radial filter is that it enables you to see the effect of the Feather setting. This was very difficult to judge before.

Lightroom 6 graduated radial filter adjustments

Feather: 50

Lightroom 6 graduated radial filter adjustments

Feather: 0

Lightroom 6 graduated radial filter adjustments

Feather: 100

Note: You can use the Shift+O shortcut to change the colour of the mask overlay.

Addition of Adjustment brush

A problem with the Graduated and Radial filters in earlier versions of Lightroom is that the shape of the mask is fixed. In Lightroom 6/CC Adobe has added the ability to combine the Adjustment brush, with both the Graduated and Radial filters.

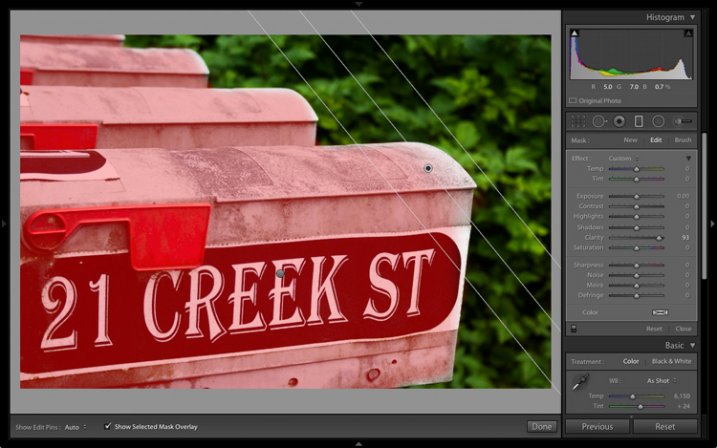
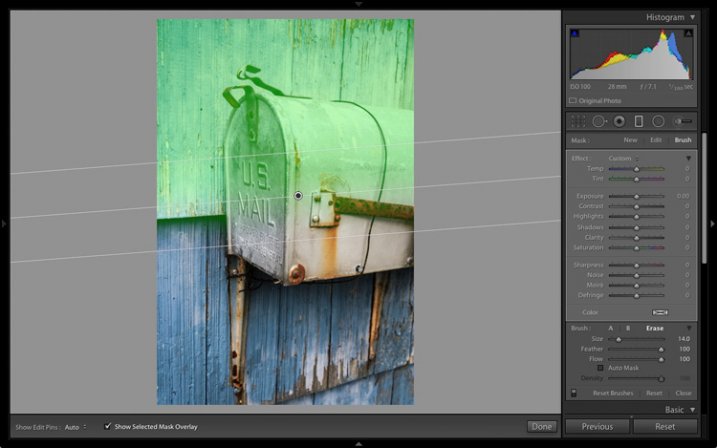
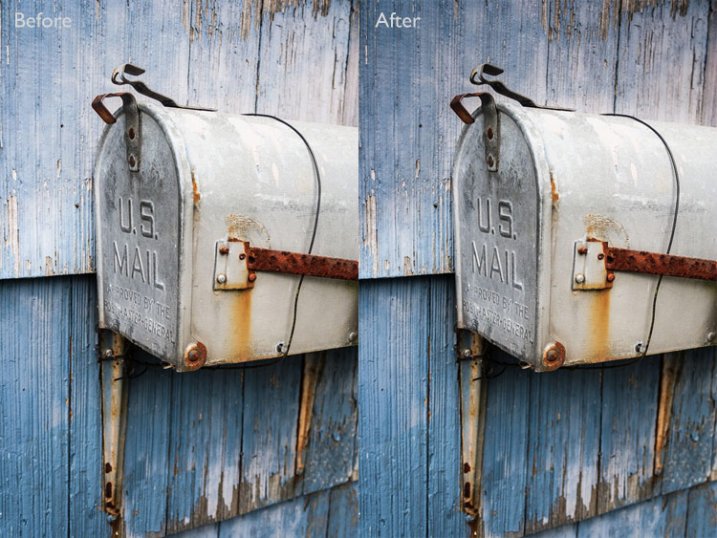
Here’s an example of how it works. In this photo I wanted to make the top half of the wall darker without affecting the mailbox. In previous versions of Lightroom the only option was to use the Adjustment brush to paint in the irregular area. Now you can use the Graduated Filter instead.

This screenshot shows the area affected by the Graduated Filter (I changed the overlay colour to green as it’s easier to see on this image).

Lightroom 6 graduated radial filter adjustments

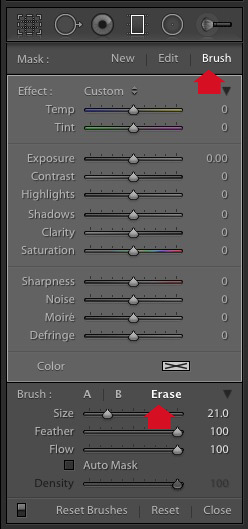
To apply an Adjustment brush, got to the Graduated filter panel and click the Brush option at top right. In this example I also chose the Erase option as I wanted to remove some of the mask overlay.

Lightroom 6 graduated radial filter adjustments

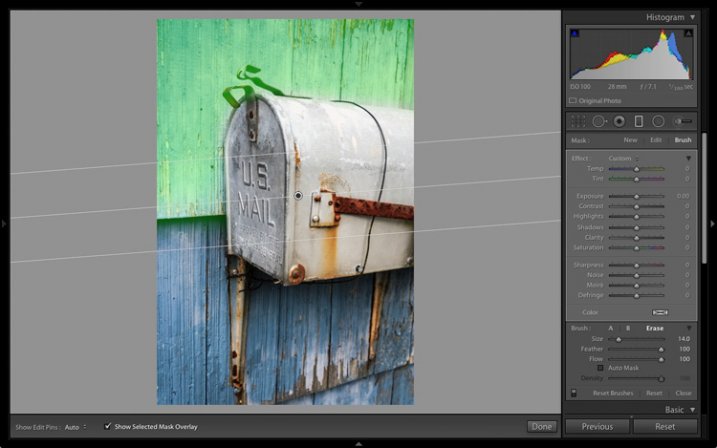
This the amended mask overlay, revealing the mailbox.

Lightroom 6 graduated radial filter adjustments

This is the result.

Lightroom 6 graduated radial filter adjustments

Your turn

These improvements are my favourite as they will make it much easier to process my photos in the Develop module. But what about you? Have you upgraded to Lightroom 6/CC yet? If you have, what are your favourite new features? Please let us know in the comments.


The Mastering Lightroom CollectionMastering Lightroom ebooks

My Mastering Lightroom ebooks will help you get the most out of Lightroom. They cover every aspect of the software from the Library module through to creating beautiful images in the Develop module. Click the link to learn more or buy.

googletag.cmd.push(function() {
tablet_slots.push( googletag.defineSlot( “/1005424/_dPSv4_tab-all-article-bottom_(300×250)”, [300, 250], “pb-ad-78623” ).addService( googletag.pubads() ) ); } );

googletag.cmd.push(function() {
mobile_slots.push( googletag.defineSlot( “/1005424/_dPSv4_mob-all-article-bottom_(300×250)”, [300, 250], “pb-ad-78158” ).addService( googletag.pubads() ) ); } );

The post New Graduated and Radial Filter Features in Lightroom 6 by Andrew S. Gibson appeared first on Digital Photography School.


Digital Photography School

 
Comments Off on New Graduated and Radial Filter Features in Lightroom 6

Posted in Photography


Using Graduated Neutral Density filters for Landscape Photography

23 Dec
You can see the effect an ND Grad has on the scene

You can see the effect a graduated neutral density filter has on the scene

One of the biggest challenges in photography is managing the light in your scene. It is for this reason that many landscape photographers love to be out shooting during the golden hours or blue hour when the light is beautiful and the contrast is manageable. Contrast is tough to manage on bright days and in certain scenes, but there are a few ways to work around this. In this article we are going to look at the usefulness of using neutral density gradient filters (aka ND grads). These filters have been around for a long time, most landscape photographers will have a set of them in their camera bag.

Filters or Photoshop?

In recent years, there has been an ongoing debate around whether it is better to use filters or to bracket the images and blend them in Photoshop afterwards or even use HDR to capture all the different tonality and light in a scene. In many cases this is a personal preference, and I switch between the two depending on the scene or the vision I have of the image I want to make.

If I am shooting during golden hour I will most often use an ND grad filter. If I am doing a starscape, I will take two images and blend them, one for the sky and one for the foreground. The reason is this. At golden hour, I can expose for the ambient light and use a filter to keep the detail in the sky. If I want a starscape (not a star trail) I need to push my ISO up really high and if there is something in the foreground of the scene that is a little too bright, it will overexpose. My first shot will be an image that will expose the the scene properly. For my second shot, I will expose the sky to capture a starscape shot. Afterwards, I will blend them in Photoshop, which really works well.

In some cases, there is no substitute for an ND grad. If you want the waves in a seascape scene to become silky smooth or a river to look soft and white, then you will need to use ND grads. This effect cannot be made in Photoshop (not yet anyway). The best part about using ND grads is the surprise you get when you see the image on the screen. You will be amazed at the effect of capturing the blurred movement of different elements in your image.

What is a graduated neutral density filter (ND Grad)?

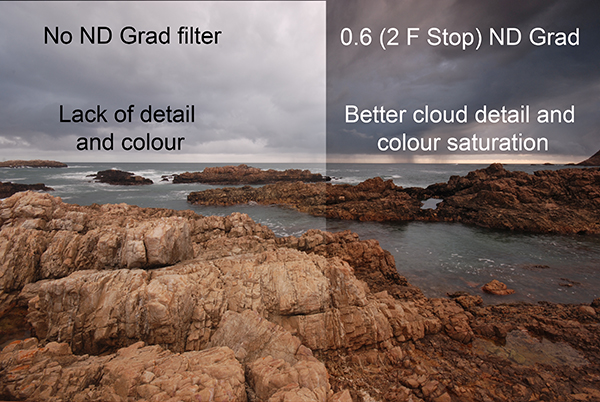
Essentially it is a rectangular, optically correct piece of resin or glass with a gradient from dark to light. It is called “neutral” because the dark part of the filter should not make any colour differences, or add a colour cast to the scene. This is not always true of cheaper filters, but the well established filter brands (Lee, Singh-Ray) leave very little colour cast on the final image. The reason behind using an ND filter is to hold light back so that the part of the scene that is brightest (usually the sky) does not overexpose. This effect creates a pleasing image. The sky is well exposed and the foreground is correctly exposed as well.

If you were to expose the scene without using an ND grad filter, very often, the foreground would be well exposed while the sky may simply be overexposed or, if you were to expose for the sky, the foreground would be very dark. As I said earlier, you can do blending in Photoshop, but sometimes, you may not capture all the detail in the sky and using a filter to capture the scene may be useful. Also, you will be able to spend more time shooting and less time editing afterwards!

A set of ND grads in varius strengths

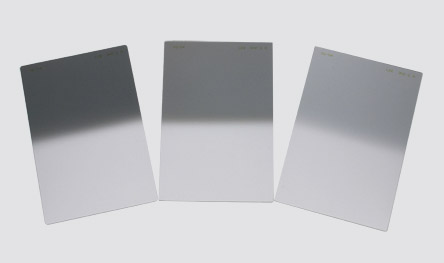
A set of ND grads in varius strengths

When should you use an ND grad filter?

Most landscape photographers will use them at sunrise or sunset, during the golden hour. You can also use them during the day to slow the shutter speed to make water smooth and silky. Blurring moving objects such as people, cars, buses or even trees blowing in the wind is also an option. What you will get is a well exposed, daylight scene with some blurred movement. This can look really interesting and dynamic in your image.

The reason you will want to use an ND grad filter is that there can be a substantial difference, light wise, between the sky and your foreground. If you have more than a two stop difference, you will probably need an ND grad filter to correct that and get a good, well balanced exposure. This not a rule, but if you try and average the exposure and you are finding that your foreground looks too dark and your sky is too bright, maybe it is time to use the filter.

An ND Grad was used in this image to expose the sky and clouds correctly

An ND grad was used in this image to expose the sky and clouds correctly

Types of ND grad filters

ND grad filters have a few variables. The first is whether the filter has a hard or soft edge. There is a reason for this and both types are useful. The hard edge filter has a very definite transition between the dark gradient part of the filter and the part that is clear. The soft edge filter gently blends the gradient across the filter, so the line is less obvious. Each one of these filters are used on different scenes. For example, the hard edge filter is really useful if you have a very definite horizon line (i.e. a seascape or a landscape scene where the horizon is pretty flat and straight). The soft edge filter is used for scenes where there is no clear horizon (i.e. a forest or street scene). Learning when to use which type of filter takes some practice, but once you can visualise what the result will look like, it is pretty easy.

Hard Edge and Soft Edge ND Grads

Hard Edge and Soft Edge ND Grads

ND grads come in different strengths

The filters are made in different strengths to compensate for different lighting conditions. Depending on the dynamic range (the difference between highlights and shadows) in your scene you can choose an ND grad filter that will be darker or lighter. Darker filters hold back more light and lighter filters, hold back less light. ND Grads are made in the following strengths 0.3 or one f-stop of light, 0.45 or 1.5 f-stops, 0.6 or two f-stops, 0.75 or 2.5 f-stops, 0.9 or three f-stops. The important calculation to remember is to try and keep your sky and your foreground within one stop of one another. Also, ND grads can be stacked if the light is really bright, so you can make the sky even darker, depending on the effect you want.

How do I use an ND grad filter?

It is easier than you might think. There are some technical details to think of, but once you have used grads a few times, it is really quite simple. Here is a process that works pretty well in most lighting conditions:

  1. Set up your camera on a tripod and take a light meter reading of the foreground. Making sure that your camera is on Manual, point it down and fill the viewfinder with the foreground to take the reading.
  2. Take a light meter reading in the same way as above, of the sky.
  3. Work out the difference between the two exposures and use an ND Grad to get your scene to within one stop of light difference. As an example, if the sky is three stops brighter than the foreground, you can use an ND Grad that blocks two f-stops of light or a 0.6 ND Grad.
  4. Slide the ND grad filter into place in front of the lens and determine the best position for the gradient to be in your image. If it is a hard horizon (i.e. a seascape scene) use a hard edge grad, if it is a forest scene, use a soft edge grad.
  5. Expose for your foreground and make the shot.
  6. Check the result on your LCD screen, zoom in on the image to make sure everything is properly exposed. Make any adjustments and shoot another image if necessary.

That’s it, simple really. Of course, as I said earlier, it takes a fair amount of practice to become adept at using these filters, but the results are worth it.

In this scene, the ND grad allowed the sky to be exposed properly and slowed the shutter speed won enough to blur the water

In this scene, the ND grad allowed the sky to be exposed properly and slowed the shutter speed down enough to blur the water.

Image editing

Once you have captured your well exposed scene, you will want to take it into Lightroom or Photoshop to put the finishing touches to the image. There are many different ways to enhance the image and make it really pop. I am not going to go into all the different adjustments you could make to the image except for one piece of advice. I will generally select the sky and the foreground separately and make a layer for each of them, then make separate adjustments to each. You may want to make the sky even more foreboding if it was a cloudy day, or perhaps brighten up the foreground a little more to show the detail. By doing this you will get the most out of the the light in the scene. Many photographers will convert their ND grad images into black and white because the movement and softness of the water in the scene can look very compelling in monochrome. The choice is yours.

What’s next?

To do this kind of photography, you will need to buy an ND grad or two. Some of the cheaper ND grads are a good place to start, brands like Cokin are good, and they are not especially pricey. The more expensive brands offer top quality, and in some cases the filters are hand made. If you find that you really love the effect these filters give, then you may want to invest in some Lee filters or Singh-Ray. These are top filter brands and the results from these products are amazing.

The most important thing to remember is to invest the time in getting the technique right and knowing how to use the equipment. Photography is all about practice and getting the technique right. Yes, good equipment helps, but the most important thing is practice. Once you have mastered the technique with a cheaper filter, then consider making the investment in the more expensive ones.

A final image after being processed in Photoshop

A final image after being processed in Photoshop

googletag.cmd.push(function() {
tablet_slots.push( googletag.defineSlot( “/1005424/_dPSv4_tab-all-article-bottom_(300×250)”, [300, 250], “pb-ad-78623” ).addService( googletag.pubads() ) ); } );

googletag.cmd.push(function() {
mobile_slots.push( googletag.defineSlot( “/1005424/_dPSv4_mob-all-article-bottom_(300×250)”, [300, 250], “pb-ad-78158” ).addService( googletag.pubads() ) ); } );

The post Using Graduated Neutral Density filters for Landscape Photography by Barry J Brady appeared first on Digital Photography School.


Digital Photography School

 
Comments Off on Using Graduated Neutral Density filters for Landscape Photography

Posted in Photography


Improve Your Images with the Lightroom Graduated Filter Tool

30 Apr

Using the Graduated Filter in Lightroom

The Lightroom Graduated Filter is a versatile tool for making local adjustments to your photos. Don’t be fooled by the name – it may be named after a type of filter used for making skies darker in landscape photography, but its uses go far beyond that.

Before we look at how you can use the Graduated Filter tool to improve your images, you may want to think about the style in which you’d like to process the photo. What is your ultimate aim? My article Finding and Achieving Your Style in Lightroom will give you some advice on figuring that out. Once you know what you want to do, the rest falls into place.

How to use Graduated Filters

Using the Graduated Filter in Lightroom

This is how you apply a Graduated Filter in Lightroom

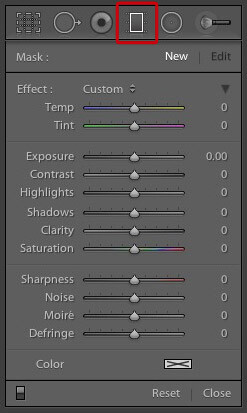
1. Click on the Graduated filter icon underneath the Histogram (the keyboard shortcut for it is “M”). The Graduated filter panel opens up beneath, revealing the sliders that you can adjust.

2. Hold the left mouse button down and drag the mouse across the image to place the Graduated filter. In this example I held the mouse button down while I dragged to create a wide Graduated Filter. There is a lot of space between the lines making up the filter, indicating that it will create a smooth graduation.

Using the Graduated Filter in Lightroom

3. If you let go of the mouse button early, you create a narrow Graduated Filter that gives a harder graduation. Drag the pin to position the Graduated Filter where you need it.

Using the Graduated Filter in Lightroom

Here, I set Exposure to -4.0 to show you the difference between the two types of Graduated Filter:

Using the Graduated Filter in Lightroom

This illustration shows the difference between creating a wide Graduated Filter (left) and a narrow one (right). Experiment with both to see how they affect your photos.

Now you know how to use the Graduated Filter tool, here a few ways you can make your photos better with it.

Note: you can reposition the placement by dragging the pin, or widen the gradation any time even after applying the filter. Just reactivate it, select it (the dot will be black) and adjust. To adjust the gradation just hover the mouse over one of the edges, click to grab it, hold down the mouse button and pull to widen or narrow the spread. 

1. Making skies darker

Let’s start with the obvious application of using the Graduated Filter to make the skies in landscape photos darker. Note that the Graduated Filter can’t rescue you if the sky in your photo is so overexposed that detail is lost – you may still need to use a neutral density graduated filter when you take the photo in the first place.

Using the Graduated Filter in Lightroom

Starting image

The first step is to make the sky darker. I did this by adding a Graduated Filter and pulling back Exposure to -1.81. Every photo is different, so use your eye to judge the Exposure adjustment required on your photos.

Using the Graduated Filter in Lightroom

Exposure -1.81 applied using the Graduated Filter

2. Adjusting Contrast and Clarity locally

My aim with this landscape was to make the foreground darker and sharper, directing the viewer’s gaze towards the horizon. I achieved this by adding another Graduated Filter from the bottom. But this time, as well as adjusting Exposure to -0.79, I increased Contrast to +20 and Clarity to +27:

Using the Graduated Filter in Lightroom

Bottom Graduated Filter applied, Contrast +20 and Clarity +27

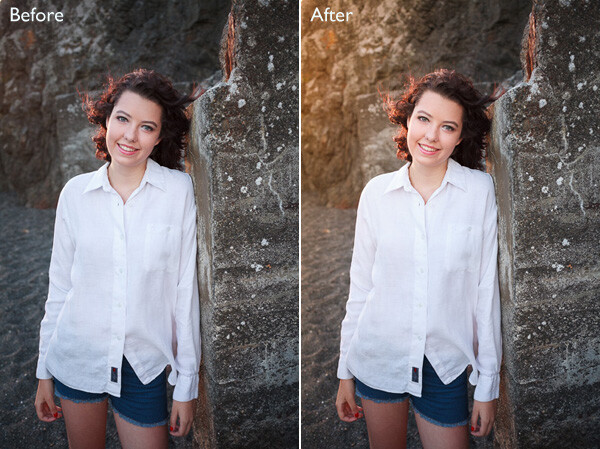
Here’s a before and after comparison, so you can see the difference adding the Graduated Filters has made. The two simple adjustments have transformed the photo.

Using the Graduated Filter in Lightroom

3. Adjusting White Balance

Another use of the Graduated Filter is to adjust colour temperature in part of the image. Sticking with the same landscape photo, I selected the top Graduated Filter to activate it and set Temp to 30. This warmed up the sky, emphasising the deep orange and red colours of the sunset:

Using the Graduated Filter in Lightroom

Be careful with adjusting Temp. If you push the slider too far the results may not look natural.

4. Making edges of your image darker

Moving away from landscapes, Graduated Filters are a handy way of making the edges of your images darker. This helps direct the viewer’s attention towards the focal point.

Using the Graduated Filter in Lightroom

This diagram shows roughly where I placed the three Graduated Filters. The benefit of using individual Graduated Filters (instead of the Radial Filter or Adjustment Brush) is that you can adjust each one individually.

Using the Graduated Filter in Lightroom

5. Adding a colour wash

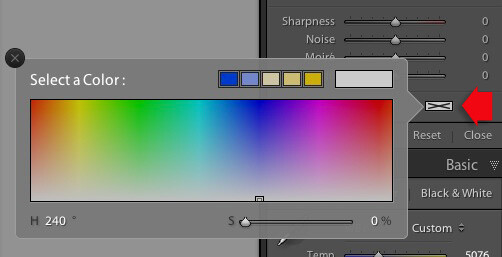
The Color setting at the bottom of the Graduated Filter panel lets you add a tint. It is laid over the filter in addition to the effects created by whichever sliders you choose to adjust. To select a colour, click on the colour picker icon at bottom of the Graduated Filter panel (the white rectangle with black cross inside indicates no colour has been selected) and select the colour you wish to add:

Using the Graduated Filter in Lightroom

Slider below is for adjust the Saturation of your selected color

One use of this is to add a colour wash to a photo, to make it look as though the subject is lit by the light from the setting sun. This technique works best when the subject was genuinely shot during the golden hour, and you use the Graduated Filter to emphasize that. In this example I selected an orange hue to imitate the sun and set Exposure to +1.16 to lighten that side of the image.

Using the Graduated Filter in Lightroom

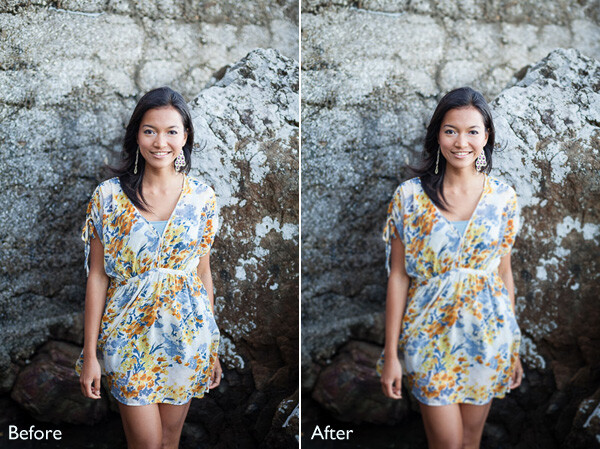
6. Lens blur effect

The Sharpness slider in the Graduated Filter panel is dual purpose. From zero to -50 it reduces sharpness. From -50 to -100 it creates lens blur. This lets you replicate the effect of using a tilt-shift lens or large format camera to create a photo with a tilted plane of focus. This is what it looks like. You may have to look closely – the model’s head is sharp but the areas at the top and bottom are not.

Using the Graduated Filter in Lightroom

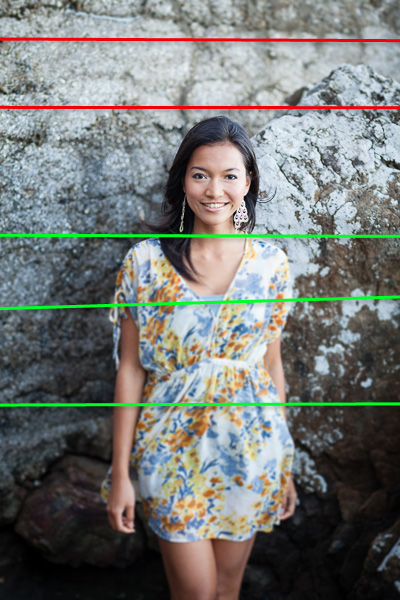
I created this effect by adding five Graduated Filters, two at the top, and three at the bottom, their position shown by the coloured lines. The effect works best with a narrow Graduated Filter.

Using the Graduated Filter in Lightroom

The red lines indicate where I added Graduated Filters with Sharpness set to -100 at top. The green lines show you where I placed three filters at the bottom. Spacing the Graduated Filters mean the effect is strongest at the edges, replicating the true effect of using a tilt-shift lens.

Hopefully these tips will help you use the Graduated Filter more creatively. Lightroom is great for processing your photos and understanding how its tools work will help you use it more effectively. If you’re new to Lightroom, then my article Seven Pieces of Advice for New Lightroom Users will help you get started. Once you’ve mastered the Graduated Filter, I suggest you read Four Ways to Improve Your Photos With the Clarity Slider in Lightroom or 3 Uses for the Radial Filter Tool in Lightroom 5 to learn how to use more of Lightroom’s fabulous tools. Have fun!

By the way, I’m curious to hear how you use Graduated Filters in Lightroom. What techniques have you come up with? Please share them with other readers in the comments.


Mastering Lightroom: Book One and Two
mastering-lightroom-bundle-1

My Mastering Lightroom ebooks are a complete guide to using Lightroom’s Library and Develop modules. Written for Lightroom 4 & 5 they take you through every panel in both modules and show you how to import and organise your images, use Collections and creatively edit your photos.

The post Improve Your Images with the Lightroom Graduated Filter Tool by Andrew S. Gibson appeared first on Digital Photography School.


Digital Photography School

 
Comments Off on Improve Your Images with the Lightroom Graduated Filter Tool

Posted in Photography