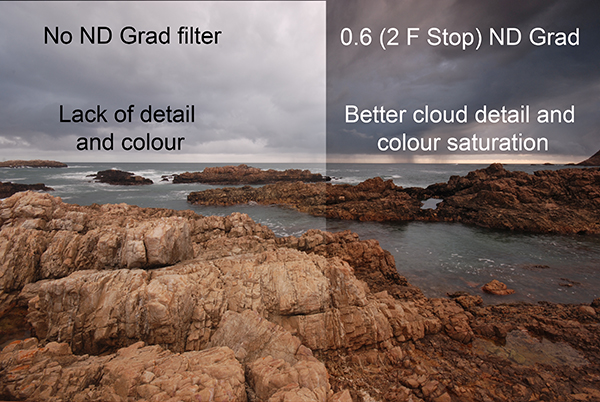
You can see the effect a graduated neutral density filter has on the scene
One of the biggest challenges in photography is managing the light in your scene. It is for this reason that many landscape photographers love to be out shooting during the golden hours or blue hour when the light is beautiful and the contrast is manageable. Contrast is tough to manage on bright days and in certain scenes, but there are a few ways to work around this. In this article we are going to look at the usefulness of using neutral density gradient filters (aka ND grads). These filters have been around for a long time, most landscape photographers will have a set of them in their camera bag.
Filters or Photoshop?
In recent years, there has been an ongoing debate around whether it is better to use filters or to bracket the images and blend them in Photoshop afterwards or even use HDR to capture all the different tonality and light in a scene. In many cases this is a personal preference, and I switch between the two depending on the scene or the vision I have of the image I want to make.
If I am shooting during golden hour I will most often use an ND grad filter. If I am doing a starscape, I will take two images and blend them, one for the sky and one for the foreground. The reason is this. At golden hour, I can expose for the ambient light and use a filter to keep the detail in the sky. If I want a starscape (not a star trail) I need to push my ISO up really high and if there is something in the foreground of the scene that is a little too bright, it will overexpose. My first shot will be an image that will expose the the scene properly. For my second shot, I will expose the sky to capture a starscape shot. Afterwards, I will blend them in Photoshop, which really works well.
In some cases, there is no substitute for an ND grad. If you want the waves in a seascape scene to become silky smooth or a river to look soft and white, then you will need to use ND grads. This effect cannot be made in Photoshop (not yet anyway). The best part about using ND grads is the surprise you get when you see the image on the screen. You will be amazed at the effect of capturing the blurred movement of different elements in your image.
What is a graduated neutral density filter (ND Grad)?
Essentially it is a rectangular, optically correct piece of resin or glass with a gradient from dark to light. It is called “neutral” because the dark part of the filter should not make any colour differences, or add a colour cast to the scene. This is not always true of cheaper filters, but the well established filter brands (Lee, Singh-Ray) leave very little colour cast on the final image. The reason behind using an ND filter is to hold light back so that the part of the scene that is brightest (usually the sky) does not overexpose. This effect creates a pleasing image. The sky is well exposed and the foreground is correctly exposed as well.
If you were to expose the scene without using an ND grad filter, very often, the foreground would be well exposed while the sky may simply be overexposed or, if you were to expose for the sky, the foreground would be very dark. As I said earlier, you can do blending in Photoshop, but sometimes, you may not capture all the detail in the sky and using a filter to capture the scene may be useful. Also, you will be able to spend more time shooting and less time editing afterwards!
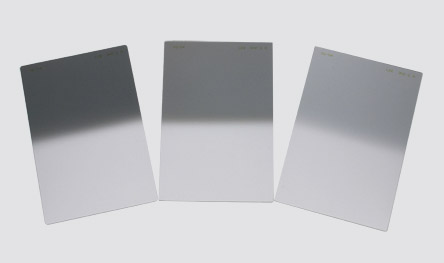
A set of ND grads in varius strengths
When should you use an ND grad filter?
Most landscape photographers will use them at sunrise or sunset, during the golden hour. You can also use them during the day to slow the shutter speed to make water smooth and silky. Blurring moving objects such as people, cars, buses or even trees blowing in the wind is also an option. What you will get is a well exposed, daylight scene with some blurred movement. This can look really interesting and dynamic in your image.
The reason you will want to use an ND grad filter is that there can be a substantial difference, light wise, between the sky and your foreground. If you have more than a two stop difference, you will probably need an ND grad filter to correct that and get a good, well balanced exposure. This not a rule, but if you try and average the exposure and you are finding that your foreground looks too dark and your sky is too bright, maybe it is time to use the filter.
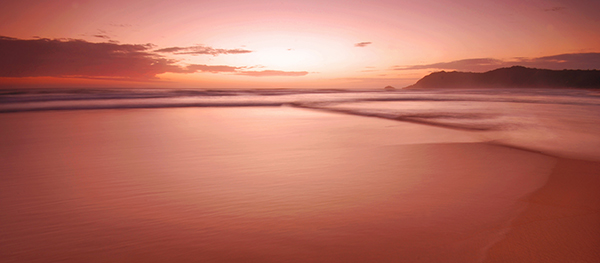
An ND grad was used in this image to expose the sky and clouds correctly
Types of ND grad filters
ND grad filters have a few variables. The first is whether the filter has a hard or soft edge. There is a reason for this and both types are useful. The hard edge filter has a very definite transition between the dark gradient part of the filter and the part that is clear. The soft edge filter gently blends the gradient across the filter, so the line is less obvious. Each one of these filters are used on different scenes. For example, the hard edge filter is really useful if you have a very definite horizon line (i.e. a seascape or a landscape scene where the horizon is pretty flat and straight). The soft edge filter is used for scenes where there is no clear horizon (i.e. a forest or street scene). Learning when to use which type of filter takes some practice, but once you can visualise what the result will look like, it is pretty easy.
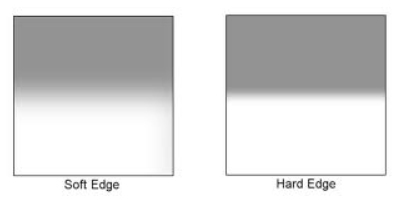
Hard Edge and Soft Edge ND Grads
ND grads come in different strengths
The filters are made in different strengths to compensate for different lighting conditions. Depending on the dynamic range (the difference between highlights and shadows) in your scene you can choose an ND grad filter that will be darker or lighter. Darker filters hold back more light and lighter filters, hold back less light. ND Grads are made in the following strengths 0.3 or one f-stop of light, 0.45 or 1.5 f-stops, 0.6 or two f-stops, 0.75 or 2.5 f-stops, 0.9 or three f-stops. The important calculation to remember is to try and keep your sky and your foreground within one stop of one another. Also, ND grads can be stacked if the light is really bright, so you can make the sky even darker, depending on the effect you want.
How do I use an ND grad filter?
It is easier than you might think. There are some technical details to think of, but once you have used grads a few times, it is really quite simple. Here is a process that works pretty well in most lighting conditions:
- Set up your camera on a tripod and take a light meter reading of the foreground. Making sure that your camera is on Manual, point it down and fill the viewfinder with the foreground to take the reading.
- Take a light meter reading in the same way as above, of the sky.
- Work out the difference between the two exposures and use an ND Grad to get your scene to within one stop of light difference. As an example, if the sky is three stops brighter than the foreground, you can use an ND Grad that blocks two f-stops of light or a 0.6 ND Grad.
- Slide the ND grad filter into place in front of the lens and determine the best position for the gradient to be in your image. If it is a hard horizon (i.e. a seascape scene) use a hard edge grad, if it is a forest scene, use a soft edge grad.
- Expose for your foreground and make the shot.
- Check the result on your LCD screen, zoom in on the image to make sure everything is properly exposed. Make any adjustments and shoot another image if necessary.
That’s it, simple really. Of course, as I said earlier, it takes a fair amount of practice to become adept at using these filters, but the results are worth it.
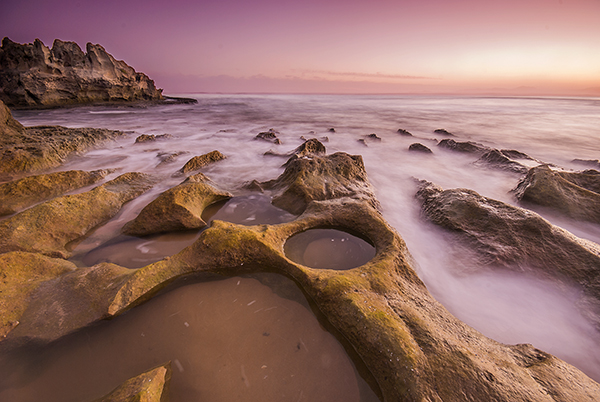
In this scene, the ND grad allowed the sky to be exposed properly and slowed the shutter speed down enough to blur the water.
Image editing
Once you have captured your well exposed scene, you will want to take it into Lightroom or Photoshop to put the finishing touches to the image. There are many different ways to enhance the image and make it really pop. I am not going to go into all the different adjustments you could make to the image except for one piece of advice. I will generally select the sky and the foreground separately and make a layer for each of them, then make separate adjustments to each. You may want to make the sky even more foreboding if it was a cloudy day, or perhaps brighten up the foreground a little more to show the detail. By doing this you will get the most out of the the light in the scene. Many photographers will convert their ND grad images into black and white because the movement and softness of the water in the scene can look very compelling in monochrome. The choice is yours.
What’s next?
To do this kind of photography, you will need to buy an ND grad or two. Some of the cheaper ND grads are a good place to start, brands like Cokin are good, and they are not especially pricey. The more expensive brands offer top quality, and in some cases the filters are hand made. If you find that you really love the effect these filters give, then you may want to invest in some Lee filters or Singh-Ray. These are top filter brands and the results from these products are amazing.
The most important thing to remember is to invest the time in getting the technique right and knowing how to use the equipment. Photography is all about practice and getting the technique right. Yes, good equipment helps, but the most important thing is practice. Once you have mastered the technique with a cheaper filter, then consider making the investment in the more expensive ones.

A final image after being processed in Photoshop
googletag.cmd.push(function() {
tablet_slots.push( googletag.defineSlot( “/1005424/_dPSv4_tab-all-article-bottom_(300×250)”, [300, 250], “pb-ad-78623” ).addService( googletag.pubads() ) ); } );
googletag.cmd.push(function() {
mobile_slots.push( googletag.defineSlot( “/1005424/_dPSv4_mob-all-article-bottom_(300×250)”, [300, 250], “pb-ad-78158” ).addService( googletag.pubads() ) ); } );
The post Using Graduated Neutral Density filters for Landscape Photography by Barry J Brady appeared first on Digital Photography School.
You must be logged in to post a comment.