RSS
 

Posts Tagged ‘Build’

6 Tips for How to Build a Story and Shoot a Photo Project

04 Nov

I’m a strong believer that setting yourself photo projects is the best way to improve your photography skills. Projects give you focus and help you build a cohesive body of work. A photo project can last for years, and set a theme that helps you find new people and subjects to photograph.

Of course, you may be wondering what sort of project you could set yourself that would achieve these aims. A project can be simple, like photographing flowers in your back yard, or it can be more complex, such as travelling to a foreign country and photographing the people you find there.
storytelling-projects-22

Getting ideas for a photo project

You’ll find lots of inspiration at websites like Feature Shoot that regularly publish photo projects.

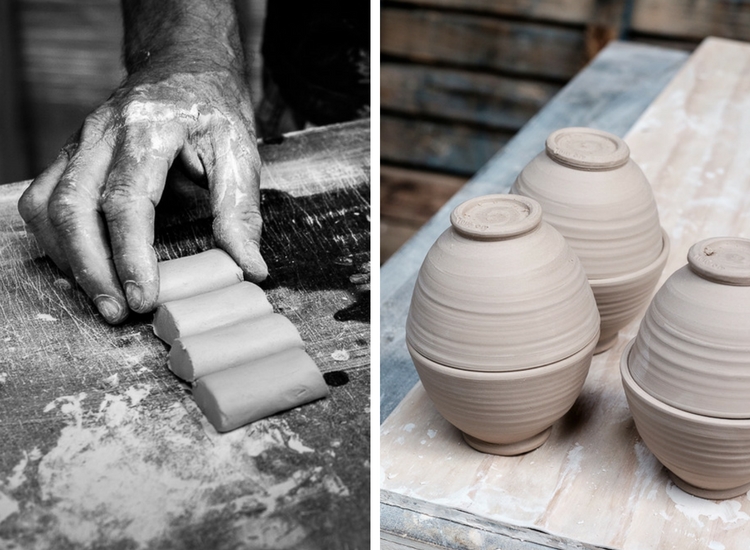
I’m going to give you some advice on tackling a project by giving you some examples from a project that I undertook to photograph artists and craftspeople. I have learned a number of things from this project.

Here are some of the most important:

  • Meeting new people and learning about their crafts is interesting. I like meeting and talking to new people and learning about their lives. The brief window I have during the shoot is a chance to connect and talk about art and creativity, as well as the work of the artist or craftsperson. Some of those people have become friends. This project has rewarded me on a personal level as well as on a photographic one.
  • It helps me find something interesting to photograph. For example, 18 months ago I spent three days in Raglan, a small town on the west coast of New Zealand’s North Island. Before I went, I contacted two local craftspeople and asked if I could drop by and take some photos. Both said yes – and I made my most interesting photos on the trip during those two shoots.
  • The project grows by itself. I send photos to the people I photograph, then ask them if they know of anybody else who may be interested. These personal introductions and recommendations help me find new artists and craftspeople to photograph.
  • My portraiture skills have improved. Practice makes perfect, and every shoot means I get a little better at this documentary style of portraiture.

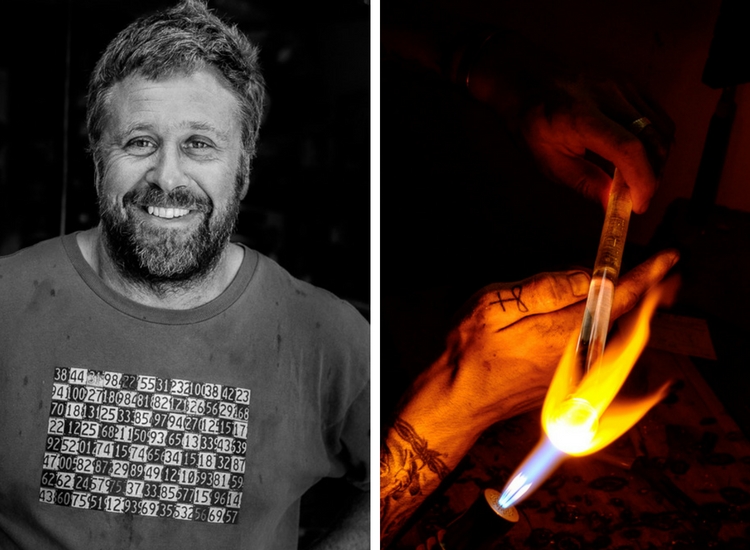
Here’s a portrait I made of artist Chris Meek, one of the artists I photographed in Raglan. We had a great conversation about art, creativity, and life. I’d never have had this experience if I hadn’t embarked on the project.
storytelling-projects-20

So, once you’ve decided on a project, how do you make it a success? These ideas will help.

1. Shoot a variety of images

This is important because it adds interest and variety to the photos you get from the shoot. But I’d like to add a proviso, because I think in general there are two ways to approach a project shoot.

Firstly, is to concentrate all your resources on getting one great photo. The second is to create a set of varied photos that collectively give a better interpretation and tell a story.

My suggestion is to combine these two approaches. Aim to create a variety of photos, but give each photo your best effort. In other words, when you see the possibility of an image, give it your full attention and make it as good as you can before you move on to the next.

storytelling-projects-17

How do you create variety? Here are two ways:

1. Vary your viewpoint. Get closer to your subject, or farther away. Take photos from below, or from above. Of course, the best viewpoint depends a lot on the subject of your project, the light, and the lenses you are using. But the key is to always be thinking about how you can add variety by moving around and taking photos from different angles.

2. Take scene setting shots and close-ups. You could start with a scene-setting photo that captures everything, then move on and create a variety of photos from closer viewpoints showing details.

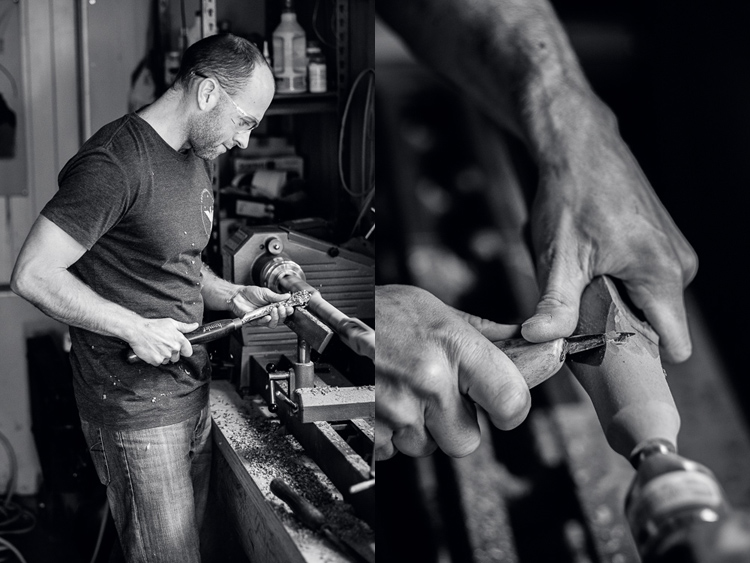
This works well for projects like mine, where you can take a photo of the artist or craftsperson at work in their studio, along with a series of tighter images and close-ups that show them at work. In this example, you can also take photos of the product the craftsperson makes as well as photos of the craftsperson themselves.

These two photos show Todd, a flute maker, working in his garage. Both were taken with the same lens, but I got a lot closer to make the second image.
Story telling and doing a creative photo project

This also applies to more static subjects like landscapes. If you have a landscape related project, you can create variety with photos that show the entire scene, mixed with some that show close-ups of details that you noticed within the scene.

2. Tell a story

It’s often hard to a story with a single image, but it’s much easier with a sequence of photos because you can show different aspects of the same story in each one.

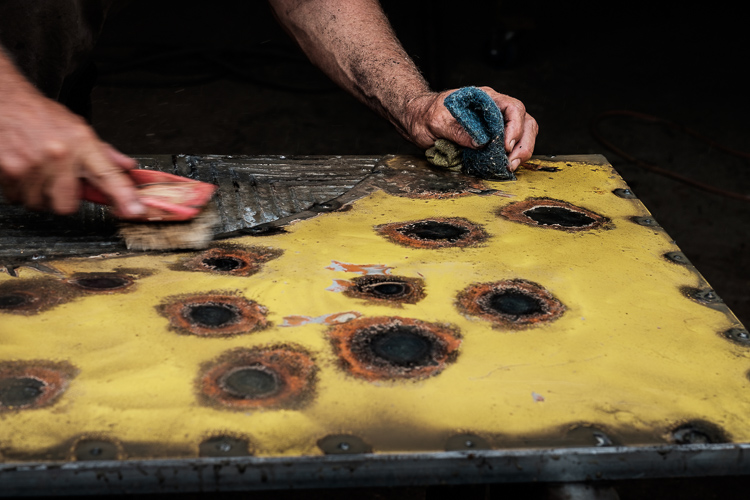
For example, with my photos of craftsmen I like to show images taken at different stages of the creation process. Put together they show how a certain item was made. That’s the story. These three photos show different stages in the creation of an artwork by Chris Meek.
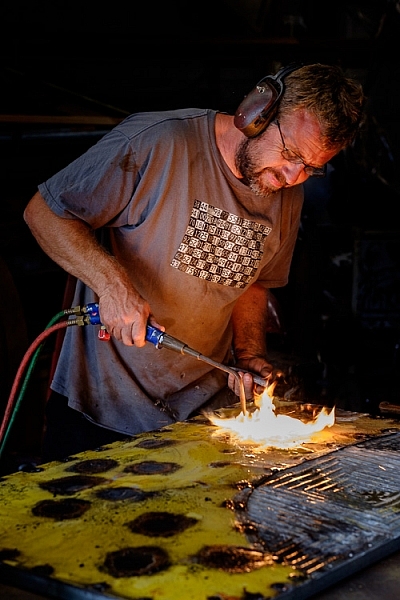
storytelling-projects-6

storytelling-projects-5 storytelling-projects-7

You can also tell a story by paying attention to detail. While taking photos of Eoin, a glass blower, I noticed that his hands gave away a lot about his profession. So I made sure that I took photos like this, that shows the dirt on his hands and the tattoo on his thumb.
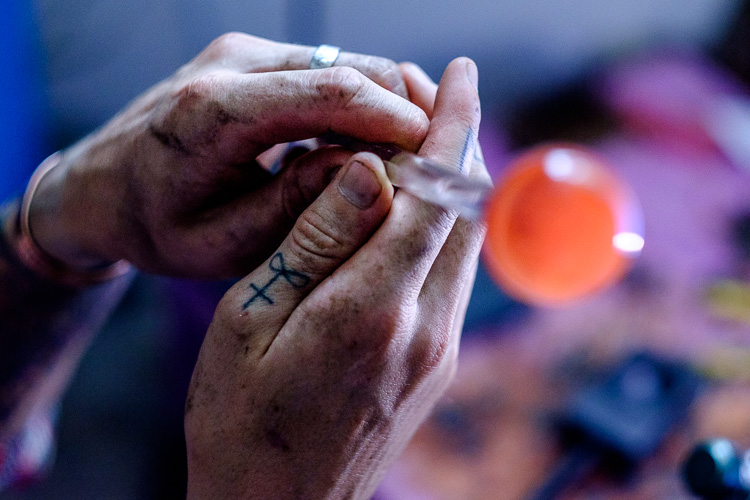
Story telling and doing a creative photo project

3. Find commonalities that link the photos

While photo stories need variety amongst the images to create interest, it is helpful if the photos are also linked in some way. For example, you could process all the photos from a shoot in black and white. Or they could be processed in a similar style, perhaps by using the same Lightroom Develop Preset as the basis for the processing.

Or, if you have a project that involves portraits, you could use light to link the photos. Using the same lighting setup for each portrait is one way to to do that.

These photos of Jasmin, a weaver who makes hats, are linked by the lighting and the processing. Each is lit by natural light coming through a window in her home, and given the same color treatment in Lightroom.
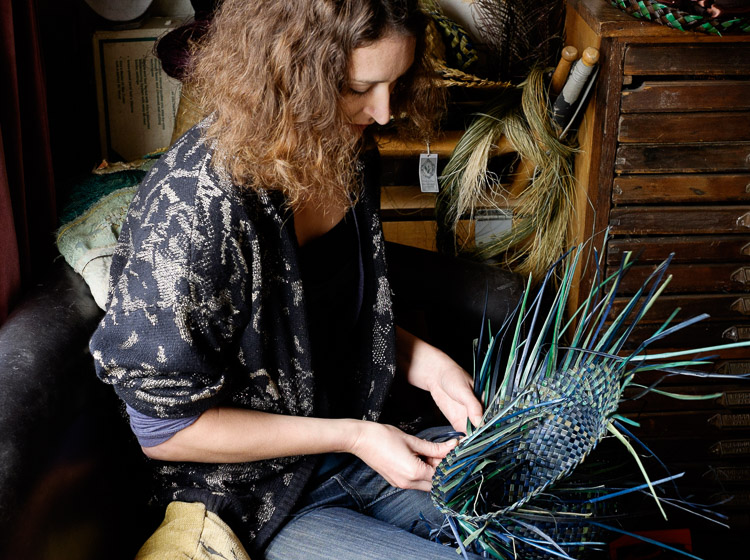
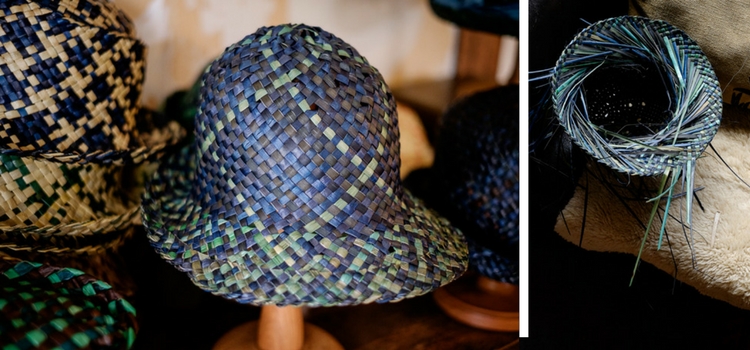
storytelling-projects-9

storytelling-projects-21

4. Show genuine interest in people

If your project involves people it is important to be genuinely interested in them and what they are doing. Let’s say, for example, you undertake a project taking portraits of surfers. You’ll get the best results if you are genuinely interested in surfing and enjoy talking with surfers.

It’s all about authenticity. If you’re genuinely interested in people, you will have plenty in common and find it easy to talk with them. But, if you’re not, then you won’t make the connection that is essential for good portraiture.

5. Give it time

Give your projects time to evolve and mature. For example, if you have a project photographing your local landscape, giving it time lets you create a series of photos that show the variation created by weather and seasons. Showing the changes that happen over a period of time is also another way of telling a story.

6. Compare and evolve

The reason why projects are such a good learning experience is because they give you the opportunity to compare your current work with your earlier photos. You will see how your ideas and techniques have evolved over time. You’ll also benefit by building a body of work and learning to edit a portfolio by selecting the strong images that work together.
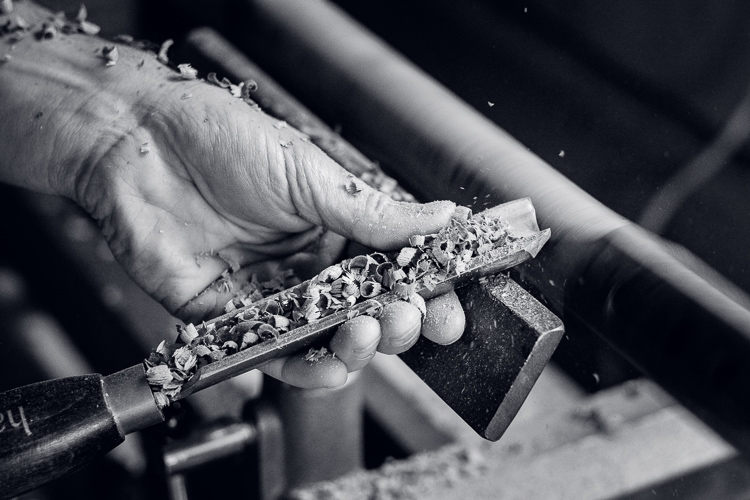
Story telling and doing a creative photo project

Your turn

Have you undertaken any photography projects? Did they help you become a better photographer? Please share your thoughts and project in the comments below.


The Creative Image

If you found this article interesting then please download my free ebook, The Creative Image for 10 brilliant ideas for creative photography projects you can do.

googletag.cmd.push(function() {
tablet_slots.push( googletag.defineSlot( “/1005424/_dPSv4_tab-all-article-bottom_(300×250)”, [300, 250], “pb-ad-78623” ).addService( googletag.pubads() ) ); } );

googletag.cmd.push(function() {
mobile_slots.push( googletag.defineSlot( “/1005424/_dPSv4_mob-all-article-bottom_(300×250)”, [300, 250], “pb-ad-78158” ).addService( googletag.pubads() ) ); } );

The post 6 Tips for How to Build a Story and Shoot a Photo Project by Andrew S. Gibson appeared first on Digital Photography School.


Digital Photography School

 
Comments Off on 6 Tips for How to Build a Story and Shoot a Photo Project

Posted in Photography


Kano Camera Kit lets anyone build and program their own camera

29 Sep

Kano, a maker of DIY educational tools, is seeking crowdfunding for a trio of DIY project kits, one of which is its new educational Camera Kit. The Camera Kit enables anyone to build a simple camera and then program it with various functions using drag-and-drop code, the goal being to impart an overall knowledge of how cameras and their related software work.

The camera is assembled from pre-made parts using an included instructional ‘storybook.’ DIYers can choose which lens they want to use — a macro, fisheye, or wide-angle — and can add both a flash and a trigger. The Camera Kit also includes a Tripwire Sensor which, when added, emits an infrared beam. If someone or something moves through the beam, the camera will snap a picture.

Various functions can be added via the programming software, including features like triggering photos via sound using an integrated microphone, adding real-time data to photos like the current weather, and more. The software also enables users to create their own photo filters.

Overall, the Camera Kit features the camera ‘brain,’ an LED ring flash, tripwire sensor, mode dial, lenses, viewfinder, battery, charging cable, tripod, lanyard, camera case, storybook and stickers.

The Camera Kit is one of three project kits Kano is seeking funding for on Kickstarter. As with the other two kits, the Camera Kit is offered as a $ 99 pledge, with estimated retail cost being $ 129.99. Kano anticipates shipping its Camera Kit to backers in March 2017.

Articles: Digital Photography Review (dpreview.com)

 
Comments Off on Kano Camera Kit lets anyone build and program their own camera

Posted in Uncategorized


Affinity Photo for iPad early build showcased at Apple’s WWDC 2016

15 Jun

At Apple’s Worldwide Developer’s Conference 2016, software maker Serif demonstrated an early build preview of its Affinity Photo for iPad software. Affinity Photo is a Photoshop alternative currently available for macOS with, as previously announced, a Windows version in the pipeline. This newly demonstrated version of Affinity Photo is designed specifically for the iPad, and brings with it the same features found on the desktop version.

Though the company hasn’t formally detailed all of the iPad version’s functionality, the video does showcase a handful of features and capabilities, including a high level of performance enabling it to handle very high resolution photos, full 32-bit HDR editing, the ability to view and edit panoramas in a 360-degree view, and focus merging.

‘We’ve still got a load of work to do on [the iPad version],’ Serif stated, ‘but we thought you might like a peek.’ An anticipated release date was not provided. The company currently offers a macOS version for $ 49.99, while Windows users can sign up for access to a pending Windows beta release.

Articles: Digital Photography Review (dpreview.com)

 
Comments Off on Affinity Photo for iPad early build showcased at Apple’s WWDC 2016

Posted in Uncategorized


5 Tips to Help Build Your Confidence in Photography

14 Jun

Think of your last bad day of photography, a time where you just blew a whole batch of portraits, or even a couple’s wedding day images were spoiled. As photographers you can’t go back and fix that. Yes if you use RAW, you can get some info back from under or over exposed shots, and editing tools these days can be incredibly useful. But, when you spend more time behind the computer than with you camera it can be a real confidence buster. It may even be taking away from future business, if not your enjoyment of photography.

So how do you build your confidence?

confidence in photography

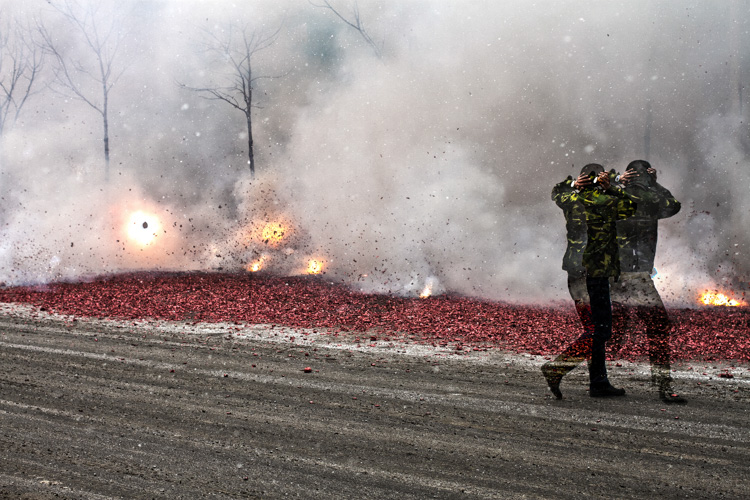
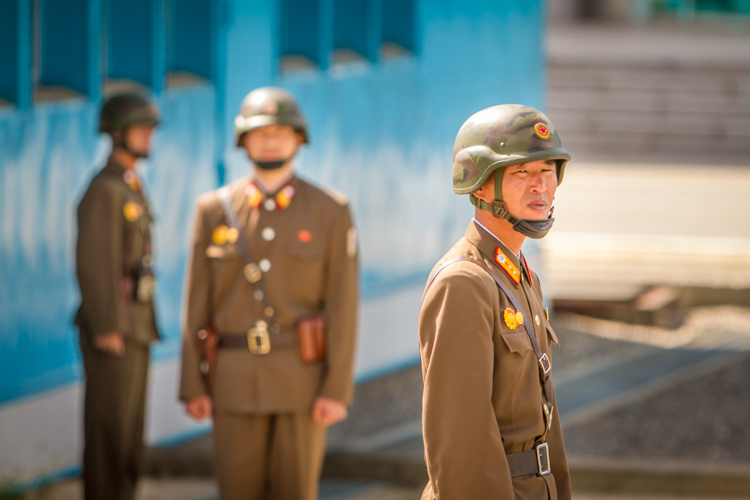
These DPRK soldiers show confidence and loyalty guarding the DMZ and the 38th parallel of Korea. The soldiers at Buckingham Palace don’t flinch, and that takes practice.

Having confidence exudes confidence, but where does real confidence come from. Well it doesn’t just come from nowhere, that is often called arrogance. It comes from the awareness of your emotional state relative to your cognitive abilities.

If you use your emotions to create, you are being confident. If your emotions are overwhelming you during your shot or photo series, you are likely under-confident. By the book, you may know everything there is to know about the exposure triangle, rule of thirds, color theory, etc., but when you are actually shooting do they do more to help, or do they hinder you?

Confidence is a delicate balance between what you know, and how well you are capable of performing. So let’s look at a couple of examples and analogies to help build your confidence as a photographer.

#1 – Confidence isn’t always consistent

Real confidence is never consistent, and has its slumps. Professional sports is a great example, even superstars have an off night.

So when you have an off night, remember another night is just 12 hours away. If it is the morning, it is still 12 hours away. Even a broken clock is correct twice a day, so don’t beat yourself up. In the short run you may have really blown a photo shoot, or missed the animal of your dreams because you were not being conscious about your settings, or you were simply absent minded. But that is the short term, and as long as you get right back out there, the better off you are going to be.

The best of the best all fail, but what keeps them on top of their game is the arduous task of owning up to being human, and going out to find a solution to your goof. In the long run, they will be memories that you get to look back on with a laugh.

confidence in photography

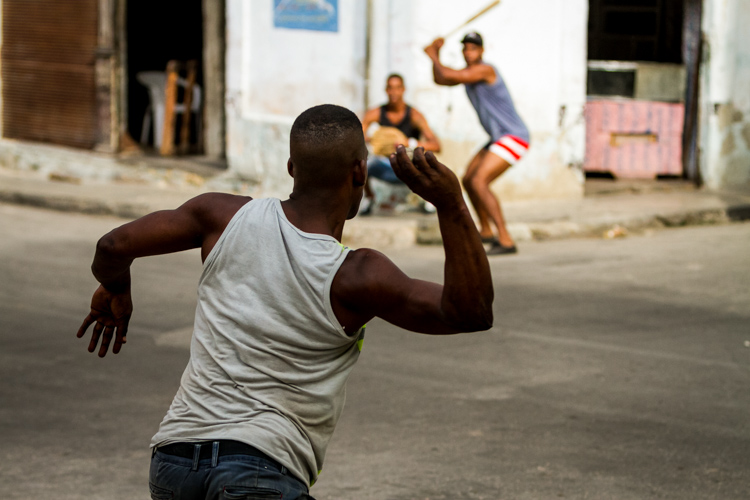
Baseball is a national pastime in Cuba. Although it was my first time shooting baseball in the barrios of Havana, it wasn’t my first time shooting it.

#2 – Learn from your mistakes

Few people are perfect photographers from birth. Generally, talent comes through sweat, tears, and sometimes even blood. If you make mistakes you can learn from them. Confidence has a conspiracy with failure. So take two steps forward, and one step back. Stay committed, and speaking of commitment and blood, I am not the only photographer who has taken a tumble, and when people ask you if you are okay, you respond with, “Yes the camera is fine”, while your knees and elbow are bleeding.

confidence in photography

Continuing with the baseball theme, after striking out, it only took one big swing to make the winning home run. Don’t give up, live, learn and keep swinging for the fences.

#3 – Be vulnerable

Enter a photo contest, and don’t expect to win. It is a final process of completing the photography and artistic conceptual circle. Letting your photo hang on a wall, while others look at it, even for a few minutes, is a scary prospect for some. But think of leaving your freshly baked pie on the dinner table, and just looking at it. We don’t do that with food, nor should we do that with our photography.

People will love it, like it, dislike it, or downright hate it, but that doesn’t mean you are wrong. It means you have succeeded in making the photography world just a little more interesting. You also never know who you will inspire. Your vulnerability will soon become a strength that will help build your confidence.

confidence in photography

After years of holding on to this photo, I finally entered it into a regional photography competition. It got in, and although I was not a recipient of anything, another gallery called a month later and wanted to host my work for a show.

#4 – Learn from others BUT don’t compare yourself to them

There is a world of knowledge available, and many people who you can learn from. Use them, ask them questions, share ideas – but don’t compare yourself to them. Generally when you compare your own work to others, it may leave you with a sense of there’s more to be desired, and a sense of failure. So learn from their perspectives, their tutorials, and their stories, but don’t get caught up in who is better.

A happy photographer is the best photographer. Furthermore, over time you will begin to see the merits in some of your earlier experimental work. Perfection is not the goal, it is the journey to becoming a more enriching photographer.

IBQ 0174
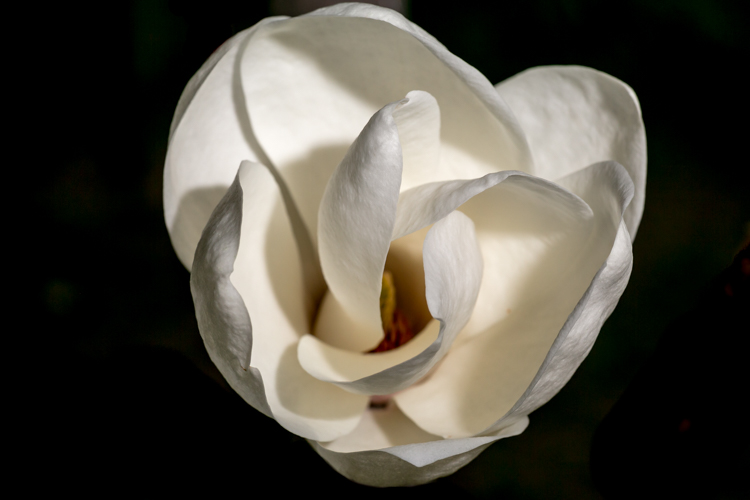
This Magnolia opening in spring was taken in full sunlight. I saw a series of flowers on a photo stream, and realized I had not taken a photo of something beautiful in a long time. This helped me learn to see, and if our images were side by side, I am sure theirs was better. But I enjoyed doing something different than what I normally shoot.

#5 – Avoid gear envy

There will always be something bigger and better, wait another year and the next new version will be out. So don’t get intimidated by other photographers’ gear, and more importantly don’t let your photos depend on your gear. Think of it as a challenge.

confidence in photography

Taken with a 50mm, manual focus lens from my father’s box of forgotten things, that I found rummaging through his old stuff. Lenses and cameras are fun to have, and fun to buy, but they don’t make the photo.

A small trick I use when the next new thing comes out, and I get in that spiral of getting all gear-junkie about it is to look at some of the classic photographers from 100 years ago or read up on some color theory. This gets me back to the basics, try it yourself.

So if you realize that every showing will not be your best, you can get over thinking that your gear dictates the success and failure of your photos, if you can start to learn from your mistakes, and begin to hang photos on a wall – then guess what? Your confidence will begin to grow, you will have more control (and more power) over photography (situations, light, camera gear, etc.). As your confidence grows it builds and builds on itself.

The next six areas are examples of how confidence will help you in that style of photography. Part one is developing confidence, and part two is a set of examples of how confidence can help in different situations.

How confidence can help you take better photos

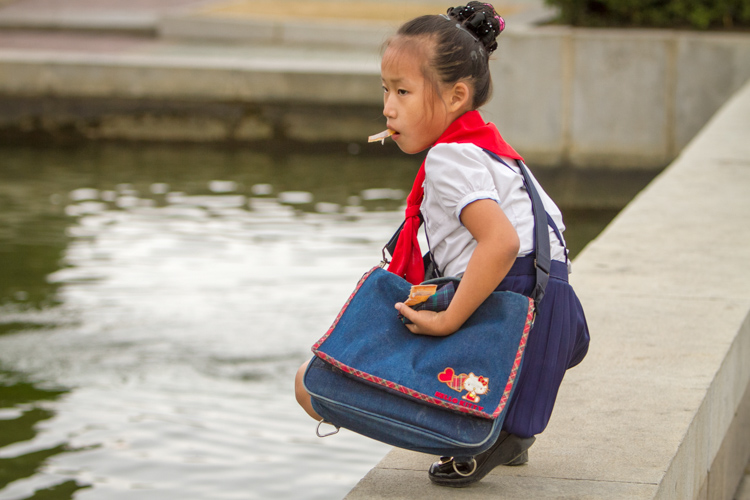
In portraiture, confidence helps you connect with, and calm your subject, to bring out their inner spirit. There is little worse than a nervous model and a nervous photographer. Even if you are not 100% sure what you’re doing, show confidence, take your time, and slowly adjust your settings to get things closer to your ideas. Try and keep from getting frustrated and making large adjustments wildly to your gear.

confidence in portrait photography

This young girl in North Korea had never seen an American before, but after me keeping my cool she was much more approachable.

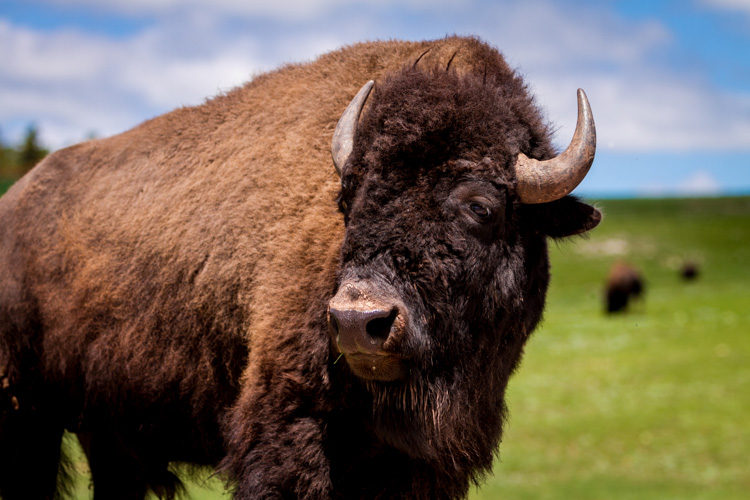
In wildlife photography, confidence lets you trust your gut, and get in the right place at the right time. Luck is important, but perseverance will ultimately lead to success. Having confidence will give you the extra optimism to keep you going, as you wait patiently.

confidence in wildlife photography

On a long road trip from east to west across the US, I hadn’t run into any large animals. In Wyoming I decided to go for another shot at an indiscrete state park, and there were buffalo everywhere.

In travel photography, confidence helps you see beyond the postcard shot. Confidence allows you to see your journey, not the one that is in the travel books. It helps you see the subtleties, and personalize your travel story, rather than trying to just take the photo that everyone else wants you to take.

confidence in travel photography

This sassy little Cuban was just parading on her porch. I walked by without grabbing my camera, then discreetly turned around and caught her exuding luxury, Cuban style.

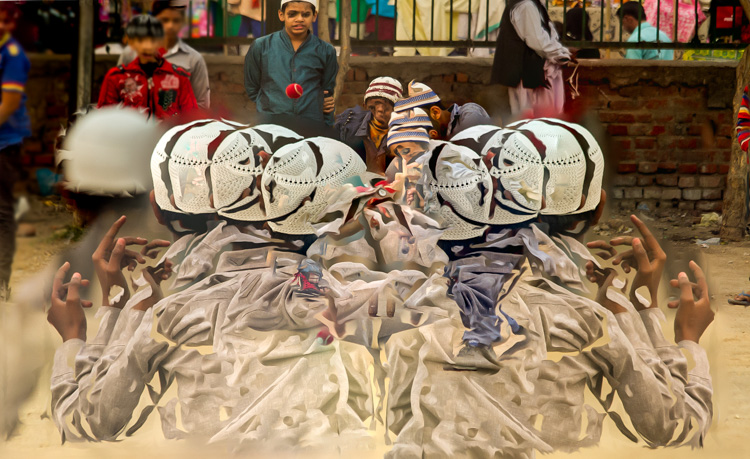
In fine art photography, confidence will allow your creative side to flow. It will allow you to access what is sometimes referred to in sports as “being in the zone.” This zone, or flow is your brilliance at its best, and confidence supports your ambitions as an artist.

IMG 2012 Edit Edit

One of my favorite images from India, where cricket matches were being played. Using multiple exposures, then giving it a symmetrical clone, I produced something that I cherish. Maybe only you like your photo, but that is what being true to yourself is all about.

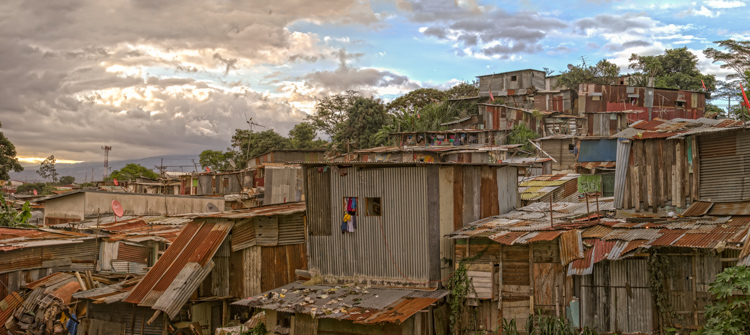
In bad weather confidence helps you see the silver lining. For all types of photography we rely on light. A great source of light is outdoors, and when that golden hour turns to wind and rain you have a choice – pack up and go, or think outside the box. Confidence helps you control your surroundings, even when they are out of control, so you can begin to work within them, and use them to your advantage.

IBQ 4876 Edit Edit 2
I can’t say that the weather was bad here, but the timing was. I was just getting to a ghetto outside of San Jose, Costa Rica at night. I wanted to get in and out before I felt compromised, unsafe. So regardless of if it’s bad weather, or bad timing, confidence can help you to push through.

In tough times confidence gives you the grit to continue. Really, this is what a lot of photography comes down to – do you have the gumption to get up early for sunrise, or not? Can you give a genuine smile to your client, even when you are not having the best day? Can you be satisfied with the gear you have, and not think about the next lens you want to get? Can you be the best photographer you can be?

confidence in photography

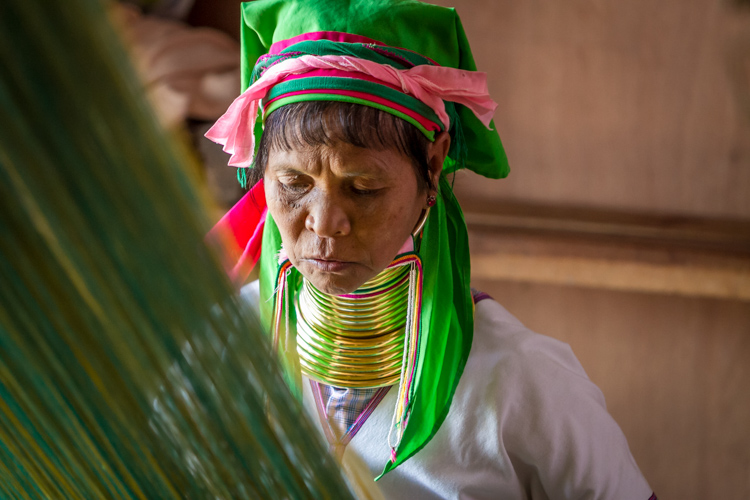
Symbolically this Burmese woman has had a few more tough times than I have. Confidence in photography will help you put things into perspective.

Confidence is hard to gain and can take years to attain. It is a process, and is easier for some than others. But if you work at it, it will build. Just as you work on other aspects of your photography, your emotions need work to. Confidence is an emotion, so practice with your feelings, and let them grow alongside the cerebral aspects of photography. Be mindful of your emotions, not fearful of them.

Do you have any other confidence building tips? If so, please share them in the comments below.

googletag.cmd.push(function() {
tablet_slots.push( googletag.defineSlot( “/1005424/_dPSv4_tab-all-article-bottom_(300×250)”, [300, 250], “pb-ad-78623” ).addService( googletag.pubads() ) ); } );

googletag.cmd.push(function() {
mobile_slots.push( googletag.defineSlot( “/1005424/_dPSv4_mob-all-article-bottom_(300×250)”, [300, 250], “pb-ad-78158” ).addService( googletag.pubads() ) ); } );

The post 5 Tips to Help Build Your Confidence in Photography by Branson Quenzer appeared first on Digital Photography School.

Digital Photography School

 
Comments Off on 5 Tips to Help Build Your Confidence in Photography

Posted in Photography


Rainbow Nests: What Wasps Build with Colored Construction Paper

14 Apr

[ By WebUrbanist in Art & Sculpture & Craft. ]

colored wasp nests

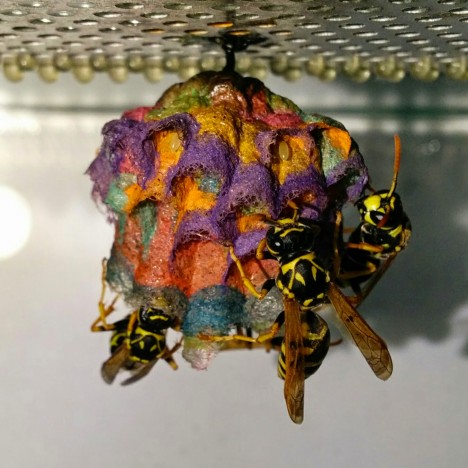
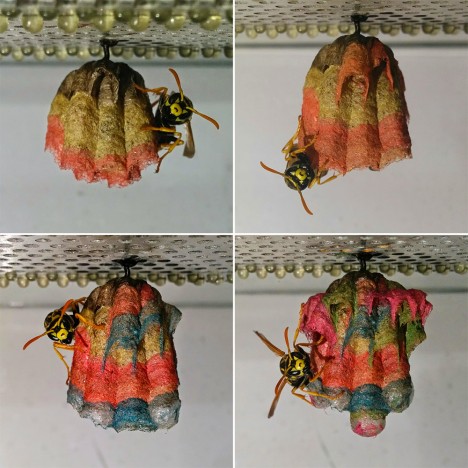
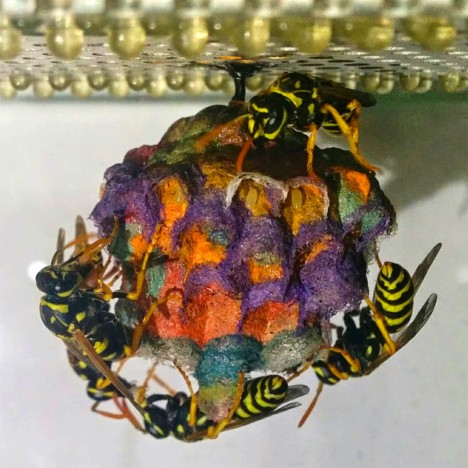
Worker wasps build with the materials available in their environment, including different hues and shades of paper, which can lead to radical rainbow homes when properly apportioned.

colored paper creations

Biology student Mattia Menchetti began giving a group of European paper wasps a variety of colored papers in a specific sequence in order to facilitate their creation of colorful nests.

colored wast colony

The effect is quite compelling, but wasps are not the only creatures that can take on colors from their surroundings and incorporate them – bees and ants have been known to as well.

bee honey france mandm

In one instance, an M&M production plant in France was found to be responsible for changing the color of honey created by a local bee hive. Apparently, the honey tasted fine, but of course, putting such oddly colorful honey on the market is a tough sell.

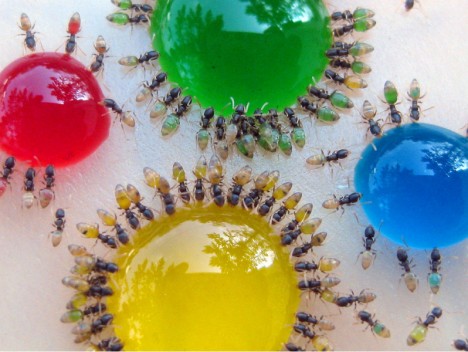
colored ant drink

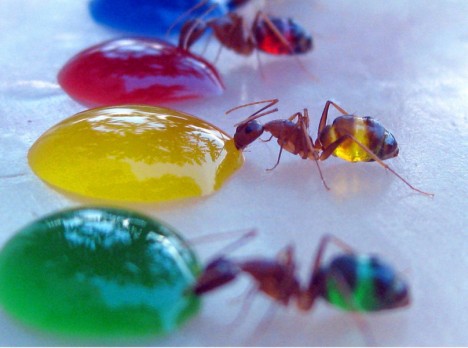
In another instance, we can see the effects of giving colored sugary water to translucent ants, whose bodies then take on the spectrum of looks found in their drinks.

colored ant colony

In this case, a scientist named Mohamed Babu from Mysore, India shot a series of photos of the colony consuming this liquid sugar water (via Colossal).

Share on Facebook


[ By WebUrbanist in Art & Sculpture & Craft. ]

[ WebUrbanist | Archives | Galleries | Privacy | TOS ]


WebUrbanist

 
Comments Off on Rainbow Nests: What Wasps Build with Colored Construction Paper

Posted in Creativity


How to Build the Best On-Location Photography Lighting Kit

22 Mar

Digging around the Internet, there are tons of resources available for constructing the perfect studio lighting setup for photographers, but very little is written about the best travel photography lighting kits. As a result, this article is an entirely DIY approach, comprised of lots of sleuthing and trial and error, to create the ideal lighting kit, that’s compact and easy to travel with. Let’s start with the essentials: the lighting gear!

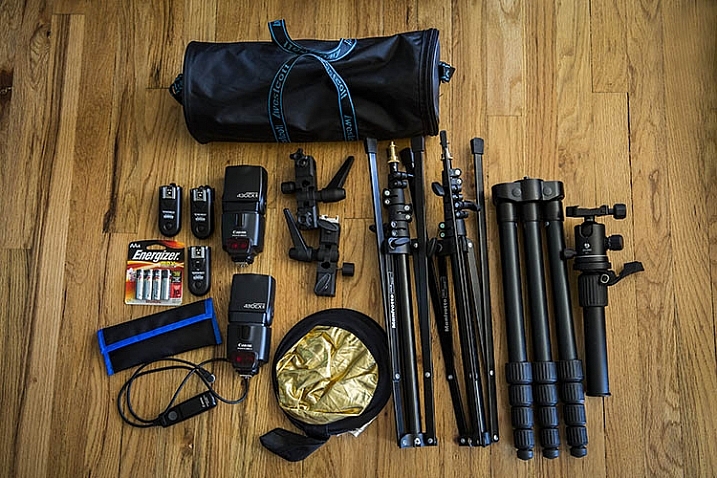
photography lighting equipment

Best Travel Photography Lights

Compared to studio lights, you really can’t go wrong with speedlights when you’re looking for portability. As a Canon shooter, this means having a Canon 580EXII as my main light, and two Canon 430 EXII Speedlites as my secondary lights. A possible lightweight and travel-friendly alternate light source is the Westcott Ice Light, which offers continuous LED lighting, although in general it doesn’t quite have the oomph and output that speedlights do.

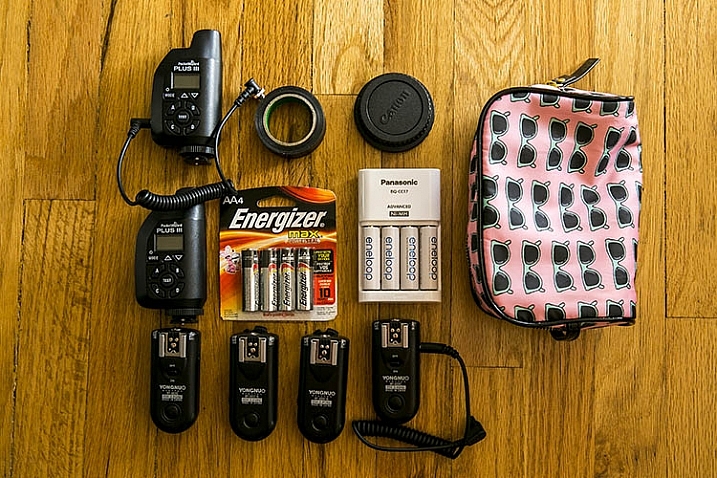
All flashes are powered by Panasonic Eneloop AA batteries, which have been a huge money-saver, thanks to the fact that they are rechargeable, and have all been extremely reliable to date. To sync all three speedlights, I have PocketWizards that I always carry as backups, but primarily rely on Yongnuo RF-603CII-C1 remote flash triggers for two reasons:

  1. They’re small and low-profile
  2. They’re incredibly cheap and affordable

Amazingly, the Yongnuos are also very reliable, and haven’t once failed in two years of constant usage.

Compact Light Stands

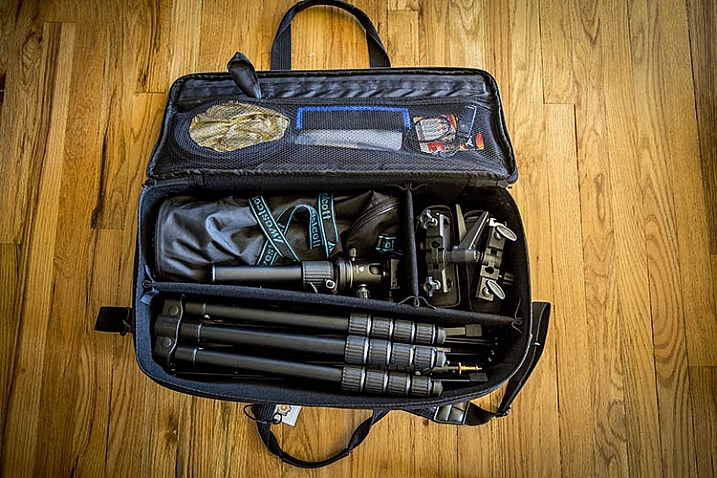
photography lighting equipment

Next on the list are light stands in the form of Manfrotto 5001B Nano stands. Weighing in at just 2.2 pounds (1kg) each, these light stands fold down to a mere 19 inches (48cm), while still having a maximum height of 74.4 inches (1.9m). They aren’t the most stable or sturdy light stands out there, but they travel extremely well, and work just fine for simple speedlight setups. Two light stands gets their own umbrella adapter and accompanying umbrella, while one lucky stand is adorned with a Westcott Rapid Box lighting modifier.

Lighting Gear Extras

As with most photo shoots, you never quite know what extra accessories you might need when on location, so my lighting kit varies from shoot to shoot. Some common extras include a a Benro Travel Flat Tripod, Canon shutter release cable, mini gold/silver reflector, speedlight color gels, gaffer’s tape, spare batteries, and camera body and lens rear caps, in case of drops and spills (sad to say these have come in handy more than once).

Bonus tip: I recommend using a lightweight zippered women’s cosmetic bag to hold, and organize, your smaller items such as remote triggers, batteries, front and rear caps, etc. This is the easiest way to keep those items contained in one spot for easy access, with less chance of losing them while at a shoot.

photography lighting equipment

Lighting Gear Bags

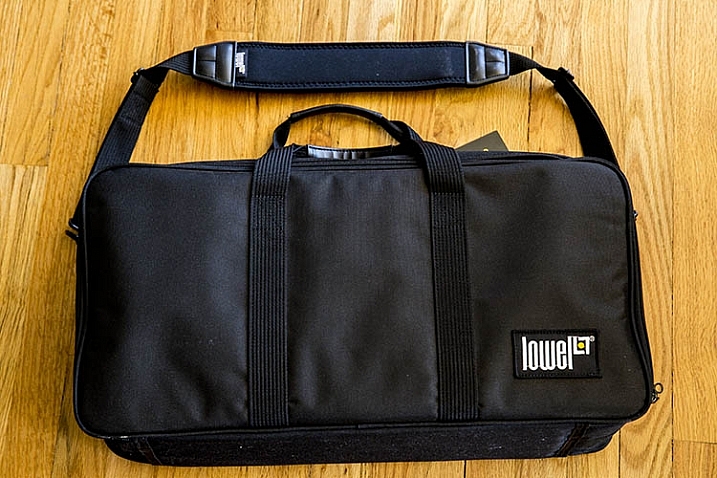
After a huge laundry list of items, you’re probably now wondering how to carry all of this stuff. Finding the perfect lighting gear bag was by far the most challenging part of assembling this DIY kit. But after lots of hunting, I found the best solution to be a Lowel Litebag, which come in a range of sizes.

With a thick and sturdy vinyl exterior and soft interior, this zippered bag has padded partitions that can be removed, or modified to suit a variety of needs. It has an adjustable, nicely padded shoulder strap and handles, making it easy to carry, even when heavy with equipment inside. It isn’t sufficiently padded to take a solid beating, but it will definitely protect your gear to a reasonable extent, without the added bulk and weight. Unfortunately, this bag isn’t the easiest to find, but it is incredibly solid, and holds all of the gear I mentioned above, with room for more!

photography lighting equipment

In Conclusion

As a traveling, or on-location photographer, it’s important to have a go-to travel photography lighting kit that is compact and flexible, while still keeping your gear safe from harm. If you’re searching for a flexible lighting kit, try out the above recommendations, and let me know what you think the comments below! Also, if you have another travel lighting kit setup, I’d love to hear about your own suggestions and modifications.

amzn_assoc_placement = “adunit0”;
amzn_assoc_enable_interest_ads = “true”;
amzn_assoc_tracking_id = “dpsgeneral-20”;
amzn_assoc_ad_mode = “auto”;
amzn_assoc_ad_type = “smart”;
amzn_assoc_marketplace = “amazon”;
amzn_assoc_region = “US”;
amzn_assoc_linkid = “6710d26f550e9793f41475ee806fee9e”;
amzn_assoc_emphasize_categories = “13900861”;
amzn_assoc_fallback_mode = {“type”:”search”,”value”:”digital cameras”};
amzn_assoc_default_category = “Photo”;

googletag.cmd.push(function() {
tablet_slots.push( googletag.defineSlot( “/1005424/_dPSv4_tab-all-article-bottom_(300×250)”, [300, 250], “pb-ad-78623” ).addService( googletag.pubads() ) ); } );

googletag.cmd.push(function() {
mobile_slots.push( googletag.defineSlot( “/1005424/_dPSv4_mob-all-article-bottom_(300×250)”, [300, 250], “pb-ad-78158” ).addService( googletag.pubads() ) ); } );

The post How to Build the Best On-Location Photography Lighting Kit by Suzi Pratt appeared first on Digital Photography School.

Digital Photography School

 
Comments Off on How to Build the Best On-Location Photography Lighting Kit

Posted in Photography


Urban Microscape: Build Your Own Miniature Metropolis

23 Feb

[ By Steph in Design & Products & Packaging. ]

microscape 1

Display your own little corner of your favorite city – or the entire metropolis of Manhattan – on your wall or table, scaled down to 1:5000 and simplified in white monochrome. ‘Microscapes’ are 3D-printed tiles developed from up-to-date aerial scale data so they can evolve along with built environments, including buildings still under construction or in planning phases. The designers are kicking off their campaign with New York City and will expand to other major cities across the United States and the world once their Kickstarter campaign is complete.

microscapes 10

microscape 2

microscape 3

The entire island of Manhattan is available in the form of individual, 6” square tiles, but to collect all 200, it would cost you a rather shocking $ 25,000. But early backers on the campaign can get a single tile of their choice, featuring some of Manhattan’s most popular locations, for a pledge of $ 65 or more. Each tile captures roughly half a square mile of the city.

microscape 4

microscape 5

microscape 7

microscape 8

The tiles are made from biodegradable, non-toxic white thermoplastic derived from cornstarch and range in height according to whatever section of the city you’ve chosen, up to 5.5 inches tall for the highest skyscrapers. The campaign is already generously over-funded, but you’ve still got a little bit of time left to snag a pre-order of your own.

Share on Facebook


[ By Steph in Design & Products & Packaging. ]

[ WebUrbanist | Archives | Galleries | Privacy | TOS ]


WebUrbanist

 
Comments Off on Urban Microscape: Build Your Own Miniature Metropolis

Posted in Creativity


How to Build an LED Light and Make an Orb

04 Jan

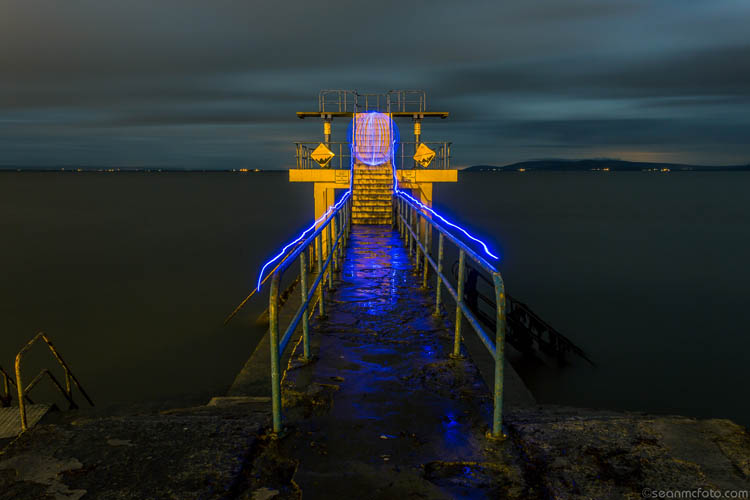
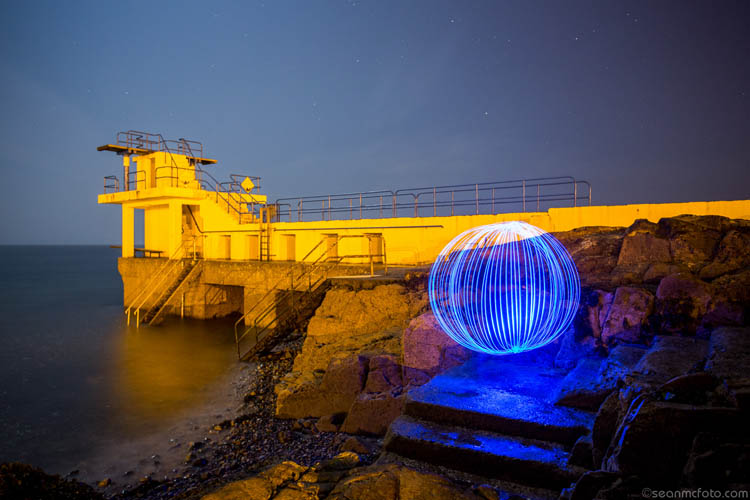
Orb15

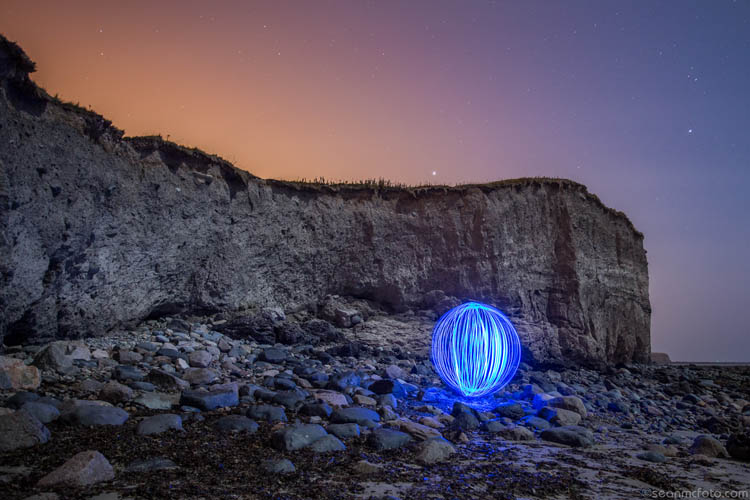
This article will tell you all about the what, where and when of orbs. Let’s start by defining them.

What’s an orb?

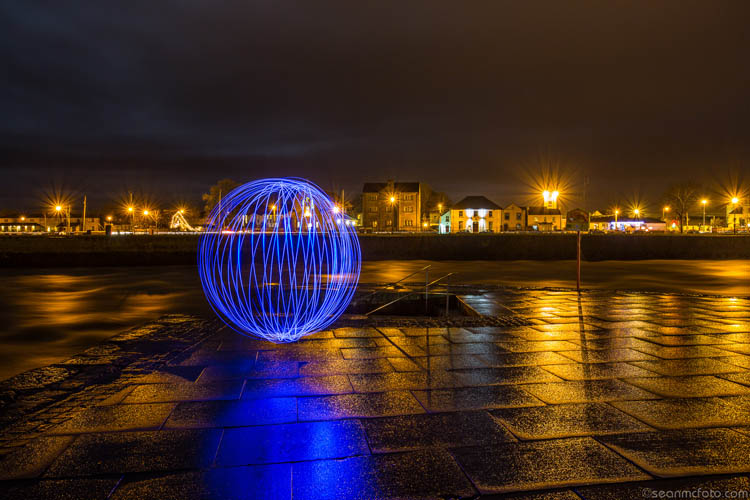
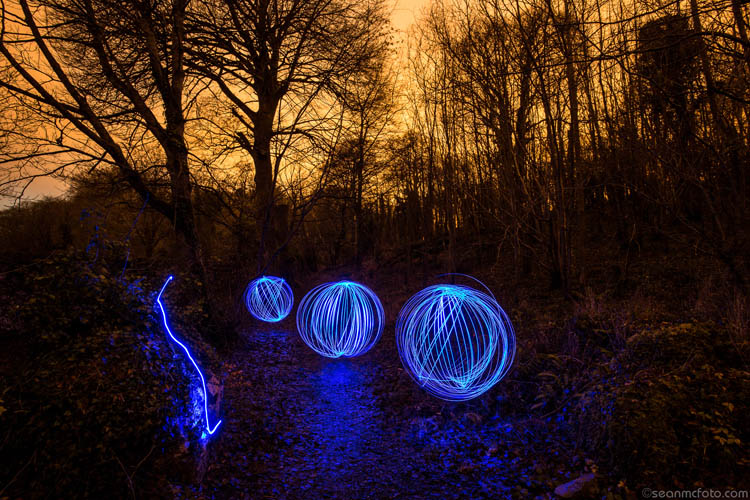
Well it’s both a cool, and fun, method of light painting that anyone can do. Basically you make a circuit with some LEDs (light emitting diodes), a battery, some wire, and a switch. You weight the LEDs, and then spin these in a circle as you move around a fixed point. Shot outside in the evening using a long exposure, this spinning creates a really cool looking sphere. By using different LEDs, you can make these spheres (called orbs) in different colors. There’s a small bit of tech involved in building them, but it’s not super hard. It’s also a project you can very definitely do with your preteen or early teen child.

Orb01

Equipment needed

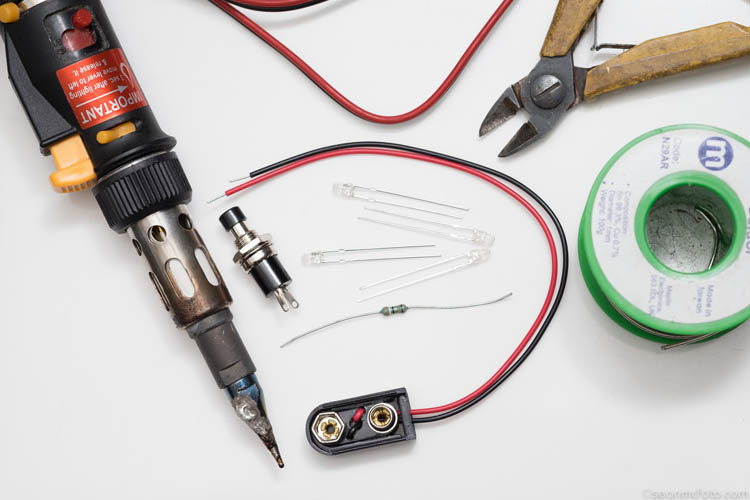
The minimum you need to make an orb is:

  • An LED (or a few LEDs to make it brighter)
  • Battery
  • Battery Clip
  • Push button to make a switch
  • Wire
  • A weight: literally anything to make the LED at the end of the wire heavy, so it spins easily
  • Resistor(s): The value depends on the type and number of LEDs you use
  • Soldering iron, solder, wire cutters, and PVC tape

Orb02

Building your LED light

Note from the Editor: Please take extreme safety precautions if you attempt this yourself. If you are not familiar with electronics get help from a friend or someone who is an expert.

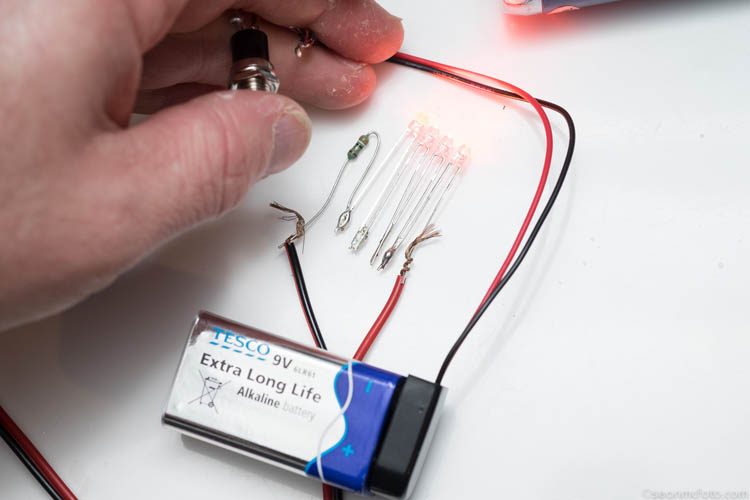
Now for the tech bit. Attaching an LED to a battery can fry the LED. So to protect it, you need to use a resistor. You may need more than one if you use an array of LEDs. Use this LED Array Wizard, and finding the values is painless. You can enter in information about the LEDs into the wizard and get both the circuit, and the resistor values.

I bought the parts for this orb locally from a Maplin store (UK based), but you can get them from any electronics components store . Make sure to find the LED Forward Voltage (often 2-3.3 volts) and the current (often 20-30mA) for the LED Array. For this project I got four orange super-bright LEDs, with a forward voltage of 2v and current of 30mA. The wizard suggested I wire them in series and use a 39ohm resistor. (As it turned out, I had two red and two orange LEDs).

Orb03

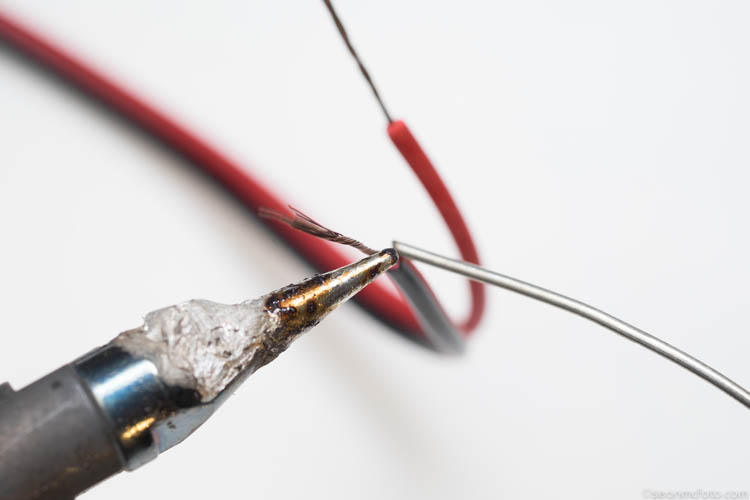
Soldering this together takes a little skill. The trick is to tin the wires, LED Legs, etc., before bringing them together to solder the connection. Pay attention to the connections.

Orb04

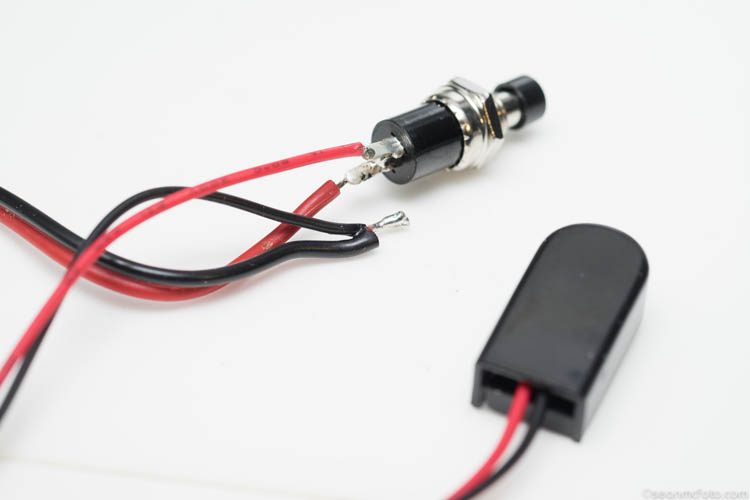
The red wire from the battery clip should go to the switch, and the black wire should go (via the other wire) to the negative legs of the LED Array (or resistor in this case). From the other side of the switch, the wire should go the the positive side of the LED Array.

Orb05

For the array, make sure to connect the LEDs correctly, as they only work in one direction. Generally one leg is longer than the other, indicating the positive terminal. Follow the wizard circuit to be safe. The resistor can be wired in any direction. Wire the array, then connect the wires from the switch, and test the circuit before committing to the final solder.

Orb06

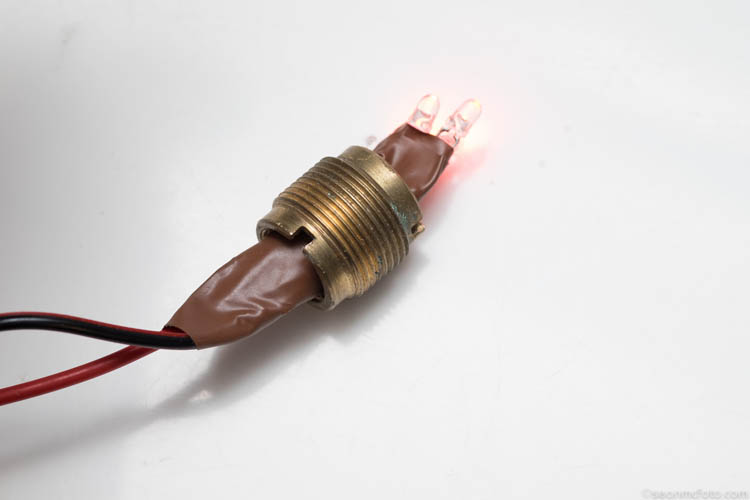
I’ve used an old adaptor nut as a weight. Even if your weight might fit over the LEDs, put it on the cable before the final solder, just in case. Once you’ve done the soldering, test again, and then use insulation tape (PVC tape) to wrap around each LED leg and the resistors, making sure none of them can touch any other. A short here could prevent the orb from working.

Orb07

Use the tape to secure your weight. Give it a test spin. You should be able to hold the battery and switch in one hand, and spin with the other. Practice getting the spin right, before pressing the switch.

Spinning technique to make the orb

You’re nearly ready for the real deal, your first orb shot! But first, you need to master a key technique – centering the orb. The first thought is to spin the orb around yourself, but this won’t actually make an orb, it just makes a mess. I mean it looks okay, but it’s not an orb. To get an orb, the center of the spin must be static. Essentially you need to shuffle around your spinning hand to make it work. A great tip is to put something on the ground – a coin helps because you can see the light hit it – and spin above it.

It takes practice to get perfect, and plenty of my orbs are not perfect, but they still look okay. They are loads of fun either way! Some people shuffle forwards, I tend to shuffle backwards. See which one suits you best.

Camera settings

Next you need to know how to set the camera. Here’s the exact setting to use: er… there is none. It depends on what you want in the photo. You need the exposure to capture the LEDs, and your surrounding area, at night or somewhere dark usually. This means a minimum of 30 seconds, but generally longer. So, you need to use Bulb mode on your camera, along with a remote cable. It may be obvious, but you’ll need a tripod to hold the camera steady during the exposure.

Bulb mode means the camera will record the image, as long as the shutter button is held down. If you use a remote cable with a button lock, you can set the remote, walk off, do your orb, come back to the camera, and then release the lock to end the exposure. As long as the button is held, the camera will continue exposing.

Orb08

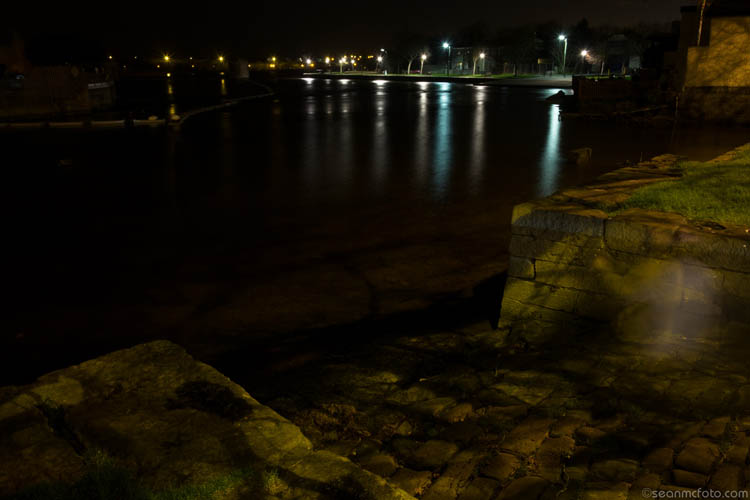
Take an initial test shot of your location with settings of about 30 seconds at f/8, ISO 100 (see image above). You’re checking that the location will expose correctly first. Change the settings to get the exposure you need. If you’re on your own, use the 10 second timer on the camera to allow yourself enough time to get to your start position. Swing the orb, and once it’s moving, press the switch to light it up. Spin around a fixed point as recommended. That’s it. Go check your camera at the end and then refine your exposure.

Orb09

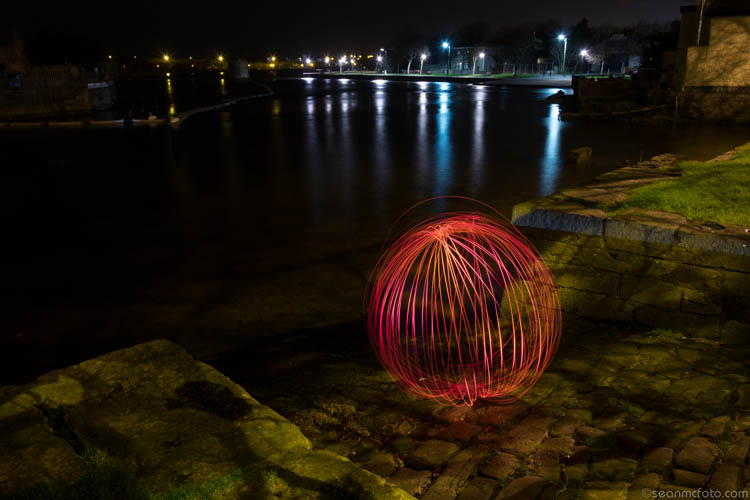
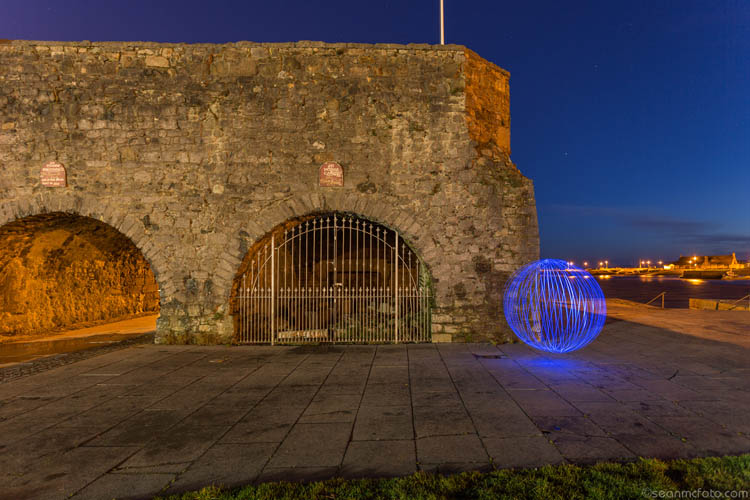
Anywhere that the orb looks out of place makes for a great shot. Also wet ground or still water is great, as you get reflections of the orb as well.

Orb10

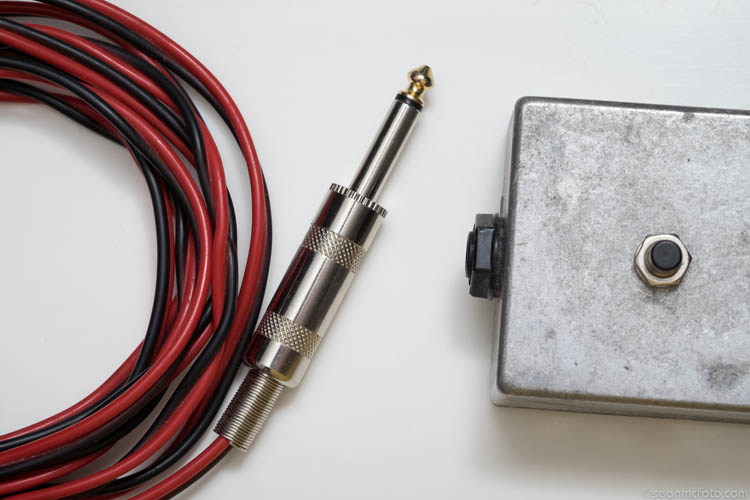
Once you’ve gotten the bug, you’ll realize that the battery area is a bit flimsy and needs something more solid. For my own orbs, I put the battery and switch into a metal box with a 1/4 inch jack socket. I added a matching jack plug to the cable, replacing the battery and switch. That way I can use one box with a number of different coloured orbs. That’s a project for another day. Have fun making your orbs!

Orb11

Orb12

Orb13

Orb14

Have you ever tried this technique before? Or are you itching to try this? If you do – please share your images, and any questions, in the comments below.

googletag.cmd.push(function() {
tablet_slots.push( googletag.defineSlot( “/1005424/_dPSv4_tab-all-article-bottom_(300×250)”, [300, 250], “pb-ad-78623” ).addService( googletag.pubads() ) ); } );

googletag.cmd.push(function() {
mobile_slots.push( googletag.defineSlot( “/1005424/_dPSv4_mob-all-article-bottom_(300×250)”, [300, 250], “pb-ad-78158” ).addService( googletag.pubads() ) ); } );

The post How to Build an LED Light and Make an Orb by Sean McCormack appeared first on Digital Photography School.


Digital Photography School

 
Comments Off on How to Build an LED Light and Make an Orb

Posted in Photography


Prefab Hobbit Homes: Build Your Own Shire Dwelling in Just 3 Days

25 Dec

[ By WebUrbanist in Architecture & Houses & Residential. ]
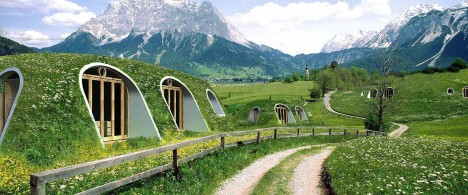
modular hobbit homes

Composed of vaulted panels covered with reinforced soil, these modular hobbit-worthy homes can be adapted to just about any site and constructed in a matter of days.
modular home construction

Produced in pieces by Magic Green Homes, then shipped to sites for assembly, each dwelling is made from prefabricated panels clad in green. The results looking much like something straight out of a Tolkien novel, but made out of shaped composite laminate, the same material approach taken to creating curves in some types of boat.

magic green house

green hoome interior

The process is designed for simplicity, eliminating the need for heavy machinery of specialized knowledge. Integral electrical, plumbing and ventilation channels come tucked inside the wall-to-roof modules as well, making systems installations easier as well.

green module warehouse

modular house construction

Overlapping flaps allow builders to join the various parts together while the integrated layers of green on top further hide any seams, making each house look like a seamless (w)hole. An interior layer of waterproofing ensures the attached modules do not leak.

green magic homes

modular green house

The overall modularity of this lends itself to easy incremental additions, expanding housing units over time. Designers or homeowners can also site the structures to blend into the surrounding landscape, much like the approach taken in underground homes and with many earthships. As with geodesic domes and other curved habitats, however, it may take a bit more than three days to decide how to finish and decorate the rounded interiors.

Share on Facebook


[ By WebUrbanist in Architecture & Houses & Residential. ]

[ WebUrbanist | Archives | Galleries | Privacy | TOS ]


WebUrbanist

 
Comments Off on Prefab Hobbit Homes: Build Your Own Shire Dwelling in Just 3 Days

Posted in Creativity


Arc Kit: Design and Build Your Own Miniature Architecture

19 Nov

[ By Steph in Design & Products & Packaging. ]

arc kit 1

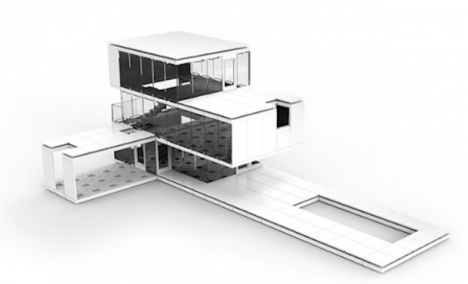
A kit that combines the precision and detail of computer modeling with the physicality of Legos makes it possible to design and build any architectural structures you can dream up. With minimalist greyscale components that are significantly more refined than those found within actual Lego modern architecture sets, Arckit by Damien Murtagh can be used as a professional tool for architects or a fun toy for architecture hobbyists and enthusiasts.

arc kit 2 arc kit 3

Traditional model-making typically requires a lot of measuring, cutting and glueing, and once you set a piece in place, you’re stuck with it. Arckit’s snap-together system made of ABS plastic allows continuous modifications so you can really experiment. It’s a lot cheaper than purchasing 3D modeling software, without the steep learning curve. While it was initially designed for adult use only, it turns out that kids love it, too.

arc kit 4

arc kit 5 arc kit 6 arc kit 7

The modular system is at 1:48 scale and comes in three packages for structures measuring 60, 120 or 240 square meters. The 120-square-meter set has proved the most popular, offering over 385 pieces, a component tray, and a booklet explaining how to put it all together. Add-on components are also available, with extras including trusses, floating staircases and printable adhesive sheets so you can customize colors, textures and other imagery however you like.

Share on Facebook


[ By Steph in Design & Products & Packaging. ]

[ WebUrbanist | Archives | Galleries | Privacy | TOS ]


WebUrbanist

 
Comments Off on Arc Kit: Design and Build Your Own Miniature Architecture

Posted in Creativity