RSS
 

Archive for July, 2013

The New SmugMug, Awesomize Your Photo Sales on the Web

30 Jul

My Home Page on the New SmugMug

SmugMug, widely regarded as one of the best internet sites on the web for amateurs and pros alike to share, and especially sell, their photos, unveiled an entirely new SmugMug this morning.

I’ve had early access to the new site redesign and have been playing around with it for the past few weeks — I’m a huge fan.

The new SmugMug brings fresh, updated, design and functionality to the service and is probably the most significant upgrade to the service since it started.

Most significantly, the new SmugMug brings a new line up of beautifully designed templates that allow even the most basic internet user the ability to have a photo commerce site up within minutes.

As much as I enjoyed the old SmugMug as a place to sell my prints, one of the negatives of the old site was that it could be complex and complicated to get a attractive looking interface up. The old SmugMug offered the ultimate in customization, but many photographers are not web design experts and it could be challenging to do it yourself. While you could hire outside pros to customize your site, this added a layer of cost and complication to the equation.

While the new SmugMug still allows advanced users an incredible amount of customization, they also now offer a series of basic templates that are pretty much plug and play. The new templates are stunning right out of the box and you can easily use a new series of tools to do minor edits to add in basic elements that you want to use to present your photos uniquely.

These new templates have been optimized to look good on the three basic interfaces, web, tablet and mobile. They have also added custom links that can be added to your blog, Facebook, Google+ and Twitter as part of any design interface.

In addition to the new design choices, SmugMug also rolled out today a new photo organizer that allows some of the most advanced functionality in photo sharing today.

When Flickr redesigned their site earlier this year, some users were disappointed that Collections lost visibility on the site. The primary way that Flickr manages photos is with sets. Sets can be one dimensional though. Sometimes you need sets of sets. Sometimes you even need sets of sets of sets. The new SmugMug allows seven layers of photo organization.

So if you want to have a page of American photos organized by states you can do that. If you want to be able to drill down into each state and look at the various cities, you can do that too. If you want to drill down even further and look at the various neighborhoods in each of the cities, you can do that.

More control over hierarchy was the number one feature request that SmugMug users had asked for in their user forums.

The new SmugMug organizer also offers lots of ways to bulk edit your photos, allowing you to batch add keywords, delete files, apply custom captions, etc.

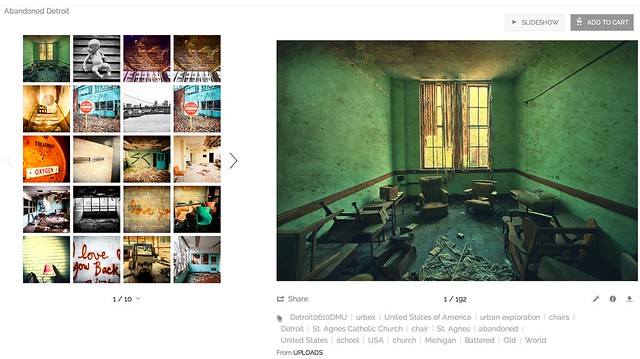
Personally, I do 99% of my metadata work at the file level in Lightroom, but here is where SmugMug offers me one of my favorite features, Smart Galleries. Smart Galleries are not something new with this release, but Smart Galleries allow you to build highly customized automated galleries based on keywords. If I want to build an album of all of my photos of abandoned buildings in Detroit, I can do this simply by building a set that includes any of my photos keyworded with abandoned AND detroit. Now anytime I upload any new photos to the site that have these keywords, they will automatically be added to that album.

Creating a Smart Gallery on the New SmugMug

My Abandoned Detroit Set on the New SmugMug

One of the problems with redesigning photo sharing sites is it doesn’t matter how good a job you do at it, there will always be naysayers from the “who moved my cheese” crowd who will moan about it. It doesn’t matter how much better you make something, some people just love to complain. Haters gonna hate, gators gonna gate, tators gonna tate, all that stuff. One of the smart things that SmugMug did with this redesign is that they gave control over the new site to the user. If you are already a SmugMug user and *don’t* want to opt into the new site design, you don’t have to.

From SmugMug:

“Unlike many other services, we’re not forcing you to ditch your existing site. You’ll have your very own secret preview mode that contains all your galleries, so that you can personalize it and get familiar with the new features. While it sounds scary, migration simply copies your website contents into a virtual sandbox that only you can see. When you’re ready, YOU unveil your changes and make it public.”

I’m sure that there will *still* be some who complain, even though they get their *choice* over new or old SmugMug, but this should go a long way towards the inevitable backlash that comes with every redesign.

Also, the pricing is staying the same for the service and they are even adding unlimited video uploading to all levels of account with no price increase. At present SmugMug’s pricing remains: Basic: $ 5/month or $ 40/year, Power: $ 8/month or $ 60/year, Portfolio: $ 20/month or $ 150/year, Business: $ 35/month or $ 300/year.
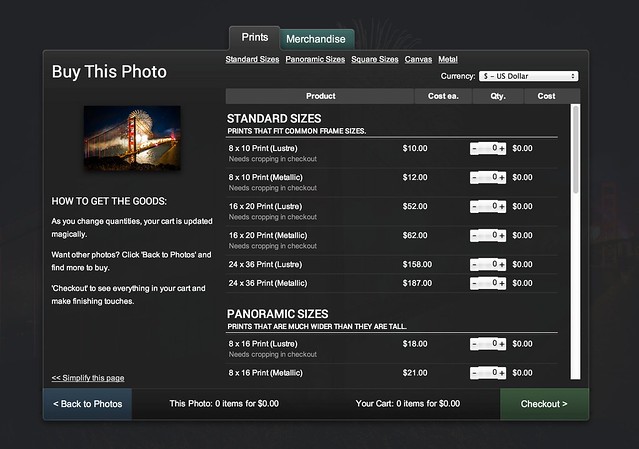
Buying a Print on the New SmugMug

If you are a photographer who has thought about selling your photos on the web, but has held back, now is the time to jump in. With the new SmugMug today, you can easily have a professional looking photo commerce site up and running within minutes. SmugMug offers a generous 85% payout on all sales and gives you a great place to send people to who want to buy your prints.

I’ll be on a special episode of the Trey Ratcliff show tonight where we’ll talk about the new SmugMug — 7pm PST.

There is a live vidcast of the new designs with SmugMug CEO Don MacAskill at 10:30am PST today here.

If you want to check me out on my SmugMug, you can find me here. I’m in the process of adding several thousand new photos to my SmugMug. Feel free to buy a print if you’d like. :)

More from SmugMug on the new design here.

Two new videos about the new SmugMug here and here.

More from David Pogue at the New York Times here.


Thomas Hawk Digital Connection
 
Comments Off on The New SmugMug, Awesomize Your Photo Sales on the Web

Posted in Photography


Dense City: Photos Show Tightly-Packed Hong Kong Towers

30 Jul

[ By WebUrbanist in Art & Photography & Video. ]

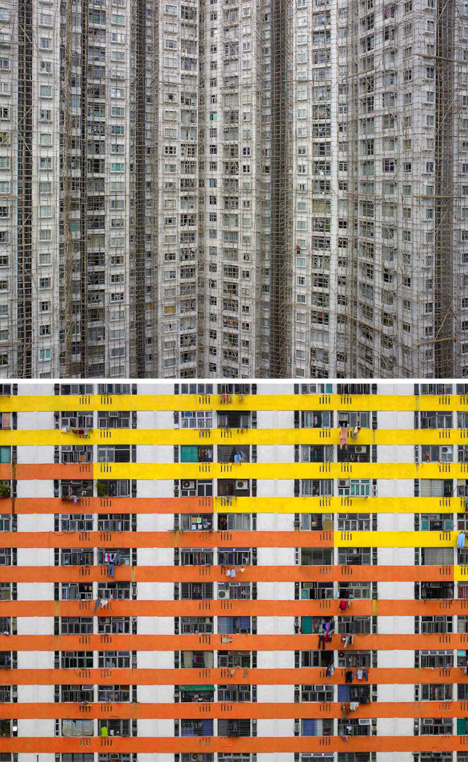
density in hong kong

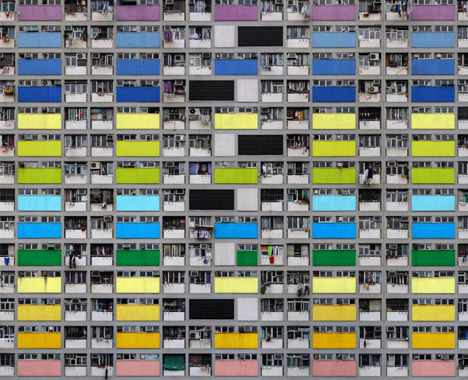
Twice as dense as New York, and four times as crowded as London, Hong Kong is a fascinating mix of natural landscape edged by incredibly dense human construction.

dense urban city images

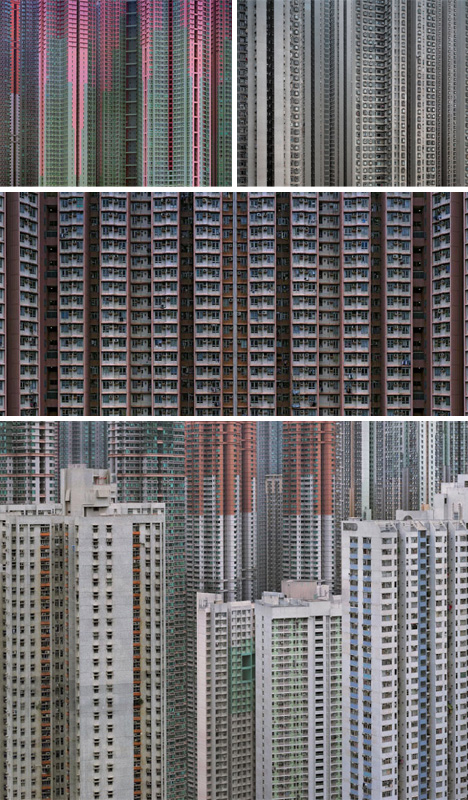
Michael Wolf, a German photographer, focuses on the latter, turning the vast structures of the city into strange stand-alone landscapes that show the enormity and relentless repetitiveness of this vertical urban environment.

dense city urban scaffolding

On the one hand, it is fascinating to see just how overwhelming the overarching rhythms of the buildings are when you take a broad view. At the same time, though, individuality begins to emerge as you zoom in and narrow the scope of your perspective.

dense dark city photos

In his book Architecture of Density Wolf explores the patterns and scales of his new home city, testing different angles and distances while remaining focused on the sometimes-bleak yet awe-inspiring man-made side of this incredibly packed island.

hong kong street level

As his main series of photographs show (versus the scout shots directly above), attempts to distinguish scales through details and color seem almost hopeless against the large-scale monotony of it all. To be fair to its inhabitants, however, those upper-level images tell only one half of the story – visiting Hong Kong has many more dimensions than can be seen looking only from on high.

Share on Facebook


[ By WebUrbanist in Art & Photography & Video. ]

[ WebUrbanist | Archives | Galleries | Privacy | TOS ]


WebUrbanist

 
Comments Off on Dense City: Photos Show Tightly-Packed Hong Kong Towers

Posted in Creativity


30. Juli 2013

30 Jul

Ein Beitrag von: Oliver Petry

Spoonful Story © Oliver Petry


kwerfeldein – Fotografie Magazin

 
Comments Off on 30. Juli 2013

Posted in Equipment


Turn an Old Camera Into a Retro-tastic Phone Dock!

30 Jul
Extra photos for bloggers: 1, 2, 3

Summer days are here! With the sun setting so late, there are more phone calls, Instagrams, texts, and all sorts of things that give your phone a good ol’ workout.

What’s that? Your phone is buzzing in your pocket for some relief! After a long, long day, it deserves some rest. Pamper your phone with a swanky charger dock made from your favorite antique camera!

Plugging it in and leaving it on the table is such a lonely way to relax. In this project, you’ll be making a super retro dock from a camera to charge your phone in style. You get to work with your hands and some rockin’ power tools, and by the end of it your phone will be thanking you for its sweet new digs.

Be careful though — your phone is gonna look so awesome in its new dock that you might not want to take it out for the next summer adventure!

Make a Phone Dock Out of a Camera

p.s. We’re hiring for an amazing opening at Photojojo. We’re looking to re-invent what/how/where we publish online, and we’re seeking one amazing somebody to lead the charge as Editorial & Community Lead.

WHY IT’S COOL:

Remember that camera you once loved but broke somewhere along your many escapades? Instead of letting it collect dust or throwing it away (gasp!), this tutorial will help you turn it into a beautiful charger for your phone! It’s like, the coolest way to recycle. Besides, all your friends will be totally jealous.

Fact: phones are better propped up. Friends texting you? Now you don’t have to crane your head to read ‘em – cause your phone is already standing up.

This project might seem kinda scary and complicated, but it’s not! If you can hold something steady for 10 seconds, then you can definitely do this. It’s only a few steps and at the end of it you’ll be an absolute pro at turning anything (that can be drilled) into charger docks. That way, you can make ‘em for all those friends you made jealous.

By the way, this project was inspired by Roberto Altieri and his Etsy shop. His craftsmanship is top notch, so take a look around. Thanks, Roberto!

Ingredients

  • Old camera that doesn’t work*
  • Phone charger cable
  • Power drill with the proper drill bits (varies depending on the size of the opening)
  • Gorilla glue
  • Metal file

*We used an old Kodak Instamatic and an iPhone USB Lightning Cable. We recommend a camera that’s made mostly of plastic, because metal parts can’t be drilled into/are difficult to drill into. Make sure the area you’re drilling into is all plastic.

PREP MAKES PERFECT:

The most complicated (and it’s not! Really!) part is to figure out where you wanna drill. We used a plastic camera, and so that was as simple as finding a spot that didn’t have a ton of metal in it. We recommend a camera that’s more plastic-y, that way it’ll be easier on you!

Figure out how you want the camera to sit on your desk when you’re done. Think about where you want the phone to be, and where that cable will come out of the camera! The back of cameras, where the film goes, is the easiest place to drill into because it’s just an empty space. part of your cord will live in here! Also, think about where the cable comes out! We did ours on the side, where the door is.

When it comes to the phone charger cord, you can get an extra cord from Amazon or your local gadget store if you don’t want to use the cord you already have.

STEP ONE: DRILL ONCE

See your phone charger cord? Pick out a drill bit that matches the width of the part that plugs into your phone. If you don’t have a drill bit that exact size, remember that smaller is better than bigger! Be very, very careful (watch those fingers!) and drill the first hole. Make sure you’re drilling completely through, the cord’s gotta go somewhere!

STEP TWO: DRILL TWICE

beforeNow, connector parts are usually ovals, and drill bits are circles. Unless you have some sort of space-age-can-drill-whatever-shape-you-want drill, the workaround is like this: 2 circles next to each other = 1 oval!

Drill a second hole next to (slightly overlapping) the first hole. We’re doing this directly alongside the first hole so that the opening is wide enough for the connector port.

STEP THREE: FILE THOSE EDGES!

beforeGet your metal file and file away at the hole where the cord will come out. Careful! The goal is to make it the shape of your connector, but not too big! Check that your connector bit fits snugly into the opening.

STEP FOUR: KEEP UP THE STELLAR FILING!

beforeThis is a continuation of Step Four; file the inside part of the hole you drilled. It can be wider here, doesn’t have to be as snug as the opening. The goal is to get your cable through without snags.

STEP FIVE: GET GLUING!

beforePush the connector port through the drilled hole. After you’re sure that’s where it wants to be, place a dab of glue and wait for it to dry (depends from glue to glue!).

STEP SIX: MAKING A FASHIONABLE EXIT

beforeNow we are gonna figure out where the cable comes out! When that’s figured out, drill a hole that is the width of your cable. Ours comes out the side of the camera where the door closes, and we recommend this.

STEP SEVEN: CHARGE IT!

beforeNow you have the exit hole, place the cable through and there we go! Close the back of the camera, make sure the cable isn’t being pinched (ow!) and charge your phone to your vintage heart’s content.

TAKE IT FURTHER:

before

  • Although we made a phone dock, you can make a dock for just about anything that uses a cord to charge. Tablets, game systems, camera batteries, anything!
  • Make a dock out of different things! Old radios, televisions, and to be extra ironic, an old telephone!

Related posts:

  1. How to Turn Your Phone Into a DIY Photo Projector for $ 1 Extra photos for bloggers: 1, 2, 3 Slide projectors are…
  2. DIY: Turn Phone Photos into Mural-Sized Prints! Extra photos for bloggers: 1, 2, 3 What’s on every…
  3. How To Make Your Cell Phone Look Like Your Favorite Camera! Extra photos for bloggers: 1, 2, 3 Photographers. We’re a…


Photojojo

 
Comments Off on Turn an Old Camera Into a Retro-tastic Phone Dock!

Posted in Equipment


OMG Life starts sales of Autographer ‘intelligent wearable camera’

30 Jul

autographer.png

British company OMG Life has announced that its Autographer camera is now on general sale. Billed as the ‘world’s first intelligent, wearable camera’, it uses an array of built-in sensors to take pictures automatically triggered by changes in its environment. It has an ultra-wideangle lens with a 136° view, a 5MP sensor, and 8GB of internal memory for up to 28,000 images. Images can be shared with smartphones using a Bluetooth connection, and assembled into stop-motion movies. It’s available from the company’s website for £399, shipping initially to the UK and most European countries.

News: Digital Photography Review (dpreview.com)

 
Comments Off on OMG Life starts sales of Autographer ‘intelligent wearable camera’

Posted in Uncategorized


Landschaft im Spiegel

30 Jul

Ein Beitrag von: Sonja Bachmayer

Die Landschaftsfotografie setzt sich seit ihrem Beginn mit dem Abbild der Umwelt des Menschen auseinander. Ihr Ziel war und ist es teilweise bis heute, eine ästhetische und eine von menschlicher Hand weitgehend unberührte Landschaft und Natur darzustellen.

Das World Wide Web stellt fest: „Landschaften sind für Hobbyfotografen ebenso wie für Profis regelrechte Objekte der Begierde. Sie sprechen unseren Wunsch nach Romantik und Harmonie an und geben Stimmungen auf besonders eindrucksvolle Weise wieder.“

Unüberschaubare Tipps für die richtige Kamera, die richtige Blendenwahl und die Must-Haves führen zum perfekten Landschaftsbild, aber möglichst ohne menschlichen Fußabdruck.

© Sonja Bachmayer

Also gut – ich habe mich umgesehen.

Ich habe festgestellt: Es ist nicht einfach, ein Stück unberührter Landschaft auszumachen. Ich habe mich gefragt: Wie sieht die Landschaft, die Natur aus, wenn man ihr einen Spiegel vorhält?

Wäre es nicht auch spannend, das von der Kamera gezeigte Bild mit dem Dahinter zu verbinden? Ich habe mir einen Spiegel besorgt und bin losgezogen.

© Sonja Bachmayer© Sonja Bachmayer

Die ersten Fotos, in der Umgebung von Wien aufgenommen, erstaunten mich selbst. Das Medium Spiegel zeigt nicht nur das Abbild des Dahinter, sondern reflektiert auch eine völlig gegenteilige Lichtsituation.

Durch das Bild im Bild entsteht eine surreale, eine beinahe künstliche Welt. Allein durch die Platzierung eines Spiegels, irgendwo – entlang des Sonntagsspazierweges, auf der Liegewiese oder im Gestrüpp der Donauauen – entsteht eine neue Sicht auf die uns umgebende Natur.

© Sonja Bachmayer

© Sonja Bachmayer

Die Fotografien entstanden von September 2012 bis Mai 2013. Aufgenommen wurden die Bilder in Wien, in Oberösterreich und an der Grenze zu Tschechien. Die Fotografien sind alle mit Hilfe eines realen Spiegels in der Größe von 50×120 cm entstanden und sind keine Fotomontagen. Die fotografische Nachbearbeitung beschränkt sich auf minimale Korrekturen.

Auf Letzteres muss ich hinweisen, weil viele, die die Fotos zum ersten Mal zu sehen bekamen, in der Regel und meist ganz selbstverständlich davon ausgingen, dass es sich angesichts der Bilder um reine Photoshop-Basteleien handelt.

© Sonja Bachmayer© Sonja Bachmayer

Diese Erfahrung war für mich interessant, aber auch nachvollziehbar. Wir haben uns daran gewöhnt, „hinters Licht“ geführt zu werden. Der Spiegel ermöglicht uns nicht nur die Betrachtung des eigenen Selbst, er macht auch die dem Betrachter beziehungsweise dem Fotografen abgewandte Seite sichtbar.

Das heile Bild der Landschaft wird durch die unmittelbar ersichtliche Rück-Sicht aufgehoben.

Mit meinem Projekt versuche ich, die Dinge ans „Licht“ zu bringen.


kwerfeldein – Fotografie Magazin

 
Comments Off on Landschaft im Spiegel

Posted in Equipment


Painted Shadows Haunt Abandoned Psychiatric Hospital

30 Jul

[ By Steph in Art & Street Art & Graffiti. ]

Lost Souls Abandoned Mental Hospital Art 1

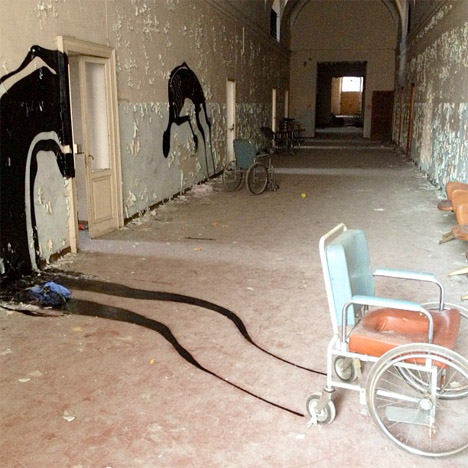
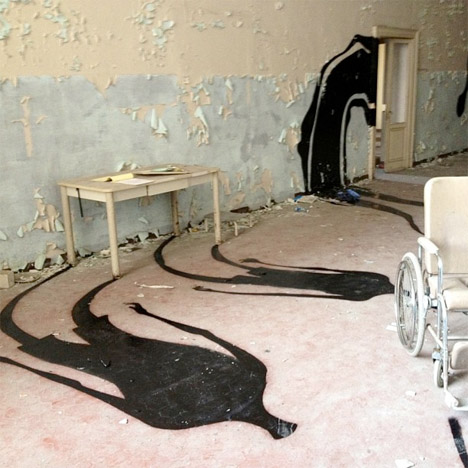
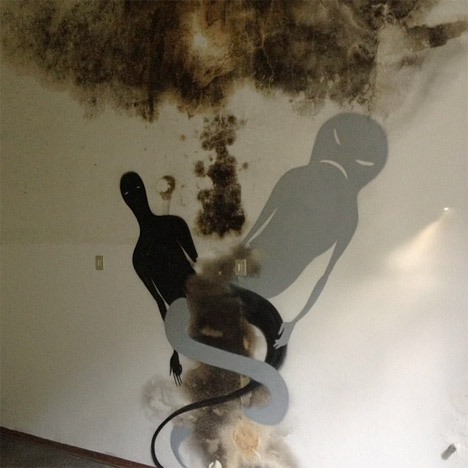
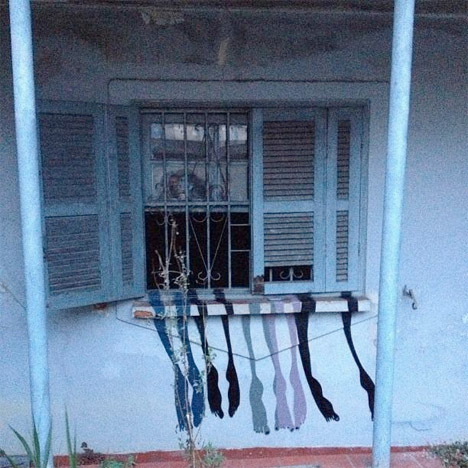
Eerie shadows float out of empty wheelchairs, trailing up cracked and peeling walls and slinking under doorways in a series of paintings in an abandoned mental hospital by Brazilian artist Herbert Baglione. These flowing black silhouettes in a ruined facility in Parma, Italy are part of a larger collection entitled ’1000 Shadows,’ reflecting the essence of darkness that is often left behind in neglected places.

Lost Souls Abandoned Mental Hospital Art 2

Lost Souls Abandoned Mental Hospital Art 3

The creepy abandoned hospital is still strewn with furniture. Spirits appear to tussle with each other, tangling amid mildew spots on the walls. Baglione’s painted shadows capture, in visual form, the feeling many of us experience when standing inside such a facility.

Lost Souls Abandoned Mental Hospital Art 4

Lost Souls Abandoned Mental Hospital Art 5

Such morose, frightening imagery may not be an entirely accurate reflection of the very real, human people who were actually patients at the hospital, but it’s certainly an effective interpretation of the haunted mood projected by the buildings themselves.

Lost Souls Abandoned Mental Hospital 6

Other settings in the series include abandoned apartments in Paris, and homes in São Paulo. See more from this series, and other works painted on urban surfaces, on Baglione’s Facebook page.

Share on Facebook


[ By Steph in Art & Street Art & Graffiti. ]

[ WebUrbanist | Archives | Galleries | Privacy | TOS ]


WebUrbanist

 
Comments Off on Painted Shadows Haunt Abandoned Psychiatric Hospital

Posted in Creativity


29. Juli 2013

30 Jul

Ein Beitrag von: Michael Pezzei

Unbenannt © Michael Pezzei


kwerfeldein – Fotografie Magazin

 
Comments Off on 29. Juli 2013

Posted in Equipment


Digital Still Life Photography [Book Review]

30 Jul

Digital Still Life PhotographyThis is a sumptuous book in a number of departments: it’s large, beautifully printed and full of useful, easily navigated information.

So why the word ‘digital’ in the book’s title?

Author Sint explains ‘I hate using Photoshop to correct my mistakes because I feel the time required to do so is both unproductive and unprofitable. … what I really love more than Photoshop is downloading pictures that I find pretty close to perfect the moment I open the image’s file.’

The book’s style is thoroughly disarming and direct to the point: when approaching a still life photograph the first step, Sint suggests, ‘is to spend a moment thinking about what type of photograph you are trying to create.’

He then describes the techniques in shooting simple setups on a plain background, the need for speed and the need to plan your shoot efficiently. After all, time is money and the more shots you can pack in per hour the higher your financial return. This book Sint affirms is about ‘how to make a living taking pictures …’

An initial step is to select a suitable shooting space. It should ideally be a big space, one that includes an office, shooting area, storage for props etc, conference area, makeup room and maybe a kitchen. However, in an effort to describe how little you really need, the author describes his own first studio: a room 250 square feet in area, containing his own twin bed, a dresser, small nightstand … with the remaining 225 square feet dedicated to the studio!

Next, you should assemble the necessary tools to make the space work: timber and the necessary power and hand tools; some form of canned compressed air or even a compressor and more. This is followed by three simple building projects: building a simple set flat; a diffusion screen; a light table.

The important subject of lighting gets serious attention, with tips on how to assemble and use a continuous light array, electronic flash, reflectors, barn doors and snoots, hair lights, scrims, a lighting umbrella etc. The variations in continuous and flash light are explained thoroughly and examples given as to which type suits what subjects.

To give an idea of the depth of detail found in the book, just go to pages 150 and 151 on clamps but not just ordinary clamps but ‘super clamps’! These can do so many more things on a still life shoot than merely position a light as they come in handy to build backgrounds etc.

More follows on soft and hard lighting, the colour of light sources, how to vary a lamp’s colour balance and filtration plus a useful primer on working with fluoro lighting and how to mix it with flash. Fluoros may be 20-30 per cent green in hue so you may filter the flash output with green gels and then add a magenta filter to the camera lens to bring everything back to a daylight balance.

A superb eight page section takes you step-by-step through the shoot of an expensive Cartier watch: how to pose it, light it, position fill lamps. And then there is the fundamental advice never to perform post editing on the original digital file: duplicate! And only work on a copy.

This book will be invaluable to the photographer who wants to move into the studio. Big time!

Author: S Sint.
Publisher: pixiq.
Distributor: Capricorn Link.
Size: 28x22x2cm.
Length: 271 pages.
ISBN: 978 1 4547 03273 3.
Price: Get a price on Digital Still Life Photography at Amazon (currently 50% off).

Post originally from: Digital Photography Tips.

Check out our more Photography Tips at Photography Tips for Beginners, Portrait Photography Tips and Wedding Photography Tips.

Digital Still Life Photography [Book Review]


Digital Photography School

 
Comments Off on Digital Still Life Photography [Book Review]

Posted in Photography


Just Posted: Fujifilm X100S Review

30 Jul

specs-1.jpg

We’ve just posted our long-awaited review of the Fujifilm X100S – Fujifilm’s flagship fixed-lens compact. The 16MP X100S offers a fixed 35mm equivalent F2 lens, and builds on the appeal of the popular but quirky X100 by adding improved automatic and manual focus, an overhauled interface and a 16MP X-TRANS sensor. Do the on-paper refinements add up to better real-world performance? Click through for a link to the full review, and a note from the editor.

News: Digital Photography Review (dpreview.com)

 
Comments Off on Just Posted: Fujifilm X100S Review

Posted in Uncategorized