
High contrast scenes with delicate colors can prove tricky for your camera’s meter and white balance settings.
If you’re familiar with the fundamentals of camera technique, then you know how much of an effect white balance can have on your images. Also, you probably have a basic understanding of how your camera’s meter works, or at least how to react to its output to change your settings appropriately.
Just beyond these basics, there are a few simple techniques that will allow you to fin- tune your white balance, and get more accurate meter readings from your subject. To take advantage of these techniques, you only need to add a single cheap piece of equipment to your camera bag: a gray card.
These humble accessories start at less than $ 10, yet the amount of control they give you over the final image, can be invaluable in tricky situations. For example, they allow you to obtain a good white balance reading from mixed light sources, or get an accurate exposure reading from your camera’s meter in a high contrast scene.
What is a gray card
A grey card is exactly what it says it is. A card that is gray. More specifically, it is middle gray, or 18% gray. This number is important because 18% gray is what your camera’s meter is trying to calculate when it meters to expose for a scene. This means if you put a grey card in front of your subject, and take a meter reading off it, you will get a correct exposure regardless of any tonal contrast in the scene.
Additionally, when used in conjunction with a camera’s custom white balance feature, you can manually set a perfect white balance for everything you photograph. This becomes especially important when you need to faithfully recreate colors in your images, whether that may be for commercial purposes or record shots.
Metering
The more useful of these two techniques is metering. In this case, a gray card is the closest thing you’ll get to a magic bullet that will allow you to get a near perfect exposure, in almost any situation.
Spot metering
To get started, the first thing you’ll want to do is to set your camera to the spot metering mode. While this is not absolutely necessary, the fact that the camera will only be metering from a small section in the centre of the frame will help a lot, especially in circumstances where you cannot fill the entire frame with the gray card. It will also save you a lot of time if you use manual mode.
Metering
With your metering mode changed, all that you have to do now, to take advantage of this technique, is put the gray card in your scene, point the centre of the frame at it, dial in the exposure your meter gives you and then just take the gray card away. Providing that the light doesn’t change, you will now have an accurate exposure for any subsequent shots that you take in this setup.
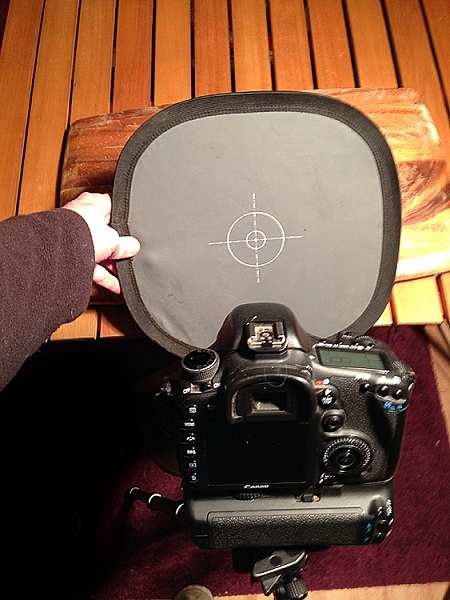
Taking a meter reading with a gray card.
Hints
There are a few things can do that will make this process easier and more accurate.
First, you should make sure that your subject remains in a similar position relative to the light source, from where you took your gray card reading. For example, if you’re taking headshots outdoors and the sun is lighting your subject from the front; that is one exposure reading. If you turn your subject to the side, or completely around, that will affect your exposure and you will need to take another reading.
The second tip is when you’re taking the exposure reading; fill the frame with the grey card as much as possible. This will help to ensure that your meter is only trying to expose for the card, and not anything around the edges.
White balance
Although the basic white balance settings in cameras can be pretty good, they do tend to struggle at times. For example, tungsten bulbs can vary greatly in color temperature, depending on their quality and power output. This may lead to the basic tungsten setting on your camera failing to give you an accurate representation of colors.
There are two ways to use a gray card to set your white balance. The first is to use it to set your camera’s custom white balance. The second method will allow you to use Lightroom to set a white balance for your images after they have been taken. You can also use Adobe Camera Raw (inside Photoshop) if you don’t have Lightroom.

Shifts in White Balance – Left: Daylight – Center: Tungsten – Right: Custom
In-camera custom white balance
The technique described here is for Canon users. If you use Nikon, Sony, or any other brand, you will need to consult your manual for instructions on setting a custom white balance.
- Step 1: Take a photo of your grey card, ensuring that it fills the frame entirely. Try to make sure that it is flat in the frame and that it is lit evenly, and in the same way as your subject.
- Step 2: Open the camera’s menu and find the option labeled “Custom White Balance” (or Custom WB). Press the select button and choose the photo of your gray card. Press select again and you have set your custom white balance. Set the camera’s white balance to use the new custom setting and start taking photos.

If something in your scene changes, such as the lighting, just repeat the steps above and all of your images should have an accurate white balance.
Post-production custom white balance
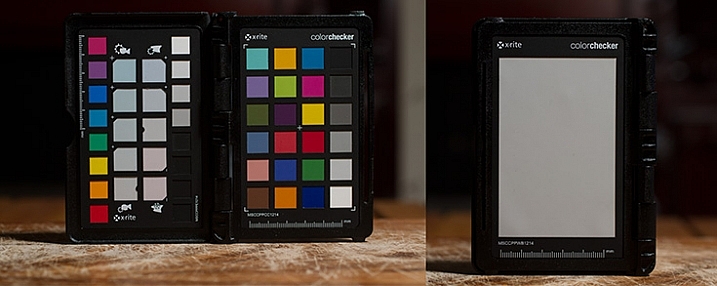
The ColorChecker Passport offers even greater control over white balance, and also has a section for setting a custom white balance in-camera.
For the post-production option, the only thing you need to do with your camera is to take a photo of your gray card in all of the scenes that you’re photographing. It may help with organization if you start off any sequence of photos with the gray card image. This way, you will always know which image to use to take a white balance setting from.
Once you’re on the computer, and have your images loaded into Lightroom, the steps are quite straightforward:
- Step 1: Select the photo of a gray card that you want to take a white reading, from and enter the develop module.
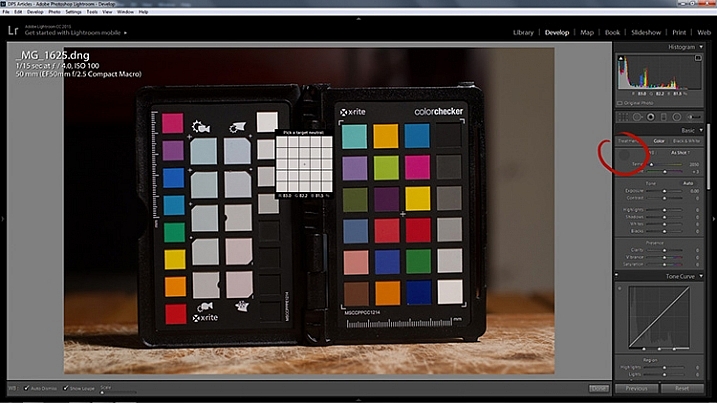
- Step 2: Select the eyedropper tool that’s next to the White Balance sliders in the right hand panel, and click anywhere on the image of the grey card. You should now have an accurate white balance setting.
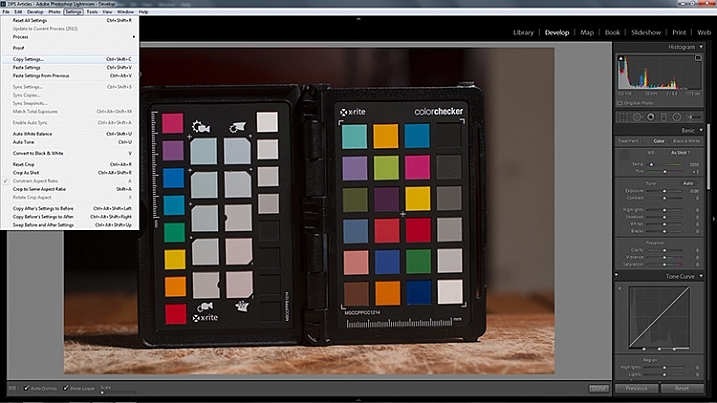
- Step 3: In Lightroom, to copy your settings, press ctrl+shift+c (CMD+C on Mac) and check the White Balance boxes. Leave all of the other boxes unchecked.
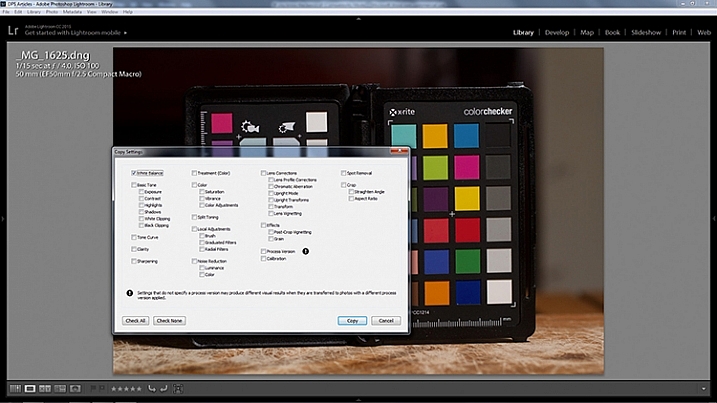
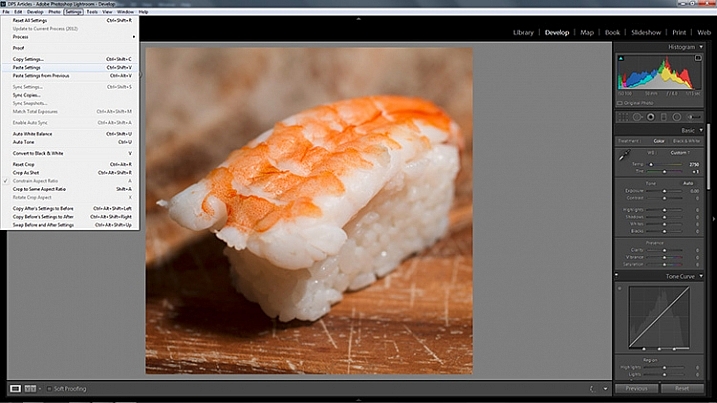
- Step 4: In Lightroom, select all of the photos you want to correct (using the filmstrip at the bottom) the white balance on and press ctrl+shift+v (Cmd+V on Mac). Now all of photos you took should have a corrected white balance.
Summary
All of the techniques outlined here are simple, and not very time consuming, yet the amount of extra control they give you over your camera makes a gray card one of the most cost effective accessories in any camera bag.
Have you used one before? Do you have any other tips to add? Please share that or any questions you have below.
googletag.cmd.push(function() {
tablet_slots.push( googletag.defineSlot( “/1005424/_dPSv4_tab-all-article-bottom_(300×250)”, [300, 250], “pb-ad-78623” ).addService( googletag.pubads() ) ); } );
googletag.cmd.push(function() {
mobile_slots.push( googletag.defineSlot( “/1005424/_dPSv4_mob-all-article-bottom_(300×250)”, [300, 250], “pb-ad-78158” ).addService( googletag.pubads() ) ); } );
The post How to Use a Gray Card to Get More Accurate Exposures and Color by John McIntire appeared first on Digital Photography School.

You must be logged in to post a comment.