RSS
 

Posts Tagged ‘Accurate’

‘Accurate autofocus on any subject in any environment’: Olympus engineer talks OM-D E-M1 Mark III AF

14 Apr
Olympus’ newly-announced OM-D E-M1 Mark III (left) alongside the OM-D E-M1X.

The recently-launched Olympus OM-D E-M1 Mark III features an advanced 121-point all cross-type autofocus system, and many other capabilities inherited from the flagship OM-D E-M1X including Live ND mode and various multi-shot features.

Modern mirrorless interchangeable lens cameras use one, or a combination of two main types of autofocus: contrast-detection and phase-detection. Contrast-detection autofocus works by driving focus until the contrast of a sampled area on the sensor is at its maximum – the presumed point of sharp focus. Contrast-detection is highly accurate, but can be slow, and relies on a certain amount of ‘trial and error’.

Phase-detection works more like human vision, using dedicated pixels to compare light coming from your subject from two slightly different perspectives at the same time. This allows the camera to judge depth, allowing for faster focus acquisition, without the ‘hunting’ characteristic of many purely contrast-detection autofocus systems.

Traditional phase-detection autofocus systems rely on pixels that are sensitive to vertical lines in a scene. Some, more sophisticated systems use a ‘cross-type’ pixel arrangement, which can detect horizontal or vertical detail, meaning that accurate focus can be achieved even with complex, non-linear subjects.

The 121-point autofocus system in the Olympus OM-D E-M1 Mark III and the E-M1X uses a combination of cross-type phase and contrast-detection, to ensure fast and accurate focus in a range of challenging environments.

In this interview, Tetsuo Kikuchi, manager of Imaging System Development at Olympus Corp explains how the E-M1 Mark III’s autofocus system was developed, and what it means to design a camera for demanding professionals.


What are the user requirements for professional-grade autofocus systems?

The most common requests we receive from professionals are that the camera must focus on their desired subject as quickly and accurately as possible, and it must continue to focus on that subject in any situation.

Professionals often stress the importance of operability, too. Their work requires the ability to quickly and easily adjust autofocus settings as shooting situations and subjects change. We believe that in order to satisfy professionals, we have to be able to meet all of those requirements.

What was the main customer feedback about autofocus in previous models?

After releasing the OM-D E-M1, which was Olympus’ first on-chip PDAF mirrorless camera, we received many requests for more AF points. These requests came from professional photographers and ‘prothusiasts’, especially in the genres of sports, bird, wildlife, and aviation.

We collated performance feedback and took special note of comments regarding focus drift to the background. Then, we set out to develop the 121-point all-cross-type PDAF system to eradicate this issue, delivering highly accurate focusing with all AF points, enabling photographers to keep their subject in focus.

Olympus’ 121-point all-cross-type PDAF system covers the majority of the frame.

What was the main priority when developing autofocus for the E-M1X and E-M1 Mark III?

There were two main goals, actually: ‘Quick focusing on targeted subjects after engaging autofocus’ and ‘stable and highly accurate continuous focusing on targeted subjects in any environment’.

What was the concept behind the 121-point all-cross-type On-chip Phase Detection AF point array?

We developed our on-chip PDAF system to achieve our goal of accurate and continuous autofocus on any subject in any environment.

The AF sensor array layout on the image sensor – which is unique to Olympus – is designed to detect any vertical, horizontal, or diagonal line patterns on subjects, and to find a defocused subject in the foreground. Thanks to our AF sensor layout design, our on-chip PDAF can deliver the high-speed focusing of phase detection and the accurate subject detection of cross-type sensors that DSLR cameras have previously achieved with a dedicated AF sensor. Our system has the added advantage of wider autofocus area coverage.

What makes Olympus autofocus technologies different to or better than competitors?

Our PDAF system can detect vertical and horizontal line patterns equally, allowing the camera to detect and focus on subjects in the foreground. This is a merit of Olympus. Because the PDAF sensors are arrayed not in one high density line but discretely over the entire area of the image sensor, any potential negative effect on image quality is also reduced.

Olympus’ most recent firmware delivers accurate autofocus without the risk of ‘focus drift’ to the background.

OM-D E-M1 Mark III, M.Zuiko Digital ED 300mm F4 IS PRO. F4, 1/250sec, ISO 3200

How difficult is it to implement cross-type on-chip phase-detection autofocus technology?

The most difficult challenge we faced when developing our all cross-type on-chip PDAF system was in determining the optimal layout of the PDAF sensors: one that would achieve the highest level of focusing accuracy with horizontally-arrayed and vertically-arrayed AF sensors simultaneously. In principle, utilizing phase detection AF can cause measurement errors; minimizing such errors is required for highly accurate focusing.

Could you elaborate on the sources of these measurement errors?

The measurement errors are attributed to a combination of factors, but the degree of measurement error is specific to the PDAF sensor layout. Therefore, we needed to build a proprietary in-house method to evaluate the reliability of measured distance data. This was important when we commenced development of the OM-D E-M1 Mark II, which was our first camera model equipped with all cross-type PDAF sensors.

Using pre-production cameras, our R&D members worked closely with professional photographers

Using pre-production cameras, our R&D members worked closely with professional photographers to conduct shooting tests, and these tests were repeated many times to refine our method. As a result, we are able to accurately evaluate our PDAF reliability and deliver exceptional performance.

Measurement errors can also come from the lens. However, our cameras can automatically correct for such errors according to the lens’ known characteristics, thus eliminating any effect.

Concept rendering, showing how cross-type phase-detection autofocus pixels are arrayed on the sensor of Olympus’ OM-D E-M1 Mark III and E-M1X.

Is there an autofocus advantage to a smaller sensor compared to APS-C or full-frame?

In principle, there is no correlation between PDAF performance and sensor size. However, our on-chip PDAF strongly complements our compact system size (which is ideal for photography genres such as bird and wildlife) because this autofocus method allows for a small camera body and fast focusing on moving subjects.

Lens resolution can affect autofocus accuracy though, because high resolution lenses make it possible to more precisely detect focus position.

The OM-D E-M1X is one of Olympus’ OM-D models that utilizes its contrast-detection plus all-cross-type phase-detection AF system.

How will the computational and machine learning based approaches we’ve seen in Olympus cameras evolve?

To ensure our products deliver the highest levels of performance, continuous device evolution must be paired with ever-evolving computational photography technologies. We have been heavily investing our resources to meet this challenge. For example, the E-M1 Mark III boasts our Handheld High Res Shot Mode, a technology that can produce high resolution low noise images, similar to those of full frame cameras, but with a system that’s significantly smaller in size.

We will develop new technologies to enable photographers to capture challenging images which are only possible using an Olympus camera and lens

We have also achieved advanced subject detection AF with AI-based deep learning technology. Features such as these will be continuously improved. Looking to the future, we will develop new technologies to enable photographers to capture challenging images which are only possible using an Olympus camera and lens, negating the need for extra equipment, special shooting skills, or additional post-processing.

The OM-D E-M1X has 121-point contrast-detection plus all-cross-type phase-detection AF. It features Olympus’ Subject Detection AF with AI-based deep learning technology.

OM-D E-M1 Mark III, M.Zuiko Digital ED 300mm F4 IS PRO. F5.6, 1/1600sec, ISO 400

Smartphone cameras today perform dynamic and local adjustments to automatically create a pleasing image. Do you see Olympus cameras also adopting this ‘auto’ approach in the future?

Our goals do not include the development of technology that significantly limits users in their individual creativity and expression. Instead, we develop cameras that facilitate the creative process, helping photographers bring their image concepts to life. While it is important that we enable photographers to utilize their skills and knowledge, we also see value to improving camera features for shooting assistance.

Thus, we will strive to uphold a balance between expression and automation with new technology that can benefit photographers of all skill levels and genres.


Tetsuo Kikuchi is manager of Imaging System Development at Olympus Corp, in Tokyo.

This is sponsored content, created with the support of Olympus. What does this mean?

Articles: Digital Photography Review (dpreview.com)

 
Comments Off on ‘Accurate autofocus on any subject in any environment’: Olympus engineer talks OM-D E-M1 Mark III AF

Posted in Uncategorized


Datacolor launches SpyderX, its fastest and most accurate color calibration tool to date

11 Feb

Color management solutions company Datacolor has announced SpyderX, its fastest and easiest to use monitor color calibration tool to date.

The new tool has been redesigned from the ground up with a new color engine ‘that provides significantly increased color accuracy and low light capabilities,’ according to Datacolor.

One of the standout improvements is the decrease in time it takes to calibrate a monitor or projector. Compared to the five minutes previous Datacolor tools required to calibrate a device, the new SpyderX tool takes less than two minutes once the appropriate software is downloaded.

The redesigned device is also more precise than ever with improved levels of color accuracy and shadow detail recognition.

The SpyderX is available in two varieties: Spyder Pro, which ‘is designed for serious photographers and designers seeking a fast and easy-to-use monitor calibration solution’ and Spyder Elite, which ‘takes it one step further with more advanced settings for professional photographers and videographers who want ultimate control of their color workflow.‘ SpyderX devices are available for $ 169.99 and $ 269.99, respectively, at Datacolor’s online store and authorized Datacolor retailers.

Press release:

Datacolor debuts SpyderX, a ground-breaking color calibration solution for monitors.

Lawrenceville, New Jersey, USA, February 11, 2019 – Datacolor®, a global leader in color management solutions, has launched SpyderX, its fastest, most accurate and easiest to use color calibration tool for monitors. The development of SpyderX is testament to Datacolor’s commitment in advancing color management solutions for photographers, videographers and creative specialists worldwide.

SpyderX uses a fully redesigned color engine that provides significantly increased color accuracy and low light capabilities, giving photographers the confidence needed to achieve their creative vision.

SpyderX enhanced features include:

  • Blazing Speed – Taking less than two minutes to calibrate a screen, the SpyderX is several times faster than previous models, with calibration happening so fast it easily becomes part of the workflow.
  • Highest Accuracy – Providing a significantly higher level of color accuracy and shadow detail on a wide range of monitors.
  • Ease of Use – Simple and intuitive single-click calibration software, as well as advanced options.

Susan Bunting, director of marketing at Datacolor, said: “We know photography is a labor of love, and a lot goes into taking every shot. That’s why we’ve redesigned SpyderX from the ground up, ensuring you can trust the color on your screen while making the whole process of calibration as intuitive and quick as possible.”

Now available in two versions, the SpyderX Pro ($ 169.99) is designed for serious photographers and designers seeking a fast and easy-to-use monitor calibration solution. The SpyderX Elite ($ 269.99) takes it one step further with more advanced settings for professional photographers and videographers who want ultimate control of their color workflow.

Purchase SpyderX at spyderx.datacolor.com, Amazon or with authorized resellers.

Articles: Digital Photography Review (dpreview.com)

 
Comments Off on Datacolor launches SpyderX, its fastest and most accurate color calibration tool to date

Posted in Uncategorized


How to Understand Reflected Versus Incident Light and Get More Accurate Exposures

14 Sep

Do you ever get under or overexposed photos when you use your camera’s light meter? Do you get frustrated that even in auto-mode you can’t get the correct exposure? That’s because there are two different type of light to deal with when taking a photo.

When you make a photograph the light is your raw material, which is why it’s important to understand how it works. It’s a very broad topic to cover, so for this article, we are just going to focus on the difference between incident and reflective light because that’s the key to getting your exposure right.

Incident versus reflective light


We all know this difference in a very intuitive way; let me give you an everyday example: when there is a sunny day, do you wear white clothes or black ones? Easy! You wear white or at least light colors, but why? If the sun will be the same, why wouldn’t you wear dark colors? Because you know that dark colors absorb light and therefore you’ll feel the heat more than wearing white which will reflect more light and keep you fresher. This is the same principle you need to apply when measuring the light for photography.

The difference explained

Diagram How to Understand Reflected Versus Incident Light and Get More Accurate Exposures

Incident light is that which is illuminating your scene. It falls on the subject before being altered (reflected) by it which is why it’s also a more accurate light reading.

When light hits objects it gets transformed by them and reflected out; this is what we perceive and what the camera captures and reads. This is called reflective light.

Light metering

Let’s see how these two concepts apply to light metering and exposure when you take a photo. In the next examples, I always used the same light for each.

In this first shot, I metered the light once I had framed the image I wanted, so it gave me a reading making an average of the reflective light.

General Reading - How to Understand Reflected Versus Incident Light and Get More Accurate Exposures

The settings were ISO 400, f/5.6, with a shutter speed of 1/80th.

And the resulting photograph looked like this:

General Reading Result - How to Understand Reflected Versus Incident Light and Get More Accurate Exposures

Reflected light from a dark subject

However, like we said when talking about clothes, dark objects absorb light. So if I make the reading by measuring the black part of the photo, the settings that were “correct” before, now appear to be underexposed.

Black Reading - How to Understand Reflected Versus Incident Light and Get More Accurate Exposures

Even if the lighting is always the same, your camera thinks there is less. As a result, your photos will be overexposed.

Black Reading Result - How to Understand Reflected Versus Incident Light and Get More Accurate Exposures

Exposure: ISO 400, f/5.6, shutter speed 1/13th.

Reflected light from a light subject

On the other hand, light objects reflect most of the light, so your camera will receive the message that it needs to reduce the exposure if you meter off something light.

White Reading - How to Understand Reflected Versus Incident Light and Get More Accurate Exposures

And as a result, you will end up with underexposed images.

White Reading Result - How to Understand Reflected Versus Incident Light and Get More Accurate Exposures

Exposure: ISO 400, f/5.6, shutter speed 1/200th.

None of these three readings gave you the correct exposure on your image because none of them were about the incident light. In order to get this accurate reading, you need to use a handheld external light meter, which can be very expensive. Fortunately, there are other ways to get the right exposure without having to spend a fortune.

Black and white… and gray

Back in the 1930s, a photographer called Ansel Adams developed a technique for the optimal exposure of photographs by dividing the degrees from light to dark into 11 zones, therefore it’s called the zone system. Everything in the world has a color and lightness that correspond to a zone. All light meters, including the one integrated into your camera, are designed to give you the middle zone: Gray V that reflects 18% of the light. So, what you need in order to have a correct exposure is to measure the light reflecting off of this tone.

Gray card Reading - How to Understand Reflected Versus Incident Light and Get More Accurate Exposures

You’ll find gray cards on the market which are used to calibrate your exposure and white balance. They are a very practical and economical way to turn the reading of your reflective light into an incident light accuracy.

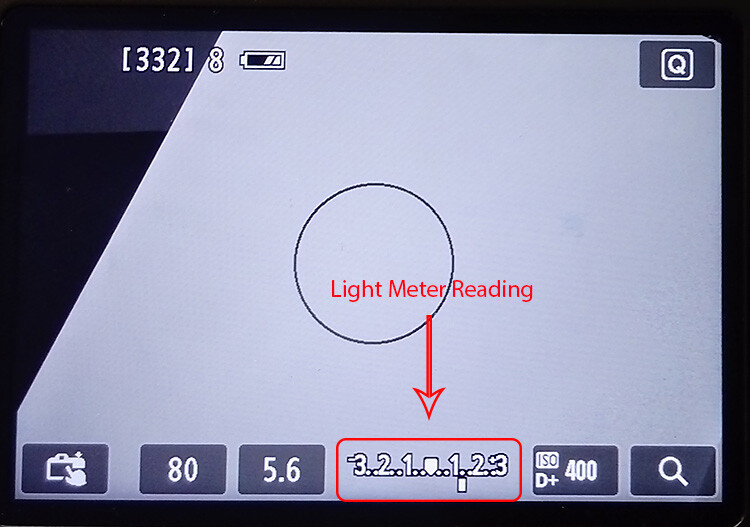
It is also very easy to use, you just have to put one in front of your subject and frame it with your camera. Once that’s the only thing in your shot, press the shutter button halfway to see the light meter and adjust your exposure accordingly. With those settings, you can have the perfect exposure regardless of the tones in your image.

Grey cardReading Result - How to Understand Reflected Versus Incident Light and Get More Accurate Exposures

Exposure: ISO 400, f/5.6, shutter speed 1/30th.

Real world examples

I know what you’re thinking, that was an unreal example because most of your photos will have much more colors than just black, white and gray V. That’s true, but the principle remains the same. Look at these real life examples:

Bridge Reflective - How to Understand Reflected Versus Incident Light and Get More Accurate Exposures

Reflective reading with an exposure of ISO 400, f/5.6, shutter speed 1/80th.

Compared to the incident reading:

Bridge Incident - How to Understand Reflected Versus Incident Light and Get More Accurate Exposures

Incident reading with an exposure of ISO 400, f/5.6, shutter speed 1/320th.


How to improvise!

What if you don’t want to be carrying around a gray card? Or did the perfect image catch you unprepared? No problem, everything in the visual world has its equivalent in the zone system.

For example, grass or wet cement correspond to the gray V zone so you can always look for elements like that in your photo and you will get a very accurate reading from them.

Take this composition of candle holders. When they are all white the photo is dark, sad and shows all the imperfections of the backdrop because it’s underexposed. However, when I add a gray candle holder and measure the light in it, the exposure is perfect.

Candleholders Reflective

Exposure: ISO 1250, f/11, shutter speed 1/125th.

Candleholders Incident

Exposure: ISO 1600, f/8, shutter speed 1/125th.

Tip: So that you are never caught off guard, you can measure the palm of your hand and figure out how much lighter or darker it is than the gray card, that way you will always have the perfect reading “at hand”.

Things to remember:

  • Get close enough to the gray object so that it’s the only thing you see through the lens, or at least the majority of it, and take that reading to set the exposure values.
  • The gray card or object needs to receive the same light as the rest of the scene. Be careful to not cast a shadow with your body or your camera when getting closer to measure the light.
  • Reflective light depends also on the material and shape of the object so a black car, for example, reflects more light than a black wool sweater.

There you go, understanding the difference between reflective and incident light can transform your photo from snapshots to pro shots!

The post How to Understand Reflected Versus Incident Light and Get More Accurate Exposures by Ana Mireles appeared first on Digital Photography School.


Digital Photography School

 
Comments Off on How to Understand Reflected Versus Incident Light and Get More Accurate Exposures

Posted in Photography


How to Use a Gray Card to Get More Accurate Exposures and Color

15 Jan
how-to-use-a-grey-card-1597

High contrast scenes with delicate colors can prove tricky for your camera’s meter and white balance settings.

If you’re familiar with the fundamentals of camera technique, then you know how much of an effect white balance can have on your images. Also, you probably have a basic understanding of how your camera’s meter works, or at least how to react to its output to change your settings appropriately.

Just beyond these basics, there are a few simple techniques that will allow you to fin- tune your white balance, and get more accurate meter readings from your subject. To take advantage of these techniques, you only need to add a single cheap piece of equipment to your camera bag: a gray card.

These humble accessories start at less than $ 10, yet the amount of control they give you over the final image, can be invaluable in tricky situations. For example, they allow you to obtain a good white balance reading from mixed light sources, or get an accurate exposure reading from your camera’s meter in a high contrast scene.

What is a gray card

A grey card is exactly what it says it is. A card that is gray. More specifically, it is middle gray, or 18% gray. This number is important because 18% gray is what your camera’s meter is trying to calculate when it meters to expose for a scene. This means if you put a grey card in front of your subject, and take a meter reading off it, you will get a correct exposure regardless of any tonal contrast in the scene.

Additionally, when used in conjunction with a camera’s custom white balance feature, you can manually set a perfect white balance for everything you photograph. This becomes especially important when you need to faithfully recreate colors in your images, whether that may be for commercial purposes or record shots.

Metering

The more useful of these two techniques is metering. In this case, a gray card is the closest thing you’ll get to a magic bullet that will allow you to get a near perfect exposure, in almost any situation.

Spot metering

To get started, the first thing you’ll want to do is to set your camera to the spot metering mode. While this is not absolutely necessary, the fact that the camera will only be metering from a small section in the centre of the frame will help a lot, especially in circumstances where you cannot fill the entire frame with the gray card. It will also save you a lot of time if you use manual mode.

Metering

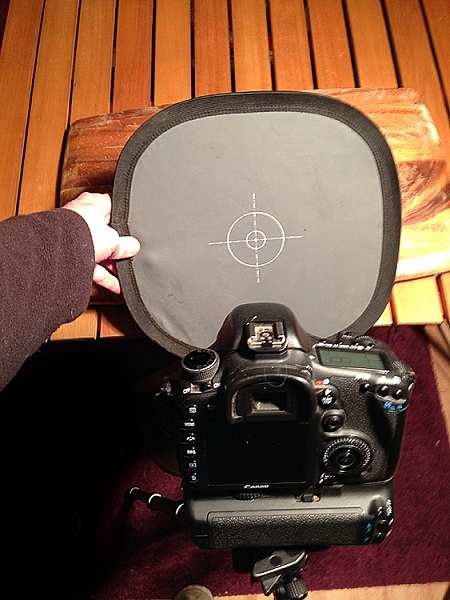
With your metering mode changed, all that you have to do now, to take advantage of this technique, is put the gray card in your scene, point the centre of the frame at it, dial in the exposure your meter gives you and then just take the gray card away. Providing that the light doesn’t change, you will now have an accurate exposure for any subsequent shots that you take in this setup.

Taking a meter reading with a grey card.

Taking a meter reading with a gray card.

Hints

There are a few things can do that will make this process easier and more accurate.

First, you should make sure that your subject remains in a similar position relative to the light source, from where you took your gray card reading. For example, if you’re taking headshots outdoors and the sun is lighting your subject from the front; that is one exposure reading. If you turn your subject to the side, or completely around, that will affect your exposure and you will need to take another reading.

The second tip is when you’re taking the exposure reading; fill the frame with the grey card as much as possible. This will help to ensure that your meter is only trying to expose for the card, and not anything around the edges.

White balance

Although the basic white balance settings in cameras can be pretty good, they do tend to struggle at times. For example, tungsten bulbs can vary greatly in color temperature, depending on their quality and power output. This may lead to the basic tungsten setting on your camera failing to give you an accurate representation of colors.

There are two ways to use a gray card to set your white balance. The first is to use it to set your camera’s custom white balance. The second method will allow you to use Lightroom to set a white balance for your images after they have been taken. You can also use Adobe Camera Raw (inside Photoshop) if you don’t have Lightroom.

Shifts in White Balance - Left: Daylight Center: Tungsten Right: Custom

Shifts in White Balance – Left: Daylight – Center: Tungsten – Right: Custom

In-camera custom white balance

The technique described here is for Canon users. If you use Nikon, Sony, or any other brand, you will need to consult your manual for instructions on setting a custom white balance.

  • Step 1:  Take a photo of your grey card, ensuring that it fills the frame entirely. Try to make sure that it is flat in the frame and that it is lit evenly, and in the same way as your subject.
  • Step 2: Open the camera’s menu and find the option labeled “Custom White Balance” (or Custom WB). Press the select button and choose the photo of your gray card. Press select again and you have set your custom white balance. Set the camera’s white balance to use the new custom setting and start taking photos.

how-to-use-a-grey-card-canon

If something in your scene changes, such as the lighting, just repeat the steps above and all of your images should have an accurate white balance.

Post-production custom white balance

how-to-use-a-grey-card-1626

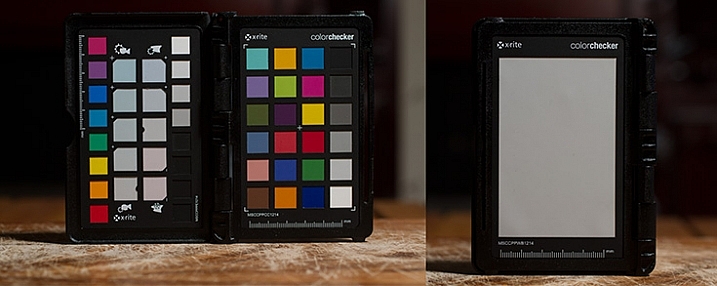
The ColorChecker Passport offers even greater control over white balance, and also has a section for setting a custom white balance in-camera.

For the post-production option, the only thing you need to do with your camera is to take a photo of your gray card in all of the scenes that you’re photographing. It may help with organization if you start off any sequence of photos with the gray card image. This way, you will always know which image to use to take a white balance setting from.

Once you’re on the computer, and have your images loaded into Lightroom, the steps are quite straightforward:

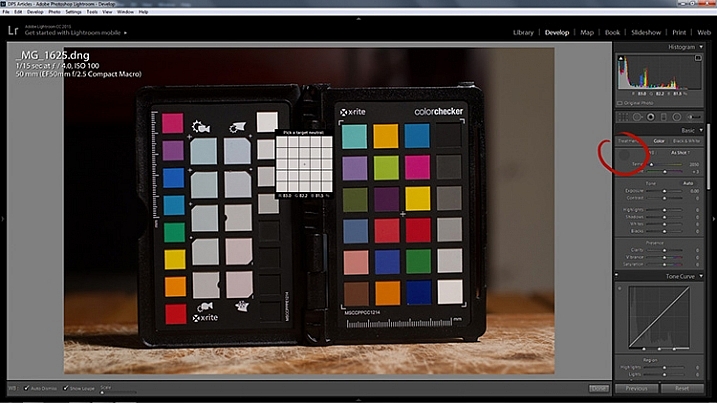
  • Step 1: Select the photo of a gray card that you want to take a white reading, from and enter the develop module.
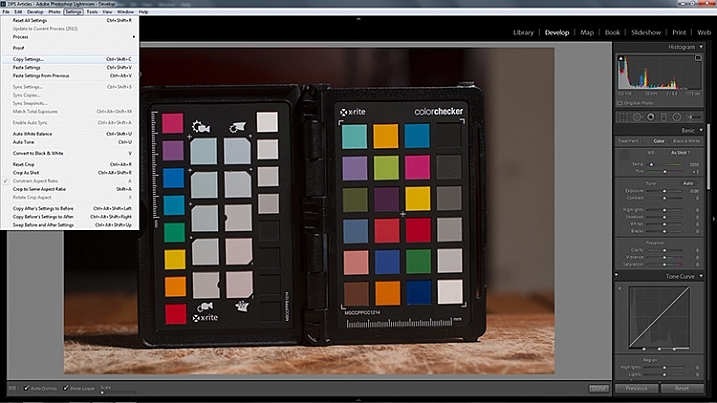
  • Step 2: Select the eyedropper tool that’s next to the White Balance sliders in the right hand panel, and click anywhere on the image of the grey card. You should now have an accurate white balance setting.

how-to-use-a-grey-card-lightroom-1

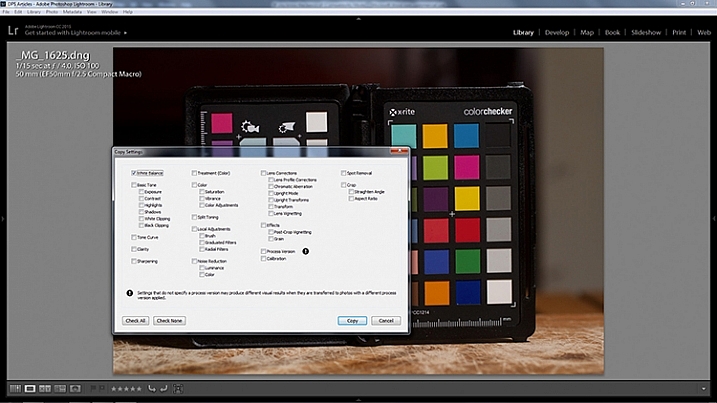
  • Step 3: In Lightroom, to copy your settings, press ctrl+shift+c (CMD+C on Mac) and check the White Balance boxes. Leave all of the other boxes unchecked.

how-to-use-a-grey-card-lightroom-2

how-to-use-a-grey-card-lightroom-4

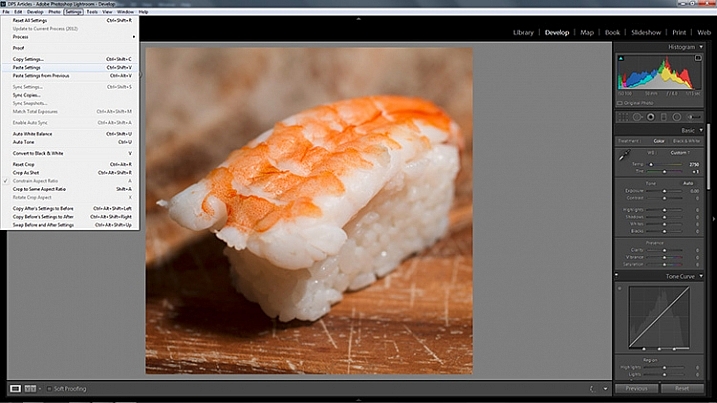
  • Step 4: In Lightroom, select all of the photos you want to correct (using the filmstrip at the bottom) the white balance on and press ctrl+shift+v (Cmd+V on Mac). Now all of photos you took should have a corrected white balance.

how-to-use-a-grey-card-lightroom-3

Summary

All of the techniques outlined here are simple, and not very time consuming, yet the amount of extra control they give you over your camera makes a gray card one of the most cost effective accessories in any camera bag.

Have you used one before? Do you have any other tips to add? Please share that or any questions you have below.

googletag.cmd.push(function() {
tablet_slots.push( googletag.defineSlot( “/1005424/_dPSv4_tab-all-article-bottom_(300×250)”, [300, 250], “pb-ad-78623” ).addService( googletag.pubads() ) ); } );

googletag.cmd.push(function() {
mobile_slots.push( googletag.defineSlot( “/1005424/_dPSv4_mob-all-article-bottom_(300×250)”, [300, 250], “pb-ad-78158” ).addService( googletag.pubads() ) ); } );

The post How to Use a Gray Card to Get More Accurate Exposures and Color by John McIntire appeared first on Digital Photography School.


Digital Photography School

 
Comments Off on How to Use a Gray Card to Get More Accurate Exposures and Color

Posted in Photography


Get more accurate color with camera calibration

28 Apr

D3x_02_Jordan_13_11_-_02.jpg

One of the ways in which you can minimize the amount of work you need to do in post-processing is to calibrate your camera. Many digital photographers are familiar with calibrating their computer monitor to help them get accurate results when adjusting images. But few think of calibrating their camera. Professional travel photographer Steve Davey explains why and how to set up a custom profile. Learn more

News: Digital Photography Review (dpreview.com)

 
Comments Off on Get more accurate color with camera calibration

Posted in Uncategorized


Accurate green screen removal in photoshop

16 Oct

www.photoshopgreenscreen.com A very easy way to remove a green screen in Photoshop and keep all of the detail in the foreground. This is great for working around detailed hairlines.
Video Rating: 4 / 5


Photoshop HD Tutorial – Accurate Background Replacement

26 Sep

www.photoshopgreenscreen.com How to replace a background in Photoshop and keep the hair!
Video Rating: 4 / 5