RSS
 

Posts Tagged ‘Turn’

How to Turn Your Living Room into a Photo Studio

08 Apr

The post How to Turn Your Living Room into a Photo Studio appeared first on Digital Photography School. It was authored by Jackie Lamas.

Have you ever wished to have a studio space where you could bring clients in and photograph all types of portraits and ideas? You can! Your living room, or any room in your home for that matter, can be quickly converted so that you can photograph your studio ideas in your home!

Setting up backgrounds on a plain wall can help you take great portraits in your own living room.

Finding the right space

Your living room might be the room with the biggest space for you to get the best angles and set up your lights. As long as you have about 10 feet of blank wall space, you can use it for your at-home studio.

Choose a wall where you can mount backgrounds. Put up studio paper, or any background paper. Alternatively, use a painted wall for your photos. It doesn’t have to be anything special, and you could use the existing wall as the main background as well.

A bedroom with big windows can be used as a studio for portraits.

Why 10 feet? The wider your wall space, the more room you’ll have to the sides of your photos. This will enable you to photograph both horizontally and vertically. You will also have room for more than one person.

If you’re photographing headshots or only individuals, a smaller wall space would work. A wall with 5 feet would be sufficient enough for headshots and individuals.

Other spaces in your home that could work

The living room doesn’t have to be the only space that you can use. For example, if you don’t have studio lights, but want to create beautiful portraits with creative direction on backgrounds and don’t want to go on location, your home can still work!

You can photograph in a covered patio with lots of wall space, in your garage, in the bedroom, or on a balcony. All of these spaces work if you have the wall space to place your subject and space to photograph them from a distance.

This makes it much simpler to choose the right location for your at-home studio in the event that you don’t have studio lighting equipment or a special look to your photographs.

Creating the best set up for studio/flash  set up

You don’t necessarily need to use studio lights for your at-home studio, however, if that is what you’re going to use then let’s go through what you’ll need in the space for the best outcome.

Use flash bouncing off the ceiling to light portraits in your living room or in the space you want for your at home studio.

You’ll need to choose a wall space that is in a darker or not-so-brightly-lit room. You can also use shades or curtains to block out light so that your off-camera lighting can correctly light your scene.

Using a flash to light these portraits to simulate the sun. Plain wall background in the bedroom.

Living rooms offer the most space but make sure you can get it dark enough to set up the lights exactly where you want them.  You could also use external flashes to set up your at-home studio.

You can light portraits creatively when you have control of the space and lighting.

Have a lamp nearby so that you can use it as a modeling light. You can also use a light dimmer so that the light doesn’t affect the outcome or interfere with the white balance, exposure, or look and feel that you’re trying to achieve.

Best set up for natural light at-home studio

If your living room or any other room in your home has great natural light, you can definitely set up your studio there. The same tips apply as far as wall space so that you can pose your subject and have enough space in the frame in case cropping is necessary. It also gives you the option to photograph vertical or horizontal.

This was shot with all natural light using a silver reflector with a 3×3 grey background taped to the wall. Edited to bump up the contrast and desaturate the colors.

Choose a room that has great window light or light coming into the space. For example, a garage space with the garage door open is a good option. Another good option is a living room with big sliding doors where light floods the room. Make sure that the sunlight isn’t coming directly into the room or through the window where it casts weird shadows on your subject.

To diffuse the light, you can hang translucent curtains. This will help with harsh lighting, shadows, and the temperature of the room. Of course, you don’t necessarily need the window open unless it adds more light to your scene – if that is the look you’re going for.

If your home has textured walls, you can use them as backgrounds for the portraits as well!

Use a reflector and bounce cards to help bounce light in the direction you want. Black flags  (black boards that help darken the light) and are great for creating shadows and can help to give you more dramatic lighting.

Be aware of the floor

In your home, your floor is already installed and this can present a problem if you’re photographing full-length portraits. Take a look to see if the floor is what you’ll want for your photos. If it isn’t, you can use paper and place it from the wall all the way to the floor. This will create a seamless look to your photos like a real studio.

In the before photo, we covered the floor with a black sheet so we could photoshop the black background in and create a seamless look.

You can also get cheap wood floor-looking laminate flooring and create your portable floor. If the trim base to the floor isn’t distracting, you could even possibly photoshop that out to create a more seamless look with the wall and the floor.

Just be aware of your floor so you know what to do before you start photographing in your new home studio.

Backgrounds for in-home studios

There are a lot of great backgrounds that you can use for a home studio. Given that it’s completely your space and you can get really creative. The simplest one is the one you already have available! Use the existing wall color and texture to create interesting portraits.

You can use existing decor to create beautiful portraits or tape a paper background to the wall for a seamless background.

Other backgrounds you can use can be:

  • A sheet that covers the wall and onto the floor for a seamless fabric background.
  • Paper either rolled onto the floor for seamless or a piece of paper taped to the wall for up-close portraits
  • Any fabric or paper with a print on it
  • Different colored paper for headshots

Pretty much anything you can think of you can create as a background! You can get really creative with balloons, tissue paper, hanging strings, lights, paper flowers, artificial flowers, string or hanging garlands either made by you or already made newspaper or even plants.

The options and ideas are limitless and will give your photos a unique look no matter what your style is.

In conclusion

Your living room can be the perfect space for you to create beautiful studio work. You don’t need fancy equipment just nice wall space and the light you love to photograph with. Add in some music and you’ve got the perfect comfortable studio right in your home!

Do you have other suggestions to make a great living room studio? Share with us and our readers in the comments below.

The post How to Turn Your Living Room into a Photo Studio appeared first on Digital Photography School. It was authored by Jackie Lamas.


Digital Photography School

 
Comments Off on How to Turn Your Living Room into a Photo Studio

Posted in Photography


NVIDIA Research project uses AI to instantly turn drawings into photorealistic images

21 Mar

NVIDIA Research has demonstrated GauGAN, a deep learning model that converts simple doodles into photorealistic images. The tool crafts images nearly instantaneously, and can intelligently adjust elements within images, such as adding reflections to a body of water when trees or mountains are placed near it.

The new tool is made possible using generative adversarial networks called GANs. With GauGAN, users select image elements like ‘snow’ and ‘sky,’ then draw lines to segment an image into different elements. The AI automatically generates the appropriate image for that element, such as a cloudy sky, grass, and trees.

As NVIDIA reveals in its demonstration video, GauGAN maintains a realistic image by dynamically adjusting parts of the render to match new elements. For example, transforming a grassy field to a snow-covered landscape will result in an automatic sky change, ensuring the two elements are compatible and realistic.

GauGAN was trained using millions of images of real environments. In addition to generating photorealistic landscapes, the tool allows users to apply style filters, including ones that give the appearance of sunset or a particular painting style. According to NVIDIA, the technology could be used to generate images of other environments, including buildings and people.

Talking about GauGAN is NVIDIA VP of applied deep learning research Bryan Catanzaro, who explained:

This technology is not just stitching together pieces of other images, or cutting and pasting textures. It’s actually synthesizing new images, very similar to how an artist would draw something.

NVIDIA envisions a tool based on GauGAN could one day be used by architects and other professionals who need to quickly fill a scene or visualize an environment. Similar technology may one day be offered as a tool in image editing applications, enabling users to add or adjust elements in photos.

The company offers online demos of other AI-based tools on its AI Playground.

Articles: Digital Photography Review (dpreview.com)

 
Comments Off on NVIDIA Research project uses AI to instantly turn drawings into photorealistic images

Posted in Uncategorized


How to Turn a Photography Technique into a Series

05 Feb

The post How to Turn a Photography Technique into a Series appeared first on Digital Photography School. It was authored by Simon Bond.

Photography is a truly diverse art form. There are so many ways you can express yourself through a photograph. The photos you take are often a reflection of your personality, and it’s your personality which leads you towards your photographic style. There are a number of photography techniques you can learn to express this style. In this article, you’ll learn how to go beyond a few photos using a particular technique, and find out how you can turn this into a series of photos. So read on and find out how you can boost your creativity, by using one technique to create a photographic series.

Look to take as many interesting photos as you can, with your chosen photo technique.

Choose the photography technique for your series

With so many photography techniques to choose from, it can be tricky to home in on just one. Perhaps you already have some go-to techniques you regularly employ? If so, it’s a good idea to choose one of these. On the other hand, perhaps there is a new technique you’d like to try, and you have a raft of creative ideas to go with it. If you need a little help, below are some ideas that lend themselves to making a series.

  • Light painting – A genre with a massive amount of potential, and creativity is almost endless. Will you try your hand at kinetic light painting? How about using a programmable LED light stick?
  • Crystal ball photography – Explore the world through a glass ball, and discover that your lens is not the only optic you can use in your photography.
  • Minimalism – Photography is the art of subtraction, and the appeal of minimalism is always there. Why not turn this into a series?
  • Silhouettes – An easy photography technique to master is silhouettes. Get down low to the ground, and photograph against the light! You’ll need a strong compelling shape to aim at though.
  • Low-key light – A series of portrait photos always looks nice, and using low-key light is a great photography technique to produce them. Why stop at portraits though? There is a whole world of still life to work with.
  • Shadows – Like silhouettes, shadows can be an interesting subject matter. Look to photograph early morning, or late evening when the length of shadow is long.
  • Headshots – A series of portrait photos is a great idea, and if you travel it’s a great chance to show the diversity of the world. In this case, the overall theme is the composition of a headshot, but within that, there is huge potential to be creative.

Creating a story through a sequence of photos works well. In this case, the concepts of water, earth, and fire are displayed.

Have a narrative

Having a photograph technique that is consistent throughout your series is great. However, thinking of an overall narrative to describe your work makes it that much stronger. Think about how you can describe your technique. If your technique is on light painting, you could be exploring dynamism, the future, or energy flows. The crystal ball might allow you to explore themes like dreams, the world in a globe or environmentalism. Those themes can be used to form a title for your body of work. Now you’re not just working to a photography technique, but also to a creative concept. It’s this creative concept that can push you to produce more work in the photography genre you’re exploring.

In this photo, a portrait photo has been taken, but within the ball is a landscape image.

Combine techniques

Now, of course, there is no reason you shouldn’t combine techniques. It’s a great way to expand your series of work. You can use many of the techniques listed earlier in this article in combination. In fact, there are lots of techniques not listed here that you could also incorporate, such as contrast. The crystal ball is just one example of a technique that you can combine with others. Below you can see a few ideas for how you can combine techniques with a crystal ball.

  • Light painting – Light paint around the crystal ball gives it a more mystical feel.
  • Headshot – Use the crystal ball as a prop for your portrait photography.
  • Minimalism – Use the ball as a focal point in your image, and make the rest of the image as minimal as possible.

This photo displays both refraction photography and light painting.

Look to themes

A popular type of photography is to photograph the same scene but at different times of the year. In this way, you can use the seasons as your theme, and repeat the composition and technique you’re using. That means you’ll get four great photos, and you’ll have a mini-series within your overall set of photos. There are lots of ways you can apply this. Below are a few ideas that you may use to expand your work.

  • The seasons – Look to produce images that show spring, summer, autumn, and winter. They don’t have to be taken from the same location, but repetition does create a stronger feel to the set.
  • Elements – Can you use your technique to portray earth, fire, water, and air? Using these elements as a starting point can be a great creative exercise to make you think about how you’ll photograph your idea.
  • The senses – Once again, another popular mini-project could be portraying touch, smell, taste, sight, and sound. Will you also look to portray the sixth sense?

This set of images uses the same technique to display the 5 senses.

Take a mixture of photos

One of the keys to producing a successful series of photos is to mix things up. If your photos all look virtually the same, you’ll eventually run out of room to create. Ahead of changing the way you apply a photography technique you should maximize a particular way of photographing. You could well return to a particular concept and composition, especially if you travel somewhere new. That said, there are some simple, and effective ways of adding variety to your work, without the need to travel.

  • Composition – A change in how you compose your photo can give your photography technique a new twist.
  • Portraits – Using a technique like light painting or silhouettes? Think about how you can add some portraits to the set.
  • Landscapes – Are you doing low-key portraits? Is there a way to incorporate a landscape into the portrait photo? Crystal ball photography is a technique that lends itself very well to landscapes.
  • Macro – Get some closeup macro photos, and change the perspective of the viewer entirely.

With crystal ball photography, adding another ball can add to the variety.

Collaborate

Finally, you could look to collaborate with other photographers who are working in a similar area to your work. This can take the form of a joint project, where at the end you pool your work together. You could do a project where you make a title for the photo, and each person goes and interprets the concept in their own way. It’s also possible that by sharing work with each other, you’ll get ideas to progress your photography technique and concept even further.

Using alternative compositions adds an extra dimension to the crystal ball photography.

Turn your photography technique into a series!

Have you turned a particular photography technique into a series? What was your experience of this, and what did you do with your series once you produced it?

Are you thinking of creating a set of images focusing in on one particular technique to do this? What technique do you plan to use for your project? Hopefully, this article helps focus your mind on some of the things you can do to create a series of images.

As always, at Digital Photography School, we’d love to hear your thoughts, and see your images in the comments section! So please share your photographic series, either old or new.


The post How to Turn a Photography Technique into a Series appeared first on Digital Photography School. It was authored by Simon Bond.


Digital Photography School

 
Comments Off on How to Turn a Photography Technique into a Series

Posted in Photography


Fractal Filters are faceted photo filters that turn your camera into a kaleidoscope

07 Jan

There’s no shortage of weird and wild photography accessories designed to add a little flair to photographs, but Fractal Filters might be one of the most interesting to hit the market in some time.

Created by Nikk Wong and originally funded on Kickstarter, Fractal Filters are creative photo filters designed to add prism-like effects to photographs using shaped and faceted glass elements.

Currently, the Fractal Filters are sold in a ‘Classic 3 Pack’ that use the patented PrismaLed optics and unique cuts to add rainbows, reflections, and halos to photographs. The kit includes the Penrose Fractal Filter, Pascal Fractal Filter, Julia Fractal Filter, a carrying case, and a sticker.

$ (document).ready(function() { SampleGalleryV2({“containerId”:”embeddedSampleGallery_2265290105″,”galleryId”:”2265290105″,”isEmbeddedWidget”:true,”selectedImageIndex”:0,”isMobile”:false}) });

The filters are made to be held by hand in front of a camera lens using the three extra-large finger holes built into the aluminum frame. Wong suggest using lenses with a focal length longer than 40mm and at F5.6 or wider, but the idea is to get creative, so don’t feel limited.

In Wong’s own words, ‘Fractal Filters are designed to provide the user a unique way to look through the lens, both making difficult shooting situations easier and easy situations more spontaneous and creatively elastic.’ Below is a gallery of sample images capture with the Fractal Filters:

$ (document).ready(function() { SampleGalleryV2({“containerId”:”embeddedSampleGallery_8071872203″,”galleryId”:”8071872203″,”isEmbeddedWidget”:true,”selectedImageIndex”:0,”isMobile”:false}) });

The ‘Classic 3 Pack’ kit is available for $ 99 on Fractals’ website and includes the Penrose Fractal Filter, Pascal Fractal Filter, Julia Fractal Filter, a carrying case, and a sticker.

Articles: Digital Photography Review (dpreview.com)

 
Comments Off on Fractal Filters are faceted photo filters that turn your camera into a kaleidoscope

Posted in Uncategorized


NVIDIA researchers can now turn 30fps video into 240fps slo-mo footage using AI

20 Jun

NVIDIA researchers have developed a new method to extrapolate 240fps slow-motion video from 30fps content using artificial intelligence.

Detailed in a paper submitted to the Cornell University Library, NVIDIA researchers trained the system by processing more than 11,000 videos through NVIDIA Tesla V100 GPUs and a cuDNN-accelerated PyTorch deep learning framework. This archive of videos, shot at 240fps, taught the system how to better predict the positioning differences in videos shot at only 30fps.

This isn’t the first time something like this has been done. A post-production plug-in called Twixtor has been doing this for almost a decade now. But it doesn’t come anywhere close to NVIDIA’s results in terms of quality and accuracy. Even in scenes where there is a great amount of detail, there appears to be minimal artifacts in the extrapolated frames.

The researchers also note that while there are smartphones that can shoot 240fps video, it’s not necessarily worth it to use all of that processing power and storage when something that will get you 99% of the way there is possible using a system such as theirs. ‘While it is possible to take 240-frame-per-second videos with a cell phone, recording everything at high frame rates is impractical, as it requires large memories and is power-intensive for mobile devices,’ the researchers wrote in the paper.

The research and findings detailed in the paper will be presented at the annual Computer Vision and Pattern Recognition (CVPR) conference in Salt Lake City, Utah this week.

Articles: Digital Photography Review (dpreview.com)

 
Comments Off on NVIDIA researchers can now turn 30fps video into 240fps slo-mo footage using AI

Posted in Uncategorized


How to Turn Your Photos into Painterly Style Watercolor Art

02 Mar

It’s fun to be creative with your photos, elevating them beyond a digital image and into painterly style art instead. Perhaps you have a great shot of your dog but the neighbor’s bright red car is distracting in the background. Maybe your kid was cute at the park but the swings are poking into one side of the shot. It might be nice to make a festive or birthday card for a relative with the personal touch.

Or maybe you have seen other people doing cool creative stuff on Instagram and you would like to have a go too?

How to Turn Your Photos into Painterly Style Watercolor Art

Image of my cat Cognac created in Waterlili.

There are many ways to edit your images with a painterly style, for this article we are going to focus on the possibilities on offer to make your images look like watercolor art. Whether you use a PC, Laptop, tablet or phone, there is something available. You don’t need Photoshop nor do you always need to spend heaps of money on software either.

Note: This isn’t a How To article, this is us dipping our toe into the water to see what the options are – some are quite complicated and probably need Photoshop (or similar).

Watercolor Programs and Apps

There are many different ways to achieve a watercolor effect. Some are surprisingly easy and yet effective, and some are a lot more complicated. Let’s start with the easy options and go from there.

1. Dedicated Mobile Apps

I have an iPad for doing creative work and there are a couple of specific Watercolor Apps that I like. They have a realistic effect and enough capability to allow you to tweak them and get some variety with your final efforts.

Waterlili

Waterlili turns your image into a watercolor and allows you to tweak color, contrast and saturation. It also has an built-in mask effect for adding some uniqueness to your image.

Waterlili is available for IOS.

How to Turn Your Photos into Painterly Style Watercolor Art - lilacs

Original photo before editing.

How to Turn Your Photos into Painterly Style Watercolor Art - lilacs

Lilac flowers done in Waterlili.


How to Turn Your Photos into Painterly Style Watercolor Art - lilacs

Same image as above, but have applied a watercolor mask effect in Waterlili for a different outcome.

Waterlogue

Waterlogue has several preset options to choose from, and some contrast options to apply. You can save your image in a variety of image file sizes (small files can be used in social media, large files could be printed).

Available for IOS, Android and Win10.

How to Turn Your Photos into Painterly Style Watercolor Art - cat photo

Original image before editing in Waterlogue.

How to Turn Your Photos into Painterly Style Watercolor Art - cat image painterly style

2. Creative Mobile Apps

A creative app is one that allows you more scope with your editing, and offers a variety of different creative and editing options. It isn’t a “one hit wonder” like the first options above. My weapon of choice here is called iColorama.

iColorama has several different ways of adding a painterly effect using its settings. But its real strength is the capability to layer and mask images (like in Photoshop) so you can blend elements of images together for a very creative and completely unique piece of art. It is a program with an impressive depth of capabilities.

It’s IOS only, but Android users could consider Snapseed.

How to Turn Your Photos into Painterly Style Watercolor Art

Original image before creative editing.

How to Turn Your Photos into Painterly Style Watercolor Art

After painterly effects applied in iColorama.

How to Turn Your Photos into Painterly Style Watercolor Art

In this third image, I took the second image with painterly effect into Waterlili, and then blended the two in iColorama for this final image.

3. Options using Photoshop

Actually most photo editing programs that support layers and masks will work here (Elements, Paint Shop Pro etc.). But you need to have Photoshop or similar installed to use these options.

Watercolor Brush and Mask

This is a fairly simple option, but you do need to know how to use layers and how to apply a mask. Also required are some watercolor brushes (these can be found free online or good quality ones can be purchased).

Load up your image, add a new white layer on top of the image. Working on the white layer, tap with your water color brush to reveal the image below. It can take a few goes to get it looking really watercolor, and tweaking the brush opacity up and down helps.

How to Turn Your Photos into Painterly Style Watercolor Art - birds

Photoshop Actions

Actions are where someone has recorded all the steps necessary to make the desired outcome in Photoshop for you. A bit of manual intervention at the beginning sets it up, click Play on the Action and it runs and does its thing.

The best Photoshop Action artist I know is sevenstyles, and he has an amazing library of effects available, including a Watercolor option. Once created you can tweak and edit many components to add your personal flourish if you want. An action can be used over and over again and does provide some variety in the results.

How to Turn Your Photos into Painterly Style Watercolor Art - cherries

Plugin Software

Plugins are separate programs that work within Photoshop to fulfill an additional requirement. Some will work as standalone programs, but many are only accessible from within Photoshop. My favorite painting plugin is Impression by Topaz Studio.

It has a huge range of different painting presets already loaded and you can tweak EVERYTHING – brush size and shape, direction, color, light contrast, add a vignette, and so on. It’s a very powerful tool and capable of beautiful painted effects. It does need a fairly powerful computer with a decent graphics card to run it, so check that your hardware will support it first.

How to Turn Your Photos into Painterly Style Watercolor Art - train

This image had the background replaced with a painted image and then it was run through Topaz Impression.

4. Dedicated Painting Software

For PC/Mac there are some options for software that is specifically designed to mimic painting effects. The most commonly known one is called Corel Painter. It’s expensive, complicated, and difficult to learn which is fine if you are an artist and that’s your thing. If you are someone who wants to dabble a bit for a really genuine watercolor effect then there is another option available called Rebelle.

Rebelle is a fraction of the price of Painter, much easier to use, and it has the most incredible realistic watercolor effect as well as other painting and drawing options. It’s also available for a free trial. I have no artistic background, so the realism of Rebelle was initially a bit of a hurdle for me, so I signed up to do an online watercolor course and work with real paints, which really helped.

You don’t need to do that, but I can tell you quite genuinely, there is little difference between dipping your brush into some real paint and doing it with Rebelle (except the digital version makes no mess!)

How to Turn Your Photos into Painterly Style Watercolor Art - lighthouse

Original photo.

How to Turn Your Photos into Painterly Style Watercolor Art - lighthouse

Painted image – the lighthouse, rocks, and sea painted in Rebelle, the sky done in Photoshop with watercolor brushes and the sketch effect done with Akvis Sketch.

Summary

This article barely dips its toe into the range of options available for doing painterly watercolor conversions of your images. Hopefully, these examples show you that there are many choices to suit all skill levels and budgets.

It can be as simple or as complicated as you want to make it. I am constantly surprised at how much mobile apps are capable of these days, seems like you don’t need Photoshop at all!

If you have other apps you use and would recommend for creating painterly style images, please put them in the comments below. Otherwise, go forth and be artistic!

The post How to Turn Your Photos into Painterly Style Watercolor Art by Stacey Hill appeared first on Digital Photography School.


Digital Photography School

 
Comments Off on How to Turn Your Photos into Painterly Style Watercolor Art

Posted in Photography


How to Turn Your Photo into a Cartoon Drawing Using Photoshop

17 Feb

Photography can be traced back all the way to the camera obscura; which was an aid for artists who could then draw their subjects from the projection created by the light passing through the pinhole. Following that tradition, in this tutorial, I’m going to show you how to create a drawing by outlining the subject from your digital photo to create a fun, cartoon-like image.

Deer cartoon - How to Turn Your Photo into a Cartoon Drawing Using Photoshop

Getting started

You can use this technique on any photo you want and apply it to any subject you like. However, I find it best, especially for your first attempt, that the subject is well defined or isolated so it’s easier for you to outline it. I also personally prefer and recommend that the image is not too busy. So, once you have chosen your photo, open it in Photoshop.

Outline the subject

To trace your subject you are going to use the Pen tool. The way it works is that you create anchor points with each click. A straight line then connects those points. Do this all around the subject.

Once you have this, change the Pen tool to the Convert Point Tool, which you can find by holding down on the Pen until the drop-down menu opens. With the Convert Point, you can curve the straight lines to make it fit the silhouette best. Just click on the anchor point and start dragging it. From each anchor point, you will have to handles, each one to control the line in each direction of the anchor.

Pen Outline - How to Turn Your Photo into a Cartoon Drawing Using Photoshop

This will help you get a smoother silhouette and avoiding unnecessary bumps that you would get if you only trace by adding anchor points.

Straight lines - How to Turn Your Photo into a Cartoon Drawing Using Photoshop

A straight line.

Curve - How to Turn Your Photo into a Cartoon Drawing Using Photoshop

Using curved lines.

Create your outline

Once you have outlined the silhouette of the subject, create a new layer. You can do this by going to the top Menu > Layer > New Layer. You can rename it as “silhouette” or “outline” just to keep things tidy, as you will be creating more layers further along.

What you’re going to do next is turn this path into a drawing, more precisely, the line that borders your drawing. Therefore, you can choose which color it will be and how thick you want it. To set it you need to go to the Brush tool and select a hard brush as thick as you want. I’m doing 8px in this case.

You can also choose the color by clicking on the foreground color at the bottom of the tool palette, for this example, I’m using black. Turn off the background layer (click the little eye icon) so you can see how it will look like and then choose your settings.

Silhouette - How to Turn Your Photo into a Cartoon Drawing Using Photoshop

Now that you have this ready, leave the new layer active go to the path palette. If it’s already opened you can open it by going to the top Menu > Windows > Path. In there you will see that a Work Path has been created, the icon will show the image as a grey rectangle and the path is the silhouette you traced.

Next, right-click on the Work Path and choose Stroke Path. A pop-up window will appear, make sure the Brush option is selected and click OK.

Stroke Path - How to Turn Your Photo into a Cartoon Drawing Using Photoshop

Adding details

You have a border or a silhouette now, but you still need details. Each one will be a new layer and a new path, that way you have it separated and can, therefore, control it more precisely.

If you want two details on the same layer, for example, to keep the two ears in one layer so that any changes apply equally, then you keep working in the same layer. But you do need to create a new path for each one.

Notice here that I have my background layer which is my original image; a Layer 1 that corresponds to the Work Path which is the outline; and a Layer 2 that contains Path 1 and Path 2 which are the two details of the ears. This is why I suggested earlier that you should rename the layers and the paths to keep track of them easier. Continue doing this as many times as you need to finish your drawing.

Layers and Paths - How to Turn Your Photo into a Cartoon Drawing Using Photoshop

Apply a filter

Once you’re finished with this, duplicate the background layer. With this new layer active, go to the Work Path (the one that has the outer line of the drawing) and right-click it. From the drop-down menu, choose Make Selection. This will select your subject so that the filter you’ll apply next doesn’t affect the background, otherwise the entire will turn into a cartoon.

Now go to the top Menu > Filter > Filter Gallery. A window will appear with all kind of filters that you can apply and a preview image. In this case, you’re going to select the one called Cutout from the Artistic Filters. On the right side there are sliders to refine the effect, just move them around until you are satisfied. I’m going to do it as Number of levels 7, Edge simplicity 5 and Edge fidelity 2. When you’re done just click OK.

Cutout - How to Turn Your Photo into a Cartoon Drawing Using Photoshop

Other tricks

You can also multiply your cartoons, apply modifying layers to change colors or saturation, and anything else you can think of! And the best part is that you can do this to any kind of photo, here are some other examples; share yours as well in the comments!

Three deers - How to Turn Your Photo into a Cartoon Drawing Using Photoshop


The post How to Turn Your Photo into a Cartoon Drawing Using Photoshop by Ana Mireles appeared first on Digital Photography School.


Digital Photography School

 
Comments Off on How to Turn Your Photo into a Cartoon Drawing Using Photoshop

Posted in Photography


How to turn household lights into cheap DIY lighting modifiers

27 Nov

This article was originally published on Jake Hicks blog, and is being republished in full on DPReview with express permission from the author.


There is an almost endless supply of lighting modifiers available on the market right now—some are cheap, and some of the better ones are certainly a lot more expensive. But does cost directly relate to quality?

Well, a lot of the times yes it does, especially if you’re referring to build quality. In general, the more you spend, the better-made and more durable the modifier will be. But does that extra money you spend mean you’re getting a better lighting modifier overall? I would have to say no; in fact, for less than £15/$ 20 you can get some stunningly beautiful light from a homemade lighting modifier.

Read on to see examples of the stupidly cheap DIY lighting modifiers I’m referring too.

I’d like to think that my work is known for its creative approach to lighting. The reason for that is because I strongly believe lighting is the single most important subject in a shot.

I can honestly say that I’ve ‘saved‘ some frankly awful shoots through engaging lighting alone. Terrible locations, inexperienced or even no experience in the model/subject can certainly make a shoot hard, but far from impossible to pull off engaging results. Dynamic lighting can bring a boring room to life and flattering lighting can enhance any subject, lighting really is the one and only tool you need and should have complete control and mastery of.

So what makes good lighting? Well that is probably a topic/article/book/anthology for another day as there are certainly a lot opinions on the subject, but I think no matter how experienced or inexperienced you are as a photographer, we all know what we don’t like and we definitely know what we do like when we see it.

In this article I aim to show you a couple of very cheap alternatives to professional lighting modifiers that I think create some beautiful light that are very functional in a lot of situations.

Regular Household Lights

The lighting modifiers we’ll be taking a look at are the dome-like frosted globes. These can be fantastic at lighting a scene in a shot, as they spread light everywhere very evenly. It also turns out that, not only do they spread light everywhere, but they also create a beautiful portrait light as well. Let’s take a closer look at the lights in question.

I purchased two white frosted dome lights from IKEA. One was small and the other was far larger. The smaller one is intended to be used as ceiling light in a bathroom. The reason it’s intended for this is because it casts light everywhere from a very small source close to the ceiling making it ideal for small rooms and corridors.

Small bathroom ceiling dome light.

The second one I purchased was far larger and is actually originally intended as a table lamp. Again this dome-like design is perfect for casting light over a large area without being overly harsh.

Large table lamp dome.

Where can you get them?

I got mine from IKEA and they are silly-cheap.

The small globe is a ceiling light called VITEMÖLLA and it can be found here for £13. The one in the picture looks slightly different as it has a white base compared to my silver one but the dome (the important part) is the same.

The large dome is a table lamp called FADO and that can be found here for £15. It’s worth pointing out and making sure that you get the white one. There are several of these FADO’s in a variety of tones so just make sure you choose the white one as the others will be fairly useless.

Regular Photographic Modifier

I also wanted to get a bit of a gauge on how the light from these domes looked compared to a regular photographic lighting modifier. For the sake of this test I actually compared them to a few shots taken with a 22″ white beauty dish.

There’s a couple of reasons for this. Firstly, it’s probably my most used lighting modifier so I have a very good idea of how the lighting looks with it. And secondly, the beauty dish is pretty pricey compared to these domes so I thought it would be an interesting comparison.

The image above also gives a nice size comparison and it clearly shows how all three of the modifiers used in the test look when side-by-side.

Getting the Domes ‘Shoot-Ready’

Obviously the domes are designed for an alternative purpose to a photoshoot, so I needed to do make a few adjustments before they were ‘shoot-ready’.

Small Dome

The smaller dome was fairly simple: I just removed the inner wiring and bulb housing and then I simply rested it atop one of my standard dish reflectors. I could have taped it on but there was no fear of it moving or tipping out so I just left it as it was and it was fine.

The small dome was easily made shoot-ready by removing the inner workings and then simply resting it in a current reflector dish.

Large Dome

The larger dome took a little more work, but not much. I simply removed the inner workings once again and then found an old speed-ring to attach it too.

A speed-ring is the metal rotating mount that attaches modifiers like softboxes to your flash head. I’ve acquired a few over the years that I no longer use so I simply taped one of them to the dome. With strong tape like gaffers tape it was surprisingly snug and there was no fear of it coming loose even when mounted on its side.

The large dome was taped snugly onto an old speed-ring which enabled me to attach it to my light horizontally if needed.

The Setup

The actual lighting setup was nothing fancy, but I also wanted to try out some alternative colouring ideas at the same time.

The model was positioned about 5 feet from the white wall behind her. I had the main lights positioned about 2 feet in front of her and above eye level, and then I also had a small softbox on the floor at the models feet with an orange gel* in place for the entirety of the test.

*Obviously you don’t need to the orange gel but I was seeing how much the gel was washed out by the modifiers so that’s why I had it in place.

A very simple setup that involves two lights; a key and orange gelled fill light.

The Results

After I had taken a few shots with the beauty dish, I switched that out for the larger dome. Then, after a few more frames, I changed it too the smaller dome. The resulting images should speak for themselves.

Beauty dish Images

Beauty Dish Shot – Click to Enlarge Beauty Dish Shot – Click to Enlarge

The Small Dome Images

The small dome setup
Small Dome Shot – Click to Enlarge Small Dome Shot – Click to Enlarge

Large Dome Images

The big dome set-up
Large Dome Shot – Click to Enlarge Large Dome Shot – Click to Enlarge

CAUTION: I’m using LED modeling bulbs in my flash heads which produce very little heat. If your flash heads have tungsten modeling bulbs, these globes will get VERY HOT as there is nowhere for the heat to escape when the globes are in position on the heads. Be sure to turn them down or off entirely.

Conclusions

I think you guys can draw your own conclusions from the images above and however you feel about the three looks, I think one thing is very clear that we can all agree on: you don’t necessarily need to spend a lot of money on expensive modifiers to produce beautiful light.

The beauty dish obviously produces a more directional light, and you can see that by how dark the background is compared to the other setups. The other dome shots throw light everywhere so more light is spilling onto the background. Because of this beauty dishes directionality and lack of spill, you should notice that the shadows on the models face are darker too. In contrast, the domes are bouncing light around the room and that spilled light is filling in a lot of the shadows on the models face. This gives the appearance of a far more flattering light as a result.

This dome spill is far from being a bad thing either; in fact, if you’re using the domes in a small space you can use that spill and bounce to really blend the subject into a scene with just a single light. This type of modifier is perfect for location shooting or environmental shots, and it’s certainly something I’ll be using for that type of work.

The small dome actually produced a far better light than I expected. Its small source creates a contrasty light that falls off quite quickly, leaving brighter highlights and darker shadows as a result. I also found that this creates some nice shimmering effects on the skin and makeup as a result of the hard-light properties.

I was really excited to try the big dome, as I thought it was going to be far and away the best looking lighting. Although I wasn’t disappointed, I still feel the resulting light didn’t look like I expected. The light was very clean in that there was a very smooth transition from shadow to highlight, which was nice, but it was still darker overall than I expected.

As a singe beauty light I think the small dome won for me with its look. If I was shooting in a larger area and wanted to illuminate more of the subject in a scene then the big dome placed a little further away would surely be the best choice.

In hindsight, I think I know where I went wrong with this test and what I would like to do differently next time.

You’ll notice that the light stand did not move the entire time, so from the small dome setup to the big dome setup the angling of the flash head caused the light source to get a lot closer to the model, which required me to turn the power of the head down. That’s not a problem normally, but when I turned the power of the head down, I also reduced the amount of light that bounced around the room. This in turn reduced the amount of light falling back into the shadows making the light appear darker than it actually is.

I would like to try this big dome again, but move it further back from the model, thereby allowing that light to bounce around the room and giving a far softer impression to the lighting—perfect for environmental shots.

Closing Comments

So there you have it: a couple of great lighting modifiers and at the cost of just over £25 for the both of them! That’s pretty damn impressive in my book, and you’d be crazy not to grab at least one of them and give them a go. Of course, if you really wanted an excellent dome modifier then you can always grab the Profoto frosted dome one here for a cool $ 177! I’m sure that’s miles better 😉

As always, if you have any questions then let me know. If there was something that didn’t make sense and you wanted clarification on then let me know. Also if you’ve ever tested a DIY modifier that has provided excellent results, I’d love to hear about it. Let me know in the comments!


Jake Hicks is an editorial and fashion photographer specializing in keeping the skill in the camera not just on the screen. To see more of his work or read more tutorials, be sure to visit his website, like his Facebook page, and follow him on Instagram and Twitter.

Articles: Digital Photography Review (dpreview.com)

 
Comments Off on How to turn household lights into cheap DIY lighting modifiers

Posted in Uncategorized


Film reversal: How to turn a black-and-white negative into a direct positive

30 Aug

If you need a fun film photography experiment to try out this week/weekend, how about giving black-and-white film reversal a shot? The folks at Branco Ottico decided to give this process a shot—turning multiple black-and-white negatives into rich, direct positive transparencies… just because.

Branco Ottico’s Davide Rossi detailed the whole process in a dual-language blog post and the video above. But if your first question is less “how” and more “why,” he covers that as well:

Why reverse a black and white film to get a positive one?

Because it is the way to create a direct positve original by the extraordinary richness of detail, because it is unique and made alive by light, because you can make a backlight reveal the shape of an object.

It’s really a very detailed photograph, with fascinating nuances and deep densities, they take your eyes wondering marvelous.

Rossi promises that these direct positive transparencies look “alive” in a way that an inverted scan on a computer screen simply can’t. “This is what I see when I shed my eyes in front of a slide created by a big 20x25cm camera,” he writes. “Faces that live their own light with such a detailed skin roughness to make you smile because it does not even look alive with the your own eyes.”

Rossi was kind enough to share some behind the scenes and final images with us. Check them out for yourself in the galleries below:

$ (document).ready(function() { SampleGalleryV2({“containerId”:”embeddedSampleGallery_0759939532″,”galleryId”:”0759939532″,”isEmbeddedWidget”:true,”standalone”:false,”selectedImageIndex”:0,”startInCommentsView”:false,”isMobile”:false}) });

$ (document).ready(function() { SampleGalleryV2({“containerId”:”embeddedSampleGallery_8196077358″,”galleryId”:”8196077358″,”isEmbeddedWidget”:true,”standalone”:false,”selectedImageIndex”:0,”startInCommentsView”:false,”isMobile”:false}) });

Mind you, the process is no walk in the park. Even if you purchase a dedicated black-and-white film reversal kit online, each different film requires a different approach—then again, isn’t that what makes this an experiment worthy of the name?

For Rossi, it took 4 days of trial and error to figure out an easy-to-reproduce three-step process that he will soon publish as a followup to this video.

If you want to give the experiment a shot for yourself, check out the video and blog post for yourself, stock your homebrew darkroom, and give it a go this weekend. If you want a bit more guidance, keep an eye on the Branco Ottico site for a detailed breakdown of Rossi’s three-step process.


All photos by Davide Rossi/Branco Ottico and used with permission.

Articles: Digital Photography Review (dpreview.com)

 
Comments Off on Film reversal: How to turn a black-and-white negative into a direct positive

Posted in Uncategorized


Plug & Plop: Urban Add-Ons Turn Street-Side Bollards into Seats & Tables

06 Aug

[ By WebUrbanist in Design & Furniture & Decor. ]

Designed to act as barriers, bollards are a common sight in cities around the world — but what if they could engage rather than just separate?

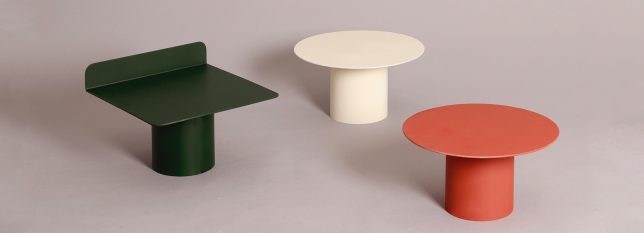
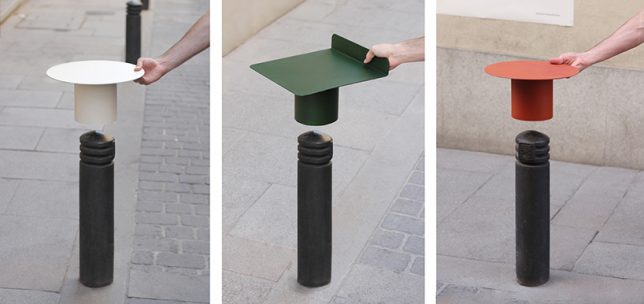
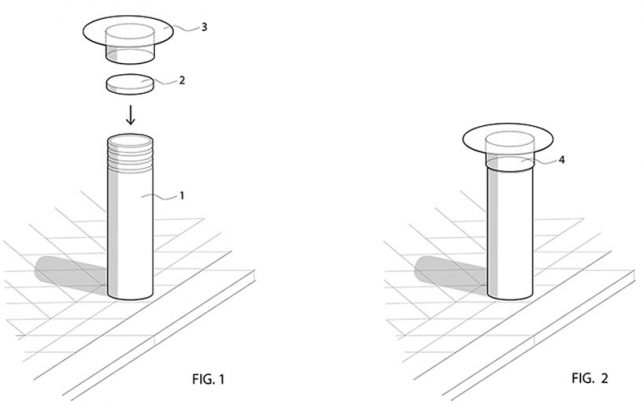
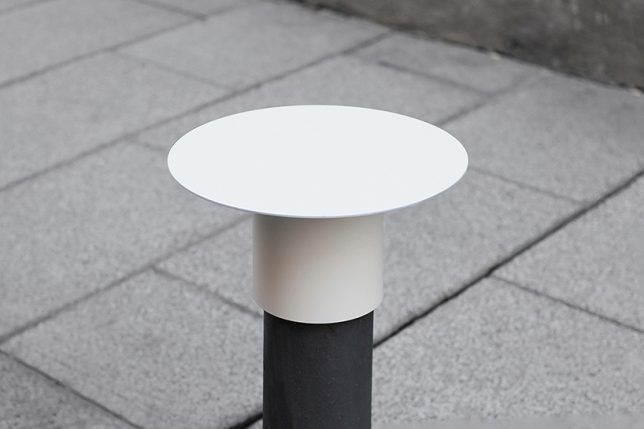
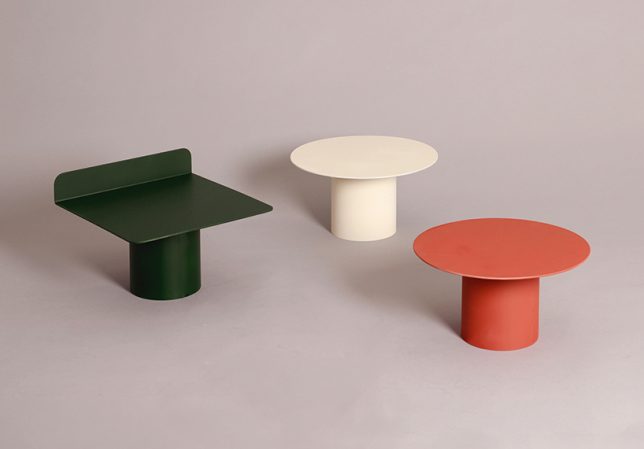
This series of simple additions from Teratoma dubbed PLUG A SEAT aim to transform (or at least extend) the function of the bollard, converting rows of columns into arrays of seating and table space.

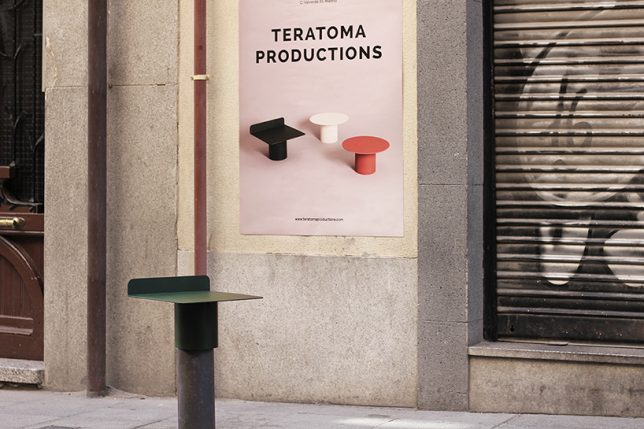
The lacquered aluminum surfaces add a bit of color along with functionality, and have a variety of potential applications — they could be affixed permanently, or added temporarily by individuals eating lunch downtown, or deployed during street festivals.

These extenders can also be sized to fit different dimensions of bollard for different metropolitan areas (though one might hope that a future iteration could be able to expand and contract on demand).

In the grander scheme, these kinds of simple guerrilla furniture designs highlight potential new uses for old extant infrastructure. And who knows: maybe bollards will start to lose their original function as self-driving cars take to the streets, but instead of being removed could find second lives serving other purposes.

Share on Facebook


[ By WebUrbanist in Design & Furniture & Decor. ]

[ WebUrbanist | Archives | Galleries | Privacy | TOS ]


WebUrbanist

 
Comments Off on Plug & Plop: Urban Add-Ons Turn Street-Side Bollards into Seats & Tables

Posted in Creativity