RSS
 

Posts Tagged ‘Turn’

Call of Nature: Waterfront Step Organ in Croatia Turn Waves into Tunes

20 Jul

[ By WebUrbanist in Art & Installation & Sound. ]

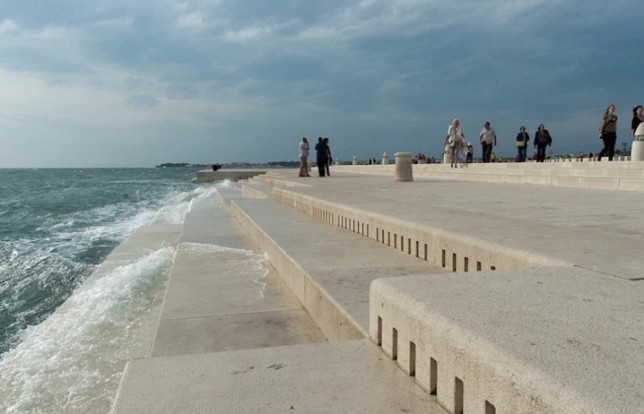
oceanfront wave organ

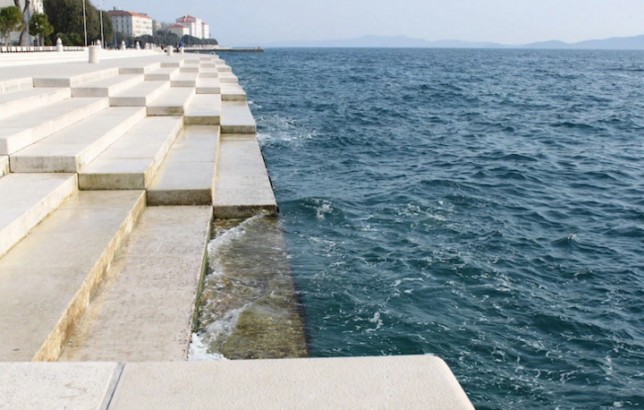
This 230-foot-long musical instrument contains 35 organ pipes and is powered by the Adriatic Sea, producing sounds for visitors that seem eerily composed rather than random.

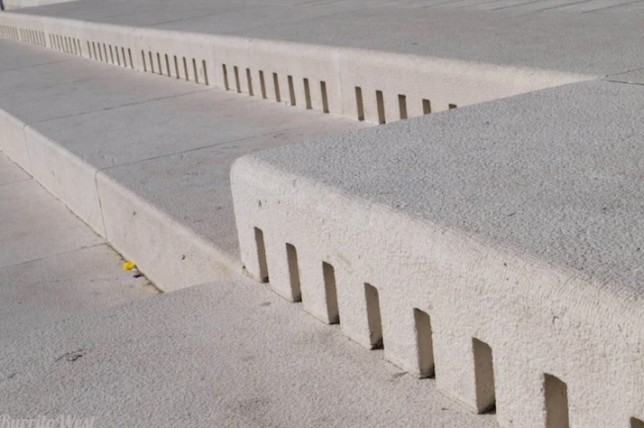
Whistle holes cut into the stone steps are ‘powered’ by air pushed in by waves of water, creating chords that are strikingly harmonious in nature. The sounds are constantly shifting, but you can listen to a clip above (a .wav file of the waves, if you will).

seafront playable instrument music

The Sea Organ, or the Morske Orgulje, is part of plan to revive Zadar, a city over 3,000 years old that was nearly obliterated in the Second World War. Architect Nikola Baši? wanted to give the place something with character, differentiated from the stark and boring concrete buildings that were created during initial years of rebuilding.

sea organ white steps

The design was inspired by the Hydraulis, an ancient Greek instrument that used water to push air through tuned pipes, but also borrows from the Wave Organ in San Francisco, a likewise seaside device amplifying the sounds of the Pacific Ocean. (images by linssimato, Lisa and J We).

Share on Facebook


[ By WebUrbanist in Art & Installation & Sound. ]

[ WebUrbanist | Archives | Galleries | Privacy | TOS ]


WebUrbanist

 
Comments Off on Call of Nature: Waterfront Step Organ in Croatia Turn Waves into Tunes

Posted in Creativity


This $31 lens will turn any room into a camera obscura

20 Jul

Turning a room into a camera obscura is as easy as blacking out the room and poking a pinhole into one of the window covers. But if you want to take your camera obscura game to brighter, more colorful heights, the Bonfoton Camera Obscura Room Lens is definitely worth a look.

This portable lens was designed to snap onto blackout curtains or into some other window cover. Then, once the room is dark enough and the outside world is bright enough, the lens will project the outside in: plastering a picture of the view from that window onto your walls, upside-down.

Here’s an example from the Bonfoton website:

A hotel room can become something else entirely through the magic of the camera obscura.

The lens was designed by husband and wife team Tommi and Annika, who say they founded the store because of the joy the camera obscura brought to their friends and family.

“We founded the Bonfoton store after we saw what the Camera Obscura room does to people emotionally when they see the effect for the first time,” explains the couple. “From a child only a few years old to a grandpa age 65 the amazement is the same. First a WOW! Or the OMG!? And then the silent stare when they realize that the image is alive and moving.”

The little company is based in southern Finland, where every lens is made more-or-less by hand. To buy one for yourself, head over to their shop and be ready to drop 27 Euro (~$ 31 USD)

Articles: Digital Photography Review (dpreview.com)

 
Comments Off on This $31 lens will turn any room into a camera obscura

Posted in Uncategorized


Recycling Rockets: Ixion Will Turn Orbital Space Junk into Spacious Habitats

25 Jun

[ By WebUrbanist in Conceptual & Futuristic & Technology. ]

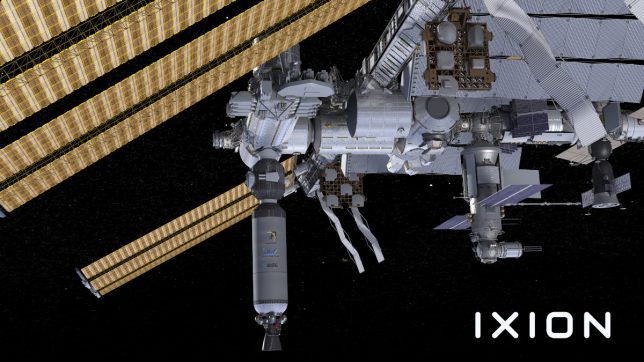
As part of their NextSTEP program, NASA has contracted a space company to turn trash into treasure, converting used rocket sections already being sent into orbit into habitation units rather than letting them drift or be destroyed.

It takes an immense amount of effort and fuel to break out of the Earth’s atmosphere, yet upper stage rocket sections are routinely set adrift or de-orbited, burning up on reentry. Nanoracks believes these can be put to better use — their Ixion project aims to take large fuel-carrying rocket tubes, burn out whatever fuel remains and retrofit them for occupation.

Once the propellant-containing segment is vented in open space, remaining materials will oil off over the course of a few days. Then Nanoracks will fill the void with pressurized air from tanks attached to the outside. Humans (or robots) will take the next step, entering the capsule to add fabric, wiring and whatever else is needed. The design will factor all of these needs in advance, featuring operable hatches and attachment mechanisms as needed.

Initially, the plan is to attach these to the International Space Station for testing and to extend their habitable space. Future tubes could be used to form the basis of a commercial station or to serve other functions — the idea, in part, is to get out ahead of the demand, readying this space junk for unknown future applications. And this idea could be just the beginning: robotic space junk collection could eventually put the vast amounts of orbital debris circling the planet to much better use.

Share on Facebook


[ By WebUrbanist in Conceptual & Futuristic & Technology. ]

[ WebUrbanist | Archives | Galleries | Privacy | TOS ]


WebUrbanist

 
Comments Off on Recycling Rockets: Ixion Will Turn Orbital Space Junk into Spacious Habitats

Posted in Creativity


Urban Blinds: Skyline Curtains Turn Bright Days into Dark City Nights

28 May

[ By WebUrbanist in Design & Furniture & Decor. ]

Casting pixelated patterns into day-lit rooms, these shades swap boring views (or overly bright days) for iconic scenes of metropolises at night.

This particular set by HoleRole features famous structures from cities like Manhattan (the Chrysler) and London (the “Gherken”).

In each piece, minimal geometric windows and pinpoint stars on black prompt observing eyes to complete each picture, but theirs is not the only (or first) approach to urban curtain design.

Aaalto+Aalto designed a similar series (Better View) some time ago but with a few key differences. For one thing: by varying the sizes of the perforations, their built landscapes take on more dimension. Implied curves as the windows recede, for instance, allow the flat surface to appear warped (as illustrated above).

Also, the larger holes let some details shine through from the background. While visible window elements and natural scenery can be identified with inspection, they also serve to animate the scenes — instead of a black-and-white image, additional details make it seem like there are objects or activities filling in the windows. The net effect adds a bit of character and fun unpredictability.

Of course, none of these are true “blackout” curtains in the traditional sense, but for mood lighting during the day they are certainly a bit more interesting when total darkness is not required.

Share on Facebook


[ By WebUrbanist in Design & Furniture & Decor. ]

[ WebUrbanist | Archives | Galleries | Privacy | TOS ]


WebUrbanist

 
Comments Off on Urban Blinds: Skyline Curtains Turn Bright Days into Dark City Nights

Posted in Creativity


How to Photograph Your Museum Visits – Turn Limitations Into Creative Challenges

20 May

Do you feel frustrated that you are not allowed to make selfies in museums? Did a light reflection ruin the photo of your favorite artwork? Are the other visitors always in the way of your perfect shot? Then this article is for you, to help you photograph your next museum visit!

Museums are a great place to get inspiration, however, the great teams behind every exhibition have to be more concerned with the preservation of the artworks than about your photo. Therefore, photographing in a museum poses two big challenges.

First, the multiple rules that you have to follow, remember to always be respectful of them because they exist for a reason. Second, the fact that you can’t alter the conditions in which you have to shoot. But this doesn’t mean that you can’t make great photos, actually, you can turn it around and use these limitations to take your photography to the next level.

Every museum has different rules so I’ll cover some of the most common:

NO SELFIE-STICK

Many museums of the world like the Palace Museum in Beijing, the Van Gogh Museum in Amsterdam, the Metropolitan Museum of Art in New York, and many others have banned the selfie-stick. Not to worry, this shouldn’t stop you from making a memory of yourself with your favorite artwork.

Whether it’s in a frame or a display case, most objects in museums are protected by glass. So, you can use your reflection on the glass to make a selfie. You can also use mirrors and other reflective surfaces you can find.

How to Photograph Your Museum Visits - Turn Limitations Into Creative Challenges

Crystals, Teylers Museum, Haarlem, The Netherlands.

How to Photograph Your Museum Visits - Turn Limitations Into Creative Challenges

Albergo Diurno Venezia, during the exhibition Senso 80 by Flavio Favelli, Art Week Milan 2017, Milan, Italy.

In order to work with reflections, you need to understand how light works. Without going into a complicated physics lesson, what you need to know is that light travels in straight lines.

Light Diagram How to Photograph Your Museum Visits - Turn Limitations Into Creative Challenges

Which is also why you can get those annoying light flares that can ruin your photos. So you need to be very aware of all the other objects in the room to avoid unwanted reflections.

Reflection Mistakes - museum

Me As Mapplethorpe, 2009. Gillian Wearing RA, (based upon the Robert Mapplethorpe work: Self Portrait, 1988) exhibited at Gemeente Museum, The Hague, the Netherlands.

Now that you know how it works, you know how to move around the space in order to control your reflection. A few tips to consider though:

  • The darker the background, the better you will see the reflection. For example, if you are doing the selfie in front of a black and white photo, position yourself in a way that you will be reflected in the darkest part of the photo, so you will stand out more. If you are wearing white or a light color shirt that’s even better.
  • Try different positions so that you are not blocking an important part of the artwork. You can even try interacting with it.
  • If there is a metallic surface or a mirror in the piece, use it to your advantage, and acknowledge your presence (smile, wave, etc.) so that it doesn’t look like a mistake.
  • Locate the light source and then position yourself in a way that the bouncing trajectory doesn’t hit the lens of your camera, but it does hit any objects you want to reflect.

NO FLASH

This is one of the most universal rules in museums. This is because the hundreds of thousands of visitors that some artworks attract would sum to a great amount of light that some materials cannot take without damage. So you’ll have to make the best with the lighting of the museum that is designed to either preserve the delicate artworks, or to set a mood that complements a whole concept of the exhibition.

In other words, more often than not it will be very dark. This is where the settings of your camera (and even some smartphones) come in.

Since this article is not about exposure I won’t go into a lot of detail, but I will give you a quick guide to adjust it to better photograph in low light. The correct exposure depends on three things:

ISO

In photography this stands for International Standard Organization just like every other ISO that you’ve heard about. What it standardizes in this case is a scale for measuring sensitivity to light. The higher the ISO number you choose, the higher sensitivity your device will have. A lot of people are afraid to go very high because there is the risk of getting noise in your image, which is like the grain that used to be in film photography.

Nowadays most cameras can keep the quality even at higher numbers, so try all the settings out to determine which one is the highest you can go with your own equipment. However, in my experience, you get less noise from a high ISO than going lower and then trying to correct the underexposure in Photoshop later. Here is an example:

ISO 320 museums

This image was taken at ISO 320.

Versus . . .

ISO 3200 museums low light

This image was taken with an ISO of 3200.

Aperture (f-number)

The simplest explanation I can offer is that the aperture is the hole in your lens that lets in light. Therefore the bigger the hole, the more light will enter.

But here is the tricky part, the aperture reference scale is inversely proportional. So, contrary to what you might think, a smaller number means a bigger hole and therefore more light. For example, a photograph taken with f/8 will be lighter than the photo taken with f/11.

This setting also controls the depth of field of your image (the area that will be in focus). So be careful moving this one because you might loose some sharpness in areas that are farther away from your point of focus if you use smaller f-numbers. Notice in the image below how the objects are loosing focus towards the back.

Depth of field museums

Crystals, Teylers Museum, Haarlem, The Netherlands.

Shutter Speed

This setting controls how much time you expose the sensor to light. Since the sensor (or film) is accumulative, the more time you expose it, the lighter your image will be. Shutter speed is very straightforward and it could be your best choice, except that anything moving will look like a blur if you go too slow.

Even if everything is still, if you are not using a tripod, YOU are the one moving. So don’t let it stay opened too long. In some museums you’re allowed to use a tripod if you pay an extra fee, so feel free to ask.

It is also useful to know that telephoto lenses need a faster shutter speed to avoid blur than the wide angle lenses. So you can also consider re-framing your image like the next example.

Shutter speed 1/8th, f/5.6, ISO 800, focal length 55mm.

Shutter speed 1/8th, f/5.6, ISO 800, focal length 22mm.

You can also use this setting in a creative way. For this photo I wanted the tram passing in between the two pieces of the sculpture to leave a blurry line to have a more dynamic result and also show more context on how the sculpture was meant to interact with the space.

Shutter speed 1/2 second, f/11, ISO 400; focal length 18mm.

Shutter speed 1.3 seconds, f/11, ISO 400; focal length 18mm.

Now that you know what each setting does, you can adjust them to your needs. Keep in mind that they are interrelated, so if you move one you need to correct the others accordingly. For example, if you close your aperture because you want more depth of field, remember to compensate it by leaving the shutter open for a longer time, or by making your ISO more sensitive (higher number). Always keep an eye on your exposure meter!

NO TOUCH

Given that you can’t change your surroundings or rearrange the artworks, you will have to be extra creative and flexible.

Take care of composition.

When photographing an artwork in a museum, don’t try to just reproduce it. To do that it’s always better to buy the postcard or the catalog. What you do want is to capture what it’s transmitting to you. Use the architecture of the gallery, make it interact with the other pieces of the exhibition, try to capture the ambiance. In other words, make it your own. Notice how in this example I didn’t photograph any specific artwork, just the space and the atmosphere.

Composition museums

Rijksmuseum van Oudheden, Leiden, the Netherlands.

Change your position.

Retaking the topic from the No Selfie-stick, if you need to avoid reflections and you can’t move the artwork or the lighting, then reposition yourself. Do this also to play with perspective, to include or exclude objects from your frame, and just try as many angles as you can.

For this next image, I was playing with perspective and the position of the circular lamps in order to make them look like the aura of the statue.

Position museums

Rijksmuseum, Amsterdam, the Netherlands.

Be aware of other visitors.

It will be very difficult for you to have the museum to yourself, so try to be respectful of others and don’t get in the way. Don’t be afraid to include people in your photo as well, just be sure to wait until the right moment so that they complement your image.

Mirrors museums

Het Dolhys, Haarlem, the Netherlands.

Silhouette museums

Museo de la luz, Mexico City, Mexico.

COPYRIGHT

Last but not least, there is one rule that you won’t see on the museum signs, but it exists and it’s very important – the issue of copyright.

While getting inspiration from other artists it’s great, remember that you are photographing the work of a fellow artist so it is covered by copyright. This can apply from the artwork being exhibited to the architecture of the museum so it can be a very complicated issue to understand.

I advise you inform yourself about it in more depth. A general rule of thumb that you can always follow is that you can’t use the image for commercial purposes without permission and/or retribution from the creator. And in any other context for educational purposes (e.g. this tutorial or giving a conference) you should always give the credits. Let’s be respectful of one another.

Next time you go to a museum you can both get inspired and creative. Enjoy and share your photos!

The post How to Photograph Your Museum Visits – Turn Limitations Into Creative Challenges by Ana Mireles appeared first on Digital Photography School.


Digital Photography School
 
Comments Off on How to Photograph Your Museum Visits – Turn Limitations Into Creative Challenges

Posted in Photography


Selective Hearing: These Earplugs Let You Turn Down Sounds of the World

22 Apr

[ By SA Rogers in Gadgets & Geekery & Technology. ]

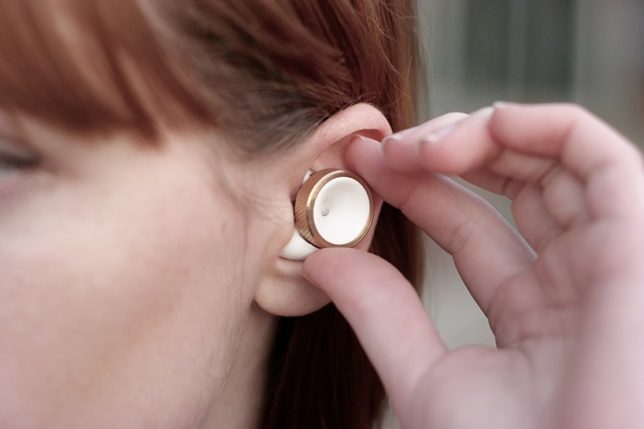
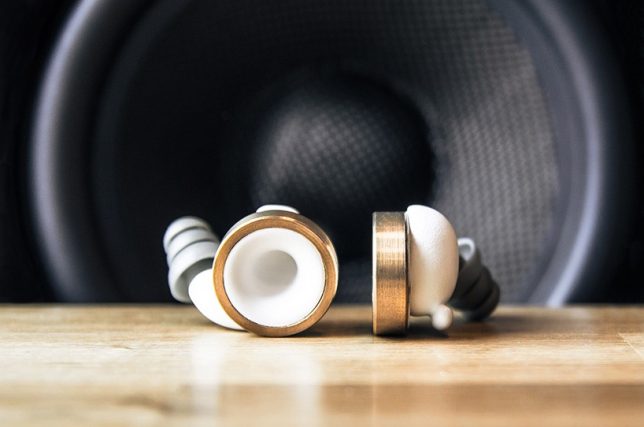
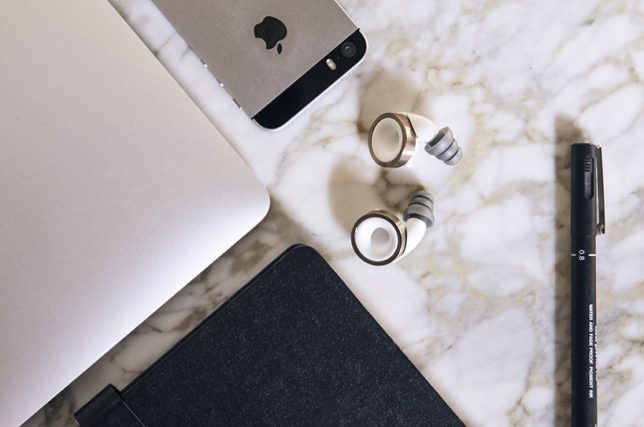
We’ve all had moments where we wished we could tune out a particular person or muffle loud music without losing the ability to hear a friend’s voice, but standard earplugs don’t exactly allow for a lot of fine-tuning. But with a new product called ‘Knops,’ you can literally turn the volume of the world up or down in an instant. Founded by musicians, the Dutch startup aims to help you hear what you want to hear and ignore what you don’t with the twist of a tiny knob.

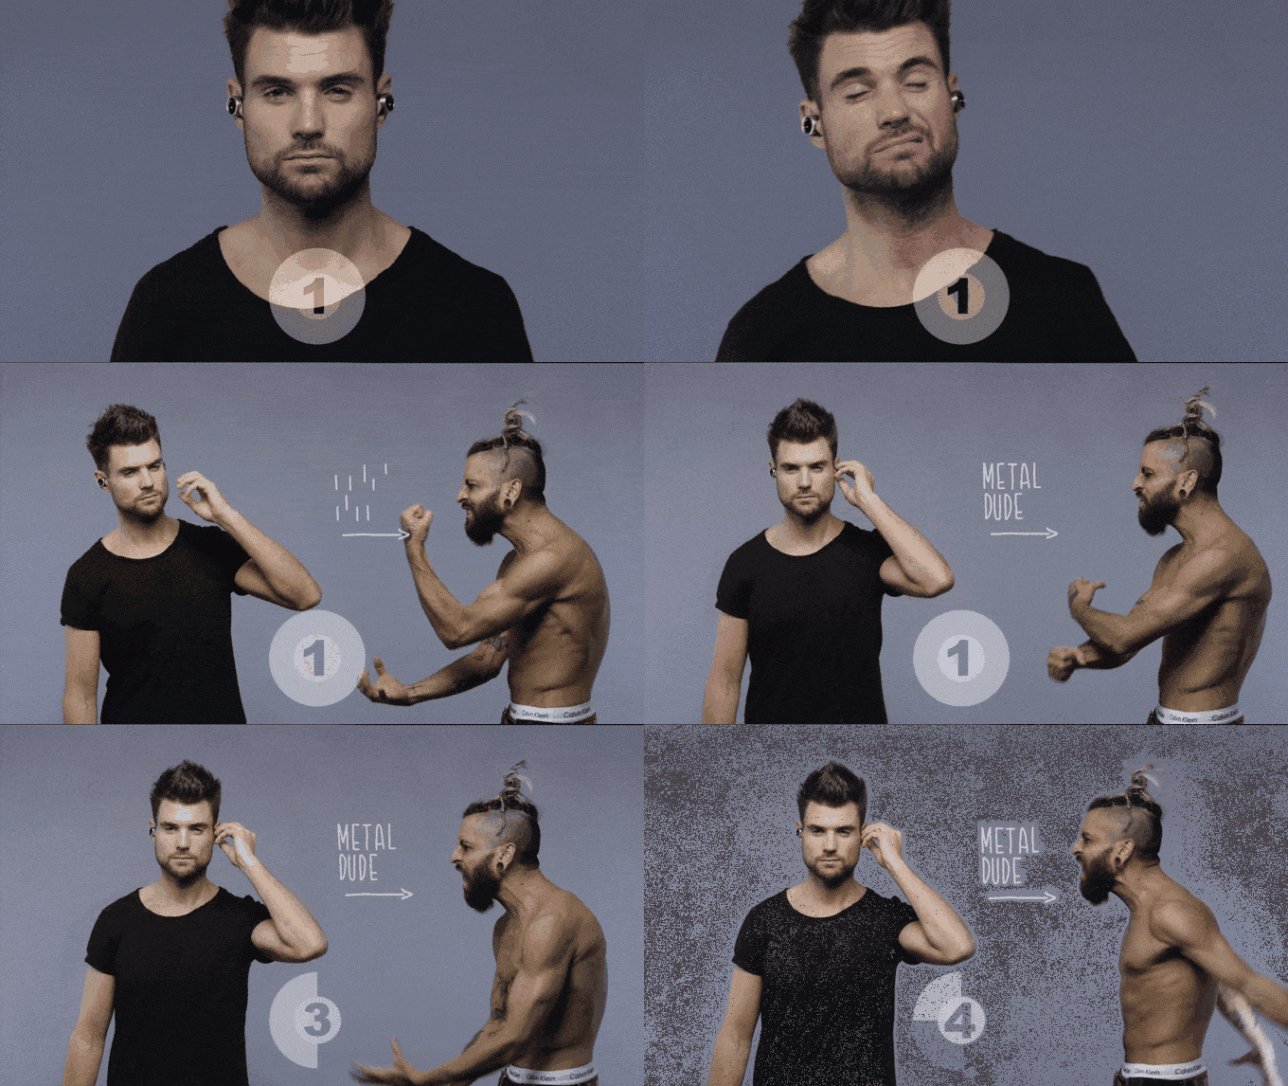
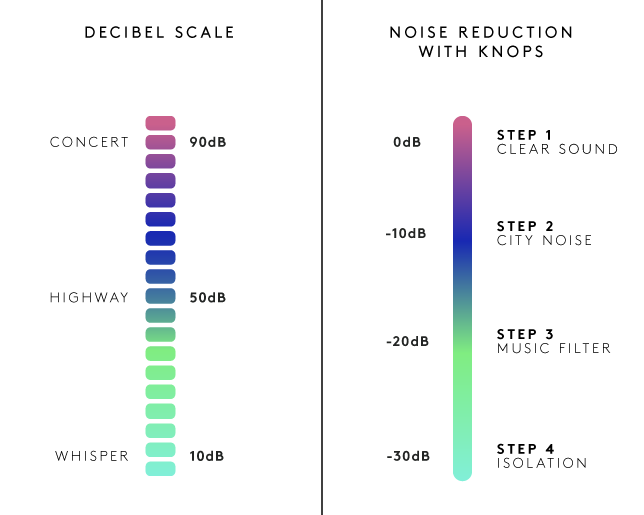
Each pair of knots has four modes you can switch between: the first is clear sound, the second reduces ambient ‘city noise’ by 10 decibels, the third muffles live music by 20 decibels, and the fourth is ‘isolation,’ blocking out 30 decibels. You can easily switch between the four levels whenever you want, eliminating the need to constantly pull out and reinsert your earplugs.

Noting that most earbuds are “downright ugly as hell,” the designers gave Knops a minimalist look available in four different colors and trims. You might imagine that they’d be unnecessarily high-tech, turning a simple product like earplugs into an expensive, high-maintenance gadget that requires syncing to electronic devices or battery charging. Surprisingly, that’s not the case. The creators wanted control over external sounds without the distortion that can come with electronic solutions.

How does it work? According to the creators, “Knops uses no electronics, no apps and no batteries. Instead our earbuds are acoustically engineered. The real sound is filtered using gold old physics. With the help of computer simulations and real-world prototypes tested in acoustic labs, we tuned Knops. We spend a lot of time fine-tuning the sound, so we can provide the best quality sound at every volume level. Working with the natural response of the ear canal.”

You can pre-order a pair by backing the project on Kickstarter for 58 Euros (about $ 62 USD) or more.


Share on Facebook


[ By SA Rogers in Gadgets & Geekery & Technology. ]

[ WebUrbanist | Archives | Galleries | Privacy | TOS ]


WebUrbanist

 
Comments Off on Selective Hearing: These Earplugs Let You Turn Down Sounds of the World

Posted in Creativity


How to Turn Your Kids into Star Wars Characters Using Photoshop

10 Feb

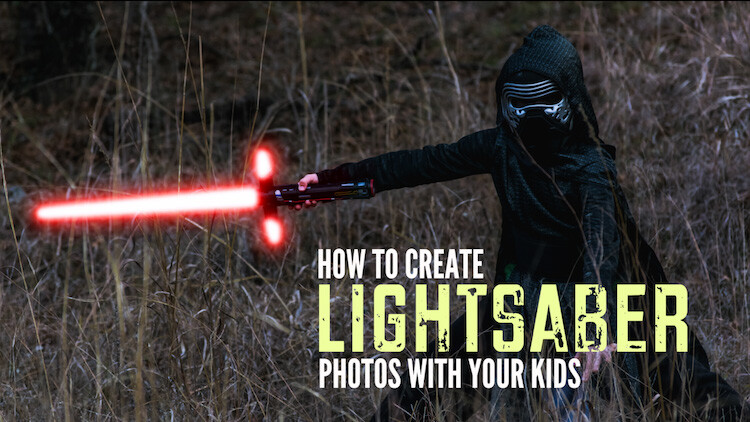
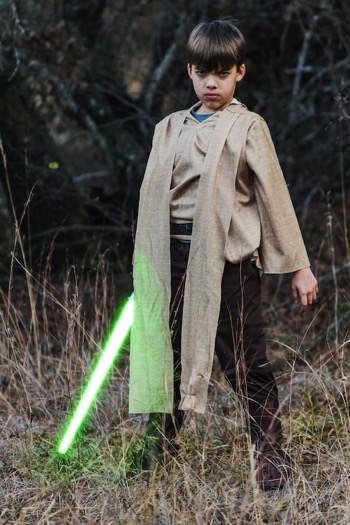
Do your kids love Star Wars? Do you love photography? If so, here’s a great opportunity to join forces and turn your kids into Star Wars heroes or villains by giving them the ultimate Star Wars weapon, the lightsaber.

How to Turn Your Kids into Star Wars Characters Using Adobe Photoshop

All you need to awaken the force are these three steps:

  1. The setup
  2. Capturing the shot
  3. Light up your sabers using Photoshop

BONUS tip – The Jumping Jedi

Step #1 – The Setup

For the setup, you will want to make sure that the photographs of your kids look as close to a Star Wars scene as possible. Don’t just take a picture of your kids wearing a t-shirt standing in the kitchen. Luke Skywalker doesn’t light up his lightsaber in a kitchen. Your kids will have a lot of fun getting into character, so spend some time on the setup.

Costumes

You can buy costumes for your kids on Amazon. Here are the costumes used in this tutorial.

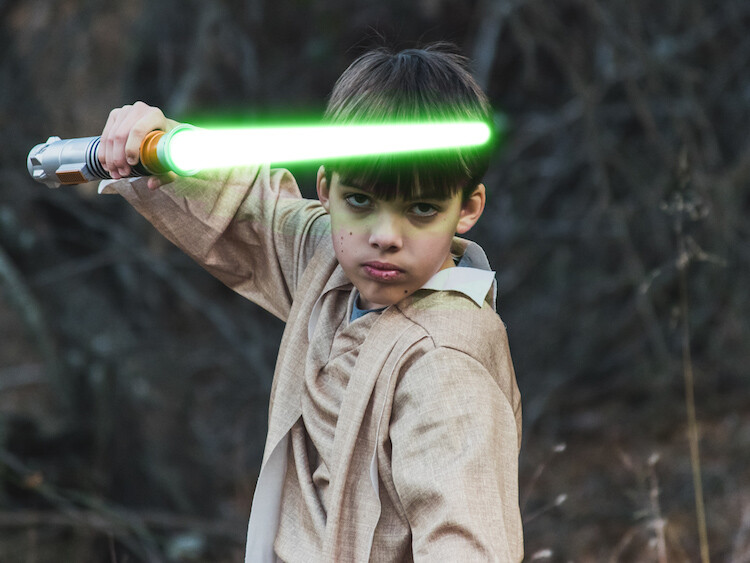
  • Luke Skywalker
  • Rey
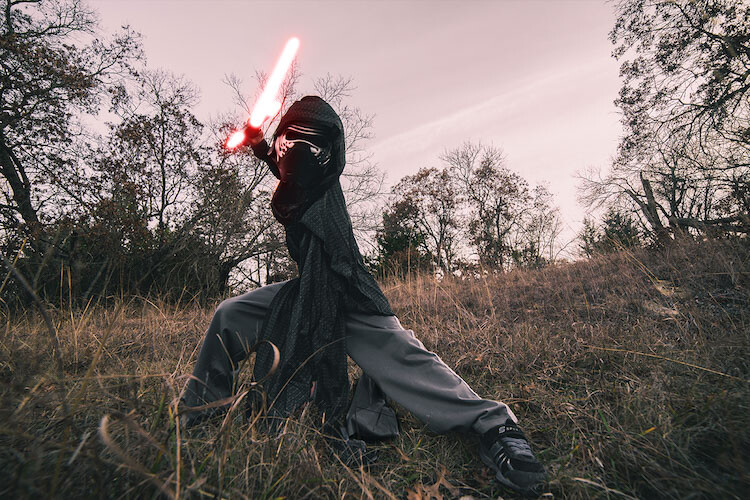
  • Kylo Ren
  • Lightsabers
  • Total customs cost ~ $ 40-70

Location

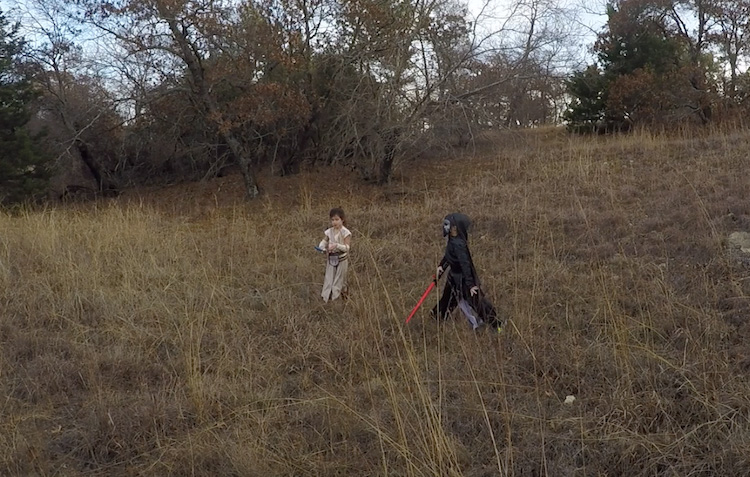
For the location, you will want to find a place that looks like it could be a scene in any of the Star Wars movies. The easiest location to use would be a park with trees, and no noticeable man-made objects in sight.

2 Location - How to Turn Your Kids into Star Wars Characters Using Adobe Photoshop

Step #2 – Capturing the Shot

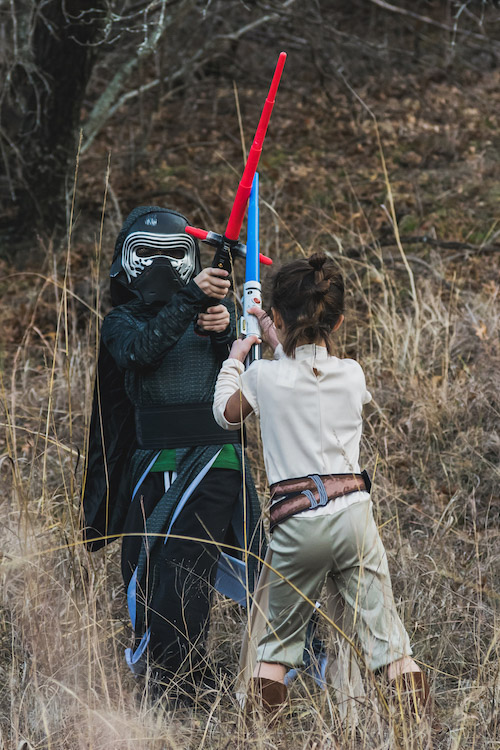
Action shots

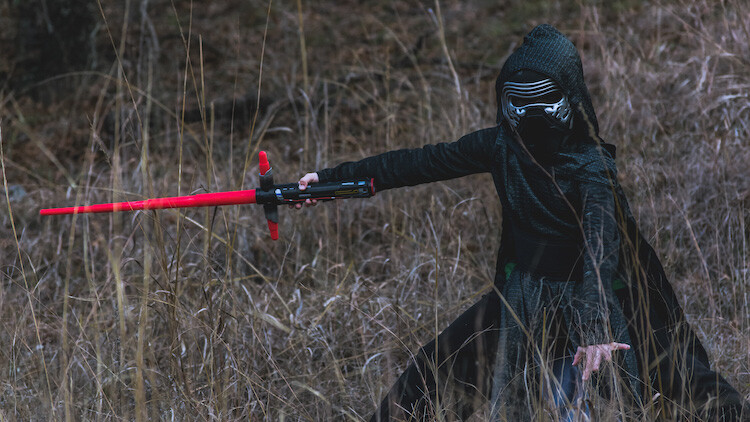
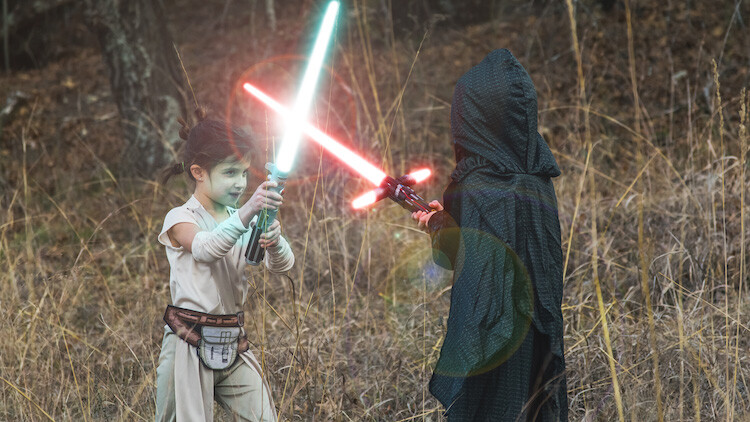
For action shots of a lightsaber battle, you will want to use a fast shutter speed of at least 1/500th of a second, and set your camera to continuous (burst) shooting mode. This will allow you to freeze the action of the battle and take multiple shots in sequence to ensure you capture the best of the action.

4 Action shot - How to Turn Your Kids into Star Wars Characters Using Adobe Photoshop

Shutter speed was 1/800th of a second.

Portraits

For the portraits, give your kids some epic poses to follow. To give you ideas for creative poses, do a Google images search for the Star Wars character of your choice. This will also help your child get more into the character. For example here are some for Rey.

5 Portrait pose - How to Turn Your Kids into Star Wars Characters Using Adobe Photoshop

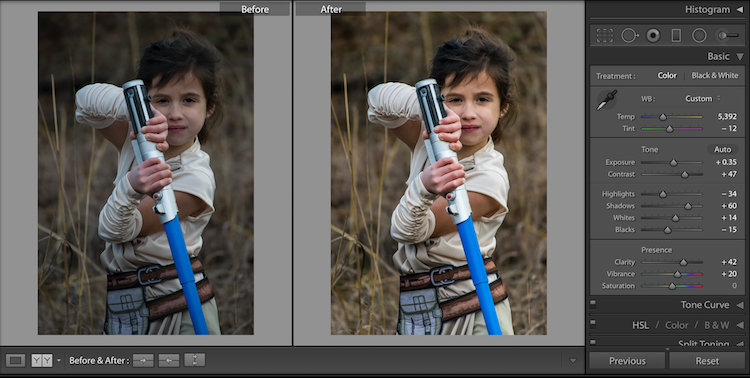
Do basic edits to the image

After you capture the image, you will need to make a few adjustments to the image to make it stand out. This can be done in Adobe Lightroom and is the final step before your photo is ready to go into Photoshop for the lightsaber effect.

For the look of Star Wars, a few basic edits, such as increasing the contrast and the clarity will help give it a rough and grungy look that Star Wars is known for.

6 Before After Lightroom Edit Star Wars

Notice the differences between the before and after of this image by making a few basic edits in Adobe Lightroom.

Step #3 – Light your sabers up in Photoshop

Adding the lightsaber effect is the last and final step in making turning your kid into the Star Wars character of their dreams. This process should take about five minutes per photo once you have done it a few times.

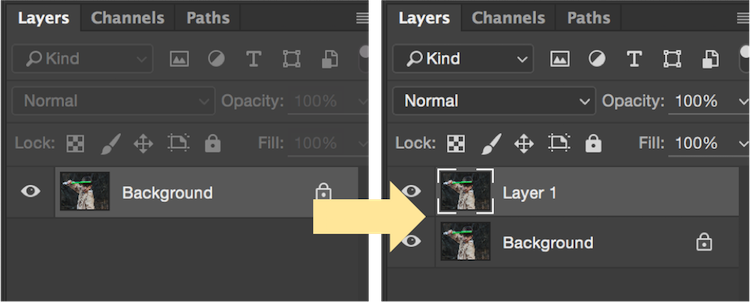
Part 1: Prepare the layer

Start by creating a duplicate layer by pressing CTRL/CMD + J.

8 Duplicate layer - Star Wars character in Photoshop

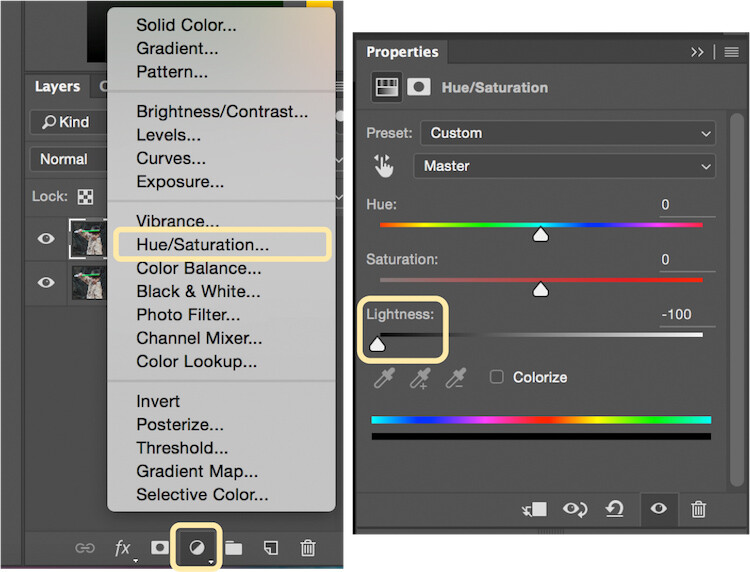
Select the icon to create a new fill or adjustment layer, and from that menu select Hue/Saturation. Then, move the lightness slider to -100 to make it black.

9 Hue Saturation

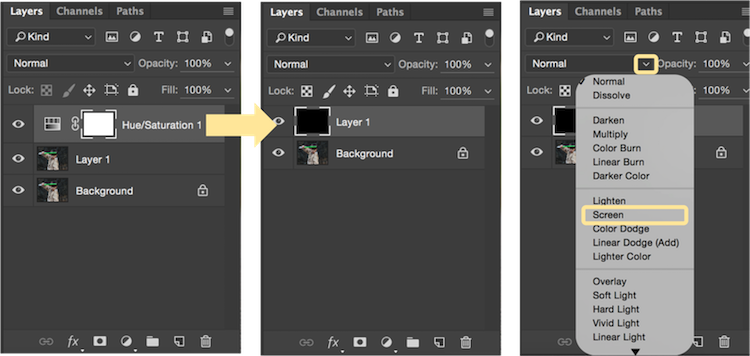
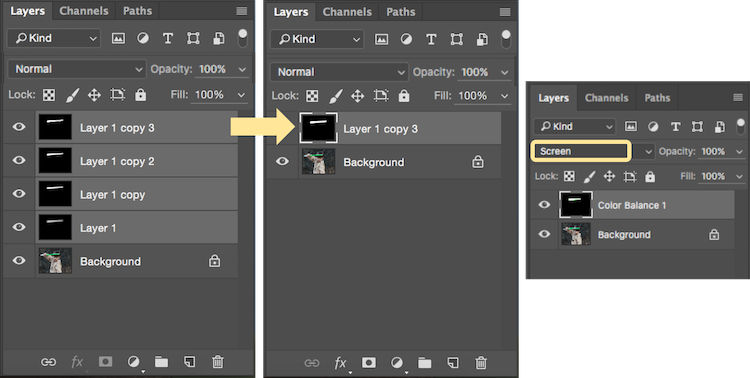
Select CTRL/CMD + E to merge the adjustment layer and duplicate layer. Next, set the blending mode drop down to Screen.

10 merge and screen Star Wars

At this point, your layers are prepped and ready to add the lightsaber.

Part 2: Add the lightsaber by using the brush tool

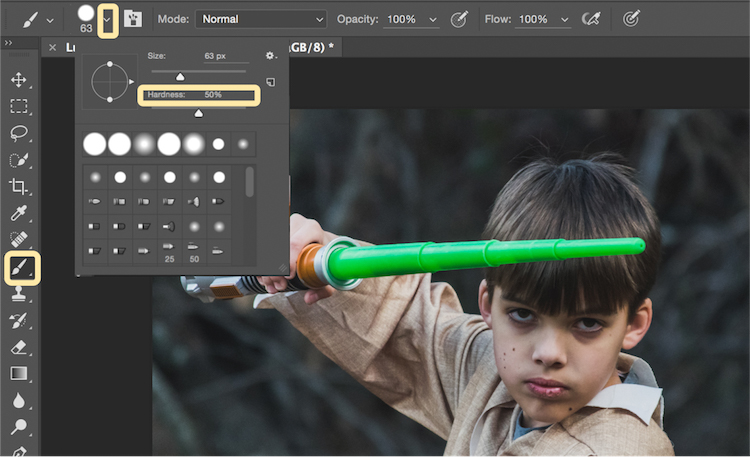
Select the brush tool, and adjust the size and hardness of the brush. The size of your brush will vary based on the size of the lightsaber and your image. Set the hardness of the brush to approximately 50%.

11 brush selection

Begin to add your lightsaber using brush strokes. Select the end point of the lightsaber, then hold down shift, and click the other end of the lightsaber to draw a straight line. Repeat these lines multiple times to fill in the lightsaber with brush strokes. You will likely need to add free-form brush strokes around the base of the lightsaber to fill it in.

12 draw the saber

Illuminate the lightsaber

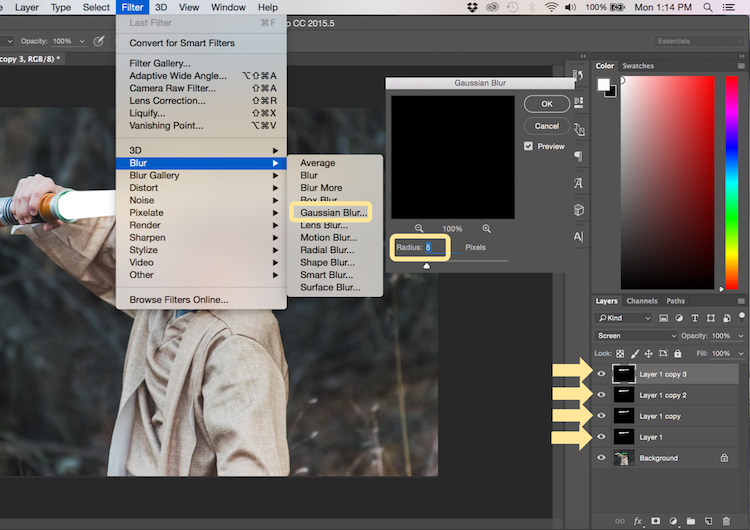
The next step allows you to illuminate the lightsaber. Create three duplicate layers of the lightsaber by selecting CTRL/CMD + J three times. For each layer, you will then select Filter > Blur > Gaussian Blur. But, each layer will be set to a different radius setting. For this image, we used 5, 15, 35, 75 for each respective layer. Note, that the amount of Gaussian Blur needed may vary based on the size of your image. Adjust these numbers as needed to ensure you have a nice glow from the lightsaber.

13 Gausian Blur

Select all of the duplicate layers (do not select the background), and merge them into one layer by pressing CTRL/CMD + E. Then set the blending mode to Screen.

14 Merge and Screen

Add color to the lightsaber

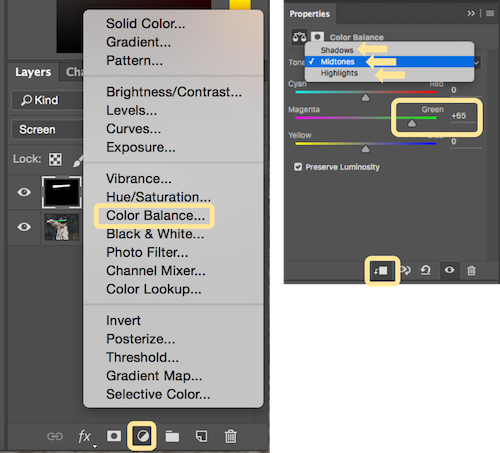
It’s now time to add color to your lightsaber. Select the icon to create a new fill or adjustment layer, and choose the option for Color Balance. Activate the clipping mask so that you only add color to the lightsaber, not the entire image. You can choose any color of your choice, but in this example, we are working with green.

You will want to add the color selection to each option for Shadows, Midtones, and Highlights. Adjust the color slider up or down based on the color preferences for your lightsaber. For this photo, we set shadows, midtones, and highlights to green at around +65.

15 Color Lightsaber

Your lightsaber is now complete, but there is still one more important step to get a realistic photo. You need to add some glow to the subject from the illumination coming off of the lightsaber.

Part 3: Add the reflective glow from the lightsaber

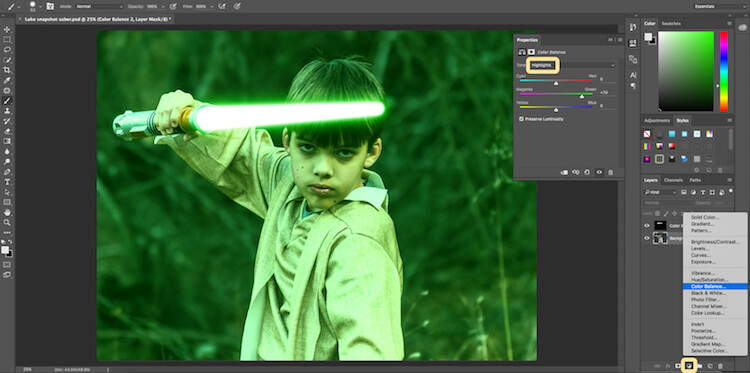
Select the background or base layer. Click the icon to create a new fill or adjustment layer, and choose the option for Color Balance. Choose the same color as you used for your lightsaber, but this time as you adjust the color for Shadows, Midtones, and Highlights, it will work best if you emphasize the color around the highlights more than the shadows or Midtones. For this photo, we used Shadows +32, Midtones +38, and Highlights +70

16 Color for Glow

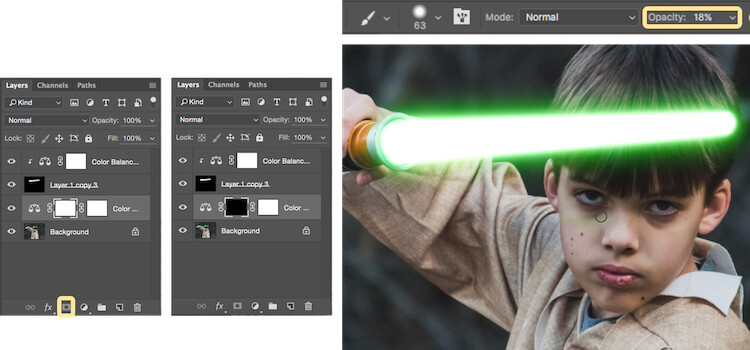
Add a vector mask and then select CTRL/CMD + I to hide all of the color balance. Select the brush tool, and make it a soft edge brush with an opacity around +18. This will allow you to brush in a soft reflection of glow to parts of the image that make it look realistic.

17 Brush in glow reflection

Bonus – Jumping Jedi

A bonus tip that you may want to use in your Star Wars photo shoot is a jumping Jedi. With a few simple tricks, you can give the illusion of your Jedi jumping high into the air over a swinging lightsaber.

First, make sure you use a tripod as you will need the camera to be completely stationary for two different shots. You can have your Jedi jump off a chair at the same time that his enemy swings his lightsaber. Then remove the chair and capture a shot of the exact same scene, but this time without the chair or characters in the shot (tripod use is important for image alignment later).

The second shot should be empty with the exception of the background because it will allow you to take the chair out of the original picture to create the illusion of a jumping Jedi.

19 Jumping jedi tripod shots

Here’s how it’s done in Photoshop.

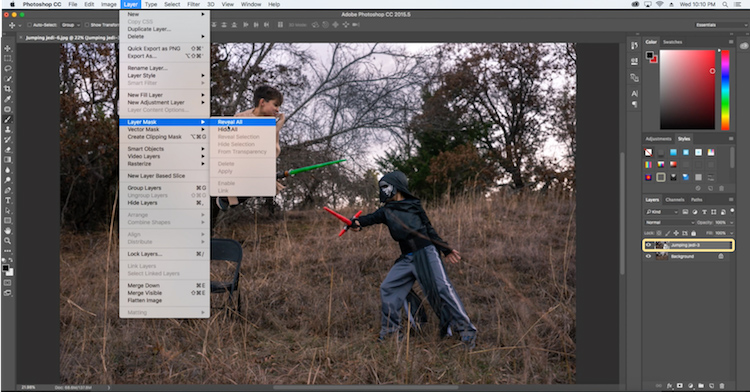
Start by opening both photos as layers. You will want the empty background shot to be set as the base layer and the action shot as the top one. Select the top layer of the action shot, and click Layer > Layer Mask > Reveal all.

20 Jumping Jedi mask

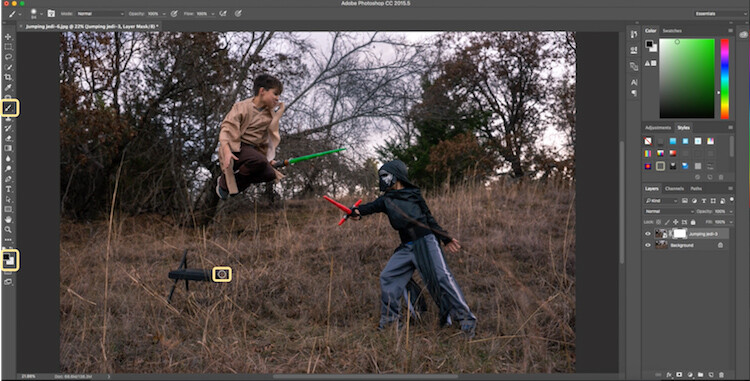
Select the brush tool, and make sure that your foreground color is set to black, which will allow you to brush away the top layer to reveal some of the base layer. If your foreground color is set to white as opposed to black you can switch it to black by clicking X. Simply brush over the chair (make sure you are painting on the mask NOT the layer) to make it disappear.

21 Jumping Jedi brush away

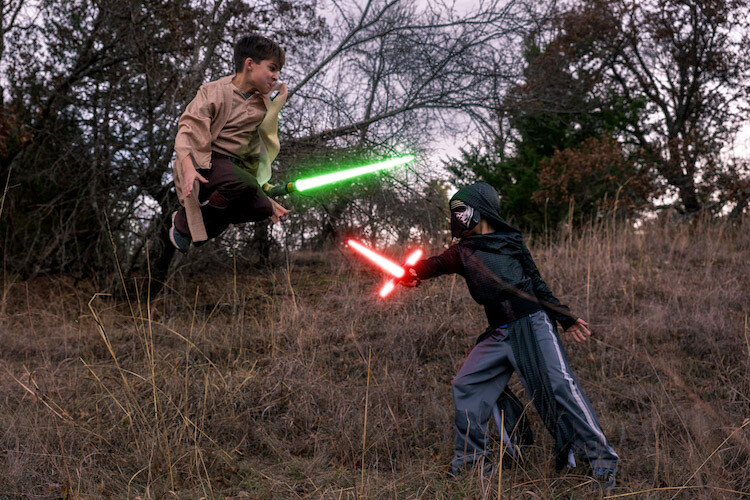
Add the lightsaber effect from above, and you have the illusion of a jumping Jedi.

22 Final photo Jumping Jedi

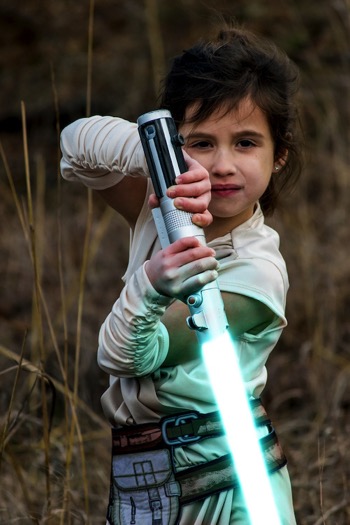
Below are some additional examples of the final images from this Star Wars project to give you additional ideas for action shots and portraits to bring your characters to life.

28 Final photo Rey portrait 29 Final Photo Luke portrait

30 Kylo Ren Red

27 Final photo saber battle

Finally

You can watch this whole process in the follow short video as well:

Note: thanks to my co-author on this article, David Kahl.

Try to awaken the force in your family by giving them a lightsaber and following this tutorial. In addition, leave a comment with any other fun photography projects that you have captured with your kids or family. Share your images if you give this a go, we’d love to see them!

googletag.cmd.push(function() {
tablet_slots.push( googletag.defineSlot( “/1005424/_dPSv4_tab-all-article-bottom_(300×250)”, [300, 250], “pb-ad-78623” ).addService( googletag.pubads() ) ); } );

googletag.cmd.push(function() {
mobile_slots.push( googletag.defineSlot( “/1005424/_dPSv4_mob-all-article-bottom_(300×250)”, [300, 250], “pb-ad-78158” ).addService( googletag.pubads() ) ); } );

The post How to Turn Your Kids into Star Wars Characters Using Photoshop by Paul Fontanelli appeared first on Digital Photography School.


Digital Photography School
 
Comments Off on How to Turn Your Kids into Star Wars Characters Using Photoshop

Posted in Photography


How to Turn Your Kids into Star Wars Characters Using Photoshop

09 Feb

Do your kids love Star Wars? Do you love photography? If so, here’s a great opportunity to join forces and turn your kids into Star Wars heroes or villains by giving them the ultimate Star Wars weapon, the lightsaber.

How to Turn Your Kids into Star Wars Characters Using Adobe Photoshop

All you need to awaken the force are these three steps:

  1. The setup
  2. Capturing the shot
  3. Light up your sabers using Photoshop

BONUS tip – The Jumping Jedi

Step #1 – The Setup

For the setup, you will want to make sure that the photographs of your kids look as close to a Star Wars scene as possible. Don’t just take a picture of your kids wearing a t-shirt standing in the kitchen. Luke Skywalker doesn’t light up his lightsaber in a kitchen. Your kids will have a lot of fun getting into character, so spend some time on the setup.

Costumes

You can buy costumes for your kids on Amazon. Here are the costumes used in this tutorial.

  • Luke Skywalker
  • Rey
  • Kylo Ren
  • Lightsabers
  • Total customs cost ~ $ 40-70

Location

For the location, you will want to find a place that looks like it could be a scene in any of the Star Wars movies. The easiest location to use would be a park with trees, and no noticeable man-made objects in sight.

2 Location - How to Turn Your Kids into Star Wars Characters Using Adobe Photoshop

Step #2 – Capturing the Shot

Action shots

For action shots of a lightsaber battle, you will want to use a fast shutter speed of at least 1/500th of a second, and set your camera to continuous (burst) shooting mode. This will allow you to freeze the action of the battle and take multiple shots in sequence to ensure you capture the best of the action.

4 Action shot - How to Turn Your Kids into Star Wars Characters Using Adobe Photoshop

Shutter speed was 1/800th of a second.

Portraits

For the portraits, give your kids some epic poses to follow. To give you ideas for creative poses, do a Google images search for the Star Wars character of your choice. This will also help your child get more into the character. For example here are some for Rey.

5 Portrait pose - How to Turn Your Kids into Star Wars Characters Using Adobe Photoshop

Do basic edits to the image

After you capture the image, you will need to make a few adjustments to the image to make it stand out. This can be done in Adobe Lightroom and is the final step before your photo is ready to go into Photoshop for the lightsaber effect.

For the look of Star Wars, a few basic edits, such as increasing the contrast and the clarity will help give it a rough and grungy look that Star Wars is known for.

6 Before After Lightroom Edit Star Wars

Notice the differences between the before and after of this image by making a few basic edits in Adobe Lightroom.

Step #3 – Light your sabers up in Photoshop

Adding the lightsaber effect is the last and final step in making turning your kid into the Star Wars character of their dreams. This process should take about five minutes per photo once you have done it a few times.

Part 1: Prepare the layer

Start by creating a duplicate layer by pressing CTRL/CMD + J.

8 Duplicate layer - Star Wars character in Photoshop

Select the icon to create a new fill or adjustment layer, and from that menu select Hue/Saturation. Then, move the lightness slider to -100 to make it black.

9 Hue Saturation

Select CTRL/CMD + E to merge the adjustment layer and duplicate layer. Next, set the blending mode drop down to Screen.

10 merge and screen Star Wars

At this point, your layers are prepped and ready to add the lightsaber.

Part 2: Add the lightsaber by using the brush tool

Select the brush tool, and adjust the size and hardness of the brush. The size of your brush will vary based on the size of the lightsaber and your image. Set the hardness of the brush to approximately 50%.

11 brush selection

Begin to add your lightsaber using brush strokes. Select the end point of the lightsaber, then hold down shift, and click the other end of the lightsaber to draw a straight line. Repeat these lines multiple times to fill in the lightsaber with brush strokes. You will likely need to add free-form brush strokes around the base of the lightsaber to fill it in.

12 draw the saber

Illuminate the lightsaber

The next step allows you to illuminate the lightsaber. Create three duplicate layers of the lightsaber by selecting CTRL/CMD + J three times. For each layer, you will then select Filter > Blur > Gaussian Blur. But, each layer will be set to a different radius setting. For this image, we used 5, 15, 35, 75 for each respective layer. Note, that the amount of Gaussian Blur needed may vary based on the size of your image. Adjust these numbers as needed to ensure you have a nice glow from the lightsaber.

13 Gausian Blur

Select all of the duplicate layers (do not select the background), and merge them into one layer by pressing CTRL/CMD + E. Then set the blending mode to Screen.

14 Merge and Screen

Add color to the lightsaber

It’s now time to add color to your lightsaber. Select the icon to create a new fill or adjustment layer, and choose the option for Color Balance. Activate the clipping mask so that you only add color to the lightsaber, not the entire image. You can choose any color of your choice, but in this example, we are working with green.

You will want to add the color selection to each option for Shadows, Midtones, and Highlights. Adjust the color slider up or down based on the color preferences for your lightsaber. For this photo, we set shadows, midtones, and highlights to green at around +65.

15 Color Lightsaber

Your lightsaber is now complete, but there is still one more important step to get a realistic photo. You need to add some glow to the subject from the illumination coming off of the lightsaber.

Part 3: Add the reflective glow from the lightsaber

Select the background or base layer. Click the icon to create a new fill or adjustment layer, and choose the option for Color Balance. Choose the same color as you used for your lightsaber, but this time as you adjust the color for Shadows, Midtones, and Highlights, it will work best if you emphasize the color around the highlights more than the shadows or Midtones. For this photo, we used Shadows +32, Midtones +38, and Highlights +70

16 Color for Glow

Add a vector mask and then select CTRL/CMD + I to hide all of the color balance. Select the brush tool, and make it a soft edge brush with an opacity around +18. This will allow you to brush in a soft reflection of glow to parts of the image that make it look realistic.

17 Brush in glow reflection

Bonus – Jumping Jedi

A bonus tip that you may want to use in your Star Wars photo shoot is a jumping Jedi. With a few simple tricks, you can give the illusion of your Jedi jumping high into the air over a swinging lightsaber.

First, make sure you use a tripod as you will need the camera to be completely stationary for two different shots. You can have your Jedi jump off a chair at the same time that his enemy swings his lightsaber. Then remove the chair and capture a shot of the exact same scene, but this time without the chair or characters in the shot (tripod use is important for image alignment later).

The second shot should be empty with the exception of the background because it will allow you to take the chair out of the original picture to create the illusion of a jumping Jedi.

19 Jumping jedi tripod shots

Here’s how it’s done in Photoshop.

Start by opening both photos as layers. You will want the empty background shot to be set as the base layer and the action shot as the top one. Select the top layer of the action shot, and click Layer > Layer Mask > Reveal all.

20 Jumping Jedi mask

Select the brush tool, and make sure that your foreground color is set to black, which will allow you to brush away the top layer to reveal some of the base layer. If your foreground color is set to white as opposed to black you can switch it to black by clicking X. Simply brush over the chair (make sure you are painting on the mask NOT the layer) to make it disappear.

21 Jumping Jedi brush away

Add the lightsaber effect from above, and you have the illusion of a jumping Jedi.

22 Final photo Jumping Jedi

Below are some additional examples of the final images from this Star Wars project to give you additional ideas for action shots and portraits to bring your characters to life.

28 Final photo Rey portrait 29 Final Photo Luke portrait

30 Kylo Ren Red

27 Final photo saber battle

Finally

You can watch this whole process in the follow short video as well:

Note: thanks to my co-author on this article, David Kahl.

Try to awaken the force in your family by giving them a lightsaber and following this tutorial. In addition, leave a comment with any other fun photography projects that you have captured with your kids or family. Share your images if you give this a go, we’d love to see them!

googletag.cmd.push(function() {
tablet_slots.push( googletag.defineSlot( “/1005424/_dPSv4_tab-all-article-bottom_(300×250)”, [300, 250], “pb-ad-78623” ).addService( googletag.pubads() ) ); } );

googletag.cmd.push(function() {
mobile_slots.push( googletag.defineSlot( “/1005424/_dPSv4_mob-all-article-bottom_(300×250)”, [300, 250], “pb-ad-78158” ).addService( googletag.pubads() ) ); } );

The post How to Turn Your Kids into Star Wars Characters Using Photoshop by Paul Fontanelli appeared first on Digital Photography School.


Digital Photography School
 
Comments Off on How to Turn Your Kids into Star Wars Characters Using Photoshop

Posted in Photography


Turn your doodles into Google satellite images with Land Lines

05 Jan

Looking for a moment of zen? We suggest spending a couple of minutes playing with Land Lines, a game that draws on Google’s satellite images of Earth.

So maybe it’s not quite a ‘game.’ Its creators Zach Lieberman and Matt Felsen call it an experiment, one that analyzes basic scribbles (zig zags and curves, nothing fancy) and finds a satellite image of Earth with matching features. It runs on either a mobile or desktop web browser.

Lines that you draw with your finger or a mouse become roads, shorelines and runways before your eyes, almost instantaneously. It runs seamlessly, and it’s oddly soothing. Give it a try and learn more about how it all came together.

Articles: Digital Photography Review (dpreview.com)

 
Comments Off on Turn your doodles into Google satellite images with Land Lines

Posted in Uncategorized


How to Turn Your Images into Kaleidoscope Patterns

29 Nov

This tutorial is a lot of fun, transforming photographs into kaleidoscopic wonders, often with surprising results. The resulting kaleidoscope patterns make fantastic desktop backgrounds and wallpapers too.

Remember kaleidoscopes? Those curious tubes with an array of mirrors and colorful beads inside? As a kid, I would while away sunny weekends straining my eye against the viewing aperture, hypnotized by the endless combination of shapes, patterns, and colors. Although I now spend most of my time looking through the viewfinder of a camera, the magic of the kaleidoscope remains in my mind as an early foray into image making.

Step 1 – Setting up the canvas

kaleidoscope-01

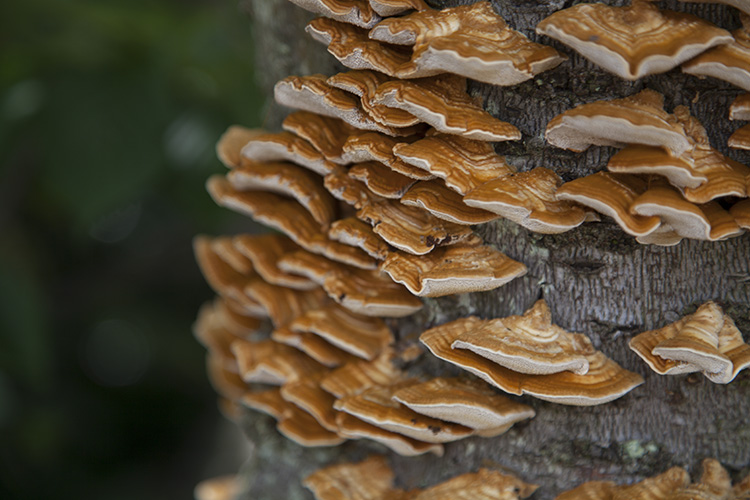
First, select a photograph. I’ve chosen this photograph of some fungi growing on an old tree stump. From my own experimentation I’ve found images with bold, contrasting colors and negative space result in the best kaleidoscopic images.

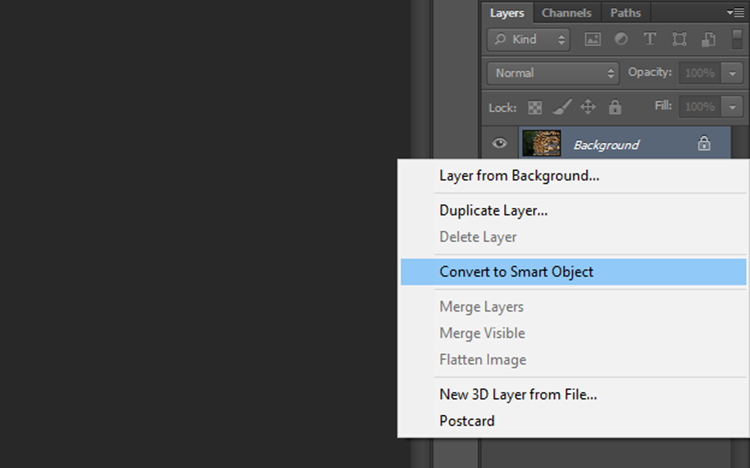
Once you have selected an image and opened it in Photoshop, right click on the image in the layers panel and select Convert to Smart Object. This will enable you to move the image around the canvas.

kaleidoscope-02

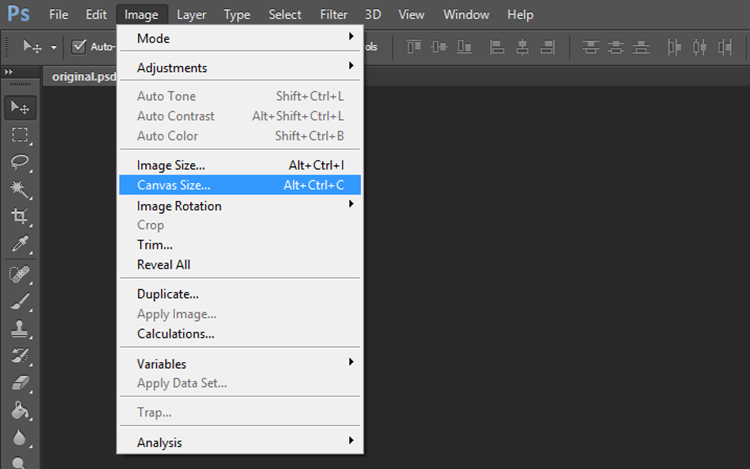
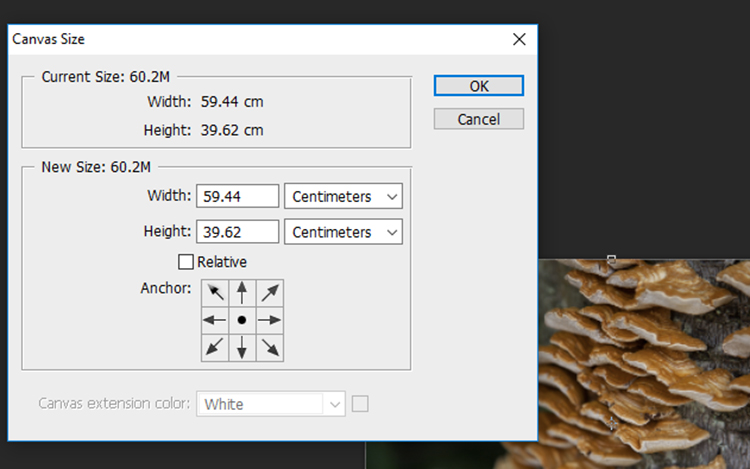
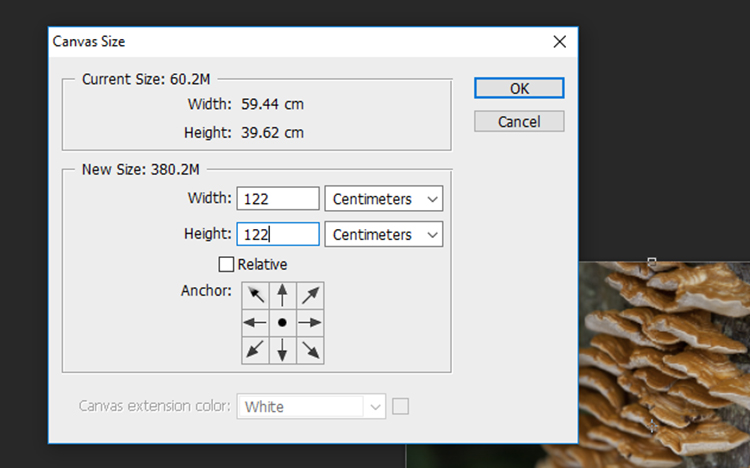
Now we need to add some space around the image. Go to Image > Canvas Size and a window will pop up with the dimensions of your current image.

kaleidoscope-03

To calculate the dimensions of the canvas, look at the largest side of the image, double that figure and add four. For example, the image I selected was originally 59.44 x 39.62cm so I multiplied 59 by 2 to get 118m then added 4 to get 122. Add the same value to the smaller side of the image so that the canvas will be square. Click OK.

kaleidoscope-04

kaleidoscope-05

Step 2- Creating the template

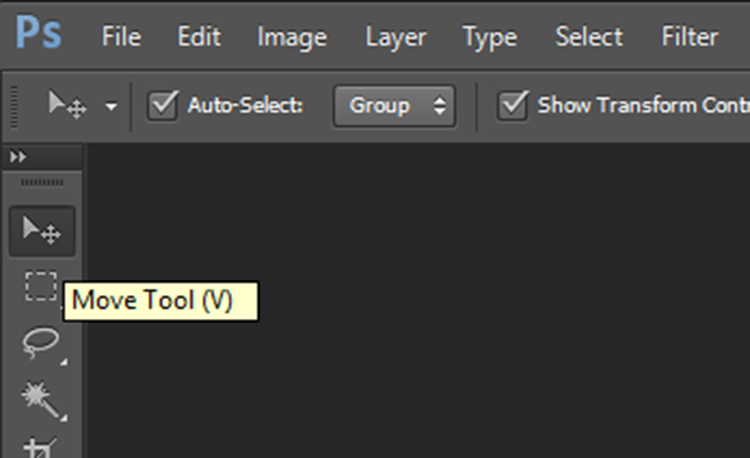
Zoom out so you can view see the entire canvas and select the Move Tool located at the top of the left toolbar.

kaleidoscope-06

kaleidoscope-07

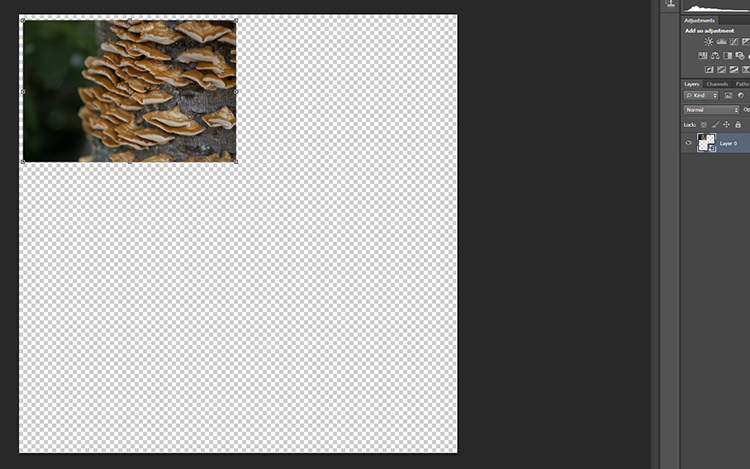
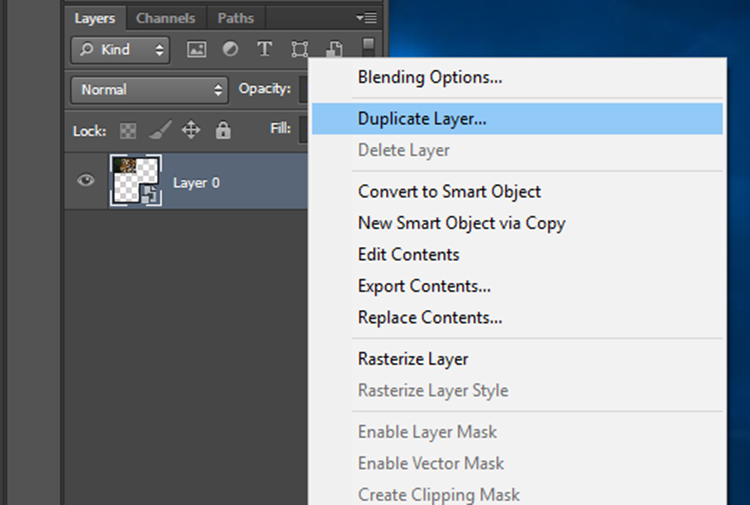
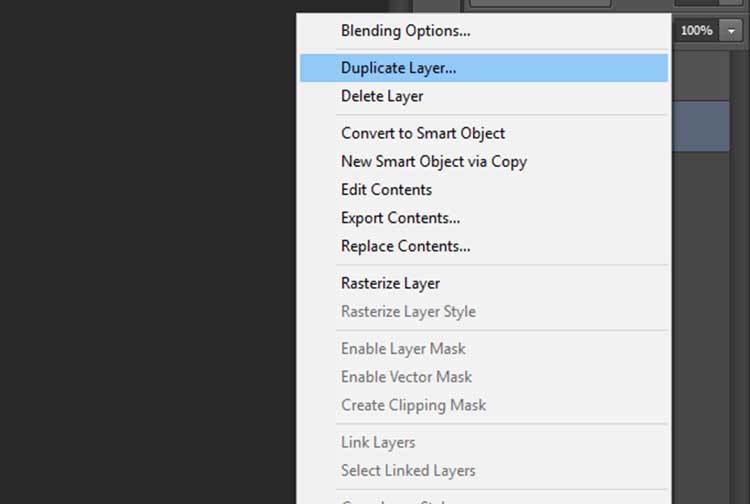
Click on your photograph on the canvas, and with the left mouse button depressed, drag the image to a corner of the canvas. Leave a few centimeters between the image and the edge of the canvas. Don’t worry about making this too exact as we will crop it to more exact proportions later. Now, duplicate this layer by right clicking it in the layers panel and selecting Duplicate Layer (or use the keyboard shortcut Cmd/Ctrl+J).

kaleidoscope-08

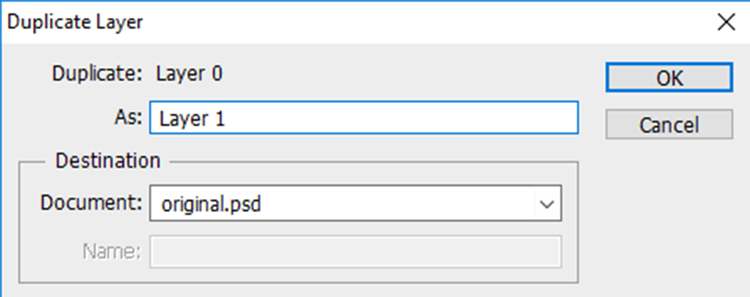
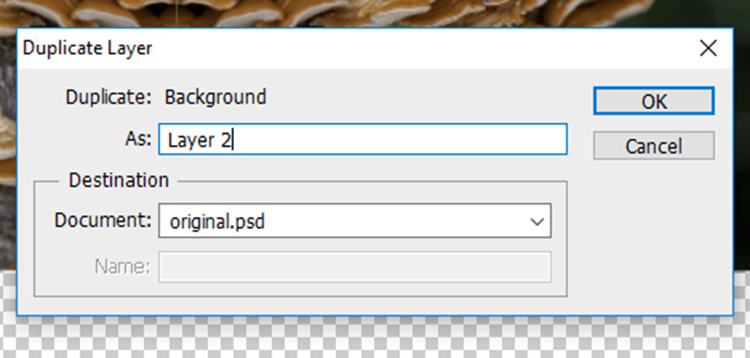
In the Duplicate Layer prompt, rename this layer as “Layer 1” as we will be duplicating a number of layers over the next few steps. Click OK and a new layer will appear in the layers panel.

kaleidoscope-09

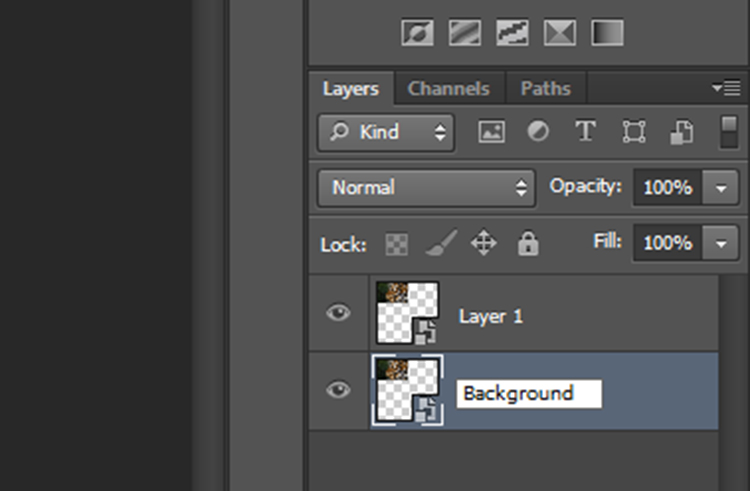
Rename the original image layer as “Background” by double clicking on the name “Layer 0” in the layers panel. This will help avoid confusion later.

kaleidoscope-10

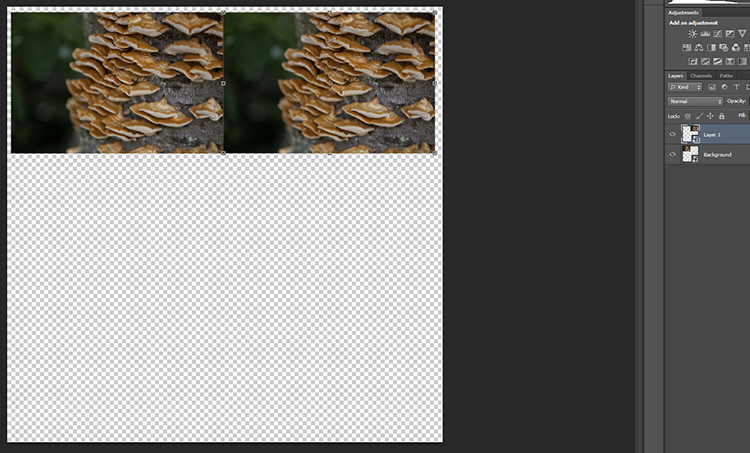
At the moment, both layers will be in the same spot on the canvas, with Layer 1 sitting on top of Background. With the Move Tool selected, click on the top layer, and with the left mouse button depressed, drag Layer 1 next to the Background image.

kaleidoscope-11

kaleidoscope-12

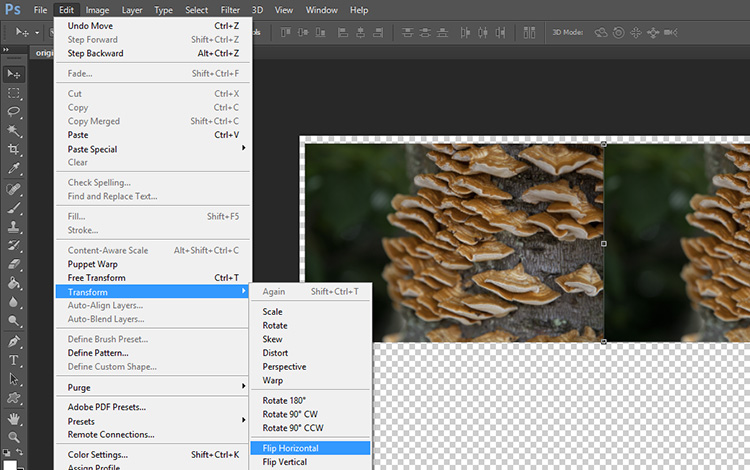
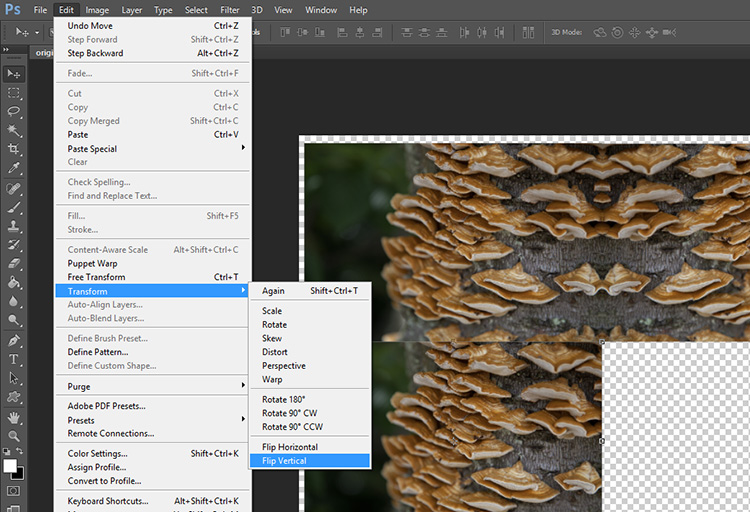
Keeping Layer 1 selected, click Edit on the main toolbar and then Transform > Flip Horizontal. Layer 1 will flip to create a mirrored image of the Background.

kaleidoscope-13

Your image should look something like this now.

Just two more to go!

Duplicate the Background layer again, and when the prompt window appears, rename it “Layer 2”.

kaleidoscope-14

kaleidoscope-16

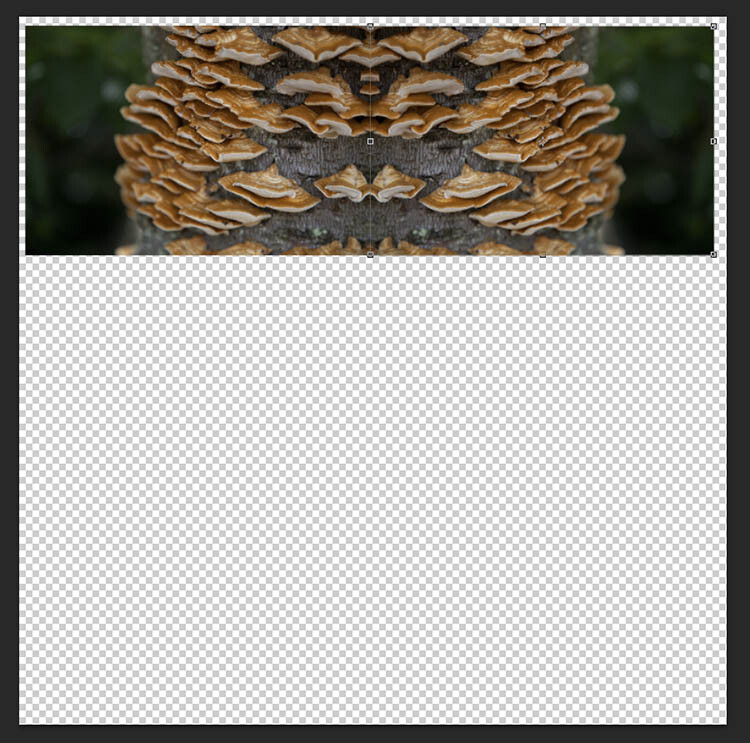
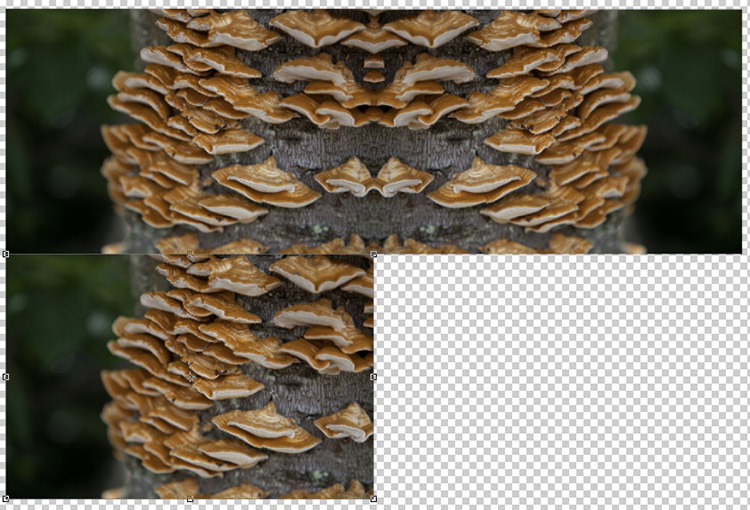
With the Move Tool selected, click on the newly created Layer 2 (which will be over Background). Keep the left mouse button depressed, and drag Layer 2 underneath Background.

kaleidoscope-17

With Layer 2 selected, click Edit on the main toolbar and then Transform > Flip Vertical. Layer 2 will flip vertically to create a mirrored image of Background from below.

kaleidoscope-18

kaleidoscope-19

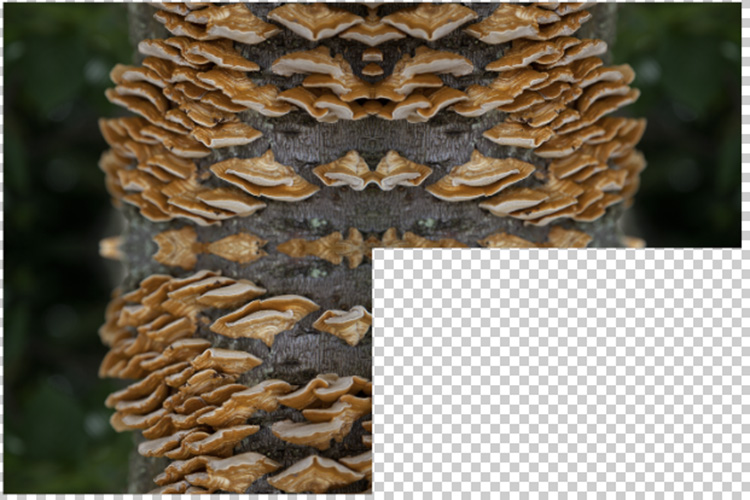
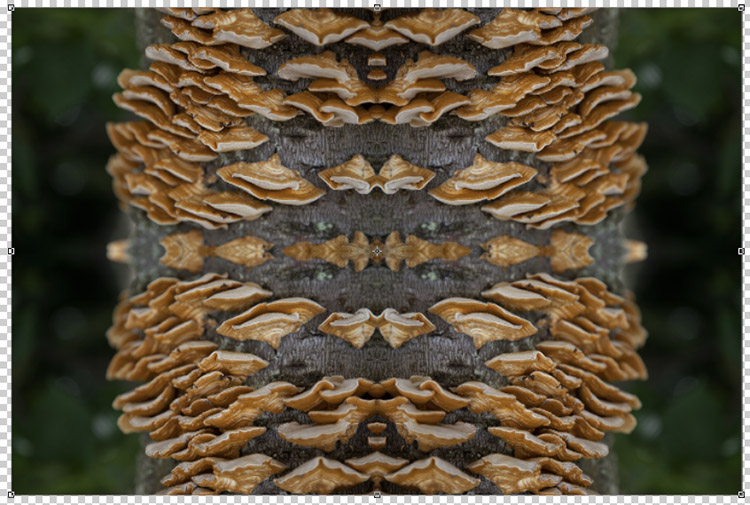
Duplicate Background one more time, this time naming the layer “Layer 3”. With the Move Tool selected, click on the newly created Layer 3 (which will be over Background) and with the left mouse button depressed, drag Layer 3 into the remaining slot to complete the rectangle.

With Layer 3 selected, click Edit on the main toolbar and then Transform > Flip Horizontal. To complete the pattern, keep Layer 3 selected click Edit on the main toolbar and then Transform > Flip Vertical.

kaleidoscope-20

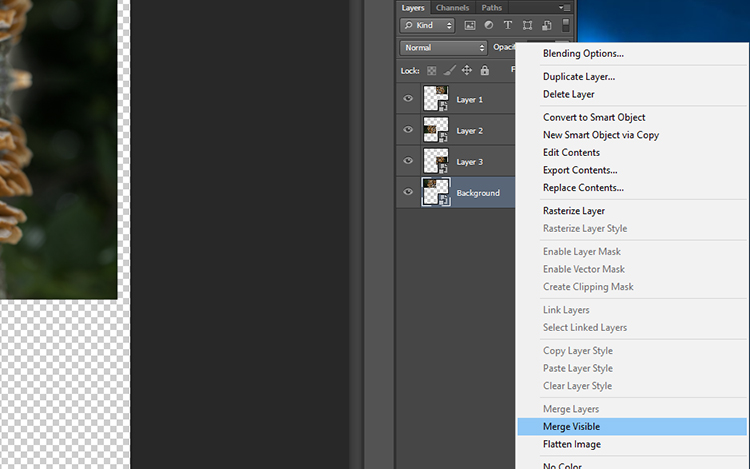
The next step is to merge the layers of the rectangle you have made so that it can be moved around as one layer. To do this, right-click on the layer titled Background in the layers panel and select Merge Visible.

kaleidoscope-21

If it hasn’t done so automatically, it is a good idea to rename this merged layer as “Background” so it will be easier to keep track of which layers are where. You now have the template for your kaleidoscopic image!

Step 3 – Creating the kaleidoscope

Select the Background layer, and with the Move tool selected, drag the layer into the center of the canvas. Right-click on Background in the layers panel and select Duplicate Layer. Rename this layer as “Layer 1”.

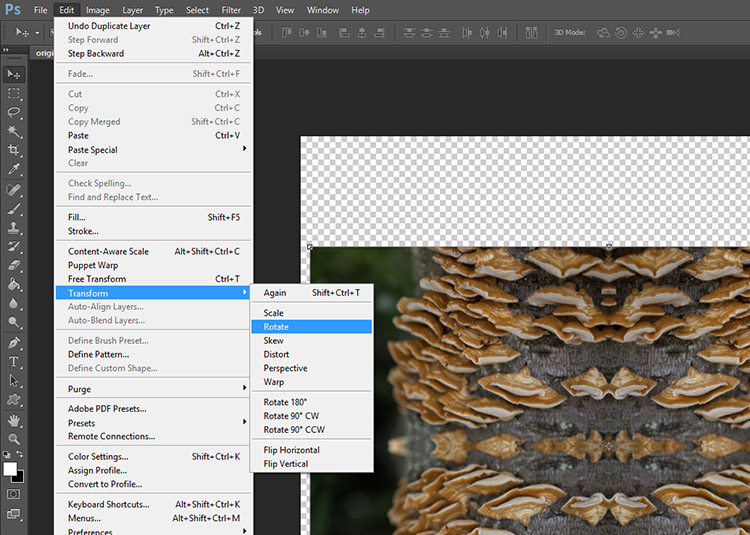
With Layer 1 selected, click Edit > Transform > Rotate.

kaleidoscope-22

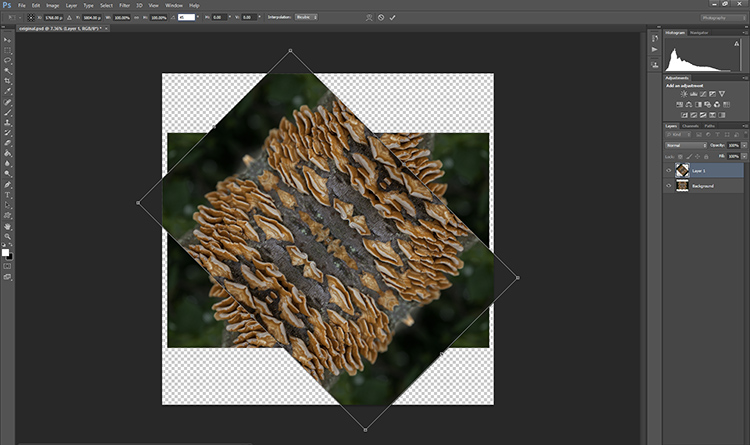
In the Transform settings panel, there is a text box next to the symbol of an angle. In this text box, type 45 and press enter. Layer 1 will be rotated to a 45-degree angle.

kaleidoscope-23

kaleidoscope-24

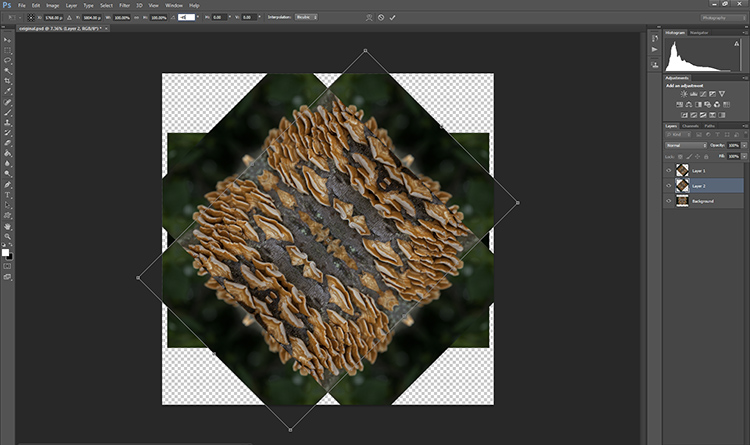
Duplicate Background again, this time renaming the layer “Layer 2”. With Layer 2 selected in the layers panel, click Edit > Transform > Rotate. In the Transform settings panel, in the text box next to the angle symbol, enter -45 and press enter.

kaleidoscope-25

kaleidoscope-26

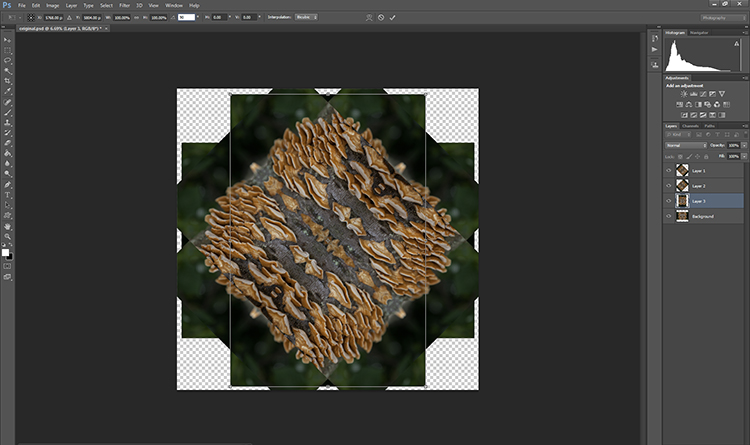
Duplicate the Background layer one last time, renaming the layer “Layer 3”. With Layer 3 selected in the layers panel, click Edit > Transform > Rotate. In the Transform settings panel, in the text box next to the angle symbol, enter 90 and press enter. The layer will be rotated 90 degrees.

kaleidoscope-27 kaleidoscope-28

Step 4 – Blending Modes

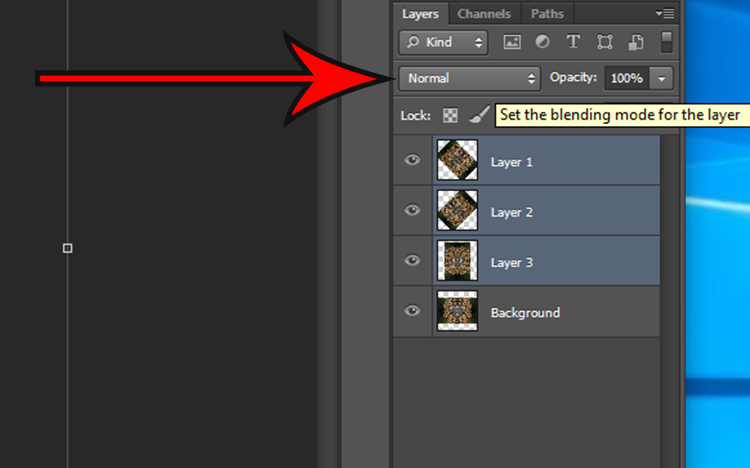
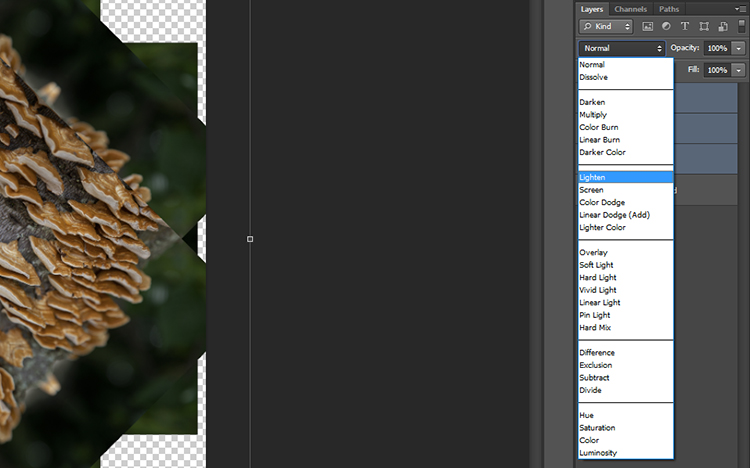
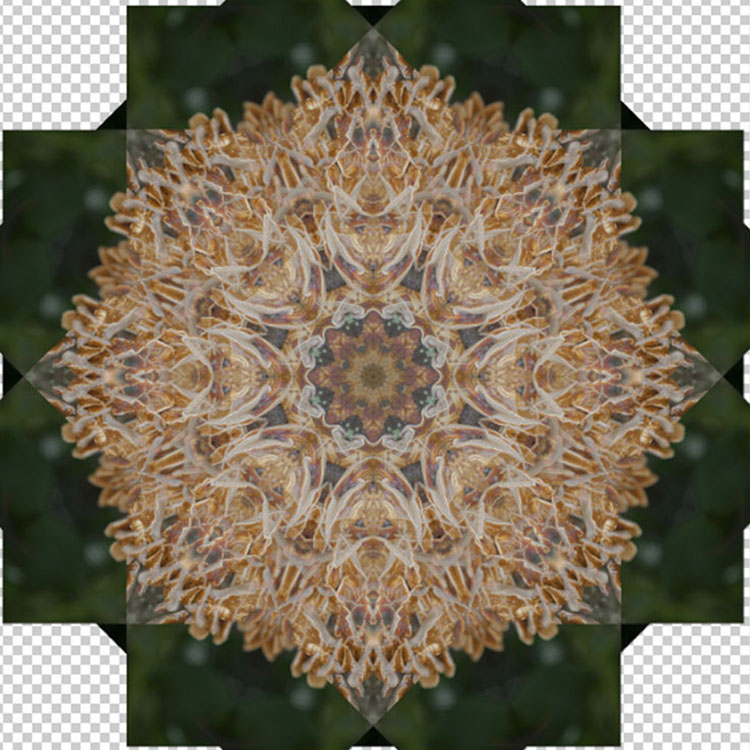
Select the top three layers in the layers panel by holding down the shift key and clicking on Layers 1, 2, and 3. With the layers selected, click on the Blending Mode drop down menu (red arrow below) and select the Lighten option. The selected layers will blend to form a kaleidoscope pattern.

kaleidoscope-29

kaleidoscope-30

kaleidoscope-31

Crop it

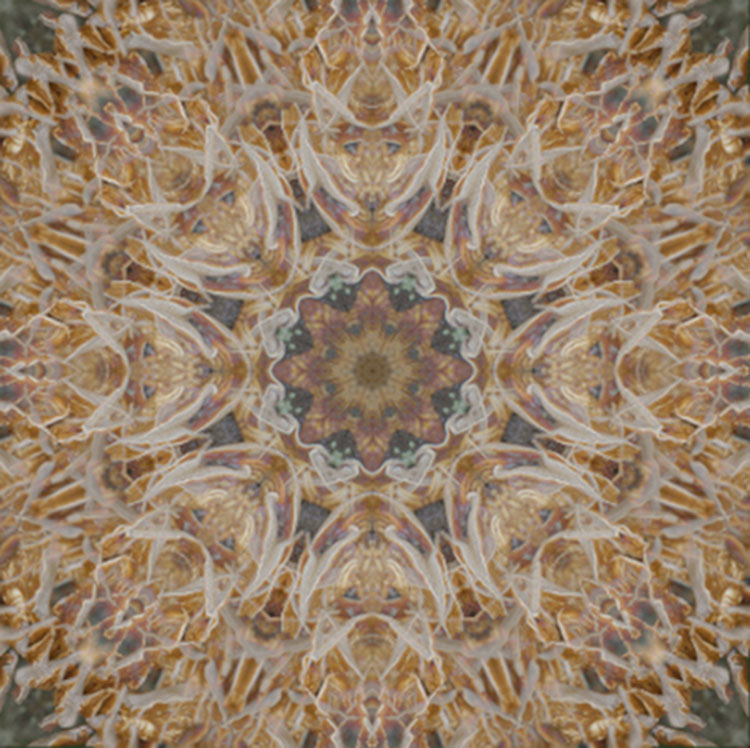
To neaten up the image you can crop the edges of the kaleidoscope down to a square or rectangle. With the Crop Tool selected, hold the shift key on your keyboard and drag the corners of the Crop Tool over the image to create a square or rectangle. When you are happy, press enter and save the image via File > Save As.

kaleidoscope-32

Step 5 – Making a desktop background

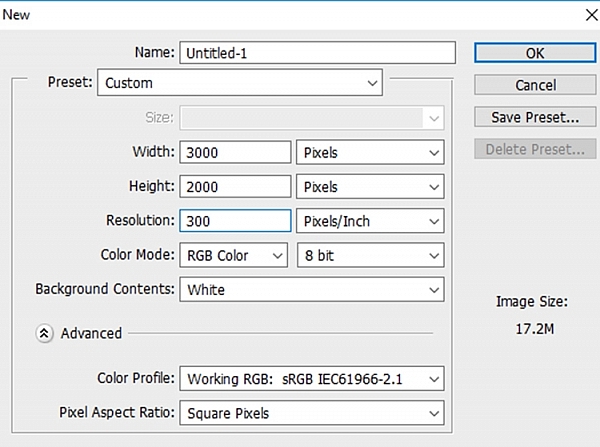
To make a wallpaper effect, open a new Photoshop document by selecting File > New and entering the dimensions 3000 pixels by 2000 pixels in the text boxes. Make sure the resolution set to at least 300 pixels/inch, so it will look nice on a large monitor screen.

kaleidoscope-33

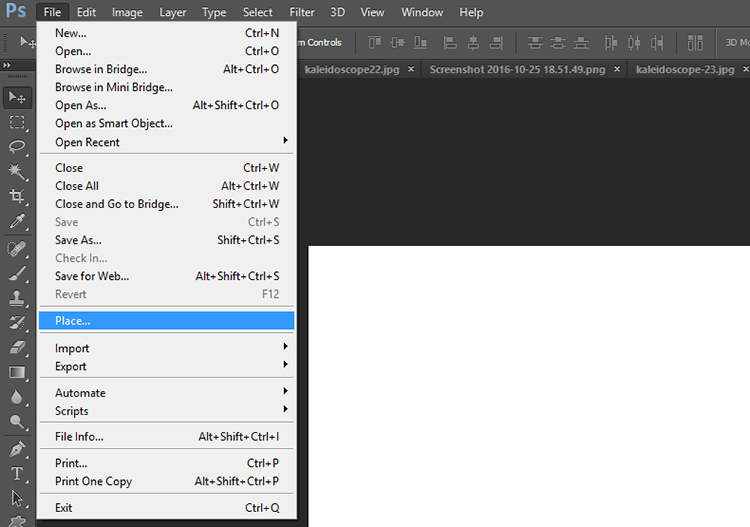
Select File > Place… and select your new kaleidoscope file.

kaleidoscope-34

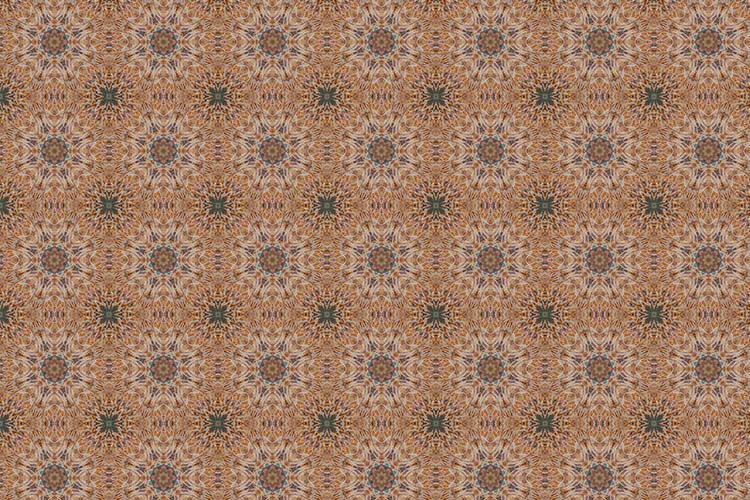
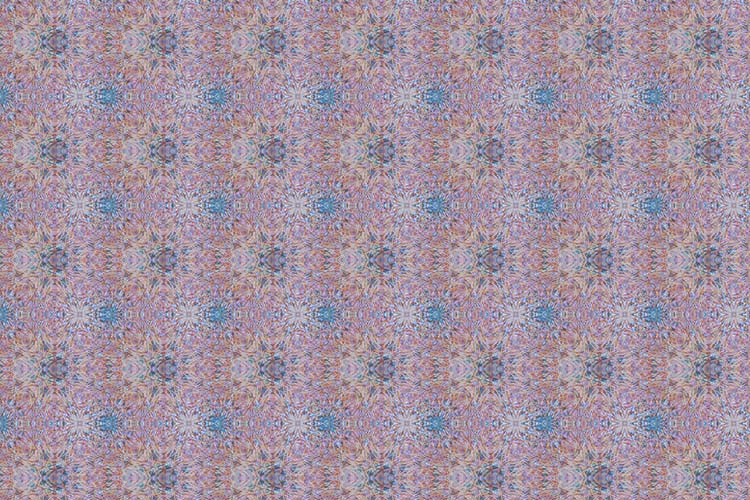
Once placed in the Photoshop canvas, you can choose to duplicate the image any number of times to create an interesting pattern, or add layers on top of one another and have fun experimenting with more Blending Modes. The possibilities are endless! Here are a few ideas.

Have you done this technique before to make a kaleidoscope pattern? Please share your results in the comments section below.

desktop

desktop-01

desktop-02

googletag.cmd.push(function() {
tablet_slots.push( googletag.defineSlot( “/1005424/_dPSv4_tab-all-article-bottom_(300×250)”, [300, 250], “pb-ad-78623” ).addService( googletag.pubads() ) ); } );

googletag.cmd.push(function() {
mobile_slots.push( googletag.defineSlot( “/1005424/_dPSv4_mob-all-article-bottom_(300×250)”, [300, 250], “pb-ad-78158” ).addService( googletag.pubads() ) ); } );

The post How to Turn Your Images into Kaleidoscope Patterns by Megan Kennedy appeared first on Digital Photography School.


Digital Photography School

 
Comments Off on How to Turn Your Images into Kaleidoscope Patterns

Posted in Photography