RSS
 

Posts Tagged ‘Turn’

Cascade Pro Webcam can turn more than 100 popular cameras into webcams on macOS

16 Jul

While the likes of Canon, Fujifilm, Panasonic and others have released firmware updates or dedicated apps to turn cameras into webcams, not every camera owner is lucky enough to have their camera’s manufacturer release such utilities. Thankfully, there are third-party developers stepping up to the plate to help bring webcam functionality to many more cameras.

One of the latest attempts is from Cascable, a development team known for making wireless remote, tethering and transferring solutions for iOS and macOS devices. The team’s newest creation is Cascable Pro Webcam, a new macOS app that will turn compatible Canon, Fujifilm, Nikon, Olympus, Panasonic and Sony cameras into a webcam for popular video conferencing and streaming programs.

Over 100 cameras are supported by Cascable Pro Webcam, with some even offering wireless connectivity if the camera has built-in WiFi. Cascable has a full list of compatible cameras on its website. Note that in order for the camera to be supported, it must have a checkmark under the ‘Control & Automation’ column on the linked page.

The highlighted (red) column is what determines whether or not your camera is compatible with Cascade Pro Webcam.

As for the video conferencing and streaming apps it supports, the Cascade team says it’s specifically tested it with Google Chrome, Microsoft Edge, Microsoft Teams, OBS Studio, Quicktime Player, Skype (8.59 or later), Twitch Studio and Zoom (5.0.5 or later).

Cascable Webcam Pro is available to download for free to try out. The free trial doesn’t limit how many times you can use it, but not all features will be available and streams will show an overlay when they last more than five minutes. Cascable Pro Webcam will retail for $ 40, but until July 24, it’s just $ 30 as part of a ‘launch sale.’ You can download the free trial and purchase a license on the Cascable website. You need to be running macOS 10.14.4 or higher.

Articles: Digital Photography Review (dpreview.com)

 
Comments Off on Cascade Pro Webcam can turn more than 100 popular cameras into webcams on macOS

Posted in Uncategorized


PhotoGIMP for Linux tries to turn GIMP into a more Photoshop-like experience

24 Jun

For Linux users, Adobe doesn’t offer any of their Creative Cloud software, including Adobe Photoshop. Linux users have long had GIMP, which is a capable photo editing alternative to Photoshop. Although similar in functionality to Photoshop, GIMP’s default appearance is quite a bit different. With a new patch for GIMP 2.10, called PhotoGIMP, users can achieve a much more similar user interface to Photoshop.

PhotoGIMP’s major contributors are Diolinux and yevklim, and the PhotoGIMP Patch has been designed for people with experience with Photoshop. As pointed out by John Aldred at DIY Photography, more users have been turning to Linux for their operating system needs. The result is that there are photographers used to Photoshop who are now needing to learn the ropes with GIMP instead. When you boot up the standard version of GIMP, you immediately see that the layout of tools is very different from Photoshop. Not only this, but the keyboard shortcuts users have committed to memory often work differently in GIMP. This is where PhotoGIMP comes in. By making GIMP look and act more like Photoshop, it should dramatically reduce the learning curve.

As you can see in this screenshot, PhotoGIMP looks quite similar to Adobe Photoshop in terms of organization, tool location and the overall user interface. Image credit: PhotoGIMP on Github

The primary features of the PhotoGIMP patch for GIMP are as follows:

  • Similar tool organization and layout to Adobe Photoshop
  • Hundreds of new fonts that mimic those available in Photoshop
  • New Python-based filters, such as ‘heal selection’
  • Default settings maximize the space on the canvas
  • New splash screen
  • Following Adobe documentation, in-app shortcuts are set similarly
  • New icon and name using a custom .desktop file

YouTube channel Novaspirit Tech recently published a video overview of PhotoGIMP, including a quick comparison showing the differences in user interface between the standard version of GIMP and PhotoGIMP.

While PhotoGIMP does not include all the same tools and features of Photoshop, it appears to look the part. For installation instructions, refer to the PhotoGIMP github page.

Articles: Digital Photography Review (dpreview.com)

 
Comments Off on PhotoGIMP for Linux tries to turn GIMP into a more Photoshop-like experience

Posted in Uncategorized


The ShiftCam ProGrip wants to turn your smartphone into the ultimate camera rig

19 Jun

Shiftcam is a maker of smartphone imaging accessories best known for its 6-in-1 lens slider cases and ‘Pro’ line of accessory lenses which were all launched via successful crowdfunding campaigns.

Now the company has returned to Kickstarter with a new project: the ShiftCam ProGrip. The ProGrip is a smartphone grip designed to emulate the ergonomics of a larger camera, like a DSLR or mirrorless model. Shiftcam says it wanted to create a product that combines the accessibility and convenience of mobile phones with the familiarity and control of a traditional camera.

Landscape orientation

In addition to a quite substantial hand grip the ProGrip features a Bluetooth shutter button and a pivot construction that allows for quick rotation of the phone from landscape to portrait orientation or vice versa. This means you can shoot photos or video in any orientation without altering your hand position on the grip.

Portrait orientation

Other camera-like features include a cold shoe mount that allows you to attach lighting accessories or external microphones, and a 1/4″ tripod mount. The ProGrip also comes with a built-in battery and can charge your device wirelessly using the Qi standard. ShiftCam says the battery’s 5200 mAh capacity roughly doubles your phone’s battery life.

ProGrip with accessories

Unlike previous ShiftCam cases the ProGrip is not meant to be used with a specific smartphone model but designed to work with a long list of devices including most recent Apple, Samsung, Google, LG, Huawei and Xiaomi high-end models. ShiftCam also says that ‘based on market intelligence from our case manufacturer’ the new grip will be compatible with the yet to be launched Apple iPhone 12 series.

The ProGrip doubles as a hands-free dock with charging capability when not used for image or video capture. Thanks to the pivot design it can adjusted for content consumption or video calls.

The ProGrip doubles as a charging stand.

The ProGrip will be available in two colors, Charcoal and Putty, and backers can choose from a range of pledging options on the project’s Kickstarter page. $ 99 secures you a basic grip. The $ 119 version includes some basic accessories, like a strap or pouch. For those who have more money to spend there are also dedicated photo, video, macro and ultra-wide kits that come with accessory lenses, with pricing around the $ 200 mark. The $ 399 Pro kit includes pretty much all available accessories and a total of seven lenses.

Shipping expected for November 2020. More information is available on the ShiftCam website.

Press release:

ShiftCam’s latest release of an innovative ergonomic battery grip will take mobile photography to the next level. Transforming Your Mobile Device into a Professional Camera in Seconds

San Francisco, CA — (June 12, 2020) – ShiftCam, a global mobile photography gear company, has announced the launch of their latest product — ProGrip — that will be a game-changer of mobile photography for both enthusiasts and professionals. The ShiftCam ProGrip Launch will live on Kickstarter on June 16 at 1PM EDT (url: https://www.kickstarter.com/projects/shiftcam/progrip-areassuring-battery-grip-for-all-mobiles). This is ShiftCam’s 6th crowdfunding campaign and will be the company’s most ambitions launch yet. ProGrip will be available in two colors, Charcoal and Putty. Backers will also have the option to purchase bundle packs which includes accessories such as lenses and strap to complete the ultimate mobile photography and videography experience.

With the launch of the ProGrip, ShiftCam is on the rise to become one of the trend setters of the Mobile Photography Industry. Understanding that as the cameras on our mobile phones become more advanced and intricate with each new model, external lenses will eventually be replaced in the process. To stay ahead of the game, the designers of ShiftCam went back to their photography roots and asked themselves what is missing from the picture.

The designers recognized that one of the major differences experienced when it comes to
shooting on their phones is that it just doesn’t provide the security and balance of a traditional DSLR camera, especially while shooting for long periods of time across different locations. That is why during product development, the ShiftCam team focused on creating something that focuses on comfort and functionality to further optimize the mobile photography and videography experience. They wanted to create a product that can close the gap by combining the accessibility and convenience of mobile phones, along with the familiarity and control of a traditional camera. Thus, the creation of the ProGrip, an innovative reassuring ergonomic battery grip for your mobiles.

ProGrip is designed as a camera-like grip that allows users to securely and comfortably carry and shoot on their mobile phones. With a built in Bluetooth shutter button, you even can click and photograph like you would with a traditional camera. ProGrip also doubles as a Qi wireless battery bank which can charge your mobile phones as you shoot so you are ready to take on your next adventure. With a universal fit and a built-in pivot rotation, ProGrip can be seamlessly snapped onto most of the mobile phones and rotated to take the perfect shot. In addition, the designers also incorporated features such as cold shoe mount and 1/4″ tripod screw to the ProGrip, so you can attach your favorite accessories to complete the ultimate mobile photography and videography experience. As a bonus feature, ProGrip can also be used as a charging hands free dock for those Netflix marathons or video calls.

“We started ShiftCam with the idea to provide the tools to help safeguard the ophisticated
emotion called life and the memories that make us who we are,” said KL, founder and CEO of ShiftCam. “It is our passion for ShiftCam to be your help with the making of memories. After all, the best part of memories is making them, which is why we strive to create the best possible tool for our customers to do so, with their mobiles on the go.”

Over the last three years, the ShiftCam team has worked diligently to perfect their products. Their previous campaigns include the MultiLens cases for iPhones, as well as the ProLens Series which feature 6 distinct professional grade lenses that can be attached to mobile phones. Also, ShiftCam was notified as an honoree of the 2020 CES Innovation Awards. Prior to that, the company was honored as a recipient of the 2018 Red Dot Design Award winner and CES innovation Awards winner. ShiftCam has also been recognized by well-known media such as Mashable, CNET, Forbes, Tom’s Guide and D Preview etc. With the launch of ProGrip, ShiftCam will establish itself as one of the industry’s top players.

To learn more about ShiftCam’s ProGrip launch visit: https://progrip.shiftcam.com/


Disclaimer: Remember to do your research with any crowdfunding project. DPReview does its best to share only the projects that look legitimate and come from reliable creators, but as with any crowdfunded campaign, there’s always the risk of the product or service never coming to fruition.

Articles: Digital Photography Review (dpreview.com)

 
Comments Off on The ShiftCam ProGrip wants to turn your smartphone into the ultimate camera rig

Posted in Uncategorized


Video: Turn almost any mirrorless or DSLR camera into a high-end Zoom webcam on macOS

13 May

Fuji X-Photographer Kim Farrelly recently published a video explaining how to use a mirrorless or DSLR camera as a webcam with Zoom without using a capture card. The tutorial is only applicable to macOS, enabling photographers who are now working from home to utilize the camera hardware they already own rather than having to purchase a standalone webcam, which are increasingly hard to find.

Though the tutorial may seem a bit intimidating to users who are less tech-savvy, it’s fairly simple. Firstly, users are advised to check whether their camera supports tethering and live view, something that can be done on the Capture One website.

Assuming the camera does support these functions, the user must first download Zoom followed by XCODE from Apple onto their computer using the following command in the Terminal application:

  • xcode-select –install

After Xcode is installed, use the following command in terminal to open up access to use external cameras with Zoom:

  • sudo codesign –remove-signature /Applications/zoom.us.app/

The path in the second line of code must be the same as the path where Zoom is installed on the Mac. By installing Xcode and executing these two lines of code, Farrelly explains that Zoom will be able to use external webcams — or, in this case, a mirrorless or DSLR camera.

The process requires two additional applications called Camera Live and CamTwist, in that order, as well as a USB cable for tethering the camera to the computer. Farrelly explains that Camera Live version 13 works “100%” with his Fuji X-T2, but it’s unclear whether this version is needed for every camera model.

Farrelly walks viewers through this entire process, including some notes and links in the video’s description on the processes that will ‘piggyback’ each application so that the camera can ultimately be used as a webcam for Zoom video calls. Viewers who experimented with the process also dropped some additional tips, such as adding a zoom effect in CamTwist in order to remove the black bars from the video feed.

Articles: Digital Photography Review (dpreview.com)

 
Comments Off on Video: Turn almost any mirrorless or DSLR camera into a high-end Zoom webcam on macOS

Posted in Uncategorized


Canon’s new software will turn select EOS, PowerShot cameras into webcams for Windows 10 PCs

29 Apr

As more and more people desire higher-quality video communication over internet while working from home due to the COVID-19 pandemic, the demand for webcams has increased dramatically, triggering incredibly high prices, sometimes three to four times over MSRP. And that’s if you can find one at all.

To help bridge a growing gap, Canon has announced the release of the EOS Webcam Utility Beta, a program for that will, with a single USB cable, turn compatible Canon EOS interchangeable lens cameras (ILCs) and PowerShot cameras into dedicated webcams on PCs running the 64-bit version of Windows 10.

‘In unprecedented times, it’s imperative for Canon to provide our customers with useful, simple and accessible solutions to assist them in whatever imaging needs they have,’ says Tatsuro ‘Tony’ Kano, executive vice president of the Canon U.S.A., Inc. Imaging Technologies & Communications Group in the press release. ‘Our goal is that the EOS Webcam Utility Beta software can help reduce some of the remote workday stress for employees who are tasked with video conferencing and virtual meetings.’

A list of the EOS and PowerShot cameras currently supported.

Downloading the EOS Webcam Utility Beta must be done from the downloads page of your supported camera’s product page on Canon’s website. Thankfully, Canon has created a library on its dedicated EOS Webcam Utility Beta page linking out to the appropriate page for each supported camera. Once to the camera’s download page, simply click the download button to start downloading the installation file.

Being it’s a beta program, Canon is asking for feedback pertaining to the application, which can be left on Canon’s dedicated forum.

Articles: Digital Photography Review (dpreview.com)

 
Comments Off on Canon’s new software will turn select EOS, PowerShot cameras into webcams for Windows 10 PCs

Posted in Uncategorized


Video: How to turn any room in your house into a giant camera

26 Mar

Photographer and DIY camera-extraordinaire Brendan Barry has shared a how-to video showing how you can turn a room in your home into a camera, and how to record the images it creates. Throughout the 30-minute video, he shows whole process from finding a suitable room and picking a lens right through to making the exposure and then creating a positive print. Although he shows the process using black and white photographic paper he also explains how pictures can be made using digital cameras.

‘It’s a bit of fun really’ Brendan explained to DPReview, ‘and a fun way to do something creative if you are confined to the house during this Coronavirus outbreak. I love the process as it playfully breaks down how pictures are made and allows us to see photography in a different way.’

In the video Brendan shows the effects of a series of lenses mounted onto a blacked out window, including a lens from a pair of glasses and a magnifying glass, but says if DPR readers want to get the best possible quality they should be picky about what lens they use. ‘In the video I quickly show a process lens. If you have one, this is what will give you the best results. They are designed to make very big prints and will allow you extra clarity and resolution. They don’t have to be expensive, and decent ones can be found on auction sites. If you measure your wall and find it is 2 metres across you’ll need a 2500mm lens, but you don’t have to make prints that big!’

‘If you are going to use a magnifying glass find a good quality one, not one with a cheap plastic lens – and the bigger the better. If it turns out to be too big you can always reduce the aperture by cutting a circular hole in a disc of card and sticking it over the lens. This will control the amount of light passing through it on a bright day. In the video I show a very roughly cut-out hole, but a smooth and even hole will produce better results. You can also buy great meniscus lenses from Amazing Camera Obscura that are ideal for making a room-sized camera.’

The projected image from the window shown from behind on a sheet of diffusing material

The tutorial shows Brendan mounting a sheet of photographic paper to make a paper negative that, once processed, is then contact printed with another sheet to create a final positive print. ‘I really like this process, and making the contact print while the original negative is still wet creates a beautiful soft look that can’t be got back once the negative has dried. However, if you’d rather shoot using a digital camera you can photograph the projected image from behind, as I show in the video, or you can project the image onto a high quality smooth white surface and photograph that from the front. Position your camera right next to the lens mounted on the window. You won’t be able to shoot it absolutely square-on, but you can fix the distortion in software afterward.’

‘Blacking out the window and mounting the lens only takes about an hour, but there are days of entertainment to be had once you get going.’

Making a room into a camera is one of Brendan’s more straight-forward projects; in the past he’s made a camera from a melon, another from a loaf of bread and one from a slab of cheese. He also has a shipping container that serves as camera and darkroom all-in-one.

You can see some of the other cameras Brendan has made, and how he made them, on his web site.

Articles: Digital Photography Review (dpreview.com)

 
Comments Off on Video: How to turn any room in your house into a giant camera

Posted in Uncategorized


YouTuber uses AI to turn historic 1911 New York trip footage into colorized 4K/60p video

26 Feb

In 1911, Swedish company Svenska Biografteatern captured footage of a trip to New York, resulting in more than eight minutes of video that, in its original form, is quite low resolution with a low frame rate.

Various efforts over the years have attempted to improve the resolution, frame rate, colors and other details with different results, but one of the best edits thus far comes from Denis Shiryaev, who recently shared the edited video on Reddit.

According to the video’s description, as well as a comment left by Shiryaev on Reddit, the project involved four neural networks, including DeOldify. In all, the various neural networks managed to increase the framerate to 60 fps, increase the resolution to 4K, bump up sharpness and even colorize. This is one of multiple videos Shiryaev has upscaled and improved; other examples include a video from the Apollo mission and ‘Arrival of a Train at La Ciotat’ from 1896.

Articles: Digital Photography Review (dpreview.com)

 
Comments Off on YouTuber uses AI to turn historic 1911 New York trip footage into colorized 4K/60p video

Posted in Uncategorized


How to turn your DSLR into a Digital Pinhole Camera

17 Oct

The post How to turn your DSLR into a Digital Pinhole Camera appeared first on Digital Photography School. It was authored by Adam Welch.

how-to-turn-your-dslr-into-a-digital-pinhole-camera

For all the advances made over the last 190-some-odd years of photographic history, at its primordial core, a camera is a highly simplistic apparatus. Our cameras are just light-proof boxes except for an opening that allows a small amount of light to enter. Any photograph ever made owes its creation to the technology of the camera obscura, from the Latin words meaning “a dark box” or “a dark room.” These magical devices project images consisting of light rays which pass through a singular, relatively small opening (aperture), thus casting the inverted scene inside the darkened space. If you were to add an optical element (lens) and an image receptor (digital sensor, film, other material) then, my friends, you have yourself an essentially modern camera system.

how-to-turn-your-dslr-into-a-digital-pinhole-camera

Even today, some cameras operate without lenses, relying only on the raw essentials of image-making to produce a photograph. These are “pinhole cameras” and consist of the bare-bones of photo-making – a light-proof box with an aperture and an image receptor.

A pinhole camera is, in fact, so easy, so simple, that you can morph your current DSLR or mirrorless digital camera into a surprisingly efficient pinhole camera. You can do so, using only a few basic materials that you likely already have on hand.

Not only is making your own digital pinhole camera a great project for all ages, but it is also an excellent way to “reset” yourself if you’ve become a little burnt out with your current photography gear.

For lack of a better phrasing, using a pinhole camera is arguably the most “pure” form of photography you can practice, in terms of tools involved. Let me show you how to turn your DSLR into a pinhole camera.

What you’ll need

As with most things, you can make your digital pinhole camera as simple or as complicated as you would like. For this example, I’m going to show you the most basic construction method I have used thus far. Now, let’s get down to business.

Materials:

  • An interchangeable lens digital camera. Although there is little chance of damaging your camera, I still recommend using a camera that you don’t rely upon daily. The reason being that you will have a small opening in which dirt or moisture could enter your camera. For our example, I’m using the back-up for my back-up; a Canon 7D MK1.
  • Aluminum foil
  • A pin or thumbtack
  • Tape. Preferably opaque such as electrical or gaffers tape
  • Scissors

how-to-turn-your-dslr-into-a-digital-pinhole-camera

That’s it! Yes, really. This is the basic materials that you need to turn your camera into a digital pinhole camera.

A brief introduction to pinhole photography

Before we continue, let’s take a quick time-out to talk about a few of the basic principles of pinhole photography. First of all, this is not going to be a tutorial for making a perfect digital pinhole camera.

Believe it or not, although incredible lacking complication, pinhole photography is an extremely nuanced craft. There are formulas for figuring out the optimum aperture size (the pinhole), and how to determine the actual F-stop you will be shooting to calculate exposure.

Even though we’ll be forgoing the complexities, it’s still good to have grounded knowledge in the principles of pinhole photography before you start.

Focal length

For our purposes, the focal length of your pinhole camera will be practically equal to the focal flange distance (FFD) or your camera. The FFD is just a fancy way of saying how far it is from the lens mount of your camera to the image sensor plane. Most cameras will have a symbol that demonstrates the image plane location.

How to turn your DSLR into a Digital Pinhole Camera

Check out this handy database over on Wikipedia for finding the FFD for your particular camera. In our case, the FFD is 44mm, which is also our effective focal length. This will come into play when we learn about optimal aperture size for the pinhole camera; which we’re about to talk about right now.

Optimal aperture (pinhole) size

Believe it or not, there is a beautifully elegant equation derived by none other than Joseph Petzval which helps us to determine the best size for the opening of our pinhole camera based on the focal length. In our case the FFD, and the wavelength of light. The equation is as follows:

How to turn your DSLR into a Digital Pinhole Camera

In the formula “d” is the diameter of the pinhole, “f” is the focal length, and lambda (the “l” with a kickstand) is the wavelength of light. Unless your goal is to make an extremely precise pinhole camera, you can essentially forgo all of the information in this section. Still, if you’re a camera nerd like me, it’s cool to know.

So, based on our formula, my “optimum” pinhole diameter is about .011mm, which is TINY. In fact, if we were to manage it, our effective aperture at 44mm focal length would be about F/157. Again, this is all just food for thought, and it won’t actually play into our final pinhole. You won’t need to crunch any numbers to turn your DSLR into a digital pinhole camera. So let’s move on to the good stuff!

Putting it all together

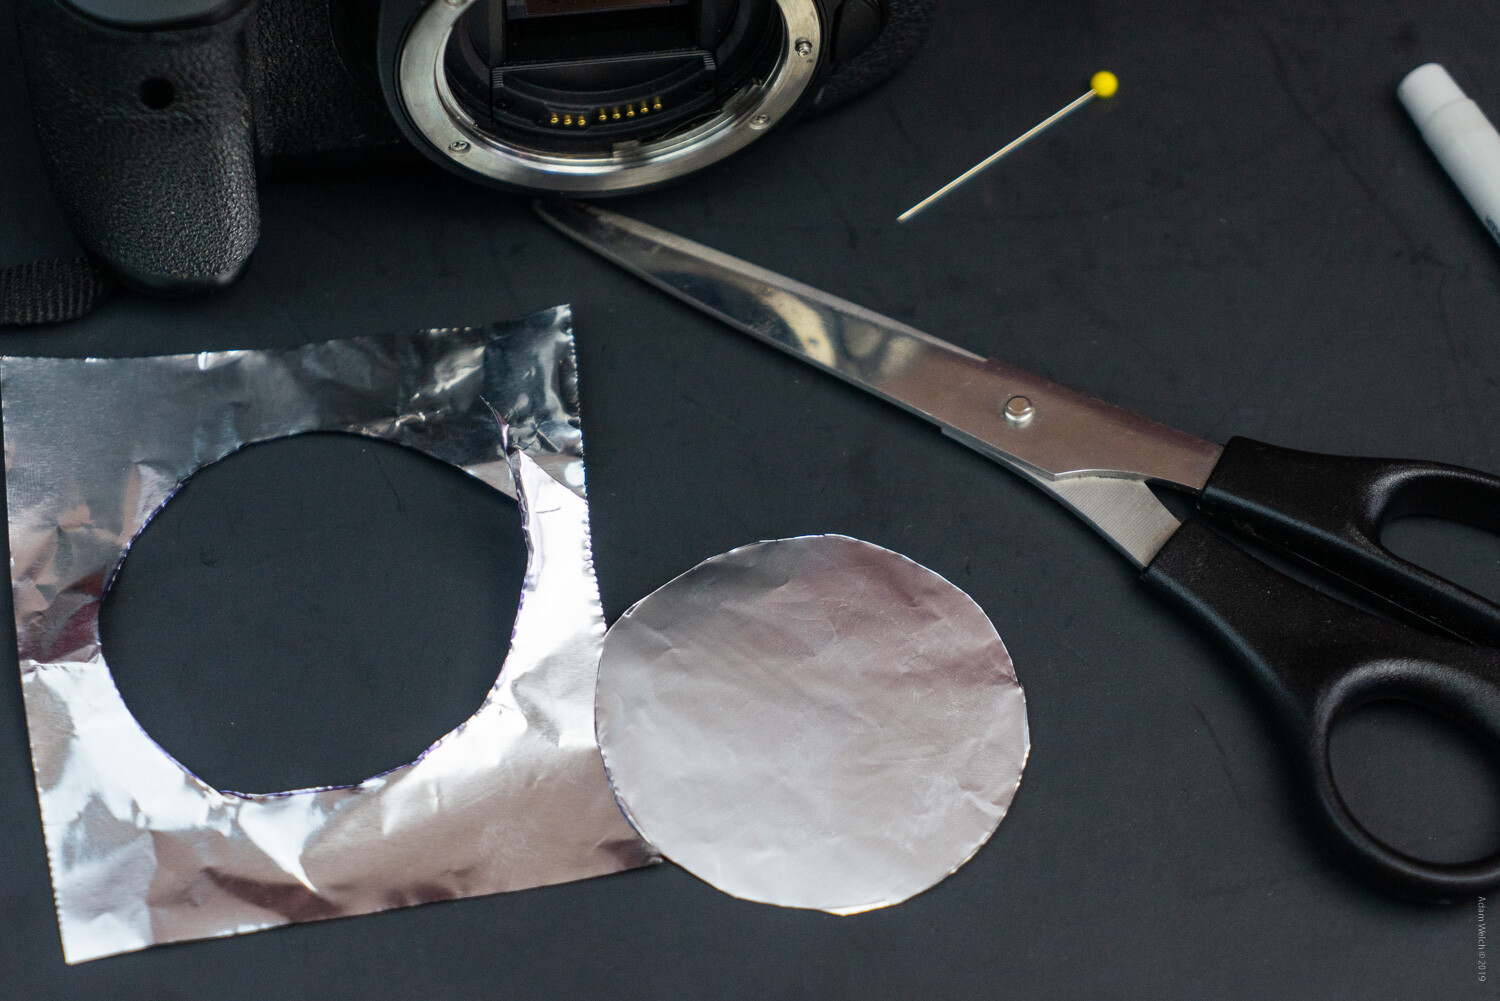
Now, let’s get to making our pinhole camera. As we’ve said before, this will be an extremely simple construct. We’ll begin by cutting out our aluminum foil diaphragm. This is the operable component of the entire system, as it will be what we eventually use to form our pinhole aperture.

Keep in mind that aluminum foil has a shiny side and a matte side. This will come into play later. A piece of foil 3×4 inches (7.6×10.2cm) should be plenty for almost all cameras.

Image: Shiny side…

Shiny side…

Image: …matte side.

…matte side.

Creating the Aperture

I like to use the front cap for the camera to trace a rough outline for the diaphragm. Just flip the cap over and this will give a good approximation of the front surface of the camera flange. Feel free to trace the outline on either side of the foil. Don’t worry if you don’t have a front cap to use as a guide, cut the foil as best as you can, making sure to leave some overlap.

how-to-turn-your-dslr-into-a-digital-pinhole-camera

Remember to trace the cap (if you have one) face down.

How to turn your DSLR into a Digital Pinhole Camera

Throughout the cutting process, try to keep the foil as unwrinkled and flat as possible.

how-to-turn-your-dslr-into-a-digital-pinhole-camera

Next, it’s time for our bravery test. We need to make our pinhole now. If you remember from earlier, our “optimum” pinhole size is .011mm. Of course, we won’t be able to achieve this exactly, so the best we can hope for is to make the smallest hole with the tools we have on hand. The pin I’m using has an approximate diameter of .77mm, which is still much larger than our optimum calculated hole size. So we’ll try to make the opening as small as possible using just the tip of the pin.

Lay the foil shiny side up on a semi-firm surface like a cutting board, or in our example, a piece of poster board. Aim for the approximate center of the foil disk and lightly press down with the pin. Don’t attempt to press the pin completely through the disk. Just a small amount of pressure will likely be sufficient to puncture the foil.

How to turn your DSLR into a Digital Pinhole Camera

And there you have it; our freshly minted pinhole.

how-to-turn-your-dslr-into-a-digital-pinhole-camera

From here, it’s just a matter of fixing our new pinhole diaphragm to the front of the camera.

Mounting the pinhole

Center the pinhole diaphragm as close as possible to the lens mount of your camera. Then, carefully tape the foil to the lens flange. I’m using a few pieces of electrical tape. It’s a good idea to use tape that is as opaque as possible and one which won’t leave excessive residue on your camera once it’s removed. Again, keep the foil as flat as you can.

How to turn your DSLR into a Digital Pinhole Camera

how-to-turn-your-dslr-into-a-digital-pinhole-camera

Begin at the outsides of the foil and be sure that the tape seals the diaphragm as tightly as possible. After this, I like to add a few more pieces of tape to the front of the foil for added strength. A delicate touch is required here. Be mindful not to cover your pinhole!

how-to-turn-your-dslr-into-a-digital-pinhole-camera

I know it’s difficult to believe, but you’ve just made a pinhole camera!

Tips for shooting with your pinhole camera

As you have likely already assumed, pinhole cameras make use of relatively small apertures. As such, shooting with them will require longer exposure times. So, a tripod will always be a good idea to have on hand for your pinhole work. Furthermore, it will be complicated to compose your images visually. However, this doesn’t mean that you can’t shoot your pinhole camera handheld!

Here are some suggestions for getting the most out of your pinhole camera when shooting with and without a tripod:

  • Bump up that ISO. Use the highest ISO you are comfortable with in order to bring the required shutter speed into a manageable range for handheld shooting.
  • Forget the viewfinder. While it’s perfectly acceptable to keep the camera held to your eye, it won’t benefit you all that much. Try shooting with the camera in a “waist level” configuration, holding it close to your body for added stability.
  • Pinholes love long exposures! Try mounting your pinhole camera on a tripod and lowering your ISO for some great long exposure images. That small aperture is your friend when it comes to super long exposure photography.
  • Protect your camera. Remember, you are now shooting without the protection of a lens. Even though the pinhole is extremely small, dirt and moisture can still make their way into the internal components of your camera.
  • Be ready to observe any and all dirt present on your sensor. Seeing as you will be shooting at extremely narrow apertures, any specs of dust or dirt on your camera’s sensor will be readily apparent.
  • Try a few extra pinholes. There is no rule saying you have to limit yourself to a single aperture. A few additional pinholes can produce some amazing effects. Experiment with different numbers and configurations of pinholes.
  • Embrace the blur. By its very nature, pinhole photography is imperfect. Remember that the beauty of working with a pinhole camera stems from the simplistic nature of the method itself.
  • Pinhole photography works great in black and white. Converting your pinhole images to black and white can change the entire dynamic of the photo.

Here are a few examples of images I made with my converted pinhole DSLR:

How to turn your DSLR into a Digital Pinhole Camera


How to turn your DSLR into a Digital Pinhole Camera

How to turn your DSLR into a Digital Pinhole Camera

How to turn your DSLR into a Digital Pinhole Camera

How to turn your DSLR into a Digital Pinhole Camera

How to turn your DSLR into a Digital Pinhole Camera

How to turn your DSLR into a Digital Pinhole Camera

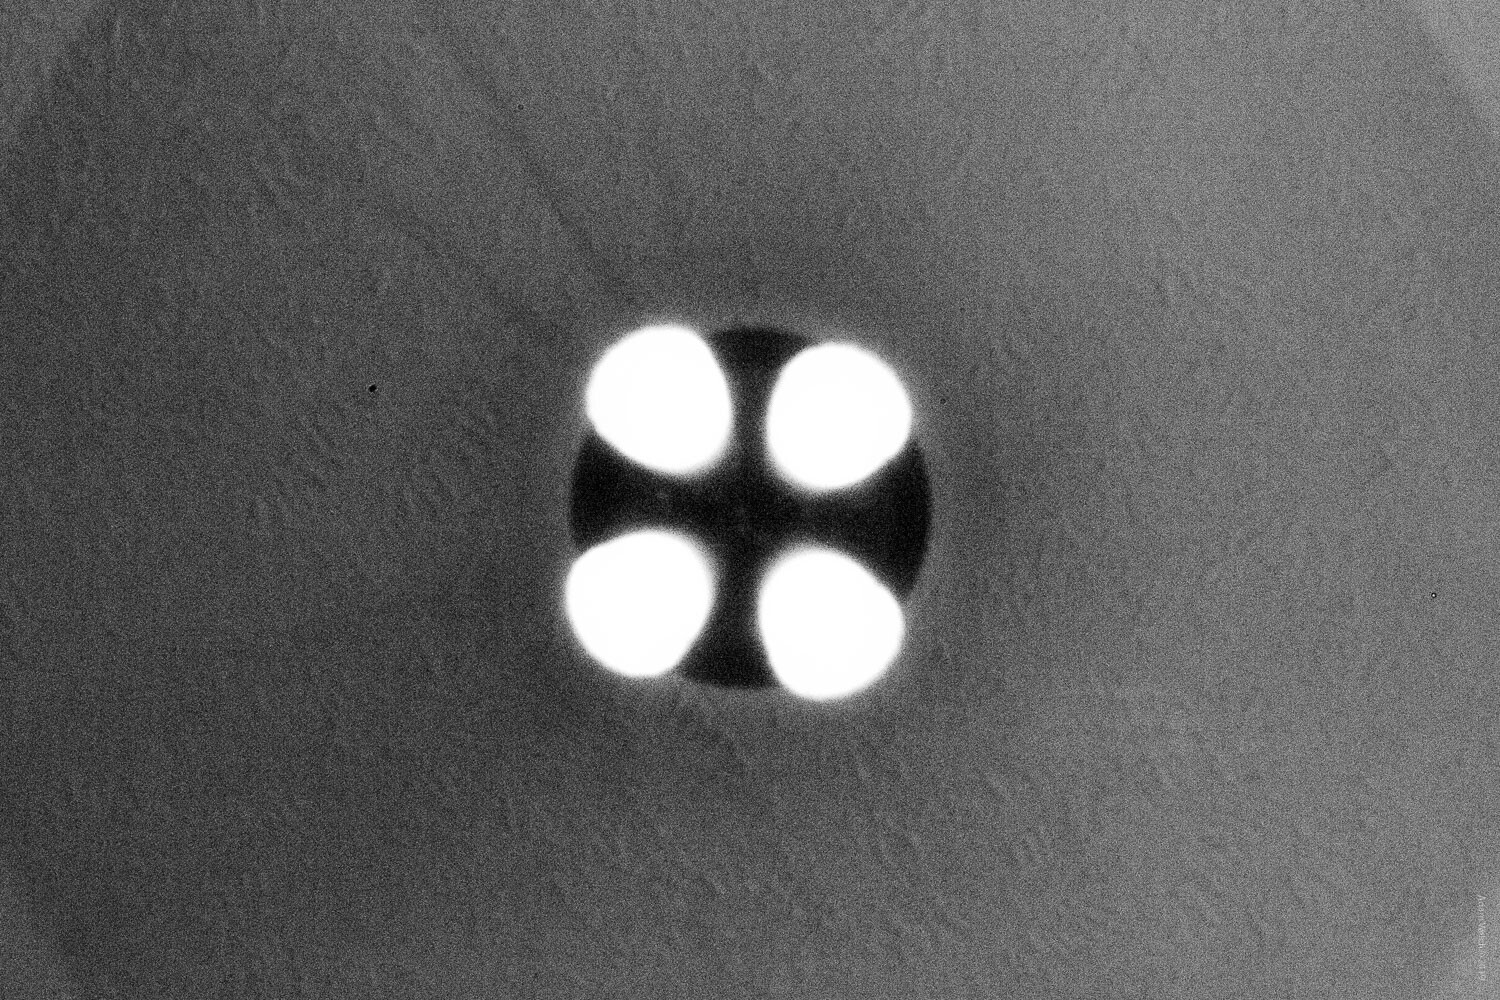
These last two images were made after I introduced three additional pinholes…

how-to-turn-your-dslr-into-a-digital-pinhole-camera

how-to-turn-your-dslr-into-a-digital-pinhole-camera

Ways to improve your pinhole camera

You can make more heavy-duty pinhole apertures using more sturdy materials and by more precisely measuring and cutting your pinholes. Of course, this means additional work and will likely require much more advanced tools. Still, we can make our pinhole camera perform much better through some simple ingenuity.

The best way to up-the-ante of your digital pinhole camera is by adding a bit of flocking to the inside surface of the diaphragm. Flocking is just a way of reducing reflections and glare inside of the camera by darkening the components that might produce these sorts of problems.

Even though we faced the matte side of the foil inward (told you this would come into play), we can still help further reduce the reflections by darkening the inside of the foil. The easiest way to do this is to use a black permanent marker to darken the inside surface of the diaphragm.

Image: Careful not to color over the pinhole. The aperture is extraordinarily delicate.

Careful not to color over the pinhole. The aperture is extraordinarily delicate.

This will help to reduce stray light rays that can degrade image quality. An even better solution is to add dark tape to the inside of the diaphragm. This will make for a much more efficient flocking material. If you plan to add tape flocking, it’s a good idea to apply it prior to making your pinhole. Again, leave a small amount of room around the aperture so that the diaphragm remains as thin as possible.

How to turn your DSLR into a Digital Pinhole Camera

Final thoughts on pinhole cameras

While I was making the images for this article, I realized what might be the greatest benefit of turning your DSLR or mirrorless camera into a pinhole camera; it makes you forget. What I mean by this is that when you use such a simple camera, most of your worries over composition and tack-sharp focus seem to fall away. It’s an odd feeling, really.

What’s more, given the fact that you’re shooting at such small apertures, it produces an enormous depth of field. This means that the entire scene will technically be “in focus.”

At the same time, you know that without the benefit of a lens, the entire photo will simultaneously be less sharp, even dreamlike. When operating under these conditions, it forces us to strip away our pretenses and focus (photo humor) on the core values of our images.

If you’ve never used a pinhole camera before, I hope that this tutorial has shown you that it is incredibly easy to turn your DSLR into a digital pinhole camera. Follow the steps shown here, and you can have a digital pinhole camera in your hands in less time required to read this article.

Have you ever used a pinhole camera? If so, be sure to share your thoughts and images in the comment section below!

Author’s note: While the method shown here poses little risk to your camera, I strongly urge you to only attempt projects such as these using equipment that you wouldn’t mind being damaged. As always, use good judgment and proceed at your own risk.

The post How to turn your DSLR into a Digital Pinhole Camera appeared first on Digital Photography School. It was authored by Adam Welch.


Digital Photography School

 
Comments Off on How to turn your DSLR into a Digital Pinhole Camera

Posted in Photography


Emojivision uses computational photography to turn your photos into emojis

04 Sep

A free new camera app for iOS called Emojivision allows you to capture images composed entirely of emoji. The app was created by Gabriel O’Flaherty-Chan, according to TechCrunch, which reports that Emojivision uses computational photography to break an image down into its core color palette, then rebuilds it using similarly colored emoji in near-real-time.

The app can be used to take any image, as with the native camera app, and also to apply the emoji filters to existing images located in the phone’s camera roll. The app is free, but enthusiastic users can pay $ 2.79 USD to get additional emoji packs. For developers, the Emojivision project is located with technical details on GitHub.

Articles: Digital Photography Review (dpreview.com)

 
Comments Off on Emojivision uses computational photography to turn your photos into emojis

Posted in Uncategorized


How to Turn Day to Night Using Photoshop for Urban Landscapes

19 May

The post How to Turn Day to Night Using Photoshop for Urban Landscapes appeared first on Digital Photography School. It was authored by Ana Mireles.

Have you ever wished you’d photographed something at night? You may not have had the time, knowledge, or gear to do it, but you still regret not getting that shot.

In some cases you may be able to return at night and have another go. But if you can’t, you can quickly turn day to night with Photoshop.

In this article I’ll show you how you to turn your daytime urban scene into a nighttime one using layers and masks. I’ll also give you a few tips on the details you should take care of for a more realistic effect.

But first I want to explain the idea behind this technique so you can apply it to all kinds of photography.

The blue night and the yellow light

You may have noticed that different lights have different colors. Sunsets are redder and warmer than the sunlight at noon. The table lamp from your bedroom is more yellow than the fluorescent light of an office building. And so on.

This is called the color temperature, and is measured in Kelvin degrees. (You can see it in full in this color temperature scale.) And you can take advantage of it to simulate night time by colorizing your image accordingly.

Make it night

First, you need to change the white daylight into a dark blue that corresponds to the night light by adding a blue layer. You can do this in various ways, although I find the easiest way it to select Layer -> New Adjustment Layer -> Color Lookup… from the menu and clicking OK.

From the Properties panel, open the top drop-down menu and choose any option that gives you a blue tone such as Moonlight, Foggy night, or Night from Day.

If you’re more experienced, and want to to have full control, you can work with a RAW file. At the top of the adjustment panel of the ACR window is a slider where you can adjust the color temperature. You can also enter the Kelvin degrees value you want directly according to the scale I mentioned before.

Turn the lights up

Next, create another layer that’s yellow or amber. If you’re using Adjustment Layers, remember to duplicate of the original first and then add the color one on top of it. If you’re sticking with the Color Lookup adjustment layer style choose Edgy Amber or Candlelight. Once you have it, merge the adjustment layer with the copy you created from the original.

If you’re doing it from ACR, don’t just duplicate your layer. Use the Create a New Smart Object via Copy option instead, or the first layer will go yellow too. You can find this option by right-clicking the layer and choosing it from the menu. Then double-click on the thumbnail to open ACR again and drag the slider to the yellow side.

You now need to add a mask to this yellow layer. You can do this by clicking on the Layer mask button on the bottom of the panel. Once you’ve created it, click Invert in the properties panel. We do it this way because the white mask will show all the content and the black one will block all of it. (To learn more about it, check out Getting Started with Layer Masks in Photoshop – a Beginners Tutorial.) For now you’ll want it all covered so you can paint only what you need to in the next step.

The yellow corresponds to the tungsten light from light bulbs, which you can use to paint lamp posts, windows and any other source of light that might be available during night time. Identify these sources and, using the Brush tool, start painting in the Layer Mask with the brush set to white.

For windows, I find it easier to paint the entire rectangle and then paint out the divisions with the black brush.

This also works for any corrections or detailed work. If you paint something by accident, change the color of the brush to black and paint back over it to cover it again. This is why we’re using masks. The work is non-destructive, and you can easily go back and forth.

The Giveaways

It’s up to you how much work you want to put into the transformation. But keep in mind that the more details you do, the more realistic the effect looks.

For example, the lamp will shed some light onto the wall where it’s hanging, so you’ll want to illuminate that part as well. With the same Brush tool you were using, diminish the opacity from the Options Bar and paint the wall where the light would be hitting. Keep diminishing the opacity as you get further away from the light source.

Another big giveaway is reflective surfaces because light would reflect onto them. In this example, the water in the canals needs to have reflected light. But it may also be needed for cars or puddles, so keep an eye on your scene and paint those as well.

There you have it: from day to night using nothing more than  layers and masks.

I hope you enjoyed this technique. I recommend you go out and do some night photography so you can learn how light, tones and colors behave. The more you understand it, the better you will be able to replicate it in post-production.

If you need some help getting started, check out The Ultimate Guide to Night Photography.

And to get some inspiration for your next digitally created night scenes, here are two great articles:

  • Creating Moods with the Kelvin Scale
  • After Dark – 22 Night Photography Images.

The post How to Turn Day to Night Using Photoshop for Urban Landscapes appeared first on Digital Photography School. It was authored by Ana Mireles.


Digital Photography School

 
Comments Off on How to Turn Day to Night Using Photoshop for Urban Landscapes

Posted in Photography