RSS
 

Posts Tagged ‘Skin’

How to Photograph Mixed Skin Tones

29 Aug

by Elena Wilkins

If you ever had my family as your clients, you could feel a tad lost at how to photograph us. Why? Well, there are three of us, and we come in a wide range of skin tones—from my fairly light skin, to my husband’s, pretty dark and handsome; our child fits right in between. We are a true colored family—a perfect fusion of all tones—a photographer’s conundrum, or, maybe even, a nightmare!

Who do you expose for? The mom? The child? Or the father? All three of us would need different camera settings… or a few tricks to make magic happen.

Because very few photographers get enough experience to properly shoot families like mine, or people of darker color in general, and even fewer know to properly process such images to perfection, we always find it hard to find the “perfect” photographer for us. I remember the first time I organized a multi-photographer photo shoot in the Northwest (Washington State), and brought my husband to it—he was everyone’s favorite model to practice on, since he happened to be the very first person of darker hue for most of the photographers at the event. Since I am the photographer and often the subject in our family images, I have been able to perfect these skills.

In this post I will share a few of my tricks, which helped me successfully satisfy not only my picky taste, but many of my darker complexion clients, as well as families, much like mine, with mixed skin tones.

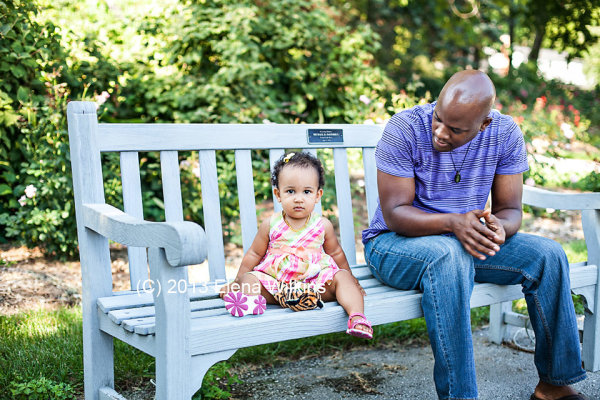
But first, meet my colorful family.

My perfect child. It is the mother’s right to think that her child is the cutest and most perfect :) .

How-to-Photograph-Mixed-Skin-Tones-5

The beautiful duo—both loves of my life.
How-to-Photograph-Mixed-Skin-Tones-4

How-to-Photograph-Mixed-Skin-Tones-3

Things to keep in mind for this post:

  1. as a photographer, I use only natural light—I shoot almost exclusively outside, on location, and barely ever use fill flash, even with darker skin people;
  2. studio techniques for photographing people of color or mixed skin tones might be slightly different—I will not be covering them in this post;
  3. I do not use reflectors, since I shoot solo, but they might be helpful, if you have an assistant;
  4. I shoot RAW, so that I could easily adjust highlights and shadows in post processing;
  5. when I refer to people of color, I mean ALL people, since all of us are of some color :) ,
  6. I live by a motto: get images right in the camera as much as possible to cut down on post processing time—I usually spend no more than 30-60 seconds per image in post processing.

5 Tips and Tricks to Photograph People of Color

1. It’s all about clothing

If at all possible, I ask my dark skin complexion clients not to wear white clothing. It makes life easier. In cases of wedding, as you can imagine, this is not an option. Sometimes I do have clients who want to be wearing white clothing specifically—I never say no! I will discuss how to make those images magical in post processing shortly.

During my initial consultation with clients, we discuss best clothing options for the shoot, depending on the look we want to achieve and the mood they want to create. Often my clients come with a few sets of clothing to the shoot and a wide range of jewelry (for the ladies, and I help them coordinate to create the best, and the most magical images.
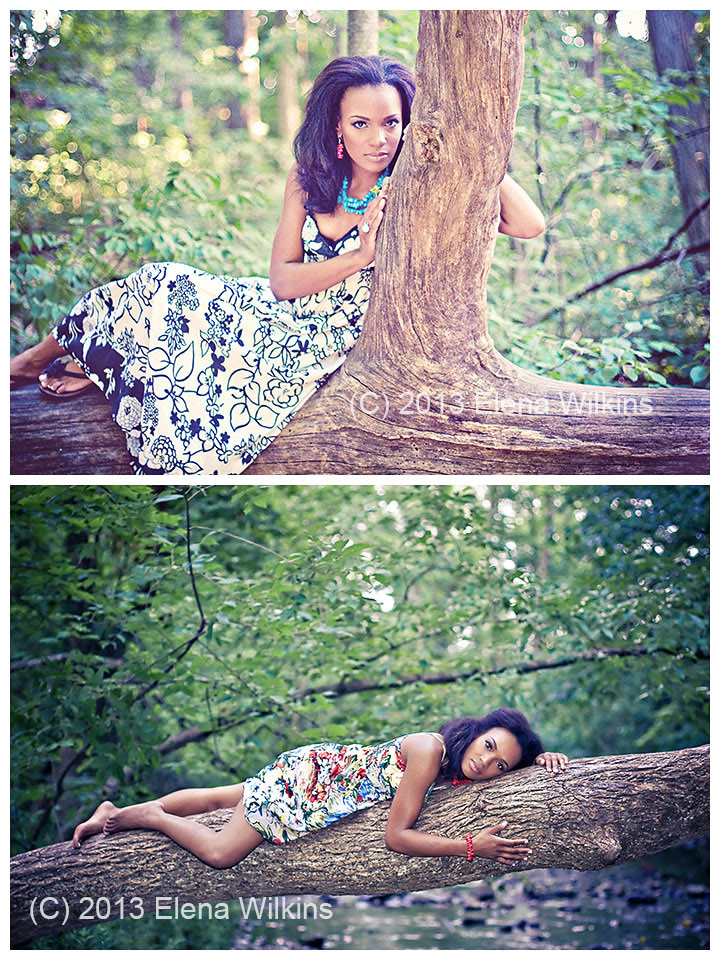
I coordinated every piece of clothing and accessories for this shoot, at my client’s request

I coordinated every piece of clothing and accessories for this shoot, at my client’s request

2. Away from Bright Lights

I love to shoot either early in the morning or in the evening, when the sun goes down, lavishing its golden rays to create perfect magic. In cases, especially with weddings, if that is not an option, and I have to shoot in the afternoon sun, I look for evenly shaded areas, so there is no competition between the natural light and my subjects’ skin. If all else fails, I do use fill flash.
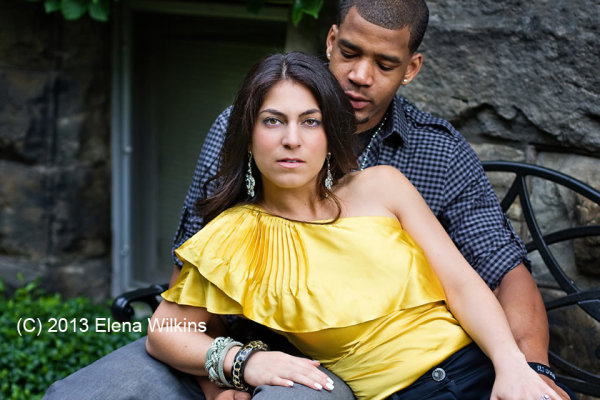
This image was shot in an evenly shaded area, away from harsh light. I exposed for Francesca’s face.

This image was shot in an evenly shaded area, away from harsh light. I exposed for Francesca’s face.

3. Expose for the Skin

When shooting a darker skin complexion person, expose for the face. Get the face right, and the rest of the image will fall into place.

If she is wearing complimentary colored clothing, concentrate on getting perfect skin tone, so you won’t need to spend too much time in post processing, and also have something to show your client during the shoot to inspire her with her beauty.
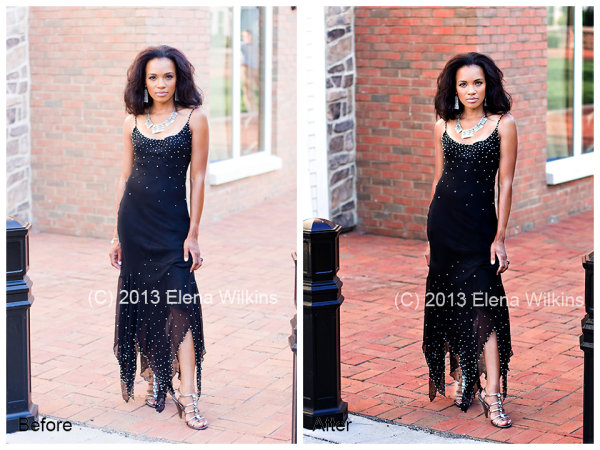
Courtnee’s face was my focus; the brick, as gorgeous as it is, was easily darkened back to its beauty in post processing with a quick action and a few brush strokes

Courtnee’s face was my focus; the brick, as gorgeous as it is, was easily darkened back to its beauty in post processing with a quick action and a few brush strokes

4. Balancing Whites and Darker Skin Tones

If your clients are wearing light clothing, especially true with weddings, make sure not to blow out highlights, so you can adjust it in post processing. This is why I shoot RAW, without exception, when it comes to weddings. I want to make sure I still can tone down my whites in post processing.
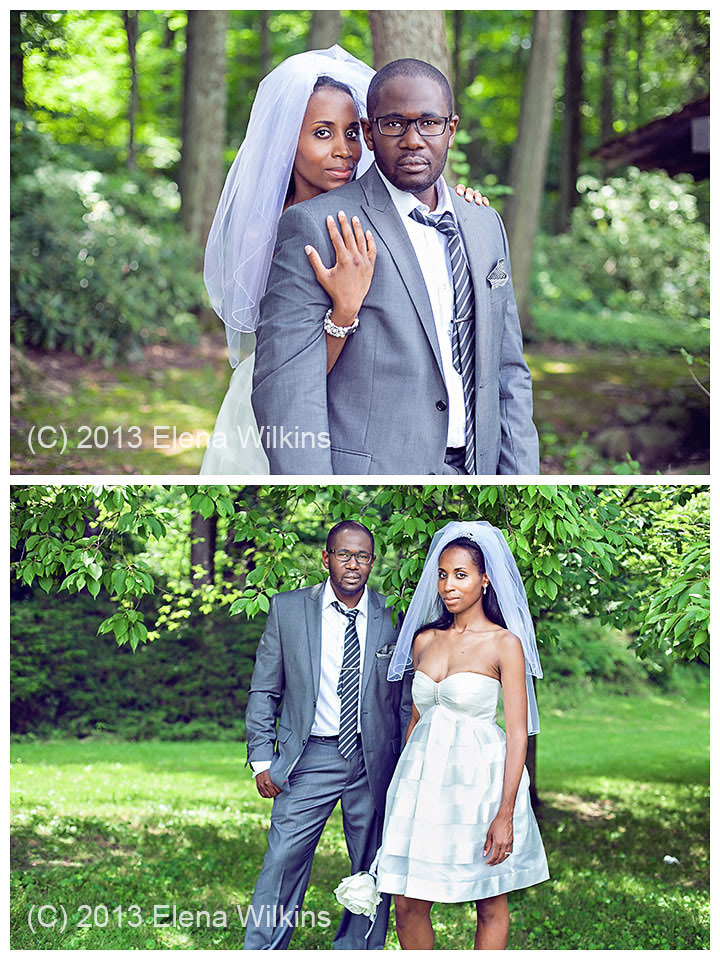
In these images I focused on my clients’ faces, making sure not to blow out whites, so I would still get detail in the dress, the shirt and the veil in post processing. In post processing, I used Bridge/Camera Raw, I brought down highlights and whites, bumped shadows, and then finished magic in Photoshop, selectively processing areas of the images that needed extra attention.
In these images I focused on my clients’ faces, making sure not to blow out whites, so I would still get detail in the dress, the shirt and the veil in post processing. In post processing, I used Bridge/Camera Raw, I brought down highlights and whites, bumped shadows, and then finished magic in Photoshop, selectively processing areas of the images that needed extra attention.

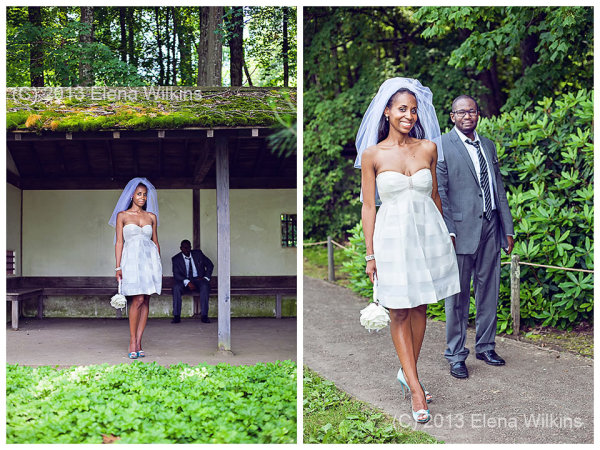
In these images I exposed for Candice, since she was the focal point of the images, and ensured that whites were not blown out, so they could be fixed, if needed, in post processing

In these images I exposed for Candice, since she was the focal point of the images, and ensured that whites were not blown out, so they could be fixed, if needed, in post processing

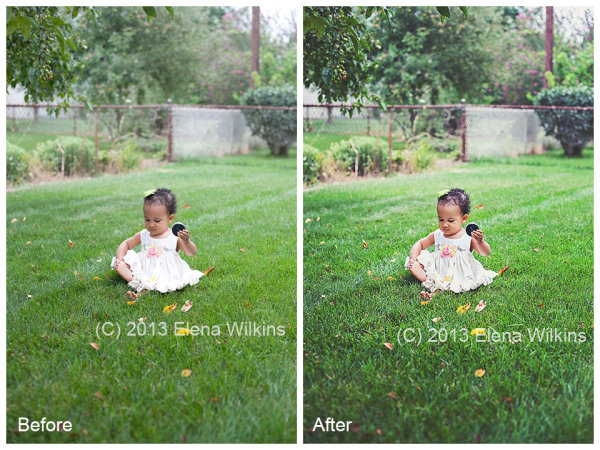
In this image of my little girl, she was facing away from direct light, I made sure to get her face just right, in camera, which left some of the highlights in her dress just a tad too bright. Not to worry! I was able to fix that in post processing, in less than 20 seconds!
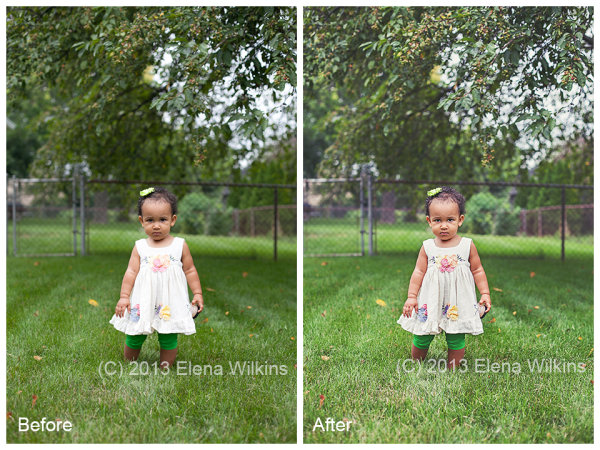
In this shot, since she was facing direct light, I made sure not to blow out highlights, so, her face turned out a tad darker, but the dress was not blown out. In post processing I lightened the face and darkened the dress. The image turned out magical, although she might not have been too happy to be interrupted for the image during her playtime.
In this shot, since she was facing direct light, I made sure not to blow out highlights, so, her face turned out a tad darker, but the dress was not blown out. In post processing I lightened the face and darkened the dress. The image turned out magical, although she might not have been too happy to be interrupted for the image during her playtime.

I will mention actions used in processing these two image at the end of the post

I will mention actions used in processing these two image at the end of the post

5. Go for the Mid-Range: Photographing Mixed Skin Tones in the Same Image

If you are photographing people of different skin tones in the same image, go for the mid-range; the rest can be adjusted in post-processing. I always make sure that the lightest person is not too light, while the darkest person is not too dark. If the lightest person turns out too light, you might have a case of blown highlights, and no Photoshop tricks will fix that. If the darkest person turns out too dark and you will try to adjust it in post processing, there might be too much digital noise on that person’s face, compared to the rest of the image.
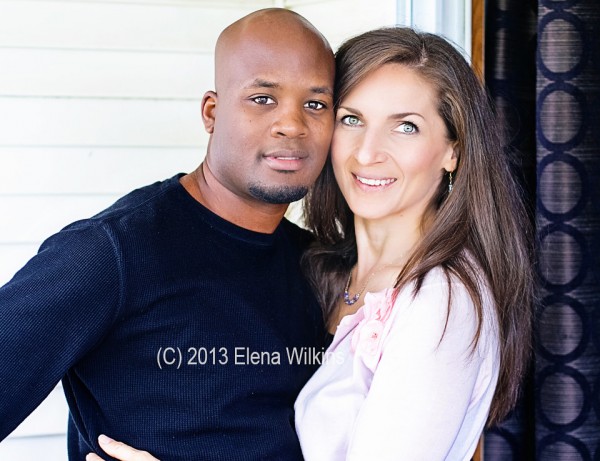
When I photograph my husband and myself, I usually take a couple of test shots to make sure I do now pale completely next to him. Having over ten years of experience, however, these days I normally do a quick test shot with just him in it, since I know how I would look next to him.

When I photograph my husband and myself, I usually take a couple of test shots to make sure I do now pale completely next to him. Having over ten years of experience, however, these days I normally do a quick test shot with just him in it, since I know how I would look next to him.

Magic Happens in Post Processing

How to Post Process Images with Mixed Skin Tones

While batch processing is the best thing since sliced bread, as you can imagine it is not always possible in situations such as I just described. Batch post-processing can be done only to a point—you could not just throw all images of clients with mixed skin tones into Lightroom and have magic happen. Some selective image post-processing (processing only parts of the images) will need to be done.

Most of us are visual people, so instead of trying to explain something with a thousand words, I created a ten minute video to show you how I photograph and post-process images of clients with mixed skin tones to perfection.

How to Photograph Mixed Skin Tones from Elena Wilkins on Vimeo.

Here are the images used in the video, and, as promised, a list of actions I used in post-processing.
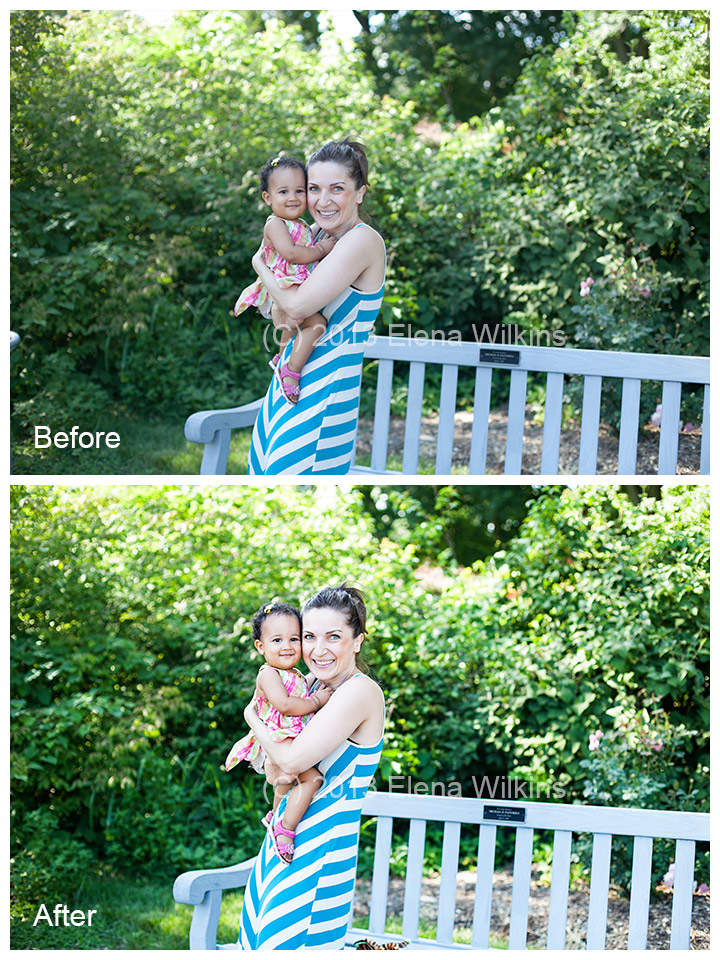
How-to-Photograph-Mixed-Skin-Tones-2

Actions used:

  • Boost action from Pioneer Woman Set 1 (used to boost tones for the entire image)
  • Touch of Light | Touch of Darkness by MCP Actions (used selectively)
  • MCP High Definition Sharpening action by MCP Actions (used for the entire image)
  • Polished Picture Sparkling Eyes by Polished Picture (used to sharpen eyes only)
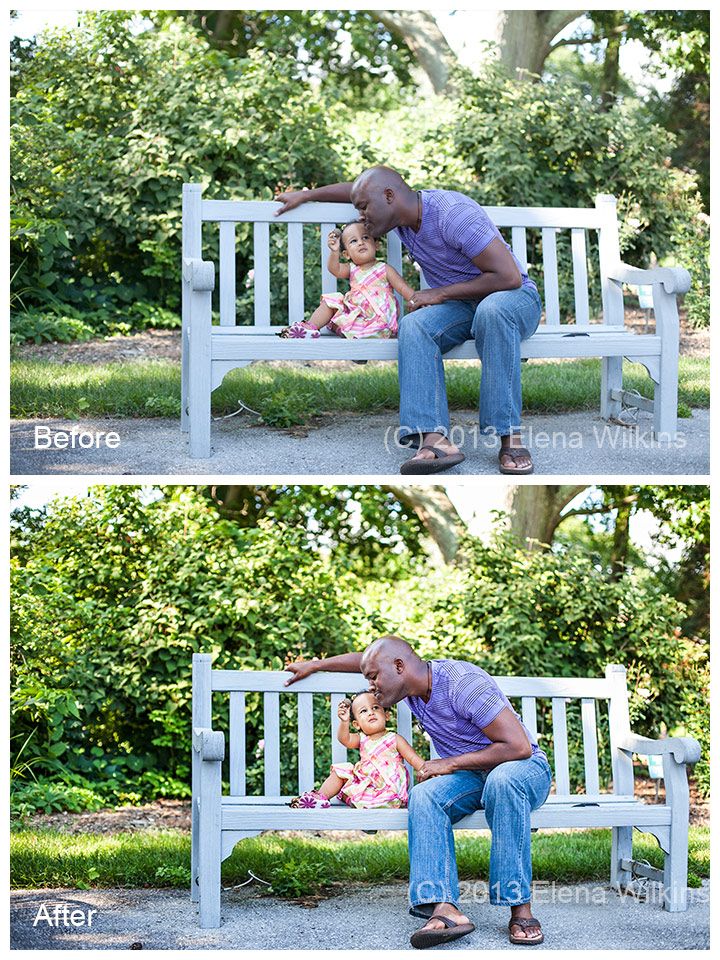
same set of actions used to process this image

same set of actions used to process this image

In the two images of my little girl, after adjusting them in Bridge/Camera Raw (I decreased highlights to -82, bumped up shadows by +50 and added contrast at +24), I used the same actions as in these images, with an addition of:

  • Polished Pictures Funky Curves (Ruby curve at 40% and Matte curve at 25%, I then painted back her face at 60%).

I hope that having read this post you will feel more equipped to photograph people of color and know how you can create magic in post-processing.

Happy Shooting!

Elena Wilkins is a lifestyle and wedding photographer. Since becoming a Mom, she took a break from full-time photography, concentrating on raising her baby and running a health and nutrition blog Vegalicious, which is filled with images of delicious foods and her colorful family. She still photographs occasional weddings and sessions, dedicating herself to serving people who need her expertise the most—people of color and families with mixed skin tones. She is getting ready to relaunch her photography web-site, Color Fusions, which she will dedicate to sharing tips and tricks of the trade, and serving her colorful clients.

Post originally from: Digital Photography Tips.

Check out our more Photography Tips at Photography Tips for Beginners, Portrait Photography Tips and Wedding Photography Tips.

How to Photograph Mixed Skin Tones


Digital Photography School

 
Comments Off on How to Photograph Mixed Skin Tones

Posted in Photography


Basic Skin Smoothing in Photoshop

22 Aug

I’ve always said that the best Photoshop is the Photoshop you never even notice.  I encourage my students to get it right in the camera, because my belief is that imaging software is a tool, not a crutch.  To quote commercial/portrait photographer Zack Arias, “If you find yourself saying, ‘I’ll just fix that later in Photoshop,’ stop what you’re doing and slap yourself as hard as you can.”  When people look at my portraits, I want them to see the personality.  I want them to see the emotion.  I want them to remember a moment in time.  What I don’t want is for them to look at my work and say, “Wow, great editing!”

In a perfect world, the photo shoot goes flawlessly.  The photos are creatively lit and bring out my subject’s personality.  It’s an intersection where subject and photographer come together in a collaborative effort that creates images needing almost no post production.

But since I don’t live or work in anything even remotely resembling a perfect world, Photoshop has become a necessary tool in the arsenal.  A levels adjustment to tweak the blacks.  Maybe a curves layer to bump the contrast.  I try to keep it subtle.  If you are shooting landscapes, it’s easy to let the artist run amok with color and special effects.  HDR?  Sure, go for it!  As a portrait photographer, though, you have to be very careful about not taking the editing and manipulation too far.

What do I mean by “too far?”  Have you ever seen a post-processed portrait where the whites of the eyes are so white that the subject looks like something out of a sci-fi movie?  What about skin so smooth it looks like plastic, totally devoid of any texture?  Any edit that pushes the bounds of reality is– in my opinion– “too far.”  I know there are people who disagree,  but my philosophy is this: whether you are coming to me for wedding/engagement photos, press photos for your band, or a head shot for the dust jacket of your latest book, we are coming together to make a portrait– not a semblance of a portrait.

Like I noted earlier, if I’ve done things properly, my portraits shouldn’t need much processing once they come off the camera.  Usually cropping/sizing.  Maybe a contrast tweak.  And maybe just a little attention to the skin.  But skin has texture.  It has pores.  It can be tricky, so here’s how I handle it.

This is a very old test shot from just before I went professional ten years ago.  Not exactly my finest hour– the pose is a bit awkward, there are multiple hot spots, the background is a mess– I could pick this photo apart for hours.  It is, however, a great image for demonstrating a skin smoothing technique.   There are a lot of different ways of doing this.  I’m not going to tell you that my way is best, but I am going to  tell you that my way is best for me.  It’s a pretty basic, straightforward approach, so it might end up being best for you, too.

First, let’s open up our image in Photoshop.  I’m doing this in Photoshop CS6 (No Cloud yet for me!), but I’ve been using this method for years, so you should be fine, regardless of which version you are using.   Step One is zooming in on our target areas.  Any adjustments you make in Photoshop will be less noticeable if you work on an enlarged view.  You’ll be making smaller, more direct adjustments, and you’ll have a better idea of when to stop.

Zooming in lets you make more direct, subtle changes.

Zooming in lets you make more direct, subtle changes.

Once we’ve zoomed in on our target areas, we duplicate the layer and add a 20-pixel Gaussian blur in the Filters menu.  You’ll immediately see the entire image go very soft.  In the Layers palette, reduce the opacity of the layer to 50%.

Duplicate the background layer in the Layers Menu.

Duplicate the background layer in the Layers Menu.

Add a Gaussian Blur.

Add a Gaussian Blur…

...and adjust it to 20 pixels.

…and adjust it to 20 pixels.

Next we are going to add a layer mask.  Don’t be intimidated.  The only thing a layer mask does is either hide or reveal the effects of the layers below it.  More on that in a little bit.  We are going to add the layer mask by holding down the ALT/OPTION key and clicking the Add Layer Mask icon at the bottom of the Layers palette.  You’ll see your image go back to its pre-blur appearance and a small black box will appear next to the layer thumbnail.

Reduce the opacity of the layer to 50% and add a layer mask.

Reduce the opacity of the layer to 50% and add a layer mask.

Next, select the brush tool.  You can use the bracket keys to adjust the size of the brush.  Pressing the SHIFT key while using the bracket keys will adjust the hardness/softness of the brush.  You’ll definitely want a brush with softer edges.  This will allow your facial edits to blend for a more natural look.  Hard brush edges will stand out.

Select a soft, white brush and adjust the size.

Select a soft, white brush and adjust the size and opacity.

Make sure you are using a white brush.  The opacity of the brush will dictate the overall affect.  The closer you are to 100%, the closer you will be to the original Gaussian blur and we don’t want that.  I generally work with an opacity between 50%-70%.  I usually work at the higher end on female portraits and the lower end on males.  Experimenting with various opacities will show you how they affect the overall look of your image.  If you think you’ve chosen the wrong opacity, simply switch the brush color to black and go back over what you’ve done.  This will replace the part of the layer mask you’ve just removed.  Then readjust your opacity, switch the brush color back to white, and continue with your edits.

Before we go any farther, let’s take a look at what exactly is happening.  When we duplicated the layer and added the blur, creating the black layer mask only covered the blur– it didn’t remove it.  By using a white brush on the black layer mask we are removing parts of the mask, revealing the blur underneath only where we need it.  You’ll notice these areas appearing on the layer mask thumbnail.

You'll see the effects of your brush strokes on the layer mask.

You’ll see the effects of your brush strokes on the layer mask.

Be careful to not brush over features like eyes and lips.  In a good portrait, facial features– the eyes particularly– should be sharp.  You do need to make sure, however, that you are consistent in your edits.  For instance, if I’ve smoothed the forehead and cheeks, chances are that the neck and shoulders are going to need some attention, too.  One sure-fire way to bring attention to your edits is to be inconsistent.  You don’t want some sort of imaginary line between retouched and non-retouched areas drawing attention to them.

The end result is a subtle, but noticeable change.

The bottom line is that skin has texture.  If you over-smooth it you will be left with a portrait that draws attention to the edits, rather than the person.  How much is too much is subjective, but keep in mind what I said earlier about going too far.  This is a technique where a little bit can go a long way.  What I really like about it is that it lets you make these edits in a subtle way, leaving you with a natural-looking portrait.

Post originally from: Digital Photography Tips.

Check out our more Photography Tips at Photography Tips for Beginners, Portrait Photography Tips and Wedding Photography Tips.

Basic Skin Smoothing in Photoshop


Digital Photography School

 
Comments Off on Basic Skin Smoothing in Photoshop

Posted in Photography


Second Skin: Kevlar Backpack for Life & Travel in War Zones

21 Aug

[ By WebUrbanist in Design & Products & Packaging. ]

emergency war zone backpack

For many of the world’s citizens (and travelers), the threat of bodily harm from war or terror attacks is a daily fact of life. Constructed of bulletproof material, this backpack is designed to reduce the risk of personal injury in unstable regions.

emergency disaster survival backpack

Dubbed Rhino Skin (part of Second-Chance Gear) and designed by Hadassah College graduate Hila Raam, the pack’s back and side straps pull forward and wrap around the wearer to form bulletproof vest.

emergency backpack bomb shelter

On top, a likewise projectile-and-debris-resistant hood can be deployed when one hits the proverbial deck upon hearing an air raid siren, helping shield the wearer, if warned, from additional shrapnel injuries.

emergency hooded attack protection

While it will not do much in some  extreme, close-proximity situations (where nothing short of full body armor would help), it does cover the head and torso, protecting vital organs and reducing damage potential from rocket, mortar or bomb strikes.

emergency bullet proof pack

From the designer: the Rhino Skin is “a modular backpack combining kevlar used as a civilian personal protection system in
countries or areas that are under daily attacks, protecting against debris and impact created from missile and rocket attacks.This unique bag pack protects the essential life or death body areas … the head, neck, back and the sides of the body. Most important the brain, heart, liver and kidneys are fully protected.”

Share on Facebook


[ By WebUrbanist in Design & Products & Packaging. ]

[ WebUrbanist | Archives | Galleries | Privacy | TOS ]


WebUrbanist

 
Comments Off on Second Skin: Kevlar Backpack for Life & Travel in War Zones

Posted in Creativity


Skin Retouching Photoshop Tutorial

22 Nov

www.sarakiesling.com http NOTE: I do not offer retouching services to others. I do have a good friend who is a professional retoucher though (and an amazing one at that), and is available for outsourcing – as well as teaching! More information on his classes is available at retouchingclasses.com and his portfolio can be seen at www.solsticeretouch.com Thanks to everyone who has commented on the video, and who has emailed me as a result of this video! I am doing my best to get back to all of your messages, and I sincerely apologize if it takes a while!! I would love to make more videos – please comment below telling me what kinds of things you are interested in learning about! Basic skin retouching using frequency separation and dodging & burning. I use this process on every photo that I do, and I usually spend about 4-5 minutes on headshots like this (and less time on full body shots when there is obviously less detail in the face). This is not intended to be a high-end retouching tutorial – but techniques that can help people who want to do natural-looking retouching while maintaining most of the natural skin texture! Here is the final photo – www.flickr.com The final editing was done with one of my Photoshop actions, available at www.sarakiesling.com 🙂
Video Rating: 4 / 5

 
Comments Off on Skin Retouching Photoshop Tutorial

Posted in Photography Videos


Phish: Skin It Back [HD] 2012-07-03 – Wantagh, NY

20 Nov

Phish performs “Skin It Back” (Little Feat cover) live at Nikon At Jones Beach Theater in Wantagh, NY on Tuesday July 3, 2012. This was the first time played since 7/29/88 – 1417 shows! Watch in HD! Subscribe to my videos for tons of HD Phish!
Video Rating: 4 / 5

 
Comments Off on Phish: Skin It Back [HD] 2012-07-03 – Wantagh, NY

Posted in Nikon Videos


Minecraft (Xbox 360) – ALL Skin Pack 3 DLC Skins + Release Date FRIDAY

04 Nov

Heres a Look at All the Skins thats released to Come in the upcoming Skin Pack 3 DLC. Now Im “Hoping” the Update will come out along with this on Friday i believe when we got the 1.7.3 Update the Skin Pack 2 Came out the same day so who knows. Be sure to LIKE the video if you found it helpful and SUBSCRIBE to stay updated with more thanks for watching. Subscribe to my Channel: bit.ly Twitter: twitter.com Follow Me on Instagram: Bigbst4tz Skin Pack 3 Info: www.oxm.co.uk 4J Twitter:twitter.com Playxbla Twitter:twitter.com Tags: minecraft mine craft xbox 360 editon xbla complete change log list everything arcade 4j studios mojang update after 15th interview confirmed no trailer parody bigbst4tz mcxbox360 finally this month videos tutorial glitch cribs world howto 1.8.2 1.8 1.9 visual 1.2.3 episodes series notch creative mode September 2012 bigbst4tz2 bigbstatz easter eggs food bar first look let’s play howto projects new mods reviews game modes working design animation cartoons movies golem machinima machinimarealm
Video Rating: 4 / 5

Elder scrolls five lets play commentaries commentary dubblejord skyrim oblivion “Elder Scrolls v” “elder scrolls skryim lets play” “Skyrim lets play” Money glitch infant money jordan weapons 80 magic spells mana conjunction Oblivion IV: nord imperial argonian dark elf high wood khajiit orc orsimer sword two hand alteration destruction marksman arrow medieval castles conjuration restoration whiterun

 
Comments Off on Minecraft (Xbox 360) – ALL Skin Pack 3 DLC Skins + Release Date FRIDAY

Posted in Animation Videos


Skin Smoothing with Lightroom 3

03 Nov

Learn how to use Lightroom to smooth skin, then enhance it further and tweak the eyes and the lips to create that model skin finish! Learn how to use the Adjustment Brush Learn how to use Clarity to smooth skin

 
Comments Off on Skin Smoothing with Lightroom 3

Posted in Retouching in Photoshop


Photoshop: Improving skin with the Healing Brush | lynda.com tutorial

31 Oct

This Photoshop tutorial discusses how to reduce and simplify skin variations using the Healing Brush tool. Watch more at www.lynda.com This specific tutorial is just a single movie from chapter four of the Photoshop CS5: Fashion Retouching Projects course presented by lynda.com author Chris…

FREE Download Photoshop CS 6 here: www.creativestation.ru Adobe Photoshop CS6 Image restoration from Black and white to color Picer www.creativestation.ru
Video Rating: 0 / 5

 
Comments Off on Photoshop: Improving skin with the Healing Brush | lynda.com tutorial

Posted in Retouching in Photoshop


Photoshop Tutorail {Change Skin Tone}

22 Oct

www.helpvid.net In this tutorial we will be using the layers palette to apply a skin tone to House actress Jeniffer Morrison; other tools used in this tutorial include the erase tool.
Video Rating: 4 / 5

 
Comments Off on Photoshop Tutorail {Change Skin Tone}

Posted in Retouching in Photoshop


How to Make Skin Tan/Pale Photoshop EASY!! PRO!!!

22 Oct

This is a quick video on 2 different ways to make skin tan, or pale in Adobe Photoshop CS4.Please post any questions or comments. Please rate and subscribe much more to come. Message me if you have any computer problems Mac or PC and I will post an HD video tutorial, or message you back if you prefer. This also applies to hardware issues, and complex programs. THANK YOU!!
Video Rating: 4 / 5

In this video I will show you how to use the color replacement tool. This is a great tool for changing hair color and more. Pick up my DVD with 46 Elements Videos for only .00 at: www.jackstechcorner.com
Video Rating: 4 / 5

 
Comments Off on How to Make Skin Tan/Pale Photoshop EASY!! PRO!!!

Posted in Retouching in Photoshop