RSS
 

Posts Tagged ‘Skin’

Alien Skin Exposure X ‘nondestructive’ photo editor to launch by year’s end

24 Nov

Alien Skin Software plans to release a new ‘nondestructive’ photo editing application called Exposure X by the end of the year. Exposure X will include several changes over Exposure 7, including improvements to the user interface, file management tools, and new keyboard shortcuts. Read more

Articles: Digital Photography Review (dpreview.com)

 
Comments Off on Alien Skin Exposure X ‘nondestructive’ photo editor to launch by year’s end

Posted in Uncategorized


Art Made Flesh: 35 Sculptures Rendered in Human Skin & Hair

16 Jul

[ By Steph in Art & Sculpture & Craft. ]

flesh art tian

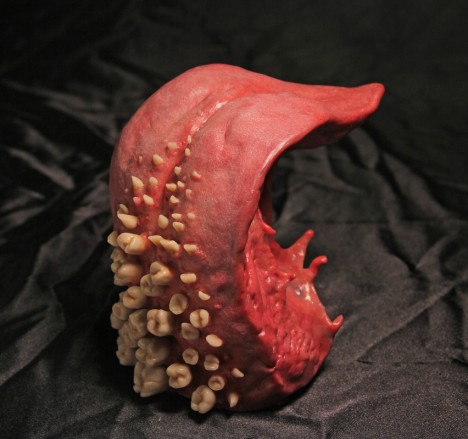
Do these fleshy works of art manipulating human body parts into unnatural shapes make you uncomfortable? That’s probably just what the artist was going for. It’s difficult for us, as humans, to look upon images of our own flesh with emotional detachment, seeing it as we would the meat of other animals, or even as an organic medium for art and architecture. Don’t worry – most of these are not made of actual humans, but rather silicone, polymer clay and wax. Read on for a tent modeled on human intestines, a pillow made of human skin and the world’s grossest pair of stiletto heels.

Jonathan Payne
flesh art payne 4

flesh art payne 3

flesh art payne 2

flesh art payne 1

Jonathan Payne calls these deeply repulsive sculptures ‘FLESHLETTES,’ and that name says a lot. They’re basically lumps of human viscera, teeth, eyes and hair put together into little miniature packages. You probably never wanted to see a nipple with teeth, but here one is, nonetheless.

Andrea Hasler
flesh art tent 1

flesh art hasler 2

flesh art hasler 3

flesh art hasler 4

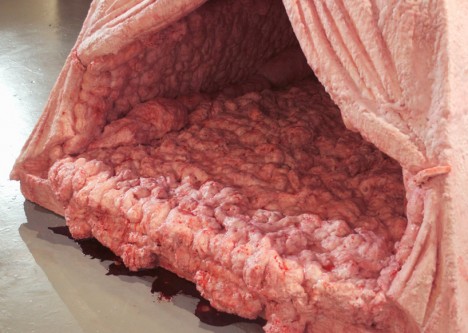
A tent made of flesh, a giant lump of what looks like human fat serenely overlooking a cliff, and a series of disgusting handbags are among the organic works of Swiss artist Andrea Hasler, who aims to humanize objects with ‘emotional surfaces.’ The tent was modeled upon human intestines and is made of polystyrene and wax as well as leather and real blood.

Felix Deac

flesh art felix deac 1

flesh art felix deac 2

flesh art felix deac 3

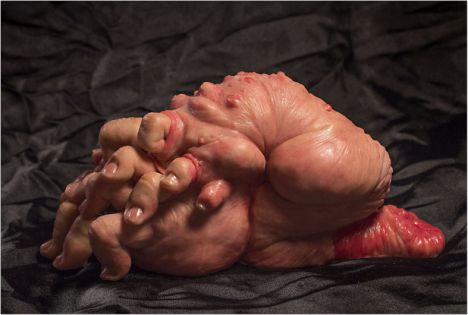
Romanian artist Felix Deac creates amorphous blobs of flesh replete with veins, moles, wrinkles and hair. While some might look like deformed human body parts, most are just abstract shapes reminiscent of nightmarish tumors that have taken on a life of their own.

Patricia Piccinini

flesh art piccinini 1

flesh art piccinini 2

flesh art piccinini 3

flesh art piccinini 4

Patricia Piccinini’s work is so shockingly realistic, photographs of it are often passed around the internet as clickbait, with people wondering ‘what the heck am I looking at?’ The controversial Australian artist creates sculptures of fantastical creatures with extremely human-like skin and hair.

Next Page – Click Below to Read More:
Art Made Flesh 35 Sculptures Rendered In Human Skin Hair

Share on Facebook


[ By Steph in Art & Sculpture & Craft. ]

[ WebUrbanist | Archives | Galleries | Privacy | TOS ]


WebUrbanist

 
Comments Off on Art Made Flesh: 35 Sculptures Rendered in Human Skin & Hair

Posted in Creativity


Easy Portrait Retouching Tutorial without Losing Skin Texture

18 Jun

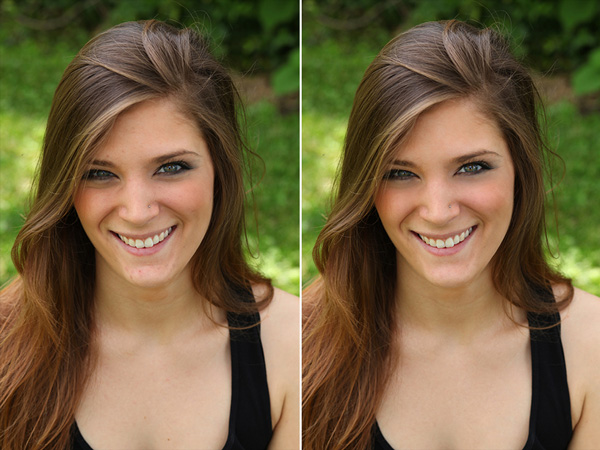
When it comes to skin retouching, less is more. Retouching skin is tricky. You want to enhance it, not beat it to death, make it fresh and glow-y, while still keeping the integrity of the skin. You want to soften wrinkles, not obliterate them. And to bring out their eyes and natural beauty while keeping them looking like themselves. Even Continue Reading

The post Easy Portrait Retouching Tutorial without Losing Skin Texture appeared first on Photodoto.


Photodoto

 
Comments Off on Easy Portrait Retouching Tutorial without Losing Skin Texture

Posted in Photography


3 Tips for Getting Great Skin Tones Using Adobe Camera Raw

10 Apr

Skin tones can be one of the more difficult aspects of a photograph to master. Getting pleasing skin tones will make your image appear more eye-catching and attractive. If you know the right steps to take, skin can be pretty simple to master. Using these three simple tricks, using only Adobe Camera Raw (ACR), your skin tones will appear more balanced and pleasing to the eye.

Before3 1

After3 1

Note: working in Lightroom you can do the this as well, because the sliders and options are the same!

White Balance

When trying to get great looking skin tones, the first thing you should pay attention to is the white balance. Correct white balance will set the stage for great skin tones. If the white balance is too cool, your skin will appear gray or bluish. On the other hand, if the white balance is too warm, the skin will look yellow or orange. Neither of these options are very pleasing to the eye, and make the skin more difficult to work with later on.

To see if your white balance is accurate, use the white balance targeted adjustment tool. It looks like an eye-dropper and is located at the top of the screen. It is the third tool over from the left. Click on the dropper, then click on an area of your photo that is white. The whites of the eyes are a good place to start. This should give you a good indication of where the white balance should be set. If your image still appears too warm or cool to your taste, use the temperature slider located to the right of your screen, it is the first one. Adjust this by sliding it to the right or left until your get a pleasing white balance. You may have to adjust Tint as well.
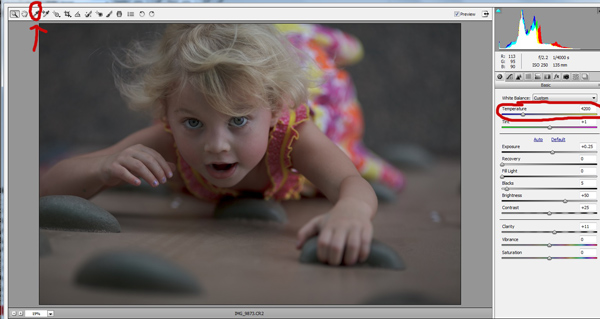
Whitebalance1

Exposure

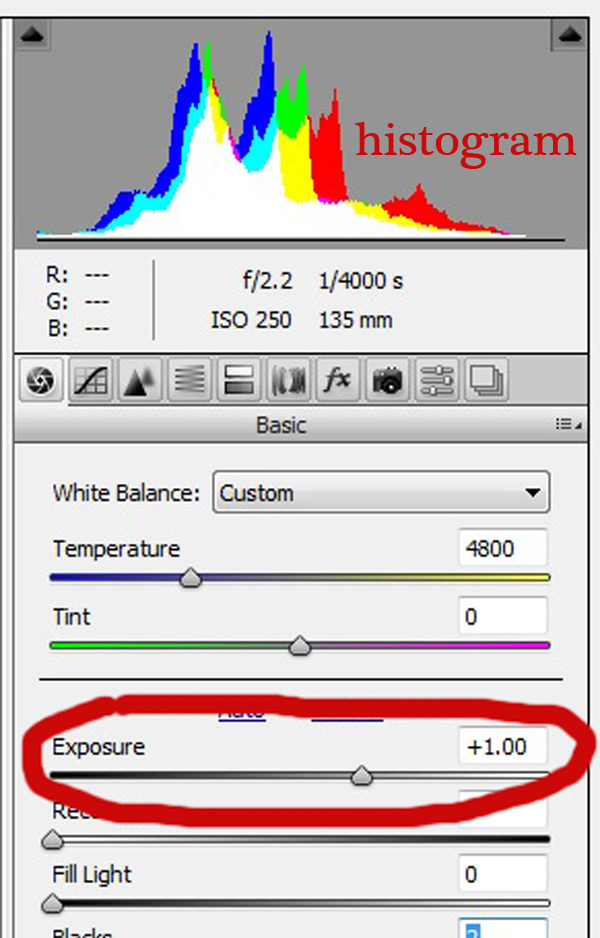
Next, make sure your exposure is correct. Take a look at the histogram located in the upper right hand corner of the screen. Ideally, you want it to look like a smooth bell curve, with the high point of the curve right in the middle. Check to make sure that the curve does not go too far to the left or the right. This may indicate that your photo is over or underexposed, causing your skin tones to either be gray and dark, or too bright and blown-out in some spots.
Exposure 2

If your curve does fall too far to one side, use the exposure slider to fix it. Located three sliders down on the right hand side of your screen, move it either left or right. Watch your histogram. When the majority of the curve is in the middle, you’ve got it! In some photos, there will be parts of your image that are very bright or dark, and cause your histogram to spike on parts of the curve. This happens often when you have a bright sky in the background. If this is the case, your curve will be off the chart on the right edge of the histogram. In an image like this, you would look at where the majority of your curve lies and ignore the parts of the curve that are out of range.

For more information see: How to Read and Use Histograms

Luminance

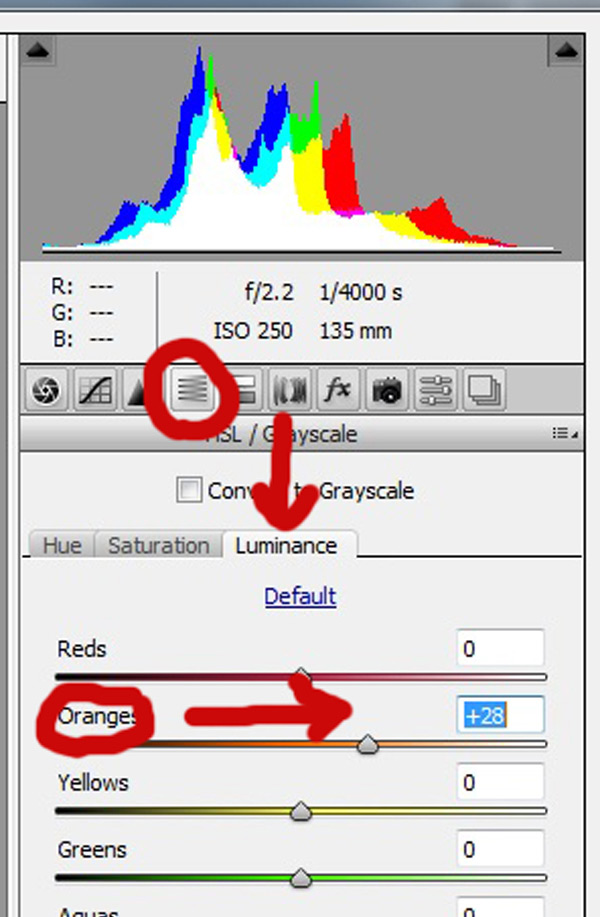
Finally, to give your skin tones just a little more brightness you will want to locate the luminance sliders (look for the HSL panel, the L stands for Luminance). You will see a horizontal strip of buttons directly under the histogram on the right panel. The fourth one to the left is HSL/Grayscale, click on that button. After selecting that option, three tabs will appear. Click on the Luminance tab. Choose the orange slider, which is two down, and move it to the right. You will notice that this affects mainly the skin in your photo and leaves the other areas of the image untouched. The more you move it to the right, the brighter the skin will appear. Keep moving the orange slider back and forth until the skin is the brightness you prefer.
Luminance 2

Before1 1

After1 1

Once you have adjusted your RAW image using these three steps, you can open it up in Photoshop to do any fine tuning or adjustments on the remainder of your photo. Your skin tones, however, should already look great and need little, if any additional work.

Before2 1

After2 1

Do you have any other tips for making great looking skin tones using ACR? Please share them in the comments below.

googletag.cmd.push(function() {
tablet_slots.push( googletag.defineSlot( “/1005424/_dPSv4_tab-all-article-bottom_(300×250)”, [300, 250], “pb-ad-78623” ).addService( googletag.pubads() ) ); } );

googletag.cmd.push(function() {
mobile_slots.push( googletag.defineSlot( “/1005424/_dPSv4_mob-all-article-bottom_(300×250)”, [300, 250], “pb-ad-78158” ).addService( googletag.pubads() ) ); } );

The post 3 Tips for Getting Great Skin Tones Using Adobe Camera Raw by Emily Supiot appeared first on Digital Photography School.


Digital Photography School

 
Comments Off on 3 Tips for Getting Great Skin Tones Using Adobe Camera Raw

Posted in Photography


Alien Skin offers Exposure 7 with Raw support

11 Dec

Alien Skin software has announced Exposure 7, a new version of its flagship film emulation software. This iteration introduces non-destructive Raw editing, supporting files from a number of Canon and Nikon cameras as well as a handful of mirrorless models from Fujifilm, Olympus and Sony. Read more

Articles: Digital Photography Review (dpreview.com)

 
Comments Off on Alien Skin offers Exposure 7 with Raw support

Posted in Uncategorized


How to Correct Skin Blemishes Using the Patch Tool in Photoshop

11 Nov

There are many articles that discuss the overuse of skin smoothing in portrait photography. Photographers strive to find a balance between realistic skin and fixing the imperfections. Obviously, one way to minimize the use of Photoshop for skin issues is to hire a phenomenal makeup artist who can make the skin look realistic and flawless all at the same time. For the times when there are issues with a client’s skin I try to not go overboard and fix every little thing. I want my client to still look like themselves when I am done editing.

UsingPatchToolSidebySideBeforeandAfter_DigitalPhotographySchool_LoriPeterson600

Some photographers use the spot healing brush religiously. I never use it. Instead I use the patch tool. My reasoning is that the Patch tool actually takes samples of the pixels and closely matches them to what you are trying to fix. If the results are not quite right, you can tweak them to suit your needs.

Step 1. Open your image

As you can see my model is absolutely beautiful, but she does have a few blemishes on her skin and we are going to fix those before we give the image to her.

Step 2. Select an area and apply a path

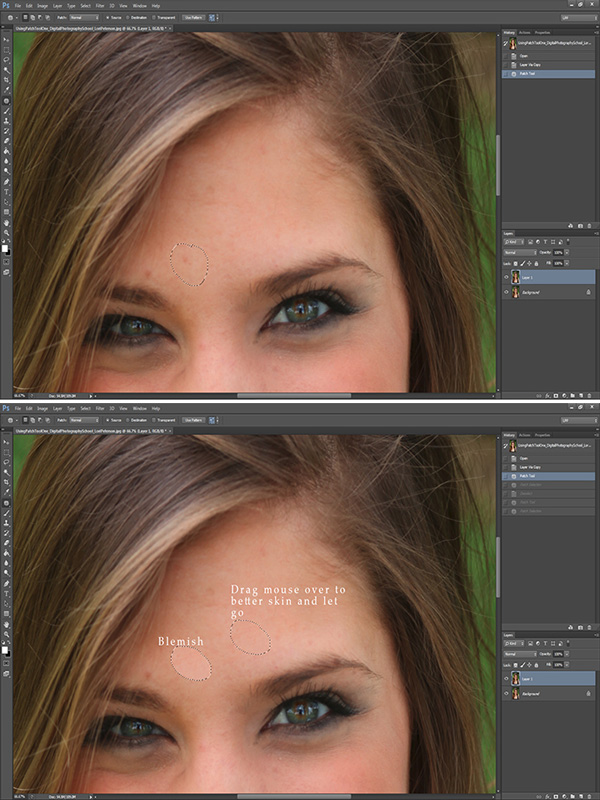
Hit Ctrl or Command + J to duplicate your layer. You can add a Layer Mask in case you want to undo anything later.  Then select the Patch tool and draw around the part of the skin that you want to replace (make sure the “Source” setting is selected to patch the source from the destination so it will use information from the area you drag to fix the blemish). Once selected, keep holding your mouse down and move it over to better spot of brighter skin. The skin does not have to be in the same area where you are working. You can use skin from the neck, shoulder, hand, or wherever you find better, smooth skin.

1UsingPatchToolEdits_DigitalPhotographySchool_LoriPeterson600

Step 3. Repeat and refine

Repeat the process for any other skin issues. Just keep circling the area you want to replace and dragging the circle over to a clean area. If you change something you did not want to or it doesn’t look right you can use your layer mask to hide it or you can click undo (Cmmd/Ctrl+Z).

Step 4. Reduce dark circles under eyes

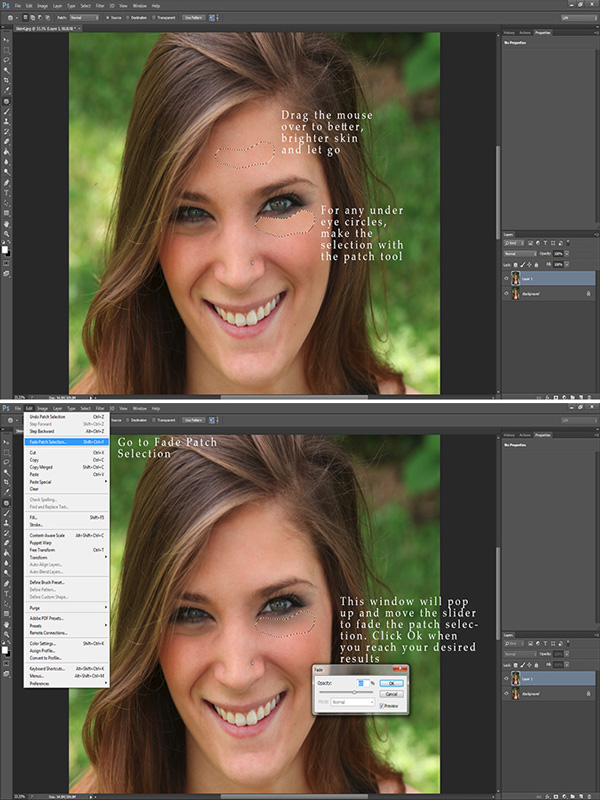
Most of the time you will find that some dark circles under the eyes are showing. While it’s actually normal, we want our clients or models to look bright eyed.  If you want to decrease these, simply use the patch tool and circle the under eye area. Drag that circled area over to better skin. The result will be very harsh if left like that, so fade the technique. Go to Edit > Fade Patch Selection and a pop up window will appear. Lower the slider until the fade looks like it will blend in. Repeat the process for the other eye. The percentage of fade you use may not be the same on both sides, depending on the lighting.

2UsingPatchTool_DigitalPhotographySchool_LoriPeterson600

Step 5. Review and merge layers

Once you finish, you will see that the skin looks much better and smoother, but the details of the skin are still there without being overly fake looking. If you are satisfied, merge your layers. If you are going to do any further edits, go to your History in the Layers Palette and make a snapshot of the image so you can always come back to it.

Step 6. Brighten eyes optional

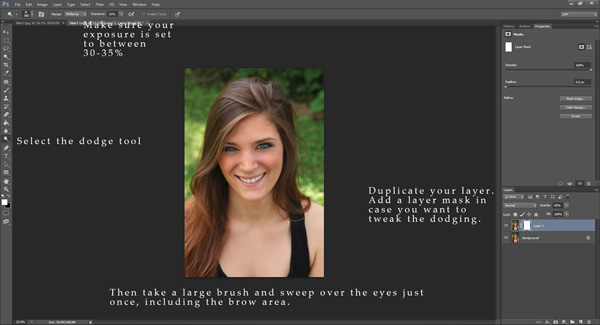
Optionally, you can brighten up the eyes a bit. Duplicate your layer again using Ctrl or Command + J. Again, add a Layer Mask in case you might want to change anything later. Select the Dodge Tool and make sure your exposure is set to around 30%. Take a big brush that covers the eye and the brow and in one motion with your mouse sweep over the eye and the brow. You can adjust the layer if it’s too bright or use your Layer Mask and remove the parts that might be too overdone.

3UsingPatchTool_DigitalPhotographySchool_LoriPeterson600

The Patch Tool can be one of the easiest and quickest ways to clean up skin and still retain the overall look of your client without making the image seem overdone. After a few times, using the Patch Tool can become like a second nature and skin edits will go quicker. Here is the before and after showing that with just a few motions with the patch tool you can achieve an overall better image where skin looks smoother, brighter, and still looks natural.

UsingPatchToolSidebySideBeforeandAfter_DigitalPhotographySchool_LoriPeterson600

The post How to Correct Skin Blemishes Using the Patch Tool in Photoshop by Lori Peterson appeared first on Digital Photography School.


Digital Photography School
 
Comments Off on How to Correct Skin Blemishes Using the Patch Tool in Photoshop

Posted in Photography


14, September, 2014 – Beauty Is More Than Skin Deep

15 Sep


We have published a few articles on medium format lately.  So, today we take it down a notch and share an article by Olaf Willoughby.  He re-visits the Leica T and his experiences as a user.  You can read test reports and reviews but using a camera is the bottom line.  Olaf digs right down to the heart of it in “Beauty Is More Than Skin Deep – Thoughts On The Leica T”. 

It’s Photokina time and I am publishing this article from the Delta Lounge at the Atlanta Airport.  The show opens Tuesday and Michael and I will be there covering all the new announcements and possibly a few new surprises.  We’ll be providing daily updates on what we see.  We also have some appointments for interviews and these should be interesting.   So, check back on a regular basis as we bring you the 2014 Photokina Report.


The Luminous Landscape – What’s New

 
Comments Off on 14, September, 2014 – Beauty Is More Than Skin Deep

Posted in News


Second Skin With Alana Tyler Slutsky

20 Jun

Alana Tyler Slutsky showcases her Second Skin photo series on Fashion Photography Blog (FashionPhotographyBlog.com)FashionPhotographyBlog.com caught up with Photo of the Week winner, Alana Tyler Slutsky to find out what has been happening since she shot her winning photo from her “Painted Ladies” series. Based in Brooklyn, New York, Alana Tyler Slutsky photographs fashion, beauty and portraits. From our previous interview with Alana, we discovered that she loves to play with color and light, as well as the idea that “fashion is fantasy.”

Alana Tyler Slutsky showcases her Second Skin photo series on Fashion Photography Blog (FashionPhotographyBlog.com)

So where is the photographer at now in her photography journey? According to Alana, she is constantly growing, ever-learning and ever-experimenting, “Now, I understand what I’m doing a lot more. Everything is premeditated and every detail is planned out It’s no longer a guessing game where I plop down lights and move them around to get what looks good – rather I go in with a plan of where everything should be placed, what modifiers should be used and what the f/stops should read. Also, I won’t shoot without a team. Before I used to shoot with whatever was lying around and would do the makeup myself (that was a total joke!) or have the “model” do it themselves. Nowadays I won’t work unless I have a team of hair, makeup and wardrobe. These are all details that tie together to make an amazing image. If you’re missing one, it’s like trying to drive a car with a flat tire – it just doesn’t quite work.”

The last article that we spoke to Alana she showed us an example of an experimental concept, back from when she was first testing lighting, became the inspiration for her recent “Second Skin” editorial shoot that got published in Creem Magazine. It was coincidental that around the same time she won Photo of the Week. It must have been meant to be. So how did the shoot for “Second Skin” come about? Alana explained, “The “Second Skin” images were the brain child of my makeup artist, Cassie Kurtz and myself. We spent a few hours on the phone bouncing ideas back and forth until we came across this one. I like to think that the “Painted Ladies” images were buried deep within my subconscious and the underlying idea of that series helped shape the “Second Skin” shoot.

Alana Tyler Slutsky showcases her Second Skin photo series on Fashion Photography Blog (FashionPhotographyBlog.com)

To create shoot, Alana shot this series using an Alienbees strobe, a soft box and a reflector. For photographers who are starting out and don’t have the budget for expensive equipment, Alana recommended “Paul C. Buff/Alienbees is an amazing company for young photographers! Not everyone has tens of thousands of dollars in order to own all of their own pro gear (such a Profoto/Broncolor etc…). Paul C. Buff is an affordable solution with the greatest customer support ever! Definitely check them out if you’re in the market for some lights. It does not hurt that they have almost every modifier you’ll be looking for! (No. I’m not paid by Paul C. Buff/Alienbees to promote them… I’m just a huge fan!)”.

Speaking of lighting, I asked the photographer, how is her lighting setup different now? She replied that “My light is a lot more controlled. Now, I know exactly what I want and figure out a proper set-up and what the light-output should read before ever setting foot on step. Being good at lighting is all about knowing how to manipulate it – from shadow transitions to color temperature.

Alana Tyler Slutsky showcases her Second Skin photo series on Fashion Photography Blog (FashionPhotographyBlog.com)

To find out more information about this shoot or contact Alana Tyler Slutsky feel free to visit any of the following:
Blog: http://alanatylerslutsky.blogspot.com

Website: http://www.alanatylerslutsky.com

Facebook: https://www.facebook.com/alanatylerslutsky

Twitter: https://twitter.com/alanaslutsky

What do you think about Alana’s new work now compared to her previous Photo Of The Week entry? Please post your comments in the comment section below.


Fashion Photography Blog

 
Comments Off on Second Skin With Alana Tyler Slutsky

Posted in Uncategorized


Alien Skin Software’s Exposure 6 now available

11 Jun

Exposure6-BoxShot-1024x1024.jpg

Alien Skin Software has launched an update to its popular photography effects software, Exposure. Announced in April, Exposure 6 has a new processing engine for instant image effect previews, a new user interface for a faster workflow and tools for ‘Bokeh.’ It’s available for download now at $ 149 for new users and as a $ 69 upgrade for existing users. Read more

News: Digital Photography Review (dpreview.com)

 
Comments Off on Alien Skin Software’s Exposure 6 now available

Posted in Uncategorized


Alien Skin Software announces Exposure 6 plugin

29 Apr

Cliff_Mautner_Exposure_6_2__Medium_.jpg

Alien Skin Software has released the latest version of its flagship photography effects software. Exposure 6 now includes a ‘Bokeh’ focus and lens-simulation feature, an updated image processing engine for instant previews, enhanced user interface for quick workflow, and unlimited creative texture control. The analog film emulation and creative effects software integrates with Photoshop, Photoshop Elements, Lightroom, and Aperture or can be launched as a stand-alone program. Learn more

News: Digital Photography Review (dpreview.com)

 
Comments Off on Alien Skin Software announces Exposure 6 plugin

Posted in Uncategorized