RSS
 

Posts Tagged ‘Skin’

Alien Skin offers Exposure X3 update

20 Mar

Alien Skin has released a significant update for its Exposure X3 image editor, adding greater precision to adjustment tools and more printing capabilities, among other improvements.

Called the Exposure X3 Complete Workflow Update, this software version introduces hue, luminance and saturation controls for individual colors. New white balance presets and adjustment in Kelvin values is now available, and workflow when copying images from a card to a collection has been improved. Along with new watermark adjustment options and added keyword functions, the update expands camera support and adds pre-sets to match Fujifilm’s film simulation modes.

Exposure X3 Complete Workflow Update is available now; current owners of Exposure X3 can download the update for free. Exposure X2 and earlier customers can upgrade for $ 99, while new customers will pay $ 149.

We’ve been given an early look at the update – take a look at our Exposure X3 review.

Alien Skin Software Announces Exposure X3 Complete Workflow Update for Photographers

Update for Exposure X3 includes hue and luminance color controls – Kelvin-based temperature and tint controls – printing – enhanced watermarks, keywords, and side-by-side view – expanded camera support

Raleigh, NC (March 20, 2018) – Alien Skin Software today announced the release of the Exposure X3 Complete Workflow Update, the latest version of their non-destructive RAW photo editor. The award-winning Exposure combines powerful organizational tools and accurate photo processing into a single intuitive solution. Enhancements to this latest version make Exposure the ideal solution for handling the full photography workflow.

Photographers can easily organize, edit, retouch, export, and print their photos using Exposure’s efficient workflow. Exposure’s intuitive design streamlines image management and backups. Its support of cloud-based storage enables multi-computer and collaborative workflows.

The Exposure X3 Complete Workflow Update introduces numerous creative and organizing enhancements.

“This latest update to Exposure X3 provides photographers with additional creative and organizational control, and handles their printing needs as well,” said Alien Skin CEO Finley Lee. “Exposure’s speed, stability, and power makes it the fastest way for photographers to bring their vision to life.”

Improvements to the color controls enable photographers to adjust hue, luminance, and saturation for specific colors. In addition, users can can easily target specific colors in their image for detailed adjustments.

For RAW images that record white balance data, photographers can now specify precise Kelvin values to correct for lighting conditions and unwanted color casts. New white balance presets provide a quick way to set the Kelvin temperature for a specific type of light.

Photographers can now print their photos directly from Exposure. New print capabilities include numerous preview and margin options, output sharpening, integrated watermarks, grid capability for printing contact sheets, and more.

Collections see several refinements. New images copied from a photo card are now placed in a Last Copy From Card collection. Optionally, when copying images from their camera card, photographers can choose to add images to any existing collections. Also, when creating a collection, it’s possible to add any images that are currently selected.

Keywords have been improved with the ability to remove all keywords from a photo and to add and remove keywords from a set. It’s also now possible to import keyword sets from other applications like Lightroom.

Exposure’s watermarks now have new metadata options, a watermark preview in the Export dialog, and improved control when moving and rotating a watermark.

A number of miscellaneous improvements include expanded camera support, the ability to backup photos to a second location when copying images from a card, a six image side-by-side layout, a new uninstaller, 15 new presets that mimic Fujifilm in-camera film simulations, and more.

About Exposure

Exposure is a RAW photo editor that provides photographers with all the tools they need to complete their workflow: from first copying images to their computer, culling and organizing, creative edits and retouching, and finally exporting and printing.

Exposure’s beating heart is its advanced rendering engine, which handles the demanding task of accurate film emulation and provides exceptional processing quality and performance. Exposure handles the most sophisticated edits. Its extensive library of customizable presets makes hundreds of iconic film looks and other styles available to photographers. Extensive editing, layering, and retouching tools make it easy to refine images, as well as to blend subtle or bold creative looks.

Powerful organizing tools enable photographers to manage even the largest photo collections.

All of Exposure’s tools work together in a carefully designed, customizable user interface, resulting in a seamless workflow for a wide range of photographers.

Exposure also works as a creative editing plug-in with other editors, such as Adobe Photoshop and Lightroom.

Pricing and Availability

The Exposure X3 Complete Workflow Update is available now from www.alienskin.com for $ 149. The update is free for current owners of Exposure X3. Upgrade pricing is available to owners of Exposure X2 and earlier versions for $ 99.

The Exposure X3 Complete Workflow Update is also the centerpiece in the Exposure X3 Bundle. This integrated collection bundles Exposure with Alien Skin’s award-winning Blow Up and Snap Art tools to add high-quality upsizing and natural media special effects. It is available for $ 199. Owners of one or more of the current apps in the Exposure X3 Bundle can purchase for $ 119. It is free for current owners of the Exposure X3 Bundle.

A 30-day fully-featured free trial of Exposure is available. Visit www.alienskin.com/exposure to learn more and download the trial.

Host Requirements

The Exposure X3 Complete Workflow Update may be used as a standalone program or as a set of plug-ins. When used as a set of plug-ins, it requires one of the following host applications:

  • Adobe Photoshop CS6 or Adobe Photoshop CC 2015 or newer
  • Adobe Lightroom 6 or Adobe Lightroom CC 2015 or newer

System Requirements

  • Apple Mac: OS X 10.10 Yosemite or newer
  • Microsoft Windows: Windows 7 64-bit or newer
  • An Intel Core 2 processor or compatible
  • A monitor with 1280 × 768 resolution or greater

Articles: Digital Photography Review (dpreview.com)

 
Comments Off on Alien Skin offers Exposure X3 update

Posted in Uncategorized


Alien Skin Exposure X3 review

20 Mar

Alien Skin Exposure X3 3.5
$ 149 | www.alienskin.com/exposure/ | Buy Now

This review is based on use of Exposure X3 and a beta version of Exposure X3 Complete Workflow Update for Mac.

Introduction

We’ve reached the point with image editing software that most basic features are covered. Correcting for exposure, saturation, and other settings are the expected baseline, which means applications need something more to differentiate themselves.

Some, like Skylum’s Luminar or Serif’s Affinity Photo (see Review: Affinity Photo 1.5.2 for desktop), are competing on price, along with the fact that they don’t require subscription plans.

Add to the mix Alien Skin Software’s Exposure X3. It’s competitive on price—$ 149 on its own, or $ 199 for a bundle that includes a couple of the company’s utilities, with no subscription—but it also includes several unique features that demonstrate the company is willing to tailor the software experience to how its customers use the product.

Differentiation in organizing

Like Adobe’s Lightroom family of products, Exposure X3 is both an image editor and an organizer for managing your photo library. You can preview thumbnails, rate and flag photos, assign keywords, and fill in basic IPTC metadata such as Title, Caption, Copyright, and contact information.

People who capture many images at a time and need fast turnaround will appreciate Exposure X3’s ability to import from multiple connected memory cards at once. You can rename files at import, specify custom destinations (and create presets for folder structures), and apply keywords and metadata during the ingest process. What it doesn’t do, surprisingly, is let you preview thumbnails of what’s coming in to cull shots before they’re copied to disk. It also doesn’t let you specify how to treat Raw + JPEG image pairs; you get both shots as separate images.

Import photos from multiple sources in the same batch.

Reviewing photos is aided by Exposure X3’s Quad and Six layout views, especially when you have several photos from the same capture burst where the subject is similar in each one. Four or six adjacent images in your library are displayed in a grid so you can compare differences between them, such as the expression on a person’s face. (There are also options to compare two or three images at a time.) If one stands out, you can pin it to the screen and compare it to others. The views are synchronized, so zooming in on one zooms them all at the same location in the image.

Compare four similar images at a time in the Quad view.

An important distinction about Exposure X3’s asset management features is that they’re directory-based, not catalog based. Applications such as Lightroom and Apple’s Photos keep track of where your photos are located on disk—sometimes all within the same library file or folder, set up by the software—and store metadata and edits about the images in a central catalog.

The advantage to this approach is that, as long as you continue to use that application to manage everything, all that data is more easily accessed by the software. You don’t need to worry about managing files, because the application does it for you. On the other hand, it means the metadata and edits don’t live with the image files. If you move an original Raw file on disk to a new location, for example, any edits you made would not go along with it. And in the case of Lightroom, moving the file in the Finder or Windows Explorer confuses Lightroom because it’s lost track of the image.

Exposure X3 doesn’t use standard XMP files, as many applications do

Exposure X3 takes a different tack. It reads images from the folders in which they’re stored, and writes edits to a separate sidecar file that lives in the same directory as the image file. When you view a photo in Exposure X3, the software also reads the information in the sidecar file and displays the edits noted there.

However, Exposure X3 doesn’t use standard XMP files, as many applications do. Within every directory of images, it creates a folder hierarchy, “Alien Skin > Exposure X3,” that contains metadata files ending in “.exposurex3” created for every image you edit. Those files use the same structure as XMP files, but can also include editing instructions that only Exposure X3 understands.

Some directory viewing software is just a visual way to traverse the folders on your disk, but Exposure X3 does use some centralized know-how to help you organize photos. The Collections feature lets you create virtual albums to group related photos that may exist in separate directories, such as shots from a single client captured over several photo shoots. Adding photos to a collection doesn’t move the files on disk.

Differentiation in editing

Before Alien Skin released Exposure as a stand-alone application, it was known for its presets that simulated the looks of film stocks and other effects. Those are all there in Exposure X3, and the results are quite good.

Exposure X3’s many presets simulate the looks of old photo processes, favorite film stocks, and more.

Want to preview how a preset will look before you apply it? Mousing over the preset thumbnails reveals the effect on your image, but you can also “audition” up to four presets at a time by selecting an image and dragging the presets you want to open slots.

Compare presets to the same image before applying your pick.

In addition to the basic editing adjustments (tone, color, and so forth), Exposure X3 also includes controls for controlling grain and creating vignettes that introduce variation such as distortion and lump size for more organic results. An IR panel introduces the soft hazy signature look of infrared photos with sliders to control color contrast and the degree of halation (light spread). A Bokeh panel includes a multitude of controls for adding selective focus. Exposure X3.5 brings the Color tools into the present with the addition of granular Hue, Saturation, and Luminance controls, as well as white balance controls listed in Kelvin units and with camera Raw presets.

One feature I stumbled upon is the software’s batch editing feature, which resulted in me accidentally making the same adjustments to several shots at once. Instead of making edits to one photo and then copying them to other images, you simply select all the images you want to change in the grid view or the filmstrip at the bottom of the screen. As you make edits to one, the adjustments are applied to all of the others.

When you make any adjustment, as with Lightroom, the effect is applied to the entire image. Unlike Lightroom, Exposure X3 supports multiple layers, enabling you to isolate adjustments on their own layers. In fact, local adjustments such as brush strokes or radial or linear gradients automatically appear as new layers. Each layer has an automatic mask that hides the adjustments until you expose them with the brush or gradient tools.

If your images are stored in a shared location, such as a Dropbox folder, someone else running Exposure X3 can view the photos

The Portrait Touch Up preset demonstrates this: when you apply it, Exposure X3 creates three layers designed to whiten teeth, smooth skin, and enhance a subject’s iris. Paint over the affected areas to reveal the effects. You can’t apply blend modes between layers, as some applications allow, but you can choose an opacity level for each layer.

Remember earlier when I mentioned that Exposure X3 stores metadata in its own sidecar files? All of the editing information is also stored in the same place, creating an interesting collaborative possibility. If your images are stored in a shared location, such as a Dropbox folder, someone else running Exposure X3 can view the photos. The adjustment data exists in the text-only sidecar files that are updated on both machines as they’re changed.

You’ll want to make sure you’re not both editing at the same time, which can overwrite edits, but it allows you to work on an image together over the phone or in alternating sessions without having to send file revisions back and forth.

Performance

Working with layers and local adjustments in Exposure X3 is a bit of a mixed bag. When editing Raw .RAF files from my FujiFilm X-T1, there was noticeable lag when using the brush, which meant I became accustomed to painting an area and waiting a beat for the result to appear before moving on. The lag was more pronounced when viewing an image at 1:1 zoom; an onscreen Rendering progress indicator showed up often. Even when reviewing images, I saw pauses as the software processed my Raw files.

This was a surprise, because I came to Exposure X3 with the expectation that it tended to do a better job handling the Raw files from Fuji’s X-Trans sensors. The update from version 3.0.6 to 3.5 did improve performance somewhat, but the lag is still noticeable.

I became accustomed to painting an area and waiting a beat for the result to appear before moving on

I also loaded some Nikon .NEF Raw files from a D90, as well as Sony .ARW Raw files from a Sony a7R III. Performance was just fine on the former, and a little slow on the latter’s significantly larger (86 MB) image files. But the X-T1’s images, which max out at 16.3MP (compared to the larger 24.3MP files from the Fujifilm X-T2, which I didn’t have to test) still performed the slowest.

For context, I tested Exposure X3 on a late-2016 MacBook Pro with Touch Bar, outfitted with 16GB of RAM (the maximum the machine can handle) and the Radeon Pro 460 graphics processor with 4GB memory (the top-line GPU upgrade when the computer was offered). This isn’t the most powerful Mac available, but it isn’t a slouch, either.

With the caveat that I’m not a software engineer, I suspect one possibility for the lackluster editing performance is that Exposure X3 doesn’t seem to be making use of the high-performance GPU. (You can check this by opening Activity Monitor, switching to the Energy tab, and looking at the Requires High Perf GPU column.)

I was also surprised that the Shadows control seems subpar. Yes, it brightens shadow areas, but it does so by flattening the entire image more than you’d expect; it feels like using a blunt instrument instead of a surgical one.

It’s a reminder that even basic features need attention, as well as the differentiating ones.

Pros and Cons

Pros:

  • Import from multiple sources at the same time
  • Edits and metadata are stored in local files, not a central database
  • Quad layout reviewing
  • High-quality presets
  • Ability to audition presets
  • Fixed price, no subscription

Cons:

  • Frequent rendering lag using Fujifilm Raw files
  • Shadows control is heavy-handed
  • No thumbnail preview during import
  • Raw+JPEG pairs are treated as separate images

Good for:

Photographers looking for non-subscription software that does more than basic editors.

Not good for:

The impatient.

Articles: Digital Photography Review (dpreview.com)

 
Comments Off on Alien Skin Exposure X3 review

Posted in Uncategorized


Alien Skin unveils Exposure X3 raw editor and organizer, available this fall

14 Sep

Alien Skin is gearing up to launch Exposure X3, the next installment in its Exposure software line. Exposure X3 is a non-destructive raw image organizer and editor, and it will bring multiple improvements and new features over the previous version. Among the changes will be new “toning enhancements” for B&W and color images, as well as a side-by-side view that allows you to compare two images.

Though the product hasn’t yet been fully fleshed out for the public, Alien Skin has revealed that X3 users will have the option of creating virtual copies of images so that the same photo can be edited in different ways without using up extra hard drive space. The company also shared that X3 will bring radial and linear brush shapes, plus adjustable borders.

Alien Skin plans to launch Exposure X3 on both macOS and Windows this fall for $ 150, though existing Exposure users will have access to a $ 100 upgrade option. Alien Skin will also offer a $ 200 bundle that includes X3, Snap Art and Blow Up, and anyone who owns at least one of these apps can get the bundle for $ 120.

Articles: Digital Photography Review (dpreview.com)

 
Comments Off on Alien Skin unveils Exposure X3 raw editor and organizer, available this fall

Posted in Uncategorized


How to Correct Skin Tones Using Lightroom’s Color Curves

27 Oct

Lightroom gives you a million and one ways to complete most photo edits. Having options is important. No two photos are alike, so no two edits are alike either. In this article, I’ll show you how to correct skin tones using Lightroom’s color curves.

There are times when the best way to edit color in general, and skin tones in particular, is to use Lightroom’s Color Curves. After reading this tutorial, you’ll be able to; measure RGB skin tone numbers to give you a general idea of which edits your photo needs, and correct the color issues using Lightroom’s Color Curves

skin-tones-Lightroom-curves-13.jpg

Finding the color numbers

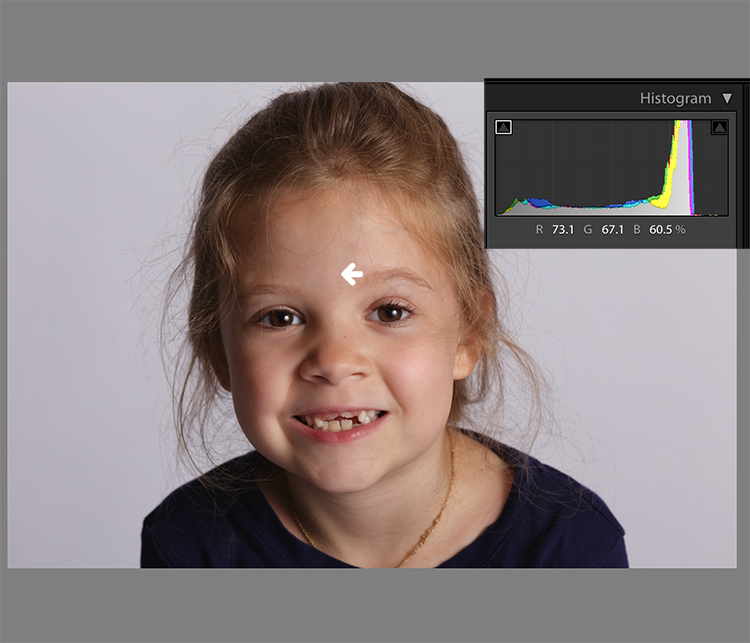
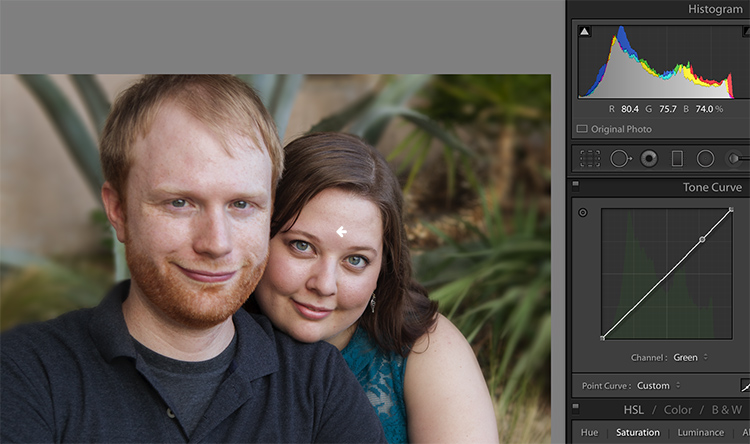
The image below is a photo that came out of the camera with a pretty good white balance and skin tone. Do you see the numbers under the histogram? Those are Red, Green and Blue (RGB) numbers.

Skin tones Lightroom curves 01

You can display the RGB numbers for your photos too. In Lightroom’s Develop module, hover your cursor over the area you want to measure. Look under the histogram for the corresponding RGB measurements.

These measurements tell us that the pixels next to the arrow in the screen shot had the following measurements:

  • Red: 73.1%
  • Green: 67.1%
  • Blue: 60.5%

RGB numbers are usually measured on a scale of 0-255, unless you are working in Lightroom. In Lightroom, you generally see them on a percent scale. 0% is the darkest value for any color, it’s so dark that there is no visible detail in that area. 100% is the brightest, and is so bright that no detail is visible.

Analyzing the color numbers

When analyzing RGB numbers for skin tone, look for the following indicators:

  • Red should be higher than Green. Green should be higher than Blue. This pattern is universal to all skin tones, regardless of age or ethnicity.
  • Each color should have at least a 2% difference, usually more, between it and the next number. Do you know how to identify a pure gray? That is a pixel that measures exactly the same in its Red, Green and Blue numbers. So skin whose RGB numbers are very close to each other is going to look gray. Not very appealing, right?
  • If any colors measure 94% or above, you probably have overexposure to deal with.
  • If any colors measure 6% or below, you probably have underexposure to deal with.

The RGB numbers in the photo above are consistent with expectations. This means that the skin is within “proper range” of a well-exposed photo with good white balance.

What do to with bad numbers?

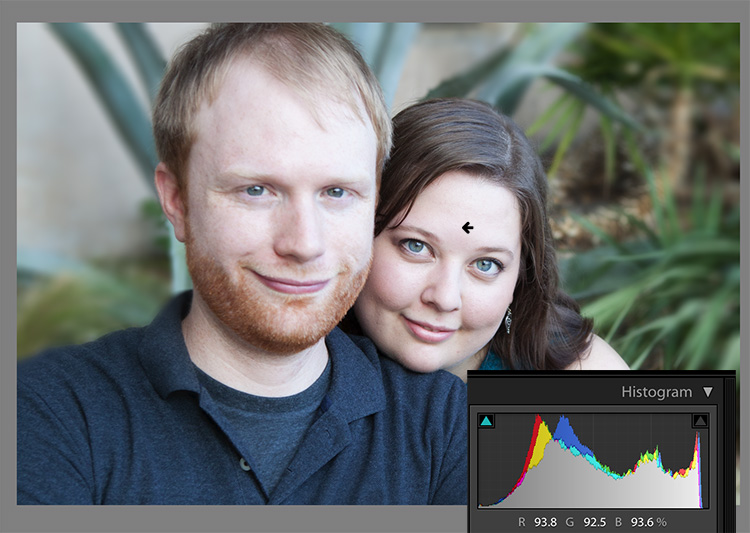
What happens, however, if your photo doesn’t look so good straight out of camera?

Skin tones Lightroom curves 02

In this photo, the measurement point was just next to the arrow on her forehead. The numbers read: Red 93.8%, Green 92.5%, and Blue: 93.6%.

Anytime you see a photo with skin tones that measure like this, your eyes are going to tell you that something is off before the numbers do. The benefit of using the numbers is that they give you the direction to which your edits for the image need to go.

The numbers in this photo cause concern because:

  • Anything higher than 94% or so in Lightroom is bright enough that your image, if you print it, might not render good detail in those areas. That means that these areas are too bright.
  • Blue is higher than Green. Red should always be the highest and Blue the lowest otherwise the skin tone will appear cold.
  • The RGB numbers are too close together – they are approaching gray. This skin in this photo is lifeless as a result.

Correcting the skin tones

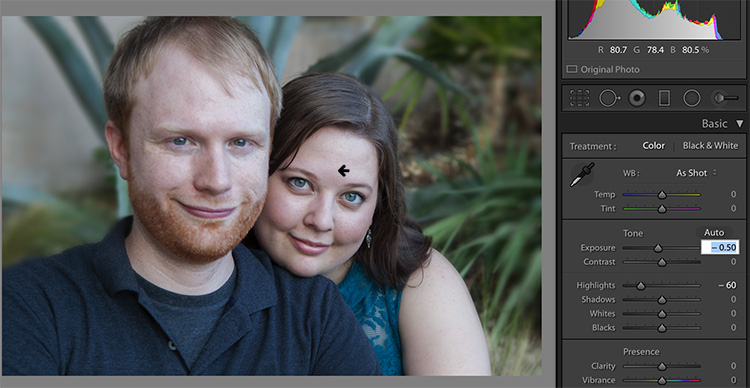
To fix this image, you would start by tweaking exposure. Proper exposure is a huge component of proper skin color. In fact, it’s often impossible to assess skin tone issues correctly without correcting exposure first.

A little-known bit of Lightroom awesomeness is that it’s easy to correct exposure while keeping an eye on the RGB numbers. In the Develop module, double click in the numeric entry field for Exposure so that the number is highlighted. Next, hover your cursor over the area of skin you are measuring without clicking. Use the up or down arrows on your keyboard to change exposure until a more appropriate measurement for the Red value appears under the histogram.

Skin tones Lightroom curves 03

Adjust Highlights (or Shadows, Whites, or Blacks) in the same way. Activate the numeric input field for editing then hover the cursor over the arrow you want to measure. Use the arrow keys on your keyboard to increase or decrease the adjustment.

Exposure for this photo is better with the adjustments you see above, but color is still off. When the RGB numbers are as close together as you see here, it’s often better to use Color Curves than the White Balance sliders to fix the issue.

Using Color Curves instead of White Balance Sliders

Color Curves has two major advantages over the white balance (WB) sliders.

You might have noticed already that Lightroom measures three colors (red, green and blue) for each pixel. However, the White Balance sliders don’t allow for editing the most important component of skin color – red. But, you can edit Red tones using Lightroom’s Color Curves.

The other big benefit of using Color Curves is that you can adjust colors in limited parts of the tonal range. For instance, if you reduce yellow in an image using the Temperature slider in the White Balance section, you are reducing yellow globally (everywhere in the image equally). Using Color Curves, however, you could reduce yellow only in the shadows, without taking away the yellow that properly belongs in the mid tones and highlights of an image.

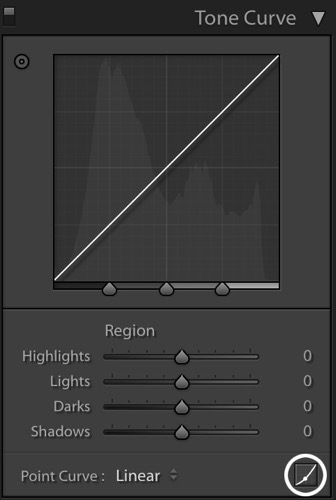
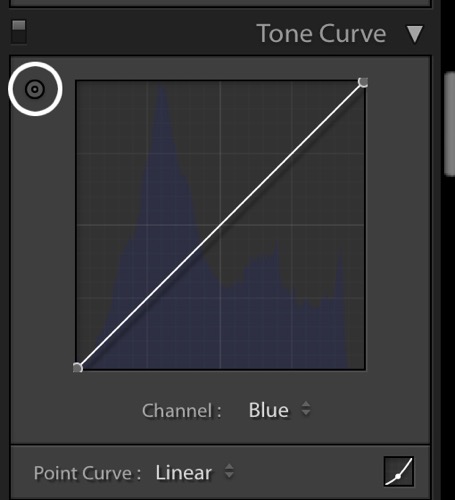
To find Color Curves in Lightroom, scroll down to the Tone Curve section. By default, it shows you the parametric curve, which looks like this:

Skin tones Lightroom curves 04

Click on the small button in the lower right corner of the Curves panel to access the Point Curve. (It’s circled in the screen shot above.)

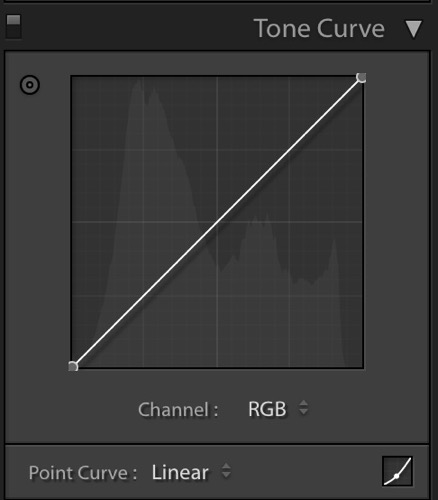
Now you are looking at the Point Curve interface:

Skin tones Lightroom curves 05

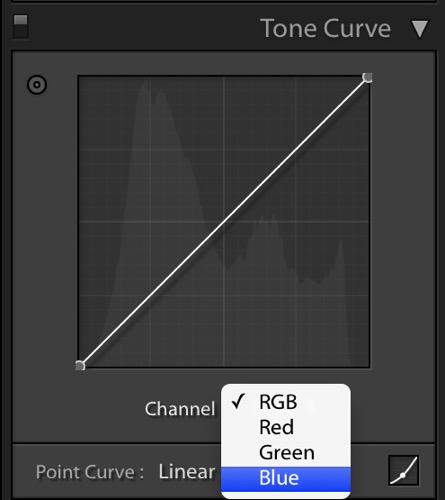
Using the Channel drop down menu, select the color you’d like to adjust.

Skin tones Lightroom curves 06

Which color channel to edit?

At this point, you may be wondering about adjusting colors other than red, green, and blue. For instance, what if your photo has too much yellow or orange? Think about it like this.

Each of the three colors measured in Lightroom has an opposite:

  • Red is the opposite of cyan
  • Green is the opposite of magenta
  • Blue is the opposite of yellow

Reducing any one of those colors using Color Curves, increases that color’s opposite. In other words, reducing blue is the same as increasing yellow.

Looking at the Curves panel, do you see the histogram behind the straight line? When you click and drag the straight line to create a curve, this tells Lightroom to adjust the pixels corresponding to that part of the histogram.

Say, for instance, that you wanted to add blue to the mid tones of an image. You would select the Blue channel and click the line in the middle of the histogram, where the midtones live. Dragging the line up would add blue to the bright parts of your photo’s tonal range.

Dragging up increases the color the channel is named after – blue, in this case. If it increases blue, that means that it’s also decreasing blue’s opposite, yellow.

Skin tones Lightroom curves 07

Dragging down decreases the color the channel is named after.

skin-tones-lightroom-curves-08b

Using the Targeted Adjustment Tool for Curves

That’s the way it works in general. But you can get much more precise color control by using Lightroom’s Targeted Adjustment Tool. Click on the button at the top left corner of your Curves panel to activate it (circled below).

Skin tones Lightroom curves 08

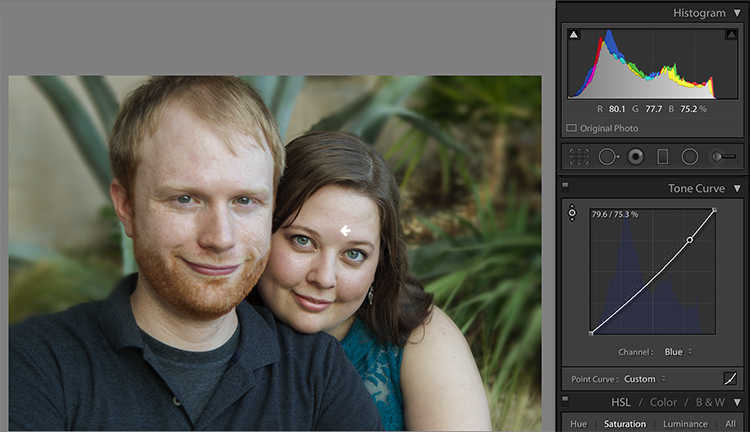
Hover this tool over the spot you’re using to measure the skin tone in your photo, but don’t click! Use the up and down arrows on your keyboard while keeping an eye on the RGB numbers beneath your histogram until the both the appearance of the photo and the RGB numbers improve.

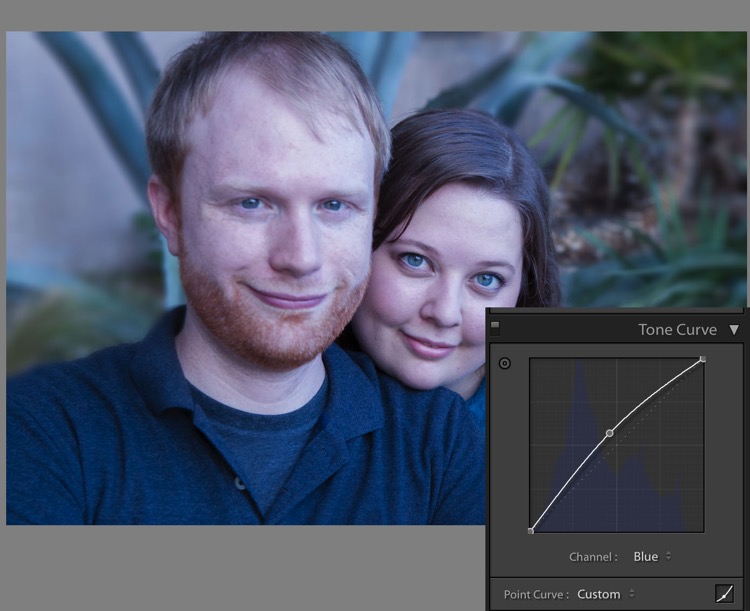
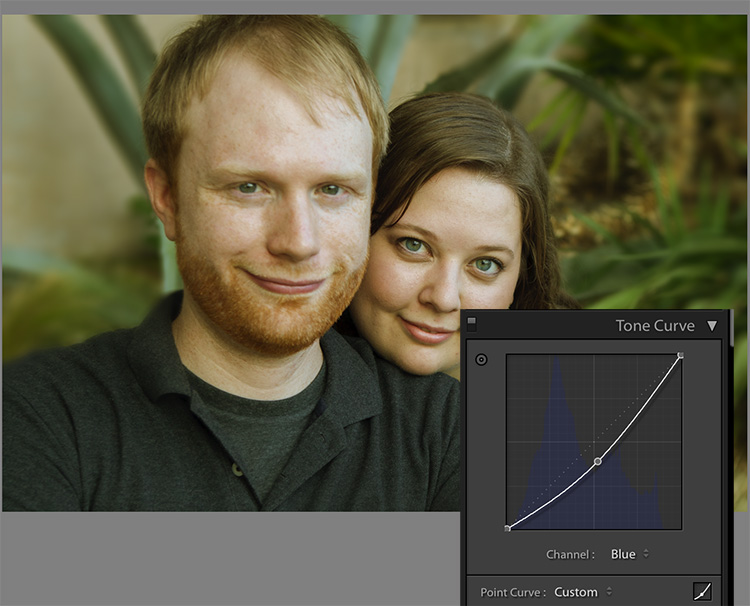
Moving the blue curve down, as in the screenshot below, provides better separation between the Green and Blue measurements. It also gives the photo the warmth it’s lacking.

Skin tones Lightroom curves 09

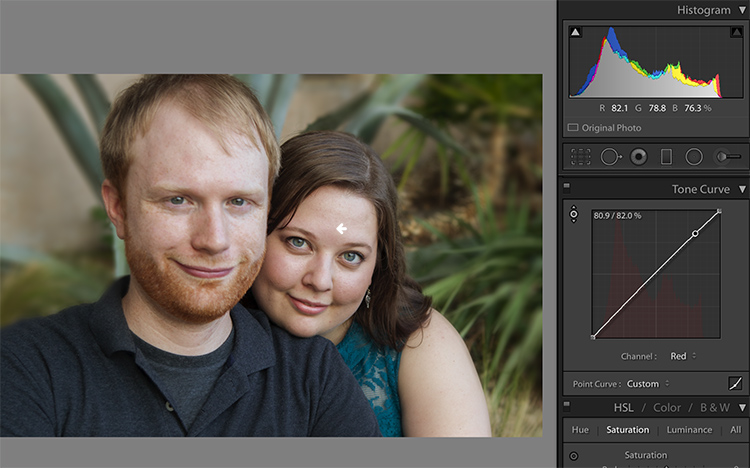
If the image still lacks vibrance, as this one does, move to the Red curve and increase the Red channel. Adding a touch of red is the best way to counteract gray skin.

Skin tones Lightroom curves 10

Next, decreasing green (to add magenta) makes the skin color, as well as the corresponding RGB numbers, look just about right.

Skin tones Lightroom curves 11

Tweaking things

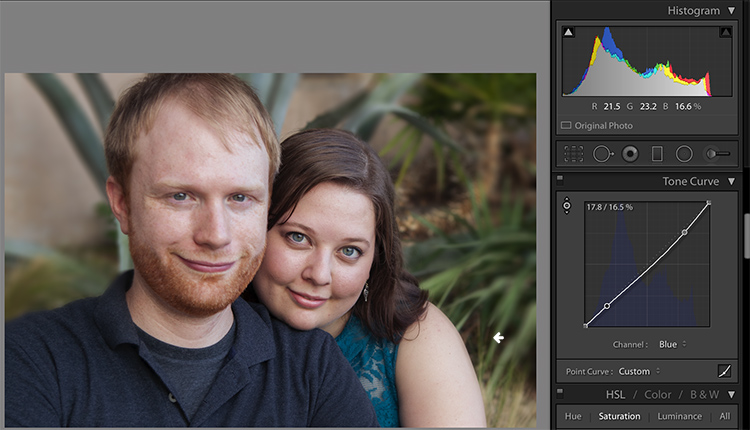
However, the warmth of the plants behind them is overpowering the subjects. To downplay it, return to the Blue channel.

Using the Targeted Adjustment Tool, add Blue to the the shadows by hovering over a dark area of the photo and hitting the up arrow on your keyboard.

Skin tones Lightroom curves 12

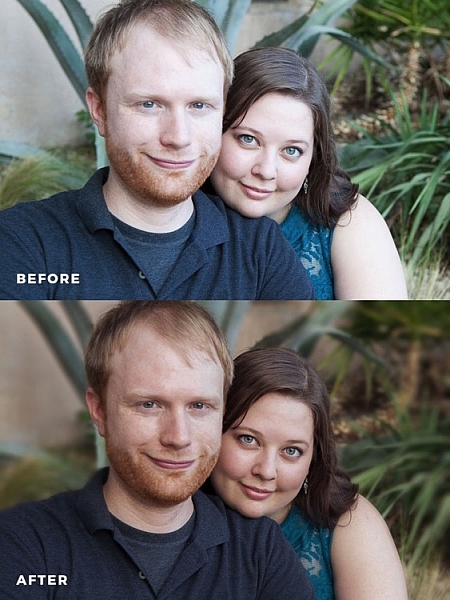
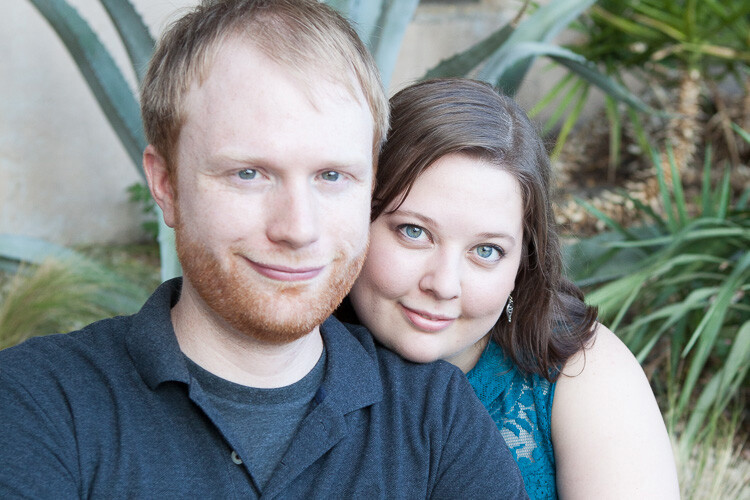
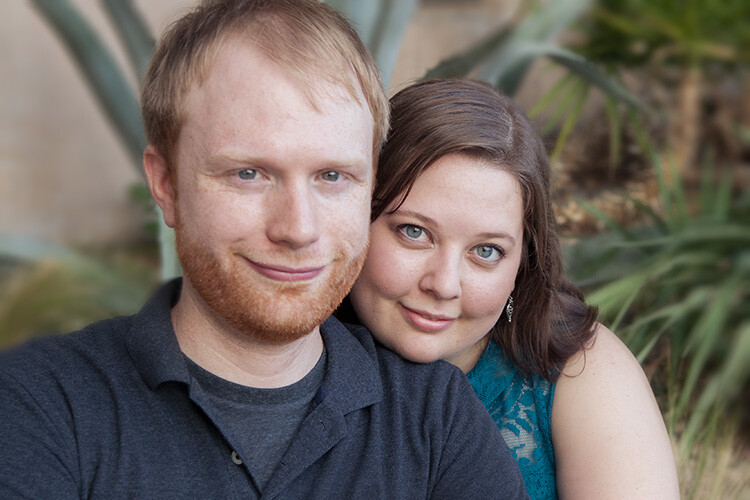
Compare the original and edited photos here:

Before

Before

After

After

Editing your own images with Color Curves and RGB numbers

Keep the following tips in mind when editing your own images.

#1 – First, a big caveat to anyone who has heard that using RGB numbers to edit will solve all skin tone problems! There are as many proper RGB measurements as there are people in the world. As you study RGB numbers, let trends in the numbers and generalities guide your edits, but don’t try for an exact numeric match.

#2 – Measure skin tones in the middle range of brightness. Look for mid-tones rather than bright highlights or deep shadows. Also avoid measuring on cheeks, the end of the nose, or other areas that are usually redder than others.

#3 – In general, when I’m editing photos, I look for tones in these ranges:

  • Red is highest > Green is middle > Blue is lowest – always.
  • The Red channel is usually between 70% and 90%. Very light skin can be as high as 94%. Very dark skin can go as low as 40-50%.
  • The Blue channel is usually between 30% and 80%.
  • It’s not possible to generalize how many percentage points difference should be between Red and Green, or Green and Blue. However, skin that has warmer tones will have less Blue in proportion to Red and Green.

#4 – Small movements of your tone curve impact your image dramatically. Don’t go overboard!

Conclusion

Studying the patterns in the RGB numbers of your photos is a great way to develop your editing eye. Everyone has photos that aren’t quite right. Analyzing the relationship between the numbers and the appearance of the photo will help you get to the point where you can eyeball a photo’s needs without referring to the RGB numbers at all.

Any questions? We could talk about this topic all day. Comment below and tell me what you think.

googletag.cmd.push(function() {
tablet_slots.push( googletag.defineSlot( “/1005424/_dPSv4_tab-all-article-bottom_(300×250)”, [300, 250], “pb-ad-78623” ).addService( googletag.pubads() ) ); } );

googletag.cmd.push(function() {
mobile_slots.push( googletag.defineSlot( “/1005424/_dPSv4_mob-all-article-bottom_(300×250)”, [300, 250], “pb-ad-78158” ).addService( googletag.pubads() ) ); } );

The post How to Correct Skin Tones Using Lightroom’s Color Curves by Erin Peloquin appeared first on Digital Photography School.


Digital Photography School

 
Comments Off on How to Correct Skin Tones Using Lightroom’s Color Curves

Posted in Photography


Alien Skin Exposure X2 launches with several new tools and Exposure Bundle

28 Sep

Alien Skin has announced the launch of Exposure X2, the second iteration of its non-destructive photo editor and organizer. The company has added several features to its latest version of Exposure, some of which have been frequently requested by users, including faded presets, a spot healing tool, metadata search and a history panel. An updated Exposure Bundle is also available, bringing with it Alien Skin’s Blow Up, Exposure and Snap Art apps.

As expected, the new spot healing tool enables users to quickly fix small imperfections in photos without opening a separate photo editor; the tool supports both healing and cloning. The faded presets, meanwhile, are customizable and add a hazy look to images. The history panel tracks any changes you make to your images, and the metadata search, of course, enables searches based on various criteria including the camera used, shutter speed, ISO and more.

Alien Skin Exposure X2 is available now for $ 149 for new customers, and $ 100 for existing Exposure X owners. The Exposure X2 Bundle is higher at $ 199 for new customers, or $ 119 for existing customers who need the upgrade.

Via: Alien Skin

Articles: Digital Photography Review (dpreview.com)

 
Comments Off on Alien Skin Exposure X2 launches with several new tools and Exposure Bundle

Posted in Uncategorized


How To Retouch Skin And Still Look Natural

20 Jul

Skin Retouching for Dummies


Hey FashionPhotographyBlog.com readers. Retouching… A LOT of people have asked for it so here it is:


When it comes to retouching skin, it’s really quite simple. In fact, you can do it in two simple steps. However, it’s also really quite time consuming. Take your time and don’t rush through it. Following these few simple steps will pay off in the end!


Whatever you do: DON’T BLUR YOUR SUBJECT’S SKIN! Skin is full of texture – keep it that way. Eliminating pores is an obvious sign of someone who doesn’t know what they’re doing. Study your face in the mirror. Texture changes as you move throughout the face and body, be conscious of this when retouching skin.


Don’t blur your subject’s skin! Skin is full of texture – Keep it that way #fpblog
Click To Tweet


(Remember: It always helps to have a good makeup artist and start with an even base of foundation. A good makeup artist can drastically cut down your time spent retouching skin in Photoshop.)


How To Retouch Skin


First things first, NEVER-EVER work directly on your background layer. This is an extremely bad habit most people have. This is considered destructive. Once you work directly on your background layer, there is no going back. Whereas, if you work on layers independent from your background layer, you can always delete them and start from scratch.


1. Select your image and open it up in Photoshop.


retouching_skin_original_imageOriginal, untouched image


2. Start by removing blemishes. To do this, I typically switch between the Healing Brush and the Clone Stamp.


The Healing Brush (band-aid tool) works by merging texture, color and luminosity from the sample area to the destination area.


The Clone Stamp (stamp) takes the information from the sample area and moves it to the destination area (no automatic blending in of texture, color and luminosity.)


retouching_skin_heal_patch_clone_stamp


Create a new, empty layer and at the top change the setting from “Current Layer” to “Current & Below.”


To remove blemishes and wrinkles, make the brush size just a bit larger than the size of the blemish. To select a source point, hold down “Option” (Mac) or “Alt” (PC) and click, then paint over the blemish to remove it. The healing brush tends to spread out a bit so it works best by using a harder brush rather than a softer brush.


BE CAREFUL* When healing, many people have a tendency to pull source areas from right next to the destination area. Doing this will create repetitions in texture. This is a major no-no. Repetitions in texture make it known that the image has been manipulated. It’s a sign of an amateur. If you see this, take a step back and try again. Are there naturally occurring patterns? Break them up. Keep your hand light – a heavy hand is also a sign of an amateur and leaves your subject looking unnatural. 


retouching_skin_after_healing_cloningAfter Healing/Cloning


2. Next up: Dodge and Burn! Dodging and Burning is the process of manipulating tone in order to even out blotches in skin. This is fantastic for (painstakingly) taking out goosebumps or evening out the blotches most people have on their skin.


Dodging and Burning is derived from a darkroom process. Dodging is lightning of tones and burning is the darkening of tones. By dodging and burning simultaneously, you’re able to even out tones and create smooth, perfect looking skin.


To begin, create a new layer set “mode” to “soft light” and select “fill with 50% grey.”


retouching skin photoshop new options

New layer options: Mode: Soft Light, Select “Fill with 50% grey”


Using the Dodge/Burn tool (J) you can choose which tones to work with – highlights, midtones or shadows. I typically start with midtones and then work my way around the image switching between midtones, highlights and shadows. Keep your exposure low. I usually work around 9%. Start small and you can gradually build your way up. 


Continuously switch between Dodge and Burn – an easy way to do this is to hold down the “Option” key. If you’re dodging midtones at an exposure of 9% and hold down the “option” key, you’ll burn midtones at 9% as long as the option key is held down. Essentially, it gives you the opposite tool of what you’re working on, however whatever settings you already have chosen (midtone/shadow/highlight and exposure) will remain the same.


*Dodging and Burning can be tricky! Until you train your eyes to see the difference between tones, it’s really easy to over-do your dodging and burning. In order to help you better see the differences in tone, you can create a guide to help train your eyes! To do this, create a “Hue/Saturation” adjustment layer and desaturate the image. Then, create a new “Curve” adjustment layer and make a deep curve. This will separate the tones and make it easier to see where you need to dodge and where you need to burn.


retouching_skin_photoshop_eye_guide_d&b_curveEye Guide: Deep Curve


retouching skin eye guide help before dodge and burnretouching_skin_eye_guide_help_before_dodge_and_burnWith Eye Guide on: Before Dodging and Burning. Notice the blotchy patches.


retouching_skin_eye_guide_help_after_dodge_and_burnWith Eye Guide on: After Dodging and Burning. Notice the smooth transitions between tones.


retouching_skin_eye_guide_help_after_dodging_and_burningAfter Dodging & Burning


Over-do it? That’s okay. Lower the opacity of your layer until it looks right. This is the beauty of working on a layer independent from your background layer.


3. After Healing, Dodging and Burning, now is time for color! ALWAYS be careful of where you place your color layers. For those just starting out, it’s best to do color last. If you manipulate color before you retouch, make sure your color layers stay on top of all the retouching layers you create.  IF YOU RETOUCH ON TOP OF COLOR MANIPULATIONS, YOU CAN’T UNDO THE COLOR. 


If you retouch on top of color manipulations, you can’t undo the color #fpblog
Click To Tweet


If you decide you don’t like the color and try to remove or change it, you’ll have to re-do all of your retouching work. Since the healing layer is set to “current and below” it is pulling color and texture from the layers below it (this would include your color layers). When you delete the color layer, the color remains in the areas which have been healed or cloned above it, leaving you with a mess that looks like this:


retouching_skin_on_top_color_manipulationsImage that has had retouching done on-top of color manipulations. The colour manipulations were removed resulting in an unusable mess!


So, those just starting out with this method of skin retouching, play it safe and work with color last.


retouching_final_skin_retouch_with_color_appliedFinal skin retouching with color applied


So – as a reminder, the order you retouch skin:

1. Heal/Clone – Remove wrinkles and blemishes

2. Dodge/Burn – Even out skin tone

3. Manipulate Color


Stay as organized as possible! It helps to make a group for retouching and a group for color to keep everything straight.

retouching_skin_layers_from_completed_retouched_imageLayers from completed retouched image (pictured above)


Good luck! Remember to take your time and practice. It takes a long time to be able to really see what you’re doing. Train your eye and you’ll be able to pick apart tones and see imperfections in skin more easily. Feel free to share your retouching here in the comments for feedback and critique!


And remember, if you have any questions, feel free to ask!


Alana


retouching_skin_animation


IMAGE SOURCE:

Feature image and images 1-12: courtesy of Alana Tyler Slutsky


Fashion Photography Blog

 
Comments Off on How To Retouch Skin And Still Look Natural

Posted in Uncategorized


How to Use the Clone Stamp Tool in Photoshop to Make Clear Skin

06 Apr

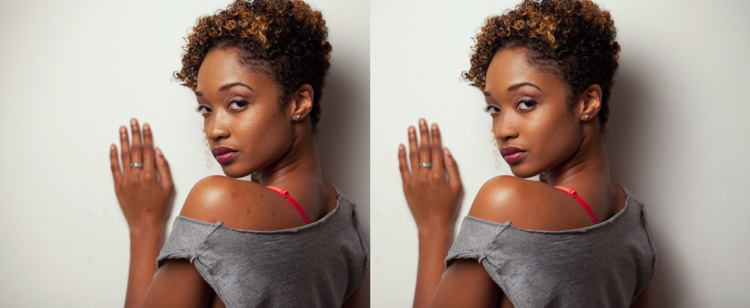
We’re all beautiful. Sometimes however, we have imperfections that can be a distraction (most often they are magnified in our minds and really not as bad as we think). In this tutorial, I am going to show you how you can use a basic Photoshop tool, the Clone Stamp, to create clear, natural looking skin in your photos.

Image 1

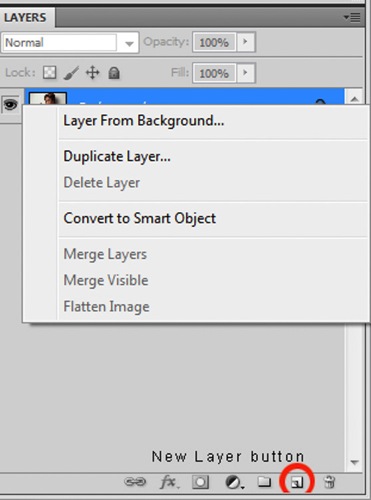
It’s always a good idea to work on a separate layer when editing or retouching images in Photoshop. Once you have your image open, you should create either a new layer or a duplicate layer which you will edit on. You can create a new layer by clicking the new layer button in your Layers Panel, or by selecting Shift+Ctrl+N on a PC (or Shift+Command+N on a Mac). If you prefer to create a copy layer like I have, you can right click on the image in the Layers Panel and select the Duplicate Layer option provided. If you prefer to use keyboard shortcuts, you can simply press Ctrl+J if you’re using a Windows PC, or Command+J if you’re using a Mac.

Image 2

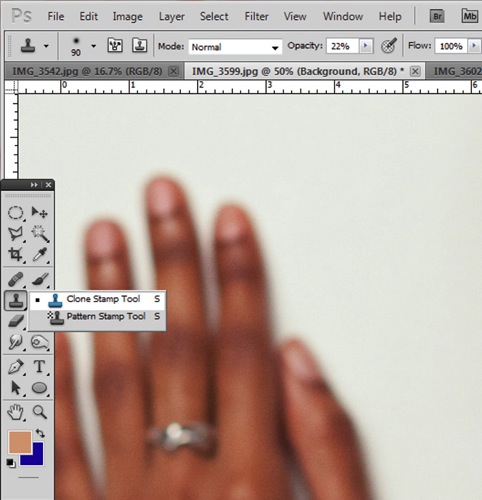
Select the Clone Stamp tool from the tools panel, it conveniently looks like a miniature office stamp. In the options bar at the top of your screen, ensure that your brush softness is set to zero, the mode is normal, and it is set to sample Current & Below. You can keep your opacity anywhere between 10 and 30% depending on the subject. To get a natural looking result, it’s best to gradually work your way up to the final complexion or shade you are trying to attain.

Image 3

Image 4

Zoom in on the area you would like to retouch by pressing Ctrl (or Command) and the plus (+) symbol on your keyboard. In this image, I’m going to focus on the shoulders mainly. You don’t need to zoom all the way in to the area, but ensure that it’s zoomed enough for you to clearly see the area you are trying to adjust.

Image 5

The Clone Stamp tool works by allowing you to duplicate a selected area, over to another section of your image. It’s really great for removing unwanted elements from your photos. Hold down the Alt key on your keyboard and click on an area of skin close to the spot you are trying to remove. If your spot is lighter than the overall skin tone, select an area that is darker than the spot; if the spot is darker than the surrounding skin, you will make your selection from an area that is slightly lighter than it.

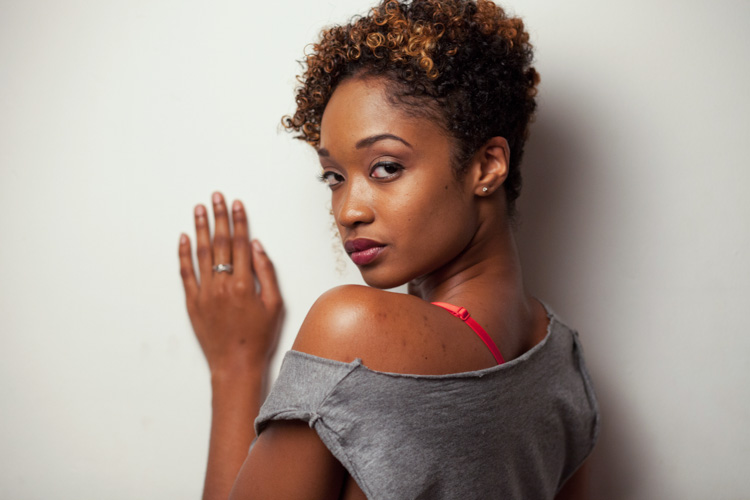
Play around with your Clone Stamp brush size and the opacity, until you find a combination that gives your best results. You will more than likely end up using a variety of brush sizes and opacities for the image (change the sample area frequently as well so you don’t get a repetition of patterns). The clone stamp method is very effective at clearing skin but requires patience on your part. A few other minor adjustments resulted in the final image below.

Image 6

With practice and patience you can clone your way to clear skin with the Clone Stamp tool. Have fun!

Please share any questions and comments you have about using the Clone Stamp tool to make clear skin.

googletag.cmd.push(function() {
tablet_slots.push( googletag.defineSlot( “/1005424/_dPSv4_tab-all-article-bottom_(300×250)”, [300, 250], “pb-ad-78623” ).addService( googletag.pubads() ) ); } );

googletag.cmd.push(function() {
mobile_slots.push( googletag.defineSlot( “/1005424/_dPSv4_mob-all-article-bottom_(300×250)”, [300, 250], “pb-ad-78158” ).addService( googletag.pubads() ) ); } );

The post How to Use the Clone Stamp Tool in Photoshop to Make Clear Skin by Tricia Bent appeared first on Digital Photography School.


Digital Photography School

 
Comments Off on How to Use the Clone Stamp Tool in Photoshop to Make Clear Skin

Posted in Photography


How to Add Vintage Frame Overlays Using Alien Skin Exposure X

20 Mar

Here is a quick and snazzy tip on adding some cool retro and vintage frame overlays to your photographs, including polaroids and borders, using Alien Skin Exposure X. It’s easy as pie, and takes seconds! Unlike Photoshop, adding frames in Exposure X does not require masking, or the use of layers.

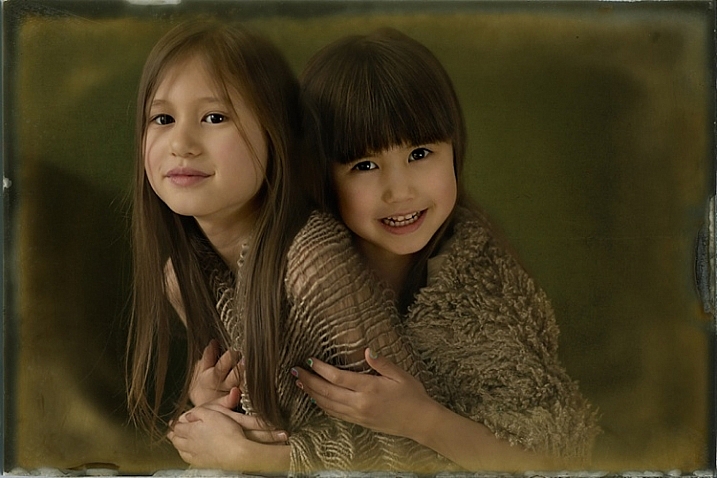
adding-vintage-frames-tutorial-alien-skin-exposure_0007

But first… why add frames?

  1. You may be going for a certain look and want your images to stand out.
  2. You may want to use your images in scrapbooks and blogs that have  a specific theme.
  3. You might just be feeling super creative and want to do something different.

Whatever your reason, it’s a fun experiment, and of course, highly dependent on your taste.

Here’s how to add a frame

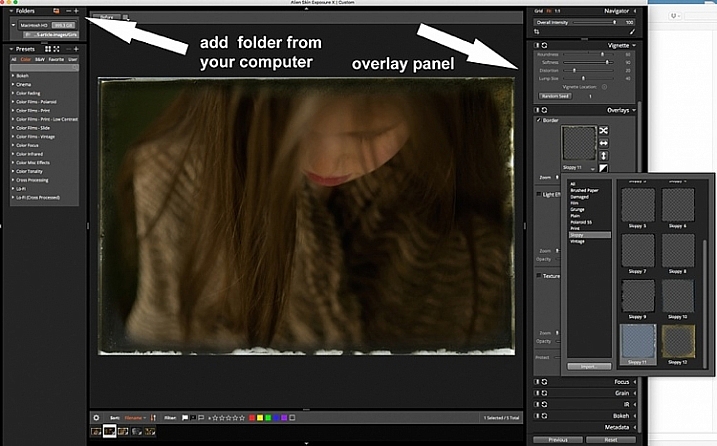
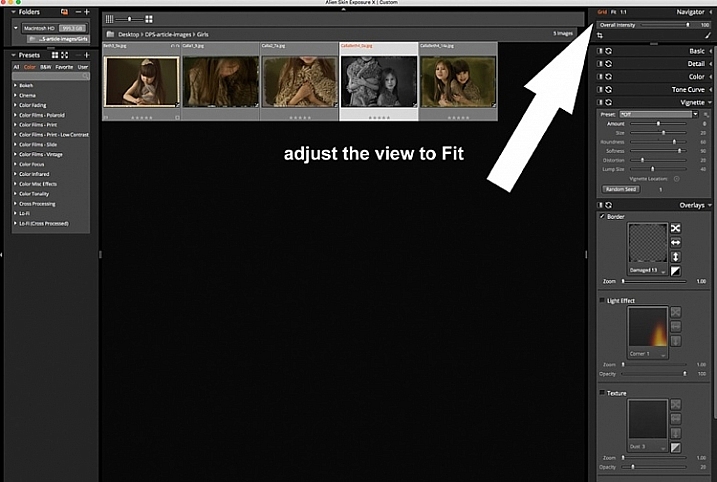
Open Alien Skin Exposure X (the latest version is 10, but previous versions work just the same). Click the + icon on the top left corner of the window to add folders from your computer. Choose the folder you want to add, and double click. You may notice that when you open the folder, your images will be initially displayed as a Grid as shown on the second photo below.

adding-vintage-frames-tutorial-alien-skin-exposure_0000

adding-vintage-frames-tutorial-alien-skin-exposure_0008

Click Fit on the upper right corner of the window and you will see (as shown on the first photo) that your chosen image is enlarged, but you can still see the rest of the set, in the thumbnails just below. Once you have your image, look on the right panel, and bring up the Overlays option by clicking on the arrow. Tick the border, then click on the box showing the overlay and a pop up window, giving you a variety of overlay options, comes up. You can scroll through these options to find the overlay you want to use.

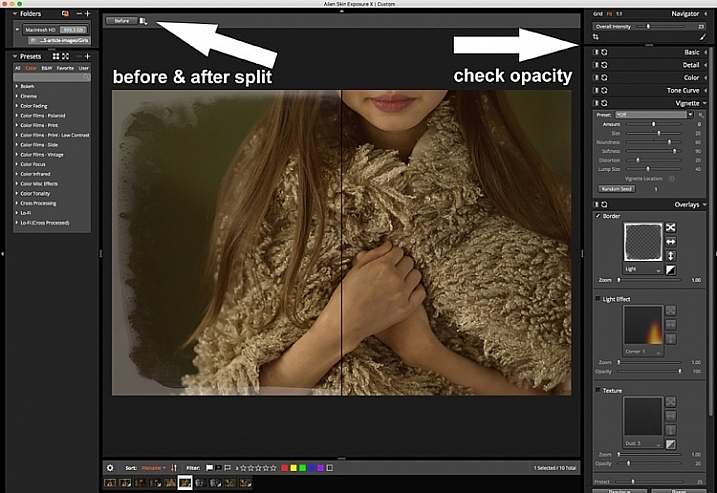
You can work on each photo individually or select all using Cmd/Ctrl + A, and your chosen settings will be applied to all the images. TypeCmd/Ctrl + D to deselect, and click on one photo to work on it individually. Don’t forget to use the Overall Intensity slider on the top right corner of the window, it works like the opacity slider in Photoshop. You also have a selection of view options that allow you to see the various before and after splits, as shown on the image below. In this case, the left half of the photo has the overlay and the right half shows the original. This is helpful in gauging the intensity of the overlay applied, and its effect on the original image.

adding-vintage-frames-tutorial-alien-skin-exposure_0001

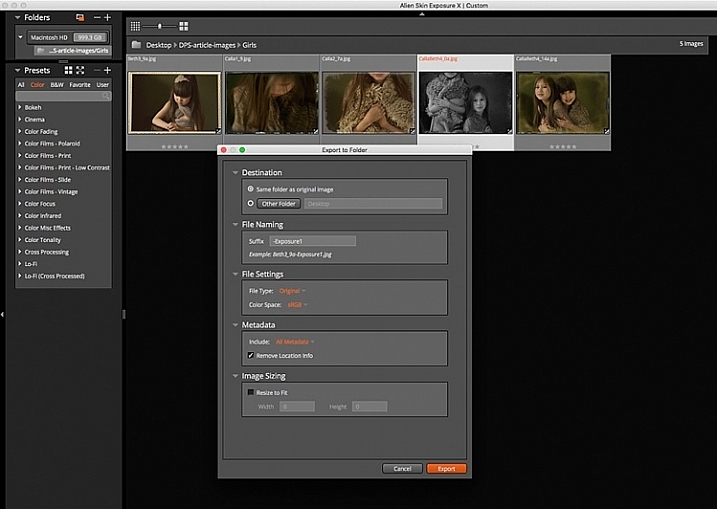
After you have applied your frames on each image, you now need to export them. Select all the images using Cmd/Ctrl + A, then either go to the Exposure bar File menu and select Export, or simply typeCmd/Ctrl + E, and you can export your new images to a folder you designate. I suggest that you keep the suggested file suffix, or change it to something of your choice, so you know these are the new files with the Exposure edits, should you want to keep them in the same folder. You will still have your original images in tact and untouched, in case you want to revisit them later.

adding-vintage-frames-tutorial-alien-skin-exposure_0002

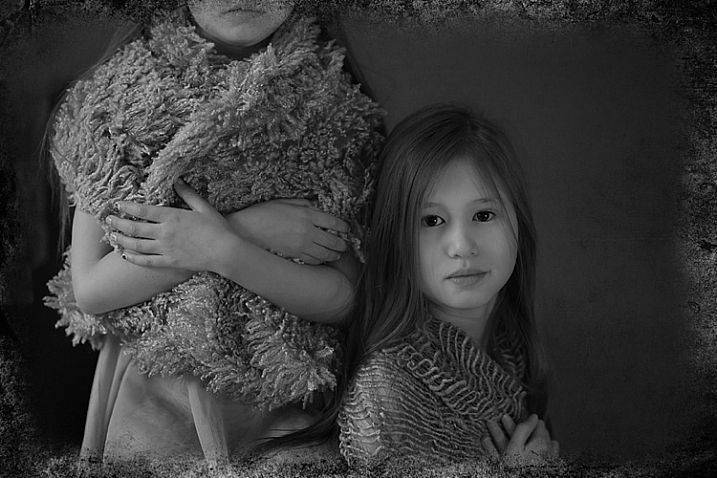
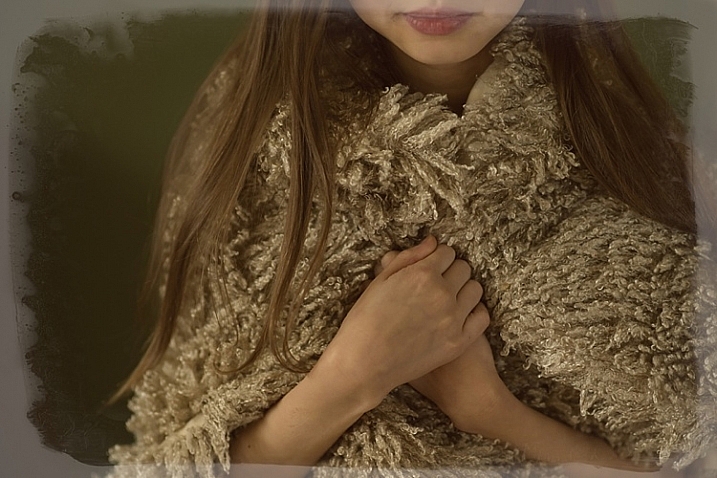
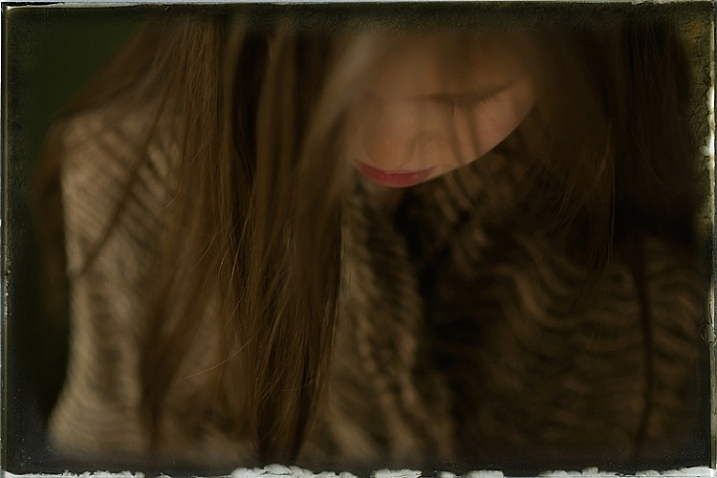
Here are the images that I used in this tutorial, with the added frames using Alien Skin Exposure X.

adding-vintage-frames-tutorial-alien-skin-exposure_0006

adding-vintage-frames-tutorial-alien-skin-exposure_0005

adding-vintage-frames-tutorial-alien-skin-exposure_0002

adding-vintage-frames-tutorial-alien-skin-exposure_0004

I hope you enjoyed this quick tip. Have fun experimenting with frames as well as other special effects. Do share any other quick tips on adding vintage frames in the comments below.

This week on dPS we are featuring articles on special effects. Check out the others that have already been published here:

  • How to Photograph the Full Band of the Milky Way
  • Fire Spinning with Steel Wool – A Special Effects Tutorial
  • Special Effect – How to Create Multiple Flash Exposures in a Single Frame
  • Stacking Light Trails for Night Photography Special Effects
  • 26 Unique Special Effects Photos to Spark Your Creativity
  • Weekly Photography Challenge – Special Effects
  • Tips for Shooting Through Objects to Create a Special Effect

googletag.cmd.push(function() {
tablet_slots.push( googletag.defineSlot( “/1005424/_dPSv4_tab-all-article-bottom_(300×250)”, [300, 250], “pb-ad-78623” ).addService( googletag.pubads() ) ); } );

googletag.cmd.push(function() {
mobile_slots.push( googletag.defineSlot( “/1005424/_dPSv4_mob-all-article-bottom_(300×250)”, [300, 250], “pb-ad-78158” ).addService( googletag.pubads() ) ); } );

The post How to Add Vintage Frame Overlays Using Alien Skin Exposure X by Lily Sawyer appeared first on Digital Photography School.


Digital Photography School

 
Comments Off on How to Add Vintage Frame Overlays Using Alien Skin Exposure X

Posted in Photography


Alien Skin releases non-destructive photo editor Exposure X

11 Dec

Alien Skin has launched Exposure X, its non-destructive photo editor and film emulation software for Mac OS X and Windows. Exposure X is the successor to Exposure 7, and functions as both a plug-in for Adobe Lightroom and Photoshop as well as a standalone editor. Features include a revamped user interface, RAW image editing, and an import system that doesn’t use a catalog file.

Plans to release Exposure X were announced weeks ago. As promised, the software combines simplified design with non-destructive editing tools for organizing, editing, processing, and storing photos. Exposure X doesn’t use a catalog file, instead opening photos directly from the source folder. The interface, meanwhile, does away with separate modules, presenting a full set of tools at all times, according to Alien Skin. Analog looks can be applied to images, including Kodachrome, Lo-Fi, Daguerreotypes, and more. 

Exposure X is a free upgrade for Exposure 7 owners and $ 99 USD for those with other Exposure versions. The software is $ 149 USD for new customers.

Via: Alien Skin

Articles: Digital Photography Review (dpreview.com)

 
Comments Off on Alien Skin releases non-destructive photo editor Exposure X

Posted in Uncategorized


Bio-Wearables: Tech Tattoos Put Working Circuits on Your Skin

30 Nov

[ By WebUrbanist in Gadgets & Geekery & Technology. ]

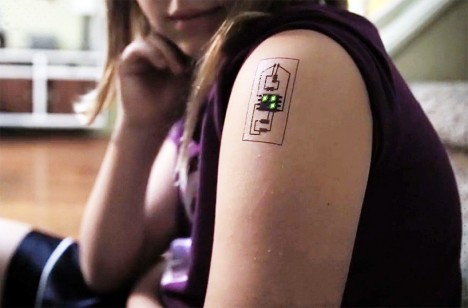
wearable circuit board tattoo

Tech Tats use conductive inks to create a circuit board right on your skin, providing a passive and unobtrusive alternative to standard wearables. Smartwatches and fitness trackers tend to stand out (worn on wrists or around necks) and need to be taken off and put back on daily, whereas these tats (while temporary) can be applied indefinitely.

The wearable can be used to monitor body temperature, blood pressure, stress levels and heart rate, then transmit data wirelessly to a mobile app or computer.

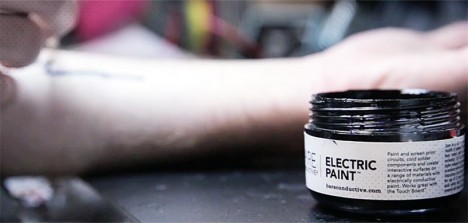
wearable electric ink paint

Lying effectively flat against the surface of your skin, these complete circuits are easy to conceal or reveal depending on whether or not you want to show off your ink.

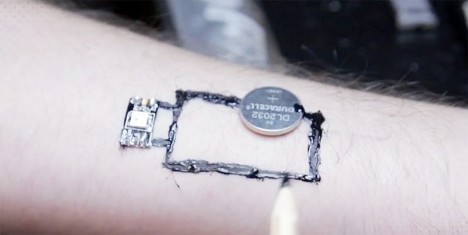
wearable tech example development

The DIY-friendly design uses LED lights, a microcontroller and conductive ink – for now, the result is intentionally temporary, but permanently-inked versions could work as well.

wearable tech app wireless

The applications are numerous, starting with medical but expanding to financial as well as other identification-oriented use cases. A wearable wallet could be tied to your banking information, for example, or you could apply a Tech Tat to your child during an outing to a busy place, providing an easy way to track them in case you get separated. Chaotic Moon is currently developing both the wearable circuitry tech as well as related applications.

Share on Facebook


[ By WebUrbanist in Gadgets & Geekery & Technology. ]

[ WebUrbanist | Archives | Galleries | Privacy | TOS ]


WebUrbanist

 
Comments Off on Bio-Wearables: Tech Tattoos Put Working Circuits on Your Skin

Posted in Creativity