RSS
 

Posts Tagged ‘Setup’

Skate Park To Go: Duo Designs Mobile Modular Setup

20 Aug

[ By Steph in Design & Products & Packaging. ]

Screen Shot 2015-08-19 at 4.55.27 PM

Skateboarding isn’t classified as a real sport in the Netherlands, but one duo decided to take the resulting lack of decent official skate parks into their own hands with a guerrilla solution. Now, legally or not, virtually any public space can become a skate park thanks to a series of modular DIY components by Martijn Hartwig and Dario Goldbach.

Screen Shot 2015-08-19 at 4.55.09 PM

The JIRAJIRA project is the duo’s final work as graphic design graduates at Willem de Kooning Academy, and consists of nine hand-painted ramps, quarter pipes and benches that can be loaded onto rolling platforms and transported to any location within Rotterdam. Dutch artists Leon Karen and Vincent Blok were commissioned to decorate each element, turning the collective park into a sort of portable gallery.

Screen Shot 2015-08-19 at 5.00.45 PM

Screen Shot 2015-08-19 at 5.01.06 PM

Keeping the whole setup mobile is ideal, since the cops are likely to come along and tell you to get lost. The modular parts are designed to work in conjunction with objects typically found in parks and city squares, like trash cans and benches. Since skaters are going to make use of any surfaces they can find anyway, possibly including some of the city’s temptingly curvy war monuments, it’s a decent compromise with the authorities.

skate park 3 skate park 2

Rotterdam’s only skate park, a metallic monstrosity known as the Westblaak, closed down after being deemed unsafe. In a profile on the city’s scene, skateboarding magazine Kingpin says that since nearly the entire city was destroyed during World War II, most of the streets are smooth and there’s plenty of eminently skateable new construction. “The only downside would be that The Netherlands is pretty much flat, so not too many stairs and or rails,” they note, so clearly the JIRAJIRA project is filling an underserved niche.

Share on Facebook


[ By Steph in Design & Products & Packaging. ]

[ WebUrbanist | Archives | Galleries | Privacy | TOS ]


WebUrbanist

 
Comments Off on Skate Park To Go: Duo Designs Mobile Modular Setup

Posted in Creativity


Learn How to Setup Studio Lighting in 15 Minutes

29 May

Do you find studio lighting daunting? Understandable. When I got my first set of lights I played with it for half an hour. Intimidated and confused, I shoved it back in the box where it stayed for six months.

Don’t worry though, mastering exposure with studio strobes is easy; in fact it’s probably one of the easiest of the photographic skill sets. By following this tutorial, you can go from no experience with studio lighting, to getting a correct exposure on your first frame, without the aid of expensive and unnecessary light meters. This isn’t a crash course in complicated theories and physics; our goal is to get you using strobes and creating photographs as quickly as possible. You can return to the theories at your convenience. I am a firm believer in the idea that it’s easier to learn the why, when you’ve already figured out the how.
Warpaint john mcintire photography 0754 2

Getting Ready

Before we start, you’ll need to do a few things in preparation:

  1. Setup your studio strobe on its stand, set it to full power and make sure it works.
  2. You should know how to connect your strobe to the camera and make it fire by way of remote trigger, pc sync cable, slaved to your on-camera flash, or by way of an in-camera system. Refer to your manuals if you need help.
  3. Have your strobe’s instruction manual at hand.
  4. Settings: Set your camera to manual mode, your shutter speed to 1/125th of a second, and your ISO to 100. (If you have an older model, or a film camera, then default to 1/60th of a second.)
  5. Have a calculator at hand will make things easier.
  6. Finally, I recommend that you start to think in full stops, which I’ll cover in the next section.

Thinking in Full Stops

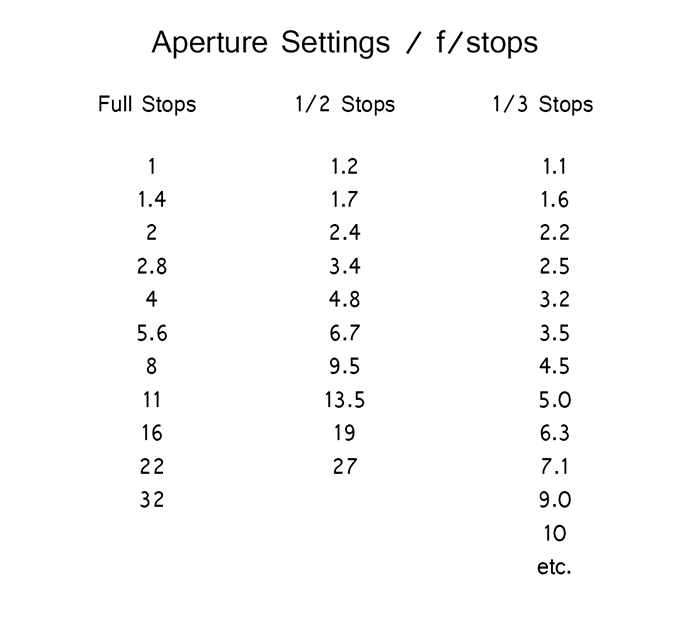
Most of our modern cameras are capable of setting the aperture in increments of 1/3 or 1/2 of a stop. This is extremely useful for fine tuning the exposure in most situations; however, for the purpose of this exercise, it is much easier to ignore them for now and concentrate on the full stop values as indicated in the chart below.
Fstops

Finding Your Guide Number

The next step is to flip through your strobe’s manual and find where it lists the Guide Number (also check whether the guide number is listed in feet or meters; this is vital). This magic number is a rather complicated thing and steeped in the brain-wracking Inverse Square Law. As promised, you don’t yet need to know why it works; you only need to know how to use it at this point.

There are two main ways to use the guide number, that will be useful to you. You can choose your aperture based on the desired outcome of your photo and calculate where to put your strobe, or you can place your strobe for a desired lighting effect and calculate the correct aperture.

Calculating Aperture

Some lighting effects require strobes to be in certain positions, and distances from your subject and other strobes. In other circumstances, your strobe might be in a fixed position and it cannot be moved.

In these events, to calculate the aperture for a correct exposure all you have to do is measure the distance between the light source and your subject in feet or meters (whichever your guide number is listed as). Now divide your guide number by that distance. For example a guide number of 66 with a distance of 6 feet between your subject and the light source would result in: 66 divided by 6 for a result of 11. Your answer is your aperture for a correct exposure: f/11.

Most guide numbers never divide so evenly into full stops. For example, if you get a result along the lines of f/9.2, just round it off to the nearest full-stop for the moment and we’ll learn how to fine-tune the exposure shortly.

Calculating Strobe Distance

Conversely, if you know what aperture you want to use, for a creative effect perhaps, simply divide the guide number by your desired aperture. My tendency for studio portraits is f/8, so if you divide our previous example of 66 by 8 (66/8) you get 8.25. To get a correct exposure for this setup, you would just place your light source 8.25 feet away from your subject. It really is that easy.

One caveat: if you have a high powered strobe in a small place, you’re not going to be able to set your camera to something ridiculous like f/64. If your power output is too high, just turn your strobe down to half power and divide the guide number by two.

Fine Tuning Exposure without Changing Your Settings

As you learned, there are instances where you want your aperture to remain constant. You also don’t want to mess with the power settings on your strobe so much that they completely change your guide number and negate your ability to calculate your exposure with ease. Yet subjects move, or you might want to over or underexpose your image for creative effect. The way to do this is simple.

To underexpose or reduce the amount of light falling on your subject, you would move your strobe further away. If your light source is really close to the subject and you move it back about a foot, you will lose 1-2 stops of light (smaller f/number). If your source is farther away from the  subject and you move it back one foot, you will lose less light. This is caused by the Inverse Square Law which states:  In physics, an inverse-square law is any physical law stating that a specified physical quantity or intensity is inversely proportional to the square of the distance from the source of that physical quantity.  (and link to the wiki definition). Just know that closer in you lose more light as you back it away, than if the light is situated farther from the subject to begin.

This is also why I asked you to consider thinking in full stops rather than fractional increments. Moving a strobe or a model one or two feet is much easier to judge on the fly than the four inches (10cm) a third of a stop increment would require.

Notes on Modifiers

The most common modifiers in studio photography will affect the output of the strobe in terms of exposure. You may need to increase or decrease your aperture, or the distance of your light source, depending on which modifier you choose.

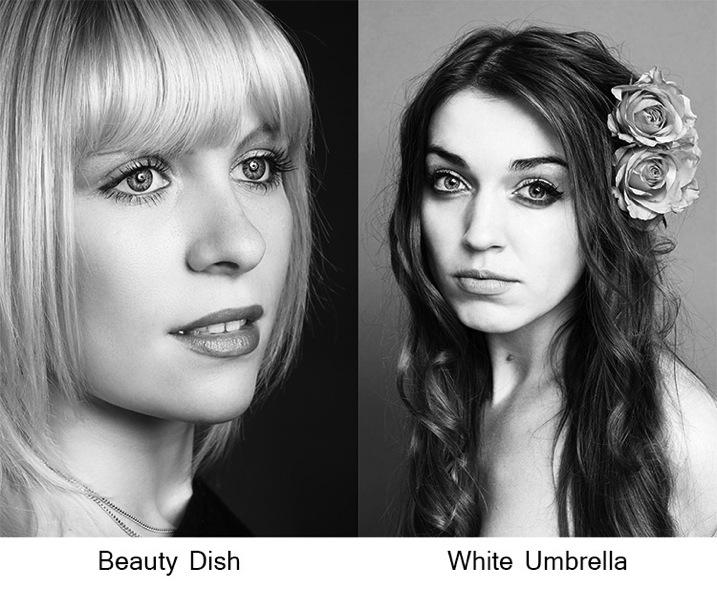
Soft boxes and white or translucent umbrellas, which all produce a softer, more diffused light, will decrease the amount of light falling on your subject. To combat this, choose a larger aperture (smaller f/number) or move your light source closer to your subject.

Beauty dishes, silver umbrellas and reflectors, which all produce a harder, more defined light, will increase the amount of light falling on your subject requiring you to choose a smaller aperture (larger f/number) or to move your light source further from your subject.
Modifierexamples john mcintire photography

If you choose to alter your aperture in these situations, feel free to revert to your 1/3 stop increments. A modifier will rarely alter the output of a strobe by a full stop.

You will quickly learn how your modifiers affect the output of your strobes and within a few sessions you should find yourself automatically compensating for them without thinking about it.

Putting it into Practice

I set up a quick portrait session to help demonstrate how to employ these techniques. Gemma graciously volunteered for the task.

The only preparation was the setup of a paper background and fitting the strobe with a beauty dish. After she arrived, I asked Gemma to stand two feet from the background and I placed the light source straight in front of her and as high possible with the beauty dish pointed downward at her face.

All that was required to start shooting was the correct aperture. The Bowens GM400 I used has a guide number of 76. I measured how far away the light source was; which was 7.5 feet. Dividing 76 by 7.5 gives a result 10.133. Because I was using a silver beauty dish, we know that I need to stop down the aperture to get a precise exposure so I set the camera to f/11 and took a test shot. As you can see from the histogram, these simple calculations gave me the correct exposure and it took less than a minute to get there.
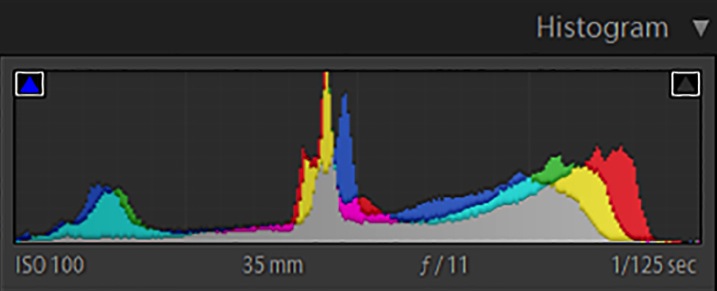
Gemmahistogram

In this image you can see that from the first frame to the last, the exposure remained constant leaving me free to concentrate on other aspects of the images.
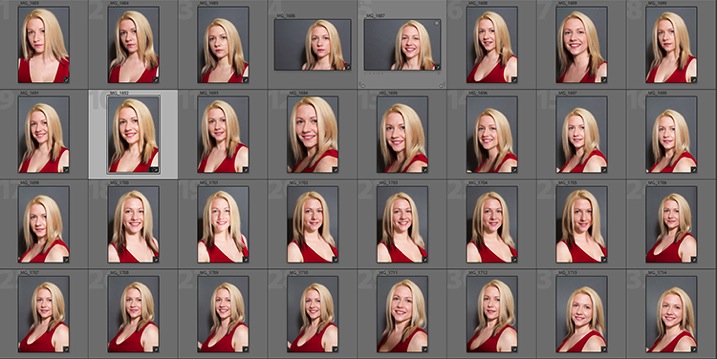
Gemmacontactsheet

Finally, here you can see the end result.

Gemma john mcintire photography 1692

I hope you’re still with me, and that I’ve convinced you that studio strobes are nothing to be afraid of. With a little practice, the techniques outlined in this article will quickly become second nature, allowing you to concentrate less on the technicalities of exposure, and more on aesthetic variables such as composition and establishing rapport with a client or model. As with most things, the key is practice. Snag a friend, a pet or even a bowl of fruit and run through the whole process again and again, until calculating the correct exposure becomes reflex, and you’ll find yourself spending more time and energy on the creative processes rather than the technical ones.

googletag.cmd.push(function() {
tablet_slots.push( googletag.defineSlot( “/1005424/_dPSv4_tab-all-article-bottom_(300×250)”, [300, 250], “pb-ad-78623” ).addService( googletag.pubads() ) ); } );

googletag.cmd.push(function() {
mobile_slots.push( googletag.defineSlot( “/1005424/_dPSv4_mob-all-article-bottom_(300×250)”, [300, 250], “pb-ad-78158” ).addService( googletag.pubads() ) ); } );

The post Learn How to Setup Studio Lighting in 15 Minutes by John McIntire appeared first on Digital Photography School.


Digital Photography School

 
Comments Off on Learn How to Setup Studio Lighting in 15 Minutes

Posted in Photography


Did Amazon just patent the seamless background setup?

07 May

amazon-seamless-white-670x434.jpg

On March 18th the United States Patent and Trademark Office granted a patent to Amazon covering a specific method to achieve the common photographic technique of capturing an image of a subject against a plain white background. Patent No.US 8,676,045 B1 describes a setup using multiple lights and a white backdrop which results in images that require no post-process retouching to remove shadows. Learn more

News: Digital Photography Review (dpreview.com)

 
Comments Off on Did Amazon just patent the seamless background setup?

Posted in Uncategorized


Lightroom Workflow – from Setup to Finished Sunrise Photo

01 Dec

One of my favorite times of the day to photograph is sunrise. There’s just something about the peacefulness of being up before the sun, before most of the human world, that allows me to clear my head.

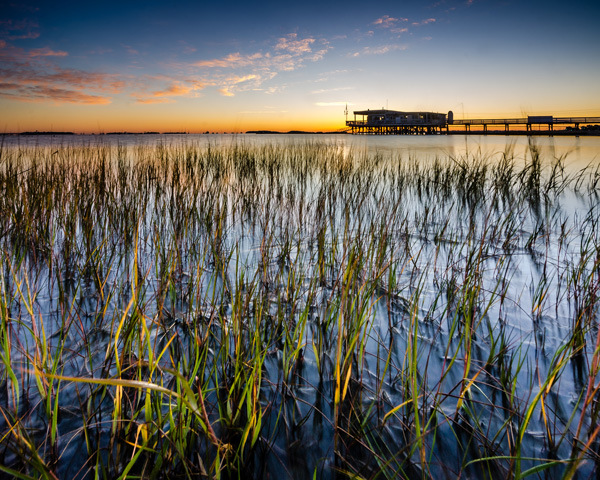
Sunrise photos have always been high on the list of fan favorites and I know that there are a great many DPS readers who love them as well, so I thought I’d share with you a little bit about how I made the shot above from finding the location to setting up the camera and then a step by step walk-through of my Lightroom workflow.

Lightroom Workflow Final Image

Determining a location

To begin a shoot you need a concept, and while photographing sunrise is always a great concept to start with, one of the most important things that you’ll need to do is find a location. This can be difficult to do sometimes, but if you’re struggling to find a new location, check out 5 Creative Ways to Find New Locations for Photography for some inspiration.

I can tell you that the inspiration for this photo came from my sister who saw this boat house while out on an afternoon jog. She sent me a text message demanding that I come spend a night so that I could photograph it at sunrise – and sure enough that’s exactly what I did. The key point to take away from this is, that inspiration can come from anyone and any where, so make sure that you are paying attention to your surroundings as well as what people are saying about their own.

As for getting to the location for a sunrise shoot you’re going to have to wake up early. Well before sunrise. For this reason I typically will either spend the night in a hotel or find a friend or family member who lives close enough to the location to allow me to crash for a few hours, otherwise there might not be any point of sleeping at all. Think of it like this… If you can still see stars – you’re doing it right!

Setting up the camera

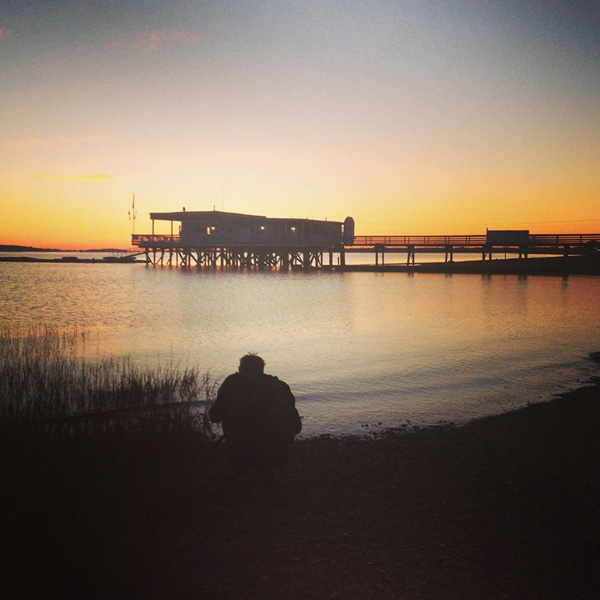
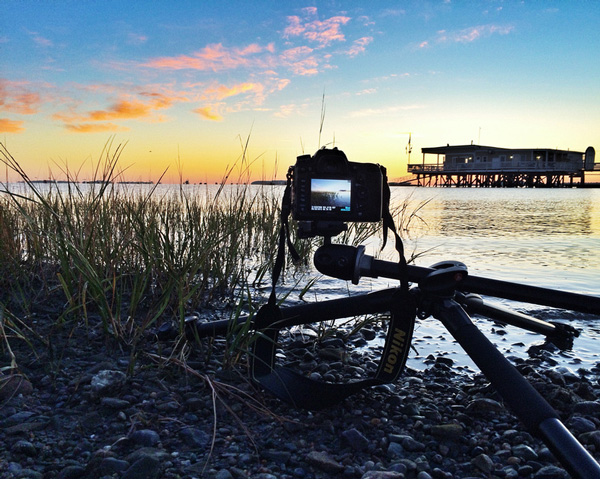
Since camera settings will vary depending on your scene I thought I’d share a couple behind the scenes shots. The first is one that my sister took of me while I was setting up my camera and tripod along the shore – notice how close to the water I get. The second shot is a close up that I took of my camera setup during the shoot, notice that for this particularity shot the tripod was nearly flat against the ground to allow me to get a very low perspective, and allow for the foreground sea grass to take up a good portion of the frame.

Lightroom Workflow - Setting up the shot

A behind the scenes shot of yours truly setting up the camera

Lightroom Workflow - Behind the Camera

A photo of the camera set up – notice how close to the water and how low to the ground I put the camera for this shot

It’s important to note that each shoot is going to be different and you must realize that with every sunrise and every location there will be challenges that you will have to overcome. While I can show you examples of how I set up the camera and my thought process behind it, when you get out to your own location it’s up to you to determine the best ways to photograph the scene.

Back home – it’s time to process the photos

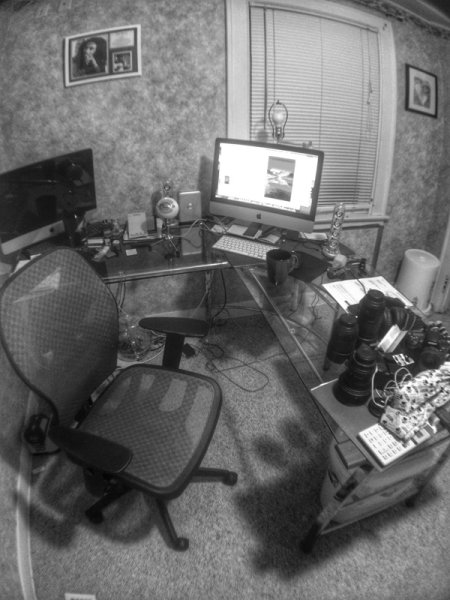
Lightroom Workflow - Office

Just for fun I thought I’d throw in this snapshot of my office – What’s your desk look like?

Lightroom workflow – which frame to process?

Before you can start processing you must determine which of the frames you want to use. There’s no “one-size-fits-all” way of doing this, it really comes down to the person behind the computer. Some people like to simply process everything from the start of their shoot to the end. Other people like to meticulously rate everything, fill in all the meta data and stay super organized. My own workflow usually consists of a quick browse through all the photos that I’ve captured in a particular shoot, rating each of the ones I want to edit with a 5-star rating, and leaving everything else untouched for the time being. I’ll usually come back to shoots from time to time, to see if anything I may have missed on my first go through jumps out at me on a second glance.

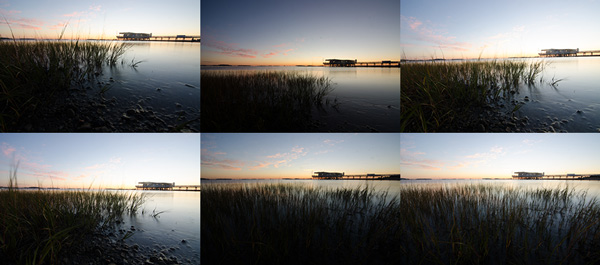
Lightroom-workflow-collage

Six different frames from the shoot – I chose the bottom right frame for today’s photo

Lightroom workflow – making adjustments

Now that you’ve chosen a photograph to edit, it’s time to dive into the develop panel and get started with the post production workflow.

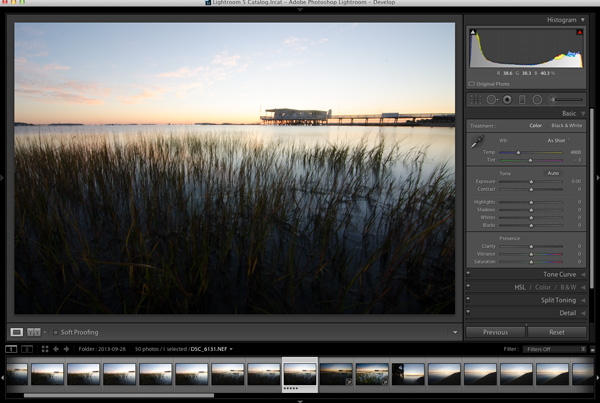
Lightroom Workflow - Oriignal

Enter the develop panel and select the photo to be edited.

Since this photograph is all about the sunrise, the first step is to make sure that you get your sky exposure as close to perfect as possible. By making a small adjustment here to the exposure slider in the basic tab you can have a great effect on the sky which will set the foundation for the rest of the photograph. It might look a bit under exposed at first, but we will be fixing this and fine tuning everything throughout the tutorial.

Lightroom Workflow - Expose for the sky

Adjust the exposure for the sky

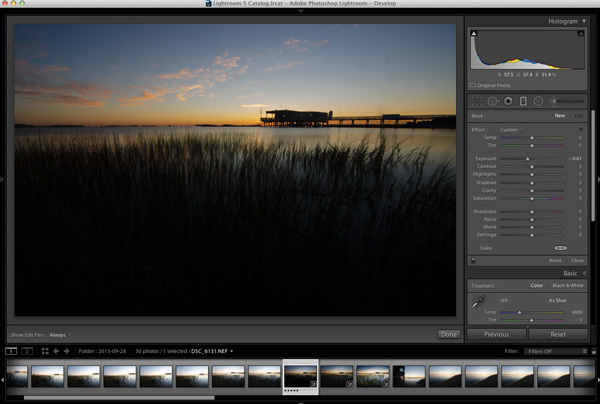
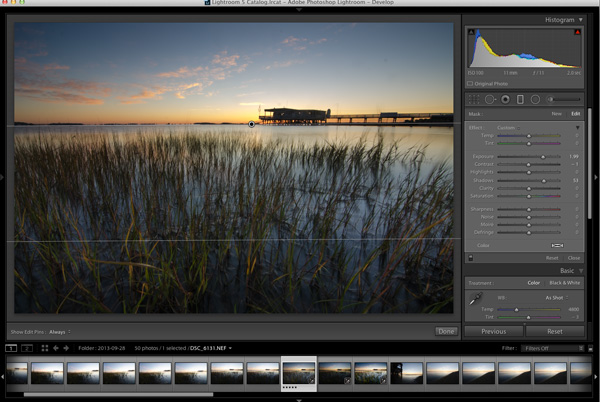
To bring the foreground back into the image you will want to add a graduated filter into the frame (assuming you didn’t use one in the field of course). To do this simply press the ‘M’ key on your keyboard to open that panel in Lightroom. To apply the graduated filter drag in from the bottom of the frame and place the filter on the horizon line. Remember the filter’s effect is greatest starting from the direction you initially dragged in from so here the effect will be greatest towards the bottom of the frame.

Next to bring the exposure back into the foreground by increasing the exposure and shadows sliders (moving them to the right) of the graduated filter until you’re satisfied with the look. You will be able to fine tune the image by using the basic tab a bit later. You can always go back to this graduated filter if you need to make a minor adjustment later on, as well, simply by revisiting the graduated slider panel and clicking on the button (dot) of the graduated slider to activate it for editing.

Lightroom workflow - graduated filter

Apply a graduated filter to adjust the exposure of the foreground without effecting the sky from the previous step

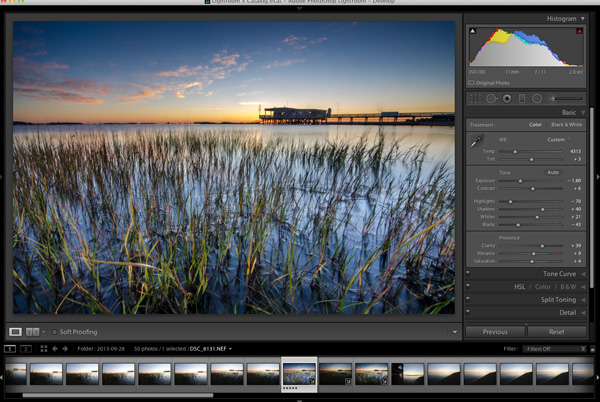
Now that you’ve exposed for the sky and brought back some foreground light, the next step is to add contrast, color, and clarity – all of which will help to make your image ‘pop’. This can be done by using the basic tab in Lightroom, which I’ve covered in Master These Five Lightroom Sliders and Your Photos Will Pop, if you’d like more information.

Lightroom workflow basic tab

After achieving a general evenness in the previous steps use the basic tab to add contrast, color and clarity

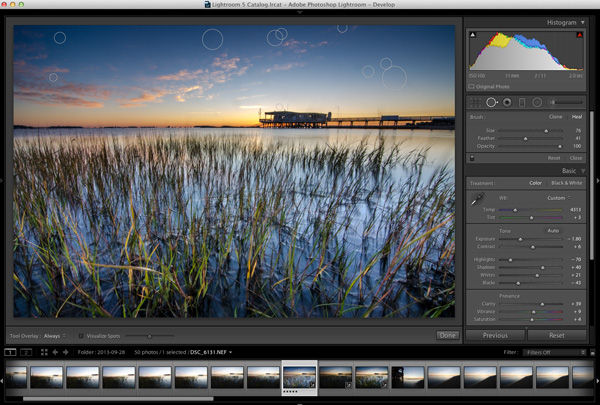
At some point you’ll want to clean up the dust spots or remove distracting pieces of litter or other unwanted items from your image so now’s a good time to jump into the clone/heal tool and do just that – as you can see I need to get my sensor cleaned.

Lightroom Workflow - Cloning

Here’s a good chance to clean up those pesky dust spots by using Lightroom’s clone/heal tool

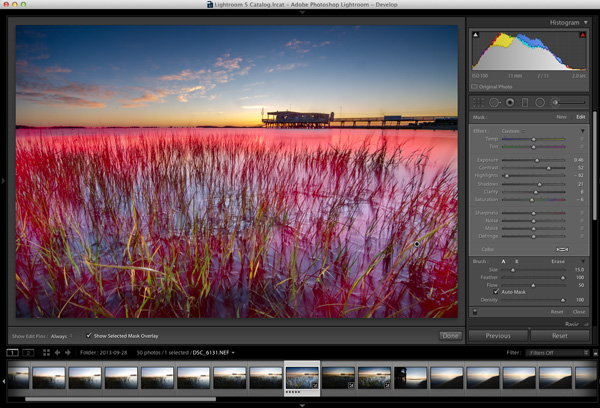
Final adjustments can be made by using a combination of different adjustment brushes. Usually you’ll want to use this tool to control specific areas of the photograph, or specific parts of the exposure. To open the adjustment brush panel press ‘K’ on the keyboard and click on your image to place a brush. If you’d like to use more than one brush you can click on ‘New’ and again click on your image which will allow you to adjust two different parts of your scene separately from one another.

In the photo below I’ve added an adjustment brush to affect the highlights, and contrast of the water at varying levels of intensity. You can control these levels of intensity by adjusting the “flow” slider of the adjustment brush which will determine how much of the effect is applied at each pass of the brush – a lower flow has less effect per pass than a higher flow.

Lightroom workflow - adjustment brush

Fine tune the highlights on the water with an adjustment brush. The red overlay can be turned on and off with the check box below the photo (or ‘O’ on your keyboard)

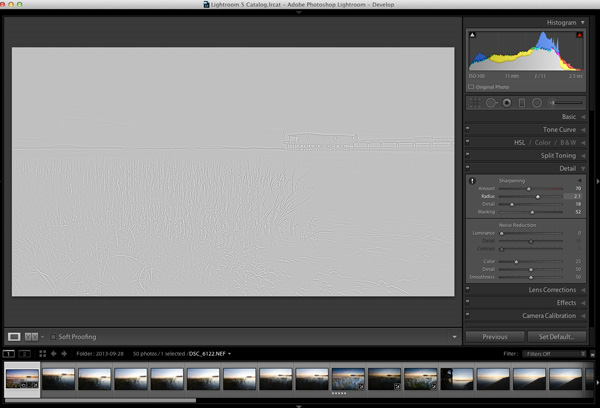
Before you call it a day – the last step is to dive into the detail panel in Lightroom and apply some sharpening. For some more information on Lightroom’s sharpening options you can watch this Youtube video A Look at Sharpening in LR4, which is part of a weekly series I run on my channel.

Lightroom workflow - sharpening

Apply any sharpening you wish using Lightroom’s sharpen panel.

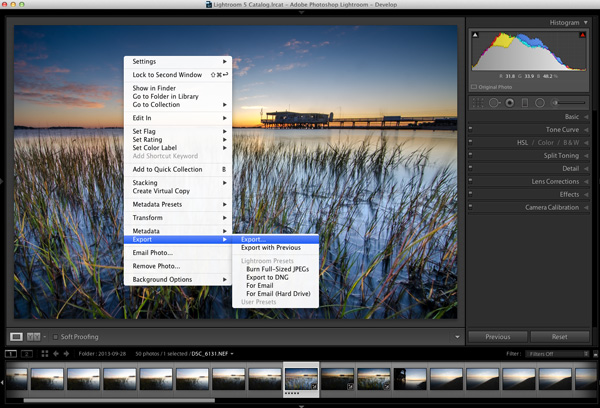
Lightroom Workflow Export

All that’s left to do now is export and share your work with the world.

Exporting and sharing

All that’s left now is to export the photo and share the results.

I hope this step by step Lightroom workflow helps you learn a bit about how to process your own photos. Share a before and after Lightroom edit in the comments below, and if you’ve got any behind the scenes shots, those are always fun to see as well. Don’t forget to let us know how you achieved the results.

Post originally from: Digital Photography Tips.

Check out our more Photography Tips at Photography Tips for Beginners, Portrait Photography Tips and Wedding Photography Tips.

Lightroom Workflow – from Setup to Finished Sunrise Photo

The post Lightroom Workflow – from Setup to Finished Sunrise Photo by John Davenport appeared first on Digital Photography School.


Digital Photography School

 
Comments Off on Lightroom Workflow – from Setup to Finished Sunrise Photo

Posted in Photography


Last Day to Enter to Win the Ultimate Time-Lapse Photography Setup

01 May

JMG-Galleries.com Ultimate Time-Lapse Photography Giveaway - Over $  5000 in Prizes

Today is the last day to enter to win some amazing photo gear and software in my Ultimate Time-Lapse Photography Giveaway.

Win an eMotimo TB3 Black & Dynamic Perception Stage 0 Dolly System
with a Quick Change 8 RPM & 21 RPM with MX2/AT2 Controller!
Enter Here: http://bit.ly/WGy7Jw

Additional bonus prizes, many worthy of grand prize status, are available from Adobe, Apple, GuraGear, BorrowLenses.com, and Lexar. Don’t miss your chance to enter to win amazing time-lapse photography gear. Good luck!


Copyright Jim M. Goldstein, All Rights Reserved

Last Day to Enter to Win the Ultimate Time-Lapse Photography Setup

The post Last Day to Enter to Win the Ultimate Time-Lapse Photography Setup appeared first on JMG-Galleries – Landscape, Nature & Travel Photography.


JMG-Galleries – Landscape, Nature & Travel Photography

 
Comments Off on Last Day to Enter to Win the Ultimate Time-Lapse Photography Setup

Posted in Equipment


Lighting Setup: The Athlete

29 Apr
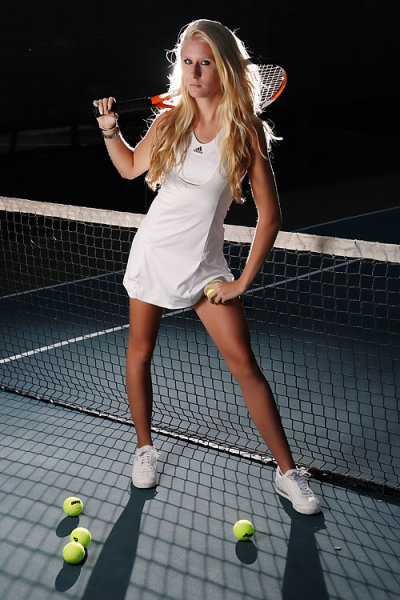
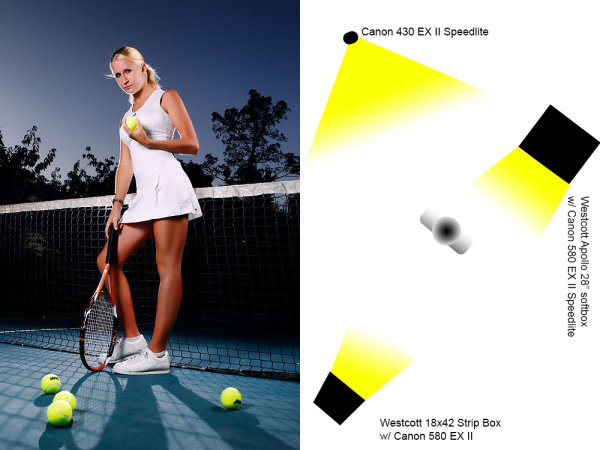
For this shot, only the strip box was used, to camera left. The back light was also used, but I turned the kicker light off for more dramatic lighting.

For this shot, only the strip box was used, to camera left. The back light was also used, but I turned the kicker light off for more dramatic lighting.

I was contacted by a local model who also happened to be a tennis player, and she wanted to do a tennis shoot for her portfolio. We discussed ideas, as well as location.  A tennis court was the obvious choice for location.  I had decided I wanted dramatic lighting, similar to what’s seen in sports drink ads, or athletic apparel ads.  I knew that would require two or three lights, and a darkened overall scene to get the look I was after.

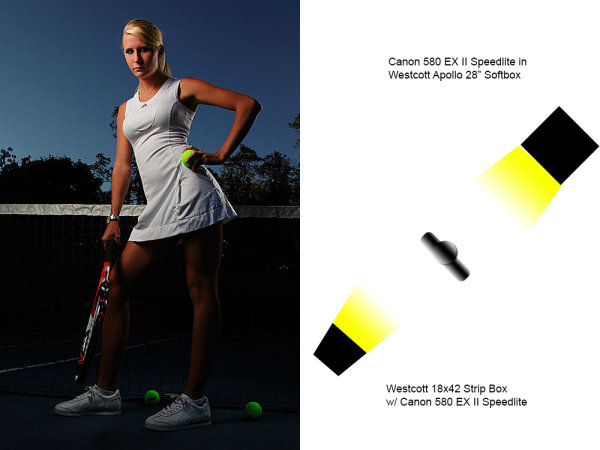
Since the shoot took place in the later afternoon, when there was still plenty of daylight, in order to get the darkened look, I needed to play around with my exposure. I was using the EOS-1D Mark IV, which has a top sync speed of 1/300. For lighting I used two Canon 580 EX II speedlites off camera in softboxes. One softbox was a Westcott Apollo 28″ softbox, while the other was a Westcott 18×42 strip box.  For the shots where the model was backlit as well, I used a Canon 430 EX II speedlite on a light stand with no modifier.  The 18×42 strip box is asymmetrical offers the ability to light a full length figure with soft falloff at the lower legs, while the 28″ Apollo softbox lights the upper half well when close up, or when pulled back can light a full length figure.  I used the strip box to light the model from the front, and the 28″ softbox as the kicker light from the right rear. For the dramatic backlight, I used a bare Canon 430 EX II speedlite pointed back towards the camera.

In order to allow the speedlites to be the main source of light, I needed to deaden the daylight.  I did this by setting the flash to E-TTL, and the camera to shutter priority.  I then dialed back the camera’s exposure compensation to -3.  This served to darken the ambient exposure, allowing the speedlites to provide lighting at the proper exposure.  This made it appear I was shooting at night, or in a darkened stadium.  It’s important to understand that there is a difference between exposure compensation and Flash Exposure Compensation.  Exposure compensation will affect the exposure of ambient light, but will not affect flash output. This allows you to balance the flash exposure with the ambient exposure in any way you prefer. The speedlites were set to ratio their exposure based on E-TTL metering.  Canon speedlites can ratio A:B. If a third group of speedlites is set to Group C, these can be adjusted using flash exposure compensation.  The main ratio used was 4:1, but I did vary this throughout the shoot.  The backlight was set to E-TTL, Group C, with Flash Exposure Compensation set to +3.

For athletes, in order to give them that larger than life look, it’s best to shoot from a low angle. I instructed the model to vary her poses between intimidating looks and stances.  I used tennis balls to add to the theme, and by sending the backlight through the net, added a dramatic shadow to the foreground. This ended up being a set I was really happy with, and the model was happy with her shots.

In this shot, the backlight was turned off, and the 28" softbox was positioned behind and to camera right of the model. This created a dramatic shadow to the front of the model while strip box lit her left side. The backlight was turned off for this shot.

In this shot, the backlight was turned off, and the 28″ softbox was positioned behind and to camera right of the model. This created a dramatic shadow to the front of the model while strip box lit her left side. The backlight was turned off for this shot.

For this shot, all three lights were in play.  The backlight caused the dramatic shadows and a highlight effect, while the kicker illuminated the model's right rear, and the strip box lit her face and front side.

For this shot, all three lights were in play. The backlight caused the dramatic shadows and a highlight effect, while the kicker illuminated the model’s right rear, and the strip box lit her face and front side.

Post originally from: Digital Photography Tips.

Check out our more Photography Tips at Photography Tips for Beginners, Portrait Photography Tips and Wedding Photography Tips.

Lighting Setup: The Athlete


Digital Photography School
 
Comments Off on Lighting Setup: The Athlete

Posted in Photography


The Basics of a One Light Setup: A Lighting Tutorial

15 Mar

Lately we’ve had a lot of readers asking for advice about simple lighting techniques for shooting portraits. Here’s a good video from TheSlantedLens that gives some good basic information on how to set up a one light setup.

Further Reading

  • 6 Portrait Lighting Patterns Every Photographer Should Know
  • Studio Portraits – Getting Started with One Light
  • 5 Classic Lighting Positions for Portrait Photography

Post originally from: Digital Photography Tips.

Check out our more Photography Tips at Photography Tips for Beginners, Portrait Photography Tips and Wedding Photography Tips.

The Basics of a One Light Setup: A Lighting Tutorial


Digital Photography School
 
Comments Off on The Basics of a One Light Setup: A Lighting Tutorial

Posted in Photography


Win the Ultimate Time-Lapse Photography Setup – Over $5000 in Prizes

06 Mar

JMG-Galleries.com Ultimate Time-Lapse Photography Giveaway - Over $  5000 in Prizes
Win an eMotimo TB3 Black & Dynamic Perception Stage 0 Dolly System
with a Quick Change 8 RPM & 21 RPM with MX2/AT2 Controller!

I am happy to announce that I’ve teamed up with eMotimo and Dynamic Perception to giveaway the ultimate time-lapse photography setup. Visit the JMG-Galleries Facebook page to enter. In addition bonus prizes, many worthy of grand prize status, are available from Adobe, Apple, GuraGear, BorrowLenses.com, and Lexar. Don’t miss your chance to enter to win amazing timelapse photography gear.


HERE’S HOW IT WORKS

STEP 1: Like JMG-Galleries.com on Facebook
Visit facebook.com/jmggalleries and click on the “Giveaway” page under our profile photo.
If you are not yet a fan you’ll need to “Like” BorrowLenses.com to access the contest

STEP 2: Enter the drawing
To enter fill out the contest entry form with your name, email address, city, and state. Gain additional entries in the drawing by subscribing to our newsletter, and following our generous sponsors eMotimo and Dynamic Perception.

STEP 3: Share for extra entries to better your odds
After you enter the drawing you will be able to share this giveaway with your friends via Facebook, Twitter and email with a custom link. You will automatically receive an extra entry in the giveaway for each friend that you refer.  You can return to our contest page at any time to check on how many referrals you’ve received.

STEP 4: Bonus prizes
Once you’ve referred 10 of your friends to enter the giveaway, return to our contest page and you will be able to “UNLOCK” our bond prize drawings for 1 of dozens of great bonus prizes.

STEP 5: Win
On May 1st we will select our winners by random drawing. After selecting our winners we will contact our grand prize winner of the eMotimo TB3 Black & Dynamic Perception Stage 0 Dolly System with a Quick Change 8 RPM & 21 RPM with MX2/AT2 Controller.  We will also announce the winners on our Facebook wall, so be sure to check our page and your email inbox to see if you’ve won.

Visit Facebook.com/jmggalleries To Enter

  • Contest Details

    Contest ends April 30, 2013 at 11:59PM PST. No purchase necessary. A purchase will not increase a contestant’s chance of winning. JMG-Galleries.com, a web site that is part of JMG Communications, LLC, is not responsible for entries that are lost, late, misdirected, incomplete, incomprehensible, illegible, damaged, undeliverable or delayed.
  • Eligibility

    To enter, you must be at least 18 years of age. Employees of JMG-Galleries, JMG Communications, LLC, their advertising agencies, affiliates, contest sponsors, employees and immediate families of each are not eligible to win any contest. Immediate family includes the spouse, great-grandparents, grandparents, parents, brothers, sisters, children, grandchildren, and great-grandchildren of the employee and his/her spouse. This also includes individuals for whom the employee is current legal guardian
  • Fraudulent Activity

    Fraudulent or abusive voting will be monitored and omitted through out the course of the giveaway. We reserve the right to disqualify users, without notice, and for any reason.
  • Prizes

    We reserve the right to substitute a prize of equal or greater value in the event that the original promised prize becomes unavailable. eMotimo TB3 Black is valued at $ 885.00, 6′ DynamicPerception Stage Zero System with a Quick Change 8 RPM & 21 RPM with MX2/AT2 controller is valued at $ 1280 and the bonus prize packages range from $ 85-$ 999. The odds of winning will depend on the number of entries. Unless otherwise noted, all contests and giveaway prizes are awarded via random drawing. Winners automatically grant the use of their name and likeness in the promotion of this and other JMG-Galleries.com contests. This promotion is in no way sponsored, endorsed or administered by, or associated with Facebook. Shipping is free for USA residents; winners outside of USA are responsible for shipping fees and your country taxes. All winners have 14 days to accept and coordinate shipping. If winner doesn’t respond within 14 days, prize is forfeited and replacement winner will be randomly selected from qualified contestants. BorrowLenses.com gift certificates are good for rentals only. Prizes are non-transferable and non-exchangeable.

Copyright Jim M. Goldstein, All Rights Reserved

Win the Ultimate Time-Lapse Photography Setup – Over $ 5000 in Prizes

The post Win the Ultimate Time-Lapse Photography Setup – Over $ 5000 in Prizes appeared first on JMG-Galleries – Landscape, Nature & Travel Photography.


JMG-Galleries – Landscape, Nature & Travel Photography

 
Comments Off on Win the Ultimate Time-Lapse Photography Setup – Over $5000 in Prizes

Posted in Equipment


$35 bluetooth wireless setup for you Camera – DSLR FILM NOOB

16 Jan

www.dslrfilmnoob.com I’ve been waiting to post this for more then a week. The first Bluetooth transmitter I received was defective and I had to send it back. The seller was kind enough to cover return shipping, but the back and forth took awhile. I finally received the working Bluetooth transmitter a few days ago and had a chance to run the setup through its paces. I’m very happy to say that everything works great! I was able to get clean audio transmitted over 50 feet line of site and about 20 feet through walls. Two tests of battery life showed 5 hours the first test and 3 hours 45 min second test. Not the 8 hours promised by the manual but still quit good for the price. The receiver actually ran out of power before the transmitter on the second test. I would have thought it would be the other way around. Both the transmitter and receiver aren’t much bigger then a compact flash card so they wont add much weight to your rig and since the Bluetooth transmitter sends stereo audio you can get 2 channels of audio back to your camera. I have the full write up with links and pictures here: www.dslrfilmnoob.com Equipment used in this video: Canon 7d & t2i Canon 50mm f1.2 Canon 35mm f1.4 Sigma 30mm f1.4 Zoom h1, Zoom h4n Generic Bluetooth transmitter/receiver set Sennheiser G2 wireless mic Rode video mic CPM FILM TOOLS RIG


Unboxing and setup of the Lencarta 60x90CM softbox

09 Jan

Unboxing and setup of the Lencarta 60 X 90CM Pro Fold softbox with Bowens S-fit ring. www.sounds-and-images.co.uk www.lencarta.com