RSS
 

Posts Tagged ‘Setup’

How I Shot & Edited – The White Infinity Setup

03 Jan

The Classic White Infinity Backdrop

In my last post about studio photography (the killer clamshell) I covered a simple two light setup for achieving a gorgeous soft beauty look.  This time I thought it might be fun to cover something a bit more general purpose and for this there cannot be anything better than the ever classic white infinity setup.

The All Can Do Lighting Setup

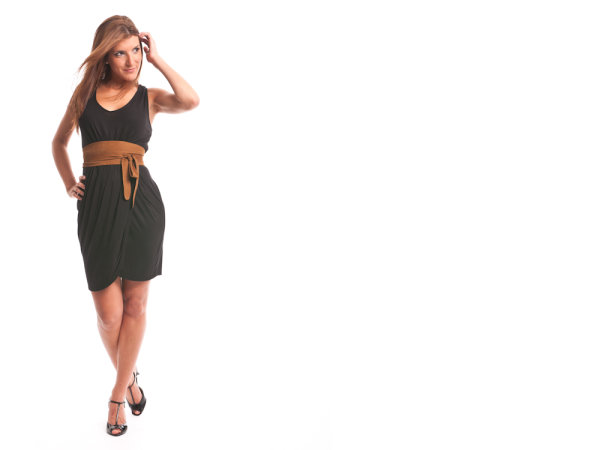
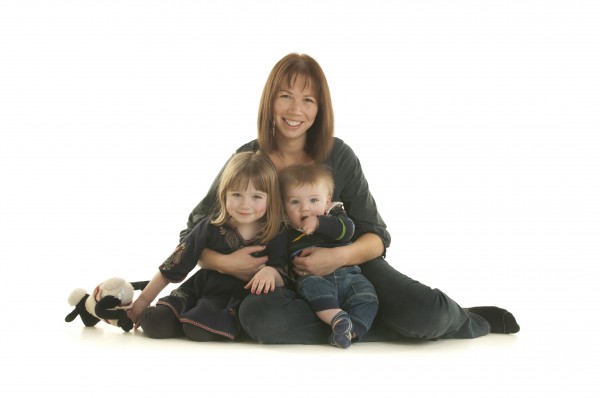
There is a reason why pretty much every major fashion or lifestyle magazine makes good use of a white backdrop and that reason is simplicity.  Not only is this lighting arrangement incredibly easy to achieve but it also delivers sharp, detailed portraits with a beautifully clean and uniform background and most importantly no visible seams or edges.  Aesthetics aside its also great for beginners to try as if done correctly provides a large and consistent zone in which to place your subject, allowing you to concentrate less on the position of your lights and more on placing and posing your model.

Families, pets, models, products the white infinity background is probably one of the most versatile setups going and to help you get started here is my approach to nailing this fantastic lighting arrangement:

Disclaimer

Ok, confession time.  The images and steps below are 100% genuine and therefore its going to be pretty obvious that I screwed up my exposure during this shoot.  Before you hit the big red ‘X’ at the top of your browser .. I can explain.  I basically had about 10 minutes to set everything up and 30 mins to take the shots before my studio rental was over.  Because I was in a rush I failed to spot that a large portion of the floor area was under exposed (by about a stop).  I promise I don’t do this all the time and if you don’t believe me check please feel free to check out the studio section of my portfolio site.  Hopefully by showing you my mistakes you will avoid them in the future.

Equipment

This lighting setup requires three lights and is best achieved using studio strobes as opposed to speed lights given the extra power needed to blow out the background.  As I have said before, hiring a studio is a cheap and very effective way to get access to this kind of equipment, making this shot all the easier to achieve.  If you do decide to do this at home however I would definitely recommend spending a little bit of money on a decent quality background paper, you can use a fabric backdrop but in my experience this will absorb much more light making the exposure more difficult than a non fabric setup.  Its also important that you have a background which is long enough to span both the back wall and floor of your shooting space.

For this setup you will need:

  • Two lights for the background, preferably with some form of diffuser to spread and soften the light.
  • A main light with as large a diffuser as you can possibly get, an octobox is ideal however any softbox or umbrella will also work.
  • If possible a light meter is also a great tool for this setup and will help speed up the setup although it isn’t essential.

The Lighting Setup

The important thing to achieve is a background that is both evenly exposed and completely blown out (i.e. solid white).  The ideal result is to have a background that is twice as bright as your subject, the trick here being the ratio of light as opposed to absolute values.

Typically I will set the exposure for my subject using an aperture of around f8.  Therefore if we want to achieve a background which is twice as bright we need to expose the background at an aperture which is one stop smaller than that used for the subject.

Just in case this doesn’t make complete sense, changing the aperture by one stop will either halve or double the available light.  Therefore if when we meter the background we use an aperture which is one stop smaller than the subject, when we open this back up again to take the final shots the background will now be twice as bright as the subject.

Here is how I go about getting this all set:

  1. Assuming a subject aperture of f8, set your camera to manual and dial in an aperture of f11 and a shutter speed of around 1/125 of a second with your lowest ISO.
  2. Aim the two background lights at the backdrop, positioning them to provide as even a spread of light as possible and either fire the stobes or take a test shot.  Take care to only expose the background, try to avoid any of the light spilling forward onto where the subject will be.
  3. If you have a light meter you can now use this to adjust the power of the background lights until you get an even exposure of f11 across the entire backing.  If you don’t have a light meter set the exposure by taking a test shot of the background, varying the power until the entire backdrop is solid white and evenly exposed.  If your camera has it you can use the highlight clipping warning combined with the histogram to double-check your results.   Remember to check the floor as well as the background, don’t make the same mistake as I did.
  4. Now its time to set the subject exposure, before doing so adjust your camera settings to f8 keeping everything else the same.
  5. Now turn off the background lights and place your subject in position.  Again if you have a light meter you can use this to confirm the right flash power to achieve an f8 exposure.  If you don’t have a light meter set your subject exposure by varying the flash power on your main light until you achieve an exposure that looks right.
  6. Now turn all your lights back on and you are all set.

Two background lights and a main subject light.

The Post Processing

Obviously you can post process your final images however you like but just in case you are looking for a few pointers here is a brief overview of my workflow and more importantly how I overcame my exposure malfunction.

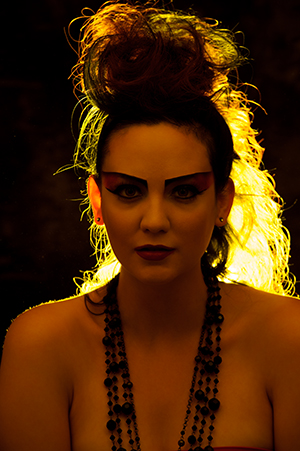
Starting Point – Notice the horrible 'yellow' area of underexposed floor.

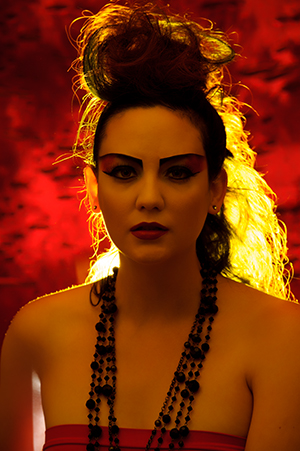
Step 1: White Balance & Crop – Basic adjustments to get the colour right and to straighten up the slight slant on the composition.


Step 2 – Minor exposure adjustment (slight exposure and fill light) to get the subject lighting right.

Step 3 – Contrast corrections using via a minor curves adjustment (slight 'S') and added detail via Clarity.

Step 4 – Now its time to fix the badly exposed floor. This was done using a gradient filter from the bottom up to increase the exposure on the area on the floor. Minor imperfections were cloned out using a spot healing brush.

Step 5 – All done, final image completed. Much better than the start as I am sure you will agree. All in all this took less than 2 minutes and would have been much less if I had got the exposure correct from the start.

Summary

The white infinity backdrop is a fantastically versatile and satisfying lighting setup and one which I would definitely recommend to anyone wanting to try something different to a single light arrangement.   Hopefully the tips here will help you to have a go at this classic lighting look, unfortunately though finding the super model is down to you!

Post originally from: Digital Photography Tips.

Check out our more Photography Tips at Photography Tips for Beginners, Portrait Photography Tips and Wedding Photography Tips.

How I Shot & Edited – The White Infinity Setup


Digital Photography School

 
Comments Off on How I Shot & Edited – The White Infinity Setup

Posted in Photography


Photobooth Business Setup & Photobooth Softwar (09206439906) 702 DZAS & FRAMES CANON MAGAZINE.mpg

27 Dec

Photobooth Business Setup 5 & Photobooth Software & Photobooth Events (09206439906) 702 DZAS & FRAMES CANON MAGAZINE Nikon DSLR Cameras: Nikon D7000, Nikon D90, Nikon D5100, Nikon D5000, Nikon D300s, Nikon D300, Nikon D700, Nikon D3s, Nikon D3, Nikon D3X, Nikon D200 and Nikon D80 Canon DSLR Cameras: Canon EOS-1Ds Mark III, 1Ds Mark II, 1D Mark IV, 1D Mark III, 1D Mark II, 1D, 1DS, 7D, 5D, 5D Mark II, 60D, 50D, 40D, 30D, 20D, 10D, 1100D/Rebel T3, 1000D/Rebel XS, 600D/Rebel T3i, 550D/Rebel T2i, 500D/Rebel T1i, 450D/Rebel XSi, 400D/Rebel XTi, 350D/Rebel XT and 300D/Digital Rebel Canon Powershot Camera: Pro1 G-series G1, G2, G3, G5, G6, G7, G9, G10 S-series S30, S40, S45, S50, S60, S70, S80, S1 IS, S2 IS, S3 IS, S5 IS, SX100 IS, SX110 IS A-series A30, A40, A60, A70, A75, A80, A85, A95, A300, A310, A400, A510, A520, A620, A640 Digital IXUS SD100 (Digital IXUS II), SD110 (Digital IXUS IIs), S230 (Digital IXUS 330), S400 (Digital IXUS 400), S410 (Digital IXUS 430), S500
Video Rating: 0 / 5

 
Comments Off on Photobooth Business Setup & Photobooth Softwar (09206439906) 702 DZAS & FRAMES CANON MAGAZINE.mpg

Posted in Nikon Videos


High-speed macro photographer shares his setup

21 Dec

opener.jpg

German photographer Markus Reugels has gained quite a bit of attention over the years for his stunning and colorful high-speed photographs of the shapes and forms created when liquid is dropped into water. If you’ve ever been curious as to what it takes to get images like these, Reugels talks briefly about the equipment and technique he’s currently using and shares an image of his actual setup.

News: Digital Photography Review (dpreview.com)

 
Comments Off on High-speed macro photographer shares his setup

Posted in Uncategorized


Best Equipment Setup for Beginner Photographers

19 Dec

www.snapchick.com SnapChick talks about the best DSLR setup for beginner photographers.


My computer setup

29 Nov

this is an update to the older mac room tour. I bought everything you see for mowing countless lawns and selling photographs, so dont say I’m spoiled, I’m not…. I just work harder than the rest of you. lol jk….but seriously. Follow Me on FaceBook: bit.ly Twitter too: bit.ly …and visit my newly updated site! thecheez.weebly.com Please Subscribe, Rate and comment and check out the bonus video at the end!
Video Rating: 4 / 5

 
Comments Off on My computer setup

Posted in Nikon Videos


The Killer Clamshell – A Two Light Setup Guide

29 Nov

Awesome Two Light Clamshell Setup – A Real Beauty

Introduction

If your just getting started in off camera flash and studio photography then single light setups are a fantastic, uncomplicated way of getting to grips with lighting techniques.  Despite the wide range of effects that can be achieved with a one light setup, working with multiple lights provides even greater range of creative options and my favourite multi light setup has to be the clamshell.  This lighting setup can be used to produce a soft wrapping quality of light; a perfectly white background and stunning catch lights resulting in a classic beauty look ideal for photographing female models.  Best of all its incredibly easy, so hopefully with the following guide you can also have a go at this great lighting setup.

Setup & Equipment

The basic idea behind this setup is to use a single large light source both as a backdrop and to provide wrap around light.  The subject is then illuminated from above using a second light with any remaining shadows filled in using a flat reflector.

For this setup you will need two light sources; ideally strobe heads although speedlights are also fine but might take slightly longer to recycle given the higher power required.  To achieve the soft quality of light both lights should be shot through large soft boxes, although if you don’t have these then you could us a large sheet as a background and something like an umbrella for the main light.

The basic setup is as follows; the key point to remember is to ensure the backlight completely fills the background.

Lighting Diagram – A Simple Two Light Setup

Metering

Metering for this shot is actually fairly simple and whilst a light meter can be helpful in speeding things up its easy enough to set the exposure for this shot by eye.  The main steps are as follows:

  • Start by leaving your flashes off and start with your camera settings.  Set a small aperture, (something like f8 or f11), a fast shutter speed (around 1/200 to 1/250) and set your ISO to its lowest setting.
  • Turn your back light on and starting with a low power take a test shot and check the image preview on your camera to see how ‘white’ the background is, a properly exposed background should be solid bright white.  A good way to check is to take a look at the image histogram, most of the reading should be to the very right hand edge of the graph indicating that the tones in the image are tending towards solid white.  If the background isn’t exposed properly increase the flash power and repeat.
  • Now its time to get your model in position and check the amount of wrap around light from the background.  Place your model in front of the back light and take another test shot.  Vary the distance between the subject and backlight to change the amount of light wrapping around your subjects head and shoulders.  The purpose of the wrap is to provide some separation and help add definition, so all you need to do is highlight the edges of your model.
  • Now turn your subject light on and take a test shot.  Check the overall exposure and vary the power/position of the light until your models face is correctly exposed.
  • Finally position a reflector below your subjects jawline and use this to bounce fill light into any dark areas of the shot in particular under your models chin, nose and eyes.

Summary

Hopefully the steps above are simple enough to convince you to give this lighting setup a try.   Not only is this a great way to try working with multiple lights but it also results in a really satisfying and flattering image and of course double the lights means double the creativity!

Post originally from: Digital Photography Tips.

Check out our more Photography Tips at Photography Tips for Beginners, Portrait Photography Tips and Wedding Photography Tips.

The Killer Clamshell – A Two Light Setup Guide


Digital Photography School

 
Comments Off on The Killer Clamshell – A Two Light Setup Guide

Posted in Photography


Studio Lighting: Building a Light Set-up

28 Nov

Studio flash photography often appears to be complicated and confusing for the new photographer.  The tangled, twisted mess of light size, power, angle, position, direction, etc… can be daunting to say the least.  Not to mention the need for extra equipment such as backdrops, light stands, modifiers, reflectors and the lights themselves. Wow! Already seems like too much huh? You might find yourself thinking, “I can just use the giant light source in the sky that is available everyday and be done with all this other mangled mess of an armamentarium.”  At times I would not disagree with you, as the natural light from the sun is hard to beat and is in great abundance, however, when I look at how much my understanding of light and shadow has improved from my many unsuccessful studio lighting shoots, the value of learning this sort of lighting is tremendous. And yes I did say “unsuccessful shoots!”

Strangely enough, when I got started with photography, studio lighting was one of the areas in which I was most interested. Not the easiest place to start I can assure you, but  it definitely does not need to be as awkwardly bemusing as it first appears. Now this article is not meant to be a full on detailed description of what lights or modifiers to buy or an in depth scientific analysis of the inverse square law complete with physics equations and Einstein like theorems.  It is more of a reason of why to get started with studio lighting and to break through any mental barriers that might be in your way.  I promise you, once you get your feet a little wet and wild in the studio, you will not only love it, but also find that you have a better eye for light even when you are out at the wee hours of the morning trying to capture that perfectly beautiful sunrise.

To shoot my studio work, I use simple, durable yet economically feasible equipment.  I currently use a set of Alien Bees strobes from Paul C. Buff. There are a lot of other brands of strobes out there, but these have worked well for me and fit within my budget.  Now, you do not necessarily need to use strobes. Westcott has their Spiderlite TD continuous lighting system that also could suffice. Basically any system of lighting can work fine. You could use a couple of lamps with a shower curtain liner to diffuse the light if you want. Don’t get too hung up on the equipment at first, but try to understand how to position and control the lighting to get the desired results.  I am trying not to get pulled into a discussion about equipment, but admittedly some equipment is required. In order to move on, I would recommend getting a good book or two on studio lighting to give you a thorough description of some lighting basics. Two that I have personally found useful are Master Lighting Guide for Portrait Photographers, by Christopher Grey or Basic Studio Lighting: The Photographer’s Complete Guide to Professional Techniques, by Tony Corbell. There was also a nice post here on DPS recently called One Light Portraits: Simple Elegance, by Rick Berk.

Whew! Let’s move on and get into some of the nitty gritty of setting up a studio portrait shoot. Lately, I have been working on some creatively themed portrait shoots as a personal project.  The basics of what you need for a shoot are simple. You need a background and a willing model or subject. This can be a plain wall in your house and a close friend or even some fabric taped to the wall with a bowl of fruit on a table in front of it. My theme was fire, so first I went to the fabric store and found an interesting black/grey charred looking swath. A quick aside, if you want to find some really cool backgrounds in the U.S. go to a fabric store around Halloween and they will have some really great stuff.  Next, I got a hold of a local model, the fabulous Brittney and set-up a time for the shoot. I also hired the amazing Dina Bree Nast a local make-up artist here in Denver, Colorado. I must say, and this is just my own opinion, but if you have never hired a make-up artist for a shoot, you have to try it as the results are spectacular and it will reduce your post-processing time tremendously.

Okay, the date, model, MUA and backdrop were set. Next and most importantly, how do I design the lighting set-up.  A little planning goes a long way with a studio shoot. When you are just getting started you do not want to have to deal with moving a lot of lights around or having your subject face the wrong way and have shadows in places where you do not want them. A sure fire way to avoid this is to first give your subject a stool or a chair to sit on. This will keep them in one place at the same distance and proximity from your lighting set-up and your background. Secondly, stick to one lighting set-up and limit the shoot to it. You want to focus on getting the shot that you want and not be constantly worried about fumbling with the lights. If you are more focused on the lights and everything else going on with the equipment, you will not pay attention to getting a great pose and expression and let’s be honest, the lighting can be less then perfect if you capture the right moment.  Finally, you would like to have an idea of what sort of depth of field at which you would like to shoot. If you want the background slightly blurred go with a wide open aperture of f/2.8-f/4. In my plan for this shot, I chose f/8 as I wanted to capture a bit of the look and texture in the background as I felt it complimented the shot. Additionally, I keep my ISO low which for my Nikon is 200 and my shutter speed I usually leave at 1/125 of a second. Thus, my camera settings are set already and I have not even taken a shot yet.

I always start my lighting set-up with the position and exposure setting of the main light or the one that will be responsible for lighting the subject.  In this shot, I already know I want my aperture around f/8 so that I can capture that background detail. This already let’s me know where I want my main lights exposure to be set. Now, there are two ways to set the main light’s exposure. You can use a light meter or you can wing it by taking some practice shots and checking your histogram and adjusting accordingly. Either way works well even though many people have opinions about one way or the other. Personally, I use a combination of both. So what about position of the light?

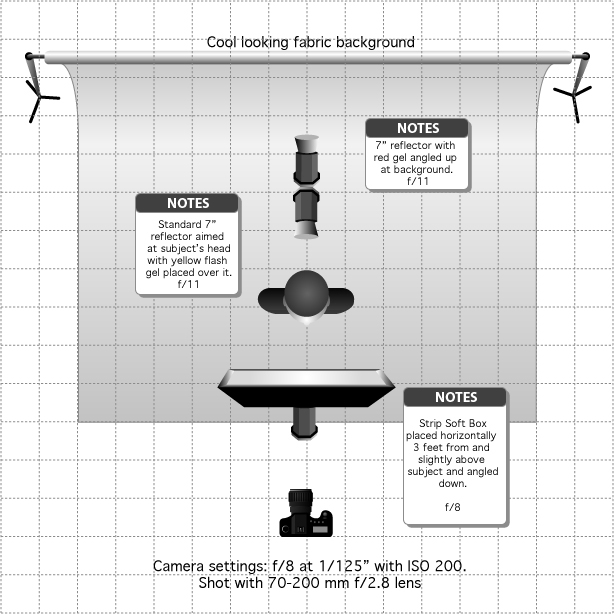
To start out with, I think using a glamour or butterfly lighting set-up (named for the shadow pattern created beneath the subjects nose) is very easy and is incredibly flattering for the subject. To achieve butterfly lighting the main light is set directly in front and slightly above the subject with the light angled down toward the subject. As a beginner, having the light directly in front of the subject is useful cause if the subject turns their head one way or the other they will still always be within the range of the main light. I used a 36-inch strip softbox in this set-up placed about 2-3 ft from the subject in the horizontal position to achieve a narrow, soft beam of light that would not spill onto the background very much. Then I took a few shots to see what it looks like.


As you can see with just the main light, the subject is adequately exposed, however, I cannot see the background and the subjects dark hair blends in so much with the background that you cannot see the outline of her hair. What does this tell me? I need to light the background as well as the hair to separate her from the background and gain some depth to the image. Since my theme was fire, I wanted to incorporate some colors that would support the theme. This made me think of reds, oranges and yellows. So to light the background I set a strobe just up off the floor angled up at the background with a standard reflector attached, however, I decided to place a red acetate gel over the light to give a little color to the background and support my theme. To set the power of this light I turned off my main light and took a few practice shots with only the background light on to see how it looked and adjusted the power of the light until I liked the look.


Here you can see with only the background light, I have a nice subtle red glow to the background that also brings out the interesting texture to compliment the fire theme of the shoot. The background light also wrapped around the subject just a little bit, likely bouncing a touch off the white surface of the softbox in front of her, giving a red tinge to the shadows. If I did not want this extra red in the image I could have moved my subject farther form the background, but I liked the effect so I left it alone.

Next, I needed to separate the subject’s  hair from the blending into the background.  I set up an additional light right behind the subject just below her shoulders and directed it with a standard reflector at the back of her head. I decided to add a yellow acetate gel over this light to hopefully give a bit of a fiery glow to the hair. Again I turned out the other lights and I took a few shots to see how it looked and adjusted it as needed.


As you can see, I now have a nice burning glow that highlights the outline of the hair and separates the subject form the background adding some depth to the image. I also get a little more of the yellow light reflecting of the strip softbox and filling in the shadows of the face with a bit of a golden tinge. When I looked back at the photo of the main light by itself I decided that this slight tinge would add some warmth into the shadow area and really compliment the photo. I have to admit this was a happy accident as a result of the light set-up.


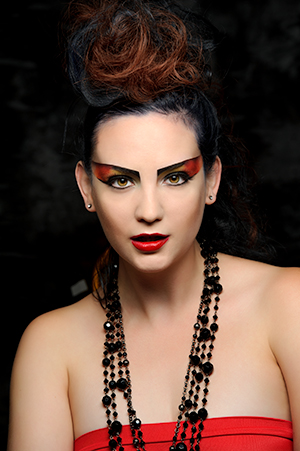
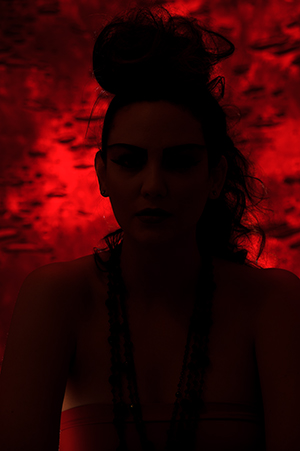
Next, I took a few shots of just the background and hair light together to check how the two looked combined.
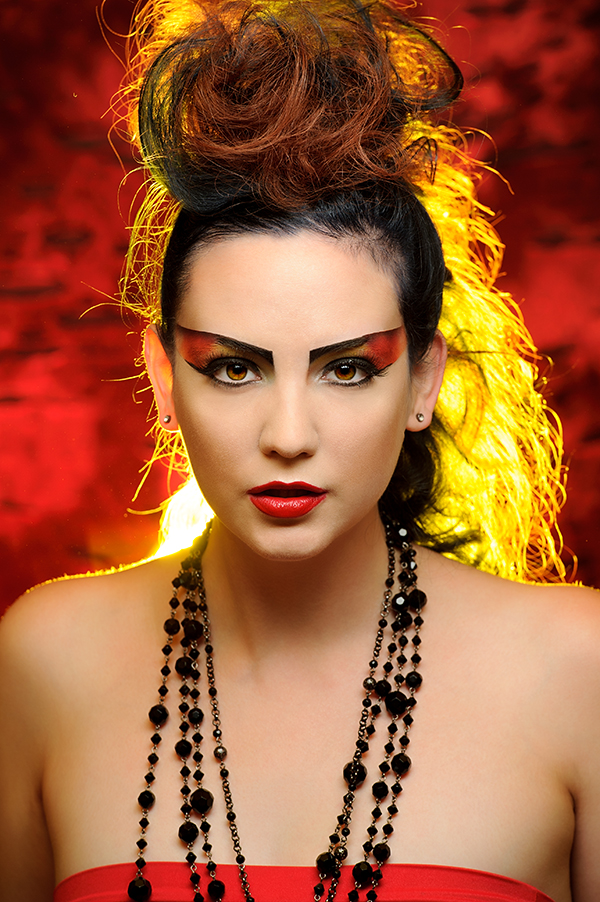
What do you think? A pretty nice combination that provided the shot with the fiery look I wanted, while also serving to bring out the background and help the subject stand out. To be critical, I was not pleased with the illumination of the subjects right ear, but I figured I could work with angles possibly to make it more subtle. Finally, I turned the main light back on and took a few more shots to see how all three lights looked together. I was very pleased with the result and felt that the little bit of red and yellow that spilled over into the shadows of the subjects face really helped to compliment the look and bring it all together.  At this point the light and camera settings were never touched and all I had to do was shoot and make sure I got the pose and expression I wanted, which when working with someone like the experienced Brittney was super easy. Is the light perfect? Definitely not, but it all comes together to produce a nice unique portrait.

I hope by going through my thought process step-by-step for this shot and by showing the effects of each light separately that it gives you a little insight into working with studio lighting and how you can construct an image one light at a time. Having total control of the lights is a bit scary, but once you start taking some baby steps with it, I promise you it will make all aspects of your photography better. Studio lighting is all about the direction and intensity of light and how it transitions and compliments into shadow. Wait, isn’t that what all photography is about? So go ahead and jump in head first. Inevitably, you will make a lot of mistakes, have many over and underexposed images, and end up with plenty of shots of which you are not proud, however, you will also absolutely get some fantastically, fascinating photos and learn a lot about the the interplay and visualization of light and shadows.  Plus, let’s be honest, don’t we have these same problems with any shoot? Any shot involves the light, background and subject and how we decide to capture and expose the image. Being able to control the light should actually make getting a great capture easier.

Post originally from: Digital Photography Tips.

Check out our more Photography Tips at Photography Tips for Beginners, Portrait Photography Tips and Wedding Photography Tips.

Studio Lighting: Building a Light Set-up


Digital Photography School

 
Comments Off on Studio Lighting: Building a Light Set-up

Posted in Photography


The Complete Easycap Setup – S-Video

14 Nov

In this video, you will learn how to set up an Easycap with S-Video, choose the right settings in Ulead, De-interlace in Sony Vegas 9.0, and choose the right render settings in Sony Vegas. After you install your Easycap, watch this tutorial, and you’ll be all set! The Easycap has great quality for the price! If you want to see want kind of quality Easycap will get with these settings, go here: www.youtube.com Don’t have a Xbox 360 S-video cable? Buy one here: www.amazon.com EASYCAP DRIVERS: Windows 7 Drivers: www.mediafire.com Windows Vista Drivers: rapidshare.com Windows XP: On the disc that came with the Easycap! I DO NOT OWN THIS SONG. CHECK OUT THE ARTIST’S FACEBOOK PAGE HERE: www.facebook.com

 
Comments Off on The Complete Easycap Setup – S-Video

Posted in Nikon Videos


New Camera Setup Tips – Super Secret Project

29 Oct

froknowsphoto.com It is really exciting when you get a new camera whether it is a new Nikon D3100 or D7000 or Canon T2i or 60D. But as soon as you take it out of the box what are the 7 things I suggest you set first in the menu? 1. Set the Camera to RAW and never take it out (or RAW + JPEG if you are new to RAW) 2. Set the card Lock – make sure that the camera will not fire without a memory card in it. 3. Set your date and time – make sure you do not let it write the date and time on the picture. 4. Set your White Balance to Auto – You are shooting RAW and will tweak it if needed later. 5. Turn off AUTO ISO if it is on – You will make better selections than the camera 6. Picture Review Off – This will keep you from looking at every single picture you take 7. Image Rotation On – This will orient the vertical shots properly when you bring the files into LightRoom There are a lot more settings in the camera I could talk about but I find these 7 will help you get off to a great start. To follow the super secret project please go here froknowsphoto.com
Video Rating: 4 / 5

 
Comments Off on New Camera Setup Tips – Super Secret Project

Posted in Nikon Videos


5 Photoshop Setup Tips

24 Oct

Photoshop setup opener

When you install a new version of Photoshop the first thing you’ll need to do is to set things up so that they work properly for you. Here are settings I make in the Preferences panel every time I upgrade.

1. Set your History States

Choose Edit > Preferences > Performance or Photoshop Preferences > Performance on a Mac and set the number of History States. Having a high setting for History States ensures that you can undo changes that you make to your image. By default it’s set to a paltry 20 so this is the first change to make.

I set my History States to the maximum value 1,000 – but even a quarter of this would be a good setting.

Photoshop setup preferences1

Here too I ensure that Photoshop can use plenty of the available RAM so I’ll crank that up to a large value – what you use will be dependent on the amount of memory you have installed.

Photoshop setup preferences2

2. Set Cursor Shape and Size

Still in the Preferences panel I like to use a Normal Brush Tip for my Painting Cursor and Precise for my Other Cursors. This can be set in the Cursors area.

You may want to use something different but it pays to look at these options and decide how you want your cursors to look as you work with them.

Photoshop setup preferences3

3. Opening Files My Way!

I dislike that Photoshop opens documents as tabs and that they are docked to the toolbar. This behavior really grates on me. If you’re like me and you prefer your documents to float you can set this in the Preferences Panel.

Choose Interface and disable Enable Floating Document Window Docking and disable Open Documents as Tabs.

Photoshop setup preferences4

In this panel you will also find the new Photoshop Color Themes in Photoshop CS6 so if the dark gray look is not to your liking you can return to a more “CS5″ look by selecting the lighter gray color.

4. Control Where Files are Saved to

Photoshop can be set either to save images back into the original folder when you choose File, Save As or to the folder that was last used for saving files. You can choose which of these behaviors you prefer Photoshop to default to in the File Handling area of the Preferences panel.

To save back to the original folder, enable the Save As to Original Folder option. To default to the last folder you saved to disable this checkbox.

Photoshop setup preferences5

5. Write your own History

So I can go back and retrace my steps in a large project I like to store a History of all that I do in Photoshop. To do this, click the General tab and enable the History Log checkbox. I save to a Text file (rather than inside the file itself) and I save a Detailed history as that stores the richest data. Choose a filename and place to save it and Photoshop will keep a log file of everything you do to every file.

Photoshop setup preferences6

So, now it is over to you. What preferences do you set up when you first install a new version of Photoshop?

Post originally from: Digital Photography Tips.

Check out our more Photography Tips at Photography Tips for Beginners, Portrait Photography Tips and Wedding Photography Tips.

5 Photoshop Setup Tips


Digital Photography School

 
Comments Off on 5 Photoshop Setup Tips

Posted in Photography