RSS
 

Posts Tagged ‘realistic’

PopMask: Photomasks So Realistic It’s Spooky

01 Oct


Don’t just steal your roommate’s jacket to go as them for Halloween. Transform yourself more convincingly. Steal their face!

We’re not talking skin-suit levels of creep here…

Thanks to the good folks at PopMask all it takes is a photo of their smiling face to get your very own roommate mask.

Upload a photo of a face, any face, and they’ll send you a high quality mask.

PopMask – Get the Face You’ve Always Wanted

p.s. Hey San Francisco! Have you tried Google Shopping Express? It’s FREE same-day delivery and you can get Photojojo stuff.

Related posts:

  1. How to Photograph a Ghost — A Spooky Photographic Trick (That’s Quite a Treat)! ~Have a cool photo product or site? Reach 270,000 photo…
  2. Glow-in-the-Dark Photograms: Turn Your Photos into Spooky Glow-in-the-Dark Wonders Extra photos for bloggers: 1, 2, 3 All Hallow’s Eve:…
  3. How to Turn a Flatbed Scanner into a Handheld Camera for Spooky Photos! Extra photos for bloggers: 1, 2, 3 Pumpkins, witches and…


Photojojo

 
Comments Off on PopMask: Photomasks So Realistic It’s Spooky

Posted in Equipment


How to Create Realistic Looking HDR Photographs

11 Jul

By Sean Ogle.

HDR photography has gotten a bit of a bad reputation, simply because so many people don’t know how or when to use it.

It kind of reminds me of my first experiences using Photoshop in high school. The only thing I knew how to do was open a photo, head to the filters, and create surreal, barely recognizable images.

That’s what I see many photographers doing with HDR today. They open up Photomatix or HDR Efex Pro and start making photos that look overly processed, overly saturated, and basically just all around over done.

Sure, there are people that like this look, but those photos overshadow the true benefits that HDR can bring to the table.

My favorite photos are the ones that look almost too real. You can tell they’ve been edited, but you aren’t exactly sure how.

With that said, the most practical use of HDR is when you’re trying to create a more realistic depiction of what your eye is actually seeing in any given scene.

This could be a landscape photographer trying to capture the perfect sunset over an ocean, or perhaps a real estate agent that’s trying to accurately show the interior of a home.

This shot of from the Jersey Shore is a good example of that:

NewImage

Without HDR there’s no way I’d be able to get the detail in the foreground, while also bringing out the colors of the sky.

What’s important here is the average person wouldn’t be able to tell this was an HDR image.

So what are some of the key components to making a realistic looking HDR shot?

Let’s take a look.

Take it Easy on the Saturation

This is one of the easiest mistakes to make with HDR. We tend to be drawn towards bright and vibrant colors, but when editing, even slight adjustments can have very significant effects.

Had I not touched the saturation with the photo above, this would look like a big orange mess after the initial HDR processing.

This is particularly important to keep in mind if you’re shooting outdoors in grassy park or forested areas. Green and yellows are the hardest colors to accurately reproduce when doing HDR, and the secret to getting them correct is to significantly reduce the saturation.

NewImage

HDR was used in this case in order to bring out the detail of the clouds, which were extremely dramatic in person. However, the saturation was turned down to -35% in HDR Efex Pro to create this image. Without doing that, the green looked completely unrealistic, and the foreground didn’t accurately capture the high desert surroundings.

Use a Tripod

Yes, this is an HDR 101 tip, but it’s extremely important. When going for realism, you want things to look as crisp and clean as possible. While the latest software actually does a surprisingly good job at correcting for minor shifts in images due to camera shake or a handheld series of brackets, it still isn’t perfect, and can leave things looking slightly fuzzy.

The biggest selling point for a realistic image is it’s clarity and this will work against you if you aren’t careful.

Consciously Make Adjustments to “Structure”

This is perhaps the biggest secret towards getting realistic HDR shots. Your eyes can see a lot more detail than a photo can capture. By very sparingly adjusting the structure setting (or the balance between HDR “strength” and “smoothing” in Photomatix), you can bring out just enough “pop” to make what might otherwise be a dull image seem much more lifelike.

Never use any settings or presets that are labeled “strong”, “grungy”, “accentuated”, “grainy” or anything similar. These are pretty much a dead giveaway that your photo is going to look fake. For many amateur photographers, it’s these effects that make a photo look “cool”, but if you’re going for realism, these are deal breakers.

However, like most aspects of HDR, structure can very easily be overdone.

Pay Attention to Your Histogram

The natural eye has a much higher dynamic range than a camera sensor, and because of this, if your brackets don’t capture the full range of light, you could find yourself with an image that isn’t quite the way you remember a scene looking.

As much as possible you want your underexposed shots all the way to the left, and your overexposed shots all the way to the right on your histogram. You may need to take more than 3 shots in order to capture the full range.

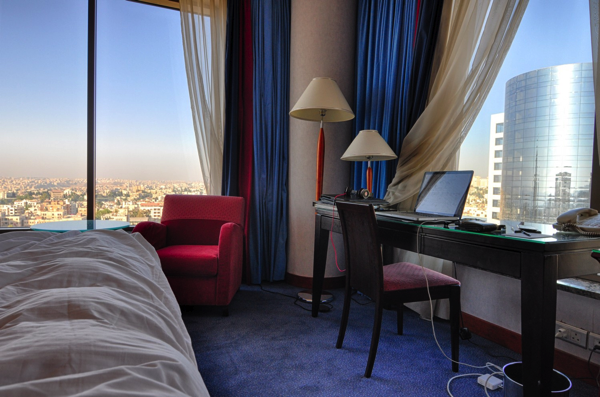
When shooting interiors with windows this is especially important. You don’t want whatever is outside to get blown out, so by making sure you’ve captured the full dynamic range you’ll be able to create a more realistic representation of the room and not lose any detail in the windows.
NewImage

One Final Thing to Keep in Mind

Every shot you take should have a purpose, and when you’re shooting, you should be very deliberate about that.

When you don’t have an idea of what you want the final result to be, it can be really easy to go overboard, and end with something that’s much more surreal than you were expecting.

If you’re shooting interior real estate, make sure you’re not losing detail outside. If you’re shooting landscapes, spend extra time adjusting for structure and saturation.

HDR is one of the very best ways to create stunning, realistic images, but only if you have the discipline to properly edit them.

Sean Ogle is an HDR photographer and entrepreneur. He specializes in helping people build small businesses that allow them to do more of the stuff they like to do. He also golfs way more than the average person probably should. DPS readers can grab his book 50 Tips to Improve Your HDR Photography for free here.

Post originally from: Digital Photography Tips.

Check out our more Photography Tips at Photography Tips for Beginners, Portrait Photography Tips and Wedding Photography Tips.

How to Create Realistic Looking HDR Photographs


Digital Photography School

 
Comments Off on How to Create Realistic Looking HDR Photographs

Posted in Photography


These Aren’t Photos: 28 Examples of Hyper Realistic Art

25 Jan

[ By Marc in Art & Drawing & Digital. ]

Hyper-Realistic-Art-Montage

Hyper realistic art is stunning for a variety of reasons: it pushes the limits of skill, it’s incredibly detailed, etc, but what really elevates the style is creating something in high definition that is even brighter and more detailed than possible in life. For the casual observer, however, it’s the dissonance between looking at something that must be a photograph, and realizing it was actually created by hand that makes it jaw-dropping.

Diego Fazio

Hyper-Realistic-Art-Diego-Fazio

Diego Fazio is an Italian artist whose careful portraiture is notable because his subjects are active. There are few things as tough to capture withe a pen or pencil as splashing water across a human subject, but Diego does it with excellent effect in Sensazioni, the piece on the left of these examples. The top right piece is Il Silenzio Del Dolore (English: The Silence of Pain), and the bottom right image is titled Come Il Vento (English: Like the Wind). According to Diego’s DeviantArt page, he began as a tattoo artist and then decided he preferred to draw bodies rather than draw on them. If there weren’t photos of Diego working on his pieces, it would be difficult to believe they were drawn by hand. Still can’t believe it? Check out the progression here, here, and here.

Dirk Dzimirsky

Hyper-Realistic-Art-Dirk-Dzimirsky

Dirk Dzimirsky is not playing around. When he wants to capture a moment, he captures every miniscule detail. One can look at Dirk’s collection here (warning, some images are NSFW). In Dirk’s artist statement, he discusses why he chooses drawing over painting. He notes that drawing allows him “to create many layers over layers of lines and dots which react to each other in order to create a vibrant texture with directions and movement” and argues that this layering makes his portraits more warm and alive than a photograph would. Picture above are four of his works. Clockwise from top left: Drawn Face VI 2009, Black Sun 2011, Frozen 2010, and Breath 2010.

Paul Cadden

Hyper-Realistic-Art-Paul-Cadden

Paul Cadden is a Scottish born hyper realist artist whose incredibly popular art is prized for its detail and subject matter. Cadden doesn’t shy away from the gritty, and uses subjects with an incredible amount of character. In describing hyper realism on his site, and how he draws based on photographs, he hits on a point that seems to be a lesson in hyper realism, that “the virtual image becomes the living image, an intensification of the normal.” All of Paul’s work can be found on his main site paulcadden.com (some of the portraits are nude, and possibly NSFW).

Next Page:
These Arent Photos 28 Examples Of Hyper Realistic Art

Share on Facebook


[ By Marc in Art & Drawing & Digital. ]

[ WebUrbanist | Archives | Galleries | Privacy | TOS ]


WebUrbanist

 
Comments Off on These Aren’t Photos: 28 Examples of Hyper Realistic Art

Posted in Creativity


Skate 3 Ultra Realistic Park

09 Jan

SUB!
Video Rating: 1 / 5

Cuba…in the lens ( watch in HD )


Roaringly Realistic Animal Chairs by Maximo Riera

19 Dec

[ By Steph in Design & Furniture & Decor. ]

Jet black and richly detailed, Maximo Riera’s sculptural Animal Chair collection consists of an octopus, a rhinoceros, a lion, a whale, a walrus and a beetle. Crafted into dramatic seating, the animals look as if they could spring to life at any moment. The project took Riera three years to complete, working with more than thirty professionals in four different countries.

The Animal Chair collection is inspired by our connection to and impact upon the natural world. These towering sculptures serve as a powerful reminder of some of the most awe-inspiring creatures on earth.

Carved from compressed foam, which is stabilized by an internal steel frame, each chair is enveloped in real leather. And while they might not be as heavy as their living counterparts, they’re not exactly portable: the elephant chair weighs 353 pounds.

Each chair is slightly asymmetrical and carefully balanced to maintain a sense of the proportions of the animal depicted, even though only parts of their bodies are represented.


Want More? Click for Great Related Content on WebUrbanist:

20 Comfy-to-Crazy Chairs and Chair Designs

Creative modern chairs and chair designs from strange seats and bizarre benches, from the fabulously modern to the flippantly unique and everything in between.
34 Comments – Click Here to Read More »»


Shock Value: Slightly Disturbing Ultra-Realistic Sculptures

Patricia Piccinini is an artist who likes to make people feel uncomfortable. Prepare to enter an intriguing world full of some incredibly realistic artistry.
2 Comments – Click Here to Read More »»


Share on Facebook


[ By Steph in Design & Furniture & Decor. ]

[ WebUrbanist | Archives | Galleries | Privacy | TOS ]


WebUrbanist

 
Comments Off on Roaringly Realistic Animal Chairs by Maximo Riera

Posted in Creativity


Computer Art Basics : How to Draw Realistic People in Photoshop

06 Nov

Drawing realistic people in Photoshop requires you to build ellipses and other shapes using the lasso, rectangle and other tools, using a photo image as your guide. A professional artist demonstrates figure drawing techniques in this free video on computer art basics. Expert: Matt Gavenda Contact: mattgavenda.com Bio: Matt Gavenda creates graphic animation for NeoSci and also works as a freelance graphic artist. Filmmaker: Nathanael Rittichier Series Description: To master the basics of computer art you have to know how create shapes, templates and vectors in Adobe Photoshop, and now you can learn these and other techniques from a professional artist. Brush up your computer art skills with the help of this free video series.
Video Rating: 2 / 5

 
Comments Off on Computer Art Basics : How to Draw Realistic People in Photoshop

Posted in Retouching in Photoshop


Creating Realistic Sun Rays in Photshop – Video Tutorial

04 Nov

Creating Realistic Sun Rays or sunbeams in Photshop – Video Tutorial by Yanik’s Photo School.

 
Comments Off on Creating Realistic Sun Rays in Photshop – Video Tutorial

Posted in Retouching in Photoshop


Realistic Fire Text Effect how to tutorial – Photoshop

28 Oct

Can you donate and help our appeal? Do a good thing today. www.indiegogo.com Photoshop CS3 The Easy Way!!!…. Just a little video to show you how to make text look like its on fire looks hot 😛 Want the font? (Bleeding? Cowboys) www.youtube.com

More to come! Don’t forget to share with your friends and request new tutorials! I’m running out of ideas lately, so that would help a lot. And ask me how to donate Bitcoins! I will love some of those! Peace.

 
Comments Off on Realistic Fire Text Effect how to tutorial – Photoshop

Posted in Retouching in Photoshop


Realistic Breyer Stablemate Photos

17 Oct

Another photography video 🙂 Love this song! I used to be HorsehoesGirl11 btw till my account was deleted!
Video Rating: 5 / 5

Smokes and water droplets
Video Rating: 0 / 5

 
Comments Off on Realistic Breyer Stablemate Photos

Posted in Photography Videos


How to create a realistic focus effect.

06 Sep

How to create a realistic Focus effect in Photoshop CS5 by using the Blur tool. Please Like and Subscribe 🙂

 
Comments Off on How to create a realistic focus effect.

Posted in Retouching in Photoshop