By Sean Ogle.
HDR photography has gotten a bit of a bad reputation, simply because so many people don’t know how or when to use it.
It kind of reminds me of my first experiences using Photoshop in high school. The only thing I knew how to do was open a photo, head to the filters, and create surreal, barely recognizable images.
That’s what I see many photographers doing with HDR today. They open up Photomatix or HDR Efex Pro and start making photos that look overly processed, overly saturated, and basically just all around over done.
Sure, there are people that like this look, but those photos overshadow the true benefits that HDR can bring to the table.
My favorite photos are the ones that look almost too real. You can tell they’ve been edited, but you aren’t exactly sure how.
With that said, the most practical use of HDR is when you’re trying to create a more realistic depiction of what your eye is actually seeing in any given scene.
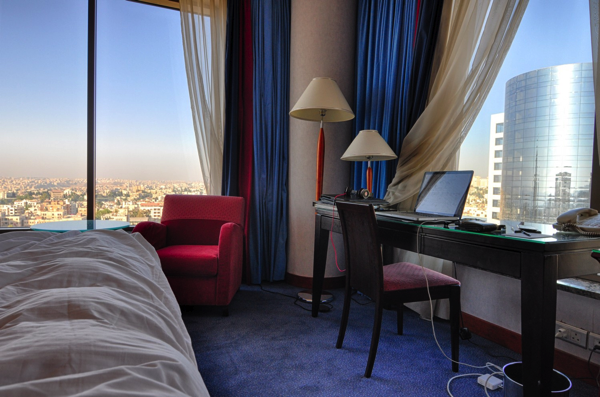
This could be a landscape photographer trying to capture the perfect sunset over an ocean, or perhaps a real estate agent that’s trying to accurately show the interior of a home.
This shot of from the Jersey Shore is a good example of that:

Without HDR there’s no way I’d be able to get the detail in the foreground, while also bringing out the colors of the sky.
What’s important here is the average person wouldn’t be able to tell this was an HDR image.
So what are some of the key components to making a realistic looking HDR shot?
Let’s take a look.
Take it Easy on the Saturation
This is one of the easiest mistakes to make with HDR. We tend to be drawn towards bright and vibrant colors, but when editing, even slight adjustments can have very significant effects.
Had I not touched the saturation with the photo above, this would look like a big orange mess after the initial HDR processing.
This is particularly important to keep in mind if you’re shooting outdoors in grassy park or forested areas. Green and yellows are the hardest colors to accurately reproduce when doing HDR, and the secret to getting them correct is to significantly reduce the saturation.

HDR was used in this case in order to bring out the detail of the clouds, which were extremely dramatic in person. However, the saturation was turned down to -35% in HDR Efex Pro to create this image. Without doing that, the green looked completely unrealistic, and the foreground didn’t accurately capture the high desert surroundings.
Use a Tripod
Yes, this is an HDR 101 tip, but it’s extremely important. When going for realism, you want things to look as crisp and clean as possible. While the latest software actually does a surprisingly good job at correcting for minor shifts in images due to camera shake or a handheld series of brackets, it still isn’t perfect, and can leave things looking slightly fuzzy.
The biggest selling point for a realistic image is it’s clarity and this will work against you if you aren’t careful.
Consciously Make Adjustments to “Structure”
This is perhaps the biggest secret towards getting realistic HDR shots. Your eyes can see a lot more detail than a photo can capture. By very sparingly adjusting the structure setting (or the balance between HDR “strength” and “smoothing” in Photomatix), you can bring out just enough “pop” to make what might otherwise be a dull image seem much more lifelike.
Never use any settings or presets that are labeled “strong”, “grungy”, “accentuated”, “grainy” or anything similar. These are pretty much a dead giveaway that your photo is going to look fake. For many amateur photographers, it’s these effects that make a photo look “cool”, but if you’re going for realism, these are deal breakers.
However, like most aspects of HDR, structure can very easily be overdone.
Pay Attention to Your Histogram
The natural eye has a much higher dynamic range than a camera sensor, and because of this, if your brackets don’t capture the full range of light, you could find yourself with an image that isn’t quite the way you remember a scene looking.
As much as possible you want your underexposed shots all the way to the left, and your overexposed shots all the way to the right on your histogram. You may need to take more than 3 shots in order to capture the full range.
When shooting interiors with windows this is especially important. You don’t want whatever is outside to get blown out, so by making sure you’ve captured the full dynamic range you’ll be able to create a more realistic representation of the room and not lose any detail in the windows.

One Final Thing to Keep in Mind
Every shot you take should have a purpose, and when you’re shooting, you should be very deliberate about that.
When you don’t have an idea of what you want the final result to be, it can be really easy to go overboard, and end with something that’s much more surreal than you were expecting.
If you’re shooting interior real estate, make sure you’re not losing detail outside. If you’re shooting landscapes, spend extra time adjusting for structure and saturation.
HDR is one of the very best ways to create stunning, realistic images, but only if you have the discipline to properly edit them.
Sean Ogle is an HDR photographer and entrepreneur. He specializes in helping people build small businesses that allow them to do more of the stuff they like to do. He also golfs way more than the average person probably should. DPS readers can grab his book 50 Tips to Improve Your HDR Photography for free here.
Post originally from: Digital Photography Tips.
Check out our more Photography Tips at Photography Tips for Beginners, Portrait Photography Tips and Wedding Photography Tips.
How to Create Realistic Looking HDR Photographs