RSS
 

Posts Tagged ‘Process’

Don’t Fear Photo Post-Processing – Shooting is Only the First Part of the Image Creation Process

14 Sep

You have just bought your new bright shiny camera and you are sure that it is just the thing that will help you create better images. You’re shooting JPG with the camera’s automatic program modes, but you’re not getting the results you wanted. You keep upgrading your cameras thinking that will do the trick, only to find that the quality of your imagery isn’t getting any better. What’s going on?

Lightroom Banner - Don’t Fear Photo Editing - Shooting is Only the First Part of the Image Creation Process

You may be missing an important part of digital photography, post-processing, with a state of the art processing program like Adobe Lightroom or Photoshop.
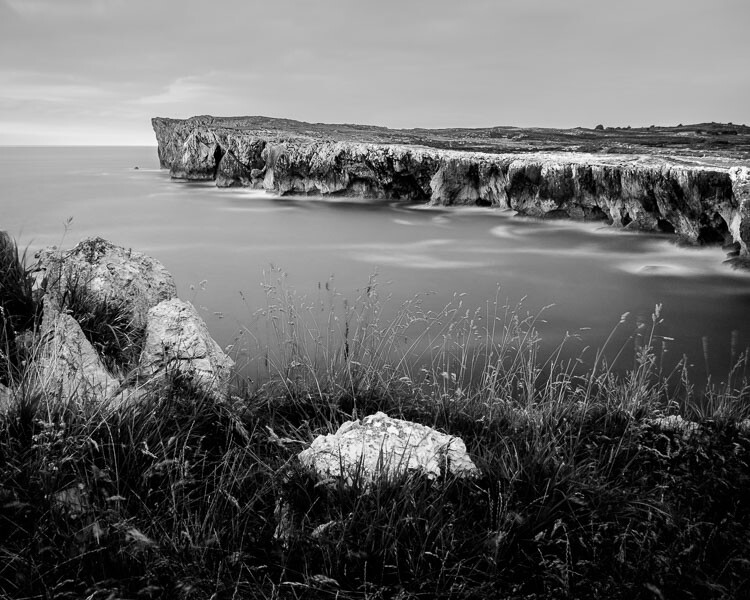
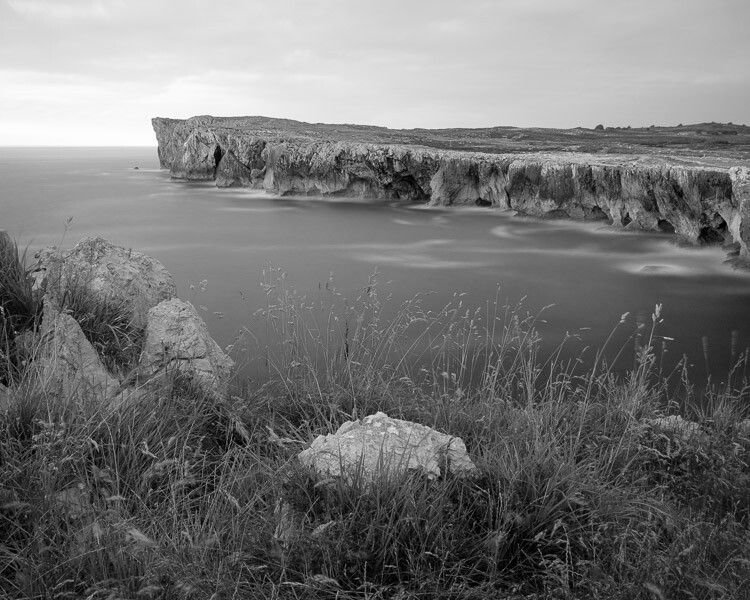
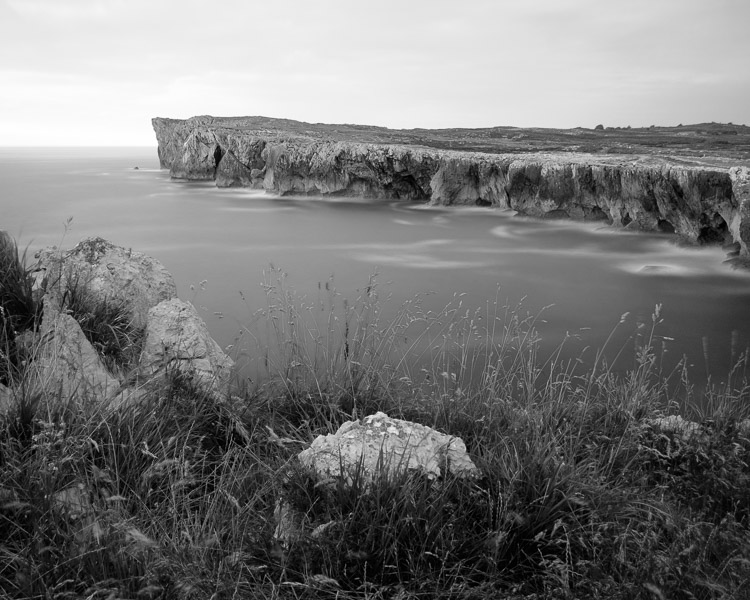
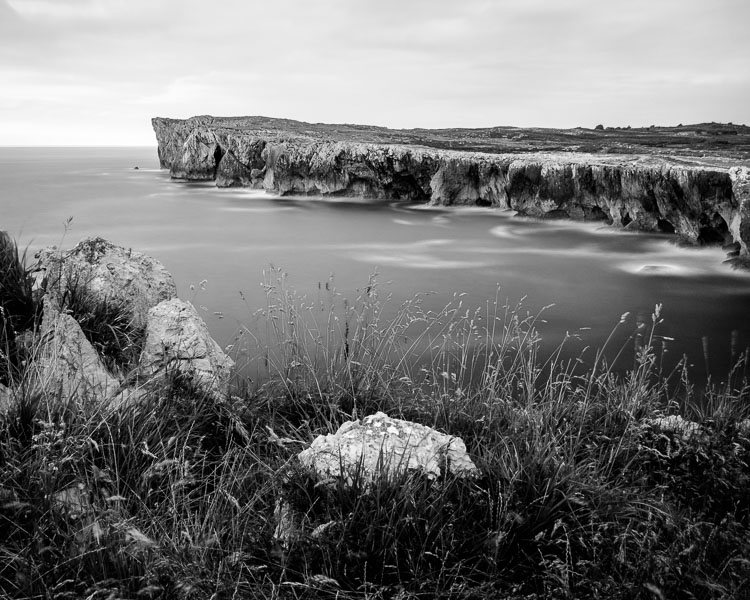
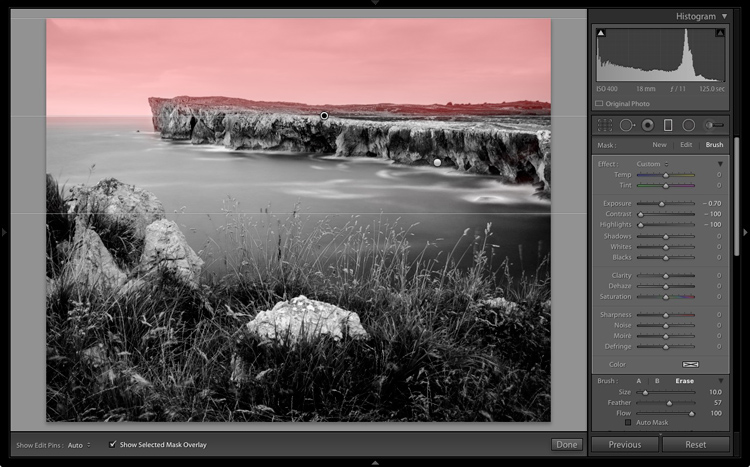
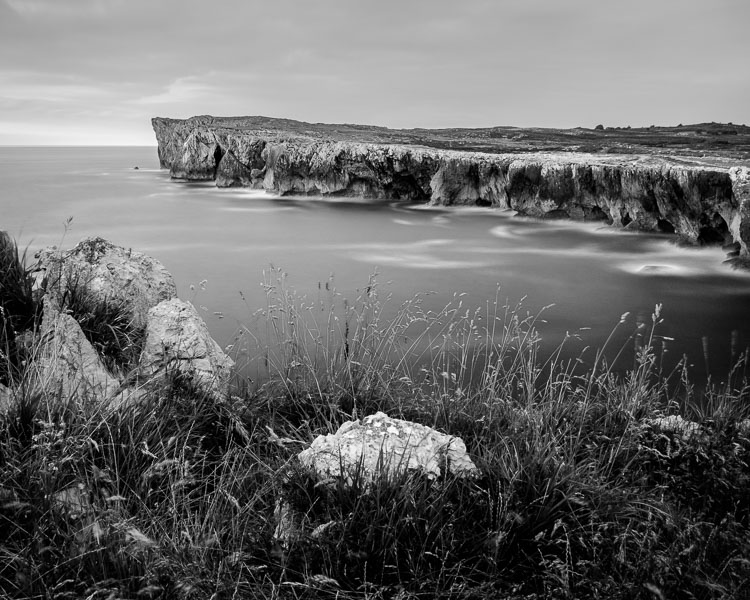
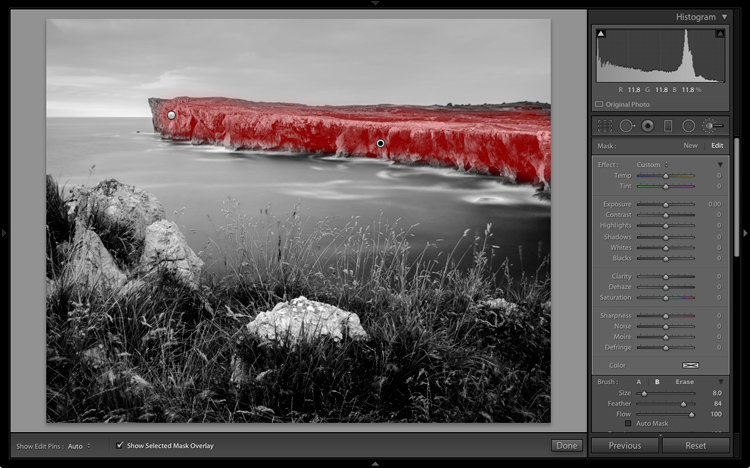
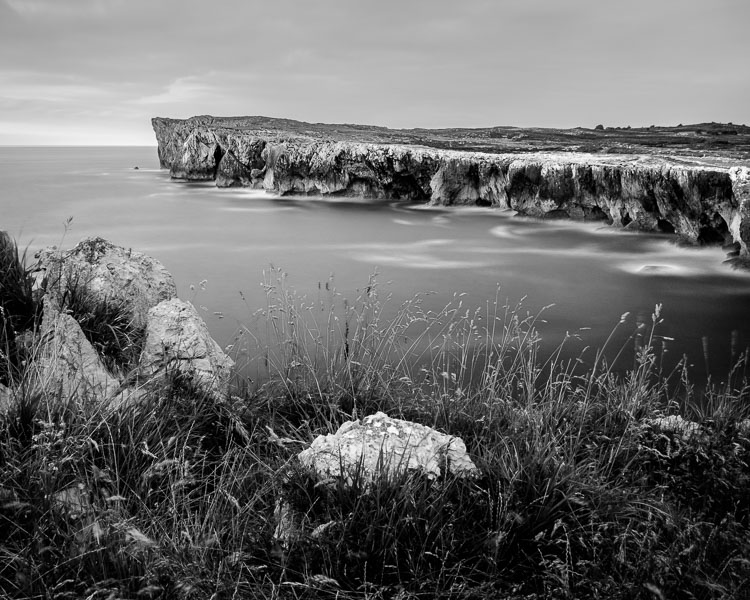
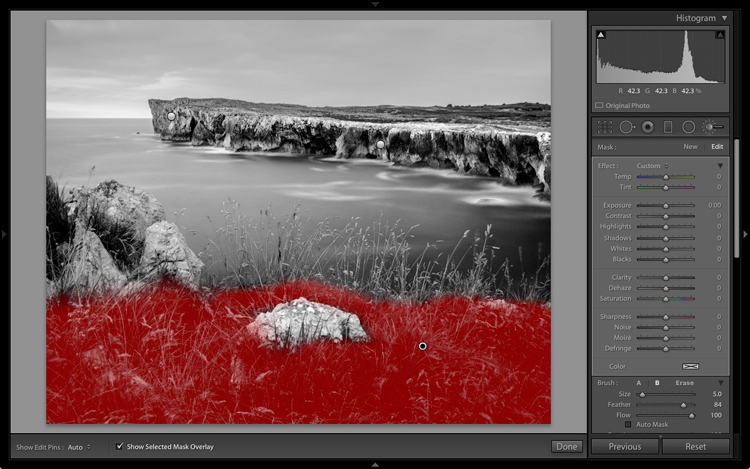
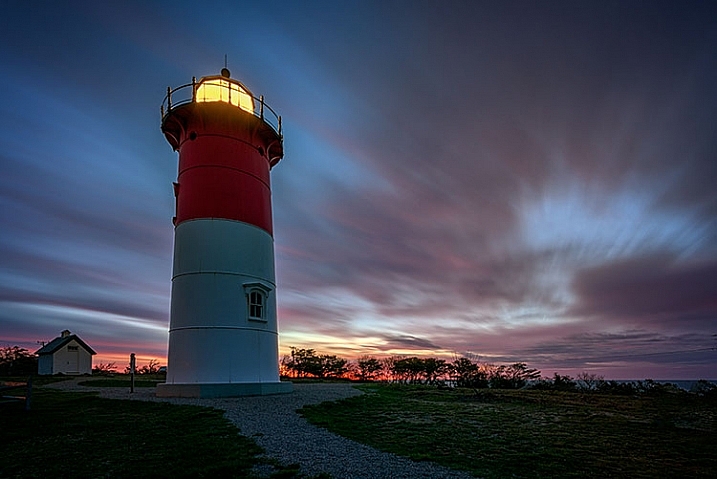
Before and after

Iceland Light Before - Don’t Fear Photo Editing - Shooting is Only the First Part of the Image Creation Process

This image of a lighthouse in Iceland was taken on a bright yet overcast day. In a matter of moments with the help of Lightroom, it became a favorite.

Iceland Light After - Don’t Fear Photo Editing - Shooting is Only the First Part of the Image Creation Process

The role of post-processing in photography is not new

There are several integral parts to digital photography. The technical and creative aspect of using your camera, and the technical and creative application of post-processing your images. Each part is equally important and when all the pieces are put together, that’s when the magic starts to happen.

Unfortunately, many people are still thinking about the days of film when you took it to a lab and the post-processing was done for you. You never had to think twice about how the image was processed. Did you ever notice that different labs gave you different results? That’s because of their level of post-processing.

Now it’s time for you to understand the importance of post-processing if you are going to create better imagery. It will take some time and some dedication to learn, but it will improve your photography by ten-fold.

The first step – shooting with post-processing in mind

First of all, start shooting in RAW format and stop letting the camera make the decisions for you. When you shoot JPG format, it will automatically process your images in camera, even though you may even not be aware of it.

Have you ever taken a JPG and a RAW image and compared the two photographs? The JPG may appear bright and saturated and the RAW file looks flat. That’s because the JPG has been processed by the camera and the RAW file is an unprocessed digital negative.


That RAW file is ready for you to make your own creative adjustments and apply your photographic vision in Lightroom or Photoshop. Only then can you start to recreate that scene you saw when you first took the image.

What kind of post-processing decisions will the camera make for your JPGs? Depending on your camera, it can automatically increase saturation, sharpness, and contrast, but it will also compress your image. There are settings in your camera where you can make blanket adjustments for every JPG (Picture Styles), however, the camera is still making the decisions for you. That gives you zero creative control.

Raw format gives you control

RAW files contain more information and will allow you to have a wider range of tones (called dynamic range) to work with when you bring your images into Lightroom or Photoshop. When shooting in the JPEG format, image information is compressed and lost forever. In a RAW file, no information is compressed and you’re able to produce higher quality images while correcting problem areas that would be unrecoverable if shot in the JPEG format.
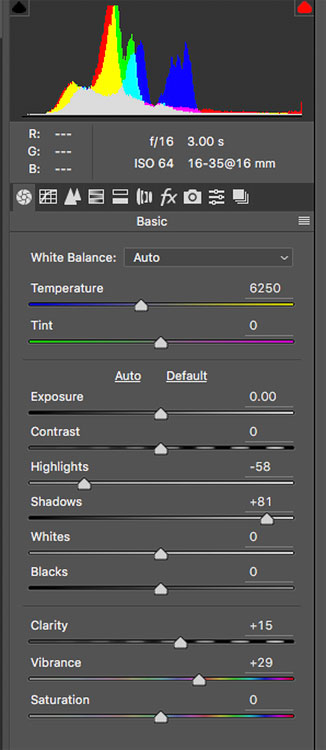
The Histogram

Once you start shooting in RAW, it’s very important to be conscious of the histogram. You can bring up the histogram on your Live View shooting screen or after you have taken the shot in your image review screen. Check your camera’s manual for the location of the histogram.

Note: If you shoot with a mirrorless camera you may be able to see the histogram on the screen before you shoot. Check your settings this is very handy.

Why is the histogram important for your photographic success?

If used correctly while shooting, the histogram will give you the information you need to know to bring up the shadows or bring down the highlights and pop out exposure and detail in an image.

The histogram shows you the brightness of a scene and it can be measured as you are shooting, or after you have captured the image. When look at the histogram and see the bulk of the graph pushing towards the right, this means you have an image that may be overexposed (or a really light toned subject).

Overexposed - Don’t Fear Photo Post-Processing - Shooting is Only the First Part of the Image Creation Process

If the data is mostly on the left of the graph, it’s an image that might be underexposed.

Underexposed - Don’t Fear Photo Post-Processing - Shooting is Only the First Part of the Image Creation Process

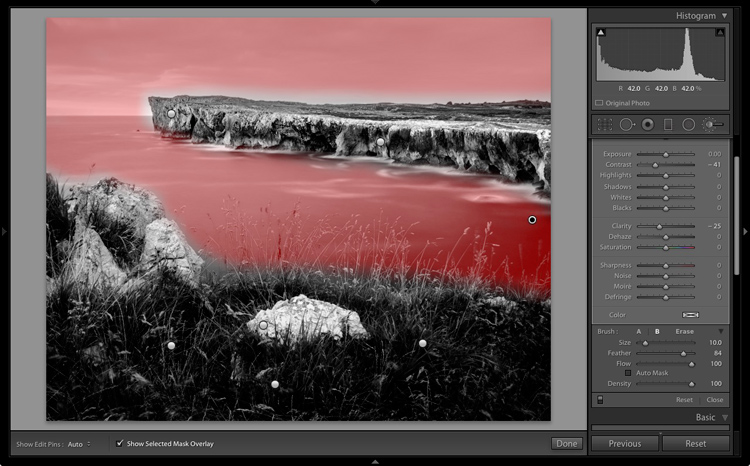
If the graph spikes on either the left or right “wall” of the histogram, that means that “clipping” has occurred. Clipping happens when you have areas in your photo with no information as a result of over or underexposure. When an area has no information, it is either pure white or pure black which is often referred to “blown out”.

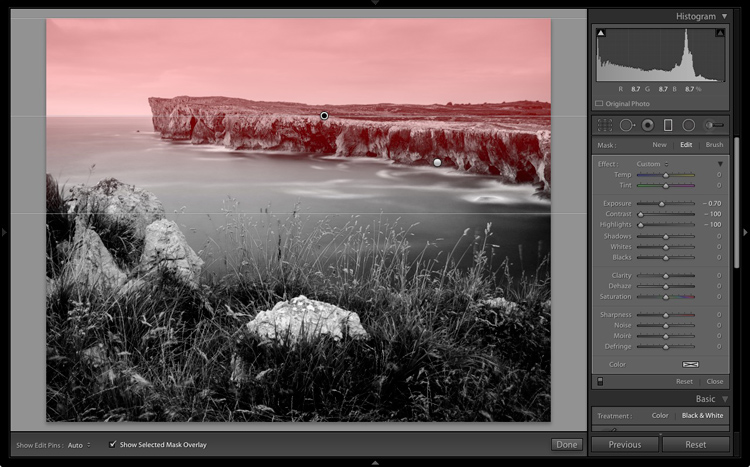
Generally, it is undesirable to have large areas of your image that have highlights or shadows clipping. See the image below. The red areas show highlight clipping, and the blue areas show shadow clipping.

Clipping - Don’t Fear Photo Post-Processing - Shooting is Only the First Part of the Image Creation Process

Because of the limited dynamic range of a camera’s sensor, the area registering as clipped usually leaves the image with no information in the shadows or highlights. A spike touching the left edge of the histogram means that there is shadow clipping. A spike touching the right edge of the histogram means that there are highlights clipping.

What is possible with post-processing?

Many photographers have frustrating results with their images because they don’t embrace digital editing and post-processing. They are doing everything right when they shoot and are good at composition. They know how to expose correctly for the scene, but don’t know where to go with the image once they get home.

For example, maybe they are in a high contrast area and have taken an image with the histogram in mind. Then they open the image on-screen and throw it out because it looks over or underexposed. They don’t know what the post-processing possibilities are even though they may have a viable image. This is where they are missing a large part of the potential in their digital photography post-processing.

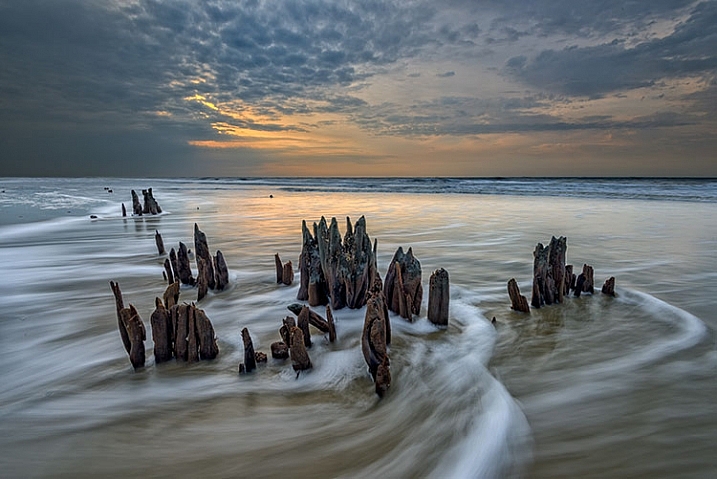
Here’s a great example. This image was taken in the Eastern Sierra in California.

Alabama Hills Before - Don’t Fear Photo Post-Processing - Shooting is Only the First Part of the Image Creation Process

It is obvious that the shadows are way underexposed and it creates an interesting silhouette. But, if you look at the histogram, you can see there is space on the left side of the graph which represents the shadows. This means there is more information there, and a good possibility of bringing up the shadows to create a whole different image.

Here is the result after brightening shadows in Lightroom. This adjustment took just seconds and creates a whole new scene.

Alabama Hills After - Don’t Fear Photo Post-Processing - Shooting is Only the First Part of the Image Creation Process

Start with Lightroom

Almost every image needs post-processing. Some people think that’s “cheating”. It’s not, it’s all part of the digital artistic process.

With post-processing, you can create the image you saw when you photographed the scene. Your eyes have the capability of seeing a wider range of light and color than your camera does, so the images need help in post-processing to duplicate the full range of light and shadows. The problem with a lot of beginners, is they tend to oversaturate or over-sharpen an image. So this talent comes with time and practice, practice, practice.


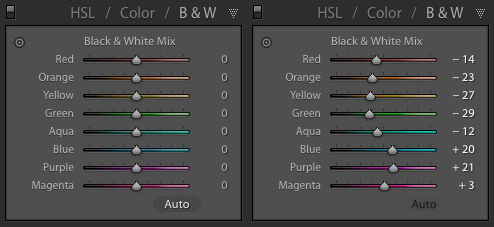
Once you have mastered the basics, there is a lot more you will be able to do with your digital post-processing that will add drama and interest to your photos. The above image of Bridal Veil Falls in Yosemite looks rather flat in the RAW version (left). Once you add saturation, sharpening, and a vignette to the whole picture it starts to pop. Then you can enhance the brightest areas by “painting with light”, and it now becomes a much more interesting image.

Start your post-processing journey with a full featured program like Adobe Lightroom. It is the standard in the industry for professionals, but it is also user-friendly for beginners and helps with both post-processing and image organization. Just be sure that your computer has enough memory and RAM to run these full featured programs. Check the requirements at adobe.com.

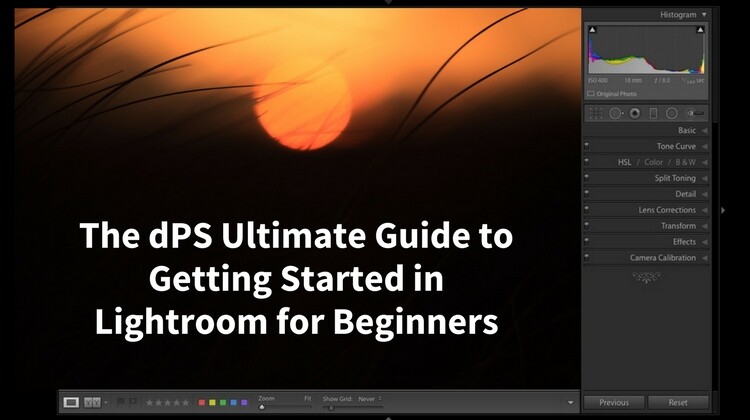
Check out our guide to LR:  The dPS Ultimate Guide to Getting Started in Lightroom for Beginners

Nothing is more satisfying than when you have a catalog of 30,000 images and you’re able to find your favorites in literally seconds by entering a few keywords and star ratings. Take some time to set it up, add a class or two, and you’ll be up and running!

Conclusion

Photo editing or post-processing is an integral part of the digital photography puzzle. Don’t think that you can skip this part and come away with satisfying images. It’s just as important to learn photo editing as it is to learn the basic functions of your camera. Only then, will you be able to bring that intentional photographic vision into post-processing and create great images

How are you going to start your post-processing journey? Is shooting in RAW and learning Lightroom in your future? Please share your thoughts with me on this subject.

The post Don’t Fear Photo Post-Processing – Shooting is Only the First Part of the Image Creation Process by Holly Higbee-Jansen appeared first on Digital Photography School.


Digital Photography School

 
Comments Off on Don’t Fear Photo Post-Processing – Shooting is Only the First Part of the Image Creation Process

Posted in Photography


How to Improve Your Art – The Creative Process in Photography

19 May

As photographers, we all want to be constantly improving our work. However, often this can seem like an uphill struggle, especially when you are just starting out. As an art form, photography is all about the creative process and exploring ideas through images, but in order to really create great images you need to put a plan in place for your own development; especially focused on skills, inspiration, purpose and output. By tackling these elements you can focus your mind and develop your work, to help you produce better and more refined art every time you go out on location.

Creating prints as a final output

Skills – The Basics

In order to get on to the creative elements, having a solid understanding of the base knowledge first is integral to improving your art as a photographer. I’m not going to go into detail here about understanding exposure, depth of field, composition, etc., but these are key things to spend time on.

It may seem like a huge task, but with solid work you can come to grips with being able to shoot in full manual mode easily within a month. After that point, you need to understand the basics as well as the layout of your camera’s functions, helping to make it an extension of yourself and not a distraction from your intended subject. There are a large number of fantastic tutorials here on dPS that can help you to get up to speed and really understand the basics.

Knowing your settings

Focus Days

Taking your learning further is all about practice and persistence, so think about spending a few days focused on certain image types. Set yourself the task of going out the door to just shoot panning images, wide angles, bokeh, etc. This will help you to formulate the skills in your photographer’s arsenal and produce more creative images for the future.

No matter how many years you have been shooting, testing yourself and constantly putting in the time will always help you improve. If you can’t find a whole day, why not a lunch break at work? Small efforts done consistently lead to great results.

Working on a local project

Restrict Yourself

Creativity is something people often believe thrives with options, but in honesty, having too many things to choose from can often dilute your vision and reduce the creativity within your images. Restrict yourself by focusing on a single subject for an extended period of time. Build a long term project in your garden or local nature reserve and keep returning to build upon your images.

Working with primes

Another option is to work with a single focal length or prime lens to explore how you can make the most of what you’ve got. If you don’t have a prime lens use a piece of gaffer tape to hold your zoom lens in position to stop the temptation of zooming in or out. These practices will enhance your skills when it comes to general shooting, as you will be able to quickly select and formulate the ways and ideas you want to shoot.

Create a prime using gaffers tape

Record

In order to get the best out of the images you are taking and the skills you are learning, remember to record them. Working with a simple notebook or online workbook, evaluate the images you have taken for successes and failures, in order to cement the lessons in your mind and learn from your work.

Sketchbook for taking notes

Inspiration

Inspiration is very important for your development as a photographer. Without constant inspiration it can be hard to formulate ideas and develop on past work. Staying inspired doesn’t just mean looking at other photographer’s work, as often over-saturaturation of a single medium can result in less creativity. So it’s better to take input from as wide a range of sources as possible.

Galleries

A traditional showcase of artwork, galleries are still a fantastic option for gaining some inspiration. The variety of work on show, from ancient works such as stone carvings and cave paintings, through to impressionism and modernism, really do offer a superb variety of visual stimuli. Often, to get the best out of them, attending a tour or showcase day can help, giving you the backstories of the work as well as explaining the techniques and mediums used. This knowledge will inform, and allow you to formulate your own processes when creating images in the field.

Nature

As a wildlife photographer, nature is a huge inspiration to me. Heading out on walks, be it with or without a camera, is a great way to soak up some atmosphere. Look at light and shape of the landscape, and pull in ideas for future images.

Architecture

Looking for line and shape

Buildings offer fantastic inspiration for photography. Lines, form and shape are used to make striking structures and can be a excellent source of inspiration. Focus on looking for the way the shapes are used to form elegant structures or draw your eye to a pivotal point. Additionally, take note of the way shadows form, as this will help you imagine and anticipate lighting for future images.

Online

In the modern world the internet has a huge amount to offer, and with so many fantastic resources it is full of inspiration. Taking a look at photographers’ portfolios, or the feeds of 500px, Flickr, etc. offer superb images that can be the perfect inspiration for your own work. One thing to avoid is that of visual trends, copying styles just because they are popular. It is always worth noting that just because an image doesn’t have many Likes or Favourites” does not deny its worth as inspiration, as images will always mean different things to different people.

In person

A great way to find inspiration is to become part of a community. Heading to events in the photography world such as exhibitions or trade shows can provide a great way to meet like-minded people as well as see some excellent work. Also, think about looking for a local photography group or club. Many areas have these and they offer a great chance to meet up and discuss work and camera techniques with your peers, all the while helping you improve and develop your skills.

Record (again)

Just as above, it’s very important to also record your inspirations. Write down the names of artists and photographers you want to look up, and make notes on what you like and dislike about certain images and media. All of these thoughts and feelings are great to revisit when creating to help formulate and focus your own work. Remember to keep that notebook handy!

Purpose

Back Garden wildlife

Creativity often needs purpose and so do your images.The most powerful images almost always have a purpose behind them, be it to tell stories, stir emotion, tempt us, or give us a glimpse into something we’ve never seen before. Images with purpose have greater strength.

When wanting to improve your own images look for purpose within your shots. Tell stories through single images or start to work on documenting a larger idea through multiple images. Have the story in your head and shoot frames to help tell it pictorially. Stories don’t need to be huge photojournalist essays, instead start off by just showcasing the mundane, everyday occurrences.

Training yourself to make powerful images of these situations will equip you with the necessary skills for more exciting opportunities in the future. Working on a local project, be it in your back garden or local community, means you can spend a great deal of time focused on your images as well as developing your story and vision.

Always ask yourself the following;

  • Why am I creating this image?
  • What am I trying to show?
  • What are the key elements in this story?
  • How can I find a unique angle?

These thoughts will help you work toward creating stronger images with purpose and meaning, leading to far more creative photography.

Taking inspiration from architecture

Output

Art deserves to be shown and deciding how you are going to output your final work is a great way to focus your creativity. In the modern world, most images just end up on a hard drive, away from the light of day where no one can see them. With all the work and effort you are putting into them, they deserve more.

In terms of being creative with your work, think about how it should best be shown. Often people lean toward online media, showcasing work through the likes of Flickr or Facebook, Although these are a great way of getting work out there, they can numb the creative and learning process somewhat.

Printing your work

Think about outputting to hard media, printing out your work as well as online platforms. There are loads of great ways to produce photo books, magazines and gallery style prints that will look far better and suit certain bodies of work far more. The creative process of learning to design a photo book, bring together a 12-part print collection, or design a magazine spread, will also be an excellent learning curve to help you when working on future projects.

In addition, there is something to be said for holding a final piece of work in your hands. A finished print really is the ultimate moment for an image. Having passed through all of the creative stages from conception and execution, through to editing and final completion in your hands is a great feeling, and one every photographer deserves after finishing an image.

Conclusion

In order to produce more and more creative work it’s all about focusing on the process. The skills behind creating, the inspiration and purpose behind projects, the final results and how they are output. By taking time to think through these stages you can really focus your mind and produce refined work to be proud of, as well as constant develope your skills and grow as a photographer in the future.

The post How to Improve Your Art – The Creative Process in Photography by Tom Mason appeared first on Digital Photography School.


Digital Photography School

 
Comments Off on How to Improve Your Art – The Creative Process in Photography

Posted in Photography


StyleShoots Live robotic photography studio uses AI to shoot and process photos

24 Feb

A new robotic ‘smart studio’ device aims to increase brands’ photography efficiency and productivity by replacing, to a certain degree, professional human photographers with artificial intelligence and a robotic camera/lighting system. Called StyleShoots Live, this smart studio is equipped with robotic lighting, a Canon 1DX Mark II camera, and machine intelligence for shooting, processing and exporting photos and video automatically.

StyleShoots, the Dutch company behind the smart studio, unveiled the product on Wednesday, saying it is ‘designed to create instantly edited video and stills for fashion lifestyle and eCommerce shoots in minutes.’ This is made possible via a large steel enclosure in which a model is posed. A variety of technologies then make technical decisions, adjusting lighting and camera settings as necessary to shoot content that matches brand-specified customized styles.

The resulting content is automatically processed, including things like cropping images to certain aspect ratios or stitching together multiple videos. The final content can then be reviewed by the human in charge and, if approved, exported for various platforms. A human is given control over the entire process via a built-in iPad Pro with a Live View mode of the model.

Speaking about the smart studio, StyleShoots’ Head of Product Anders Jorgensen said:

‘Fashion brands need to keep their customers engaged with fresh content every day – and video shared on social media is the most powerful form of storytelling. To keep up with the continuous demand, StyleShoots Live creates stills and video ready for publishing on Instagram, Facebook, Snapchat, and websites within minutes – without any manual editing or post production.’

Of course, such a studio raises concerns about technology and its potential ability to replace human photographers with machines. In response to that concern, StyleShoots explained in a long FAQ sheet that it didn’t design its smart studio to be a replacement for humans. ‘To run a fashion shoot,’ the company explained, ‘you need a creative eye to compose the shot, pose the model and style the clothes — a robot can’t do that (yet).’

Source: StyleShoots

Articles: Digital Photography Review (dpreview.com)

 
Comments Off on StyleShoots Live robotic photography studio uses AI to shoot and process photos

Posted in Uncategorized


How to Process a Black and White Landscape Photo Using Lightroom

20 Sep

The process of converting a color landscape photo into a black and white image using Lightroom goes beyond changing the treatment to black and white. That’s just the start. From there you have to tweak and refine, using all tools that Lightroom gives you, to craft an image that matches the vision you carry in your mind.

Black & white landscape in Lightroom

A good way of showing you how this works is to take you step by step through the process that I use when converting a landscape photo to black and white in Lightroom. You’ll see the techniques that I use. and more importantly, the reasoning behind them. This should give you the insight you need to use these tools on your own images.

1. Make sure you have a good image for black and white

The first step is to make sure that you are working with a photo that suits a black and white treatment. Good black and white photos have strong composition that make use of texture, line and tonal contrast.

It’s a good idea to convert only your best landscape photos to black and white. It will take you some time to convert a photo, so why waste it on anything less than your best work?

2. Prepare the color photo

First, open your photo in Lightroom’s Develop module. Then, I do two things before converting a color landscape photo to black and white.

  1. Use the Spot Removal tool to get rid of any dust spots.
  2. Set White Balance to Auto so that the color balance of the photo is more or less neutral. Photos with strong color casts are harder to successfully convert to black and white.

If you are converting a photo that you have already processed in color it’s a good idea to make a Virtual Copy and work on that. This way you don’t lose the work you have done on the original color version.

Black & white landscape in Lightroom

Here’s the color photo that I am going to convert to black and white.

3. Analyze your photo

This takes practice and becomes easier the more you convert photos to black and white. The idea is to make some big picture decisions about what you want to achieve with your conversion. With my photo I can see that:

  • The sky is too bright, and I would like to make it darker.
  • The distant cliffs have beautiful texture that I would like to bring out
  • So do the grass and stones in the foreground.
  • The sea and sky are smooth, creating a visual contrast against the heavily textured parts of the photo.
  • There is good tonal contrast between the grass and stones in the foreground.

This analysis helps me set some goals for the conversion.

4. Convert the image to black and white

There are three ways to convert the photo to black and white using Lightroom. They all do the same thing, so it doesn’t matter which of these methods you use:

  1. Set Treatment to Black & White in the Basic Panel.
  2. Use the keyboard shortcut; V .
  3. Click on B&W in the HSL/Color/B&W panel.

The conversion is likely to look quite flat. That’s okay – it’s easy to add some contrast.

Black & white landscape in Lightroom

Now go to the B&W tab in the HSL / Color / B&W panel. It will look like one of the these two examples below depending on your Preference settings in Lightroom:

Black & white landscape in Lightroom

If you go to the Presets tab in Preferences (see below) you’ll see a tick box titled Apply auto mix when first converting to black and white. If this is unchecked, all the sliders will be zeroed, as in the screenshot on the left (above). If it is ticked, Lightroom takes a guess at what settings to use to make a good conversion and you’ll see something like the screenshot on the right (above).

Black & white landscape in Lightroom

My preference is to leave the box unticked.

When I convert the image to black and white I go to the HSL / Color / B&W panel and click the Auto button at the bottom of the B&W tab. If I like the result, I leave it there. If I don’t, I use the undo command (Ctrl-Z on a PC, Cmd-Z on a Mac) to undo it.

In this case, I liked the result of pressing the Auto button, so I left the settings as they were. I rarely do any work more than this in the HSL / Color / B&W panel.

Black & white landscape in Lightroom

5. Basic panel adjustments

Now it’s time to make some global adjustments in the Basic panel. Global adjustments are those that apply to the entire image.

The image is flat so the first step is to increase contrast.

Going back to the analysis I did earlier, I can see that I want to emphasize the textures in the photo. Clarity is the ideal tool for this. Increasing Clarity also increases contrast. You should adjust both Clarity and Contrast sliders to get the best overall effect, without overdoing it. You can also use the Highlights and Shadows sliders to adjust the brightness of the lightest and darkest tones in the image individually.

In the end I set Contrast to +40, Clarity to +60, Shadows to -13 and Highlights to -49. Remember that every image is different, and that these settings only apply to this one.

Black & white landscape in Lightroom

6. Make local adjustments.

Now it’s time to make some local adjustments. Local adjustments are those that just affect part of the image. Lightroom gives you three tools to do this – the Radial filter, the Graduated filter and the Adjustment Brush.

I want to make the sky darker in this photo, so I will do that with a Graduated filter. This screenshot shows the location of the Graduated filter (the area affected by the local adjustment is shown in red).

Black & white landscape in Lightroom

I used the brush to erase part of the Graduated filter so that the sea and cliffs weren’t affected.

Black & white landscape in Lightroom

I set Exposure to -0.70, Contrast to -100 and Highlights to -100. Again, the settings required depend on your photo.

My aim here was to make the clouds darker and reduce the contrast so that they appeared smoother. The contrast in this image is in the cliffs, the sea and the foreground, not the sky. Less contrast in the sky means that it won’t compete with those areas for attention.

Black & white landscape in Lightroom

The next local adjustment is on the cliffs in the background. I used the Adjustment Brush for this. Here’s the area affected by the local adjustment (shown in red again).

Black & white landscape in Lightroom

I set Clarity to +86 and Shadows to +16.

Black & white landscape in Lightroom

You may remember that in my analysis I decided that I wanted to make the foreground darker to emphasize the tonal contrast between the grass and the rocks. I’m going to use the Adjustment Brush for this as well.

First, I added an Adjustment Brush to make the grass darker. Here’s the area affected (shown in red).

Black & white landscape in Lightroom

I set Highlights to -64, Shadows to -48.

Black & white landscape in Lightroom

That left a light patch in the bottom left corner, and a dark patch under the stone in the center. I used the Adjustment Brush two more times, to make the light patch darker and the dark bit lighter, creating a more even tone across the bottom of the image.

Then I used the Adjustment Brush on the stones, with a Clarity adjustment to bring out the texture. Below is the result of all those adjustments.

Black & white landscape in Lightroom

Next I used the Adjustment Brush again and selected the sea and the sky.

Black & white landscape in Lightroom

Then I set Contrast to -41 and Clarity to -25. The idea was to remove some of the contrast and texture from these areas, to emphasize the smoothness and lack of texture and set up a stronger visual contrast against the heavily textured cliffs and foreground.

Black & white landscape in Lightroom

That’s it. The final image could certainly be refined a little further, but it’s important to pick a point at which to stop so that you don’t spend too much time on the conversion. Where this point is depends on how much of a perfectionist you are, and how much time you are willing to devote to a single image.

Here’s the initial black and white conversion and the final result together so you can see the difference more clearly.

Black & white landscape in Lightroom

Original color image.

Black & white landscape in Lightroom

First version of black and white conversion.

Black & white landscape in Lightroom

Final image.

There are lots of ways you can convert landscape photos to black and white in Lightroom. I’ve only touched on the topic here, so if you have anything to add please let us know in the comments.


Mastering Lightroom

If you want to know more about processing black & white photo in Lightroom then please check out my ebook Mastering Lightroom: Book Three – Black & White.

googletag.cmd.push(function() {
tablet_slots.push( googletag.defineSlot( “/1005424/_dPSv4_tab-all-article-bottom_(300×250)”, [300, 250], “pb-ad-78623” ).addService( googletag.pubads() ) ); } );

googletag.cmd.push(function() {
mobile_slots.push( googletag.defineSlot( “/1005424/_dPSv4_mob-all-article-bottom_(300×250)”, [300, 250], “pb-ad-78158” ).addService( googletag.pubads() ) ); } );

The post How to Process a Black and White Landscape Photo Using Lightroom by Andrew S. Gibson appeared first on Digital Photography School.


Digital Photography School

 
Comments Off on How to Process a Black and White Landscape Photo Using Lightroom

Posted in Photography


To Process or Not To Process? Let’s Discuss

05 Jun
Processing a RAW file.

Processing a RAW file can allow a photographer to bring out the full range of tones in an image.

Often when I’m looking at photos in forums online, or interacting with photographers in person, inevitably someone will proudly claim that the image in questions is “Straight out of the camera”. Almost without fail, this leads to a huge discussion as to the merits of post-processing images, with those on the side of straight-out-of-the-camera images acting as if those photographers who process their images are somehow in the wrong, or are being deceptive.

There are merits to both sides, to be sure, but what’s amazing is how staunchly both sides defend their positions. At times the discussion becomes more heated than “Mac versus PC” or “Canon versus Nikon”. Having been on both sides of the debate, due to the nature of the work I’ve done in the past, I can understand both sides. However, I can also say that both sides can be somewhat misguided in their arguments at times.

Processing? NO!

Unprocessed sports image

Photojournalists covering sports or other news are often advised not to process images, and some news agencies outright forbid it.

Those who oppose any post-processing sometimes argue that it is a crutch, that they don’t need post-production to fix their images, because they get it right in camera. That said, there are plenty of reasons why you might not want to process your images, purity of the image aside.

In the photojournalism world, image manipulation beyond dodging and burning, contrast, and color correction, is a big no-no. Every few months a story shows up in the photo industry news websites that tell the sad tale of another photojournalist who lost his job or a contest because he or she removed or added an element from an image. In the photojournalism arena, this is understandable. Your job is to tell the story visually, and removing or adding elements in an image changes that story. So in that case, it’s best to keep the manipulation to a minimum. Some news agencies have forbidden their photographers from using the RAW format at this point, to reduce the chances that the images have been drastically altered. The goal here is truth, and while the photographer has already added their spin to it by making important compositional and exposure decisions at the time of capture, that’s where it should end.

Editor’s note: long time National Geographic and Magnum photographer Steve McCurry is under fire for this very issue right now. What are your thoughts on that, is he in the wrong or is it a witch hunt? 

Event Photography

Event photographers who shoot thousands of images in the course of a few hours often choose not to process images due to the amount of time it takes.

Another time where processing images is probably not a great idea is when you are covering large events. For instance, in a past life, I owned a studio that specialized in covering youth sports events, such as soccer and baseball tournaments. On the average Saturday afternoon, it was quite common for me to capture several thousand images on my own, and I often had a team of three or more photographers working for me! Speed is the key at these events, so it’s important that the images be sellable to the participants and their parents as soon as they are shot. This means exposure, white balance, contrast, and saturation must all be good straight from the camera. As soon as a game ended, those images were loaded immediately onto our server to be previewed by customers and participants. There was no time to adjust that many images individually.

Finally, there are those who simply prefer not to do that much work on a computer with their images. The act of capture satisfies their creative urges, and they are happy with their images.  There is nothing wrong with that. Some might say that working in this manner ensures their exposures are correct in every way when the image is made, which is certainly an admirable way of practicing the art of photography. This philosophy of course, also allows you to go out and do more photography, and spend less time on a computer.

Those who choose not to process get their images correct in camera, because to them there is no post-processing option. It helps them be better photographers at the time of capture, because they must pay attention to the details of the exposure, check their histogram, adjust white balance, and apply the correct picture style.

Post-Processing is Part of the Photographic Process

Processed Landscape Image.

Landscape photographers process RAW files in order to pull as many tones as possible out of the image, preserving shadow and highlight detail.

Often, when I hear the words “I get it right in camera,” it often sounds to me like “I don’t know how to use Photoshop.” True or not, for those on the side of post-processing, the photographic process doesn’t end at the press of the shutter button, in the same way it didn’t end for those of us who once shot film, then ventured into the darkroom to develop film and make prints. Those who have never been in the darkroom will likely never understand exactly how much manipulation could be achieved in the darkroom, from color and contrast adjustments, dodging and burning, to masking and photo compositing.

The truth is, there has NEVER been such a  thing as a “straight out of the camera” image.

(With possibly the exception of slides, but they can still be altered in the printing stage.)

Even for those today, who choose to not use Photoshop or other image processing applications, the image is far from being straight out of the camera. You’re simply letting your camera do the processing for you. When you choose a picture style, you’re telling your camera how to handle color, contrast, tone, and sharpness. You can create your own styles as well, manipulating color and contrast in camera to your own liking. Simply because the image wasn’t touched on a computer doesn’t mean it wasn’t processed, or manipulated. Knowing all of this, doesn’t it sound foolish to say that an image straight from the camera hasn’t been processed?

Let’s get this out of the way quickly: Post-processing is not a crutch. If I look at an image on the back of my camera and say “I’ll fix it later”, then it’s already a bad image, and no amount of processing is going to correct it. I am a staunch proponent of shooting RAW, for many reasons. As an avid landscape photographer, I know full well that the camera can have problems handling a scene with a lot of dynamic range, such as a sunset. I use optical filters on my lens to help with that, but there are still times when the image out of the camera fails to capture the image I saw with my eyes.

Close attention to the histogram is essential, ensuring that I have all of the tones I need to work with, careful not to clip highlights and shadows. This is very similar to Ansel Adams’ zone system. I know where objects in my scene should register on the histogram, and I adjust my exposure to ensure that’s what I get when I open Photoshop. As Ansel Adams once said, “Dodging and burning are steps to take care of mistakes God made in establishing tonal relationships.” The same is true for color correction.

This side-by-side comparison shows what is possible when processing a RAW file. On the left is the image straight from the camera, using the Standard picture style. On the right, the same image processed in Adobe Camera RAW.

This side-by-side comparison shows what is possible when processing a RAW file. On the left is the image straight from the camera, using the Standard picture style. On the right, the same image processed in Adobe Camera RAW.

As a landscape photo artist, I do not consider myself a documentarian. While I’m not personally a fan of compositing images together to create the finished piece, I do believe that all darkroom tools are on the table. This starts with RAW processing, and continues into Photoshop, where I will use adjustment layers, filters, and masks to bring the most out of my image. My intent is to bring out what I felt when I was at the scene, capturing the image. Very rarely, for me, does a camera do that without a little help from me.

Adobe Camera RAW

This is the tool palette in Adobe Camera RAW. Each slider is a separate control over the image, and each tab across the top represents another set of controls, enabling you to get the most out of the image.

Finally, and this is my biggest reason for shooting RAW when it is feasible, is the purity of the data. If you are capturing JPEGs straight out of the camera, the camera has already decided to throw away a good portion of the data you’ve captured. JPEGs are 8-bit files, across three color channels. For each of the three color channels (RGB) the camera is converting your image, at the time of capture, to 256 shades of gray per color, leaving your image with 16.7 million total possible colors. In addition, the image is compressed, and redundant data is discarded. This compression is lossy compression, and every time you open and do anything to your image, such as removing a dust spot, and then save it again, you are throwing away more data. Eventually, artifacts will appear in the image, ruining it and making it unusable.

Today’s RAW files are 14-bit files, meaning each color channel contains 16,384 shades of gray. This means 4 trillion total colors are available in the image. Issues such as banding and artifacting, which can arise when using JPEGS, are nearly nonexistent issues when editing a RAW file. I’ve seen JPEG banding in portraits where the skin tones change, and I’ve seen it happen in landscape images where the sky transitions from a vibrant blue to a pale orange at sunset. It can happen to any image. So even if I plan to do nothing to my image but remove a dust spot, it’s worth starting with a RAW file that requires some processing. Even if you oppose post-processing, it’s quite easy to apply a picture style the same way the camera does, and export a JPEG.

Processed Portrait

Portrait photographers often choose to process images to allow them to create a feeling about their subject, in addition to allowing them to retouch the image, and make their subject look their best.

Conclusions

Honestly, there’s no right or wrong way to work with your images. After all, a photographer’s work is very personal to them, and everyone chooses to work in their own way. When I can, I prefer processing my images and getting the most from the file. When the situation calls for it, I will shoot JPEG, knowing full well I won’t be able to make adjustments later, so I make sure it’s right when I push the shutter button.

What do you prefer, and why? Do you process or not?


Editor’s Note: This is one of a series of articles this week that are Open for Discussion. We want to get the conversation going, hear your voice and opinions and talk about some possibly controversial topics in photography. Let’s get it started here – do you agree or disagree with the points above? Do you have any others to add? Give us your thoughts below, and watch for more discussion topics each day this week.

See all the recent discussion topics here:

  • 7 Commonly Accepted Photography Beliefs Debunked
  • Is HDR dead? Some dPS Writer’s Thoughts on this Controversial Topic
  • How to Find your Personal Photographic Style
  • Why You May be Failing to Reach Your Potential as a Photographer

googletag.cmd.push(function() {
tablet_slots.push( googletag.defineSlot( “/1005424/_dPSv4_tab-all-article-bottom_(300×250)”, [300, 250], “pb-ad-78623” ).addService( googletag.pubads() ) ); } );

googletag.cmd.push(function() {
mobile_slots.push( googletag.defineSlot( “/1005424/_dPSv4_mob-all-article-bottom_(300×250)”, [300, 250], “pb-ad-78158” ).addService( googletag.pubads() ) ); } );

The post To Process or Not To Process? Let’s Discuss by Rick Berk appeared first on Digital Photography School.


Digital Photography School

 
Comments Off on To Process or Not To Process? Let’s Discuss

Posted in Photography


How much do you process your images? – a dPS POLL

05 Jun

This week on dPS it’s all about things that are debatable and open for discussion. One thing that’s always a hot item is post-processing. Do you do it or not? If so how much? If you want to get in on that discussion head over to:  To Process or Not To Process? Let’s Discuss

How much do youprocess your images_

Then fill in this poll and tell us – how much do you process? Are you a minimalist or do you take your time and make art with each image?

Note: There is a poll embedded within this post, please visit the site to participate in this post’s poll.


Editor’s Note: This is one of a series of articles this week that are Open for Discussion. We want to get the conversation going, hear your voice and opinions, and talk about some possibly controversial topics in photography.

Give us your thoughts below, and watch for more discussion topics each day this week.

See all the recent discussion topics here:

  • 7 Commonly Accepted Photography Beliefs Debunked
  • Is HDR dead? Some dPS Writer’s Thoughts on this Controversial Topic
  • How to Find your Personal Photographic Style
  • Why You May be Failing to Reach Your Potential as a Photographer
  • To Process or Not To Process? Let’s Discuss

googletag.cmd.push(function() {
tablet_slots.push( googletag.defineSlot( “/1005424/_dPSv4_tab-all-article-bottom_(300×250)”, [300, 250], “pb-ad-78623” ).addService( googletag.pubads() ) ); } );

googletag.cmd.push(function() {
mobile_slots.push( googletag.defineSlot( “/1005424/_dPSv4_mob-all-article-bottom_(300×250)”, [300, 250], “pb-ad-78158” ).addService( googletag.pubads() ) ); } );

The post How much do you process your images? – a dPS POLL by Darlene Hildebrandt appeared first on Digital Photography School.


Digital Photography School

 
Comments Off on How much do you process your images? – a dPS POLL

Posted in Photography


How to Process a Landscape Photo in 5 Minutes Using Photoshop

07 Sep

2-for-1 special

As part of Landscape Photography Week here on dPS, we’re offering TWO for the price of ONE on our best-selling Living & Loving Landscape Photography ebooks!

Click here to take advantage of this offer.


In this ultra fast video tutorial photographer Joshua Cripps walks your through how to process a landscape photo using Photoshop in under five minutes. He talks really fast and works quickly so if you miss anything just watch the video again (he even says that at the end) or pause it so you can follow along.

How did you make out with your own landscape image, could you do it in five minutes? If it takes you a little longer that’s just fine, especially if you’re just learning Photoshop.

Note: everything he does in the video can also be done in Lightroom using the basic sliders, adjustment brush, and graduated filter.


Here on dPS this is landscape week – here is list of what we’ve covered so far. Watch for a new article (or two) on landscape photography daily for the next couple days.

  • 6 Tips for Better Low-Light Landscape Photography
  • Landscape Photography and the Human Element
  • 5 Ways a Telephoto Lens Can Improve Your Landscape Photography
  • Landscape Photography from the Side of the Road
  • 32 Majestic Landscape Photos to Inspire Your Wanderlust
  • Weekly Photography Challenge – Landscape
  • Landscape Photography – Shooting the Same Location Through the Seasons

googletag.cmd.push(function() {
tablet_slots.push( googletag.defineSlot( “/1005424/_dPSv4_tab-all-article-bottom_(300×250)”, [300, 250], “pb-ad-78623” ).addService( googletag.pubads() ) ); } );

googletag.cmd.push(function() {
mobile_slots.push( googletag.defineSlot( “/1005424/_dPSv4_mob-all-article-bottom_(300×250)”, [300, 250], “pb-ad-78158” ).addService( googletag.pubads() ) ); } );

The post How to Process a Landscape Photo in 5 Minutes Using Photoshop by Darlene Hildebrandt appeared first on Digital Photography School.


Digital Photography School

 
Comments Off on How to Process a Landscape Photo in 5 Minutes Using Photoshop

Posted in Photography


How to Shoot and Process a Time Lapse Movie – Quick Method

27 Jun

The other day I was in the city and I was watching the clouds because they were moving so fast. It was a sign that bad weather was on the way, but I also knew the clouds would be a good opportunity to try some time lapse photography.

Eureka Tower image for time lapse

There are many ways of taking a series of images to use for time lapse photography. My camera was setup on a tripod and set to take a photo every five seconds over 10 minutes. In total 120 images were taken, however that number is up to you. The other day I took 300 images to use for one.

You can do this in various ways and it is best to check your camera manual to see if you can take photos at intervals. If you can’t then you may have to use something like an intervalometer or just manually take a photo every five seconds or whatever interval you choose.

When I got home I did some research and found a fairly easy way of putting the images together to get a quick time lapse. Follow along a I show you how you can do this as well.

Lightroom

The 120 images were imported into Lightroom. If you are unsure of how to Import photos then look at this article: Quick Tip: Importing to Lightroom Made Easier.

The images for the time lapse in Lightroom

The images for the time lapse in Lightroom

Choose the first image and you do some basic processing to it in the develop module. I straightened, then cropped, a bit of a building out of the side of it, brought out the shadows and highlights.

Processing done to the image.

Processing done to the first image.

Select all images for the time lapse and click Sync, in the bottom right of the Develop module.

The Sync Button

The Sync Button

When the window to Synchronize Settings comes up, tick the box at the bottom to Check All. You want all the changes that you made to the first image to be applied to all of them. They are basically all the same image except for the changes that you want to use for the time lapse.

Press Synchronize in the bottom right of the window. You will see that all the images change and are now ready to be exported.

Synchronizing the images.

Synchronizing the images.

Exporting the Sequence

There are a few things to consider when you export them, one is the way you rename them. If the number or sequence isn’t at the front of the file name then there may be software problems to put them in the right sequence. It doesn’t make a difference with Photoshop CC.

The images should be changed to jpeg. It is only for the internet so you can use a low resolution, 72 dpi is okay. The size of the image was changed to 1980 pixels for the longest side, which is a good size for videos and for HD.

In the following image you can see which export settings I used for the Time Lapse sequence images.

Exporting the images.

Exporting the images.

Press Export. Then, to put the images together to make the time lapse you will need to move into Photoshop.

Photoshop CC

In Photoshop you need to go to File and Open. (File > Open) Go to the folder with the exported images and select the first one in the sequence. In the same window, before you press Open, make sure you check the box that says Image Sequence which is down near the bottom.

Getting the images ready for the time lapse.

Getting the images ready for the time lapse.

Once you have checked it, select Open.

Before Photoshop opens them a new window will come up asking you how many frames per second you want to use.

Setting the frame rate.

Setting the frame rate.

At this stage you can just click OK; you will have a chance to change it later on if you want to make it slower or faster.

To make it a time lapse you need to open another window in the Photoshop main window. Go up to Window in the main menu at the top, and then down to Timeline and select it. (Window > Timeline)

Opening the Timeline.

Opening the Timeline.

You will see a new window appear down the bottom. Look at the following image:

Looking at the Timeline.

Looking at the Timeline.

If you press the play button you will see your time lapse run.

If you want to change the Frame Rate this is the time to do it. In the Timeline Window, up in the top right corner, you should be able to see a down arrow with lines next to it, click on that and a drop-down menu will appear. Go down and select Select Timeline Frame Rate…

Changing the frame rate.

Changing the frame rate.

You can change this as many times as you like. Keep doing it until you get a frame rate you like. Once you are happy with how long it runs for, you can render the video.

Go up to File, then select Export. In the drop down menu choose Render Video. (File > Export > Render Video)

Exporting the video.

Exporting the video.

After initializing, the Render Video window will come up. In this Window you can name your video and decide in what format you want it saved.

Working out the video type.

Working out the video type.

Set it on one of the HD settings and you will get an MP4 video. It gives you quite a good video.

If you decide you really like doing them there are lots of other methods, this is just a quick way to do time lapse movies using Lightroom and Photoshop CC.

googletag.cmd.push(function() {
tablet_slots.push( googletag.defineSlot( “/1005424/_dPSv4_tab-all-article-bottom_(300×250)”, [300, 250], “pb-ad-78623” ).addService( googletag.pubads() ) ); } );

googletag.cmd.push(function() {
mobile_slots.push( googletag.defineSlot( “/1005424/_dPSv4_mob-all-article-bottom_(300×250)”, [300, 250], “pb-ad-78158” ).addService( googletag.pubads() ) ); } );

The post How to Shoot and Process a Time Lapse Movie – Quick Method by Leanne Cole appeared first on Digital Photography School.


Digital Photography School

 
Comments Off on How to Shoot and Process a Time Lapse Movie – Quick Method

Posted in Photography


The Workflow Process With Jonathan Skow

19 Jan

Hi FashionPhotograhyBlog.com readers,

Vince Gonzales from Vinpix has joined us again on the site, following the interview he did with Trina Turk and Jonathan Skow; the faces behind the popular Californian fashion label, “Trina Turk”, Vince takes Jonathon Skow, LA photographer and fashion celebrity, aside to find out how the photographer processes his workflow when shooting for the “Trina Turk” range. Take it away Vince… 

Vinpix Jonathan Skow Trina Turk

 Vince Gonzales:  Jonathon, tell me a little about your workflow when you are approaching these shoots when you are going to a location. Our readers are kinda nerdy and techie so you can’t get too nerdy here… obviously, you are shooting digital, but do you shoot any film?


Jonathon Skow: No, no film. All digital


Vince Gonzales: And is it 35 format or medium format?


Jonathon Skow: 35 format.


Vince Gonzales: Do you use natural light for exteriors with strobes? 

Vinpix Jonathan Skow Trina Turk

 Jonathon Skow: [I use] Pretty much all natural light. I like back lighting, yeah it’s pretty much all natural light. Sometimes we’d use the shiny board or we’d put a black cloth on one side; something that would give in a little bit of shape.


It’s pretty much [natural light], I don’t want it to look like too polished, the idea is like this natural California lifestyle so I don’t want it to feel too refined. It’s nice to me when there’s a little bit of shadow to it, or if there’s some flare or sunspots; things like that I like l welcome.


Vince Gonzales: And what’s your post process? Are you doing that or is that being handled somewhere else? 

Vinpix Jonathan Skow Trina Turk

 Jonathon Skow: No, I just have a digital tech who comes on the shoots and we use light room. Usually we have a recipe like “oh this [image] let’s try to make this a little warm or less contrast”.  Honestly, and I hate to admit this, but I am influenced a lot by Instagram, in the idea of their filters.


I came into photography from the creative side, being someone old enough to start in film and then moved into digital. I still was kinda [wary] of [digital] you know. I always thought that the film was this natural sort of process that would happen and [when] you would get it back it would be surprise but younger people would be like  “oh but why bother, why not do that yourself on digital?” And I was like “no you can’t do that” but then Instagram  made me think “oh why not put a weird filter on it and have a look”.


Not that we go super extreme but I’ll talk with the digital tech before and we’ll look at some different things and have a plan for the sort of mood of what the [shoot] is going to be. Not that we stray too far but there’s little tweaks. 

Vinpix Jonathan Skow Trina Turk

Did you find Vince’s interview with Jonathan Skow interesting? Please leave your comments below in the comment section. We would like to know what you thought about this post. If you enjoyed this post, stay tuned as Vince has another post coming up soon on FashionPhotograhyBlog.com. You can also read our article on how Trina Turk and Jonathan Skow got their clothing lines “Trina Turk” and “Mr Turk” got started here.


IMAGE SOURCE: 

Feature image & images 1-4: Stills of Trina Turk’s designs, courtesy of Jonathan Skow & Vinpix


Fashion Photography Blog

 
Comments Off on The Workflow Process With Jonathan Skow

Posted in Uncategorized


20 December, 2014 – The Granting Process

21 Dec


In the last 15 years, I have had the privilege to meet and get know as well as make good friends with some of the finest photographers in the world.  Michael Reichmann is one of those photographers, and it has been a privilege to be able to travel to many of the different corners of the world with him. More than anything else he became one of my best and finest friends.  When I made the decision to joining Luminous-Landscape, I did so because we shared a common passion and a great desire to share that passion with others around the world.  Of course, the passion is photography and as the founder of the site Michael has shared his passion freely for fifteen plus years.  

Late last year Michael shared with me his latest passion, and as we headed into 2014, he began to work on the Luminous-Endowment.  His dream was to create an organization that could award grants to photographers so they could pursue and complete photographic projects that may not have been able to do without a form of assistance.  The Luminous-Endowment was born, and in less that a year the organization has raised a nice amount of money and made it’s first round of grants. Please stop over to the Luminous-Endowment site and learn more about what we do and also think about purchasing at our special Christmas price Michael’s Retrospective book.  All proceeds for the book go into the Luminous endowment.

Alain Briot one of the finest instructors I have met and a regular contributor on Luminous-Landscape is one of the jurors for the Endowment.  You can learn about the jurors on the Endowment site.  Today Alain shares with us his insight into The Granting Process and how a photographer who may interested in obtaining a grant can prepare better and submit a grant application that will give them an edge.  At the same time, it gives those of us who won’t be requesting a grant somethings to think about as we go about creating our regular work and projects.


The Luminous Landscape – What’s New

 
Comments Off on 20 December, 2014 – The Granting Process

Posted in News