RSS
 

Posts Tagged ‘Perspective’

Use Photoshop to Correct Perspective Distortion of Buildings in Your Images

25 Jun

Shooting buildings can be tricky. The main reason is that they are tall, and you need to get far away from them if you want to fit them into the frame. If you are shooting in the city, you don’t have the luxury of getting really far away, the best you may be able to do is get farther down the street. What you have to do then, is tilt your camera upwards to get the whole building in, and that’s when it happens – perspective distortion.
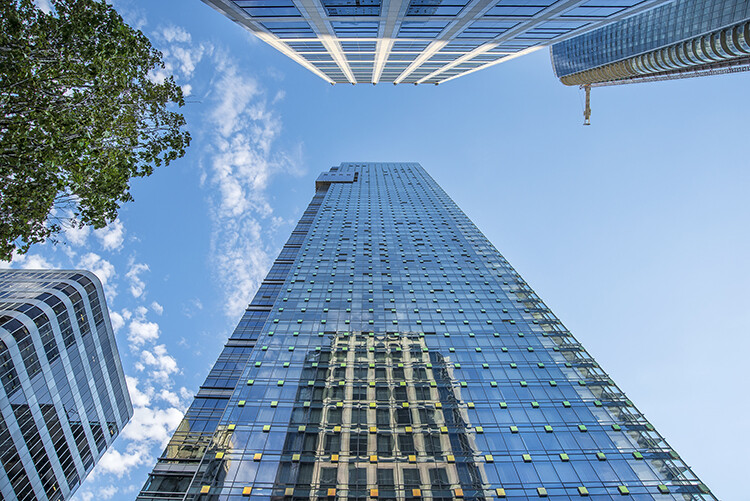
City Scenes can be difficult to photograph

City scenes can be difficult to photograph because of the risk of distortion

When you are using a wide angle lens (which you probably will be when shooting architecture) and you tilt your lens up or down, your image will distort. Architectural photographers would use a tilt-shift lens to counteract this distortion, which can make a really big difference in your image. The only problem is that it is a specialist lens, and it is expensive.

Until a few years ago, that was the only solution for fixing perspective distortion, but in the latest versions of Photoshop, there are a few truly amazing tools that can fix it painlessly. Sometimes the distortion may work well in the image, but if you need to fix it, these techniques can help. To learn more about getting better architectural photos read: Tips for Different Approaches to Architecture Photography

1. Working with distortion

The definition of distortion is: when the straight lines of a subject are either curved in a particular direction, or they converge or diverge. This happens when the focal plane of your camera is pointed upward or downward. This is called perspective distortion. The second most common type of warping is barrel distortion, this type is dependent on the type of lens you are using. Barrel distortion make the image look like it has been inflated in the middle of the scene so it looks like a barrel – wider in the middle, and narrower at the top and bottom. Wide angle lenses tend to distort a fair amount when pointing up or down, and in some cases, you may get barrel distortion in the image too. So, how do we fix this?
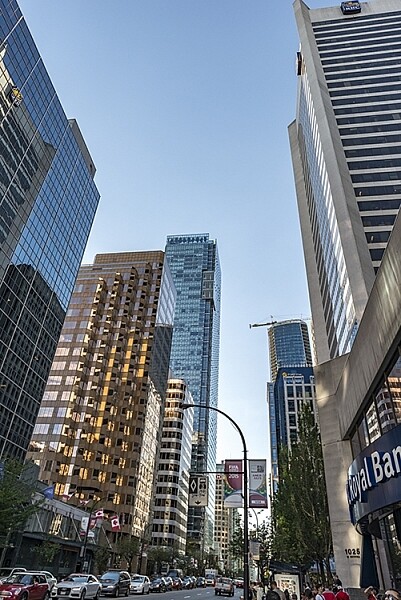
Tall buildings distort easily with a wide angle lens

Tall buildings distort easily with a wide angle lens.

2. Fixing distortion in camera

If you want to avoid perspective distortion, then you will need to keep your focal plane at 90 degrees to your subject. In other words, don’t tilt your camera up or down when you are shooting. This may work well for landscape photography, but when you are shooting tall buildings, it may be very difficult to get that right. Sometimes there is no way to avoid perspective distortion in camera.

Thankfully Photoshop can help you out here. Barrel distortion is a function of the lens you are using, wide angle lenses can make the middle of the image seem bloated or inflated. You can try and fix this by zooming in a little, as wide angles tend to suffer from barrel distortion when they are at their widest focal length. Zooming in is not always possible, so we will fix the bulk of the issues in Photoshop.

3. Fixing distortion in Photoshop

Photoshop has a few functions that can help you fix both perspective and barrel distortion. One of the best tools that has been included with recent versions is the Adaptive Wide Angle Tool. This tool is intuitive and easy to use, but takes a little practice initially. In the past, I would use the transform tools (i.e., Distort, Skew, Perspective and Warp). While these worked really well, it took a fair amount of time to get the corrections to look realistic.

In the examples below, you can see that the building looks shorter and more squat. Some further adjustments would need to be made to correct this, but overall, the buildings are vertical and look correct architecturally.  With the Adaptive Wide Angle tool, this process is easily done, in some cases with only three or four mouse clicks.
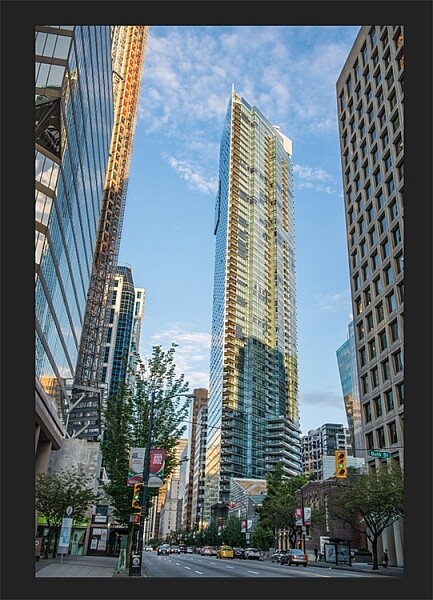
Image of a building before the distortion tool was applied in Photoshop
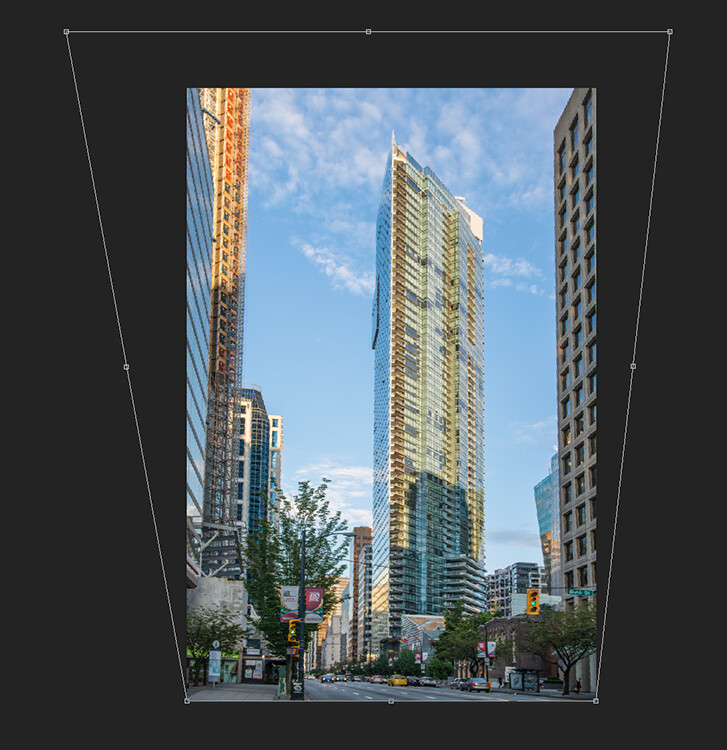
Image of a building before the distortion tool was applied in Photoshop

Same image after the distortion tool was applied

Same image after the distortion tool was applied

4. Adaptive Wide Angle tool

The Adaptive Wide Angle tool sits under the filter menu. Open the image you want to correct (with skew buildings or walls) click on FILTER>ADAPTIVE WIDE ANGLE, and a new box will open up with your image inside it.
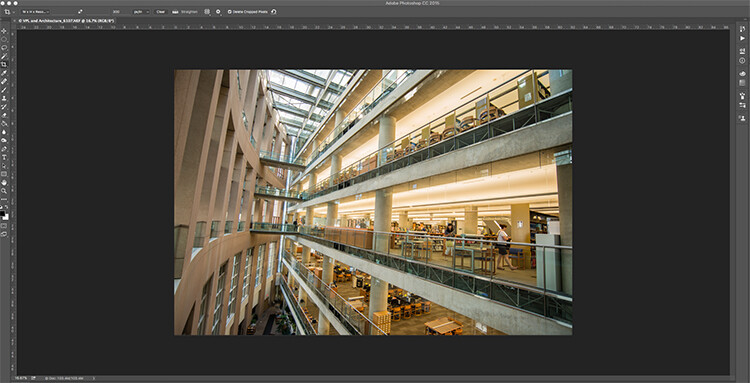
Adaptive Wide Angle tool screen

Image to be corrected, you can see the vertical lines are pretty skew

Depending on how your image is displayed in the box, you may need to scale it to see the whole thing. On the right hand side you will see a box that says Correction. Underneath that you will see a scale slider, adjust it until you can see your whole image in the box. There is a dropdown box in there with other options such as perspective, fisheye, etc., – I find leaving it on Auto seems to work best. The other functions within that box may work in some cases, but by leaving it on Auto and making specific adjustments to the verticals and horizontals in your image, you will get the best results.
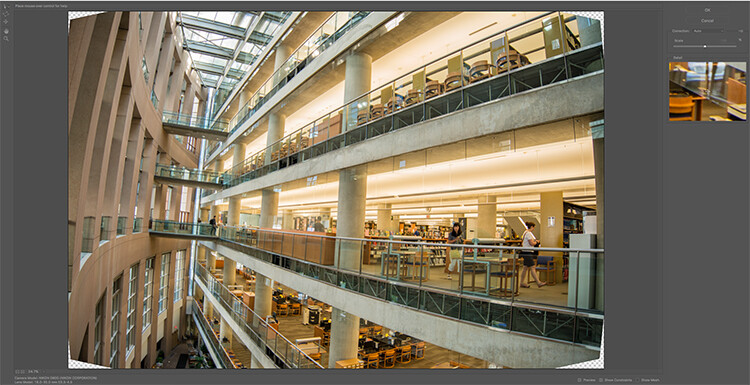
Adaptive Wide angle tool screen

Adaptive Wide angle tool screen

You will then need to identify the walls of the building that are converging or diverging. On the left hand side of the dialogue box, you will see some constraint tools. The tool that is first in the row is simply called the Constraint Tool, this is the one I use most often.

Click on that and move your mouse over to one of the vertical lines of the building, and draw a line down the wall. Start at the top of the building and drag the line down to the bottom, along a vertical wall that should be straight. Click at the bottom of the line when you are done and Photoshop will drop a line down exactly where you dragged. As you click, Photoshop will correct any barrel distortion, but the line will still be skew.

At the bottom of the line you will see a square, right click on the square and three options will pop up: Horizontal, Vertical, and Arbitrary. These are the three ways you have to correct that line. If it is a vertical wall, then click on Vertical. Immediately, Photoshop will bring that wall into a perfect upright position. What you will notice is that it may distort other lines now. That’s okay, find a second vertical that is not correct and repeat this process, once you have done three or four verticals, your building should be perfectly straight, as should the rest of the building. Sometimes what may happen is that the horizontal alignment may shift with all these vertical changes. You can then select a horizontal line in the image and repeat the same process you did for the verticals, just use a line that you know should be horizontal. Also, when you right click, select the Horizontal option in the popup box.

To make sure you are making a precise selection when you draw your line, there is a 100% zoom window on the right hand side. This is really useful, as it can be difficult to be zoomed in to the image, and drag the line down at the same time. This box really helps make sure that you start and finish at the right places on the building.
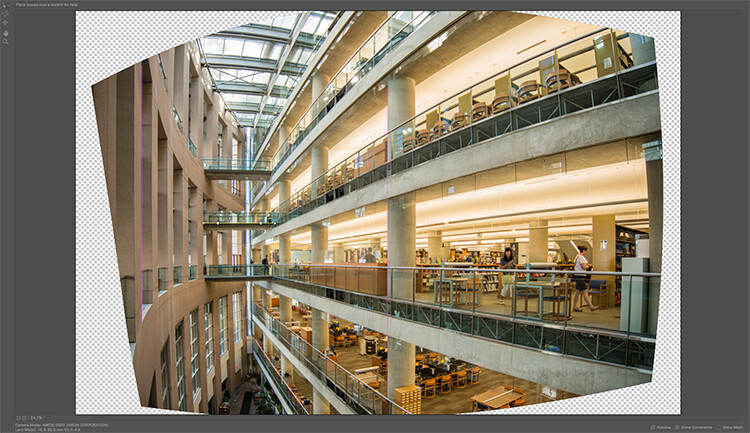
Adaptive Wide Angle tool and image after 3 adjustments have been made

Adaptive Wide Angle tool and image after 3 adjustments have been made

Once you have straightened some of the more skewed verticals, and one or two horizontals, your image should be looking pretty close to perfect. Once you are done, click ok and your image will open up in Photoshop. From there you can edit the rest of the image with all the lines being straight and aligned.

A new tool has recently been launched by Adobe Photoshop for CC users called Guided Upright and you can find it in Camera RAW of the latest version.
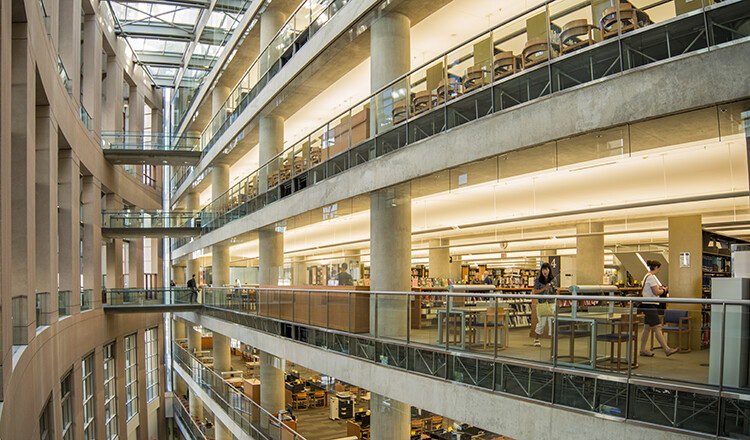
Final image after being edited in the Adaptive Wide Angle tool

Final image after being edited in the Adaptive Wide Angle tool and cropped.

Here is a great short minute video that Adobe has released, take a look, this could also be a useful tool to use.

What’s your go-to method of correcting perspective distortion? Please share in the comments below.

googletag.cmd.push(function() {
tablet_slots.push( googletag.defineSlot( “/1005424/_dPSv4_tab-all-article-bottom_(300×250)”, [300, 250], “pb-ad-78623” ).addService( googletag.pubads() ) ); } );

googletag.cmd.push(function() {
mobile_slots.push( googletag.defineSlot( “/1005424/_dPSv4_mob-all-article-bottom_(300×250)”, [300, 250], “pb-ad-78158” ).addService( googletag.pubads() ) ); } );

The post Use Photoshop to Correct Perspective Distortion of Buildings in Your Images by Barry J Brady appeared first on Digital Photography School.
Digital Photography School

 
Comments Off on Use Photoshop to Correct Perspective Distortion of Buildings in Your Images

Posted in Photography


Using a Wide-angle Lens with Wildlife for a New Perspective

18 May

With more and more budget telephoto lenses hitting the market, wildlife photography is becoming increasingly accessible. Consequently, you don’t have to look very far to see beautiful wildlife portraits, shot with a clean bokeh using a long lens. Close-ups like this definitely have their place, but this traditional form of wildlife photography is perhaps harder to achieve stand-out photos within nowadays.

But who said you had to use a telephoto lens for captivating wildlife photos? In nature photography, wide-angle lenses are traditionally associated with landscape photography. But by using a wide-angle lens with wildlife, you can incorporate the environment, and habitat of a species, into your photo. This is will add an entirely new perspective to your images, and it’s a really enjoyable technique to play with.

How Do You Do

Equipment you’ll need

While you can do wide-angle shots of wildlife using a camera trap system, I’m going to be looking at firing the shutter manually. So here are some pieces of equipment you’ll want to get hold of.

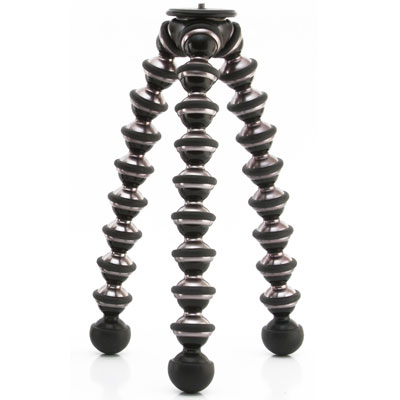
Joby Gorillapod

These three bendy tripods are extremely versatile, and allow you to position your camera in all sorts of places, whether that be wrapped around a tree, or precariously positioned on a rocky beach. This will help you to position your camera low to the ground, in the ideal position. Tripods rarely let you go to ground level, as they often have a neck or centre column. Plus, they’re very large when spread out to the ground. But make sure you buy the more heavy-duty of Joby’s offerings, as the cheaper versions will not cope with the weight of a DSLR.

Joby

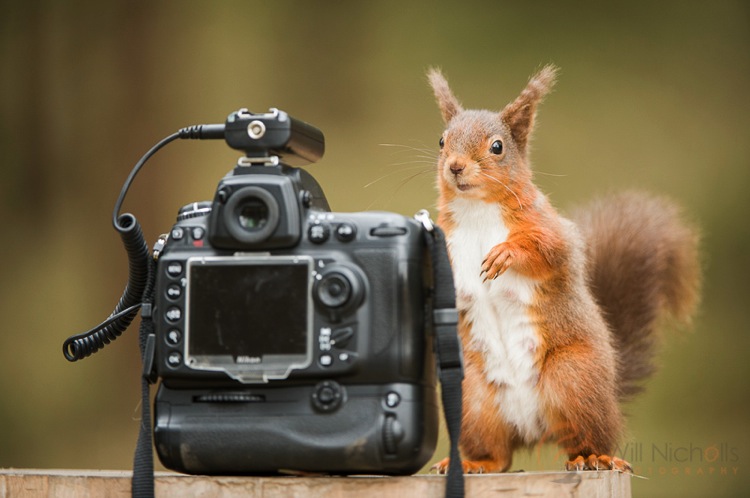
Wireless release

You’ll definitely need some form of wireless trigger for your camera. You can’t press the shutter directly, as no animal will come near your camera if you’re sitting right behind it. Instead, get hold of some wireless releases from YongNuo. They are about $ 40 and work perfectly well. They are a radio based system, which do not require line of sight, and have they a range of up to 100 meters (supposedly).

Yongnuo

Setting up for the shot

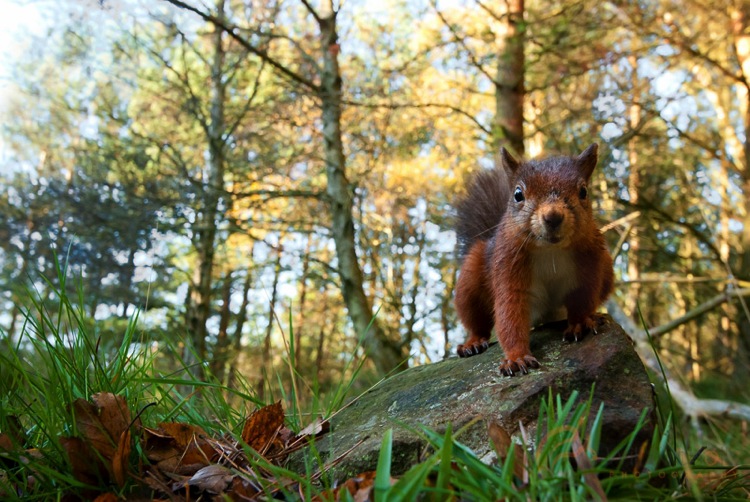
You need to think about what you’re trying to convey in your photo. The best part about a wide-angle lens is the ability to include the habitat of your subject, so think about what are its key features. For me, red squirrels are a great subject for wide-angle photography. They live in British woodlands, so the obvious backdrop is a collection of trees.

Remotesquirrel2

Position the camera as low to the ground as possible; you want to make sure you are at or below eye-level of the animal. This really shifts the perspective of the shot. Remember that because you’re shooting wide (perhaps even as wide as 14mm), you’ll need to ensure your subject comes close enough to the lens, or it will appear too small.

To do this, you can use some form of bait. I will stress right away that live baiting is seen as extremely unethical in wildlife photography, and I strongly suggest you do not take this approach in any form of wildlife photography. If your subject is a carnivore, then you can collect road kill or other already dead animals to use as bait. But for me, squirrels are omnivores and they are very happy with a few hazelnuts to bring them close to the camera.

Remote High

Put your camera into aperture priority mode. Make sure you have your exposure compensation set to expose the scene properly, and any changes in light should be adjusted for by the camera automatically. Set your focus manually, predicting where the animal will turn up, and make sure to switch the camera’s autofocus off (otherwise it will attempt to refocus when you fire the shutter).

Now you can sit back and wait. Make sure you’re in range, but stay hidden. You can use a pop-up photography blind for this, and just be patient. Once an animal begins to approach, fire a test shot while it is still at a distance. This will help the animal get used to the sound of the shutter. For some animals a test shot won’t be appropriate, such as with birds that may fly away. If you’re lucky, your subject will realize that the camera means no harm, and happily sit and pose for your shot.

Things to be aware of

You should never put your photograph before the welfare of an animal. Period. There are no exceptions here, and to do otherwise is strongly condemned in the wildlife photography field. It therefore goes without saying that you should not perform this type of photography at the breeding site of an animal. If you shove a camera outside a bird’s nest, it will likely abandon it, and any chick in the nest will die. Disturbance like this never ends well.

Wide-angle photography handheld

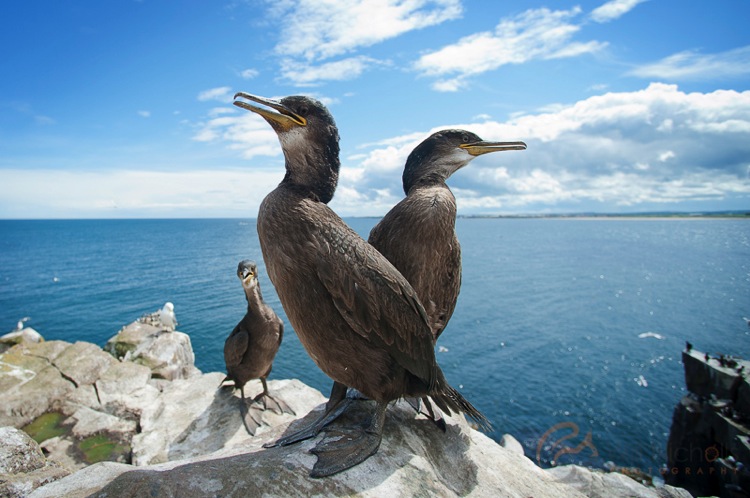
There are some situations where you can hand-hold your camera and take wide-angle shots of wildlife. This is often the case for seabirds which nest on islands and cliff tops. These usually reside in wildlife reserves, and it is the case in the UK that you can walk around these reserves. Consequently, the animals are used to people and are completely unafraid. It’s therefore possible to get close enough. As long as your subject doesn’t show any signs of stress, then you are probably okay to approach.

Juvenile Shags

In conclusion

Wide-angle photography is great fun with wildlife. It feels just like Christmas, not knowing what you’re going to get until you go back and check the camera. Sometimes you’ll be bitterly disappointed at an out-of-focus image that had potential, but eventually you’ll come away with something you can be proud of.

googletag.cmd.push(function() {
tablet_slots.push( googletag.defineSlot( “/1005424/_dPSv4_tab-all-article-bottom_(300×250)”, [300, 250], “pb-ad-78623” ).addService( googletag.pubads() ) ); } );

googletag.cmd.push(function() {
mobile_slots.push( googletag.defineSlot( “/1005424/_dPSv4_mob-all-article-bottom_(300×250)”, [300, 250], “pb-ad-78158” ).addService( googletag.pubads() ) ); } );

The post Using a Wide-angle Lens with Wildlife for a New Perspective by Will Nicholls appeared first on Digital Photography School.

Digital Photography School

 
Comments Off on Using a Wide-angle Lens with Wildlife for a New Perspective

Posted in Photography


Canon 35mm F1.4L II: a photojournalist’s perspective

07 Dec

By Jordan Stead

I prefer prime lenses to zooms because I can already see the frame before I raise the camera to my eye. After you’ve shot with a lens for a long time you get used to it. After looking through a 35mm lens for so long, I can visualize the field of view instinctively. And 35mm suits the way that I shoot. It’s challenging, and at the same time, a very versatile focal length. 

The original Canon EF 35mm F1.4L USM, wide open at F1.4. (Photo: Jordan Stead, seattlepi.com)

A tendency when I’m using zooms is to shoot at the widest end most of the time. I always try to put myself as close to something as I possibly can, and so I end up zooming out as much as I possibly can. By being fixed at 35mm, it’s not super wide, it’s not tight, but it can be both simply by stepping back or stepping forward. It forces me to think about composition, it makes me work harder, and it makes me think more about layering.

The author with a typical camera and lens outfit for a two-photographer team shooting professional sports. More specifically, Super Bowl 49. Several camera bodies, several long sports lenses, and at least one 35mm F2 prime.

Photo: Josh Trujillo, seattlepi.com

I remember buying my original Canon EF 35mm F1.4L from a strange man in a California parking lot during an internship years ago. I can safely say that shooting with it as extensively as I did enabled me to build my personal vision as a photographer. It’s been a staple in many photographers’ bags since the 1990’s, and it’s by no means a bad lens following the release of the Mark II.

The original Mark I offers good sharpness, robust build quality, and despite the fact that it isn’t technically weather resistant, I can guarantee you it actually is very weather resistant in normal use. Even bodily fluid resistant. And somewhat drop resistant. The durability of that era of L-series lens is impressive.

Using a 35mm and want a 50mm or 85mm field of view? Step in and think layering instead of zooming. Shot on the original Canon EF 35mm F1.4L USM at F4.5. (Photo: Jordan Stead, seattlepi.com)

There are a couple of downsides to the original EF 35mm F1.4, but only if you’re pixel peeping. Corner sharpness isn’t outstanding: It tends to have kind of a smear to it, which I don’t actually mind too much. I’ve always enjoyed a little natural vignetting, because it tends to draw your eye more to the center of the frame, but there are times when the chromatic aberration can be pretty bad. If you’re shooting something like a lot of backlit trees, or a portrait of somebody with blond hair, backlit, your photograph will contain some wild Christmas colors. 

Shot on the original Canon EF 35mm F1.4L USM at F4. (Photo: Jordan Stead, seattlepi.com)

After years and years of heavy use, my original 35L was repaired three or four different times, due to being abused in just about every possible way. It had been dropped many times, slammed against something while dangling off my shoulder while running, soaked through with snow, rain and probably a fair amount of beer, too. At the end of its life, it would only work when shot wide open at F1.4. I do recall the autofocus switch assembly popping completely out of the lens body at one point with a long trail of electronics dangling out after. I pushed the guts back into the body, gaffer taped it over, and kept on shooting.

Canon EF 35mm F1.4L II USM

Price: $ 1,799 USD

Aperture range: F1.4-F22

Nine rounded aperture blades

Two Aspherical Elements, One UD Element

Blue Spectrum Refractive Optics

Weather-sealed design

Once my original 35L turned to dust, I found myself unwilling to spend $ 1,300 to replace it. Canon’s non L-series EF 35mm F2 IS was getting outstanding reviews across the board and it was much smaller and lighter than the F1.4 version. The 35mm F2 doesn’t have a big red ring on it, so it’s a little subtler (and cheaper), and comes with image stabilization. I’ve discovered now, having shot with the 35mm F2 for over a year, that IS on short glass can be truly amazing – especially when panning or shooting in low light and keeping ISO low.

Can you tell the difference between F1.4 and F2? If you can’t – or don’t care – opt for the cheaper, lighter, IS-equipped Canon EF 35mm F2 IS USM, used here at F2. (Photo: Jordan Stead, seattlepi.com)

With IS, you can get away with a 0.5 second exposure if you are super, super still. That’s something you’d be hard pressed to be able to get away with on a non-IS lens, including the old 35mm F1.4. Then there’s the price. For so much less than the F1.4, you’re still getting solid build quality, with stabilization, and all you’re really losing in return is a stop of light. But you definitely don’t get that particular, dreamy F1.4 look, unless you’re close enough to a subject to throw their background significantly out of focus.

Having now shot a lot with the new EF 35mm F1.4L II, the first thing that stood out to me was the size; nearly the same as the Canon 24-70 F2.8 Mark II! Then again, compare it against the Sigma 35mm Art F1.4 and it’s around the same bulk.

It’s almost not worth talking about the image quality. I figured if the Sigma Art was as good as everyone says it is (and it is), then for $ 1,800, Canon had to have at least matched if not exceeded it. I was confident that the quality was going to be outstanding, and it is. The 35mm F1.4L II is eye-searingly sharp. Colors are amazing, bokeh is beautiful and the lack of CA is unmatched. I’ve never worried about CA a whole lot, but it was apparent when shooting the 35L II in a challenging environment (such as a backlit, daylight scene), it definitely holds its own better than both its predecessor and cheaper F2 sibling.

Canon EF 35mm F1.4L II USM: if sharp is what you want, sharp is what you’ll get. Taken at F1.6. (Photo: Jordan Stead, Red Box Pictures)

What I’ve come to really enjoy about the Mark II is the focus accuracy and speed. The Mark I is great, I’ve had tons and tons of good luck with it, but the Mark II is just so fast and so accurate, especially when paired with a body like the EOS-1D X. Considering when you first get a prime and all you want to do is shoot it wide open for a month, you judge it harshly on whether the focus is landing correctly, especially when you know your technique is up to snuff. It was great to go into my edit and see I was having a much better hit rate at F1.4. And it’s not just because of the relatively low 18MP resolution of the EOS-1D X, I’ve had similar results with the EOS 5DS R and 5D Mark III.

The fear is that I’ll probably buy a Mark II version for myself now. The 35mm F2 is just so convenient, and I really do appreciate the weight, but it can’t quite beat the image quality and autofocus performance of the 35L II. 

“F1.4 and be there?” Not the best advice (nor how the saying goes), but the Canon EF 35mm F1.4L II USM sure makes shooting wide open more fun – and rewarding. Taken at F1.4. (Photo: Jordan Stead, Red Box Pictures)

Putting this new lens on my camera has made me enjoy shooting at F1.4 more and, in turn, worry less about CA. Compared to the original 35mm F1.4 there are many advantages across the board. I really have nothing bad to say about the Mark II besides its hefty size, but that’s just the standard at this point for 35mm F1.4s, anyway.

With the inevitability of more high-megapixel bodies on the way, it is important to consider that you’re not necessarily buying a lens like the Mark II just for right now: you’re buying it for the future. With cameras like the 5DS R, older lenses – even L-series lenses – can mostly still deliver decent results, but the 35mm F1.4L II is a step up in terms of sharpness, color and CA control. If a high-megapixel body is something you’re considering in the future, you’re going to want to pick up this lens.

Articles: Digital Photography Review (dpreview.com)

 
Comments Off on Canon 35mm F1.4L II: a photojournalist’s perspective

Posted in Uncategorized


Manfrotto and Lastolite brands combine and launch new Speed-Lite softbox and Perspective Backgrounds

03 Nov

The accessory brands Lastolite and Manfrotto, both of which are owned by the Vitec Group, have combined to form the new brand ‘Lastolite By Manfrotto’. The new brand name will eventually encompass the entire Lastolite product range, but for now it includes a new version of the Ezybox Speed-Lite softbox for hotshoe flash units and three new scene-painted backgrounds. Read more

Articles: Digital Photography Review (dpreview.com)

 
Comments Off on Manfrotto and Lastolite brands combine and launch new Speed-Lite softbox and Perspective Backgrounds

Posted in Uncategorized


Examples of Perspective Change for More Dynamic Images

08 Jul

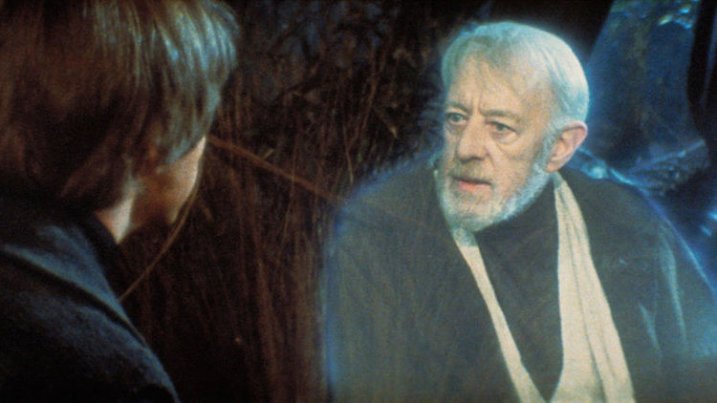
There’s a line in Return of the Jedi that has always struck me as particularly insightful, especially considering its inclusion in a movie filled with a two-ton slug-shaped bounty hunter and a planet full of fighting teddy bears. In a conversation with his former mentor Obi-Wan Kenobi, newly-minted Jedi Knight Luke Skywalker asks his sensei if Darth Vader is indeed his father. When Obi-Wan confirms the awful truth, Luke asks why his teacher had formerly lied to him, telling him instead that Darth Vader “betrayed and murdered your father.”

Luke Skywalker and Obi-Wan Kenobi discussing the importance of perspective.

Luke Skywalker and Obi-Wan Kenobi discussing the importance of perspective.

“What I told you was true,” Kenobi calmly replies, “from a certain point of view.” Incredulous, Luke balks at this assertion and wonders aloud how his mentor can claim such a relativistic stance on what is, in his mind, clearly a black-and-white issue. With a dose of characteristic zen Kenobi explains to his pupil, “Luke, you’re going to find that many of the truths we cling to depend greatly on our own point of view.”

Perspective and Photography

Without wading too deep into philosophical waters I just want to point out that this concept, also known as perspective, is critically important in photography, as well as cinematic space operas. Learning to shoot photos from different perspectives is a way of not only shaking up the status quo, but injecting new life into what might otherwise be dull, boring, or entirely pedestrian pictures. To illustrate how perspective changes can radically alter a picture, here are three examples that will hopefully give you an idea of some things to try if you want to breathe new life into your own photography.

Perspective in Nature

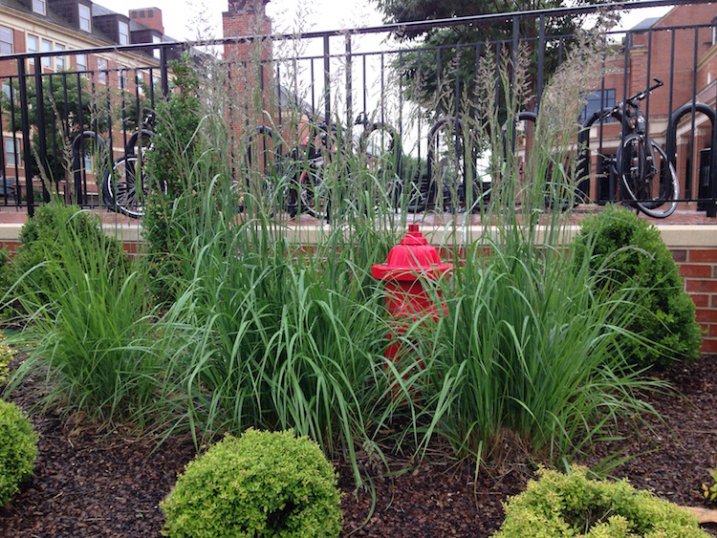
grass-full

Not a very photogenic location unless you look at it from a few different perspectives.

This is a fairly common scene you might find in any city: a fire plug with some tufts of grass sprouting clumps of purple seeds. It may not seem all that special, and indeed it’s the kind of scene I would probably pass by in pursuit of a more interesting picture. Look what happens with just a bit of perspective change, though:

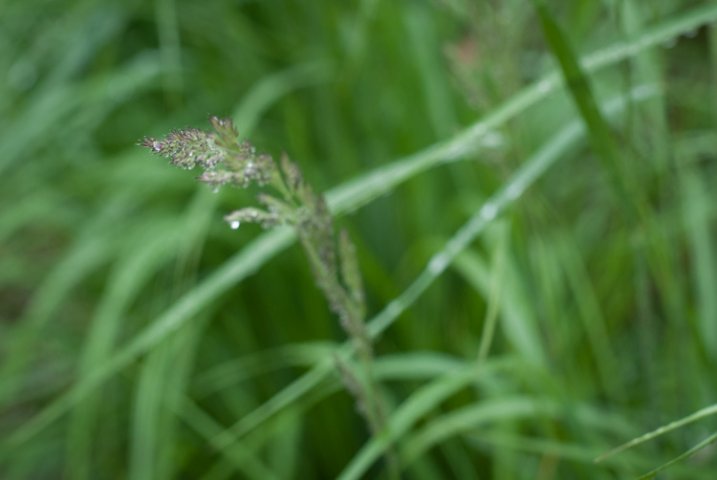
grass

Looking down and focusing on one strand of grass yields an entirely different picture.

By getting up close with one of the stalks of grass and focusing on its purple seeds dripping, and slightly bent with fresh rain, I now have an entirely new picture of the same exact scene. This little perspective change results in a photograph that is much more intimate and reveals details that were invisible in the initial photo. Background elements such as the out-of-focus grass still give the impression that this stalk is part of a much larger scene though we also lose a few things too: the bicycles and other buildings are gone, which means the picture is much more isolated than the first one and lacking a larger context. Neither picture is inherently better, but both are quite different, even though they contain the same subject. One final perspective shift results in an entirely different picture yet again.

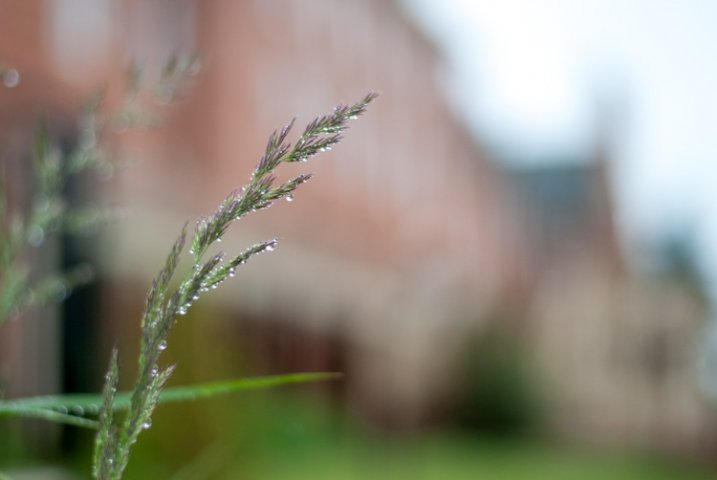
grass-building

Re-framing the same piece of grass makes for a new, and much more interesting image.

Now the same stalk of grass as the previous version (literally the exact same one and not a different piece of grass on the same plant) is given an entirely new context and the picture here is quite different. It has a much more urban feel with brick buildings instead of green grass in the background, and it feels more majestic and powerful overall. To get this picture I had to get out of my comfort zone a little by kneeling down and contorting my body, but the extra effort resulted in a photo that I like quite a lot. Perspective changes like this can add entirely new dimensions to a picture, and even change its whole meaning, and all it takes is a few seconds of extra work before you click the shutter.

Perspective in Architecture

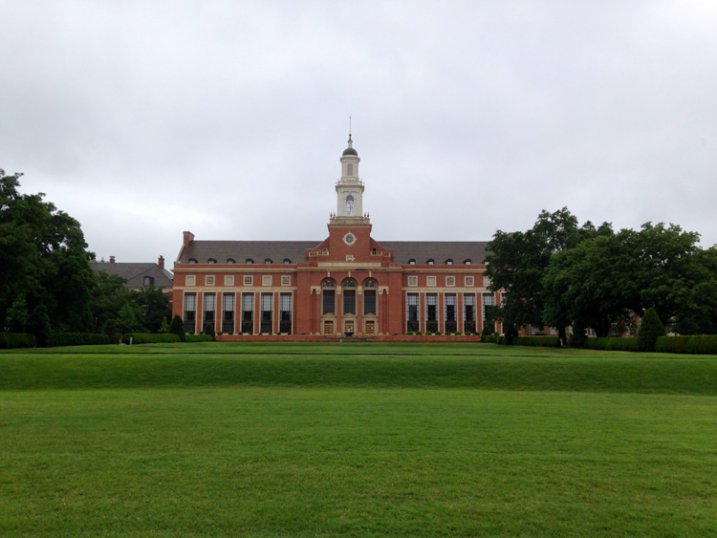
For another example of how perspective can alter a picture here’s a shot I took of the Edmon Low Library on the campus of Oklahoma State University in the midwest United States:

library-far

This perspective shows the Low Library within a larger context, sitting between trees and at the end of a grassy open mall.

It’s an interesting shot but virtually identical to hundreds if not thousands of other pictures you might find on a simple Google Images search. Watch what happens when I change perspective just a bit by walking closer:

library-medium

This perspective isolates the library itself, and imparts a feeling of scale and grandeur on the viewer that was missing in the first shot.

To get this picture I walked about a hundred yards down the lawn which isolated the building from its environment, and now the picture is much more constrained: it’s about the building itself, not the building in relation to the surrounding campus features. The picture is similar but subtly different, and its overall meaning has been changed by taking a very short walk (and as a bonus, getting a bit of exercise in the process). Watch what happens with one final change in perspective:

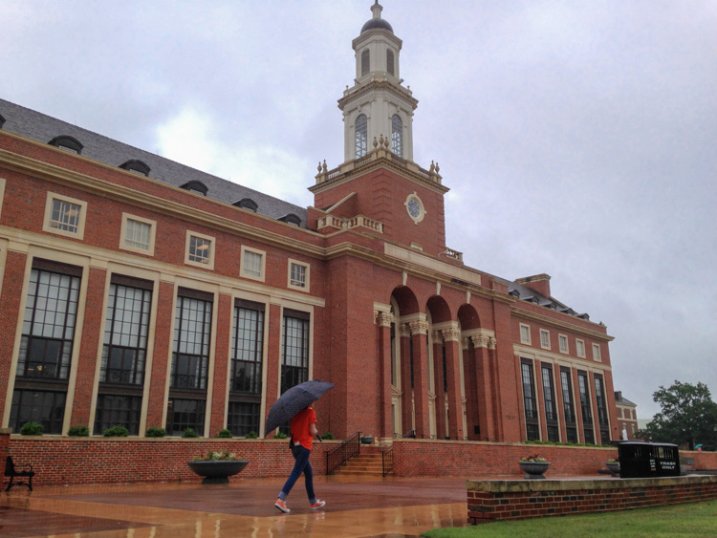
library-close

Finally we see the same building, on the same day, but in a much more dynamic and interesting context.

It’s still the same library, but the picture has changed dramatically from the first shot. Instead of a static image of a building surrounded by green spaces, this now shows the library in a whole new context. The imposing bell tower looms large over the veranda, and the student walking past adds a new dynamic element, to what was formerly a rather boring picture. Showing the building from this angle as it recedes into the background, illustrates how it is part of a much larger campus, and overall I find this a much more interesting image.

Working with People

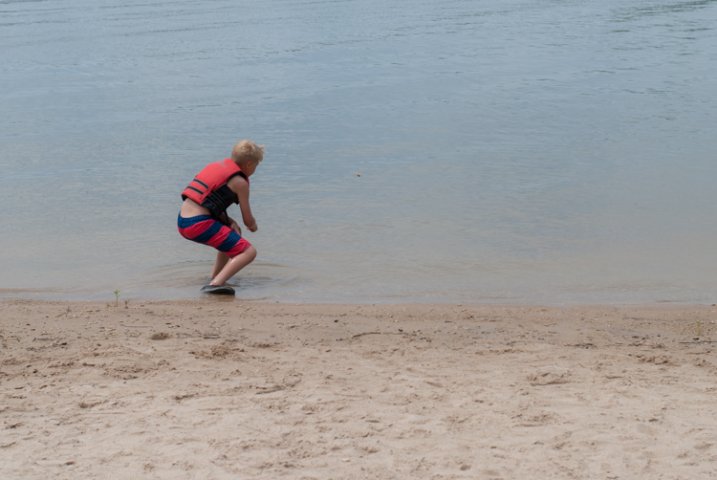
Looking at buildings and nature is one thing, but changing perspective when taking pictures of people can blow the doors wide open when it comes to creating pictures that are new, interesting, and much more impactful. To illustrate this, here are a few photos of my nephew skipping rocks at the beach on a recent family vacation.

My nephew practicing his rock-skipping technique.

My nephew practicing his rock-skipping technique.

There’s nothing particularly wrong with this photo but there’s nothing especially interesting about it either. To get this picture I stood on the beach with my camera while he skipped rocks, and did put in much effort to take perspective into account. It’s a decent snapshot that more or less captures the scene, but watch what happened when I changed my perspective:

photography-perspective-skipping-rocks-front-side

The same scene as above, but far more interesting with the background activity and low angle of view.

The scene has been drastically improved simply by walking 20 feet down to the beach, and crouching down to my nephew’s eye level. There’s now a sense of action and movement, and you can also see the intense concentration on the boy’s face as he winds up to skip a rock. In addition to these alterations you now have a sense of context; you see where the subject is in relation to his surroundings. By changing perspective I am able to show the rest of the beach, which includes some of his cousins and my brother having fun in the background. Here’s one final perspective change that alters the picture even more:

photography-perspective-skipping-rocks-front

That rock went sailing, and skipped a half dozen times.

This one is all about my nephew with nothing else except the beach to provide a sense of context and is, in my opinion, the best of the bunch. You see him alone, along with the same intense expression as in the previous photograph but without any distracting background elements. To get this picture I waded into the water and crouched down until my camera was just a few inches above the surface. It was more difficult to get this shot, and certainly would have been easier if my camera had an articulating LCD screen, but the payoff was well worth it. Compare this to the initial shot, and you will see a massive difference just from a little work on my part to change perspective.

Hopefully these examples give you a few things to ponder the next time you are out with your camera. It takes a little more work to shoot things from different perspectives, but you may find yourself with new creative possibilities and new ways of looking at your subjects and the world around you.

What are your favorite tips and tricks for finding and exploring new photographic perspectives? Share your thoughts in the comments below.

googletag.cmd.push(function() {
tablet_slots.push( googletag.defineSlot( “/1005424/_dPSv4_tab-all-article-bottom_(300×250)”, [300, 250], “pb-ad-78623” ).addService( googletag.pubads() ) ); } );

googletag.cmd.push(function() {
mobile_slots.push( googletag.defineSlot( “/1005424/_dPSv4_mob-all-article-bottom_(300×250)”, [300, 250], “pb-ad-78158” ).addService( googletag.pubads() ) ); } );

The post Examples of Perspective Change for More Dynamic Images by Simon Ringsmuth appeared first on Digital Photography School.

Digital Photography School

 
Comments Off on Examples of Perspective Change for More Dynamic Images

Posted in Photography


Nikon D810A: An astrophotographer’s perspective

07 Jul

We first became acquainted with Adam Woodworth when we featured his portfolio earlier this year. His photos capture the interplay between the earthly and the celestial, often framing the center of the Milky Way Galaxy in alignment with landscape formations. Recently, he’s been trying out Nikon’s D810A, the world’s first full frame camera dedicated to astrophotography. See some of his photos and find out his impressions on using it. Read more

Articles: Digital Photography Review (dpreview.com)

 
Comments Off on Nikon D810A: An astrophotographer’s perspective

Posted in Uncategorized


Weird Wooden Room: See the Sea From A New Perspective

30 Jun

[ By Steph in Art & Installation & Sound. ]

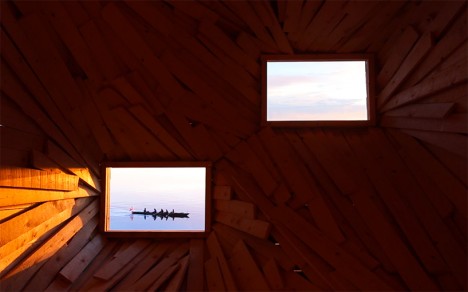
wooden room 1

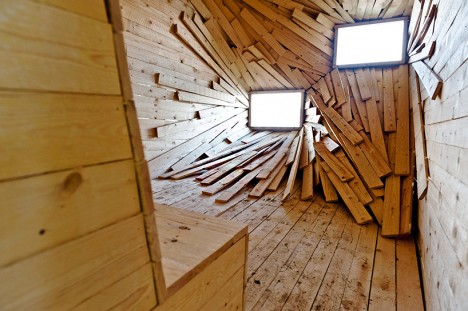
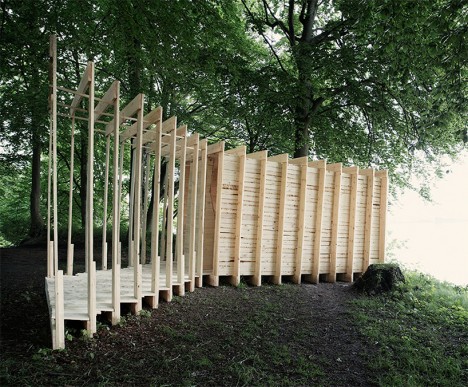
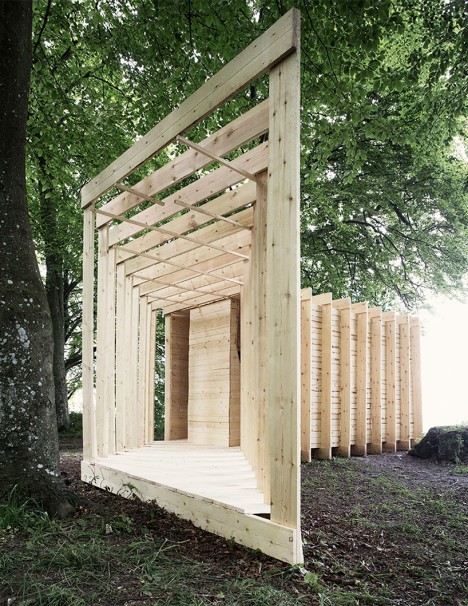
Two perfect rectangles of sea and sky are framed like paintings within a surreal wooden observation structure, inviting visitors to experience coastal Denmark from a new perspective. ‘New Horizon’ is a sculpture by Paris-based firm Atelier 37.2 created for the 2015 Sculpture by the Sea festival, drawing in guests from a forested path right to the edge of a hill overlooking the water.

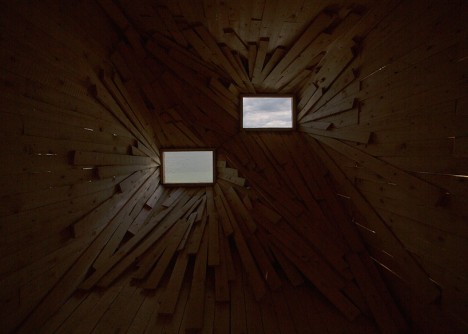
wooden room 2

wooden room 6


wooden room 5

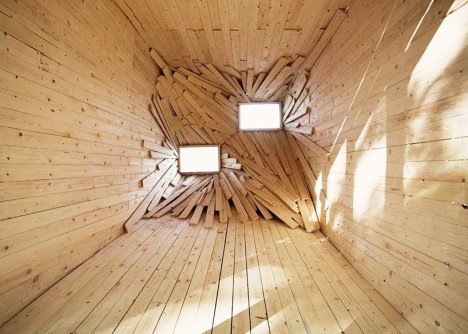
The accordion-like structure stretches in two angled sections, one open to the surrounding woods and the other an enclosed room filled with a chaotic assemblage of planks. This room looks dramatically different depending on the time of day, with sunlight streaming in and highlighting the space itself in the morning. As the sun makes its way to the other side of the sky, the space darkens, putting the focus squarely on the framed viewpoints.

wooden room 4 wooden room 3

As the artists themselves describe it: “Playing with classical perspective deconstruction, from the inside the horizon line disappears. Experience the landscape as two monochromatic ever-changing Rothko paintings.”

Share on Facebook


[ By Steph in Art & Installation & Sound. ]

[ WebUrbanist | Archives | Galleries | Privacy | TOS ]


WebUrbanist

 
Comments Off on Weird Wooden Room: See the Sea From A New Perspective

Posted in Creativity


Playing with Perspective in Paris: New Optical Illusion Art

25 Apr

[ By Steph in Art & Street Art & Graffiti. ]

varini optical illusion 1

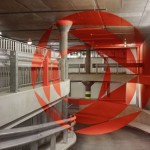
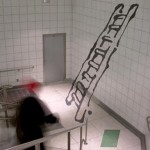
Two-dimensional shapes seem to hover weightlessly in space like a projection, but step slightly to your right or left and the whole image falls apart, becoming a chaotic assemblage of lines painted onto various surfaces in a room. Swiss painter Felice Varini has been transforming public spaces with his single-vantage-point illusions since 1978, and now he’s brought them to the Grande halle de la Villette in Paris’ Parc de lab Villette.

varini optical illusion 2

varini 7

varini 8

Varian invites us to look at the spaces around us in a new way, taking a closer look at the physicality of the world we have constructed around us through his somewhat disorienting optical illusions.

varini 4

varini 5

varini 6

The spaces themselves are Varian’s true media, more so than the paint. Even when certain shapes and motifs are repeated, the result is different every time. “My work evolves in relation to spaces that I am in contact with,” he says.

varini 3

The installations will be up through September 13th, 2015, and guided tours are available.

Share on Facebook


[ By Steph in Art & Street Art & Graffiti. ]

[ WebUrbanist | Archives | Galleries | Privacy | TOS ]


WebUrbanist

 
Comments Off on Playing with Perspective in Paris: New Optical Illusion Art

Posted in Creativity


Change Lenses for a New Perspective and Story

12 Oct

Recently we’ve had a few articles by dPS writers about lenses on such topics as:

  • Which Three Lenses do You Need for Photography?
  • The Only Three Lenses You Need for Travel Photography
  • Ready to Upgrade Your Kit Lens? Tips for Which Lens to Invest in Next
  • Buyers Guide – Prime Lenses vs Zoom Lenses

change-lenses-new-storyThis video produced by Canon shows the photographers using pretty much the same three lenses as mentioned on the second article above: a really wide-angle lens, a 50mm, and a medium telephoto. See how the photographers used each lens to create a very different look and feel from each of the scenarios they encountered.

The lenses mentioned in the video are (Nikon equivalents also listed):

  • Canon EF 10-18mm f/4.5-5.6
  • Nikon 10-24mm f/3.5-4.5G
  • Canon EF 50mm f/1.4
  • Nikon 50mm f/1.4G AF-S
  • Canon EF 70-200 f/2.8L IS
  • Nikon 70-200mm f/2.8G AF-S

There are also many other great options for lenses including Pentax, Olympus and Sony. You could also consider some of the third party brands like Tamron and Sigma which are making some really  nice, highly rated, lenses.

What can you take away from that? How can you use the lenses you already have to tell different, or perhaps even better, stories?

Show us the same subject shot with three different lenses and let’s see your stories!

The post Change Lenses for a New Perspective and Story by Darlene Hildebrandt appeared first on Digital Photography School.

Digital Photography School

 
Comments Off on Change Lenses for a New Perspective and Story

Posted in Photography


Using Depth of Field and Perspective for Better Composition

01 Jul

We all know this problem. You take a picture of a beautiful scene but it just doesn’t turn out the way you want. Something is missing. It usually isn’t a matter of your camera or the settings you are applying. But what is it then? The question at hand is how do you get from a snapshot to an interesting, unique, and well composed photograph.

To answer this, we have to move away from the technical aspects and go more into the creative and artistic aspects of photography. You might say that this is a very subjective matter and that beauty is in the eye of the beholder, but there are a few building blocks that will help to improve your photography and also develop your own unique visual language.

Depth of field for a more three-dimensional Look

An important aspect of photography is that we want to capture a three-dimensional reality by taking a two-dimensional image. When we are out in the field, our eyes in collaboration with our brain create very complex images within split seconds. The most important factor in this context is that our eyes are constantly moving while focusing on different subjects. The focal plane is shifting with a subject in focus and everything in front or behind appearing to be blurred. This “Depth of Field” is one the most important techniques we can utilize to simulate depth and three-dimensionality.

Begginner photography tips 06

Utilizing depth of field to create a more three-dimensional look

In order to play with depth of field, we need a scene with a defined foreground and a background. Whereas the background is usually a given, a lot of images lack foreground which makes an image appear flat and boring. Choosing a defined foreground will enable us to actively compose an image and become creative.

Once you have chosen a background and a foreground you like (ideally both complementing each other), you have to find the right position for you and your camera in order to combine both for an appealing overall image. To find the right position, you should try different angles, move around, get low to the ground and don’t solely rely on your zoom. By using a large aperture (small f-stop number) and a selective focusing, we can isolate the foreground from the background by making the foreground objects sharp and the background blurry (or vice versa). This will convey a sense of depth and three-dimensionality.

Begginner photography tips 10

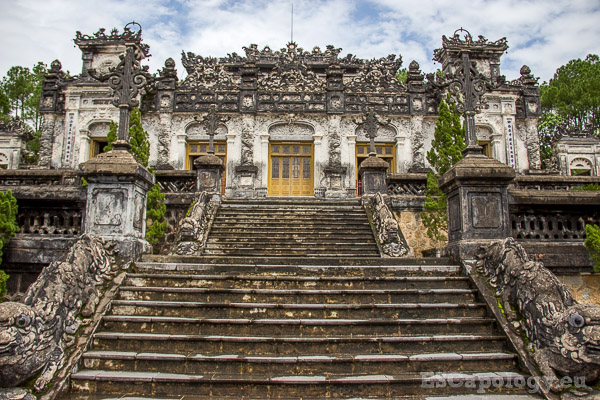
No foreground. Lack of depth and composition.

This image (above) of one of the ancient tombs around Hue, Vietnam looks flat. There is no depth, no three-dimensionality and it lacks a clear composition. Because a foreground is missing, the image is too busy and distracting.

Begginner photography tips 04

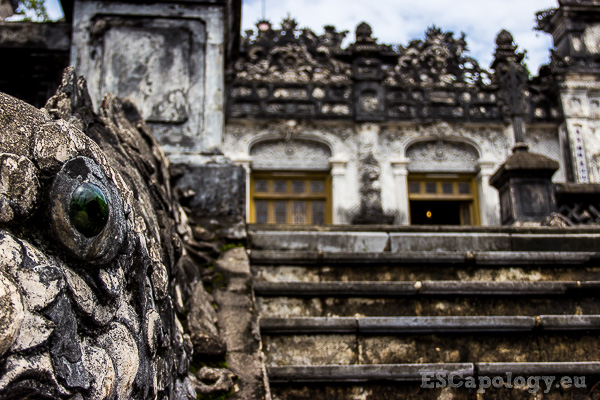
Foreground and background nicely isolated to create a sense of depth.

Above an image of the same subject but with a much better composition. The focus is on the eye of one of the dragons, making it our foreground. The rest of the tomb is our background, slightly blurred and nicely separated. It generates a sense of depth and also appears much calmer and structured than the first image. The viewer is being led into the picture. You can use this technique when photographing very popular places like for example the Eiffel Tower, Angkor Wat or other monuments. Instead of taking the same shot as every other tourist, experiment with different backgrounds and foregrounds, get creative, move, and I am sure you will end up with an original and authentic image.

Begginner photography tips 03

Cambodian Fighter. Focus on the subject, still including the environment.

You can also apply this technique to your people and portrait photography. It not only helps to really put emphasis on your subject, but also to incorporate some of the environment, which will help to tell a story. In the picture above, the focus is on the weary fighter, catching his breath during a fierce Khmer Boxing fight in Cambodia. We are at eye level with the fighter and again, the foreground is nicely separated from the rather blurry background. Yet, we can still see parts of the surrounding environment which is the ring and the crowd in the back. The focus however always remains on the main subject.

Leading lines for a sense of perspective

Of course depth of field is not the only means to create a sense of depth and three-dimensionality. The concept of leading lines is another one of those building blocks that you can apply. The viewer of a photograph usually associates diagonal lines which are leading into an image, to a vanishing point perspective. This means that objects which are farther away also appear smaller. This context automatically and unconsciously gives the viewer an impression of three-dimensionality.

Begginner photography tips 02

Two images with a clear vanishing point perspective.

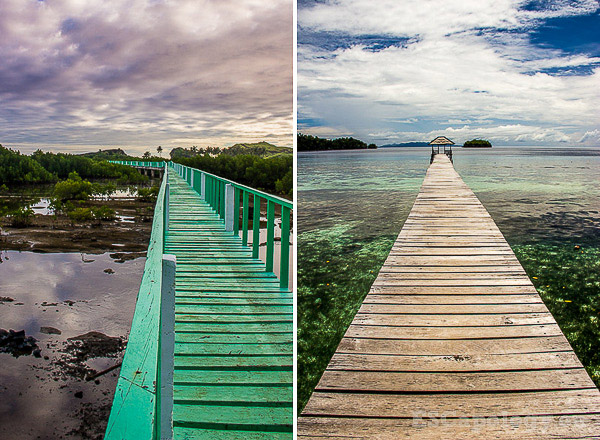
As you can see in the images above, a shallow depth of field is not necessarily needed to convey that sense of depth we are looking to achieve. Here it’s all done by using a jetty as lines, which connect different layers of the picture – the image becomes much more plastic and complex.

Begginner photography tips 01

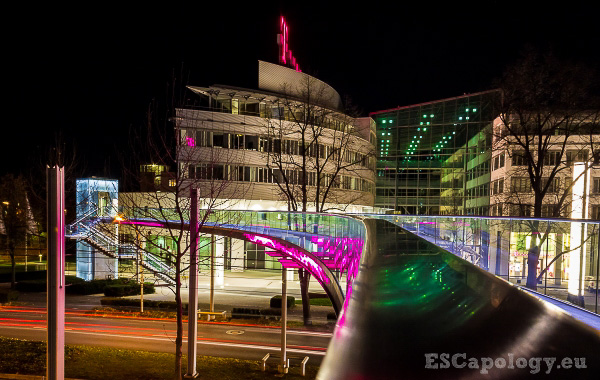
Night Scene: The bridge leading into the picture.

Similarly the image above becomes three-dimensional because the pedestrian bridge is leading into the image. It also appears to become smaller and smaller as it leads into the background. This way the image has that sense of depth even without applying a low depth of field. The bridge as a leading line is connecting our different layers, the foreground and the background.

Begginner photography tips 07

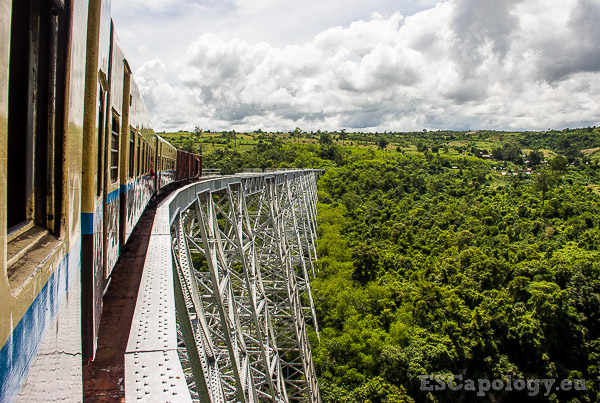
The bridge and the train convey a sense of depth.

Providing a relationship in size

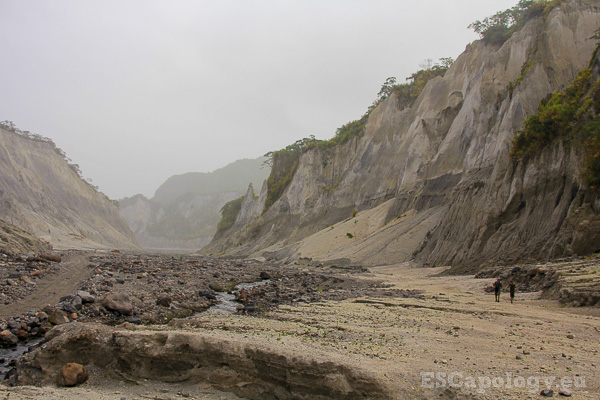
When regarding a picture, the viewer often needs a reference point in order to correctly interpret the information our two-dimensional images provide. We can do this by establishing proportions and providing a relationship in size. Often this isn’t needed as we know a lot of the subjects we are capturing. In the image above we were dealing with familiar objects like a pedestrian bridge, a street and a commercial building. It was easy to put everything into context. But a lot of times, when we are confronted with unfamiliar things, this isn’t as easy.

Begginner photography tips 09

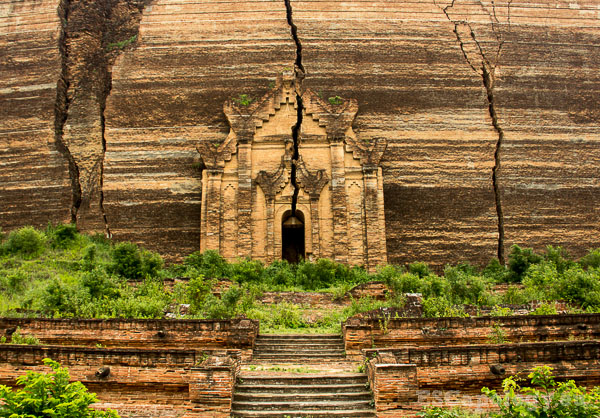
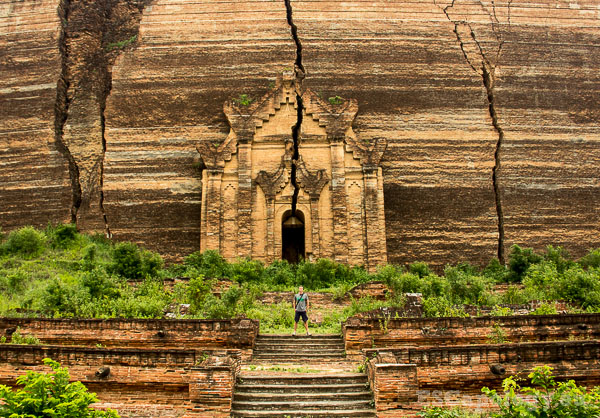
Mingun Pahtodawgyi in Mingun, Myanmar. Can you tell how big it actually is?

In the picture above is Mingun Pahtodawgyi, a temple in Mingun, Myanmar. Left unfinished, this huge construction was planned to become the world’s biggest stupa with a height of 150 meters. It is huge and impressive but the picture above somehow doesn’t manage to convey this. Just by looking at this image it is impossible to gauge the sheer size of the temple. A reference is missing.

Begginner photography tips 08

Mingun Pahtodawgyi. Are you getting a better sense of dimension?

Here I have added myself to the picture and despite my rather stupid pose, it instantly provides a point of reference. This relationship in size helps to categorize the stupa and establishes a sense of dimension. To achieve this effect and to provide a relationship in size, you can also use other elements which help the viewer to better comprehend an image.

Begginner photography tips 05

The hike up Mt. Minatubo, Philippines. Another example of relationship in size.

Try to practice, and utilize, these three building blocks to improve your photography. You can also try combining two of these techniques to generate an even greater sense of depth. Of course these concepts are by far not the only factors that make for a good and well composed image. There are many more things to take into account but for now, it should give you a good starting point.

Begginner photography tips 11

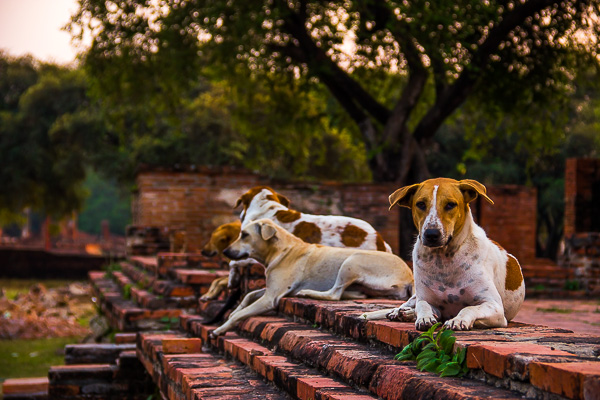
Temple dogs – a shallow depth of field and leading lines combined.

I hope you liked this article. Feel free to comment below and let us know what other techniques or concepts you found helpful on your quest of becoming a better photographer.

The post Using Depth of Field and Perspective for Better Composition by Philipp Dukatz appeared first on Digital Photography School.


Digital Photography School

 
Comments Off on Using Depth of Field and Perspective for Better Composition

Posted in Photography