RSS
 

Posts Tagged ‘Panoramas’

5 May, 2014 – Having Fun With Panoramas

06 May


Panorama photography is very popular today.  Many smartphone and point and shoot cameras make shooting panoramas as easy as pushing a button and panning the camera.  In today’s article Having Fun With Panoramas, Kevin Raber shares how to shoot panos handheld shooting individual images.  He shares how to shoot and process these images.  His article includes multi row panos with over 50 images.  If you never tried doing panos or want to brush up on the technique then this article is for you.  

This July Luminous-Landscape hosts a workshop to the Northern Polar regions – Svalbard – Land Of The Polar Bear.  We have only 2 berths left on the first cruise.  The second cruise is Sold Out.  If you’d like a very special small boat experience to this region then register today.  You can find out more information HERE.


The Luminous Landscape – What’s New

 
Comments Off on 5 May, 2014 – Having Fun With Panoramas

Posted in News


Time Stands Still: Sublime Slow-Motion Subway Panoramas

11 Feb

[ By WebUrbanist in Art & Photography & Video. ]

slow mo foto

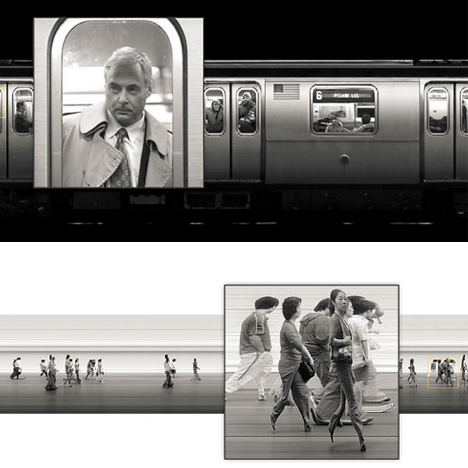
A subway speeds by the platform, leaving most passengers with a fleeting impression and fast-fading memories of people glimpsed only for a moment, but not this crafty slow-motion documentarian. If you watch no other video today, this week or this year, make the time for at least one of those below.

In the above video excerpt, Adam Magyar captures frozen bystanders in fast succession (50 frames per second) at a Tokyo, Berlin and New York (Grand Central) train stations. His custom technology captures everything, and limited post-processing generates a kind of three-dimensional panoramic portrait of everyone in view. These finished products come both in the form of prints and videos, but the latter in particular are must-watch wonders.

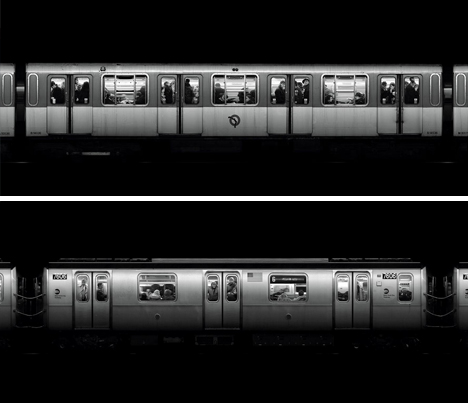
“In Stainless, I scan rushing subway trains arriving to stations. The images record a number of tiny details of this moment. We see people staring towards their destinations standing at the doors framed by the sliding door windows. They are scrutinizing the uncertain future. Similarly to all my images, their main motivation is arrival. The darkness of the tunnels deep below the city turns these chemically clean mock-ups into fossils of our time. “

time subway black white

Magyar uses slit-scan and other technologies and techniques to, as writer Joshua Hammer describes, “bend conventional representations of time and space, stretching milliseconds into minutes, freezing moments with a resolution that the naked eye could never have perceived. His art evokes such variegated sources as Albert Einstein, Zen Buddhism, even the 1960s TV series The Twilight Zone.”

The extended film from Tokyo is shown above. It is truly mesmerizing to watch the most mundane behaviors caught in mid-act, be it a wet dog in mid-shake, creamer hanging over coffee mid-pour or a woman seen in mid-sneeze. It took Magyar years to perfect his craft – the worthy projects that led up to it (shown below) are essential to understanding how he achieved his current mastery.

1-uyFMTPB431muvczp1PH1uQ

time people linear rows

time square people aligned

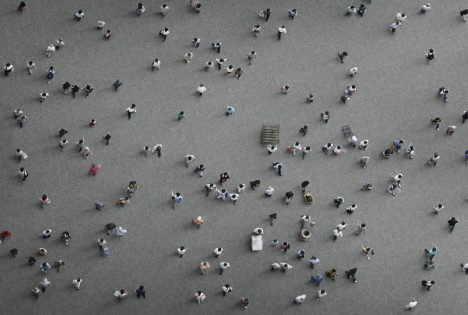
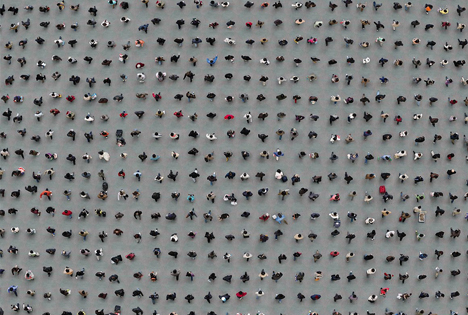
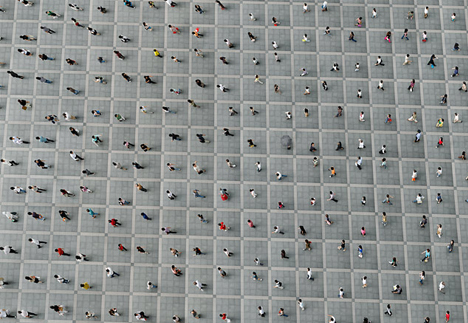
If the process behind this uncanny effect seems impossibly complex: his signature un-moving montages came with a great deal of time and technological experimentation. This Stainless series is indeed just the latest in a long line of  experimental photo projects, starting with Squares (shown above) which features collections of people taken out of time and selected to force a grid-like order on passersby.

Next Page – Click Below to Read More:
Time Stands Still Sublime Slow Motion Subway Panoramas

Share on Facebook


[ By WebUrbanist in Art & Photography & Video. ]

[ WebUrbanist | Archives | Galleries | Privacy | TOS ]


WebUrbanist

 
Comments Off on Time Stands Still: Sublime Slow-Motion Subway Panoramas

Posted in Creativity


Editorial: Why I can’t stop taking iPhone Panoramas

24 Sep

iphone.png

DPReview editor Barnaby Britton spent his weekend taking pictures on the new Apple iPhone 5s, which among other refinements features a new camera, larger sensor, built-in filter effects and a unique two-color flash. It also offers an improved panorama mode with adaptive ‘live’ metering across the frame. In this short article he explains why even if you don’t have any interest in the new iPhone, you should definitely pay attention to the iPhone 5s’ panorama feature.

News: Digital Photography Review (dpreview.com)

 
Comments Off on Editorial: Why I can’t stop taking iPhone Panoramas

Posted in Uncategorized


Using AutoPano Giga To Create Panoramas With Gigapan Heads Or Freehand Shooting Grids

04 Feb

I know, it’s a long title but I want to show how easy it can be to assemble panoramas with either a Gigapan head or by shooting freehand, gridded panoramas. AutoPano Giga has been my panorama product of choice after starting with huggin, a free option that does quite well it its own right.

One ability AutoPano Giga excels at is the ability to take images and information from a number of automated shooting heads, such as Kolor’s own PanoGear or even other brands, such as the GigaPan EPIC Pro, which I reviewed for DPS two years ago. I noted in that post that Gigapan’s software was in its first stages and was quite basic and while the software has been upgrade over the intervening two years, it’s still not as robust as Kolor’s AutoPano Giga. Plus, it can not handle freehand panoramas

Utilizing AutoPano Giga to produce stunning panoramas shot with Gigapan’s heads (mine were shot with the EPIC Pro) is fairly simple.

Shoot

Shooting with the Gigapan EPIC Pro is explained in the previously mentioned post. That much hasn’t changed.

Import

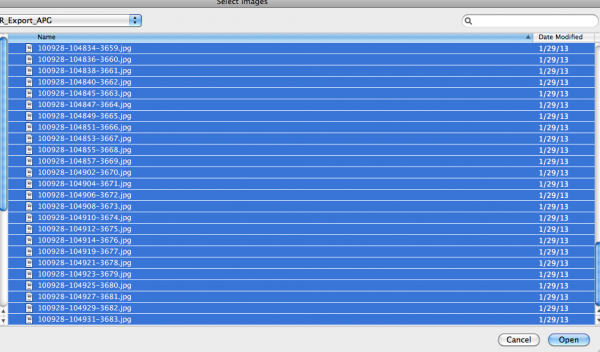
Bringing images into your computer is no different than your normal shooting method. The nice thing about AutpoPano Giga is it will understand your RAW files no problem, so there is no need to convert (but you can if you are impatient and want smaller file sizes). I have found it handy to shoot panoramas, especially large ones, on a separate memory card reserved just for panoramas. That makes finding the files all the easier.

With all your panorama files in one location, it is time to use the stitching wizard in AutoPano Giga.

Wizard

The first step in the wizard is to pick the device that was used, in this case we select Gigapan.

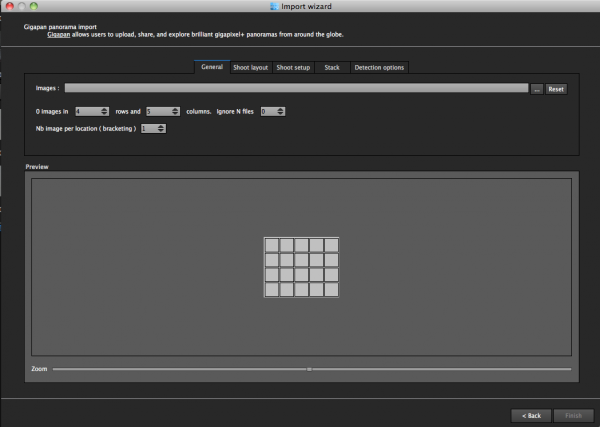
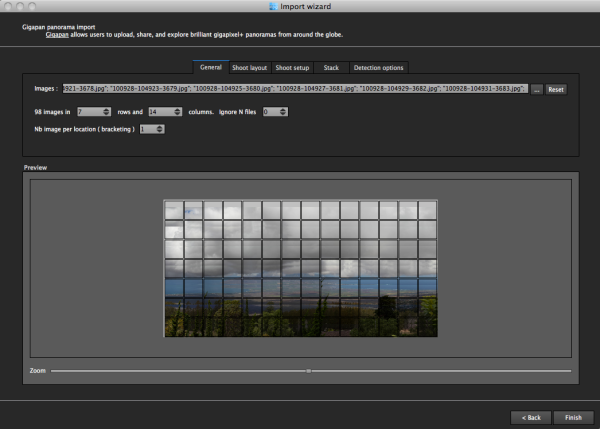
The next screen asks for input. If your shot went off without a hitch and you have a nice grid of images, AutoPano should know this. For instance, when I select the 98 images from my demonstration shot from Maui, Hawaii at the Ali’i Kula Lavender Farms, AutoPano knows this shot was 7 rows and 14 columns. The nice thing about this method is there is no need to import a control file that explains the grid to the software. This is also why, with careful execution, freehand panoramas can be imported.

With a straightforward shot like this, there is little else for me to do, but let me show you what the other screens do, if you are curious.

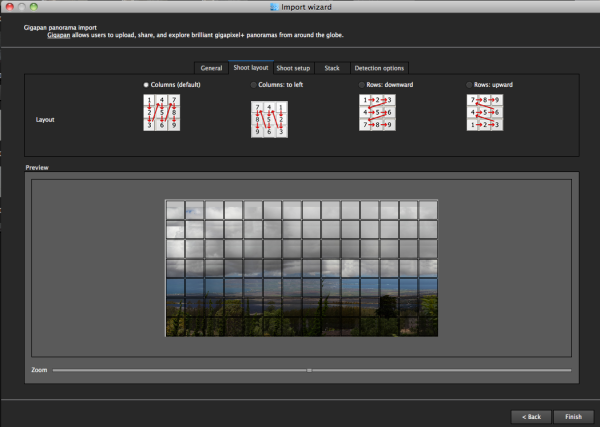
The next screen allows for changing of the panorama shooting direction. One thing I wish this screen had is the ability to pick a grid shot top to bottom, then back up the next column, down the next, and so on, for those times when I shoot a panorama freehand, such as this 2.2 gigapixel image of the Taj Mahal (shot without a tripod and head because they are restricted).

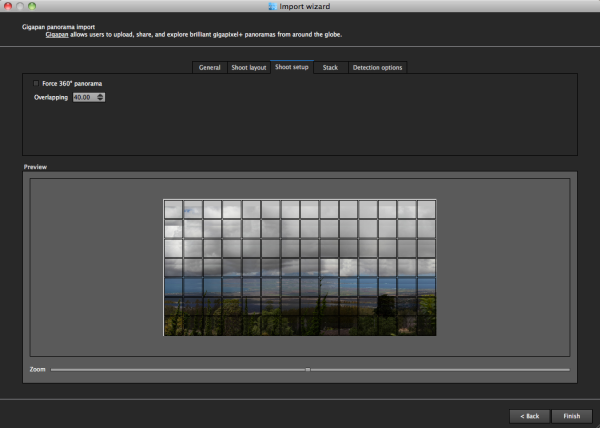
After that screen, custom overlap or forcing a 360 degree view can be selected.

The last two screens deal with control points and that can be left on auto unless you have a particularly good reason to change them. This software works quite well on auto (with some manual tweaks to come).

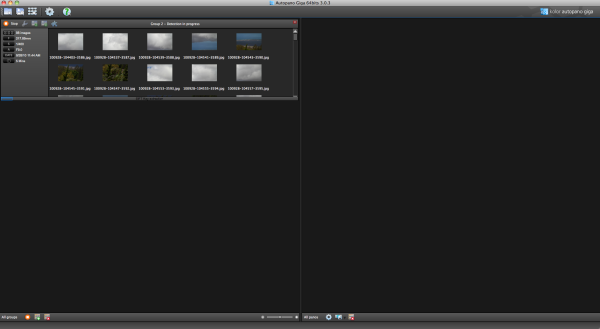
Press “Finish” and AutoPano takes you to the main screen and starts detecting and stitching. I like that, while I can tell the program the pattern of a shoot and the amount of overlay, it will still automatically detect control points and I can even set this number to 200 by default, to ensure the best matching.

Output

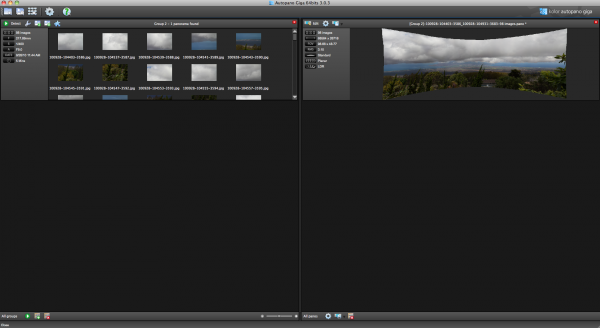
Things aren’t always perfect right out of the box because the software doesn’t know which type of projection you want. Below you will see the resultant output on the right, which has a planar projection.

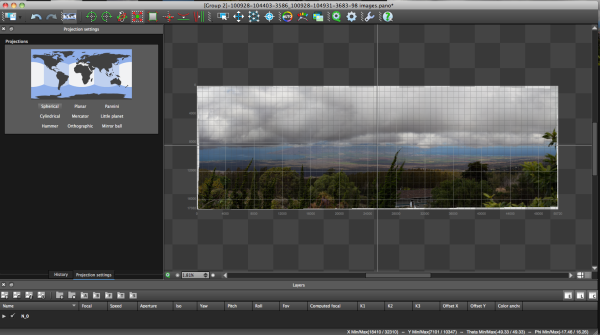
This is easily changed in the Edit screen, where a number of adjustments can be made if desired. I decided on a spherical projection to keep my sides straight.

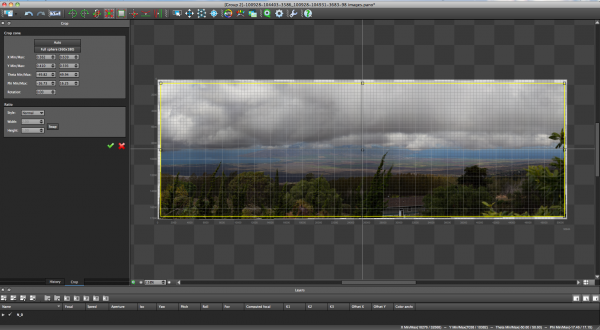
From there, the only change I saw that needed to be made was to crop the image, which is dead easy: click on the crop tool and it automatically selects the crop dimensions. Changes are made by dragging corners or sides and rotations can be made (in case your tripod wasn’t level when shooting).

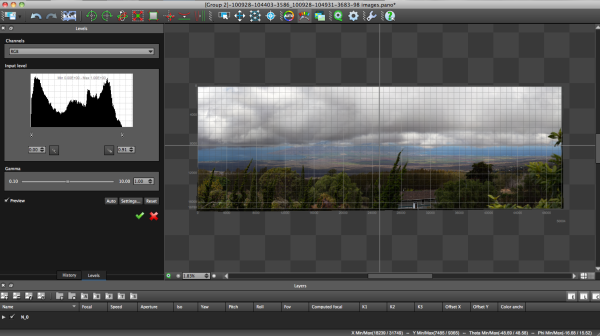
The last bit of editing I tend to do in the program is to set the levels, which is as easy as setting them in Photoshop or other programs.

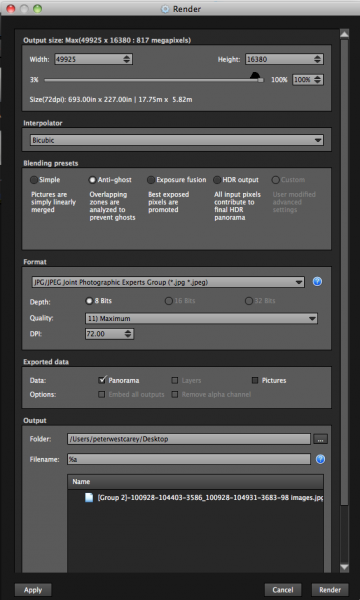
Before being completely done, we need to get the resultant image out of AutoPano Giga and that is done by clicking on the gear in the main screen in order to render the image. Settings on this screen allow for the resizing of the image once rendered (handy if you are sending this out as a JPEG as the max dimension for those is 30,000 pixels) as well as file type, compression, color depth and more.

What Else Can Be Done?

AutoPano Giga is a robust panoramic creation and editing program. This post is not intended to be a complete review of all the features as that list is rather long. Some of the highlights include:

  • Ability to handle HDR bracketed shots (it is available in the first screen of the wizard and is labeled Nb image per location (bracketing)
  • Manual removal of ghosts via masking(although the automatic option works well)
  • Saving results in a variety of file types, including .PSB and .TIFF
  • Batch processing
  • Editing vanishing points and pitch, roll and yaw

Results

How did it come out? Great! But…unfortunately DPS isn’t set up to show case large panoramas but I have hosted the resulting image on my blog. The final image is 43MB large and will take a little time to download with the amount of traffic DPS typically sees.

Click here to be taken to the image. Zoom in and use Full Screen mode for the best experience. Can you spot the airplane taking off? What about people surfing?

For references sake, the panorama was made with a Canon 7D and 28-300mm L lens. It was composed of 98 images shot in Manual Mode at ISO 100, 135mm, f/9, 1/400. The Gigapan EPIC Pro was lent to me from Borrowlenses.com.

AutoPano Giga is available for free trial download here.

Post originally from: Digital Photography Tips.

Check out our more Photography Tips at Photography Tips for Beginners, Portrait Photography Tips and Wedding Photography Tips.

Using AutoPano Giga To Create Panoramas With Gigapan Heads Or Freehand Shooting Grids


Digital Photography School

 
Comments Off on Using AutoPano Giga To Create Panoramas With Gigapan Heads Or Freehand Shooting Grids

Posted in Photography


How to Match Exposures when Stitching Panoramas in Photoshop

03 Feb

Since the introduction of Photoshop CS2, Adobe’s image editing software has shipped with the ability to easily merge a series of photographs into a panorama.  Often, it is incredibly simple: once you have the images you want to stitch together, it only takes a few clicks to produce the blended panorama.  However, whilst Photoshop may be able to seamlessly merge your images 90% of the time, on occasion it may struggle to perfectly match the exposures across the input images resulting in a final panorama with obvious joins between the individual photographs.

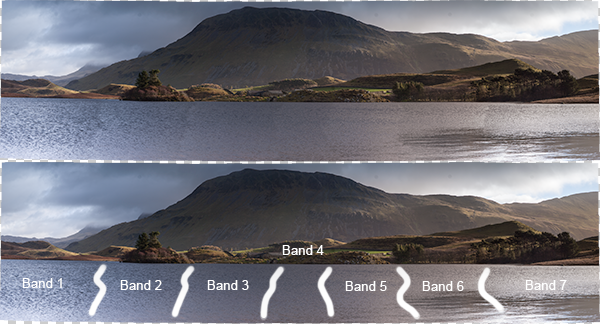
To see what I mean, have a look at the image below.  This is a 7 shot panorama, straight out of Photomerge, and you can see obvious banding in the water of the lake, as the exposure/colour tone subtly change between images.
panorama_exposure_match_image-3

Top: The panorama fresh out of Photomerge. Bottom: I've highlighted the joins between the individual input images where the blending of exposures was not sufficient

This article walks through a series of fairly simple steps to edit the above panorama to remove the obvious joins and give a perfectly blended panoramic image  (note: I am only going to discuss processing the panorama once it has been stitched by Photomerge.  For tips on how to take the images, prepare them for stitching and on use of Photoshop to stitch them, see this recent article by Jason Weddington).

It is worth mentioning that the images I started with were a challenge to shoot for a panorama as the exposure differed greatly between the far left of the image, where I was shooting away from the sun, and to the far right, where I was shooting towards the sun.  Therefore, before blending the images into the panorama, the individual images were processed in Adobe Lightroom to try and match the exposures as closely as possible first.  Once complete, the selected images were exported to Photoshop to ‘merge as a panorama’, using the ‘auto’ setting.

On to the steps…

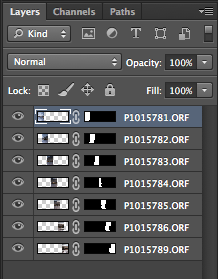
1.  Once the images have been merged, the output image will consist of several layers (one for each input image, in this case 7) with a mask applied to each layer.  In many cases, these layers can be flattened at this point to give the final panorama, however, we’re going to make a few edits first.
panorama_exposure_match_image-2

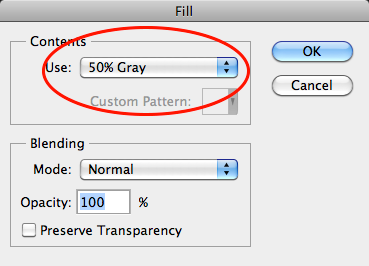
2.  Create a new layer, on top of all other layers.  Fill the layer (Edit > Fill) with 50% grey:
panorama_exposure_match_image-4

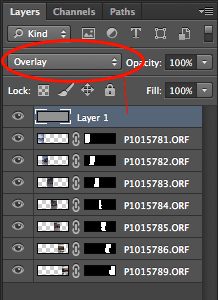
3.  Set the blending mode of the ‘grey layer’ to ‘overlay’.  When set to overlay, a 50% grey layer will appear transparent, so initially this layer will make no difference:
panorama_exposure_match_image-5

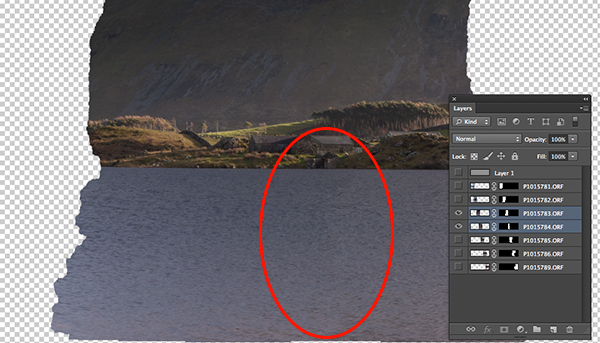
4.  Find one of the joins where the exposure needs to be tweaked, for example, below, there is an obvious join between the two images.  The left hand image needs to be a little lighter and the right hand image needs to be a little darker.  Let’s address the left hand image first.
panorama_exposure_match_image-6

Only the two layers of interest are selected here. The left hand image needs to be lightened, whilst the right hand image needs to be darkened

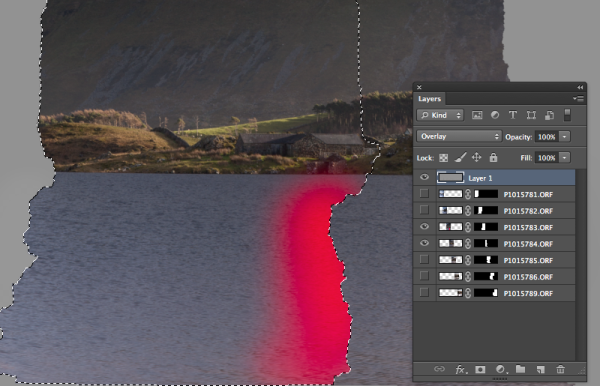
5.  If we ctrl+click/cmd+click the mask of the appropriate layer (i.e. click on the black/white rectangle in the layer bar), we will bring the portion of the image to be edited into an active selection (we only want to edit inside of that selection for the time being).

6.  Ensure the ‘grey layer’ is highlighted

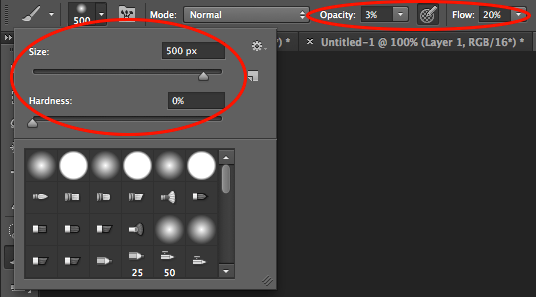
7.  Select the brush tool.  You will want a large, soft brush so set the size to be a few hundred pixels (I used 500 px in this instance, but the size is relative to the size of your panorama) and set the hardness to 0%.  Set the opacity to 3% and the flow to 20%:
panorama_exposure_match_image-7

8.  To lighten the layer we want to select the colour white (if we wanted to darken the layer, we would select black).

9.  Using the brush, liberally brush over the join and back towards the centre of the image.  This will paint white onto the grey layer, but only within the current selection.  As the brush is very soft the edits should be subtle, but as you brush you should be able to see the area under where you have painted white gradually begin to get lighter.
panorama_exposure_match_image-8

An active selection of the mask of the left hand image is required so that any edits are only applied within that selection. The idea is to paint white onto the 'grey layer' in the region highlighted by red in the above image.

10.  In order to get seamless joins, I find that is is a compromise between lightening one image and darkening the other in order to maintain a smooth transition of tone/exposure across each image.  Therefore to edit the right hand image, you repeat steps 5 to 9, but ensure that the right hand image is within your active selection, and that the colour black has been selected for your brush.

Initially it is a slow process that involves carefully modifying each image at the join in order to match the exposure, however once you get a feeling for the brush it can become quite quick.

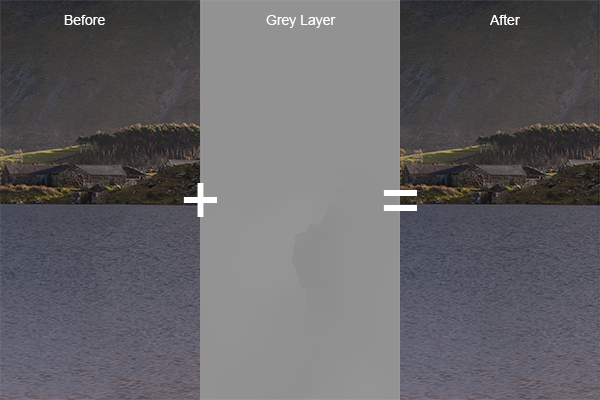
If we change the blend mode of our ‘grey layer’ back to ‘normal’ you will be left with something similar to the middle image below, where you can see the result of the white/black brush strokes on the grey layer and the difference it makes to the actual join.
panorama_exposure_blending_9

A composite showing the starting image, the modified 'grey layer' and the final image, when the 'grey layer' is set to 'overlay'.

If you repeat that for each join across the panorama, you will end up with grey layer that looks like the image below (with the blend mode set to ‘normal’).

panorama_exposure_match_image-10

The 'grey layer' for the entire panorama showing the white/black brush strokes around each join

Once you set the blending mode back to ‘overlay’, all of the joins should disappear, and you should be left with a perfectly blended panorama with no tell tale signs of the joins:

panorama_exposure_match_image-11

The entire panorama when the 'grey layer' is set to 'overlay'. The joins between the images are no longer visible in the water of the lake

As the edits have been made to the ‘grey layer’ no permanent edits have yet been made to the actual images, so any mistakes are easily rectified or any further modifications can easily be made.  Once you are happy with the blending of the individual images, you can flatten the layers to produce your final panorama and make any further finishing touches:

panorama_exposure_match_image-12

The final panorama: Llyn Cregennen, North Wales, UK

I hope those steps were easy enough to follow.  Ultimately, this is just one application of a the use of a 50% grey layer, set to ‘overlay’, in order to modify the exposure of an image in a non-destructive manner (until the layers are flattened, that is).  So if you try to blend a panorama in Photoshop but didn’t quite get the results you were after, you dont have to jump for the clone brush straight away or send the image to the trash.  Give these steps a try and see if you can manually match your exposures where Photoshop can’t.

Please let me know if you have any feedback, I welcome any comments and, as always, I’ll try to respond when I can.


Post originally from: Digital Photography Tips.

Check out our more Photography Tips at Photography Tips for Beginners, Portrait Photography Tips and Wedding Photography Tips.

How to Match Exposures when Stitching Panoramas in Photoshop


Digital Photography School

 
Comments Off on How to Match Exposures when Stitching Panoramas in Photoshop

Posted in Photography


How to Shoot Really Big Panoramas

21 Jan

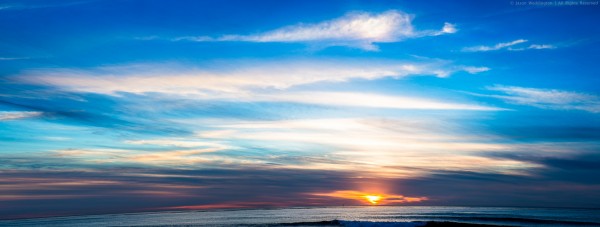
The image below is a stitched panorama comprised of 7 separate frames, stitched together in Photoshop CS6, using the Photomerge feature. The full sized finished image weighs in at 85 megapixels. In this article I will share some tips for creating your own stitched panoramas.

stitched panorama

Sunset Cliff, San Diego, CA – 1/160, f/5.0, ISO 125, 70mm (Canon 5DmkIII, EF24-70mm f/2.8L USM)

Shooting your Photos

The first step in creating a stitched panorama with Photomerge is to shoot suitable images. Keep these points in mind:

  • Overlap the images – according to Adobe, the images should overlap by at least 40%, but no more than 70%. Outside of this range, Photomerge may not be able to align the files correctly.
  • Keep your settings constant – you need to keep focal length, focus point, and exposure constant throughout the series of images so that you can combine them later. The easiest way that I’ve found to do this is to take one shot on P, look at the camera settings, and then dial those settings in on manual mode. I also focus on a suitable object about 1/3 of the way into the scene, and then change the camera to manual focus so that the focus will be constant.
  • Shoot vertical – this is a little counter-intuitive since we’re making panoramas. It’s usually best to shoot vertical (portrait orientation). Since you’ll merge multiple frames together later to get as wide as you need, shooting vertical will give you a taller overall panorama. Also, you’ll need some of this vertical space for cropping. More on cropping later.

Preparing your Files

The next step in the process is to prepare your files for Photomerge. This is actually optional. If you shoot JPEG and you’re happy with your images straight out of the camera you can go directly to Photomerge in Photoshop. If you shoot RAW, process your RAW images in whatever program you use, and export full size TIFF or PSD files to a temporary location on your computer so you can open them from Photomerge.

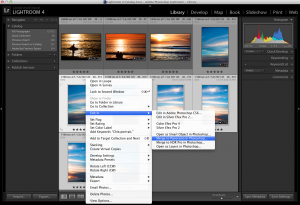
Lightroom users: If you process your RAW images in Lightroom, you don’t have to export to disk, because you can send your files straight to Photomerge from Lr.
1. Select the files
2. Right-click and choose “Merge to Panorama in Photoshop…”

from Lightroom to Photomerge

Sending files straight to Photomerge from within Lightroom

Merging your Panorama with Photomerge

The next step is to open your images in Photomerge from within Photoshop, and stitch together your Panorama.

(Lightroom Users: if you jumped to Photomerge straight from Lr, skip to step 4 below)

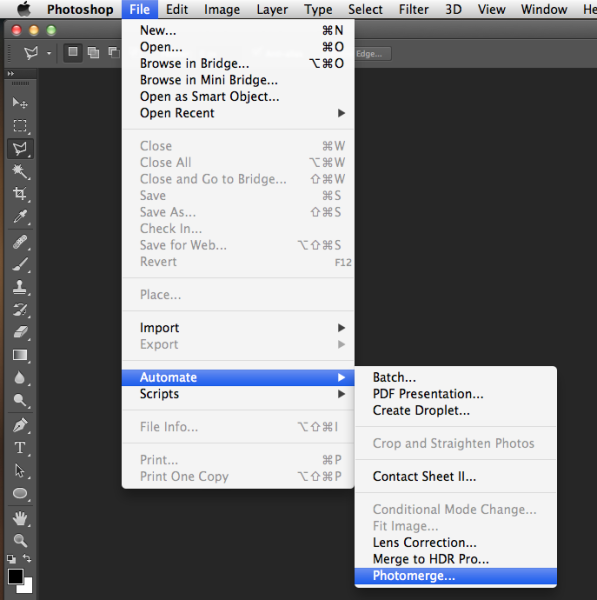
1. From the file menu, chose Automate > Photomerge

Launching Photomerge

Launching Photomerge within Photoshop CS6

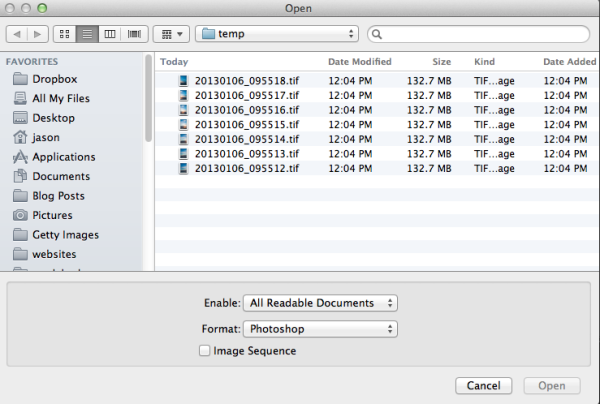
2. Click “Browse” and navigate to the files you exported to a temporary folder in your drive.

Browse for files

Browse to the location where your files are located

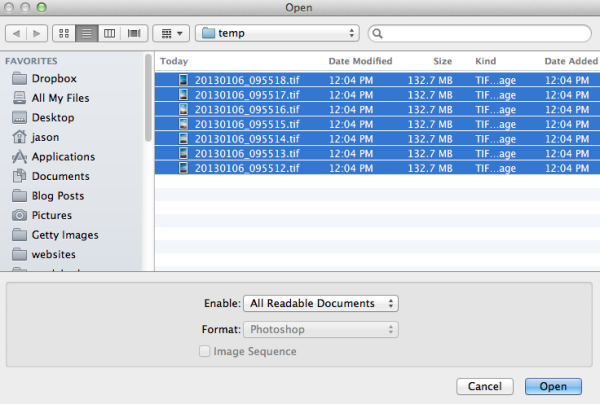
3. Select all of the files and click “Open.”

Select all files

Select all files

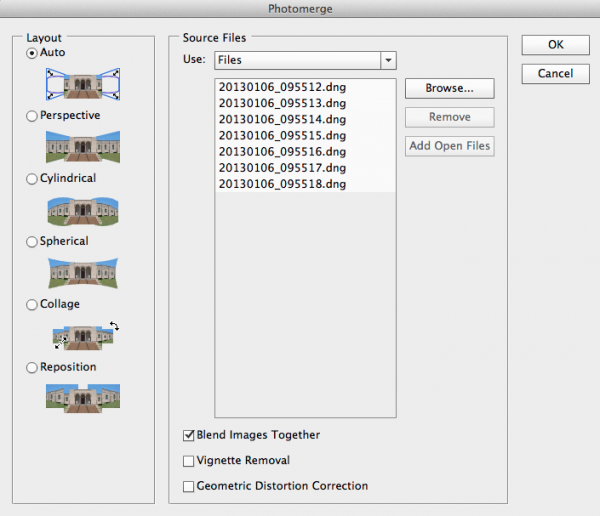
There are several options under “Layout” on the left side of the Photomerge dialogue box, but I’ve had good success with Auto. For a detailed explanation of each of the options, check out the Adobe Help article here.

Photomerge dialogue

Photomerge dialogue

If you noticed any vignetting or distortion in your source images, select the options to correct that during the Photomerge process. Personally I don’t use these two options, as I’ve noticed they slow down the Photomerge process exponentially. Instead I prepare my images in Lightroom and apply Lens Correction in Lr before sending my images to Photomerge. However these features are there if you need them.

Photomerge options

Photomerge options

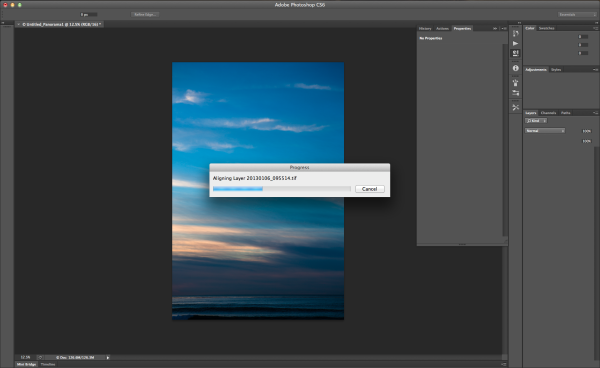
4. Click OK and wait for Photomerge to complete.

Photomerge working

Photomerge working

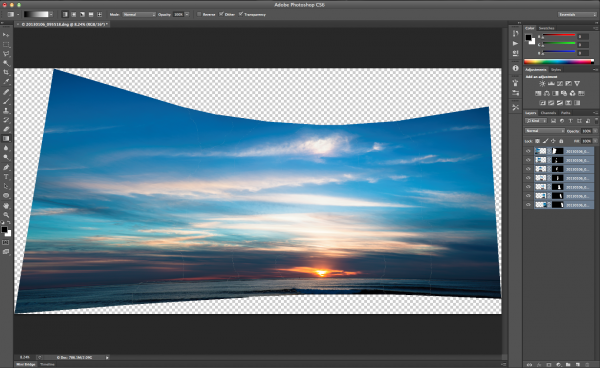
5. When Photomerge finishes its magic, you will have a single panorama with each image in a separate layer. Zoom to 100% and check the seams between the images. If everything looks OK, flatten by navigating to the Layers menu and selecting “Flatten Image.”

Panorama in separate layers

Panorama in separate layers

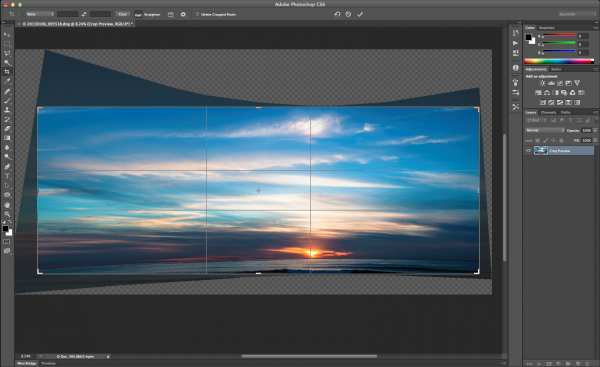
6. Crop a rectangular composition from the center of your stitched panorama. This is where shooting in portrait mode really helps. There is a more vertical height to the photo and therefore more space available for cropping.

Cropping your Panorama

Cropping your Panorama

Conclusion

The Photomerge feature in Photoshop makes stitching Panoramas easy. For me, the hardest part is remembering to take advantage of this feature by shooting images when I’m out an about that I can later stitch together into a panorama. Next time you’re out shooting and the you can’t figure out how to fit the scene into your lens, try shooting multiple frames and stitching together a panorama when you get back to your computer.

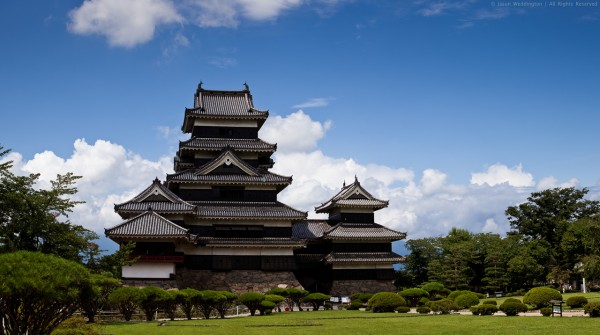
Matsumoto Castle

7-frame stitched panorama of Matsumoto Castle. Matsumoto City, Nagano Prefecture, Japan – 1/500, f/7.1, ISO 100, 70mm (Canon 5DmkII, EF70-200mm f/2.8L IS USM)

I appreciate feedback, please comment below or feel free to connect with me through Facebook or Google+. I’ll do my best to answer questions and reply to comments.

Post originally from: Digital Photography Tips.

Check out our more Photography Tips at Photography Tips for Beginners, Portrait Photography Tips and Wedding Photography Tips.

How to Shoot Really Big Panoramas


Digital Photography School

 
Comments Off on How to Shoot Really Big Panoramas

Posted in Photography