RSS
 

Posts Tagged ‘Panoramas’

How to Create Panoramas in Affinity Photo

10 Mar

The post How to Create Panoramas in Affinity Photo appeared first on Digital Photography School. It was authored by Kevin Landwer-Johan.

how to create panoramas in Affinity Photo

Want to create a stunning Affinity Photo panorama? It’s easier than you might think!

In fact, Affinity has a built-in, automated feature specifically designed to make creating panoramas easy and fun.

And in this article, I’m going to share with you the step-by-step process for both capturing and editing panoramas – so you can get beautiful results.

Let’s get started.

Affinity Photo Panorama of rice fields
A panorama created from 15 individual photos.
Nikon D800 | 105mm | f/8 | 1/640s | ISO 400
© Kevin Landwer-Johan

Taking photos for your Affinity Photo panorama

If you don’t have a lens wide enough to capture the vista before you or the skyscraper above you, then creating a panorama is a great option.

Panoramas are often made of wide scenes, but you can also create vertical panoramas of very tall subjects.

Alternatively, you can create an Affinity Photo panorama with images taken in a grid. That way, rather than making a wide or tall panorama, you can stitch together photos to capture an image both taller and wider than you could shoot with your widest lens.

Note that you can make a panorama of anything; it doesn’t have to be a wide or tall scene.

Lahu man Affinity photo panorama
Nikon D800 | 85mm | f/1.4 | 1/200s | ISO 400
© Kevin Landwer-Johan

Hardcore pano photographers will insist a tripod is necessary. Personally, I prefer not to use one when I make panoramas, with one exception: when I need a slow shutter speed and want to keep my camera steady.

Include overlap

When you take photos for a panorama, you must include a reasonable amount of overlap from one image to the next.

Without this overlap, Affinity Photo can’t seamlessly stitch the photos together.

But how much overlap should you include? Generally, I’d recommend around 25% or 30% overlap for great results.

When I take photos for a panorama, I look at an element in each frame about 25% from the edge. I then include that element in the next frame (also about the same distance from the edge). As I move my camera across or up and down while taking pictures, I am careful to line up the non-joining edges as evenly as I can. Trying to keep a straight line helps to make a panorama that will crop well.

Using a standard focal length lens or longer is best. If you use a wide-angle lens, you will run into problems lining up the images due to edge distortion.

cactus plants in a pot
I created this panorama using six shots (two columns of three horizontal photos).
Nikon D800 | 75mm | f/4 | 1/125s | ISO 400
© Kevin Landwer-Johan

Affinity Photo panoramas: the basics

Once you have a series of photographs for your panorama, open Affinity Photo.

If your photos are in RAW format, edit the colors and tones so the images look their best. Try to give each photo similar tones and color temperatures, because if your photos are different exposures or color temperatures, this will be noticeable.

I generally create a resized set of images for each new panorama. I make sure to reduce the file size, especially when I’ve taken a lot of photos. This makes it easier for Affinity Photo to manage many files at once.

(If you leave your images at full size and full resolution, you’ll be waiting a long time for your panorama to render.)

Affinity Photo panorama of rice growing
© Kevin Landwer-Johan

Import photos for your panorama

Once you’ve resized and saved your photos, go to the top menu in Affinity Photo.

Select File>New Panorama. This will open up a dialog box.

Click on Add, then navigate to the folder where you saved your images for the panorama.

Affinity Photo screen grab

Select every file, then click Open. The photos will be imported into Affinity Photo.

Then select Stitch Panorama. Once you’ve clicked this, you will see a preview of your panorama on the right and the individual files on the left.

Affinity Photo screen grab

If there are any images that Affinity Photo cannot stitch with the others, they’ll appear below the preview. 

Click OK. Affinity Photo will render your panorama and open it as a new document. This may take a while, depending on:

  • The number of images you have
  • How large each image is
  • How powerful your computer is

Tweaking your panorama in Affinity Photo

Once your panorama is rendered, you will most likely have some blank space around it. There are a few ways you can edit this. 

Cropping is the easiest. When you click on the Crop tool, a new menu bar will appear above your document. If you select the option to Crop to Opaque, Affinity Photo will automatically adjust the crop bounding box to exclude any areas that are blank. 

You can also rotate your panorama if your horizon or verticals are not straight. And you can freehand crop your panorama.

Another option is to Inpaint Missing Areas. You’ll see an icon in the middle of your screen above your document (though you’ll need to deselect the Crop tool first; otherwise, the icon won’t be visible).

When you click Inpaint Missing Areas, Affinity Photo will use its AI technology to autofill the blank areas around your panorama. This works best when there is not much detail along the panorama edges.

As you can see in my example below, Affinity has managed to fill in the sky very well. But at the bottom, the inpainting is not good because there’s too much detail in the rice field:

Affinity filling in blank areas

With the Inpaint Missing Areas tool selected, click Apply. Affinity Photo will render your panorama and present it as a single image file.

For this example, I chose to use the automatic inpainting because it filled in the sky nicely. Once my panorama rendered, I then cropped the funky area from the bottom where Affinity did not extend the rice field well.

Affinity Photo panorama of a rice field

Creating Affinity Photo panoramas: conclusion

Affinity Photo panoramas are very easy to create, especially if you’re careful to add plenty of overlap when taking your photos. 

If you haven’t tried creating a panorama, give it a go. Experiment with a simple series of images to start with. You can make a panorama with two to five photos to keep things less complicated. Then, once you have a feel for the process, start to include more images in each series.

Try using different focal lengths to see which you prefer. If you want to make a very detailed panorama, use a long lens and take lots of photos.

Remember, though: The more photos you include, the longer it will take to render your panorama!

Now over to you:

What types of panoramas do you want to create with Affinity Photo? Share your thoughts – and photos – in the comments below!

The post How to Create Panoramas in Affinity Photo appeared first on Digital Photography School. It was authored by Kevin Landwer-Johan.


Digital Photography School

 
Comments Off on How to Create Panoramas in Affinity Photo

Posted in Photography


How to Use Scene Elements to Create Impactful Panoramas

13 May

The post How to Use Scene Elements to Create Impactful Panoramas appeared first on Digital Photography School. It was authored by Ian Johnson.

Close your eyes and let me take you to a scene that you have experienced before. You are standing in front of a wonderful vista. It is huge – a sunset, a mountain range, a canyon, a cityscape – and you are blown away by the grandeur of it. After admiring it for a bit you pull out your cell phone or camera to take an image. But alas, your phone cannot capture the image because it extends far out of your field of view. “Not to worry,” you think to yourself as you flip your device into panorama mode to create impactful panoramas.

A few seconds later and your newly stitched image captures the whole scene with one problem: all the things you loved about the scene have been reduced to tiny pixels making it hard to appreciate how beautiful it was out there. In my opinion, you’ve fallen victim to the “panorama trap.”

Paradoxically, wider is not always better for capturing a large vista!

Panorama, How-to, Foreground, Photography, Lessons, Northern Lights, Mountains, Cannery

This panoramic image illustrates the “Panorama Trap.” I wanted to photograph the mountains, but there is nothing compelling to draw me into the image or tell the story of that place (it happens to be the Denali Highway).

You can up your panorama photography game by carefully thinking about elements of the shot before making it. For instance, integrating close foreground elements using hyperfocal distance or switching to a longer lens can give you a more interesting shot. We’ll go through that and more in this article!

Why panoramas?

In order to capture a more interesting shot, it is useful to think about why you are using a particular technique. For instance, you might think of black and white photography for shadows and contrast, macro techniques for tiny things (although that’s a rule to be broken), and side-lighting for portrait photography. Each of these techniques or photography genres is meant to maximize the benefit and impact of the elements in the image.

So, why panoramic? Because you want to maximize and impress the viewer with grand-scale elements in the image which you cannot capture in one image alone. Using the mantra of “making a shot” and not “taking a shot” is good to keep in mind for panoramas. To make a more compelling panorama, envision what you want to accomplish and how you want the image to feel or influence your viewer before pressing the shutter button.

Panorama, How-to, Foreground, Photography, Lessons, Northern Lights, Mountains, Cannery

Some scenes are just too big for one image! This snow-covered landscape caught my attention during an afternoon of skiing. I like the framing of the trees on the left, but to my eye, this image still gets caught firmly in the panorama trap because it lacks compelling elements in the foreground.

Techniques

Integrate Close Foreground Elements using Hyperfocal Distance

Foreground elements are critical pieces to incorporate into your image to grab the viewer. Foreground elements help tell a story, give the image context, and make it more interesting to look at. Since many panoramas get taken with a mid-length (e.g., 50 mm) to ultra-wide lenses (e.g., 12mm), you must walk close enough to foreground elements to give them a presence in the image.  You can maximize the impact of a foreground element by using a photography technique called hyperfocal distance.

Panorama, How-to, Foreground, Photography, Lessons, Northern Lights, Mountains, Cannery

This image was made during a recent trip to Hawaii and shot on a Nikon D810 with a 24mm Sigma Art f/1.4. The Mamane Tree in the foreground was a compelling silhouette.  I am only about 10 feet from it, but HFD enabled me to keep the foreground and Milky Way sharp.

Hyperfocal distance (HFD) is not a “hyper-difficult” subject. By definition, it is the closest thing your lens can focus on while keeping the horizon at infinity. HFD is influenced by your lens focal length, by your camera’s sensor size, and by your aperture. As a rule of thumb, wider lenses have a shorter HFD than longer lenses, and the larger your sensor is, the shorter the HFD is. Creating a smaller aperture (e.g., f/16 instead of f/2.8) will also decrease the HFD.

Depending on your system and camera settings you may be able to have foreground elements 2.0 feet (0.6m) away and have all elements beyond that in focus! There are many resources to learn HFD from and to calculate it for your camera system. I recommend starting with this article to learn more. As you use HFD more, you will begin to have an intuitive sense of how far objects have to be from your camera to be in focus.

Panorama, How-to, Foreground, Photography, Lessons, Northern Lights, Mountains, Cannery

This image incorporates HFD to frame the image. The closest spruce is about 8 feet in front of me. I made the image with a Nikon D810 and a 12mm, ultra-wide lens

Hopefully, you have made the connection of why HFD will help you integrate interesting foreground elements into your panoramic image. Here’s how you can achieve intriguing panoramas in three generic steps:

  1. find a compelling scene,
  2. locate an interesting foreground element, and
  3. walk to the HFD in front of the foreground element and begin shooting.

I recommend stopping your lens down to f/8, so it is at its sharpest and shooting with a panning tripod head to keep your horizon straight and level. It will make the stitch and final image cleaner. However, don’t be overwhelmed – these techniques take time and patience.

Panorama, How-to, Foreground, Photography, Lessons, Northern Lights, Mountains, Cannery

This image was made on an Olympus OMD Em5 with a 12mm lens adapted with a Metabones speed booster. The foreground silhouette tree was about 8 feet away. I got as close as HFD would allow to make it impactful in the image.


Panorama, How-to, Foreground, Photography, Lessons, Northern Lights, Mountains, Cannery

This image is not utilizing HFD, but I had to consciously know how close to stand to these spruces to give them impact in the image. I intentionally balanced their silhouette against the glow of the Northern Lights.

Now that you have learned briefly about HFD, I’m going to tell you to keep in mind that rules are made to be broken! The foreground of your image may be far more important to the telling of that story than the horizon. Having an in-focus foreground element and out-of-focus background is okay too.

The image below has many compelling elements. However, my goal was to bring you into the winter scene by ensuring the hoar-frost-covered Black Spruce in the foreground was tack-sharp.

Panorama, How-to, Foreground, Photography, Lessons, Northern Lights, Mountains, Cannery

Rules are made to be broken! In this image, I knew my background and stars were going to be out of focus. That did not matter to me because they were only accents to the foreground trees and their beauty.

Use long lenses to bring the scene to you

You may be thinking to yourself “I can’t always get closer to my subject, so what then?” Not to worry – you can make compelling panoramic images by using long lenses to bring the landscape closer to you. When using a long lens of 150mm or more, it is critical that you use a tripod with a panning head. Use a cable release to remove shake in the lens and shoot at a large aperture (e.g., f/20) to get sharp elements.

Panorama, How-to, Foreground, Photography, Lessons, Northern Lights, Mountains, Cannery

This image of Denali was made with an Olympus OMD Em5ii at 100mm. I isolated the mountain and its foothills to create a panorama full of layers, colors, and textures.

You can use a telephoto lens to isolate and photograph your favorite part of a scene. Above, I used one to isolate Denali, and below, I used it to isolate a cannery against the large mountains of the Juneau Range.

The steps for making a panoramic image with a telephoto lens are similar to using HFD. You need to:

  1. Identify a scene,
  2.  identify which part of the scene to isolate with the telephoto, and
  3. shoot the scene with the telephoto and cable release.
Panorama, How-to, Foreground, Photography, Lessons, Northern Lights, Mountains, Cannery

I made this image from a boat and shot it at 330mm to isolate the cannery. The effect of “compression” from the telephoto lens made the mountains feel very close to the cannery. In reality, they are over 18 miles (350km) away!

Practice makes perfect

Experimenting with HFD and long lenses is going to result in some images that you “could have done better on.” Expect to learn from your mistakes!

I’ll share an image that illustrates when my HFD distance estimating was off. I did not achieve a sharp foreground and background. However, I like how the sharp part of the image draws your eyes through the snow-covered trees. So, this image is not a total flop.

As I always say, “pixels are cheap.”

I hope you make tons of pixels while experimenting with panoramic images!

Panorama, How-to, Foreground, Photography, Lessons, Northern Lights, Mountains, Cannery

Even images that are not perfect can have qualities you like! The air glow on this night was spectacular and I like how the distant spruces are in focus drawing your eye through the tunnel of snow-covered trees.

The post How to Use Scene Elements to Create Impactful Panoramas appeared first on Digital Photography School. It was authored by Ian Johnson.


Digital Photography School

 
Comments Off on How to Use Scene Elements to Create Impactful Panoramas

Posted in Photography


Panoram app will split your panoramas up for easy posting to Instagram Stories

22 Jan

There are countless apps capable of splitting up a panorama photo so it can be put side by side into an Instagram post, but Panoram appears to be one of the first apps to offer this sort of capability for Instagram/Facebook Stories (or Snapchat).

Panoram is currently an iOS only app for the time being. As its name suggests, Panoram will take a panoramic photo and split it into three separate frames that can then be uploaded to Instagram, Facebook or Snapchat so they can be viewed as a single image when viewers tap through their feeds. Cropping the photo is done directly in the app using a basic overlay.

The app itself isn’t too special, but its do one thing well approach makes it a nice app to keep around for when needed. Currently there’s no option for additional frames, so don’t count on using ultra-wide panoramas.

Panoram is free to download in the iOS App Store. The free version contains ads and plasters a watermark on the final panorama, which can be removed with a $ 1 USD in-app purchase.

Articles: Digital Photography Review (dpreview.com)

 
Comments Off on Panoram app will split your panoramas up for easy posting to Instagram Stories

Posted in Uncategorized


Weekly Photography Challenge – Panoramas

03 Nov
Gorge Heritage Walk Panoramas by Caz Nowaczyk

Gorge Heritage Walk in Mt Buffalo National Park, Victoria in Winter on a sunny day by Caz Nowaczyk

This week’s photography challenge topic is PANORAMAS!

Panoramas are a fantastic way to capture the vastness and detail of the subject that you are shooting. Whether it’s a dynamic landscape or cityscape, panoramas always have an impact.

Check out some of the articles below that give you tips on how to take panoramas and how to edit them together for the final product.

Tips for Shooting Panoramas

How to Shoot and Stitch a Panorama Photo

21 Tips to Help You Create Better Panoramas

How to Shoot Really Big Panoramas


Tips For Stitching Panoramas in Post

How to Match Exposures when Stitching Panoramas in Photoshop

Step by Step Using Merge to Panorama in Lightroom

Weekly Photography Challenge – Panoramas

Simply upload your shot into the comment field (look for the little camera icon in the Disqus comments section) and they’ll get embedded for us all to see or if you’d prefer, upload them to your favorite photo-sharing site and leave the link to them. Show me your best images in this week’s challenge.

Share in the dPS Facebook Group

You can also share your images in the dPS Facebook group as the challenge is posted there each week as well.

If you tag your photos on Flickr, Instagram, Twitter or other sites – tag them as #DPSPANORAMAS to help others find them. Linking back to this page might also help others know what you’re doing so that they can share in the fun.

New England Highway by Caz Nowaczyk - Panoramas

Winter sunrise on the New England Highway, Llangothlin, NSW by Caz Nowaczyk


The post Weekly Photography Challenge – Panoramas appeared first on Digital Photography School.


Digital Photography School

 
Comments Off on Weekly Photography Challenge – Panoramas

Posted in Photography


21 Tips to Help You Create Better Panoramas

18 Jun

Panoramas are a great way to approach photographing landscapes. By allowing you to capture a larger amount of the scene in front of you, it is easier to portray what you actually saw with your eyes in your photographs. Software has made it stupidly easy to stitch your photos into panoramas; however, there are still some considerations you can take to get the most out of your landscapes and make better panoramas.

panorama of mountains and a lake - 21 Tips to Help You Create Better Panoramas

This article presumes you already know how the basics of capturing a sequence of images and to how to stitch them together as panoramas in Lightroom or another dedicated software package.

Part 1 – Gear

Such a specialized technique may seem like it requires a lot of specialist gear to get right, but that’s not the case. Of the three items listed below, only two are absolutely necessary and as someone interested in landscapes, you probably already have the most important one.

1) Tripod

21 Tips to Help You Create Better Panoramas - camera on a tripod

A tripod is an absolute necessity if you want to create better panoramas.

This first one is probably obvious, but it’s the most important when it comes to creating better panoramas. All of the images in your sequence need to line up perfectly and the only way to ensure that is with a good, sturdy tripod. The tiniest of movements between your photographs can cause Lightroom to fail when stitching your photos together.

failed panorama - 21 Tips to Help You Create Better Panoramas

You never know when an image might not get through the stitching software. Do your best to get it absolutely right in camera to avoid situations like this one (notice the disconnected railing).

Disheartened may be the feeling you get when you see the words “Unable to merge the photos. Please cancel and review the selection.” So, please, for your own sanity, use a tripod when shooting panoramas.

2) Panoramic tripod head

21 Tips to Help You Create Better Panoramas - tripod head detail

If you have a tripod head that can turn in measured increments like this one, attach your lens to the tripod if you can (using a tripod collar), rather than your camera body.

This is an optional piece of kit, but I promise you, if you plan on doing panoramas often, make sure you have a panoramic head on your tripod. These heads rotate on the center axis of your camera and help minimize distortion in your final image.

Panoramic heads are also marked with numbers from 0 to 360 degrees so you can make your camera movements with absolute accuracy. There are a lot of good panoramic tripod heads available and you will be able to find one in the same price range as other styles of heads.

Now, to be absolutely clear, I’m talking about the cheap kind that you can find in a normal price range. There are panoramic heads with motorized components made for the explicit purpose of stitching together photos. I’m not talking about those. If you can afford one, by all means, go for it, but unless you specialize in panoramas, it’s unlikely that you would ever need to even consider one.

3) Spirit level

spirit level - 21 Tips to Help You Create Better Panoramas

Spirit levels will help you guarantee that all of your shots line up in the stitching software.

While you can still achieve good results without one, using a spirit level will help you make sure that your panoramic sequence stitches together with a minimal amount of distortion. This is important when you have compositional elements at the edges of your frame. If those elements get distorted too much, they will wind up (either partially or fully) outside of your crop.

You may already have one or more built into your tripod, but if not, you can buy one that fits your cameras hotshoe for a reasonable price.

Part 2 – Capture

Camera craft is easily the most important aspect of capturing better panoramic images. From getting a correctly aligned sequence of images, to focus and exposure, there are a lot of elements that you need to get right in camera to ensure that your images come out well.

4) Practice your movements

To be fast, you should be able to operate your camera and your tripod without thinking about them. In fact, these movements should be ingrained as muscle memory. How do you do this? Practice, lots of practice.

21 Tips to Help You Create Better Panoramas - panorama of a scene outside

Practice your camera and tripod movements when it doesn’t count. For example, I had an hour of down time in a hotel, so I took a few sequences through the window.

One of the best ways to go about getting that practice is to make some time to set up in a low-value environment. So when your practice images are (inevitably) bad, you won’t have missed any images that were worth taking. It can be as simple as going into your backyard and setting up there for an hour.

Once you’re set up, go through the motions of taking a panorama in slow, deliberate steps. Make sure that every action from focussing through to the actual camera movements is perfectly executed. Go through the motions a few times and when you are sure that you have it down, speed up a little. Again, repeat this until you’re satisfied that you have it down. Then speed up again.

Keep practicing like this until you’re performing all the actions without even thinking about them. Doing this for just an hour will reduce your chances of a mistake when you are standing at the edge of a lake in that once in a lifetime perfect light.

If you really want to hammer it down, don’t just practice like this once. If you have some downtime, try using that time to reinforce these skills instead of, say, scrolling through your phone.

5) Take notes

21 Tips to Help You Create Better Panoramas - notes on paper

Notes don’t have to be complicated, they just need to be clear enough that you understand them without much effort.

Taking notes will ensure that you are an organizational genius. It doesn’t matter how you take your notes, whether it be on a notepad, your phone, or in voice recording app such as Evernote. As long as you can annotate the file numbers where each of your panoramas starts and stops, you’re on to a winner.

Editor’s tip: You can also take a shot of your hand in front of the lens before and after your pano shots so you can mark the beginning and end of the series that way as well. 

6) Longer lenses

Instead of using your wide-angle lenses, use longer focal lengths when making panoramas. 35mm, 50mm and 85mm are all good choices depending on the scene in front of you. The longer focal lengths allow a different perspective by bringing everything forward in the frame, unlike wide-angle lenses that push everything back.

Because you are both shooting in portrait orientation and stitching together multiple images, you will still get a wide view of your scene with the sky and foreground intact.

Create Better Panoramas - using a longer focal length

Long lenses are great for panormas. The images for this panorama were shot at 200mm. However, 50mm, 85mm and any focal length above that, will help to bring your subject forward in the frame.

7) Manual exposure

For the best results, set your camera to Manual mode for the duration of your sequence. If your exposures don’t match from frame to frame, then the software may not be able to merge your panorama.

If your scene is simple and has relatively few elements in it, you may get away with Aperture Priority mode. However, if one half of your image has a mountain or a building and the other half a clear sky, the difference in exposures will result in unusable images for the panorama merge.

8) Small aperture to help with stitching

Another way to make sure the stitching software performs well is to use a small aperture to keep everything in the frame as sharp as possible. Using apertures like f/11 and f/16 will go a long way in helping you to get sharp panoramas.

You can use larger apertures if you’d prefer, but just be aware that it might result in the software being unable to merge your panorama.

9) Focus somewhere inside your frame

Create Better Panoramas - wide shot of a path in the forest

In this image, I focused two-thirds of the way down the path, set the lens to manual focus, and then reframed the camera to start at the left.

When focusing, it seems easy enough to set your focus somewhere in the first frame of your sequence. If you’re focusing to infinity, that’s fine, but if you’re focusing on a point closer to you, your focal point may not wind up in your final crop.

It takes longer and requires you to be careful not to jar the camera, but consider setting the focus on your main focal point of the image. Then switch to manual focus and recompose the camera to your starting position.

This does create an extra chance for things to go wrong. However, you have to ask yourself whether it’s better to have an out of focus image because of a mistake or an out of focus image because you didn’t bother to take the necessary steps in the first place?

10) Portrait orientation

camera on a tripod shooting vertically - Create Better Panoramas

When shooting panoramas, you have access to all the information in the horizontal aspects of a scene. Maximize your information in the verticals by shooting in portrait orientation.

Because you will be creating one big image out of many smaller images, it’s a good idea to maximize the amount of real estate you have to create the final photo. Instead of keeping your camera in landscape (horizontal) orientation, put it into portrait (vertical) orientation so that you get as much information as possible on the vertical axis of your scene.

As far as the horizontal, you can always take more photos at either end of the sequence to make sure you get the most information, but this isn’t the case with the vertical.

11) Excessive overlap

example of image overlap - Create Better Panoramas

In this sequence of three images, you can see just how much overlap there is. With the left and right images lined up, the middle image is barely visible. Overkill? Maybe, but it’s worth it for peace of mind.

When you are taking the images that you will stitch together, be overly generous with the amount you leave as overlap from one image to the next. Yes, this will result in you needing more frames for a complete sequence and it will require more processing power as well. But it also gives you more leeway in the stitching process and it will result in better final images.

12) Overshoot

Create Better Panoramas - panoramic scene

Taking more images than you need for your final panoramas will provide you with a wealth of options for composition once you’re back at the computer.

When creating panoramas, there’s only one hard and fast rule (apart from the tripod) that I adhere to. That is to take more images in a sequence than I think I need. For example, if you’re trying to create an image of a church and you get all the images you think you need in five frames, shoot five more.

If you allow yourself excess on either edge frame, you will have far more compositional choices later. On top of that, you will also negate any potential distortion that may cause your focal point to be cropped during merging. Trust me, the wiggle room this provides is well worth the tiny bit of extra time and space on your memory card.

13) Be fast

Because you are taking multiple images for each panorama, there is a chance that elements in your scene may be moving. Water and clouds can prove to be a huge headache in the stitching process. You can alleviate this to a degree by being fast. Once your first shot is created, your hands should be already moving to change the camera to its next position.

14) Bracket for HDR

HDR pano shot - Create Better Panoramas

Merging to HDR and stitching panoramas in Lightroom works really well. Merge each individual frame to HDR first, then stitch them together as a panorama.

Should you find yourself in a high contrast scenario, feel free to bracket your exposures for HDR blending. I have had good results in Lightroom with blending each frame (from a bracketed set of exposures) into HDR individually and then merging them all together as a panorama.

If you try this, make sure you don’t use the Auto Tone function in Lightroom’s Merge to HDR dialogue box. It will treat each image as an individual and will make it next to impossible to stitch your images together as a panorama. Instead, wait until your panorama is merged and then make your adjustments manually.

15) Use your GND filters

Create Better Panoramas - pano of a mountain scene

When creating panoramas, use your GND filters to your heart’s content.

Likewise, you can use graduated neutral density filters to your heart’s content. If you have a tricky horizon line, such as a mountain range, just move your filter into the appropriate place between taking the images. As long as you are careful to not move your camera, this will work just fine.

Part three – Post processing

Because you are stitching together your images in software, the post-production stage of creating panoramas cannot be ignored.

16) Create a system to differentiate sequences in Lightroom

After a heavy session of shooting images for panoramas, you may find yourself inside Lightroom utterly confused. Triple that confusion if you were shooting HDRs and panoramas together. With so many similar images, it can difficult to figure out what starts and stops where.

An easy way to deal with this at the time of shooting is to devise a way for you to know when a sequence starts and when it ends.

All I do is wave my hand in front of the lens for the first image, then I take the first frame again having removed my hand. At the end, if I’m starting another panoramic sequence, I do it again. Inside Lightroom, all you have to do is look for the images that fall between the shots of your hands.

thumbnails of pano shots in Lightroom - Create Better Panoramas

It doesn’t matter how you differentiate your sequences, but you definitely need to do something. It will save you hours of frustration and confusion.

I also use the color label system in Lightroom. After identifying a panoramic sequence, I select them all and right click and select “Set Color Label > Blue” from the menu.

Other options include taking a photo with the lens cap on or holding a piece of paper in front of the lens. You could do anything for this as long as it helps you figure out where things begin and end.

If you combine this with taking notes, then you should never find yourself in a state of confusion.

17) Do Lens Corrections and Chromatic Aberration removal first

Create Better Panoramas - lens correction panel in LR

An important step to take before you start the stitching process is to apply any Lens Corrections and removal of Chromatic Aberrations before you stitch the images together. Any vignetting or distortion caused by your lens can have drastic effects on your panoramas and it’s best to deal with them before they have a chance to become a problem.

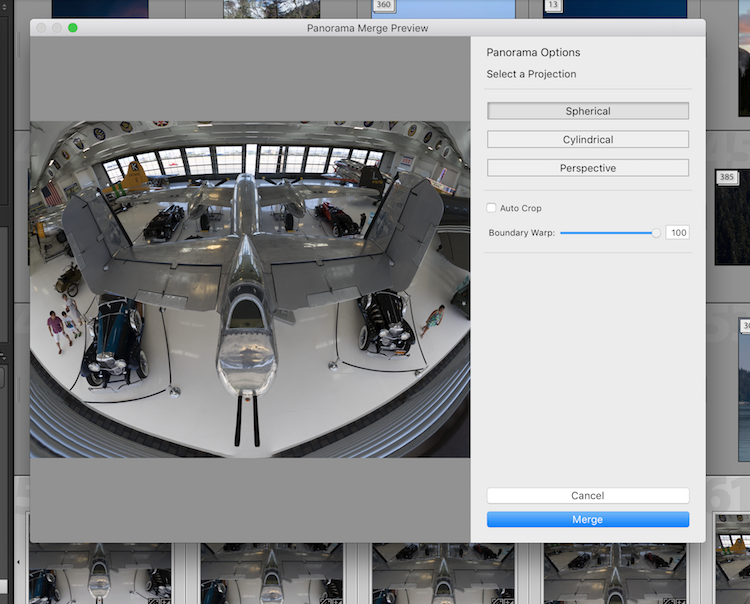
18) Use boundary warp

merge to panorama in LR - Create Better Panoramas

Using boundary warp in LR Merge to Panorama can help ensure that you get everything you intended in your frame.

The Auto Crop function often works well to get rid of the white space around a stitched panorama, but sometimes elements in your scene (foreground elements most of the time) can wind up cropped out of the composition. You can use the boundary warp slider in the Merge to Panorama dialogue box to adjust how your image is cropped.

It doesn’t always work, but if you are unhappy with how things appear, remember to try the boundary slider as it may fix your problem.

19) Crop

If you’re at all like me, then cropping is a bit of a dirty word. You know, get it right in camera and don’t sacrifice the resolution and all that jazz. In terms of panoramas, throw that out of the window. Not only should you crop to your heart’s content, but you should revel in it.

If you have overshot a scene, you probably have a really wide image. The thing is, those really wide panoramas often aren’t very pleasing. Go in with the crop tool, and find a strong composition inside of your stitched frame.

Try to think about it like this – your image, straight out of the stitching software is what you saw at the scene. Instead of composing your image while behind your camera, you’re now composing it with the crop tool. Because you (hopefully) took more images than you needed and you have far too much information to best present your subject. Just get rid of the excess and leave only what needs to be there.

20) Consider standard crop ratios

Create Better Panoramas - ultra wide panorama shot

Here is the original panorama straight out of the stitching software. While cool, the format is a bit wide for most uses.

As mentioned, ultra-wide panoramas are a hard sell. They are cool from a technical standpoint, but in terms of composition, they tend to fall short. Instead, consider using crop ratios already associated with panoramic images. These include 16:9, 16:10, 1:3, 6:17, 1:2.

The first two of these are already crop presets in Lightroom. The last three are all aspect ratios native to dedicated panoramic cameras. In order, they are the Hasselblad Xpan, the Fuji GX617, and the Lomography BelAir.

16:9 Ratio

16:10 Ratio

1:3 Ratio

6:17 Ratio

1:2 Ratio

As you can see, there are plenty of options for established crop ratios.

Bonus round

21) Shoot panoramas of normal scenes for bigger files

Not every scene needs to be shot as a panorama. In fact, there is more than enough for you to accomplish as a photographer if you never so much as touch the technique.

However, panoramic stitching offers you another tool that may not be as obvious.

Create Better Panoramas

Shot normally, the resulting PSD file is about 35mb.

If you approach a normal scene (let’s say in a 2:3 ratio) and shoot it in a panoramic sequence, the extra information you capture in the vertical means that your final image size will be quite a bit larger than just a straight shot from your camera.

If, for example, you suspect that you will want to make a huge print of a particular image, this technique will give you some extra resolution to work with.

Cropping in from the panoramic sequence gave me a PSD file of 55mb, nearly twice the size of the original.

Conclusion

That’s a long list, but it’s not exhaustive. If you’ve stuck with me this long, you’re probably pretty serious about getting the most out of your panoramas.

If you’re just starting out with this technique, remember not to be too hard on yourself if you forget to use every one of these tips. Take it slow and before you know it, you’ll find that all of this becomes second nature with only a little bit of effort and practice.

The post 21 Tips to Help You Create Better Panoramas appeared first on Digital Photography School.


Digital Photography School

 
Comments Off on 21 Tips to Help You Create Better Panoramas

Posted in Photography


Novoflex ClassicBall ball heads can be mounted upside-down for level panoramas

28 Apr

Novoflex has launched a trio of new Classicball tripod ball heads that can be mounted upside-down for producing level panoramas. The new lineup is comprised of the CB 2, CB 3 II and CB 5 II models, each able to accommodate cameras and gear weighing up to 5kg/11lbs, 8kg/17lbs and 12kg/26lbs, respectively. All three models feature a leveling bubble built into the base of the mount.

According to Novoflex, all three new Classicball models are compatible with all ‘common’ tripods, and each can be used with optional quick-release accessories. A lever on the side of the ball head clamps the camera into position; users can also adjust the friction using the blue 5-stop friction dial. Each model features a trio of 90-degree openings for positioning the camera fully backward, forward, and to the side. The ball head’s design allows for 360-degree rotation, including in reversed (upside-down) mode, which itself supports optional L-bracket, plate and quick-release accessories.

The new Classicball models are available on Novoflex’s website now for $ 495 (CB 2), $ 475 (CB 3 II) and $ 692 (CB 5 II).

Via: DIY Photography

Articles: Digital Photography Review (dpreview.com)

 
Comments Off on Novoflex ClassicBall ball heads can be mounted upside-down for level panoramas

Posted in Uncategorized


How to Shoot Vertical Panoramas (Vertoramas)

01 Sep

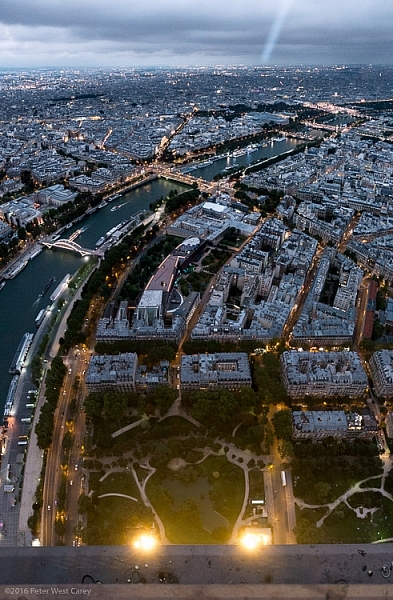
PWC-Oregon2012-0205-0684-PanoThe Eiffel Tower. The Statue of Liberty. Redwood trees. Not all the world fits into our horizontal frame of it. Some of it climbs up and up! For those images you need to learn a new technique; vertical panoramas, or vertoramas as they are known.

What are vertoramas?

A vertorama is simply a panorama, but shot vertically. It is for the tall things of the world, and uses much of the same techniques as a panorama, but with some important considerations I’ll touch on later in this article.

They are as simple as two shots combined to capture more foreground, or a chance to capture the tallest of the tall things on the planet without a wide-angle lens. They are a great option when you don’t have a super-wide angle lens, or you want to capture more detail than that wide angle lens will provide in one shot.

Picking the best subjects

Tall things are the obvious choice for making vertical panoramas, but also look at your normal images to see what can be included in the foreground.

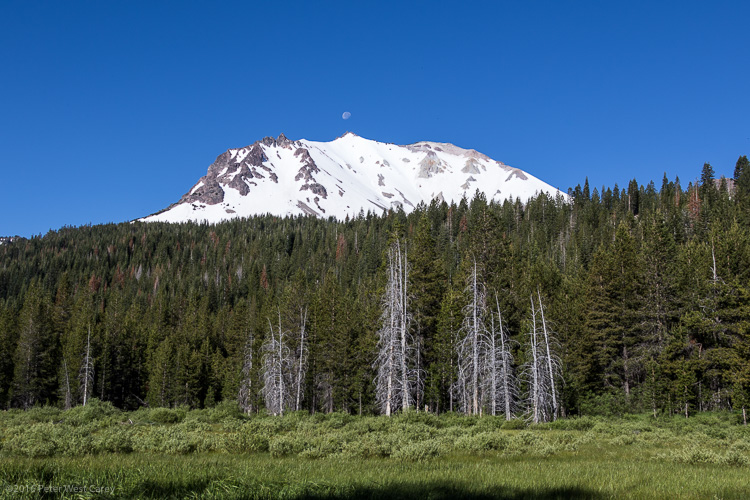
For instance, this view of Mount Lassen in Lassen Volcanic National Park is pretty enough.

PWC-Travel2016-0624-8343

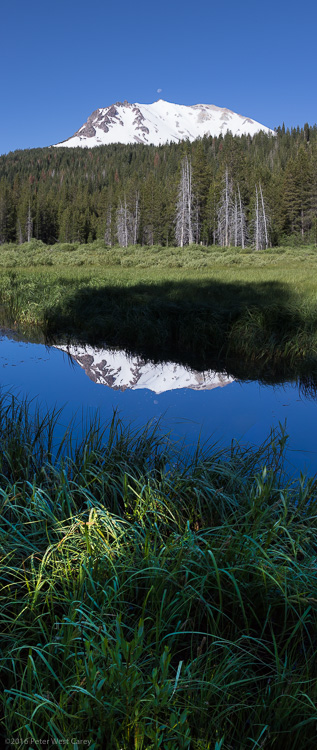
But what else is going on in the foreground? And not just the foreground, but the extreme foreground?

PWC-Travel2016-0624-8329-Pano

A Vertorama can take your normal landscape image and give it depth, like this image of Delicate Arch in Utah.

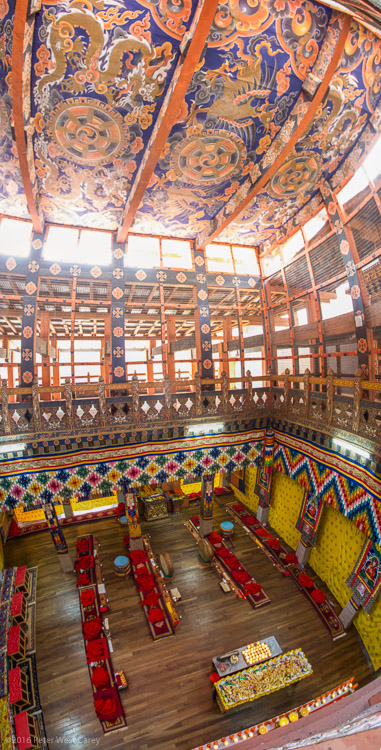
I pick subjects where my vantage point gives me something above and below a level view of the subject. This view of a temple in Bhutan is such a location, as I was on a balcony with subjects below and certainly above.

Vertoramas are also used to emphasize the enormity of an area. In this case I used my iPhone’s panorama mode, turned the phone sideways, and kept panning up and up, and then back over the top of my head (flexibility is a key with this format!) to show the grandeur of the structure. Shot inside the amazing Cathedral Notre-Dame de Paris.

PWC-France2015-083121-0711

Waterfalls, statues, buildings, trees, landscapes…they are all ripe for the format.

How to shoot vertoramas

Shooting vertoramas is not much different than shooting panoramas, but there are some important considerations. First, if you need help with panoramas, dPS writer Barry J Brady has a good article on them here: How to Shoot Panoramic Photos. The settings are the same for vertical panos, but you need to make sure you can pan all the way up with your subject, which is sometimes hard to do with a tripod.

Where it gets a little trickier is in the distance of your subject. This is fundamentally different than panoramas, because for the most part, panoramas have a roughly equal distance from the camera to all parts of the scene. Roughly.

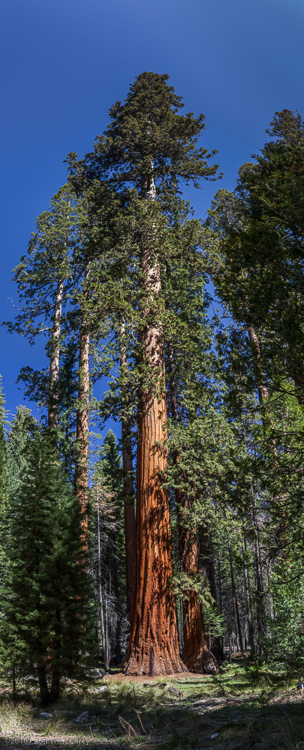
But a vertorama often has a subject leading away from it and this can cause distortion.Can you imagine the truck of this redwood tree being much closer than the 200 foot tall top?

PWC-Sequoia in Mariposa Grove

In which case, give yourself plenty of room at the bottom of the image as that will be your constriction point when you go to crop. I shoot landscape orientation (camera in horizontal position) for almost all of my vertoramas, in order to have enough space to crop.

Editing Options

I find more and more that the PhotoMerge -> Panorama feature in Adobe Lightroom works just fine for vertoramas. So does the same feature in Photoshop proper, maybe 80% of the time. Where it comes up short is in the variety projections.

PWC-Vertorama-screenshot

If you are looking for a little more power, try AutoPano Giga by Kolor (now owned by GoPro). There are a number of projections that can help with vertoramas, including Hammer. Plus it has the fun Little World projection that helps make those funky, little world images.

Both programs are run just as they would be for a horizontal panorama.

Things to consider

Sometimes I look at vertoramas and I think they have no place in our digital world. When so much of what we view is on a horizontal screen, it’s hard to see their full beauty. You can turn your phone sideways, but you’re still missing the scale of the shot. Have you found yourself scrolling a lot in this article, and maybe not even seeing the whole images?

PWC-France2015-083117-0943-Pano

That being said, I love how vertoramas look when they are printed. Printing can be done at Costco, Walgreens or any place that prints panoramas.

Vertoramas can be trickier to shoot than a regular panorama as your tripod doesn’t typically pan up and down as smoothly as side to side. I suggest getting more acquainted with shooting these images handheld. It’s not hard to do.

Also, use your smartphone camera. That panorama mode works perfectly fine when you pan the camera skyward. Most newer phones even realize you made a vertorama and flip the image so it looks proper.

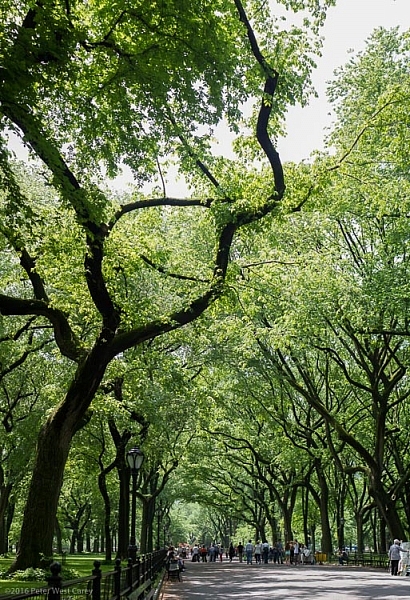
Lastly, vertoramas don’t all need to be skinny and tall. They are also used to create a more formal aspect, even a nice square, of a subject hard to capture in a single frame. This image of Central Park in New York is an example as it was shot with a 50mm lens on a crop sensor camera, far from being wide angle. But the result is a nice, wide image that gives more depth to the scene. See also: 5 Steps to Rock the Brenizer Method.

A vertical panorama of trees and tourists in Central Park, New York City, New York, USA

A vertical panorama of trees and tourists in Central Park, New York City, New York, USA

Conclusion

Vertoramas are a fun way to explore the world. They stretch our normal view, and force us to think creatively to capture what we are after. I personally love the format for what the extra foreground can bring to the story.

If you’ve shot vertoramas before, what are some of your favorite subjects? Any other advice you might give to beginners? Please share in the comments below, along with your vertical panorama images.

googletag.cmd.push(function() {
tablet_slots.push( googletag.defineSlot( “/1005424/_dPSv4_tab-all-article-bottom_(300×250)”, [300, 250], “pb-ad-78623” ).addService( googletag.pubads() ) ); } );

googletag.cmd.push(function() {
mobile_slots.push( googletag.defineSlot( “/1005424/_dPSv4_mob-all-article-bottom_(300×250)”, [300, 250], “pb-ad-78158” ).addService( googletag.pubads() ) ); } );

The post How to Shoot Vertical Panoramas (Vertoramas) by Peter West Carey appeared first on Digital Photography School.


Digital Photography School

 
Comments Off on How to Shoot Vertical Panoramas (Vertoramas)

Posted in Photography


PanoCatcher automates capturing panoramas and timelapses

30 Sep

A new device called the PanoCatcher is described as a ‘robotic photography platform,’ and is designed to automate the capture of time lapses, panoramas, and other similar photos. The device is made from CNC precision-machined aluminum, and is compatible with most mirrorless and DSLR cameras. Read more

Articles: Digital Photography Review (dpreview.com)

 
Comments Off on PanoCatcher automates capturing panoramas and timelapses

Posted in Uncategorized


20 May, 2014 – Post Processing Panoramas

21 May


As a follow up to Kevin Raber’s recent article on Having Fun With Panoramas today we present an article by Tom Legrady on Post Processing Panoramas.  This article for the most part focuses on the use go the Adaptive Wide Angle Filter in Photoshop.  The use of this filter especially in panoramas corrects for much of the distortion that is introduced during the stitching. 

Michael and I (Kevin) will be in Buffalo June 5-8 as part of the Silo City Workshop.  This workshop conducted by Mark Maio will be photographing one of Michael’s and my favorite things; abandoned buildings.  In this case these will be the abandoned Buffalo Childs Street grain elevators.  If you are free and want to have a great few days shooting these amazing structures inside and out then go to the Silo City Web Page and register today.  There are only a few spots left.  Another bonus is Capture Integration will have a rep there with Leica Gear as well as Medium format digital gear if you are so inclined to try this gear out.  Hope to see you there.


The Luminous Landscape – What’s New

 
Comments Off on 20 May, 2014 – Post Processing Panoramas

Posted in News


Google+ now converts DSLR panoramas into Photo Spheres

16 May

photosphere.png

The Google Photo Sphere 360-degree panorama feature was introduced in November 2012. However, until now, viewing 360-degree panoramas not created with Google Camera or a compatible app was a slightly cumbersome process. Google has now changed that with an update to Google+. Learn more

News: Digital Photography Review (dpreview.com)

 
Comments Off on Google+ now converts DSLR panoramas into Photo Spheres

Posted in Uncategorized