RSS
 

Posts Tagged ‘panel’

Understanding the HSL Panel in Lightroom for Beginners

02 Mar

Understanding the HSLPanel for Beginners

There are many things involved in post-processing an image, that might seem a little bit daunting at first. That doesn’t mean that they are difficult to learn, or hard to understand. The HSL panel in Adobe Lightroom (or similar editing software that uses Adobe Camera Raw), tends to bring about feelings of anxiety, when it comes to making sense of all those sliders. Some photographers choose to pretend it doesn’t even exist, just because it looks a little complicated. Nothing could be further from the truth!

Simply put, those three little letters stand for Hue-Saturation-Luminance. What makes the HSL panel so powerful, is that it allows you to control different colors independently. HSL adjustments will enable you to brighten, or emphasize specific saturations, and control the hue of only certain colors. Like working with black and white? Then you should definitely make use of the HSL panel, and take your black and white conversions to a whole new level. Let’s get started!
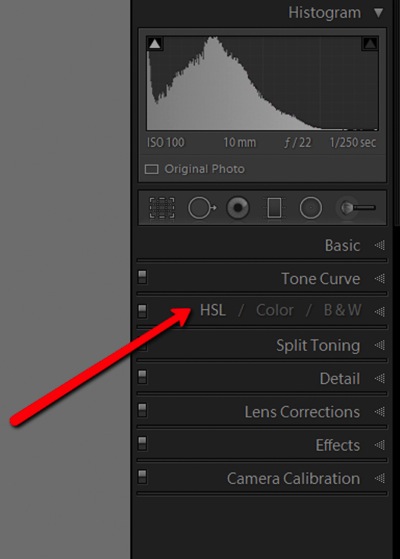
HSL Dropdown

We’ve already talked about what the letter HSL stand for, so now let’s break it down, so that you will really understand how each one affects your image.

H – What is hue?

Admittedly, trying to discern the functional difference between the words hue and color, can form a little bit of a gray area (haha color humor). But generally, we think of hue in terms of the shade of a color on a gradient and is dependant on the wavelength of the light reflected. Don’t worry, that’s about as scientific as we will get.

Let’s say that I see a flower out in a field. The flower has beautiful yellow petals. What shade of yellow are the petals? Are they actually yellow, or are they maybe a dark yellow with a little bit of orange? Maybe a brighter, more greenish yellow? This subtle gradient of color is what we might describe as hue, and it varies infinitely across the color wheel. Controlling the hue of the colors in your image is a great way to bring realism to your photo, or even depart from it using psychedelic alternatives to the actual colors within the scene.

S – What is saturation?

Saturation is much simpler to comprehend. When we talk about saturation, we are referring to the intensity of a color. Saturation can play a central role in controlling the mood of a photograph. Highly saturated colors generally convey brighter emotions, whereas muted, desaturated color can lend a sense of brooding or sadness. What the HSL panel allows you to do is control the saturation of only the colors you choose, which will really expand your creative range.

L – What is luminance?

This may very well be the most easy part about HSL to understand, and requires the least amount of explaining. Luminance is simply the reflective brightness of colors. It is extremely useful when there are certain colors within the image that you feel should be either darker, or brighter. This comes in handy, especially when working with black and white images (converted from color), but more on that in just a moment.

There are a couple of ways to configure the HSL panel, but I prefer to leave each adjustment section open while I work. True, it takes up a fair amount of space in the develop module, but it also let’s me make quick adjustments as I go without switching back and forth between the dedicated hue, saturation, and luminance panels.
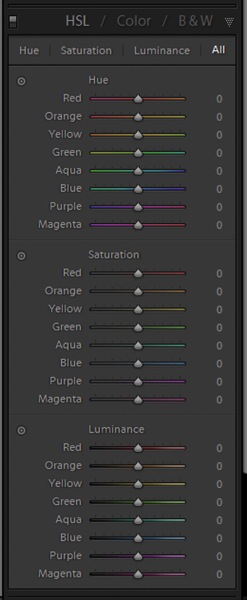
HSL All

Adjusting specific saturations

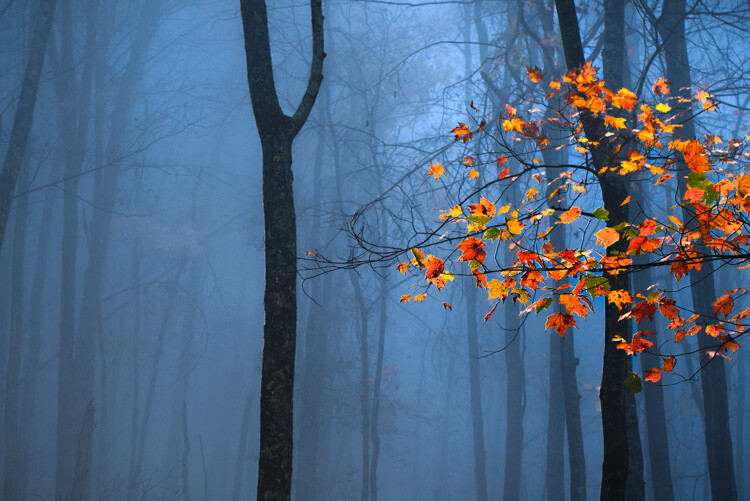
Let’s say you have an image that you want to bring out only certain colors. You can do this by using the saturation slider. An easy way to select the color you want to adjust, is by using the color picker. It eliminates the guesswork of deciding what color is actually which. In this case I want to increase the saturation, brightness, and hue of the leaves, without affecting the blues of the background.
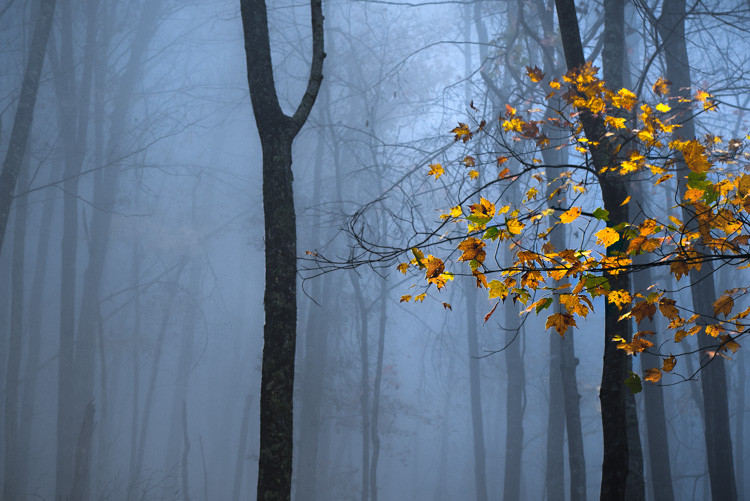
Original Image

Find the saturation section of the HSL panel, and select the picker tool (see red arrow below to locate it).
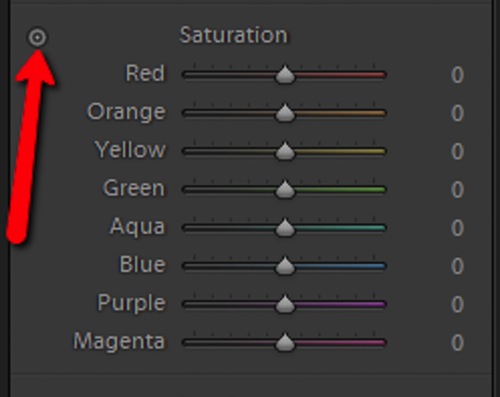
Color Picker

Hover over the color you want to saturate or desaturate. Notice that this will subtly highlight the corresponding color values in the saturation section of the HSL panel. Then simply click and hold while you drag up or down.
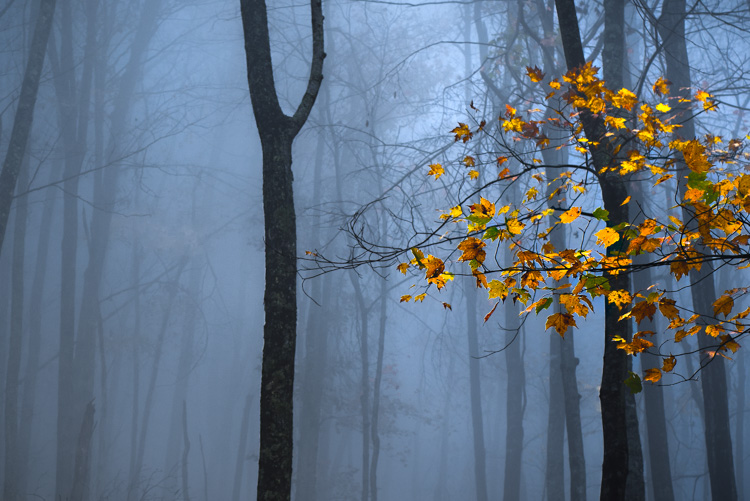
Saturation Image

The change here is barely perceptible for the time being, but after some more adjustments, it will be obvious.

Adjusting specific luminance

Next, we will make the leaves a little bit brighter, so that they stand out from the blue background even more. They mainly consist of oranges and yellows. Go to the luminance section, and again select the color picker tool. This time it will control the brightness of the selected color.

Click and drag (up to lighten, down to darken).
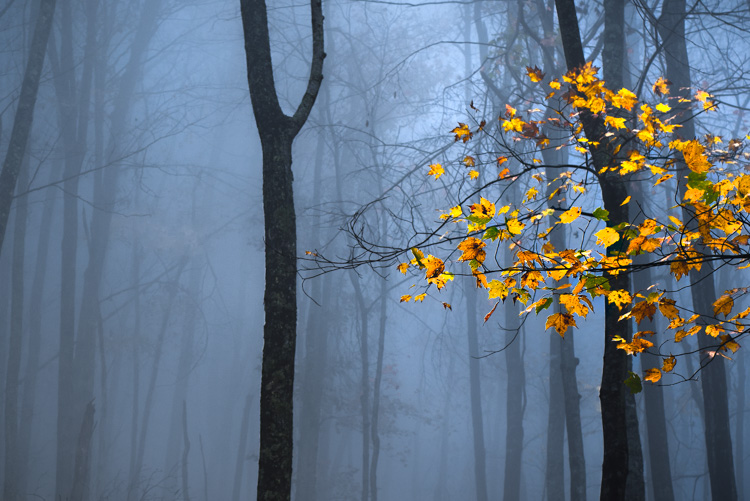
Luminance Image

Adjusting specific hues

I like saving the hue adjustments for last, because it’s easier (for me at least) to decide the final color tone, after it has reached the desired brightness and saturation. For this picture, I want to make the leaves more orange than yellow in hue. As above, locate the hue adjustment section and the color picker and then…you guessed it, click and drag.
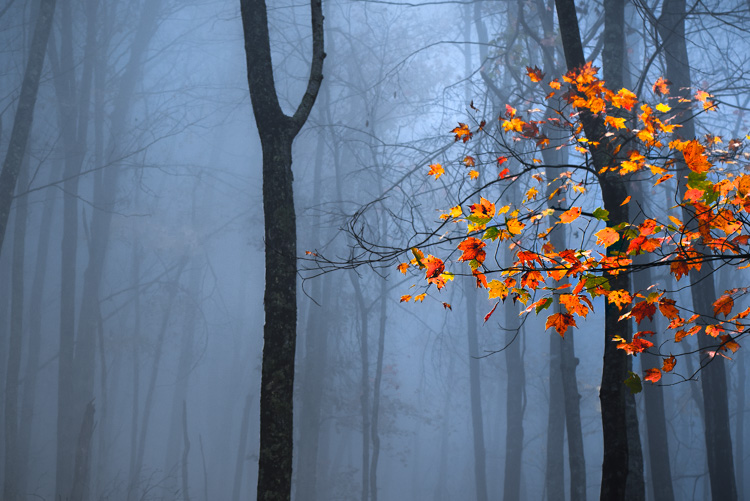
Hue Image

After you finish, make sure to go back and perform any fine tuning using the sliders, in order to get everything just right.
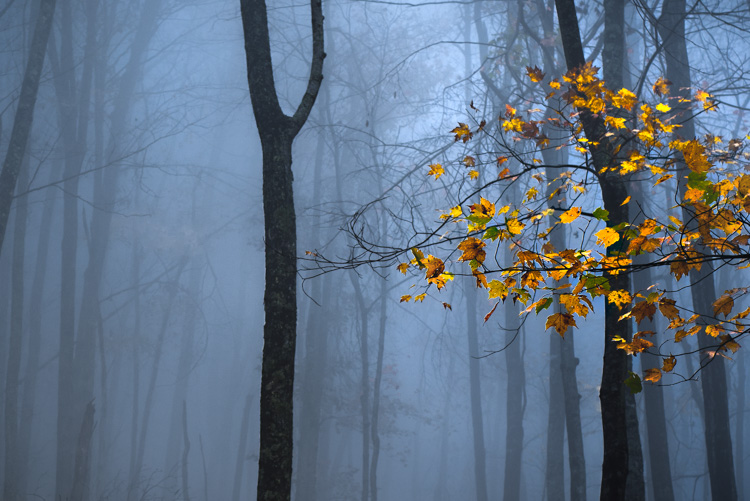
Original Image

Before adjustments

Final Image

After – final image

HSL with Black and White

When it comes to black and white, the HSL panel can work wonders. Of course, seeing as the image is black and white, there won’t be any effect on the hue or saturation of the colors. Rather, Lightroom gives you a completely different set of controls, which is virtually a stand-alone luminance adjustment panel.
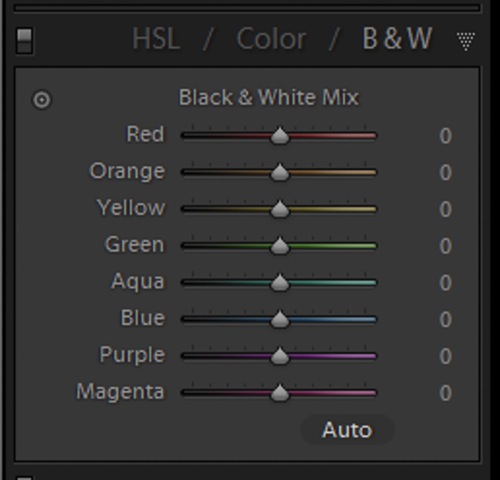
BW Panel

Even though you are working with a monochromatic image, the color information is still stored, so the program knows what color was there, before the conversion to black and white. Keep in mind, this does not apply to images shot in non-RAW format (like JPG) using your camera’s black and white setting, or images which you previously converted to grayscale in Photoshop. Doing so removes all the color information from the image file, making the option for working with individual color luminance in Lightroom unavailable.

By being able to selectively adjust the brightness of each color, you will now be possible to adjust the luminance of your black and whites very creatively. This way, you can really control the contrast and mood of your image much better and easier. Adjusting the luminance of certain colors, within a converted black and white image, can drastically change the way the photo appears to the viewer. Here is color image after being converted to black and white.
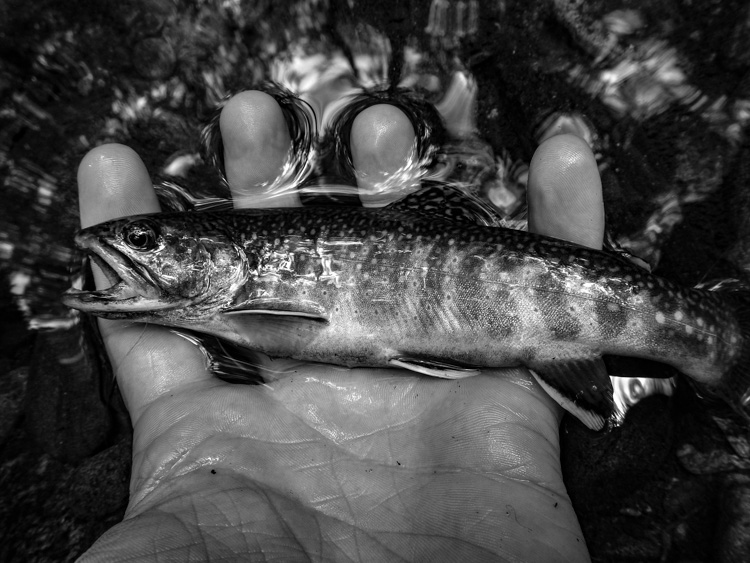
Black and White

Here you see the same image, after some selective adjustments in the black and white section of the HSL panel.
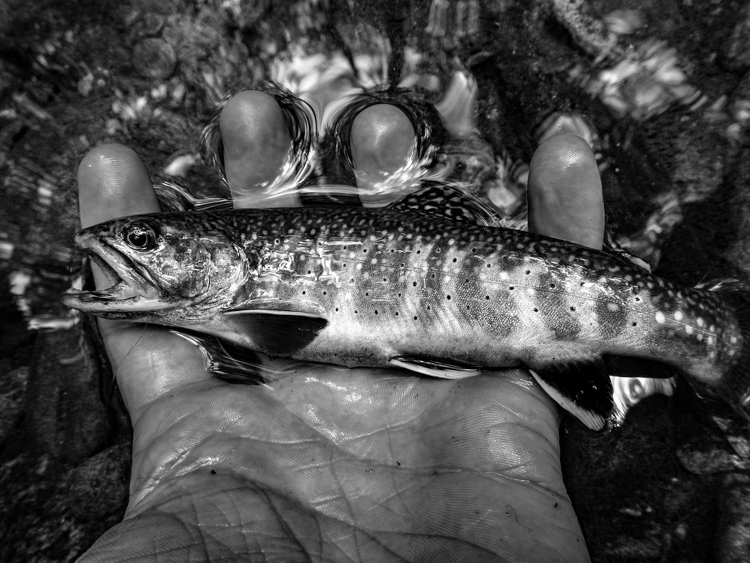
HSL Black and White 2

Working with the HSL panel may look overwhelming, but once you understand how each adjustment affects your photo, it becomes a lot less scary. By being able to adjust the hue, saturation, and luminance of colors, independently of one another, will allow to take a huge amount of creative control over your post-processing. Don’t be reluctant to experiment with HSL and have fun with your photography!

Have you used the HSL panel before? What other tips or tricks to you have for using it? Please share in the comments below.

googletag.cmd.push(function() {
tablet_slots.push( googletag.defineSlot( “/1005424/_dPSv4_tab-all-article-bottom_(300×250)”, [300, 250], “pb-ad-78623” ).addService( googletag.pubads() ) ); } );

googletag.cmd.push(function() {
mobile_slots.push( googletag.defineSlot( “/1005424/_dPSv4_mob-all-article-bottom_(300×250)”, [300, 250], “pb-ad-78158” ).addService( googletag.pubads() ) ); } );

The post Understanding the HSL Panel in Lightroom for Beginners by Adeel Gondal appeared first on Digital Photography School.

Digital Photography School

 
Comments Off on Understanding the HSL Panel in Lightroom for Beginners

Posted in Photography


CreativeLive Photo Week: Watch DPReview on Media Panel

03 Oct

As part of CreativeLive’s annual ‘Photo Week’, DPReview took part in a panel discussion with other members of the photography industry to discuss technology, photography, and a lot more besides. Read more

Articles: Digital Photography Review (dpreview.com)

 
Comments Off on CreativeLive Photo Week: Watch DPReview on Media Panel

Posted in Uncategorized


How to Make a DIY Light Panel or Scrim

07 Apr

how-to-guide-banner

In an earlier article we discussed 10 reasons why you should consider using a light panel instead of a softbox for your next shoot. In this, part two, I am going to:

  • Show you how to create your own self-standing PVC light panel frames and accessories
  • Share some cheap fabric alternatives to use with your new frames
  • Offer helpful tips on making them stronger and easier to assemble

Before we get started, I want to talk a little bit about the size of our panels versus what you may buy online. There are a lot of different brands of frames out in the market, and most of them top out at around 72”. A six foot tall panel might sound plenty big, but when you are shooting someone who is tall, you are not going to have the area of coverage you need around your model’s head. To remedy this, you will have to attach the panel to your light stands, using an adapter, to raise it off the floor.

The panels we are going to create measure in at roughly seven feet tall, giving you a little more headroom and allowing you to free up your light stands for things such as… lights!

With that being said, while the panel part of this project is pretty quick and easy, creating the fabrics can be a bit more daunting, especially if you are uncomfortable around a sewing machine.

If you do not want to tackle making your own fabrics, you can still clamp large pieces of fabrics to the frame – such as bed sheets. Another option would be to build your frames to the smaller dimensions as a name-brand panel, then purchase the fabrics from that company. The money you save building the panels might even be enough to cover the cost of the fabrics.

Here are the main things you are going to need to create your panel:

List of Tools for Creating the Frame

  1. Ratcheting PVC cutter or shears
  2. Measuring tape
  3. A marker

As far as PVC goes, your local hardware store will most likely have two lengths to choose from. Depending on how you are going to transport the PVC, you can choose between the standard 10 foot sections or pre-cut five foot sections. The 10 foot sections will save you more money, but getting them home may prove a bit tricky, unless you have a long vehicle such as a truck, SUV, or van.

I like to build my panels out of ¾” Schedule 40 pipe. Schedule 40 is both rigid and lightweight. If you decide to buy the PVC in 10 foot sections, you will need three pieces per panel. If you go with five foot sections, you are going to need six pieces per panel.

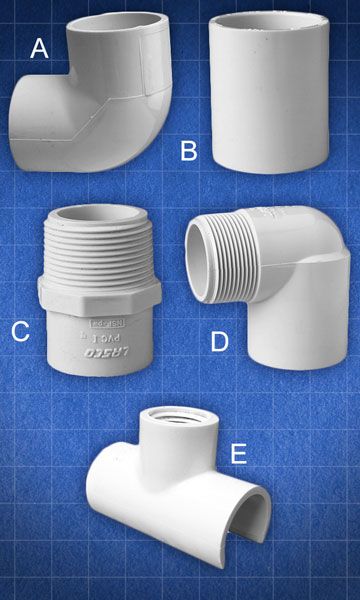
As far as fittings, you are going to need: (all fittings Schedule 40)

  • Eight 90 degree ¾” elbows
  • Two ¾” couplers
  • Two ¾” slip to threaded adapters
  • Two ¾” slip to threaded street elbows
  • Four ¾” threaded saddle tees
fittings

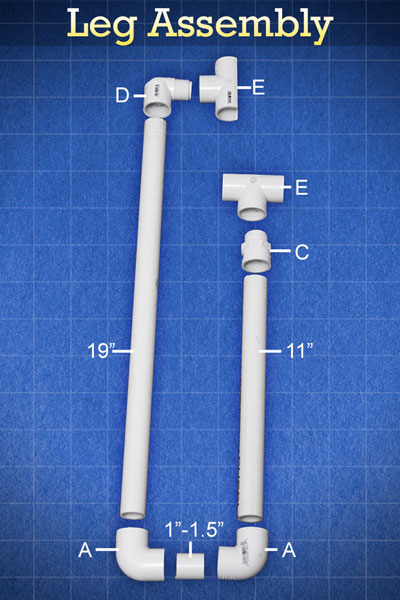
(A) 90 degree ¾” elbow (B) ¾” coupler (C) ¾” slip to threaded adapter (D) ¾” slip to threaded street elbow (E) ¾” threaded saddle tee

That should do it. Let’s get started on the panel.

Measure and mark

With your tape measure and marker, measure and mark your cuts on each section of pipe. When measuring your cuts, be sure to start your measurement from the last mark you made.

Your marks need to be at:

For 10’ pipe

Piece 1

  • Mark 1 – 40.75” (103.5 cm)
  • Mark 2  – 40.75“ (103.5 cm)
  • Mark 3 – 19” (48.3 cm)
  • Mark 4 – 19” (48.3 cm)

Piece 2

  • Mark 1 – 40.75” (103.5 cm)
  • Mark 2  – 49.5“ (125.7 cm)
  • Mark 3 – 11” (27.9 cm)
  • Mark 4 – 11” (27.9 cm)

Piece 3

  • Mark 1 – 49.5” (125.7 cm)
  • Mark 2  – 40.75“ (103.5 cm)

For 5’ pipe

Piece 1

  • Mark 1 – 40.75” (103.5 cm)
  • Mark 2  – 19“ (48.3 cm)

Piece 2

  • Mark 1 – 40.75” (103.5 cm)
  • Mark 2  – 19“ (48.3 cm)

Piece 3

  • Mark 1 – 40.75” (103.5 cm)
  • Mark 2  – 11” (27.9 cm)

Piece 4

  • Mark 1 – 40.75” (103.5 cm)
  • Mark 2  – 11” (27.9 cm)

Piece 5

  • Mark 1 – 49.5” (125.7 cm)

Piece 6

  • Mark 1 – 49.5” (125.7 cm)

Once you have finished marking all of your cuts, take your PVC cutters or shears, and cut out all the pieces. When you’re done you should have:

  • Panel Sides: four  40.75” pieces
  • Panel Top and Bottom: Two 49.5” pieces
  • Leg 1: One 11” and one 19” piece
  • Leg 2: One 11” and one 19” piece

Next, take one of your leftover scrap pieces and cut two small sections of pipe, roughly 1.25” inches in length. These will later be inserted into the elbow joints of the legs, so that they can pivot.

Assembly

panel-construction-diagram

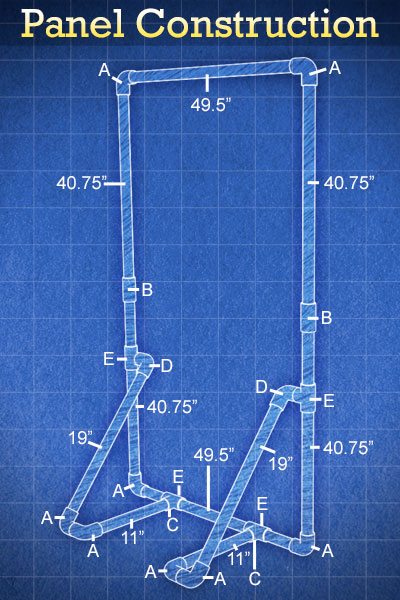
Assembly diagram showing each length of pipe, and each fitting, that make up the completed light panel. Letters coincide with above fitting diagram.

To create the sides of the panel, join together the ends of two side pieces with a coupler. Next, connect the top and bottom sections to the side pieces using 90 degree elbows.

Three short sections of PVC are all that make up the feet for your panel. First, add a 90 degree elbow to the 19″ and 11″ pieces of pipe. Attach the threaded coupler adapter to the other end of the 11” piece, then attach the 90 degree street elbow to the other end of the 19” piece. Next, screw a threaded saddle tee connector onto each of the threaded adapters. Finally, join the two pieces together by inserting the small piece of PVC between the two 90 degree elbows. You should now have a pivoting leg that can snap onto your panel, so that it can stand on its own without having to attach it to a light stand.

leg-assembly

Assembly diagram showing how to assemble the snap-on panel legs. Letters coincide with the above fitting diagram.

*Quick Tip*

The shape of the legs are great for placing sandbags on, whenever you are on location and it is breezy.

Fabrics

I have three main types of fabric that I always keep handy. Diffusion, black, and white. You should be able to find everything you need at your local fabric store. For the diffusion panel, I use a white (translucent) rip-stop nylon. For the black, I use a nylon material. Make sure that it does not let a lot of light pass through it, that it’s fairly opaque. For white panels, I found that the white lining of blackout curtains works awesome! It does not have to be hemmed, and it does not allow light to pass through it, which seems to make it a very efficient bounce source. Just make sure you pick the whitest blackout fabric you can find. (The fabric comes in off-white colors, as well.)

The fabrics for the panels can be made by cutting out pieces of material, about 2-3 inches larger than the  4’ x 7’ frame, then hemming them. Hemming is not required but will keep the edges tidy and professional looking.

To make the fabric panels easier to attach to the frames, sew 10” strips of wide elastic on a diagonal to the back corners of each piece. Once added, attaching the panels to the frames is as easy as slipping each corner into the elastic pocket.

elastic-strip

Example of elastic strip pocket, created to make fabrics easier to attach to panel frame.

At this point, you have pretty much finished your DIY light panel. Now, I am going to show you some additions that will make your light panel even more versatile.

Accessories

Crossbar

A crossbar is a great thing to add to your panel for extra strength in outdoor windy conditions, and it can make the panel a lot easier for an assistant to hold and position.

To add a crossbar to your panel, just cut out an extra 49.5” section of PVC, the same size as the top and bottom sections of our panels. Next, replace the couplings on each of the side pieces with a ¾” tee. This will give you a channel to attach your crossbar to. That is all there is to it!

A Bungee or Shock Cord

If you decide to make more than one panel, you are soon going to realize how cumbersome it is to dump out all the individual pieces and sort through them.

To make your life a little easier, you can use a 23 foot length of thin elastic bungee (shock) cord and run it through each piece of your panel. The bungee cord keeps all your pieces together when the panel is broken down, and the slight tension helps pop the pieces into place when you are ready to set things up.

To add the shock cord to your frame, lay out all the un-assembled pieces on the ground and start feeding the elastic cord through the PVC. Next, pull the two ends of the bungee cord tight until the ends of the frame touch each other, then tie the ends together. Finally, cut off and discard any extra cord.

Single and Double Clips

clips

Single and double clips are an essential accessory to carry in your bag, along with your panels. Single clips offer a great way to attach pieces of fabric to your frame, or further secure your fabrics for windy conditions.

Things Needed to Make Clips:

  1. Measuring Tape
  2. Marker
  3. 5’ section of 1” Schedule 40 Pipe
  4. Ratcheting PVC Cutter/Shears
  5. Dremel tool with cutting and grinding attachment
  6. PVC cement
  7. C-Clamp

To create a single clip, cut a 2” section of pipe using your shears. Next, use a Dremel tool fitted with a cutting wheel to cut a section from the PVC. (Use the circumference diagram below as a reference, to produce a sufficient clip.) Once you finish cutting out the section, use a grinding attachment to bevel, smooth, and round any rough edges.

clip-cut-diagram

Double clips are made by cementing two single clips together, then attaching a c-clamp to them until the cement dries. These clips do an awesome job of attaching two or more frames together. For instance, by using double clips, you can create a giant 8’x7’ diffusion source, bounce source, or v-flat.

Adding Strength

Though PVC frames are cheap and lightweight, their strength does not stand up to their commercial aluminum counterparts. If you find that you are needing your panel frames to be stronger and more rigid, there are a few things that you can do to strengthen them without adding a lot to their weight. (The only downside of each method is that you won’t be able to use bungee cord to keep the panels together.)

Spray Foam

Filling your tubes with spray foam might be the easiest way to add stiffness and strength to your panels. To insure that there are no voids left in the pipe during the filling process, drill a few small holes along the length of each section. The holes should be just large enough to stick the straw of the spray foam through. Once each section is filled, make sure that it is placed on a flat surface, otherwise it will stay bent once the foam dries.

Dowel Rods

Wooden dowel rods are another great way to strengthen your PVC frames. This method will require a saw to cut off the excess ends of the dowels. A ¾” dowel will not fit snugly into most ¾” pipe. (The inner diameter of the pipe is more around .8”.) To remedy this, try wrapping the ends of the dowels in a few layers of gaffer or duct tape, then hammer them into the pipes using a rubber mallet. You can also try applying a large glob of PVC cement to the rod before placing it inside the tube. Once the cement dries, it should hold the dowel in place.

Closing Thoughts

I hope this article has proven helpful and has made you excited to start using light panels in your photography. If you have not yet read the first article entitled “10 Reasons to Ditch Your Softbox for a Light Panel”, I encourage you to do so. This article shows the benefits of using a light panel over a softbox and shares techniques that will help you get the most out of using one.

Until next time, go out, have fun, experiment and create something awesome!

googletag.cmd.push(function() {
tablet_slots.push( googletag.defineSlot( “/1005424/_dPSv4_tab-all-article-bottom_(300×250)”, [300, 250], “pb-ad-78623” ).addService( googletag.pubads() ) ); } );

googletag.cmd.push(function() {
mobile_slots.push( googletag.defineSlot( “/1005424/_dPSv4_mob-all-article-bottom_(300×250)”, [300, 250], “pb-ad-78158” ).addService( googletag.pubads() ) ); } );

The post How to Make a DIY Light Panel or Scrim by Joel Dryer appeared first on Digital Photography School.

Digital Photography School

 
Comments Off on How to Make a DIY Light Panel or Scrim

Posted in Photography


Video: DPReview panel at CreativeLive’s Gear Day 2015

20 Mar

Recently we joined our friends at CreativeLive for a panel discussion as part of their 2015 Gear Day. Our live discussion centered on the continued rise of mirrorless cameras, 4K video and what it means for stills photographers, the benefits and pitfalls of high pixel sensors, and of course, lots of new and exciting gear. Watch the segment and nerd out with us all over again. See video

Articles: Digital Photography Review (dpreview.com)

 
Comments Off on Video: DPReview panel at CreativeLive’s Gear Day 2015

Posted in Uncategorized


10 Reasons to Ditch Your Softbox for a Light Panel

11 Mar

So you want to create soft, beautiful light? One of the first light modifiers that comes to your mind is probably the tried and tested softbox. But, when it comes to versatility, are softboxes really worth the money? In this article, we are going to look at a viable contender to the age-old softbox – the light panel.

Now, the goal of this article is not to bash softboxes, I personally have nothing against them. I own several and use them whenever I feel that they are the right tool for the job. However, my go-to light modifier for the majority of my photography is the light panel. Why? I am glad you asked. Here are 10 reasons why you should consider using a light panel instead of a softbox for your next shoot.

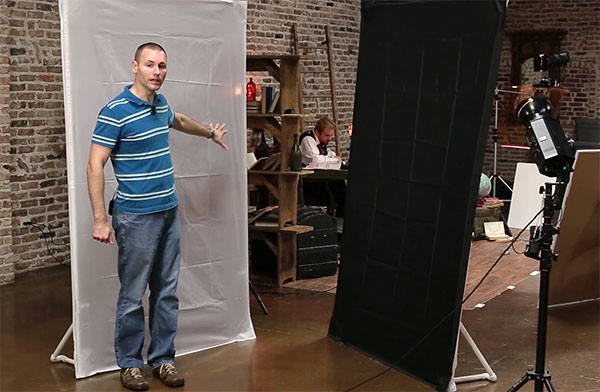
Wide shot of two light panels

Wide shot of two self-standing PVC light panels fitted with diffusion and black fabric. The diffusion fabric is used like a large softbox, while the black fabric is used to flag or block light.

#1. They are inexpensive

For under $ 50 you can create a self-standing light panel that is larger than softboxes costing more than $ 300!

#2. They are easy to make

You can make a basic panel frame and legs with nothing more than a hacksaw. However, a pair of PVC shears is a great investment and will make your job a lot easier.

#3. Quickly change the size/quality of the light

Moving the light closer or further from a panel fitted with diffusion fabric can quickly create a different size softbox effect (closer to the panel = smaller light/harder quality versus further from the panel = larger light/softer quality). Since the panel and light are separated, the panel becomes the source of illumination and can remain in the same stationary position, in relation to the subject, throughout the entirety of the shoot.

#4. Easily change the shape of the light

By clamping pieces of black fabric over a panel fitted with diffusion material, you can create light sources of different shapes. This is a great technique if you want to create a tall, thin stripbox effect, or if you only need to use a portion of the panel.

#5. Different fabrics = different light modifiers

While softboxes can be sort of a one-trick pony, light panels can easily be turned into flags (to block light) or reflectors, just by changing out the fabric. I love to add black material to my panels and use them as flags to shape the light. I also like to use opaque white fabric to reflect and bounce light. It makes a beautiful fill for both indoors and out.

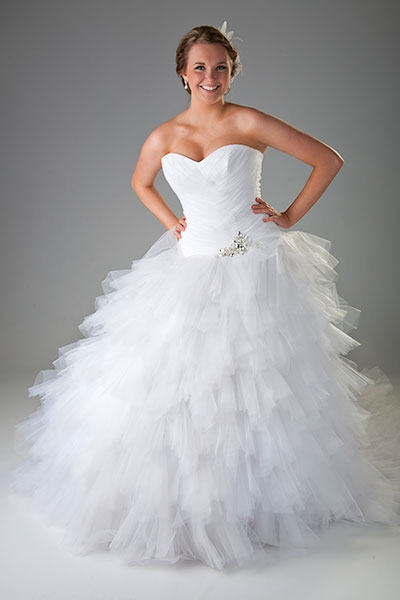
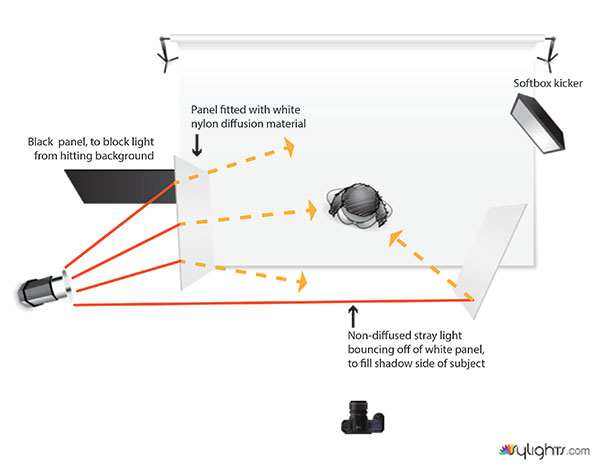
One of the coolest things you can do with light panels is harness the stray light from your strobe, to create multiple sources from one light. I oftentimes shoot through a diffused panel, then reflect some of the stray light back into the shadow side of the subject, using a second panel fitted with a white reflective material (as seen in the figures below).

portrait of bride lit with light panels

A bridal portrait primarily lit using two light panels

diagram showing how to bounce stray light with light panels

Using two panels to create a large soft key and fill from one light source. The white reflective panel was placed where stray, un-filtered, light was able to strike the front edge, which opened up the shadows more than if it were only allowed to bounce the light coming from the diffusion panel. A black panel was added to keep the light from spilling onto the background. It could have been removed, lighting the background and essentially filling the job of three lights (background, key and fill lights).

#6. No speed rings required

Speed rings can be such a hassle. After shelling out serious cash for a new softbox, the last thing you want to do is buy an adapter so you can actually use it. It can be a one-time cost, but if you ever change brands of lights you are most likely going to need a whole new set. Want to add a softbox to your speedlights? Well, you are going to need another type of speed ring adapter for that, too. With light panels, no matter the type of light source, all you have to do is place your light behind the panel and start shooting. Which brings me to #7 on our list.

#7. Home Depot light friendly

If you are just starting out and you want to try your hand at lighting with inexpensive Home Depot shop lights, then light panels are the best way to soften them. Stick multiple lights behind a panel fitted with diffusion fabric, or bounce them off a piece of white fabric to create a soft, bright, single source that can be used for photography or video. Now, all you will need is a good air conditioner to manage the heat!

#8. Gelling made easy

Have you ever tried to gel a softbox? It can be a tremendous waste of gel. Especially if your softbox is large. By shooting through a diffusion panel, you are able to attach a small square of gel to your strobes reflector, allowing you to purchase your gel in small sheets instead of giant rolls. For instance, at the time of this writing a 20×24” sheet of Rosco CTO gel cost roughly $ 7.50, as opposed to a 20”x25’ roll, which cost around $ 94.

#9. Better reflections for your product photography

Softboxes are made to distribute the light evenly over the face of the outer diffusion panel. Even with the inner baffle removed, the reflective interior creates a fairly even spread of light. When lighting reflective objects, this evenness can sometimes be a bad thing. Notice the gradated reflections in the two images below. This is the kind of reflection you will typically get when placing a light behind a light panel. Take note on how it adds contrast, depth and interest to the scene.  If these same images were lit using a softbox, the reflection would be an even tone, with no gradation or falloff.

jewelry product shot using overhead light panel

Light placed behind light panel creates gradated reflection in black reflective paper.

jewelry product shot using a gelled strobe and light panel

Another example of the pleasing gradation light panels reveal in reflective surfaces. The same reflective black paper from the first example is used, but the light has been gelled blue.

#10. Portable walls

Have you ever been out on a remote location where you have needed a changing area for your model? You can easily create a makeshift changing room by attaching three or four panels together using connector clips, then covering them with black fabric. If it is windy, throw some sandbags on the bottom of each panel to weigh them down, for good measure.

I hope this article has given you a little more insight on how versatile and economic light panels can be.

Many companies make and sell light panels. They are usually made from light-weight aluminum and are relatively inexpensive, compared to softboxes. However, you can save a lot of money by making your own frames out of PVC.

In a future article I will:

  1. Show you how to create your own self-standing PVC light panel frames and accessories
  2. Offer helpful tips on making them stronger and easier to assemble
  3. Share some cheap fabric alternatives to use with your new frames

Until then, go out, have fun, experiment and create something awesome!

googletag.cmd.push(function() {
tablet_slots.push( googletag.defineSlot( “/1005424/_dPSv4_tab-all-article-bottom_(300×250)”, [300, 250], “pb-ad-78623” ).addService( googletag.pubads() ) ); } );

googletag.cmd.push(function() {
mobile_slots.push( googletag.defineSlot( “/1005424/_dPSv4_mob-all-article-bottom_(300×250)”, [300, 250], “pb-ad-78158” ).addService( googletag.pubads() ) ); } );

The post 10 Reasons to Ditch Your Softbox for a Light Panel by Joel Dryer appeared first on Digital Photography School.


Digital Photography School

 
Comments Off on 10 Reasons to Ditch Your Softbox for a Light Panel

Posted in Photography


High pixel-density camera displays and wide-gamut Cinema 4K panel technology on the way

04 Nov

Reports from Japan’s Display Innovation 2014 exhibition highlight a number of advancements and prototypes in camera LCDs. Included are a high-pixel-density 3.2″ display using WhiteMagic technology, a high-resolution touch screen with in-cell touch sensors and a 31″ cinema 4K wide-gamut display with 99.5% AdobeRGB coverage from LG. Learn more

Articles: Digital Photography Review (dpreview.com)

 
Comments Off on High pixel-density camera displays and wide-gamut Cinema 4K panel technology on the way

Posted in Uncategorized


New Zazzle Products Panel

24 May

BlogPhoto

 
Comments Off on New Zazzle Products Panel

Posted in Equipment


Google updates Image Search with preview panel

29 Jan

shared:google.png

Google has rolled out an updated version of its Image Search feature with faster browsing speeds and a redesigned UI. Users can now view larger versions of images in a preview window with an option to flip through images using arrow keys, and limited metadata, including the pixel dimensions of the original file, is displayed alongside the thumbnail. Click through for more information and a link to Google’s blog post.

News: Digital Photography Review (dpreview.com)

 
Comments Off on Google updates Image Search with preview panel

Posted in Uncategorized


Making Basic panel adjustments in Camera Raw | lynda.com tutorial

31 Oct

This Camera Raw tutorial discusses how to make image adjustments using the Basic panel and the Crop tool. Watch more at www.lynda.com This specific tutorial is just a single movie from chapter ten of the Photoshop CS5: Athletic Retouching Projects course presented by lynda.com author Chris Orwig. The complete Photoshop CS5: Athletic Retouching Projects course has a total duration of 6 hours and 9 minutes, and covers removing blemishes from the subject and the background, adding motion blur, enhancing muscle tone, making adjustments to photos shot in an outdoor setting, and more. Photoshop CS5: Athletic Retouching Projects table of contents: Introduction 1. Outdoor Portrait 2. Simplicity 3. Strength 4. Speed 5. Gym Workout 6. Energy 7. Pushup 8. Indoor Track Sprint 9. Enhancing Strength 10. Surfer Portrait 11. Underwater Portrait 12. Jump 13. Father and Son Portrait Conclusion

Check out Bas Rutten’s Liver Shot on MMA Surge: bit.ly In this video, Mahalo expert Justin Z. briefly explains how the Sharpen tool works in Photoshop. Sharpen Tool ——————————————————————— The Sharpen tool is a neat feature that allows you to make pixels look slightly more jagged. On photographs, it will help create a sharpened effect that will make the selection look clearer. 1. To access this tool, click and hold the “teardrop” icon in the tool bar. Drag down to the tool that looks like a “triangle” that says Sharpen Tool.2. Click and drag on a portion of your canvas to see the effect. This tool can prove useful for both enhancing and hiding blur created by photographs. You can use it for all kinds of effects.3. The top Options panel has a few choices: * Brush Size and Stroke * Strength (which determines how much blur will be created with each stroke) * All Layers (which allows you to use the Sharpen tool on all layers at once) Read more by visiting our page at: www.mahalo.com
Video Rating: 5 / 5

 
Comments Off on Making Basic panel adjustments in Camera Raw | lynda.com tutorial

Posted in Retouching in Photoshop


Batman Year One SDCC 2011 Panel with Bryan Cranston, Ben McKenzie & Kate Sackhoff

25 Oct

Check out more at www.bkbn.net & http Doyou like High End SuperHero & Video Action Figures, Statues, or Replicas? Love them at Great Prices? Then You Will LOVE URBAN COLLECTOR. Buy DC Direct, Kotobukiya, NECA and MORE at www.urban-collector.com Check out http Your #1 Source For Geek News, Reviews, & More! Everything toys, comics, video games, movies, cartoons, & more is here! Subscribe to the BKBN Crew at www.youtube.com www.youtube.com www.youtube.com www.youtube.com www.youtube.com www.youtube.com www.youtube.com www.youtube.com www.youtube.com Intro by KorimTV Subscribe to him at www.youtube.com Subscribe to my Vlog Channel at www.youtube.com Check Out The BIG KIDS! BIG NEWS! Podcast Every Week at www.bkbn.podomatic.com with http www.youtube.com www.youtube.com www.youtube.com Twitter Me! www.twitter.com Follow Me on Dailybooth at www.dailybooth.com My Blog, Videos, Updates, News & Reviews at www.longshotdreams.com and http If you like my vids please subscribe to my channel. Sundays 1pm-3pm Pacific Standard Time Special Fan Live Show Wednesdays 3pm to Whenever on www.blogtv.com Support My Friends Sites www.jonbaileyVO.net http boxintypex.blogspot.com korimtvfilms.webs.com realistikkvideos-realistikk.blogspot.com www.enclinedesigns.com http
Video Rating: 5 / 5

 
Comments Off on Batman Year One SDCC 2011 Panel with Bryan Cranston, Ben McKenzie & Kate Sackhoff

Posted in Animation Videos