RSS
 

Posts Tagged ‘Movie’

Stripped: 12 Sleazy Abandoned Adult Movie Theaters

01 Aug

[ By Steve in Drawing & Digital. ]

abandoned-adult-theater-1a

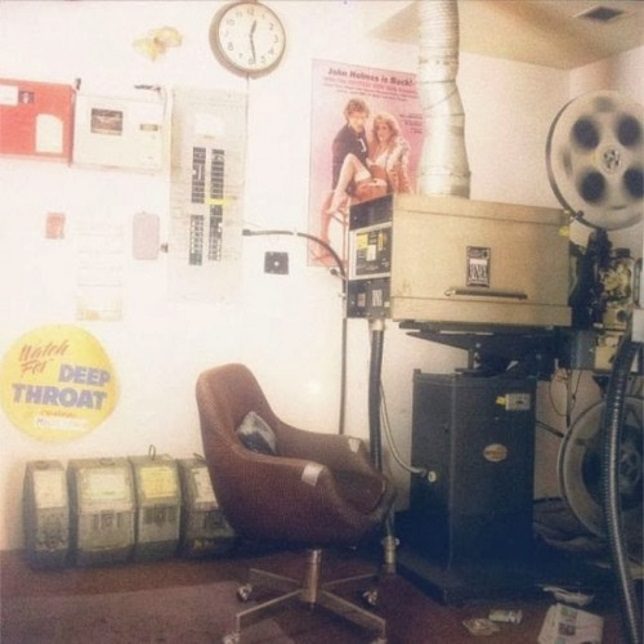
These 12 abandoned adult movie theaters hark back to the days before the advent of the internet let porn aficionados get their kicks without leaving home.

abandoned-adult-theater-1c

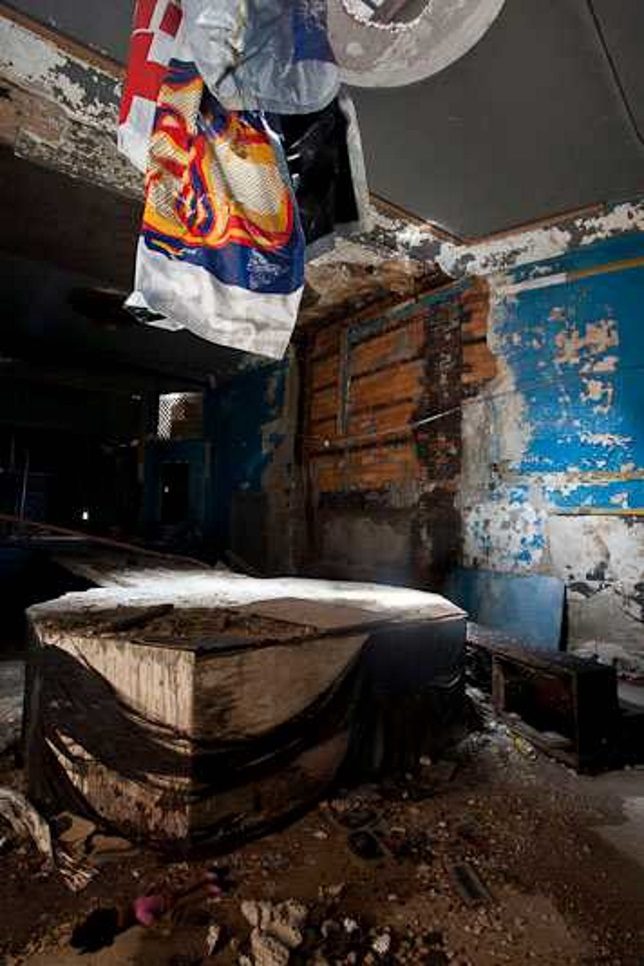
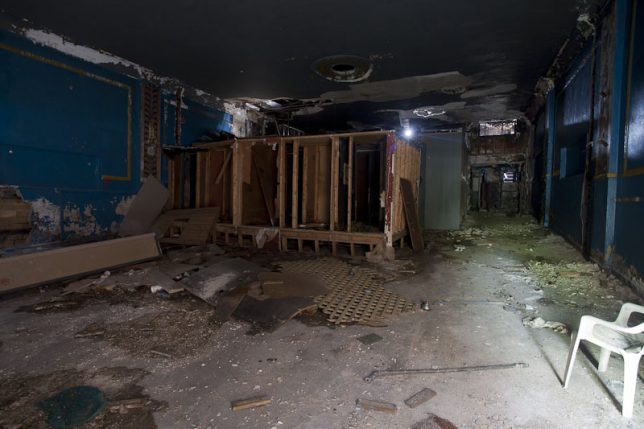
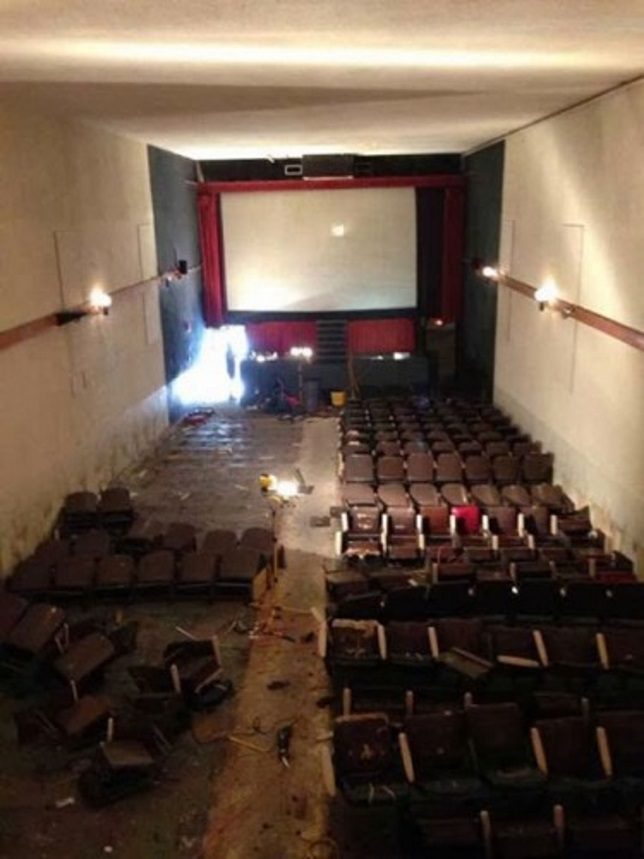
The bedraggled Franklin Theater was once a posh picture-show palace that seated 350 privileged patrons per sitting. Opening in the late 1920s – arguably Detroit’s golden age – the Franklin gradually deteriorated along with the rest of the Michigan metropolis. The name was changed to “Guild” in 1962 and the fare fell from first-run flicks to foreign art films to, finally, xxx-rated offerings. Kudos to Detroiturbex.com for snapping these gritty images.

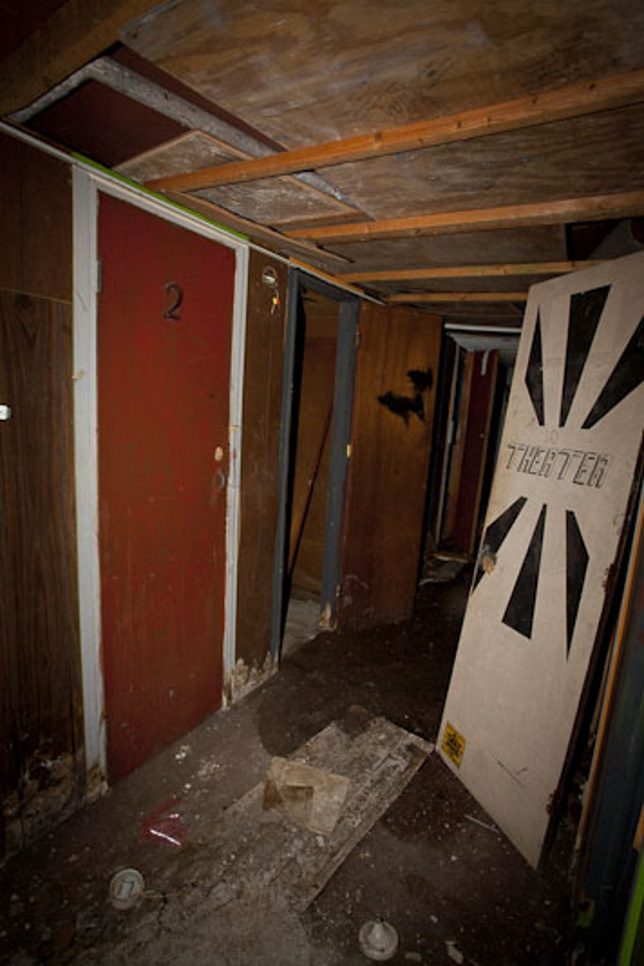
Private "entertainment" booths.

abandoned-adult-theater-1e

Like many movie houses forced by changing economic conditions to cater to society’s baser desires, the Franklin/Guild installed private “entertainment” booths in 1992. This audience-friendly feature allowed the theater to hang on another decade or so until it met the sad fate common to far too many Detroit establishments: abandonment, neglect and vandalism.

Flickering Out

abandoned-adult-theater-2a

The Kinsei Theater in Yokosuka, Japan managed to hold out well into the 21st century though more recent photos appear to show a more expected outcome. As grungy as it looks, the Kinsei Theater hasn’t decayed much from its heyday… perhaps inherent grungy-ness comes standard when one opens an adult theater.

Roll Credits

abandoned-adult-theater-3d

abandoned-adult-theater-3c

abandoned-adult-theater-3a

abandoned-adult-theater-3b

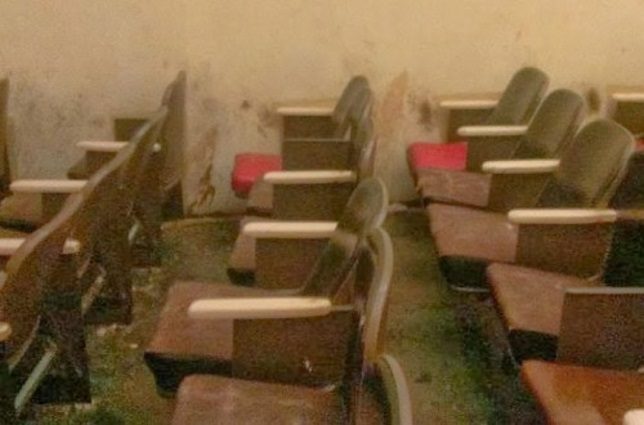
This unnamed abandoned adult theater doesn’t look too grotty in the light… provided said light isn’t of the UV variety. Credit the nice folks at Bugaga.me for the images above; hopefully they washed up REAL good after they left.

Ex-Salax

abandoned-adult-theater-4a

abandoned-adult-theater-4b

Flickr user Emanuele (zak mc) captured the rich tableau above on September 5th of 2012. A casual crowd of all ages traverses the Seville, Spain street completely oblivious to the decrepit SALA X adult movie theater moldering away on the sidelines. Note the curious upside-down sign just to the right of the theater. Contrast Emanuele’s take of the SALA X with the monochrome shot by Alejandro Pacheco taken – presumably at night – two years earlier.

Next Page – Click Below to Read More:
Stripped 12 Sleazy Abandoned Adult Movie Theaters

Share on Facebook


[ By Steve in Drawing & Digital. ]

[ WebUrbanist | Archives | Galleries | Privacy | TOS ]


WebUrbanist

 
Comments Off on Stripped: 12 Sleazy Abandoned Adult Movie Theaters

Posted in Creativity


4K from Space: ISS astronauts shoot 3D movie of planet Earth

07 May

Astronauts based on the International Space Station have been working as movie makers to help create a 3D film featuring the planet Earth as viewed from space. A Beautiful Planet was shot in 4K using Canon’s cinema camera system, and will be shown in IMAX theaters from the end of the month. The film includes dramatic views of the planet lit up at night as well as overhead perspectives on weather systems and the Northern Lights.

A Beautiful Planet IMAX® Trailer

Footage for the film was collected by six space station astronauts over the course of three missions from November 2014, after Canon EOS C500 and EOS-1D C cameras were delivered to the ISS via an unmanned supply ship with a collection of lenses. Made in association with NASA, the film aims to educate viewers about Earth, but also to highlight the effects humanity has on the planet.

For more information on the film and where you can see it visit the IMAX website.

Press release

IMAX® Film ‘A Beautiful Planet’ Features “Out Of This World” Canon 4K Imagery

Using Canon Cameras and Lenses, Teams Shooting from the International Space Station Capture Breathtaking Images of Our Planet from a Vantage Point Few Get to See

MELVILLE, N.Y., April 14, 2016 – The future of 4K filmmaking is looking up — in fact, all the way to space. A Beautiful Planet, the latest 3D space documentary from acclaimed filmmaker Toni Myers and IMAX Entertainment, made in cooperation with NASA, will premiere in IMAX in New York on April 16 and was shot primarily in space using Canon cameras and lenses.  The film will be shown to the public exclusively in IMAX® and IMAX® 3D theaters beginning April 29.

The Canon EOS C500 4K Digital Cinema Camera and EOS-1D C 4K cameras were transported from Earth to the International Space Station (ISS) in November 2014 via an unmanned supply ship, and were received by NASA astronaut Terry Virts, astronaut Samantha Cristoforetti from the European Space Agency and Cosmonaut Anton Shkaplerov. This was the first time that 4K cameras were brought aboard the space station for a commercial film project. During a six-month mission at the ISS, Virts, Cristoforetti and Shkaplerov worked closely with NASA astronauts Kjell Lindgren, Butch Wilmore, Scott Kelly, and Kimiya Yui of the Japan Aerospace Exploration Agency (JAXA) to take turns using Canon’s advanced digital cameras and lenses to film footage of lightning storms, the continents, volcanoes, coral reefs and bright city lights on Earth for the film. One of the film’s greatest and most dramatic highlights, the striking imagery of the Northern Lights–or the aurora borealis– was captured by NASA astronaut Kjell Lindgren. These awe-inspiring images were previously unattainable in such stunning resolution.

The Canon EOS C500 4K (4096 x 2160-pixel) Digital Cinema Camera is capable of originating uncompressed RAW output for external recording to meet the demands of premium cinematic productions and other top-quality production markets. It features a Super 35mm, 8.85-megapixel CMOS image sensor, DIGIC DV III Image Processor and an expansive range of recording and output options specifically for 4K and 2K image acquisition. The compact, lightweight Canon EOS-1D C Digital SLR camera delivers outstanding video performance and provides video recording at 4K (4096 x 2160-pixel) or Full HD (1920 x 1080-pixel) resolution to support high-end motion picture, television production and other advanced imaging applications.

‘A Beautiful Planet’ joins Canon at NAB
A gallery of still images taken on the ISS with the Canon EOS-1D C camera and Canon lenses during the shooting of the film will be shown at the Canon booth # C4325 at the National Association of Broadcasters (NAB) trade show, April 18-21, 2016 in Las Vegas, NV. During NAB, the film’s Director of Photography, James Neihouse, ASC, will speak at Canon’s stage on the challenges and benefits of shooting in space. Joining him will be Marsha Ivins, a consultant on the film, former NASA astronaut, and a veteran of five space shuttle missions. Neihouse has worked on more than 30 IMAX films including Space Station 3D and Hubble 3D and trained more than 25 shuttle and space-station crews on the intricacies of large-format filmmaking.

The documentary, A Beautiful Planet was produced, written, and directed by Toni Myers, and is narrated by Academy Award®-winning actress Jennifer Lawrence.

About A Beautiful Planet
A Beautiful Planet is a breathtaking portrait of Earth from space, providing a unique perspective and increased understanding of our planet and galaxy as never seen before. Made in cooperation with the National Aeronautics and Space Administration (NASA), the film features stunning footage of our magnificent blue planet — and the effects humanity has had on it over time — captured by the astronauts aboard the International Space Station (ISS). From space, Earth blazes at night with the electric intensity of human expansion — a direct visualization of our changing world. But it is within our power to protect the planet. As we continue to explore and gain knowledge of our galaxy, we also develop a deeper connection to the place we all call home. From IMAX Entertainment and Toni Myers — the acclaimed filmmaker behind celebrated IMAX® documentaries Hubble 3D, and Space Station 3D — A Beautiful Planet presents an awe-inspiring glimpse of Earth and a hopeful look into the future of humanity.

Articles: Digital Photography Review (dpreview.com)

 
Comments Off on 4K from Space: ISS astronauts shoot 3D movie of planet Earth

Posted in Uncategorized


CES 2016: Close up with Kodak’s new Super 8 movie camera

14 Jan

In a bit of a surprise, one of the hottest products to make an appearance at CES 2016 was an analog product: Kodak’s Super 8 movie camera. Built around the classic Super 8 film format, the camera does make some nods to contemporary digital technology: instead of an optical viewfinder there’s a flip out LCD screen, and there’s also a SD card slot for recording sound.

But the film is the real star of the show, and processing is included in the cost. If you’re into the retro thing looking to make some films (or even just someone on a quest for the nostalgic look of Super 8) this might be just the camera you need to go along with your vinyl albums. DPReview editor Dale Baskin talks with Kodak’s Josh Coon to learn a bit more about this camera.

Articles: Digital Photography Review (dpreview.com)

 
Comments Off on CES 2016: Close up with Kodak’s new Super 8 movie camera

Posted in Uncategorized


InVisage posts short movie shot with its QuantumFilm HDR smartphone sensor

27 Oct

For a few years now, InVisage has been working on a new kind of smartphone image sensor that claims to offer higher dynamic range and zero rolling shutter than the chips currently found in mobile devices. It appears the technology is now at a stage where its benefits can be demonstrated, and for this purpose InVisage has commissioned a short movie called Prix  shot entirely on a prototype device using InVisage’s QuantumFilm technology. Read more

Articles: Digital Photography Review (dpreview.com)

 
Comments Off on InVisage posts short movie shot with its QuantumFilm HDR smartphone sensor

Posted in Uncategorized


Create Your Own Movie Easily

06 Sep

The high quality home movie creator software such as Movavi, is a great help for you who want to be creative and creating your own movie. The software will help you to join the audio and video files. All you need to do is to install and run the movie creator software, and then prepare […]
Digital Photography Information Center

 
Comments Off on Create Your Own Movie Easily

Posted in Equipment


How to Shoot and Process a Time Lapse Movie – Quick Method

27 Jun

The other day I was in the city and I was watching the clouds because they were moving so fast. It was a sign that bad weather was on the way, but I also knew the clouds would be a good opportunity to try some time lapse photography.
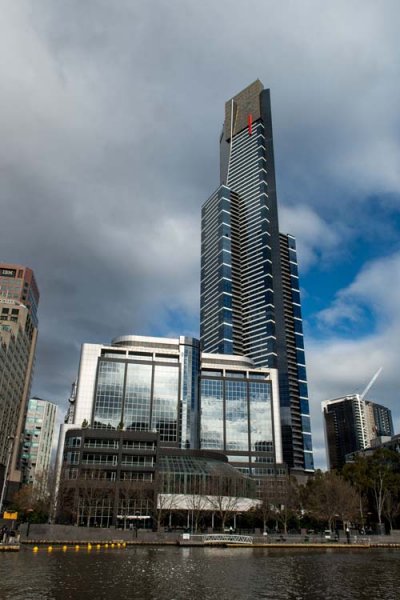
Eureka Tower image for time lapse

There are many ways of taking a series of images to use for time lapse photography. My camera was setup on a tripod and set to take a photo every five seconds over 10 minutes. In total 120 images were taken, however that number is up to you. The other day I took 300 images to use for one.

You can do this in various ways and it is best to check your camera manual to see if you can take photos at intervals. If you can’t then you may have to use something like an intervalometer or just manually take a photo every five seconds or whatever interval you choose.

When I got home I did some research and found a fairly easy way of putting the images together to get a quick time lapse. Follow along a I show you how you can do this as well.

Lightroom

The 120 images were imported into Lightroom. If you are unsure of how to Import photos then look at this article: Quick Tip: Importing to Lightroom Made Easier.
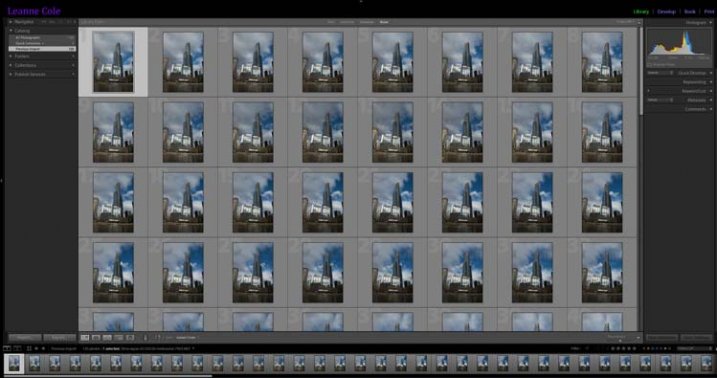
The images for the time lapse in Lightroom

The images for the time lapse in Lightroom

Choose the first image and you do some basic processing to it in the develop module. I straightened, then cropped, a bit of a building out of the side of it, brought out the shadows and highlights.
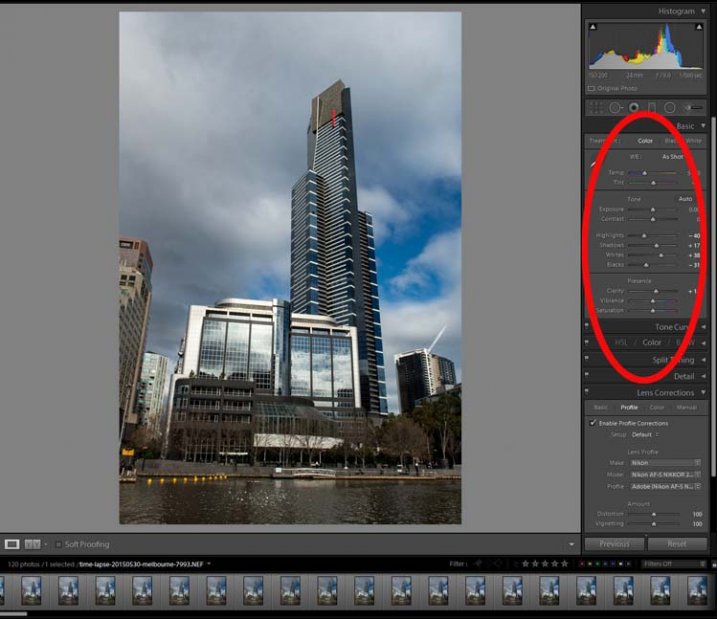
Processing done to the image.

Processing done to the first image.

Select all images for the time lapse and click Sync, in the bottom right of the Develop module.
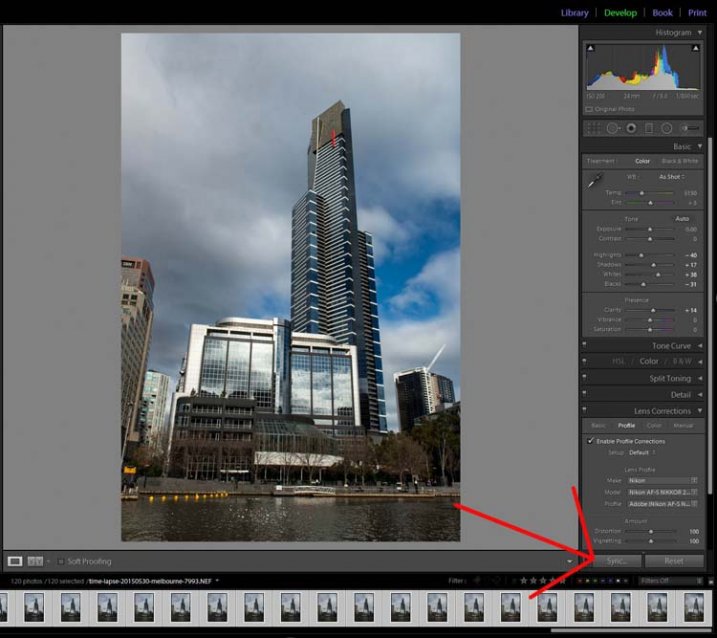
The Sync Button

The Sync Button

When the window to Synchronize Settings comes up, tick the box at the bottom to Check All. You want all the changes that you made to the first image to be applied to all of them. They are basically all the same image except for the changes that you want to use for the time lapse.

Press Synchronize in the bottom right of the window. You will see that all the images change and are now ready to be exported.
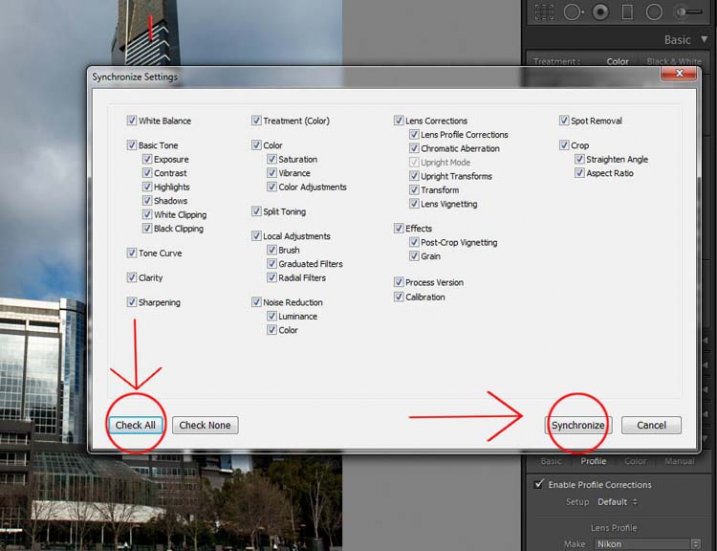
Synchronizing the images.

Synchronizing the images.

Exporting the Sequence

There are a few things to consider when you export them, one is the way you rename them. If the number or sequence isn’t at the front of the file name then there may be software problems to put them in the right sequence. It doesn’t make a difference with Photoshop CC.

The images should be changed to jpeg. It is only for the internet so you can use a low resolution, 72 dpi is okay. The size of the image was changed to 1980 pixels for the longest side, which is a good size for videos and for HD.

In the following image you can see which export settings I used for the Time Lapse sequence images.
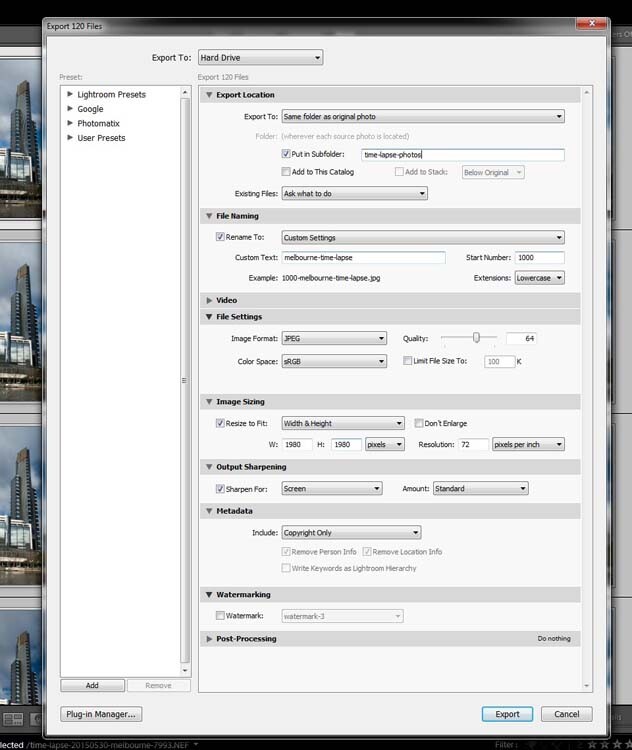
Exporting the images.

Exporting the images.

Press Export. Then, to put the images together to make the time lapse you will need to move into Photoshop.

Photoshop CC

In Photoshop you need to go to File and Open. (File > Open) Go to the folder with the exported images and select the first one in the sequence. In the same window, before you press Open, make sure you check the box that says Image Sequence which is down near the bottom.
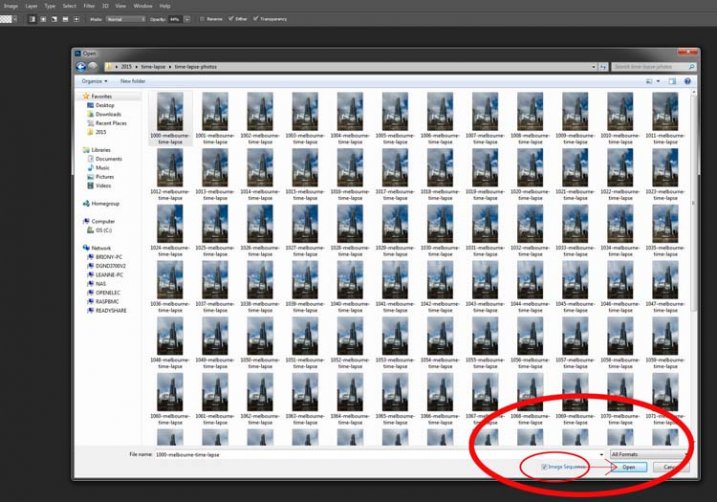
Getting the images ready for the time lapse.

Getting the images ready for the time lapse.

Once you have checked it, select Open.

Before Photoshop opens them a new window will come up asking you how many frames per second you want to use.
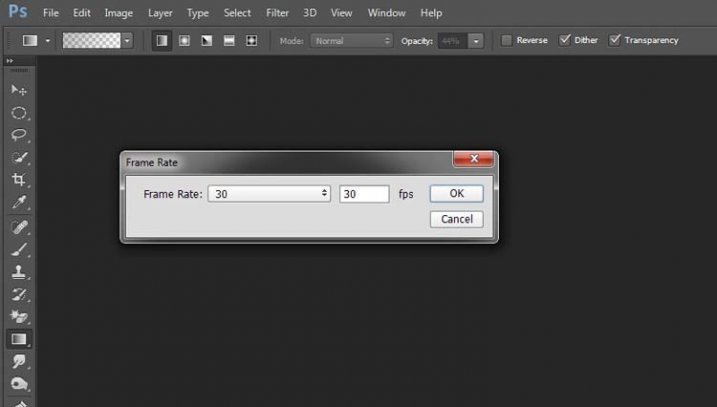
Setting the frame rate.

Setting the frame rate.

At this stage you can just click OK; you will have a chance to change it later on if you want to make it slower or faster.

To make it a time lapse you need to open another window in the Photoshop main window. Go up to Window in the main menu at the top, and then down to Timeline and select it. (Window > Timeline)
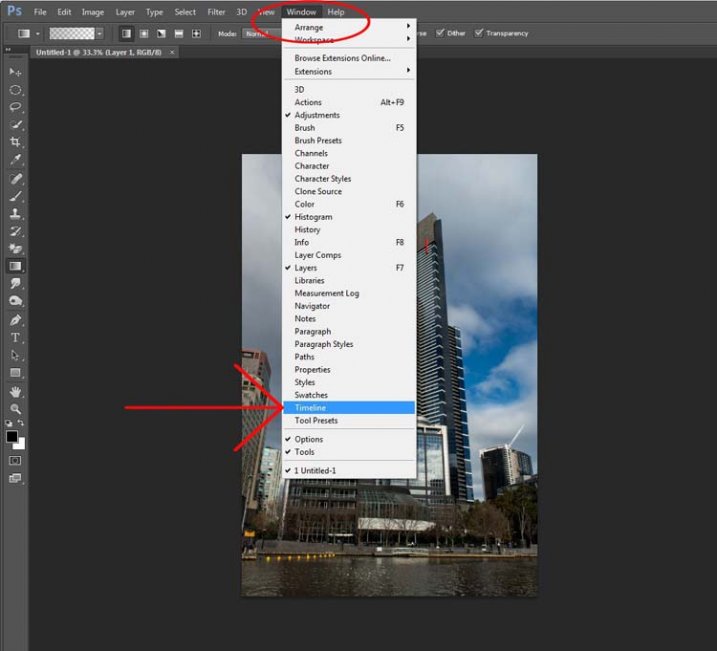
Opening the Timeline.

Opening the Timeline.

You will see a new window appear down the bottom. Look at the following image:
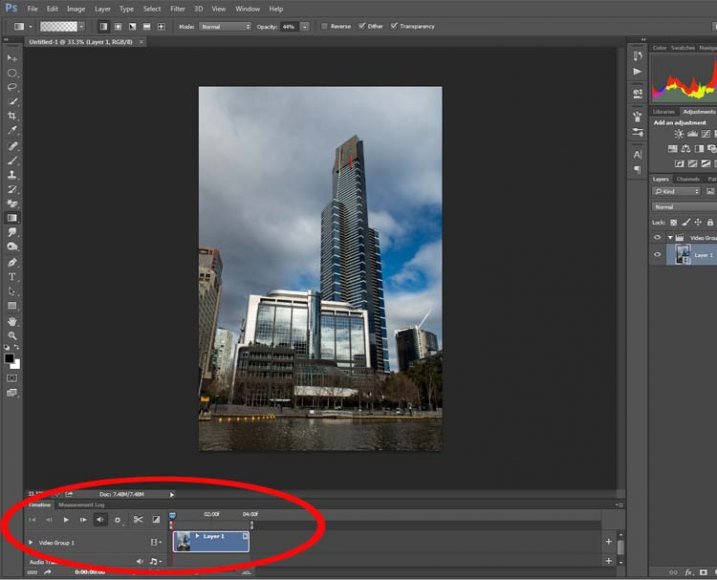
Looking at the Timeline.

Looking at the Timeline.

If you press the play button you will see your time lapse run.

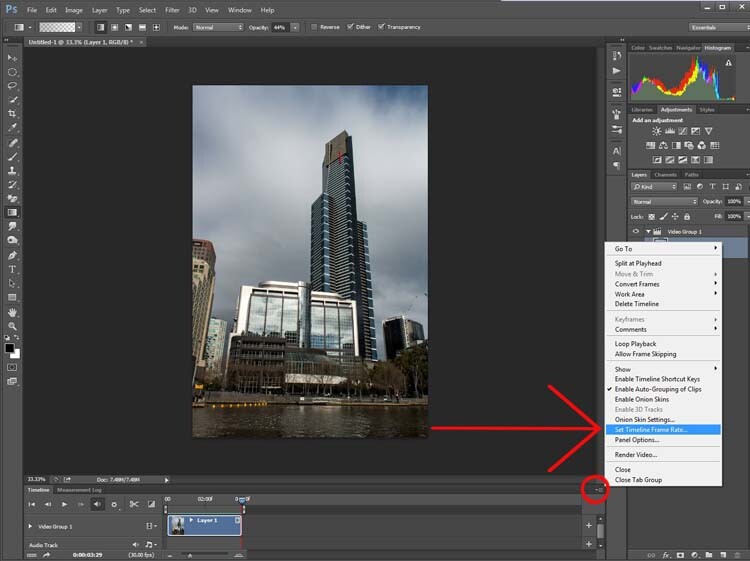
If you want to change the Frame Rate this is the time to do it. In the Timeline Window, up in the top right corner, you should be able to see a down arrow with lines next to it, click on that and a drop-down menu will appear. Go down and select Select Timeline Frame Rate…
Changing the frame rate.

Changing the frame rate.

You can change this as many times as you like. Keep doing it until you get a frame rate you like. Once you are happy with how long it runs for, you can render the video.

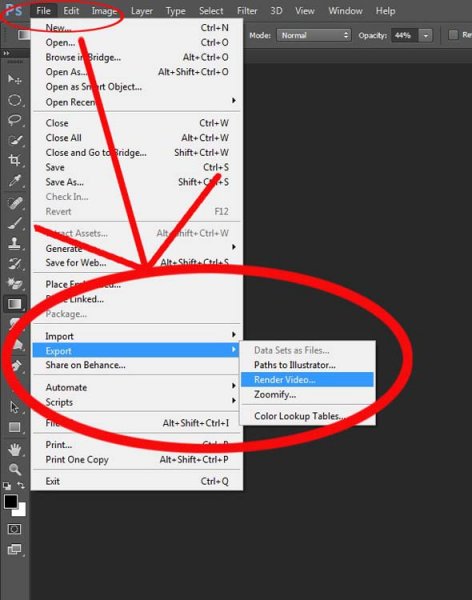
Go up to File, then select Export. In the drop down menu choose Render Video. (File > Export > Render Video)
Exporting the video.

Exporting the video.

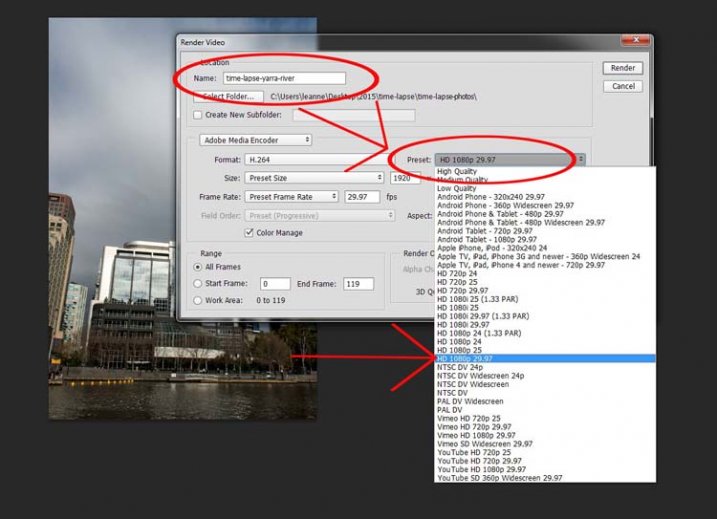
After initializing, the Render Video window will come up. In this Window you can name your video and decide in what format you want it saved.
Working out the video type.

Working out the video type.

Set it on one of the HD settings and you will get an MP4 video. It gives you quite a good video.

If you decide you really like doing them there are lots of other methods, this is just a quick way to do time lapse movies using Lightroom and Photoshop CC.

googletag.cmd.push(function() {
tablet_slots.push( googletag.defineSlot( “/1005424/_dPSv4_tab-all-article-bottom_(300×250)”, [300, 250], “pb-ad-78623” ).addService( googletag.pubads() ) ); } );

googletag.cmd.push(function() {
mobile_slots.push( googletag.defineSlot( “/1005424/_dPSv4_mob-all-article-bottom_(300×250)”, [300, 250], “pb-ad-78158” ).addService( googletag.pubads() ) ); } );

The post How to Shoot and Process a Time Lapse Movie – Quick Method by Leanne Cole appeared first on Digital Photography School.


Digital Photography School

 
Comments Off on How to Shoot and Process a Time Lapse Movie – Quick Method

Posted in Photography


Vortex: Black Whirlpool Spins Endlessly in a Movie Theater

30 May

[ By Steph in Art & Installation & Sound. ]

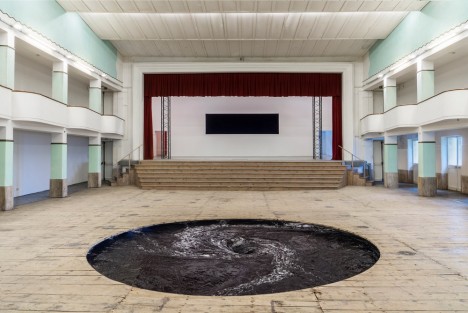
anish kapoor vortex 1

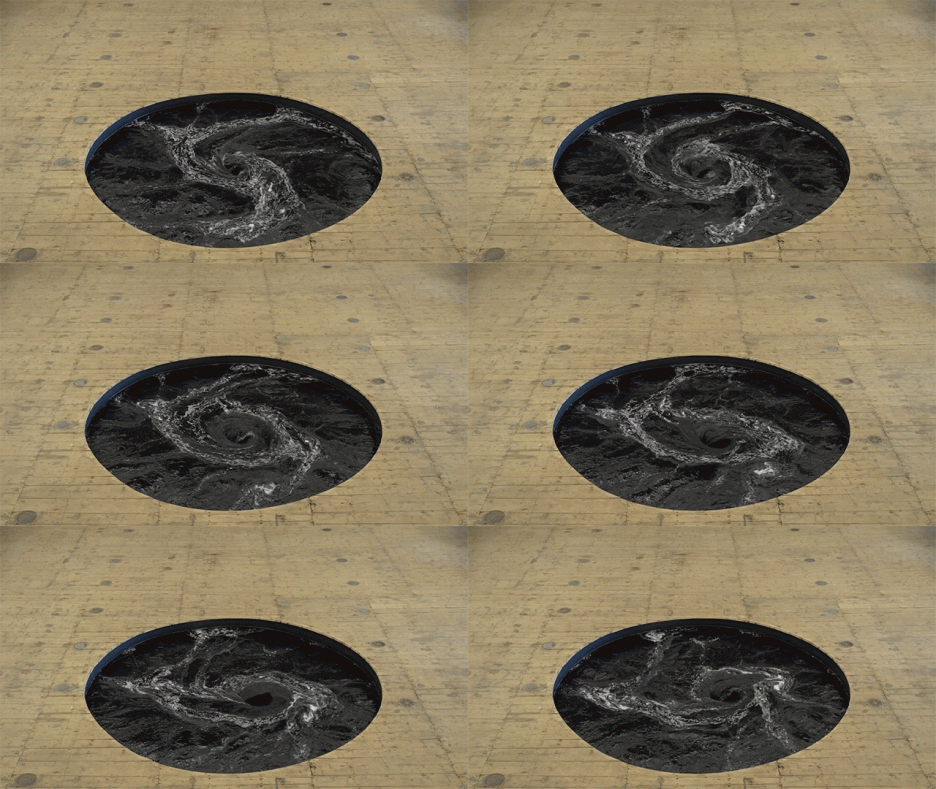
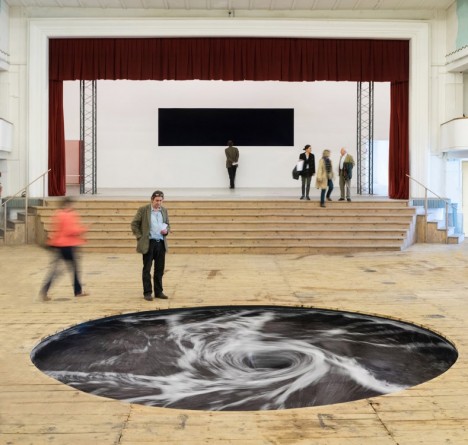
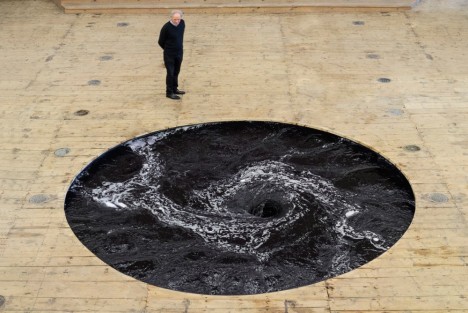
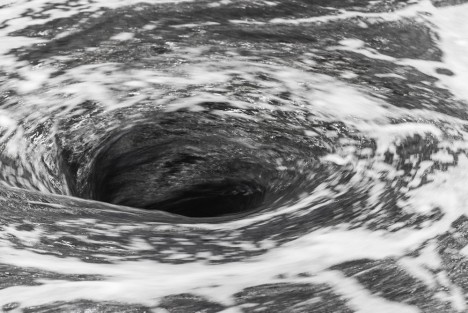
A seemingly bottomless vortex of black water spins endlessly in the unlikeliest of places: the floor of a brightly-lit movie theater in San Gimignano, Italy. Peer into its mesmerizing depths, however, and it’s easy to forget where you are, feeling as if you might get sucked inside.

anish kapoor vortex 5

anish kapoor vortex 3

‘Descension’ is an installation by artist Anish Kapoor, specifically conceived for the former cinema, which has now been transformed into a gallery. The whirlpool is among a series of works by Kapoor on display in the space, including alabaster sculptures and large-scale works in fiberglass.

anishkapoor vortex 2

anish kapoor vortex 4

“I have always thought of it (the void) as a transitional space, an in-between space,” says Kapoor. “It’s very much to do with time. I have always been interested as an artist in that very first moment of creativity where everything is possible and nothing has actually happened. It’s a space of becoming.”

anish kapoor vortex 6

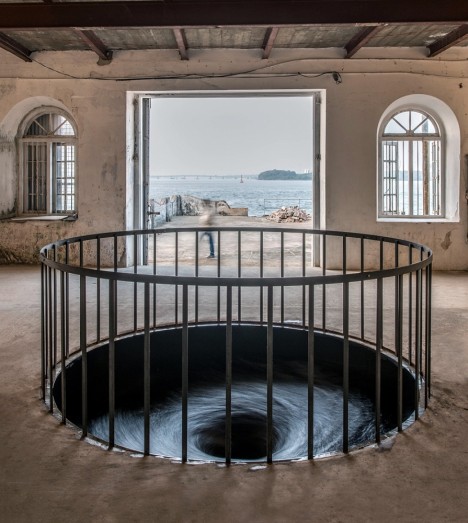
The artist, who’s best known for massive inflatable buildings, London’s ArcelorMittal tower and Chicago’s iconic Cloud Gate, previously installed a spiraling black whirlpool in the floor of the Aspinwall House in Fort Kochi, India for the country’s 108-day-long contemporary art biennale.

Share on Facebook


[ By Steph in Art & Installation & Sound. ]

[ WebUrbanist | Archives | Galleries | Privacy | TOS ]


WebUrbanist

 
Comments Off on Vortex: Black Whirlpool Spins Endlessly in a Movie Theater

Posted in Creativity


Ferrania to restart film production in still and movie formats

13 Oct

Italian film and camera brand Ferrania is set to come back to life after a Kickstarter fundraising project reached its target with over two weeks left to run. A company called FILM Ferrania will use the money raised to re-commission and redesign existing machinery from closed sections of the Ferrania factory to begin the manufacture of film. Initial production will be for 35mm and 120 roll formats for stills, and Super 8 and 16mm movie film. Learn more

Articles: Digital Photography Review (dpreview.com)

 
Comments Off on Ferrania to restart film production in still and movie formats

Posted in Uncategorized


Netflix is seeking Instagram users to photograph movie locations

03 Oct

Netflix is looking to hire a trio of photographers who will travel the country snapping photos and posting them to the entertainment company’s Instagram account. The three Instagram users selected for the roles will travel with expenses paid for two weeks, taking pictures of iconic movie and TV locations. Learn more

Articles: Digital Photography Review (dpreview.com)

 
Comments Off on Netflix is seeking Instagram users to photograph movie locations

Posted in Uncategorized


Time-Lapse Photography – a Quick Guide to Building Your Movie

11 Aug

Time-lapse photography shows you events that occur over an extended period that are captured on camera and shown in a relatively short time.

Time-lapse imagery is the capture of individual images of a subject at preset intervals over a preset duration. These individual images are then combined using software, thereby compressing the event into a much shorter time span.  If you were to witness an ice cube melting it would take an hour or more. With time-lapse the process from solid to liquid could be seen in seconds.

What do you need to do time-lapse photography?

Cameras

Though point-and-shoot cameras will do the job, digital single lens reflex cameras (DSLR’s) and mirror-less cameras allow for the most flexibility. They not only capture images that are of a higher quality but have features most suitable for time-lapse. In particular, they are capable of manual exposure and focus control. They also have an array of lenses to choose from and all the accessories required for capturing time-lapse sequences.

Lenses

All focal lengths are suitable based on the subject you select. A lens that has a manual aperture ring is best as the aperture blades do not open and close for each shot captured.

Intervalometer

The key to achieving a great lime-lapse sequence is a good intervalometer. This is a device capable of triggering your camera with accurate intervals and precise shutter actuations. It can be an external or internal device.

Tripod

Image Stabilization and Vibration Reduction are good but they are no substitutes for a good tripod for time-lapse photography. Use a solid tripod.

Batteries and/or AC Couplers

Because of the long duration of time-lapse sequences, the batteries in your camera may drain out before the sequence is completed. Here are a few tips to help you increase your battery life:

  • The single battery in your camera powers a number of functions. Many of these can be switched off for time-lapse capture or you can decrease their “on-time”.
  • A major drain on the battery is the LCD display and Live View. Use these screens only if it is imperative and then make certain that you lower the brightness using one of the custom functions. Also, limit the preview duration, keeping it to a minimum.
  • Don’t use your camera’s LCD screen for viewing and deleting images. Leave that activity to be performed on your computer after you have downloaded your images.
  • If you are shooting a sequence indoors you can use an AC coupler to power your camera.  An AC coupler is used in lieu of the camera battery.

Formula for Time-Lapse Capture

The typical frame rate for movies is between 24 and 30 frames per second. As a guideline, the greater the frames per second the smoother the playback.

When using a DSLR, you have all the control to create good time-lapse sequences. Selection of shutter speed, depth of field and the interval between shots can be set as desired. Just remember, the faster the movement of the subject or subjects within your project, the shorter the interval between images captured. However, you may be limited in low light situations.

Here is a guide for intervals:

1 Second

1 – 5 Seconds

15 to 30 Seconds

3 – 15 minutes

Air and Road Travel

Sunrise Sunset

Moon going across the sky

Growing Plants

City Scenes with Traffic

Crowd Scenes

Stars and Milky Way

Home Building Projects

Bicycle Rides

Slow Moving Clouds

A good starting point for any subject matter is to create your time-lapse with a shorter interval than you may think is appropriate. You can always discard alternate or irrelevant images from your final sequence if you want to speed up the action.  For example, if you decide to use a 30 second interval for a moon sequence, but want to be sure that the final sequence will be smooth, shoot at 15 second intervals. You can get back to your original plan by removing every alternate image for the final sequence.

Prepare your images

Using any software editing program, crop or size your captured images to a width of 1920 pixels and a height of 1080 pixels for a 1080p HD video (use 1280 pixels by 720 pixels for 720p video). Make sure your crop registration is identical for all the images.  If you are not comfortable doing this, use the automatic resizing provided by most time-lapse assembly software.

Now that the images of the sequence are ready, you can use one of the many free applications for Windows and Mac operating systems to create your video. Some of these are VideoVelocity from CandyLabs, Photolapse from Stephan van der Palen and Time-Lapse Assembler created by Dan Bridges. For under $ 30 Apple Quicktime Pro 7 can be used to create some excellent time-lapse video.

How to use Time Lapse Assembler for Mac

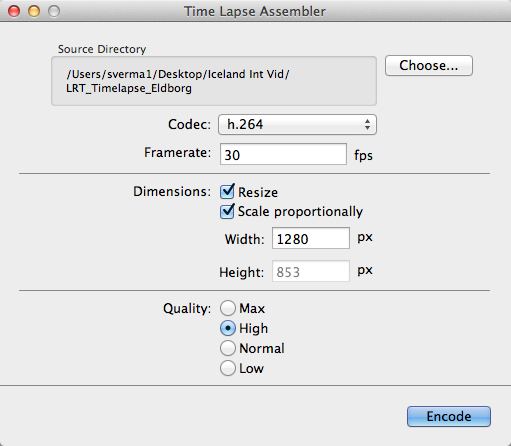
tla-1

  1. Open Time Lapse Assembler
  2. Select the directory that contains the image sequence
  3. Select the codec. Use h.264 or mp4v for making .mov files or mp4v for making .mp4 movies
  4. Leave the frame rate at 30fps
  5. Set the dimension to resize
  6. Scale proportionately
  7. For HD video you can adjust the width to 1920 or 1280 (1920 for 1080P video and 1280 for 720p video)
  8. Select Quality High (you can always use Max but the rendering will take longer
  9. Click on Encode
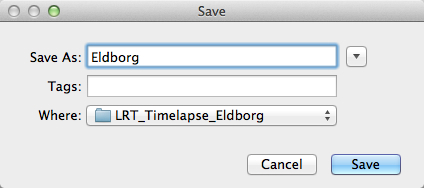
  10. You will be presented with a Save window. Name your sequence and click Save.

tla-2

The software will produce a Quicktime compatible movie file that can be viewed as is, or used for further editing in iMovie or any other video editing software.

See below an example of the video in very low resolution:

Here are the steps for Quicktime Pro 7

  1. Open Quicktime
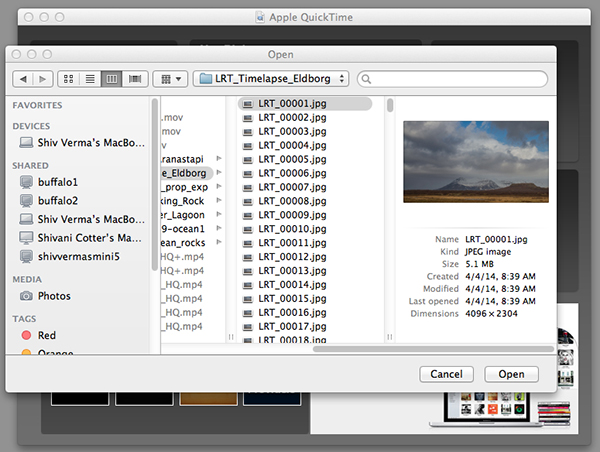
  2. Go to the menu and under File – click on Open Image Sequence. Go to the directory where you downloaded your images (make sure you have only the images that belong in the sequence in this folder)
  3. Click on the first image of the sequence and click Open

    Select the Sequence

    Select the Sequence

  4. You will be presented with a choice for picking your frame rate – use 30 frames per second for a smooth sequence. Now click OK
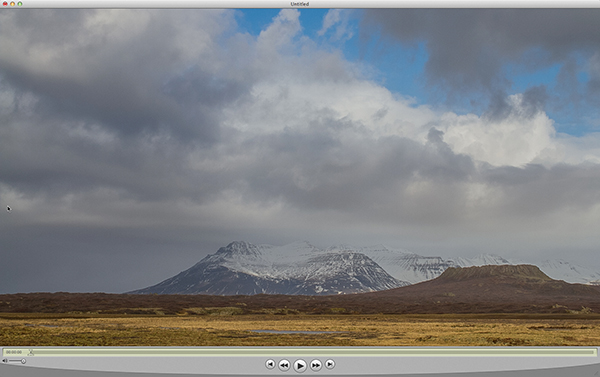
  5. Quicktime will import all the images in that folder and assemble them in their original sequence and at their original resolution. You probably will not be able to see the entire image as it is larger than the resolution of your screen but you can go to the Menu>View>Fit to Screen. You now have the first frame visible in its entirety.
    Assembled Sequence

    Assembled Sequence

    If you attempt to play this sequence you will not see the movie as you might like it to be. It will not be smooth and may pause for long periods. This is because the individual frames are very large and the video has not been rendered for playback.

  6. Save this sequence File>Save
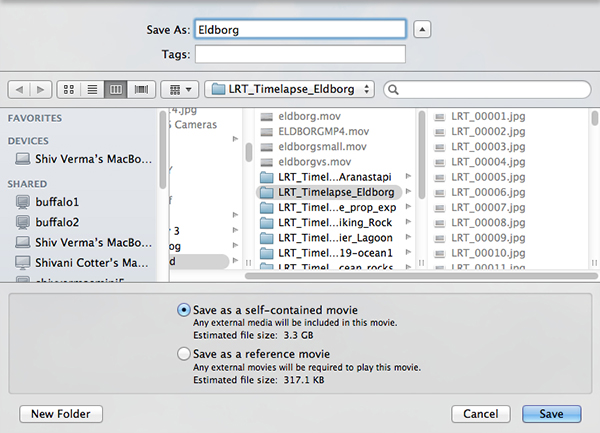
  7. You will be presented with options as to where you would like to save the Quicktime file.
  8. Save the file in the same directory as the original images and name the file

The next steps will render a viewable video

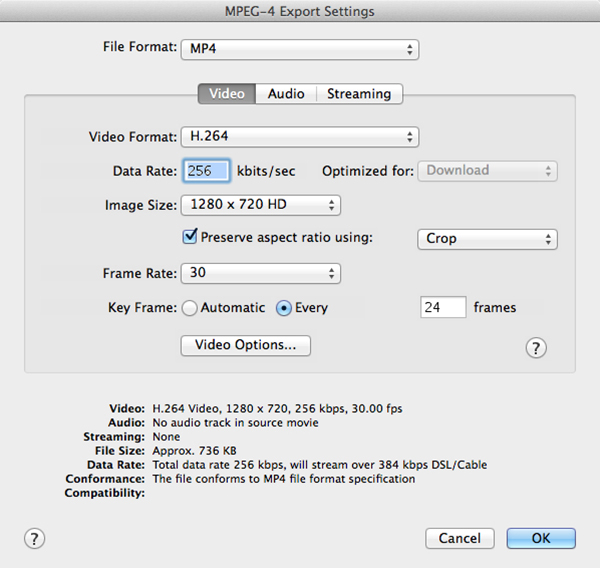
  1. You will export this sequence File>Export
  2. You will get the typical “Save As” option and the “Where” option. Save the export in the same folder as the original files giving it a pertinent name.
    QT-3
  3. There are two other sets of export criteria and an options button. For now, export the sequence as a QuickTime Movie and in the Options Section use H264.
    QT-4
  4. The export will take some time so be patient. Once the rendering and export is complete you will be able to watch the video. 

Have fun making your time-lapse – enjoy!

The post Time-Lapse Photography – a Quick Guide to Building Your Movie by Shiv Verma appeared first on Digital Photography School.


Digital Photography School
 
Comments Off on Time-Lapse Photography – a Quick Guide to Building Your Movie

Posted in Photography