Time-lapse photography shows you events that occur over an extended period that are captured on camera and shown in a relatively short time.
Time-lapse imagery is the capture of individual images of a subject at preset intervals over a preset duration. These individual images are then combined using software, thereby compressing the event into a much shorter time span. If you were to witness an ice cube melting it would take an hour or more. With time-lapse the process from solid to liquid could be seen in seconds.
What do you need to do time-lapse photography?
Cameras
Though point-and-shoot cameras will do the job, digital single lens reflex cameras (DSLR’s) and mirror-less cameras allow for the most flexibility. They not only capture images that are of a higher quality but have features most suitable for time-lapse. In particular, they are capable of manual exposure and focus control. They also have an array of lenses to choose from and all the accessories required for capturing time-lapse sequences.
Lenses
All focal lengths are suitable based on the subject you select. A lens that has a manual aperture ring is best as the aperture blades do not open and close for each shot captured.
Intervalometer
The key to achieving a great lime-lapse sequence is a good intervalometer. This is a device capable of triggering your camera with accurate intervals and precise shutter actuations. It can be an external or internal device.
Tripod
Image Stabilization and Vibration Reduction are good but they are no substitutes for a good tripod for time-lapse photography. Use a solid tripod.
Batteries and/or AC Couplers
Because of the long duration of time-lapse sequences, the batteries in your camera may drain out before the sequence is completed. Here are a few tips to help you increase your battery life:
- The single battery in your camera powers a number of functions. Many of these can be switched off for time-lapse capture or you can decrease their “on-time”.
- A major drain on the battery is the LCD display and Live View. Use these screens only if it is imperative and then make certain that you lower the brightness using one of the custom functions. Also, limit the preview duration, keeping it to a minimum.
- Don’t use your camera’s LCD screen for viewing and deleting images. Leave that activity to be performed on your computer after you have downloaded your images.
- If you are shooting a sequence indoors you can use an AC coupler to power your camera. An AC coupler is used in lieu of the camera battery.
Formula for Time-Lapse Capture
The typical frame rate for movies is between 24 and 30 frames per second. As a guideline, the greater the frames per second the smoother the playback.
When using a DSLR, you have all the control to create good time-lapse sequences. Selection of shutter speed, depth of field and the interval between shots can be set as desired. Just remember, the faster the movement of the subject or subjects within your project, the shorter the interval between images captured. However, you may be limited in low light situations.
Here is a guide for intervals:
|
1 Second |
1 – 5 Seconds |
15 to 30 Seconds |
3 – 15 minutes |
|
Air and Road Travel |
Sunrise Sunset |
Moon going across the sky |
Growing Plants |
|
City Scenes with Traffic |
Crowd Scenes |
Stars and Milky Way |
Home Building Projects |
|
Bicycle Rides |
Slow Moving Clouds |
A good starting point for any subject matter is to create your time-lapse with a shorter interval than you may think is appropriate. You can always discard alternate or irrelevant images from your final sequence if you want to speed up the action. For example, if you decide to use a 30 second interval for a moon sequence, but want to be sure that the final sequence will be smooth, shoot at 15 second intervals. You can get back to your original plan by removing every alternate image for the final sequence.
Prepare your images
Using any software editing program, crop or size your captured images to a width of 1920 pixels and a height of 1080 pixels for a 1080p HD video (use 1280 pixels by 720 pixels for 720p video). Make sure your crop registration is identical for all the images. If you are not comfortable doing this, use the automatic resizing provided by most time-lapse assembly software.
Now that the images of the sequence are ready, you can use one of the many free applications for Windows and Mac operating systems to create your video. Some of these are VideoVelocity from CandyLabs, Photolapse from Stephan van der Palen and Time-Lapse Assembler created by Dan Bridges. For under $ 30 Apple Quicktime Pro 7 can be used to create some excellent time-lapse video.
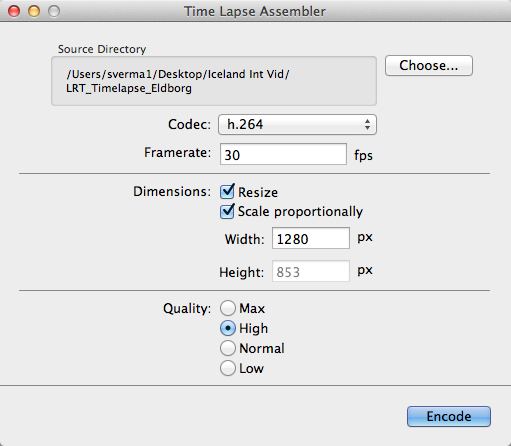
How to use Time Lapse Assembler for Mac
- Open Time Lapse Assembler
- Select the directory that contains the image sequence
- Select the codec. Use h.264 or mp4v for making .mov files or mp4v for making .mp4 movies
- Leave the frame rate at 30fps
- Set the dimension to resize
- Scale proportionately
- For HD video you can adjust the width to 1920 or 1280 (1920 for 1080P video and 1280 for 720p video)
- Select Quality High (you can always use Max but the rendering will take longer
- Click on Encode
- You will be presented with a Save window. Name your sequence and click Save.
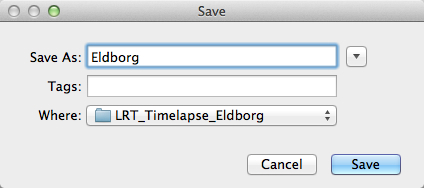
The software will produce a Quicktime compatible movie file that can be viewed as is, or used for further editing in iMovie or any other video editing software.
See below an example of the video in very low resolution:
Here are the steps for Quicktime Pro 7
- Open Quicktime
- Go to the menu and under File – click on Open Image Sequence. Go to the directory where you downloaded your images (make sure you have only the images that belong in the sequence in this folder)
- Click on the first image of the sequence and click Open
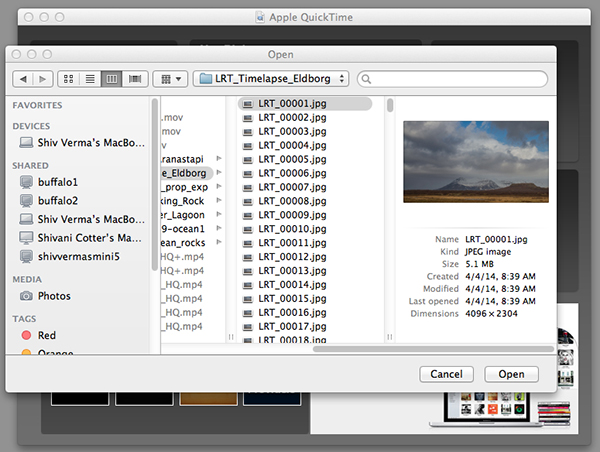
Select the Sequence
- You will be presented with a choice for picking your frame rate – use 30 frames per second for a smooth sequence. Now click OK
- Quicktime will import all the images in that folder and assemble them in their original sequence and at their original resolution. You probably will not be able to see the entire image as it is larger than the resolution of your screen but you can go to the Menu>View>Fit to Screen. You now have the first frame visible in its entirety.
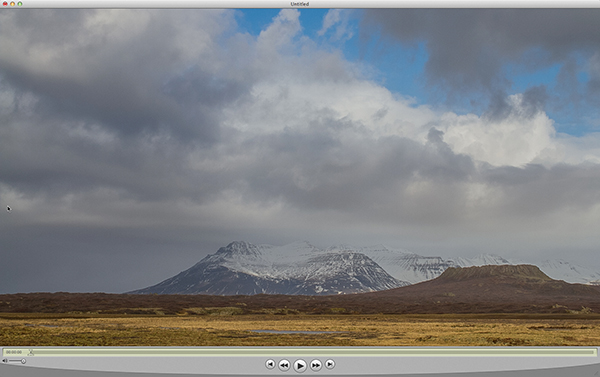
Assembled Sequence
If you attempt to play this sequence you will not see the movie as you might like it to be. It will not be smooth and may pause for long periods. This is because the individual frames are very large and the video has not been rendered for playback.
- Save this sequence File>Save
- You will be presented with options as to where you would like to save the Quicktime file.
- Save the file in the same directory as the original images and name the file
The next steps will render a viewable video
- You will export this sequence File>Export
- You will get the typical “Save As” option and the “Where” option. Save the export in the same folder as the original files giving it a pertinent name.
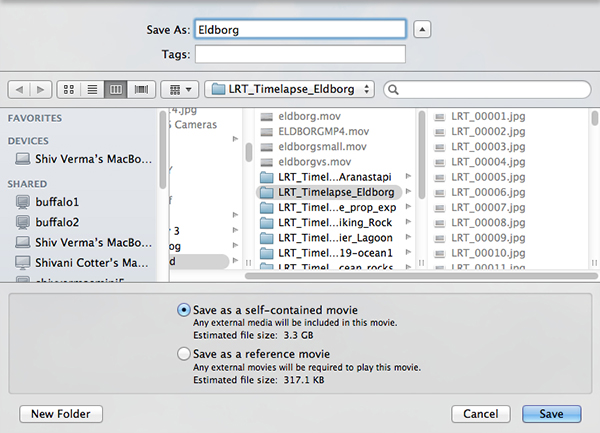
- There are two other sets of export criteria and an options button. For now, export the sequence as a QuickTime Movie and in the Options Section use H264.
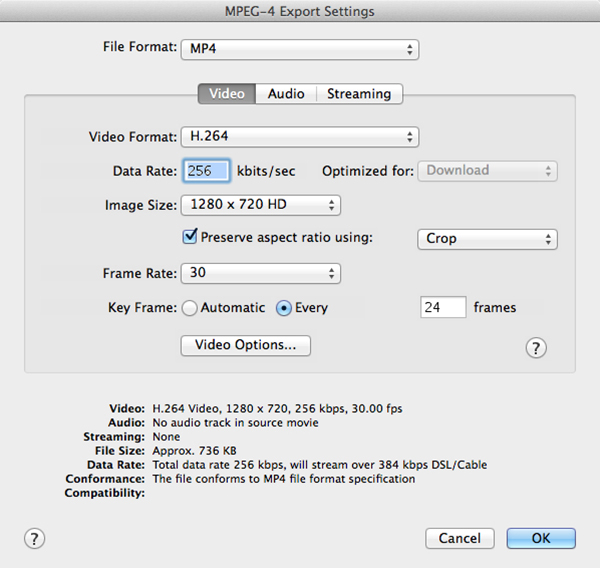
- The export will take some time so be patient. Once the rendering and export is complete you will be able to watch the video.
Have fun making your time-lapse – enjoy!
The post Time-Lapse Photography – a Quick Guide to Building Your Movie by Shiv Verma appeared first on Digital Photography School.
You must be logged in to post a comment.