RSS
 

Posts Tagged ‘Love’

Dear Nikon: Please let us keep the 20mm F1.8G, Love, Dan

20 Jan

An open letter to Nikon 

Dear Nikon, 

Dan Bracaglia here from DPReview.com. It’s been brought to my attention (mostly due to the nagging of coworkers) that the Nikkor 20mm F1.8G lens you’ve loaned us needs to be returned to Nikon ASAP. I guess this makes sense, seeing as we’ve had it for about 20 months now. But perhaps I can convince you, beyond a reason of a doubt to allow us just a little more time with it. I ask because I truly love this lens. And here’s why:

There’s no such thing as a perfect lens, but a lens can certainly be the right tool for a specific job, and to that extent, it’s perfect. Your 20mm F1.8G is just that for me.

I first moved to Seattle about five months before you shipped DPReview the lens. I’d previously been living in New York City and photographing live music. Back then I largely shot with a 17-35mm F2.8 (the lens motor has since died) and an on-camera flash. It was the perfect setup for the rowdy punk rock shows I frequented.

ISO 12,800, 1/160 sec at F2. Edited to taste in Lightroom.

But, after moving I realized I was going to have to switch up my music rig. I became aware that shows in small and mid-size venues in Seattle were well-documented, but shows happening in less traditional spaces, like friends’ basements, living rooms or art/community centers were often not photographed (despite being well-attended). So I launched a photoblog with the goal of documenting my local music community.

Out of respect for these intimate environments, I vowed to leave my flash at home and shoot available light only. And what could be better for documenting in the dark than fast primes? 

When shooting shows with available light, three things matter most to me in a lens: its size/weight (too large = too intrusive), it’s brightest aperture and its focus speed. Your 20mm, Nikon, is a perfect balance of all these things. A look at the Sigma 20mm F1.4 to gives an idea of how big and cumbersome a brighter 20mm lens could be.

And when paired with my D750, the combination is fast-to-focus (using the center area) even in conditions that are often too dark for me to physically see. This is incredibly impressive and useful. Even if I can’t tell whether or not my subject is in focus, I need to be able trust that my camera and lens can. Simply put, when used together the D750 and 20mm F1.8G sing.

ISO 12,800, 1/160 sec at F1.8. Edited to taste in Lightroom.

I’ve been mostly shooting it alongside your marvelously cheap 50mm F1.8D, which was actually my favorite Nikon lens (shocking!) before I got my paws on the 20mm 1.8G. I use the 50mm for detail shots and the 20mm to capture the tone of the room. Both are coat-pocketable and don’t add much bulk to the D750. Moreover both are sharp enough for me by F2.2 and fast-to-focus. The only thing I don’t like about the 20mm against the 50mm is the price, which is much more than the quintessential fast 50. 

That’s where the loan comes in. I know, I know, I’m lucky to be able to have access to loaner gear (we do ALSO use the lens for camera testing and sample image shooting), it’s just hard to justify spending $ 800 on a lens that will likely be soaked in beer within two weeks of my purchase (not that it’s ever happened to your 20mm…). I suppose I should be grateful for having had the chance to use a piece of gear and fall in love with it before buying it. After all, the inherent danger of using loaner gear from any brand, is getting attached.

At the the end of the day, maybe I should look at the $ 800 price tag as less about the cost of the lens and more about the price of being able to continue to document something I love, without drawing much attention. And to that regard, I owe it to myself, my community and you, to pony up and buy one. 

I’ll do that, but maybe after just one more loan extension?

Sincerely,

Dan Bracaglia

P.S. Anyone at Nikon want to purchase a slightly busted 17-35mm F2.8 for $ 800?

Articles: Digital Photography Review (dpreview.com)

 
Comments Off on Dear Nikon: Please let us keep the 20mm F1.8G, Love, Dan

Posted in Uncategorized


Throwback Thursday: The Olympus Stylus Epic and my love for clamshell cameras

19 Aug

Bring back the clamshell!

From left to right: The Olympus Stylus Epic, The Olympus [mju :] II, The Olympus XA. The first two are the same camera (different names for different markets), the latter started my love for clamshell cameras.

My love affair with the clamshell camera design started with the Olympus XA and ultimately lead me to the Olympus Stylus Epic, also know as the Olympus [mju:] II in the Japanese market (pronounced mew two, like the Pokémon). It’s a funky plastic 90’s style camera that to the untrained eye, looks a little like a piece of junk.

Both the Olympus XA, released in 1979, and the Stylus Epic, released in 1997, feature excellent fixed 35mm F2.8 lenses and Olympus’ brilliant clamshell design. The XA is an aperture priority-only rangefinder, while the Stylus Epic is a fully automatic camera with a three spot autofocus system and built-in flash.

Open/On Closed/Off

Due to its ease-of-use, small size and sharp lens, the Stylus Epic is my go anywhere camera (the XA I use mainly for street photography and travel). I’ve long searched for the perfect camera to slide in my back pocket every time I leave the house and this soap-shaped oddball is the one for me. It’s not as cool looking as a Ricoh R1 (which I also shoot with occasionally), but I’ve found it to be much more reliable.

If you haven’t figured it out by now, I’m a huge camera nerd and a big supporter of shooting analog. Film photography offers a nice balance to my daily concentration on digital photography for DPReview (my analog site is PopularAmerican.club). It also helps me to slow down and practice decisiveness. Of course the Stylus Epic, being a fully automatic camera, isn’t exactly encouraging me to work on fundamentals, but it does free me up to be more in the moment and act on instinct.

While these cameras are mostly fully automatic, they feature good metering.

The major selling points of the Olympus Stylus Epic are as follows: it is a full-frame, 35mm camera with an excellent (and reasonably fast) lens in my favorite focal length, it weighs a mere 5.1 oz and is no larger than a Sony RX100 series camera (which weighs nearly double). It’s also weather-sealed and built extremely tough, despite its plastic appearance. Lastly, its strange curved design makes it easy to slide in and out of a pocket.

The Olympus Stylus Epic is about the same size as a Sony RX100-series camera and about half the weight.

But hands down my favorite feature of the Epic is its clamshell. There’s no on/off switch – simply slide it open and it’s ready to shoot. It’s essentially a lens cap that doubles as a power switch, and it’s brilliant.

“It’s essentially a lens cap that doubles as a power switch, and it’s brilliant.”

Of course, Olympus didn’t abandon the clamshell design when it moved to digital around the turn of the century. There were plenty of tiny sensor compacts that featured clamshells. But at some point, they were no more. I haven’t pinpointed when the last one was released (if you know, shout it out in the comments,) but it seems by around 2007, the clamshell had been phased out entirely.

But why? Perhaps aesthetically, the design was too dated-looking. Or perhaps due to the decline in sales of compacts, Olympus moved in a different direction. Whatever the reason, I implore you, Olympus, bring back the clamshell!

There are, of course, several excellent large sensor fixed lens digital compacts on the market, though only the Ricoh GR and Nikon A can really be considered pocketable (the Fujifilm X70 is just slightly too big IMHO.)

These cameras are cool, but they suffer from one flaw. Most of them extend their lens when turned on, a design execution made to keep the overall package compact. But what happens when the camera is accidentally turned on in your bag or pocket and the lens attempts to extend with nowhere to go? The point is, I like a lot of the digital fixed lens compacts on the market, but ultimately I find them to be somewhat fragile, an undesirable quality for a take-anywhere camera. Furthermore, none of the pocketable ones are weather-sealed and only the Leica Q and Sony RX1R offer a full-frame sensor to match that of my Stylus Epic. Both are also large (un-pocketable) and expensive.

The Stylus Epic extends its lens only to focus when the shutter is pressed.

So is it possible to make a modern camera as small as the Stylus Epic, without an extending lens, while retaining a relatively large sensor? We’ve been following along with Sony’s development of a curved sensor for a while now, and reading back through our coverage got me thinking: perhaps this technology is the key a digital reincarnation of my beloved Stylus Epic.

Available settings include: flash on, flash off, red eye reduction, slow synchro (night scene flash), slow synchro plus red eye and spot mode (which requires pressing both back buttons simultaneously to engage). I mostly keep it on the default setting. Unfortunately the only mode the camera retains after being turned off and back on is red eye reduction. I’ve read a lot of complaints that the Epic doesn’t recall the “flash off” setting once turned off, which I tend to agree is very annoying.

As far as designing a 90’s throwback, manufacturers are obviously very comfortable tapping into classic design styles; take the Olympus PEN-F and pretty much every recent Fujifilm X-camera, for instance. But up until now, these throwback designs have all come from cameras released in the 50’s, 60’s and 70’s. I think its about time we had some throwback designs from the 80’s and 90’s and a reincarnation of the Epic seems like the perfect place to start!

To be fair, the Olympus Stylus Epic does extend the lens barrel, but not until the shutter has been fully pressed. This leads to a very slight shutter delay, but it is hardly noticeable.

I’m not even asking for a full-framer, but even a 1″-type sensor, fixed lens compact with a fast 35mm-equivalent lens would do it for me. Just make sure it’s pocketable, has a good flash, is weather sealed and is built like a tank. So Olympus, if you’re reading this, please consider a reboot of my dear Stylus Epic. Just don’t forget the clamshell!

Curvy beauty.

Is there a classic film camera you’d like to see a a digital reincarnation of? Let us know in the comments!

*A previous version of this article incorrectly stated the Epic uses a curved film plane.

Articles: Digital Photography Review (dpreview.com)

 
Comments Off on Throwback Thursday: The Olympus Stylus Epic and my love for clamshell cameras

Posted in Uncategorized


Throwback Thursday: The Olympus Stylus Epic and my love for clamshell cameras

18 Aug

Bring back the clamshell!

From left to right: The Olympus Stylus Epic, The Olympus [mju :] II, The Olympus XA. The first two are the same camera (different names for different markets), the latter started my love for clamshell cameras.

My love affair with the clamshell camera design started with the Olympus XA and ultimately lead me to the Olympus Stylus Epic, also know as the Olympus [mju:] II in the Japanese market (pronounced mew two, like the Pokémon). It’s a funky plastic 90’s style camera that to the untrained eye, looks a little like a piece of junk.

Both the Olympus XA, released in 1979, and the Stylus Epic, released in 1997, feature excellent fixed 35mm F2.8 lenses and Olympus’ brilliant clamshell design. The XA is an aperture priority-only rangefinder, while the Stylus Epic is a fully automatic camera with a three spot autofocus system and built-in flash.

Open/On Closed/Off

Due to its ease-of-use, small size and sharp lens, the Stylus Epic is my go anywhere camera (the XA I use mainly for street photography and travel). I’ve long searched for the perfect camera to slide in my back pocket every time I leave the house and this soap-shaped oddball is the one for me. It’s not as cool looking as a Ricoh R1 (which I also shoot with occasionally), but I’ve found it to be much more reliable.

If you haven’t figured it out by now, I’m a huge camera nerd and a big supporter of shooting analog. Film photography offers a nice balance to my daily concentration on digital photography for DPReview (my analog site is PopularAmerican.club). It also helps me to slow down and practice decisiveness. Of course the Stylus Epic, being a fully automatic camera, isn’t exactly encouraging me to work on fundamentals, but it does free me up to be more in the moment and act on instinct.

While these cameras are mostly fully automatic, they feature outstanding metering.

The major selling points of the Olympus Stylus Epic are as follows: it is a full-frame, 35mm camera with an excellent (and reasonably fast) lens in my favorite focal length, it weighs a mere 5.1 oz and is no larger than a Sony RX100 series camera (which weighs nearly double). It’s also weather-sealed and built extremely tough, despite its plastic appearance. Lastly, it’s strange curved design makes it easy to slide in and out of a pocket.

The Olympus Stylus Epic is about the same size as a Sony RX100-series camera and about half the weight.

But hands down my favorite feature of the Epic is its clamshell. There’s no on/off switch – simply slide it open and it’s ready to shoot. It’s essentially a lens cap that doubles as a power switch, and it’s brilliant.

“It’s essentially a lens cap that doubles as a power switch, and it’s brilliant.”

Of course, Olympus didn’t abandon the clamshell design when its moved to digital around the turn of the century. There were plenty of tiny sensor compacts that featured clamshells. But at some point, they were no more. I haven’t pinpointed when the last one was released (if you know, shout it out in the comments,) but it seems by around 2007, the clamshell had been phased out entirely.

But why? Perhaps aesthetically, the design was too dated-looking. Or perhaps due to the decline in sales of compacts, Olympus moved in a different direction. Whatever the reason, I implore you, Olympus, bring back the clamshell!

There are, of course, several excellent large sensor fixed lens digital compacts on the market, though only the Ricoh GR and Nikon A can really be considered pocketable (the Fujifilm X70 is just slightly too big IMHO.)

These cameras are cool, but my biggest beef with them is their design, or rather the weak point of their design. Most of them extend their lens when turned on, a design execution made to keep the overall package compact. But what happens when the camera is accidentally turned on in your bag or pocket and the lens attempts to extend with nowhere to go? The point is, these cameras are great, but ultimately I find them to be a bit fragile, an undesirable quality for a take-anywhere camera. Furthermore, none of the pocketable ones are weather-sealed and only the Leica Q and Sony RX1R offer a full-frame sensor to match that of my Stylus Epic. Both are also large (un-pocketable) and expensive.

So how then does the Stylus Epic retain its incredibly small size, despite its full-frame ‘sensor?’  By utilizing a curved film plane, of course! This not only helps keep things shrunken, but the curvature of the film plane matches that of the lens. This is also a major reason that the Epic is so darn sharp.

Available settings include: flash on, flash off, red eye reduction, slow synchro (night scene flash), slow synchro plus red eye and spot mode (which requires pressing both back buttons simultaneously to engage). I mostly keep it on the default setting. Unfortunately the only mode the camera retains after being turned off and back on is red eye reduction. I’ve read a lot of complaints that the Epic doesn’t recall the “flash off” setting once turned off, which I tend to agree is very annoying.

We’ve been following along with Sony’s development of a curved sensor for a while now, and reading back through our coverage got me thinking: could this new sensor technology make it possible to create a digital reincarnation of my beloved Stylus Epic? Totally. Do I think Olympus should make it happen? Oh, hell yes.

Camera companies are obviously very comfortable tapping into classic design styles; take the Olympus PEN-F and pretty much every recent Fujifilm X-camera, for instance. But up until now, these throwback designs have all come from cameras released in the 50’s, 60’s and 70’s. I think its about time we had some throwback designs from the 80’s and 90’s and a reincarnation of the Epic seems like the perfect place to start!

To be fair, the Olympus Stylus Epic does extend the lens barrel, but not until the shutter has been fully pressed. This leads to a very slight shutter delay, but it is hardly noticeable.

I’m not asking for a full-framer, but even a 1″-type sensor, fixed lens compact with a fast 35mm-equivalent lens would do it for me. Just don’t forget to make sure it’s pocketable, has a good flash, is weather sealed and built like a tank (no extending the lens when turned on). So Olympus, if you’re reading this, please consider a reboot of my dear Stylus Epic. Just don’t forget the clamshell!

Curvy beauty.

Is there a classic film camera you’d like to see a a digital reincarnation of? Let us know in the comments!

Articles: Digital Photography Review (dpreview.com)

 
Comments Off on Throwback Thursday: The Olympus Stylus Epic and my love for clamshell cameras

Posted in Uncategorized


Shoot for Love

15 Aug

Hello there, It’s been a hot minute since I updated this page, but that doesn’t mean I haven’t been shooting and sharing how I make what I make! Kaestle and […]
Jake Garn Photography

 
Comments Off on Shoot for Love

Posted in Uncategorized


Do You Love What You Do?

17 Jul

Craftsmanship Taking Pride

Utsushi_The-Search-for-Katsuhiras-Tiger_01

There are moments when you get jolted back to what really matters. This short documentation of the process in which classical Japanese metal artist Ford Hallam recreates a lost masterpiece by the 19th century Mito tsuba artist, Hagia Katsuhira is one of them. My jaw was literally on the floor in awe of the commitment and precision – and most of all the beauty of the process itself. The sword-guard that the artist re-created is incredibly beautiful in itself and the journey that Ford Hallam undertook is even more beautiful.


Do you love what you do ?


Is it possible to even remotely approach this level of dedication and precision in your own work? This film made me stop and reflect on all this and I encourage you to invest 30 mins of your time to watch this.


The project and filming was funded by Mr Bob Morrison and took place from June to October 2009.


IMAGE SOURCE:

Feature image & images 1-2: courtesy of Per Zennstrom


Utsushi_The-Search-for-Katsuhiras-Tiger_01


Fashion Photography Blog

 
Comments Off on Do You Love What You Do?

Posted in Uncategorized


Do You Love What You Do?

16 Jul

Craftsmanship Taking Pride

Utsushi_The-Search-for-Katsuhiras-Tiger_01

There are moments when you get jolted back to what really matters. This short documentation of the process in which classical Japanese metal artist Ford Hallam recreates a lost masterpiece by the 19th century Mito tsuba artist, Hagia Katsuhira is one of them. My jaw was literally on the floor in awe of the commitment and precision – and most of all the beauty of the process itself. The sword-guard that the artist re-created is incredibly beautiful in itself and the journey that Ford Hallam undertook is even more beautiful.


Do you love what you do ?


Is it possible to even remotely approach this level of dedication and precision in your own work? This film made me stop and reflect on all this and I encourage you to invest 30 mins of your time to watch this.


The project and filming was funded by Mr Bob Morrison and took place from June to October 2009.


IMAGE SOURCE:

Feature image & images 1-2: courtesy of Per Zennstrom


Utsushi_The-Search-for-Katsuhiras-Tiger_01


Fashion Photography Blog

 
Comments Off on Do You Love What You Do?

Posted in Uncategorized


6 Reasons to Love Ultra-Wide Lenses

12 Jul

Get 50% off Tom’s ebook Ang’s World – A Life in Photography eBook, now only until July 26 at Snapndeals.

Right now is the best time in the history of photography to get into ultra wide-angle lenses. In the last few years, lens designers have given us quality that is far better than ever – in fact, far better than we ever thought possible. Yet you may have been warned against using ultra wide-angles. Tutors tell you they’re really tricky to use, that you’ll produce ugly effects. Even that these lenses teach you bad habits.

Well, I’ve used ultra-wides for well over 30 years and they haven’t harmed my career. In fact, my last two exhibitions were shot entirely with them.

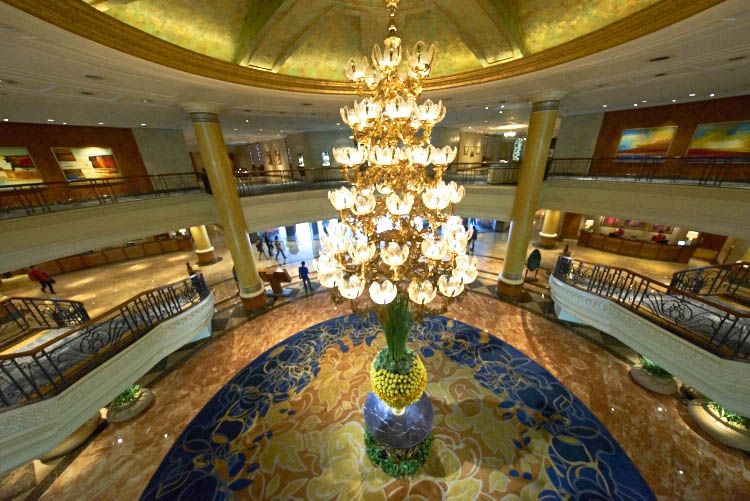
01 DSC0565

When you need to get everything into a single image – as in this hotel in Manila, Philippines – and you have no room to manoeuvre, an ultra wide-angle focal length of 11mm is your best friend.

If wide-angle lenses take in more of the view than normal, ultra wide-angles take in a huge amount more. The field of view of these lenses is enormous. Compared to around 47º of normal lenses, they can be nearly two-and-a-half times wider, about 130º. There’s one proviso: straight lines in the view remain fairly straight. This contrasts with fish-eye lenses that freely bend straight lines.

Going by 35mm equivalent focal length (comparing focal length to a standard 35mm film or full frame format), focal lengths shorter than the normal 50mm are called wide-angle. The range from 24-35mm can be said to be wide-angle. Shorter than that, to around 18mm is very wide. Any focal length shorter than 18mm we call ultra or extreme wide-angle. Best-known of these lenses is the Sigma 12mm-24mm zoom, challenged by the mighty, and costly, Canon 11mm-24mm f/4. This dwarfs the neat, new Voigtländer 10mm.

02 DSC1518 28mm

This image covers about 28mm – the widest angle that you’ll commonly see because it’s the widest often found in zoom lenses on compact cameras.

03 DSC1518 11mm

Compare the same view shot at 11mm: almost the widest straight-line shot you can obtain on any format. When you get used to ultra wide-angles, normal focal lengths look telephoto.

Let me share the reasons why I love using ultra wide-angle lenses.

#1 – THEY IMMERSE YOU

The first one, above all, is that they immerse you in the scene. They take you into the situation. They draw you in. The reason is simple; you, as the photographer, must get close to your subject to capture it effectively. The lens draws you into the action, often well into personal space, and it draws you into the undergrowth.

04 asleep at prayers

With my wide-angle zoom set to 16mm I had to get within touching distance of this mother and her sleeping child. Watching from the outer perimeter just wasn’t an option.

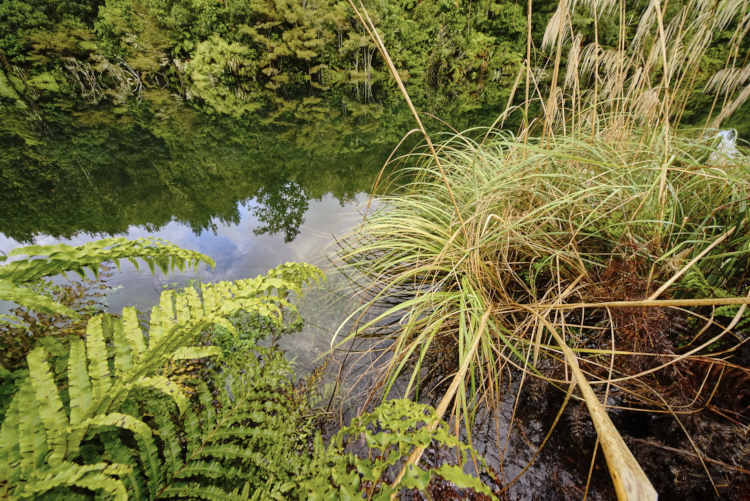
05 DSC2794

You can reach close into nature, the nearest leaves almost touching the lens, yet still capture the wider vista of the trees beyond as well as their reflections in the lake.

#2 – THEY HELP YOU SEE STRAIGHT

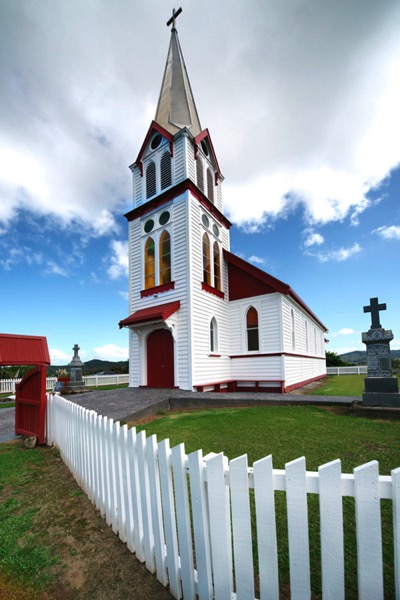
You know what it’s like; you’re close to some elegant building like a cathedral and you want to get it all into the shot. But when you point the camera up, the building leans backwards in a thoroughly inelegant way. If you use an ultra wide-angle lens, there’s a good chance you can get the whole building into shot without having to point upwards. Keep the camera pointed at the horizon, and all the verticals stay vertical, so the cathedral won’t look like it’s leaning back.
You’ll get lots of foreground, but that’s easily cropped off.

Here’s a bonus benefit: with ultra wides, you usually don’t have to back that far away from the building to get it all in.

06 DSC0587A

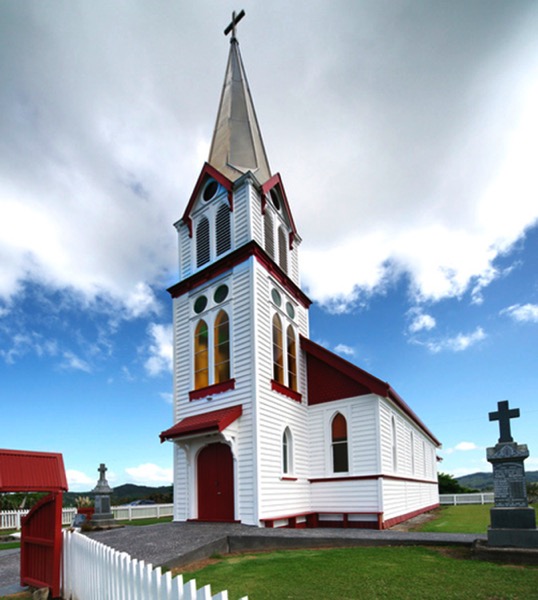
The soaring steeple of this church in New Zealand is not improved by being exaggerated – which would have happened if the camera had been pointing upwards more.

6A DSC0587A crop

The ultra wide-angle view of 12mm took in too much of the foreground fence, so cropping it off benefits the whole image.

#3 – THEY REVERSE SCALE

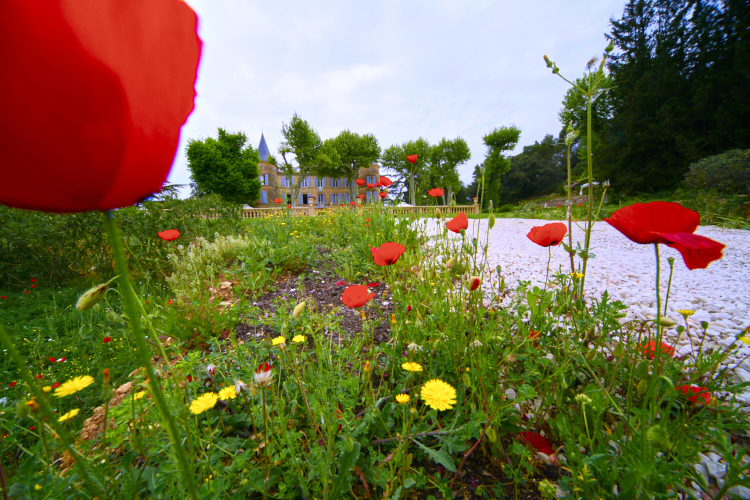
This effect is perhaps the best-known of ultra-wide lenses: they make things close to the lens look enormous, while objects further away look tiny. You may see this called perspective distortion or extreme perspective. In practical terms, what you can exploit is that small things can be made to look huge, and big things made to look very small. The wider the lens, the greater the effect.

07 MG 8638A

With the poppy nearly touching my ultra wide-angle zoom lens set to 12mm, the chateau becomes a tiny, model-like building.

07B DSC8791 1 A

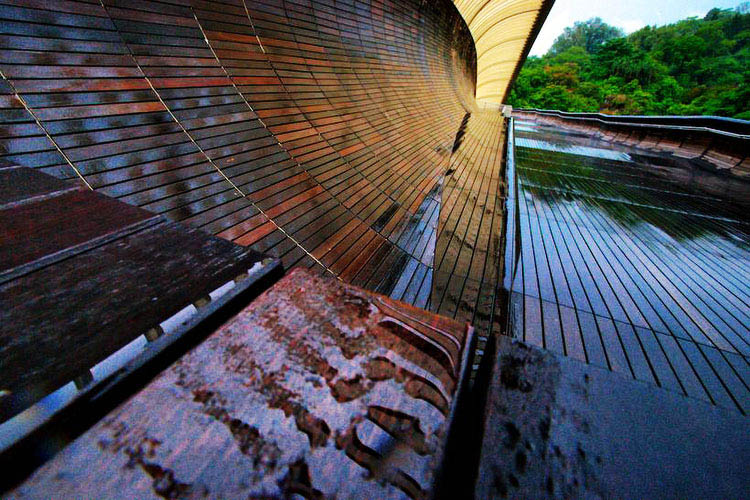
It follows from their strong effect on foreground-background difference that converging lines are very strongly rendered, making for dramatic receding effects as in this wooden walkway in Singapore.

#4 – THEY HAVE BUILT-IN PANORAMA FUNCTIONALITY

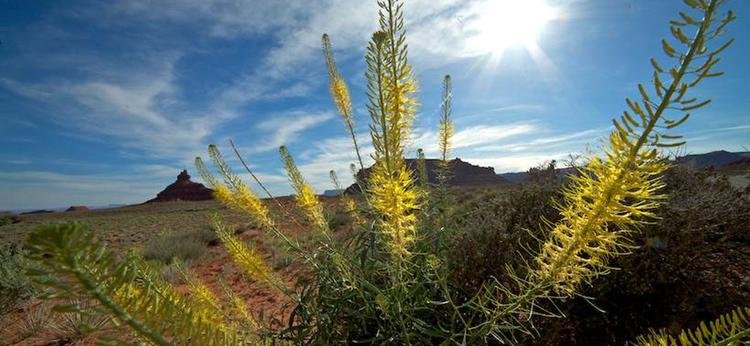
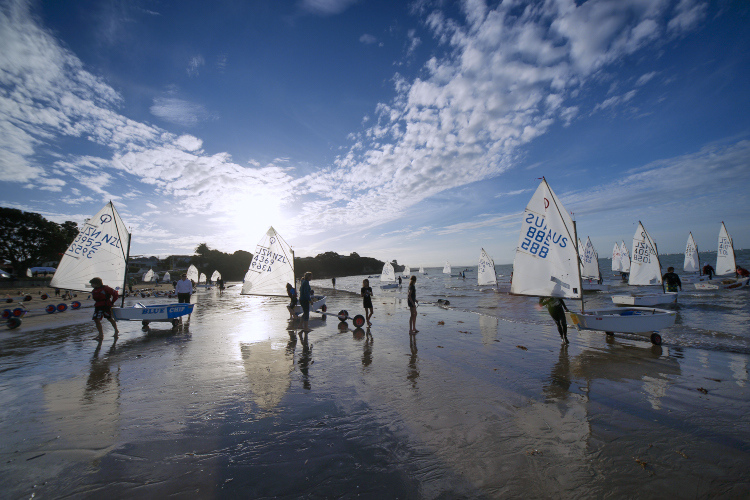
Thanks to their ability to capture a huge amount of scenic real estate, ultra-wides are perfect for creating pseudo-panoramas. You simply slice chunks from the top and bottom, and you can create an image that would otherwise need the stitching together of two or more shots. To make the most of this, it helps to ensure the camera is aimed horizontally, as a crop tends to emphasize any leaning of objects.

08 valley of gods ANG2981A

A view of the Valley of the Gods in USA at 12mm can lose the sky and the foreground, so taking your attention to the relation between the flowers in the foreground and the distant landmarks.

09 DSC0940A

A 12mm focal length shot of sailing in Auckland, New Zealand, was attractive with the sky and sand in view.

09B DSC0940A cropped

But it’s much stronger cropped to panorama, as the emphasis is clearly on the repeated triangles of the sails and busy activity.

#5 – THEY GIVE GLORIOUS REFLECTIONS

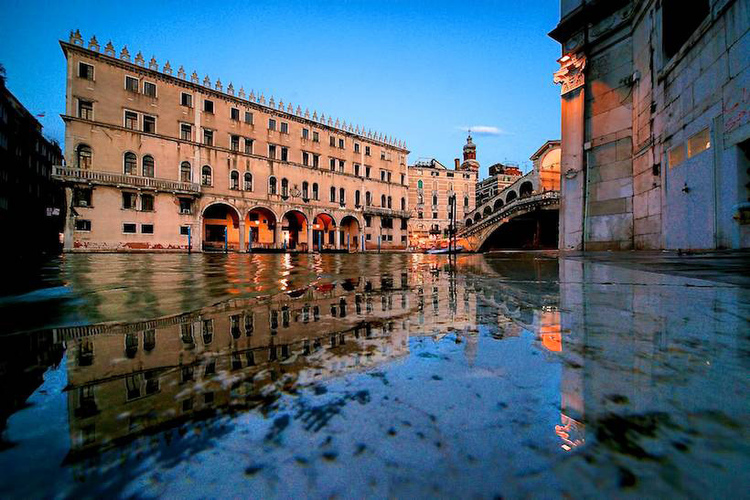
If you love working with reflections (who doesn’t?) the wider your field of view, the more reflection you can dig out, and you can’t have too much of that magic. The secret to making the most of reflections is to get as close to the reflecting surface as possible. I’ve been known to dip the camera nearly in the water in my attempt to get to the mirror surface.

10 Travel 154A
This image, at 12mm setting, was the easiest possible capture, if not best for looking after equipment. After a heavy downpour in Venice, I placed the camera on the ground and pressed the shutter button. The camera got wet, but the ground steadied it for the long exposure needed.

#6 – THEY ARE SIMPLY MAGIC!

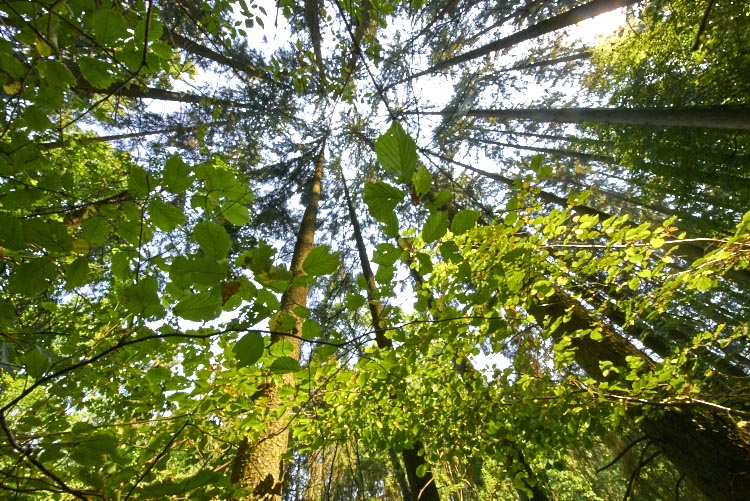
To be sure, many views such as landscape vistas may look like you should capture as much as possible, when selective views often work more effectively. But here’s the thing – where you absolutely need the widest view, an ultra wide-angle can’t be beaten. Where views and treatments simply call for the widest possible view, then the wider you can get it, the better. This is particularly true of ceilings, (e.g., painted ceilings of great houses), and also natural ceilings such as a leafy canopy.

11 DSC2282
If this view were shot at 16mm or 18mm it might look pretty similar. But a wide-angle freak wants more! Made at 11mm focal length, the extra field coverage draws in nearby detail such as criss-crossing branches and sun-lit leaves that smaller views miss out.

In the end, the best reason for using any lens is that it makes magic. Ultra wide-angles do that for me, which is why it’s my most used lens. Do you have any wide-angle images or thoughts you’d like to share? Please do so in the comments below.


Get 50% off Tom’s ebook Ang’s World – A Life in Photography eBook, now only until July 26 at Snapndeals.

googletag.cmd.push(function() {
tablet_slots.push( googletag.defineSlot( “/1005424/_dPSv4_tab-all-article-bottom_(300×250)”, [300, 250], “pb-ad-78623” ).addService( googletag.pubads() ) ); } );

googletag.cmd.push(function() {
mobile_slots.push( googletag.defineSlot( “/1005424/_dPSv4_mob-all-article-bottom_(300×250)”, [300, 250], “pb-ad-78158” ).addService( googletag.pubads() ) ); } );

The post 6 Reasons to Love Ultra-Wide Lenses by Tom Ang appeared first on Digital Photography School.


Digital Photography School

 
Comments Off on 6 Reasons to Love Ultra-Wide Lenses

Posted in Photography


How Two Weeks in the Wilderness with One Prime Lens Restored My Love for Photography

27 May

If you have read a few of my previous pieces here on the Digital Photography School like “5 Uncomfortable Truths about Photography“, or “How Making Horrible Photos Will Lead to More Keepers“, you’ll know that I have a much greater respect for learning, effort, and practice than I have for the latest and greatest gear. Good photography does not rely on equipment or rules.

But what happens if you lose your will to produce? What happens when the desire to make images simply slips away?

It happened to me last year, I just stopped wanting to make images. For most of the summer, my busiest and usually most productive season, I had no desire to shoot. Out of habit I still carried a camera on the wilderness trips I guide, and on personal trips across Alaska, but the images I made were few and lackluster. Now, a year later, I cringe to look through those, at the missed opportunities.

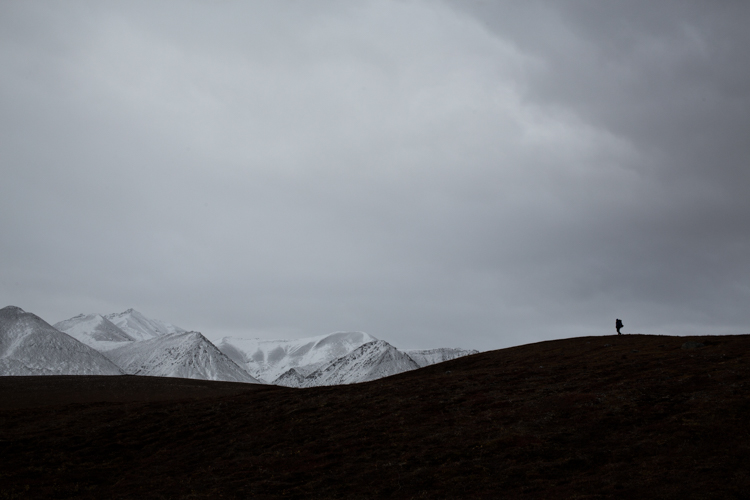
I broke out of the funk, but not the way I expected. Tired of carrying along gear I wasn’t using, for the final trip of my summer season, a 17 day pack-rafting trip in the Arctic National Wildlife Refuge, I carried only a camera body and one single 24mm f/2.8 prime lens.

AK-ANWR-Katakturuk-Canning-Packraft-1085-88

It wasn’t a creative decision, I took that combo because it was the best way to make my kit as light possible and still get the quality I wanted, and the lens and camera fit easily in a small holster style case that I carried, attached to the chest straps of my pack.

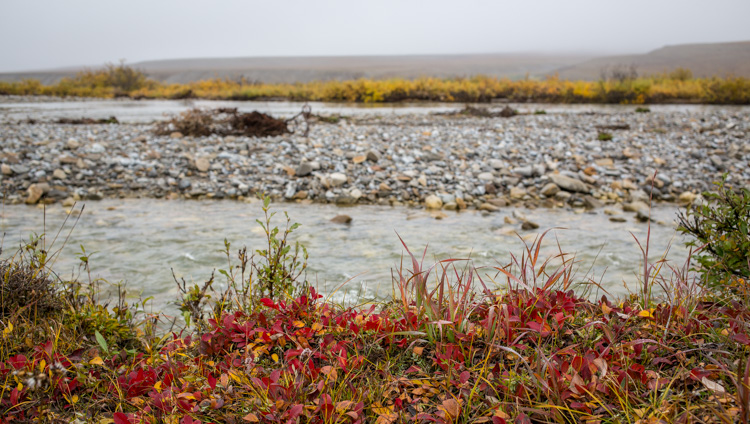
Toward the end of August my two clients and I flew from Fairbanks, Alaska north toward the Arctic National Wildlife Refuge. We passed little ranges of mountains in the interior, above the Yukon Flats, and over the rugged high peaks of the Brooks Range. Just to the north of the mountains on the arctic coastal plain of the refuge, the pilot descended, picked the unmarked strip out of the landscape, and settled the oversize wheels of the bush plane down onto the autumn tundra.

Within a few minutes of landing, we’d unloaded our heavy packs and the pilot was rocketing down the grass and into the air. He was the last person we’d see for more than two weeks.

The first 10 days of the trip were dedicating to hiking, though the mileage was such that we could take a day or two off periodically, which was good, because when the first snow storms of autumn hit a week into the trip, we were in no mood to walk.

AK-ANWR-Katakturuk-Canning-Packraft-1085-102

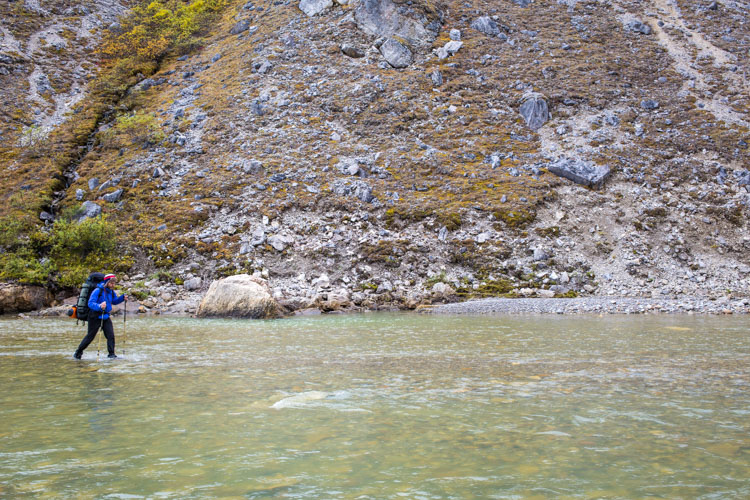
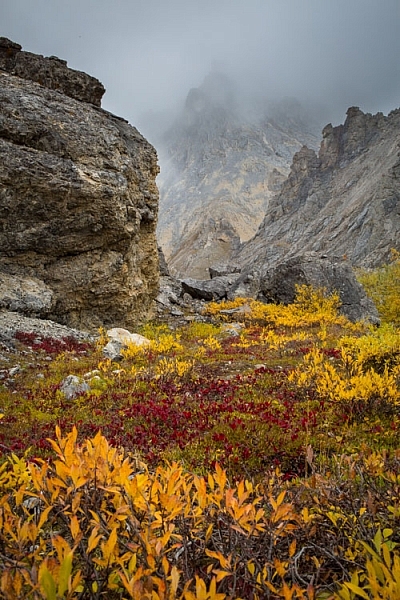
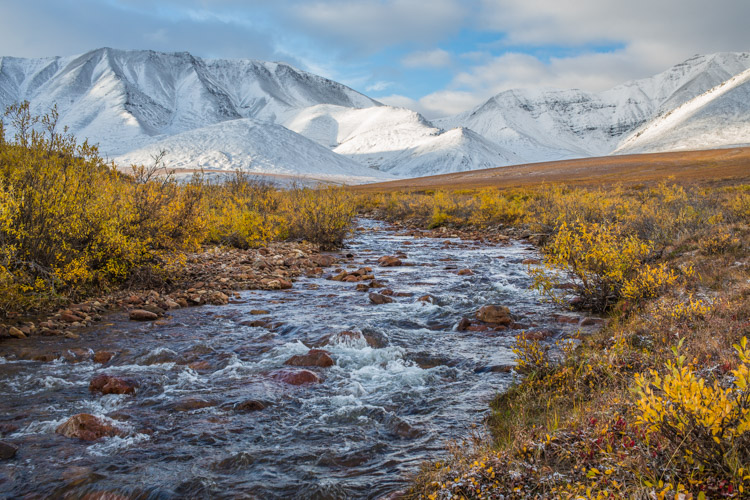
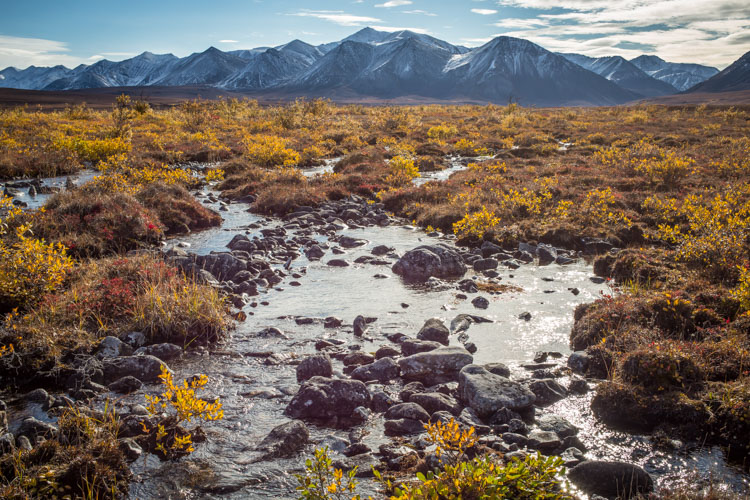
The route carried us through a narrow gap in the mountains cut by a small river. We walked through that gap on a cold, windy day when low clouds obscured the tops of the mountains. We had to criss-cross the river, and our feet were constantly soggy. But the willows along the creek and the small patches of tundra were bright with autumn colors, and a much-needed distraction from the cold.

Once on that first day, just once, I was stopped in my tracks by a scene that had to be photographed. I’d made photos earlier in the trip, but they’d been snapshots. This was a scene that inspired me; a rare thing.

The simple camera and lens setup removed much of the tedious decision making. There was no easy compositional escape in the form of a zoom lens, rather I had to move about to make the scene come together. I worked within the restraints of the lens (which were numerous), and it was utterly liberating.

AK-ANWR-Katakturuk-Canning-Packraft-1085-135

I gave the image five whole minutes before the chill forced us on, and for the first time all summer, five minutes wasn’t enough.

The following day, we woke to clouds, shredded by the previous day’s winds, and big patches of blue shone through, bright and optimistic. We hiked over a low pass, and watched a Grizzly sow and two young cubs graze in a sedge meadow a quarter mile and two hundred vertical feet below. My little lens didn’t have a prayer of making anything more than a token image of the brown specks on the tundra below. Instead I peered down through binoculars as the bears dug up sedges and combed berries from the bushes with their teeth.

AK-ANWR-Katakturuk-Canning-Packraft-1085-277

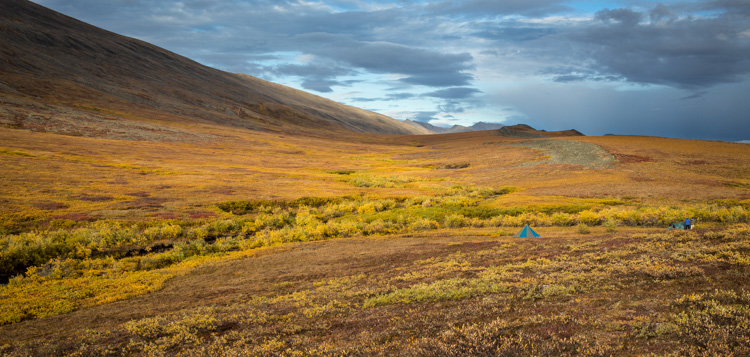
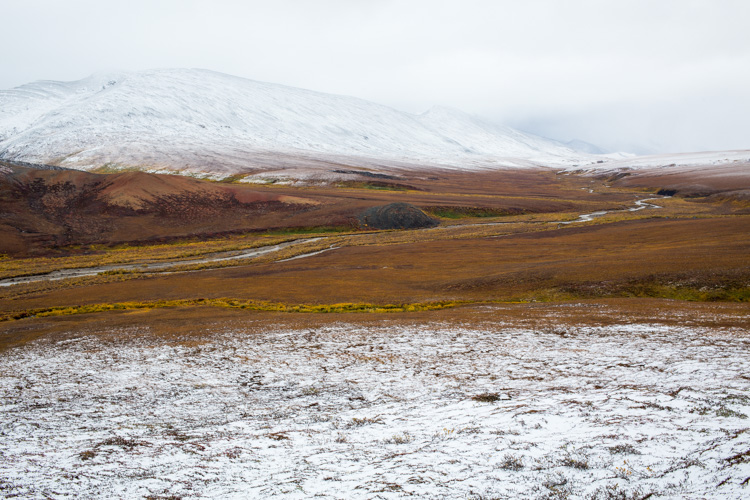
On the sixth day, the storm hit. We were camped on a meadow of soft, dry tundra above a small creek when the winds shifted from a pleasing breeze from the east, to a howling gale from the west. It happened in moments, the speed of the weather change taking me completely by surprise. Rain, then pelletized snow arrived, followed by a genuine snow storm in the night. For two solid days we were battered by the strongest winds and most intense storm I’ve ever experienced in the Brooks Range. Just keeping our tents standing was a constant battle.

AK-ANWR-Katakturuk-Canning-Packraft-1085-582

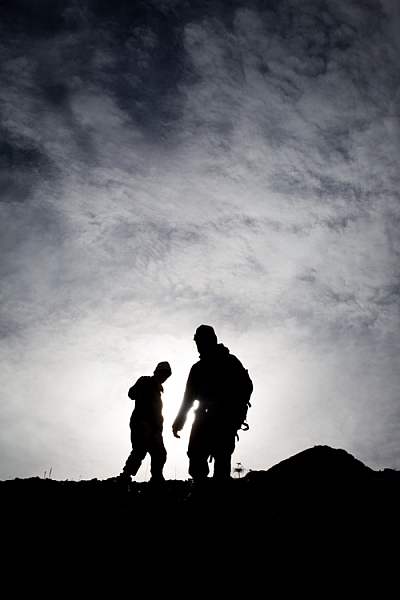
Yet in that time, my clients and I managed a few excursions away from camp. We climbed up to a low ridge where the full brunt of the west wind hit us hard. There, we leaned into the gale and watched the falling snow tear across the tundra.

It wasn’t a photogenic scene, at least not by traditional standards, and yet I made images because I wanted to. Creativity, quite suddenly, brightened up like a cartoon bulb over my head.

AK-ANWR-Katakturuk-Canning-Packraft-1085-504

On the third morning, before I even opened my eyes, I knew the storm had passed. My tent wasn’t shuddering in the wind, and when I did lift my eyelids, I could see the day was too bright to be dominated by clouds.

Emerging from my tent, I saw that fresh snow cloaked the mountains and dusted the tundra around our camp, but blue dominated the sky above. I went for my camera and spent a happy hour making images as the drenched tents and rain gear steamed in the rising sun.

AK-ANWR-Katakturuk-Canning-Packraft-1085-556

Two days later we reached the river and our cache of food and boating gear that had been waiting for us. In those two final days before we traded in our hiking boots for pack-rafts, I think I made more images than I had in the previous three months combined. I couldn’t get enough of it.

AK-ANWR-Katakturuk-Canning-Packraft-1085-384

The 50 miles of paddling stole some of my photographic productivity. (It’s hard to paddle a small bouncing raft through swift, splashing water while taking photos). Nonetheless, as we descended the river out of the mountains and onto the coastal plain, my renewed love for photography stuck with me. Even when another storm hit and we were pinned down for two more days, even when the snow fell in heavy wet flakes, and when the wind tore the autumn colors from the vegetation and shifted the landscape from red and yellow to brown.

AK-ANWR-Katakturuk-Canning-Packraft-1085-643

Our final camp lay where the river met its coastal delta. Caribou criss-crossed the plain in small bands, and migrant birds were congregating in the many lakes. My little lens was no match for the distant wildlife, but it didn’t matter. I’d rediscovered photography, which meant that I was more aware of my surroundings, and the images that lay in it, than I had been for some time. Even if I didn’t have the right equipment to capture some of the photos I found, I recorded them mentally in sharp detail. As it turns out, those mental images are just as rewarding as the ones glowing on my computer screen.

Paging through the images from the trip, I see an interesting evolution. The first images are mostly snapshots, but as time passed, and my inspiration picked up steam, the images become more purposeful, more composed… better, even.

Conclusion

Purposefully restricting yourself can be a great tool to boost creativity. It’s a little like playing charades: using limited tools to effectively get your message across. It can be fun, and a bit frustrating. It forces your mind outside its comfortable box, and into a place where creativity is far more important than gear. When, and if, you return to your diverse array of lenses and cameras, you will no longer take all those compositional possibilities for granted.

If you are stuck in a rut, or just want to try something new, give up your zooms for a couple of weeks, only shoot black and white, use your camera exclusively in manual mode, or shoot some film. After, share your experiences in the comments below, I’d love to hear what happens.

googletag.cmd.push(function() {
tablet_slots.push( googletag.defineSlot( “/1005424/_dPSv4_tab-all-article-bottom_(300×250)”, [300, 250], “pb-ad-78623” ).addService( googletag.pubads() ) ); } );

googletag.cmd.push(function() {
mobile_slots.push( googletag.defineSlot( “/1005424/_dPSv4_mob-all-article-bottom_(300×250)”, [300, 250], “pb-ad-78158” ).addService( googletag.pubads() ) ); } );

The post How Two Weeks in the Wilderness with One Prime Lens Restored My Love for Photography by David Shaw appeared first on Digital Photography School.


Digital Photography School

 
Comments Off on How Two Weeks in the Wilderness with One Prime Lens Restored My Love for Photography

Posted in Photography


How I Learned to Stop Worrying and Love Auto ISO

26 May

ISO is one of the three critical elements of exposure, and yet among the people I have talked to it seems to cause the most confusion. Aperture can be physically represented by simply making a circle with your fingers to represent the size of the opening in your camera lens, and shutter speed can be mimicked by closing your eyes, opening them briefly, and then shutting them. Neither one is a perfect comparison but it helps get the point across, especially to those who are new to photography.

ISO, in my experience, is a bit trickier to explain, and yet it can make or break a picture, even if you have the other two elements set just right. Or…it could make or break a picture in days gone by.

We have reached somewhat of a unique time in the history of photography in that ISO is, to some degree, no longer relevant in the same way that aperture and shutter speed still are. While I certainly would not let my camera choose the aperture and shutter speed for most of my shots, I have all but abandoned my misgivings about Auto ISO, and now almost always let the camera choose for me. As a photographer it has not been an easy leap for me to make, but it has been incredibly liberating, and I think it could be for you too.

A tack-sharp picture shot at ISO 4000 with minimal digital noise.

A tack-sharp picture I shot at ISO 4000 with minimal digital noise.

My first real digital camera, not counting a few point-and-shoot models I had in the early part of the previous decade, was a Nikon D200. It was a beast of a camera, with some features that outclassed even most modern models, like a maximum shutter speed of 1/8000 second and a weather-sealed body. One thing it did not do so well was high ISO values, specifically anything past 400. I could shoot at 800 in a pinch, but going all the way up to 1600 resulted in pictures that were a muddy mess and 3200, its maximum possible value, was an unmitigated disaster. This trained me to use the following thought process in virtually all shooting situations:

  • Shoot in Aperture Priority (I set the aperture and let my camera set the shutter speed)
  • Set the ISO to 100, 200, or 400 depending on the lighting
  • Select an aperture that would give me the depth of field or overall image sharpness I wanted
  • Hope the shutter speed wasn’t too slow so I didn’t get a blurry picture
  • If the shutter speed was too slow, raise the ISO to no more than 800
  • If the shutter speed was still too slow, compromise my artistic vision by opening up the aperture
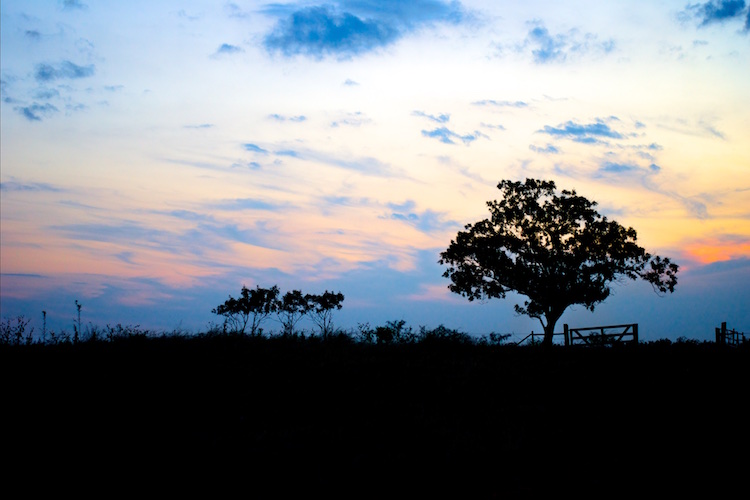
auto-iso-sunset

Even my old D200 could produce some fine images, though things quickly went south above ISO 400.

It was a process that worked somewhat successfully, but often resulted in images that were compromised in one way or another. When I finally upgraded to a much newer camera, a Nikon D7100, I still had the same mindset when it came to setting the ISO. I wanted to do it myself, lest my camera make some kind of silly decision on its own, that resulted in a picture with way too much noise for my taste. For a while I used the same thought process as shooting with my D200, even though the D7100 had vastly superior high ISO capabilities (which have since been surpassed by nearly every modern camera on the market today including its own successor, the D7200).

At first I used the old rule that had been burned in my mind regarding anything higher than ISO 400, which was to avoid it at all costs. Despite the evidence right in front of my eyes I was still used to the old way of doing things, and mentally set my maximum threshold at ISO 800, which I told myself, could only be exceeded in the most dire of circumstances. It took me far too long to discard this line of thinking, and I’m hoping you won’t have to make the same mistakes I did to get there.

Shot on my D200 at ISO 400.

Shot on my D200 at ISO 400.

A Brief History Lesson

The term ISO is somewhat of a holdover from the days of analogue film, when you would go to a camera store and buy an entire roll of film with an ASA value of 100, 200, or 400. ASA 200 was twice as sensitive to light as 100, 400 was twice as sensitive as 200 (which made it four times as sensitive as 100), and so on. Once the film was loaded in your camera you could not simply change your mind and use a different value; you had to shoot the entire roll before changing to another ASA for different lighting conditions.

ASA 100 film was great for outdoor situations or other scenarios where there was a lot of light, just like shooting at ISO 100 on a digital camera. ASA 400 was better for indoor situations when you needed film that was more sensitive to light, if there was simply not much to work with. If you looked hard enough you could get film that went up to ASA 800 or 1000, but anything beyond that was about as common as a polycephalous bos taurus (two-headed cow).
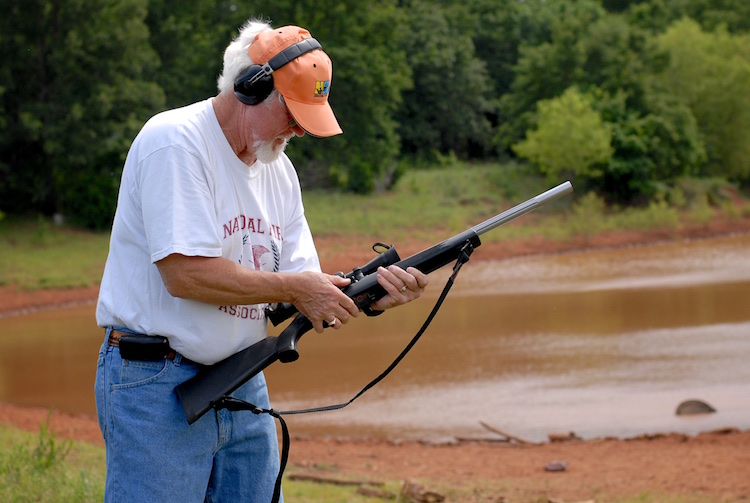
I took this photo of a champion marksman on my old D200 at ISO 400. If you look super close at the trees you will see some noise in the image, but doing that kind of misses the point of the photo.

I took this photo of a champion marksman on my old D200 at ISO 400. If you look super close at the trees you will see some noise in the image, but doing that kind of misses the point of the photo.

Early digital cameras, not unlike my world-weary Nikon D200, did not offer much in the way of low-light shooting capabilities that their film-based counterparts didn’t already have. Even as recently as a decade ago if you wanted to shoot in a low-light situation you might as well just grab a roll of high-ASA film, since most digital cameras just weren’t very good at their (roughly) equivalent high ISO values. (ISO and ASA are not directly 1:1 equivalent, but the measurements can be treated as fairly similar for the purposes of comparison.)

However, all this started to change rapidly as digital sensor technology advanced over the years, and now we are at the point where virtually any consumer camera can shoot up to ISO 3200 or even 6400 (a value that was unheard of with analog film) without much of a penalty in terms of overall color and luminance noise. In fact, most digital cameras are so good they can set the ISO automatically (hence the term Auto ISO), essentially removing a critical element of the exposure equation altogether, and freeing you so you only have to think about aperture and shutter speed.

Why I Use Auto ISO

This line of thinking was what used to stop me dead in my tracks as a photographer. The whole reason I learned to shoot in Manual mode was so I could have more control over my photos! Why on earth would I want to give control back to my camera, as if it knows better than I do what settings I want? The answer, I discovered over several years of shooting, is not as black and white as I once thought.

In most situations, the primary element of exposure that concerns me is the aperture, since it dramatically affects things such as depth of field and image sharpness. Of course I also have to pay attention to the shutter speed, since I generally don’t want motion blur, which then leaves the question of ISO. After shooting with my D7100, and subsequently my full-frame D750, I have realized that in most cases, I’m happy to let my camera decide the ISO for me, because I simply don’t care about it anymore. This might sound a bit extreme, but I humbly submit that perhaps you shouldn’t either.
Shot at ISO 2000 on a three-year-old Canon SL1 (EOS 100D)

Shot at ISO 2000 on a three-year-old Canon SL1 (EOS 100D)

Some photographers are prone to pixel-peeping, and I must admit I am certainly one of them. Zooming in on a picture to 100% magnification, in order to take note of barely-visible imperfections is a great way to compare various aspects of cameras, lenses, and even similar photographs. Shooting at high ISO values will often reveal noisy blemishes that stick out like a sore thumb when viewed up close. However, what I have come to realize, even when shooting with my D7100 which is over three years old, is that I simply don’t need to view my photos at ultra-close range to enjoy them, and for the most part don’t care about the noise that shows up when I see those ISO values skyrocketing. If I have to choose between a blurry picture and a noisy picture, I’ll take the latter every time, and twice on Sunday.

How to Use Auto ISO

The exact mechanics of enabling Auto ISO vary from one camera to the next, but on most models from major manufacturers like Canon, Nikon, Sony, Fuji, Olympus and their peers, there is usually an option in one of the menus that allows you to do a few things:

  • Enable Auto ISO
  • Choose a maximum ISO value
  • Choose a minimum shutter speed

Once you learn to find your comfort zone with these settings, you might find yourself thinking less about ISO, and more about things like framing and composition. On my D7100 I’m comfortable shooting up to ISO 3200, so I set that as the maximum value. I have the minimum shutter speed set to 1/(2x lens focal length). This means if I’m using a 50mm lens and shooting in Aperture Priority, my camera will lower the shutter speed to no less than 1/100th in order to get a properly-exposed picture, and if that still doesn’t do the trick it will then automatically raise the ISO clear up to 3200.

Learning to relinquish this amount of control has been incredibly freeing, so much so that for a while it actually felt like I was cheating because I was not manually selecting the ISO for every single shot. On my D750 I use similar settings but set the maximum value at 6400.

As you play around with this on your gear you are going to have to find a solution that works for your individual needs and photographic taste. Some cameras only let you specify one single value for the minimum shutter speed (as opposed to calculating it based on the focal length of your lens) and your mileage for how effective this technique is may vary, but if you can learn to embrace Auto ISO and let your camera do some of this heavy lifting, you might find yourself getting a lot more keepers on your memory card.

For this impromptu Easter photo I set the aperture at f/3.3 and let my camera do the rest. It chose a shutter speed of 1/100 and then raised the ISO as high as it needed to (2800) in order to get a good exposure.

For this impromptu Easter photo I set the aperture at f/3.3 and let my camera do the rest. It chose a shutter speed of 1/100 and then raised the ISO as high as it needed to (2800) in order to get a good exposure.

I would be remiss if I did not mention some of the downsides of Auto ISO as well, as not all is bright and sunny, and warm and fuzzy on this side of the fence.

One of the most significant limitations of shooting at high ISO values is the lack of dynamic range – basically, how much data your image sensor is able to capture in a given picture. If you have a RAW file that was shot at ISO 5000, and you need to use Lightroom to recover detail from the shadows, or raise the exposure of the whole image, you will find you have much less room to work with than if you shot the photo at ISO 100.

Also, depending on your camera, you may also find cases of severe banding, or ugly horizontal lines, that show up when you try to recover shadow detail at high ISO values. Finally, all things being equal a picture shot at ISO 4000 will generally have less vibrant colors, and skin tones will seem a little more artificial and false, than a similar picture shot at ISO 400.
Selecting the ISO was the last thing on my mind; I used an aperture of f/4 and a minimum shutter speed of 1/100. My camera selected an ISO of 5000 and I could not be more pleased with the result. A year ago I would have never gone that high, and would have had a blurry photo instead.

Selecting the ISO was the last thing on my mind when I made this image. I used an aperture of f/4 and a minimum shutter speed of 1/100, my camera selected an ISO of 5000, and I could not be more pleased with the result. A year ago I would have never gone that high, and would have had a blurry photo instead.

Despite these limitations, shooting with Auto ISO has been a huge boon for me, and I think it could be for you too. If you have never tried Auto ISO, I recommend giving it a chance and see how you like the results. For me it was a little like enabling back-button focus, in that I was highly skeptical at first, but after a few weeks I was hooked and now I don’t think I could ever go back.

Do you use Auto ISO? Share your thoughts in the comments below, and I’d love to see some of your favorite high-ISO images as well. Cameras today really are incredible imaging machines, and it’s fun to see what they can do if we push them a little bit.

googletag.cmd.push(function() {
tablet_slots.push( googletag.defineSlot( “/1005424/_dPSv4_tab-all-article-bottom_(300×250)”, [300, 250], “pb-ad-78623” ).addService( googletag.pubads() ) ); } );

googletag.cmd.push(function() {
mobile_slots.push( googletag.defineSlot( “/1005424/_dPSv4_mob-all-article-bottom_(300×250)”, [300, 250], “pb-ad-78158” ).addService( googletag.pubads() ) ); } );

The post How I Learned to Stop Worrying and Love Auto ISO by Simon Ringsmuth appeared first on Digital Photography School.


Digital Photography School

 
Comments Off on How I Learned to Stop Worrying and Love Auto ISO

Posted in Photography


8 Reasons to Love Long Exposure Photography

06 May

Long exposure photography is not a new type of photography, but it is one that is gaining in popularity. Many photographers are buying Neutral Density filters (ND Filters – more on them below) to capture their own long exposures. It is quite an addictive form of photography. Over the last couple of years I have added many different ND filters to my kit. I use Formatt Hitech filters, though there are other brands that have them as well. Here are some reasons why I love this type of photography.

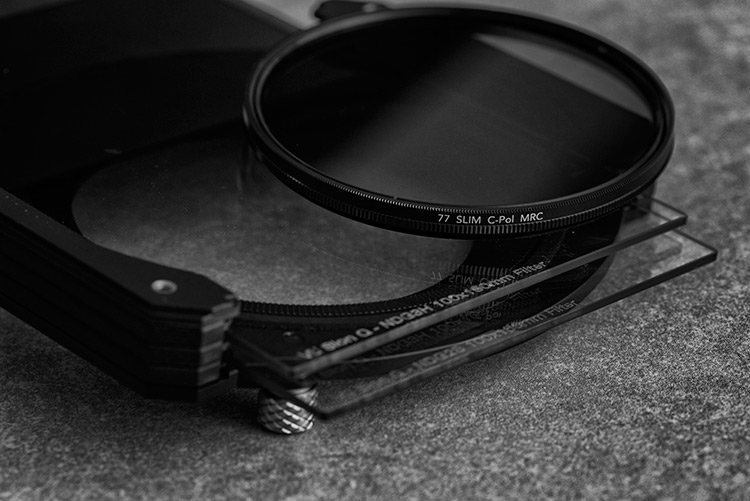
Drop-in and screw-in filters

Note: Neutral Density filters or ND Filters are designed to restrict the amount of light that enters the lens and camera. They can either screw onto the end of the lens or you can buy brackets that will fit square ones. They came in different densities, and how dark they are is referred to by how many stops of light they block. The most common ND filter is the 10 stop which many brands make. The neutral refers to them having no colour, supposedly. They are meant to have no colour and cause no colour cast in your images, though the more stops the filter has, often the more likely you are to get some colour cast. Cheap ND filters always have a colour cast, usually magenta. If you want to get serious about doing long exposure photography, then purchasing good quality filters from the start is something you will never regret.

1 – Get a smooth look to water, or show how the water moves

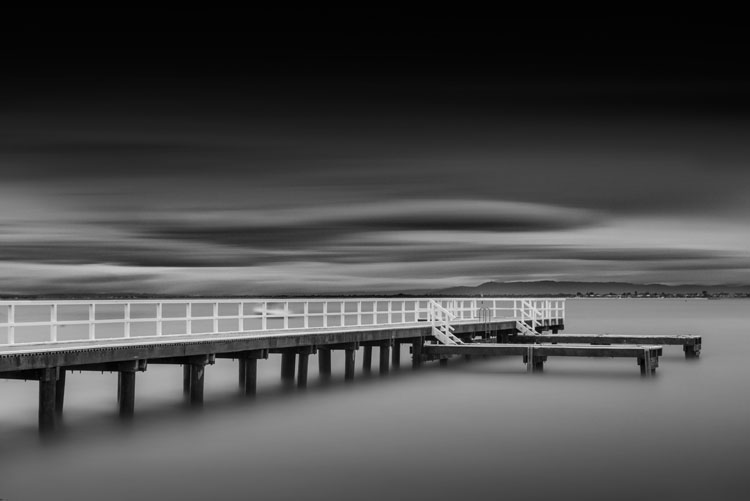
One of the more popular ways of using long exposures is to smooth out water to make it look still or frozen. This can be done with the ocean, rivers, and lakes. It can make the water in a scene less distracting because the water doesn’t have any movement in it. The image is then more about the sky, the rocks or whatever else is there.

LeanneCole-7reasons2lovelongexposures-daveysbag

A pier at Davey’s Bay, the long exposure has blurred the clouds and smoothed the water – 5 minute exposure.

Another alternative is to do long exposures of around a second, so you can see the movement of the water. As the tides come in and out on the beach, you can see where it has been, it almost looks like a slow motion capture. It’s a wonderful effect and we are seeing it a lot more. Though water moving on the beach isn’t the only way to use it, water falling over rocks can be just as engaging.

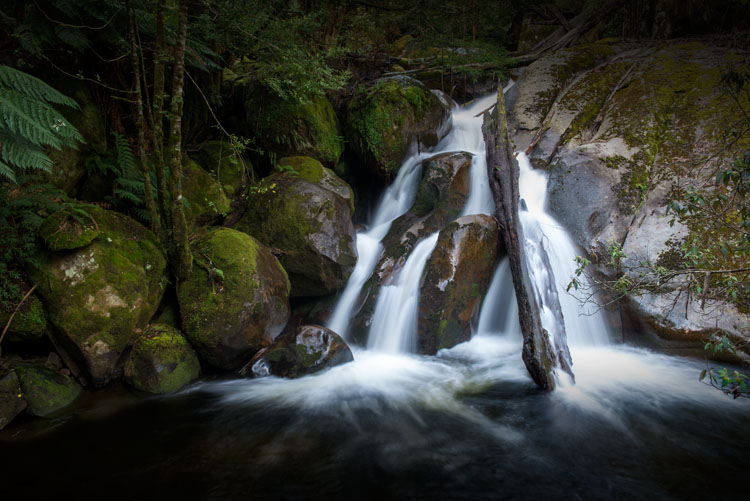
Waterfalls are another type of long exposure that people love. Though many waterfalls are down in canyons, you still need a ND filter to get that smooth marshmallow effect with the water as it flows down. Though, you don’t often need a multi-stop one like you would for the previous water examples.

LeanneCole-7reasons2lovelongexposures-taggertycascades

Adding a few seconds (1.33 seconds) to an image of a waterfall gives it a lovely marshmallow effect. You can also see the movement of the water.

2 – Get blurred clouds

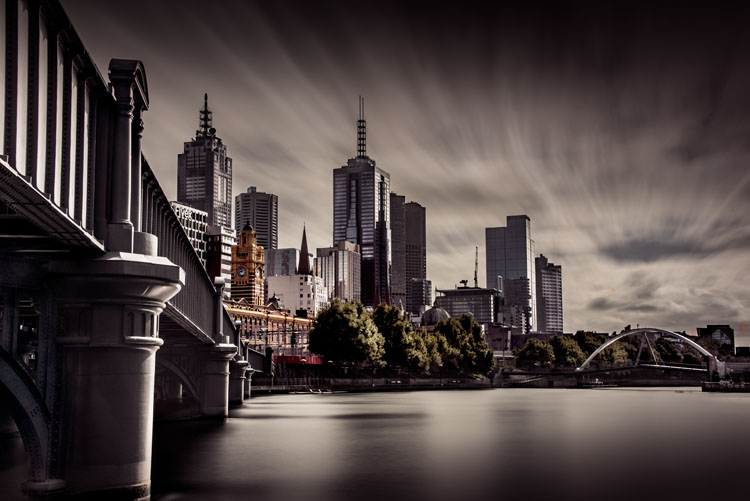
Architecture is a very popular subject for long exposures because you can blur the clouds. It gives the image a different look, and it almost seems like your subject is lost in time. With blurring the clouds, it also makes the building(s) you are photographing your main focus point, and gets rid of any distractions.

LeanneCole-7reasons2lovelongexposures-melbourne

Melbourne from across the river. The long exposure (4 minutes for this shot) gives the view a different feel to what we normally get.

3 – You can clear spaces of people and traffic

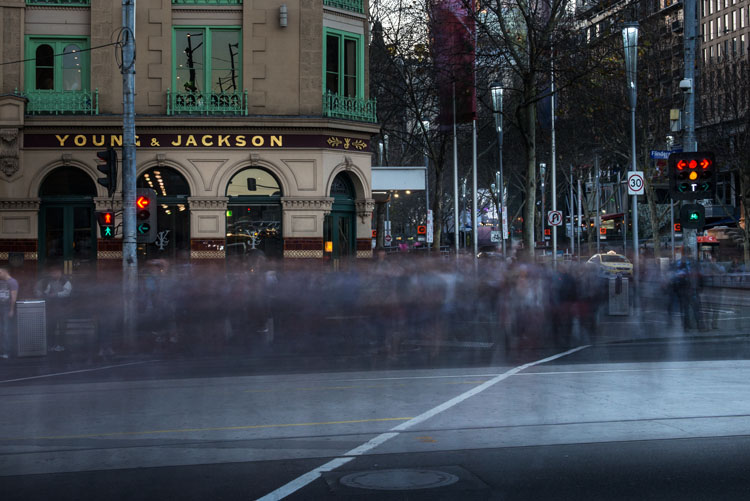
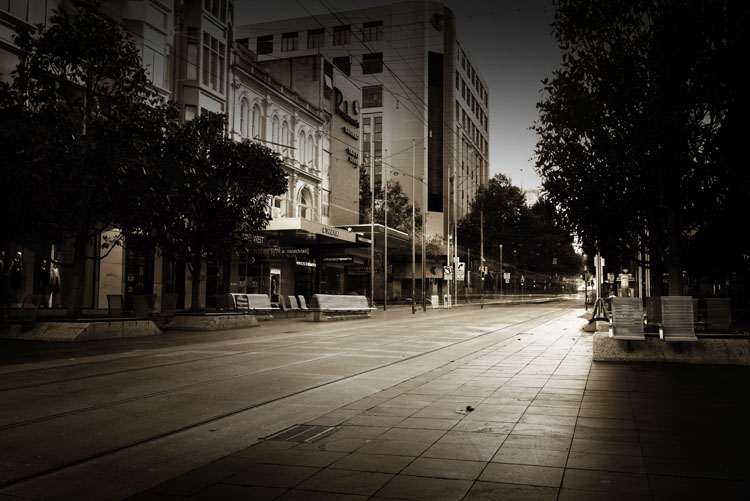
If you love photographing areas in towns and cities, but one of the challenges of that type of photography is that people are always around, long exposures using filters will help you clear those distractions. Exposures of several minutes can almost clear a scene of people, though it depends on the density of them. A scene where there are only a few people walking around can come out with the appearance of being empty with a long exposure. However, where there are many people you will find that they just blur, though this can be a great effect as well.

LeanneCole-7reasons2lovelongexposures-youngandjacksonscorner

Photographing a busy intersection with a ND filter makes people look like ghosts – 30 second exposure.

4 – There is a quietness about the work

Once people are introduced into a scene that you are photographing, it brings with it noise, as in how people see the images. They can be noisy, and whether people looking at the images realize it or not, they hear what they would hear if they were actually there. Vehicles can have a similar effect.

LeanneCole-7reasons2lovelongexposures-bourkestmall

Bourke Street Mall at peak hour, a 10 minute exposure has removed the people and given it an empty feeling.

If you do a long exposure of the same thing, that noise is gone. Often when you see a long exposure image it has a quietness to it. Fill a room with images done this way and put people in it, they will feel as though they have to be quiet.

5 – Take photos of a common subject and give it a completely different feel

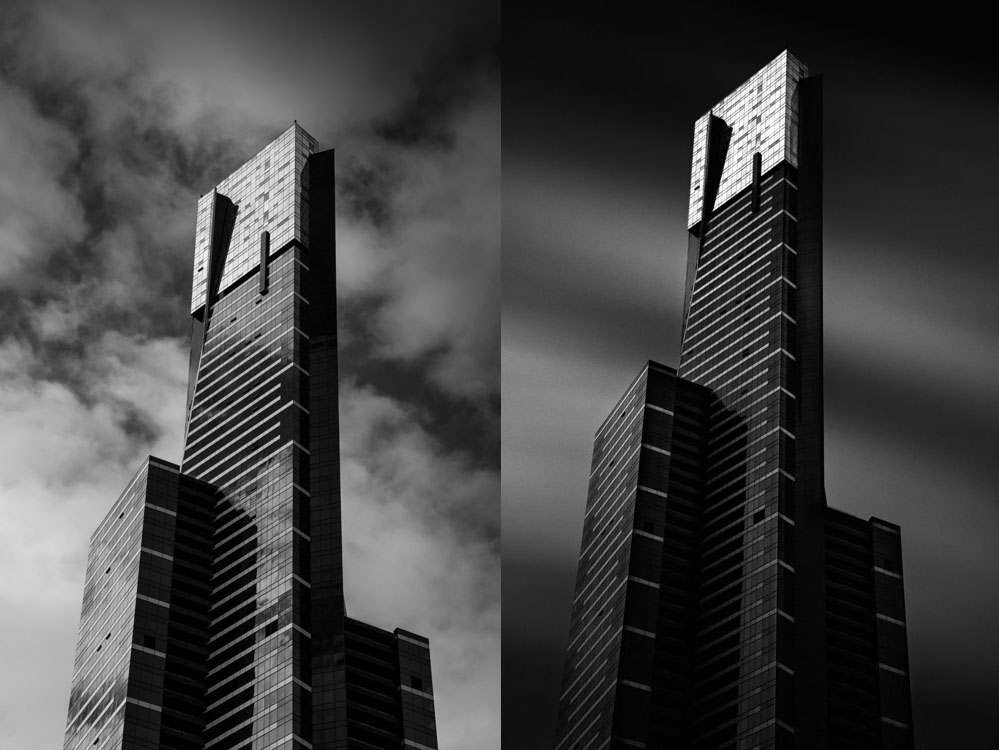
In every city around the world there are iconic places and scenes that everyone is trying to photograph differently than others. If you have some ND filters and your tripod, you can create an image that not many others get. Especially when travelling, not many people have filters with them. You would have an opportunity to get something quite different to the thousands of other photos that are taken in those places. Of course it is a given that they are places where you can set up a tripod.

LeanneCole-7reasons2lovelongexposures-eurekatower

Eureka Tower is a very photographed building in Melbourne, the image on the right is similar to what most people get, but by adding a ND filter you give a well photographed building a different look. Left image: 1/200th – Right image: 6 minutes.

6 – Give a landscape a sense of time, or time passing

When you have images of clouds being blurred as they go over the top of a building or a landscape, it seems like you have captured time. Many people feel like they are looking at time passing. The long exposure is taken over a period of time, so it makes sense that you would get that feeling when you look at those images.

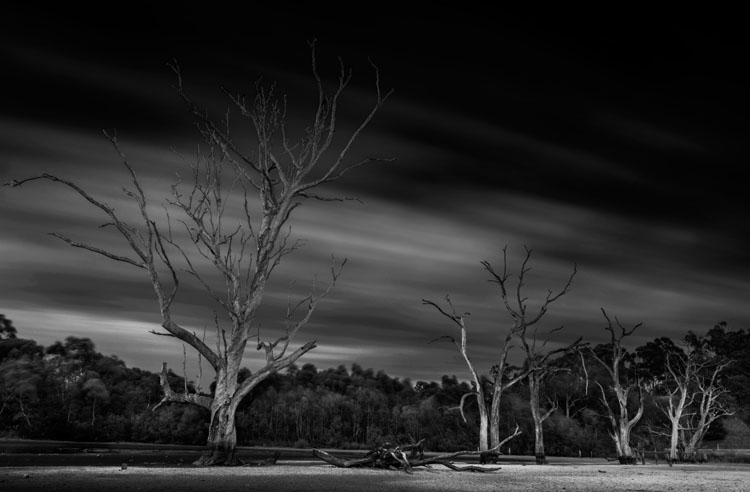
LeanneCole-7reasons2lovelongexposures-banyuleflats

Dead trees in a dried out swamp, and the moving clouds give the impression they have been there for an eternity – 3 minute exposure.

7 – Images have a surreal look and give you a different perspective

One of the great aspects of long exposure photography is that you can set up your camera, your tripod, and slot in your neutral density filter, but you won’t know what you will get until the image is taken. It will give you an image that is nothing like what you can see with your eyes. When you get the images onto your computer it is always a surprise to see exactly what you have captured.

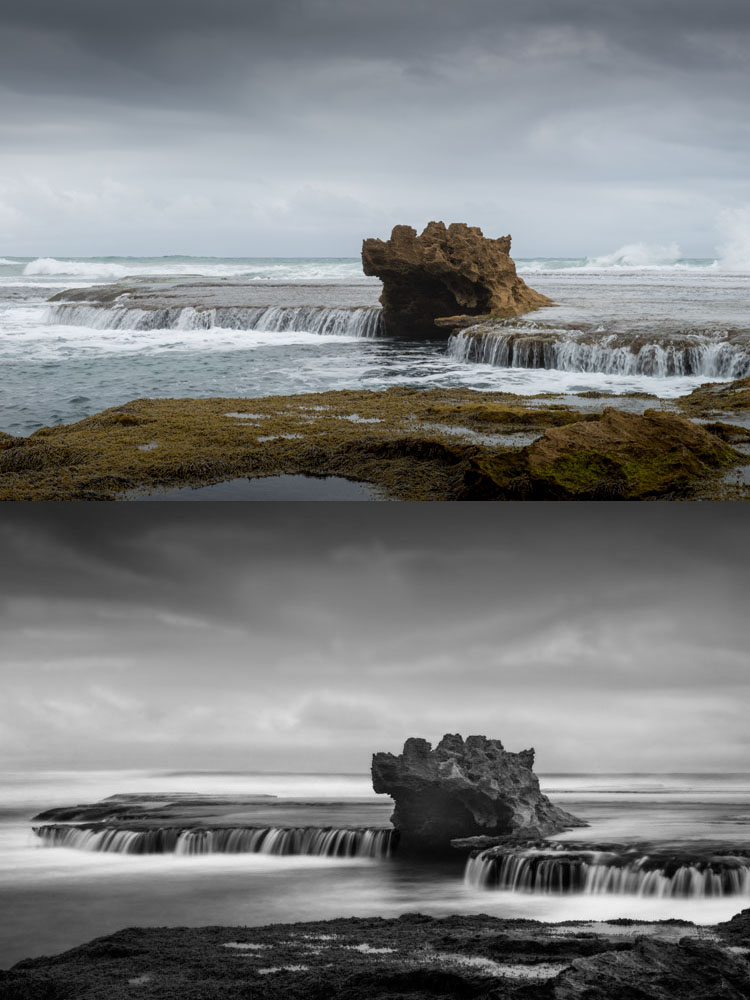
LeanneCole-7reasons2lovelongexposures-dragonshead

The same image, one take without the ND Filter and the second one with it. It gives the scene a completely different feel. Top image: 1/50th – Bottom image: 13 seconds.

8 – Night Photography is great for the same reasons

Night photography gives you an opportunity to take photos and not have to worry about filters. You can expose for however long you need. If it;s a windy evening and there are clouds in the sky, you will get movement in your images. If you are taking photos across a water way, then the water will be smooth, and you will get reflections of the lights if there are some on the other side. For all the reasons stated for long exposures, night photos have the same effect.

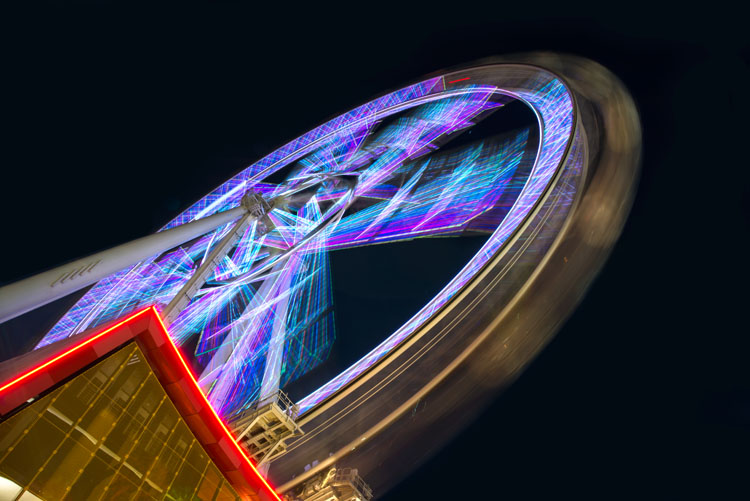
LeanneCole-7reasons2lovelongexposures-melbournestar

A night long exposure makes the Melbourne Star blurred and you can see how it moves – 2 minute exposure.

These are the reasons why I think long exposure photography is wonderful. If you are curious and want to try doing these then I am sure you will become addicted like many others. If you already do them, you might have your own reasons and perhaps you would like to share with us what they are in the comments below as well as your long exposure images.

googletag.cmd.push(function() {
tablet_slots.push( googletag.defineSlot( “/1005424/_dPSv4_tab-all-article-bottom_(300×250)”, [300, 250], “pb-ad-78623” ).addService( googletag.pubads() ) ); } );

googletag.cmd.push(function() {
mobile_slots.push( googletag.defineSlot( “/1005424/_dPSv4_mob-all-article-bottom_(300×250)”, [300, 250], “pb-ad-78158” ).addService( googletag.pubads() ) ); } );

The post 8 Reasons to Love Long Exposure Photography by Leanne Cole appeared first on Digital Photography School.


Digital Photography School

 
Comments Off on 8 Reasons to Love Long Exposure Photography

Posted in Photography