RSS
 

Posts Tagged ‘Love’

A Love Letter to the Humble Softbox

08 Oct

When it comes to shaping and modifying your light, there are so many options available it can be hard to stay in one place for long. In the beginning, you’ll use the basics such as a softbox or an umbrella. But as you get comfortable with noticing the tiny differences in light, you’ll quickly graduate to more specialized modifiers. Beauty dishes, reflectors (the kind that fits to a strobe), octaboxes and striplights all do wonderful things to your light. And you can easily get caught up in the ways these and other modifiers can be used.

Overlooked

Despite all these options, I feel the basics can sometimes be overlooked. Have you ever stopped to think why the humble softbox has become so universal? No doubt there are many answers to that question, but an important one is that it works – and works well.

To be clear, I’m talking about the basic rectangular photographic softbox around 3′ x 4′. Not too large, and not too small. (Popup softboxes have their place, but we’re not talking about them in this article.) With the right techniques, these workhorses of the photographic studio can give you beautiful, soft light that suits just about any subject you can think of.

Basics

You probably already know the basics of how a softbox works. But for the sake of posterity, let’s go through it again.

A softbox is mounted on the front of the strobe to shape and more evenly distribute the light. They’re often fitted with silvery material on the inside to help bounce the light around and ensure it spreads evenly through the diffusion material at the front. This diffusion material effectively becomes your light source. Because your light source is now much bigger than the bare strobe, the quality of light changes from hard to soft (hence the name ‘softbox’).

Manipulating the quality of the light gives you much more flattering light for almost any subject, especially portraits.

Never Forgotten

For these reasons a great deal of photographers start their camera lighting with a softbox. They’re cheap, easy to find and use, and provide excellent results. But as their skills increase, and new and more complicated techniques open up, it can be hard to resist the allure of fancy, niche modifiers.

For a few years I used nothing but a beauty dish. Even now I tend to favor large octaboxes for portraits. But in this article I want to show you that just because you’ve moved on to other things doesn’t mean you should forget the basics. As I said, there’s a reason the softbox has become so universal.

Examples

Here are several examples of what you can achieve with a simple 3′ x 4′ softbox that cost around $ 35.

Note: As you’ll see in the annotations, for some of these shots a 5-in-1 reflector ($ 15) was also used.

1.

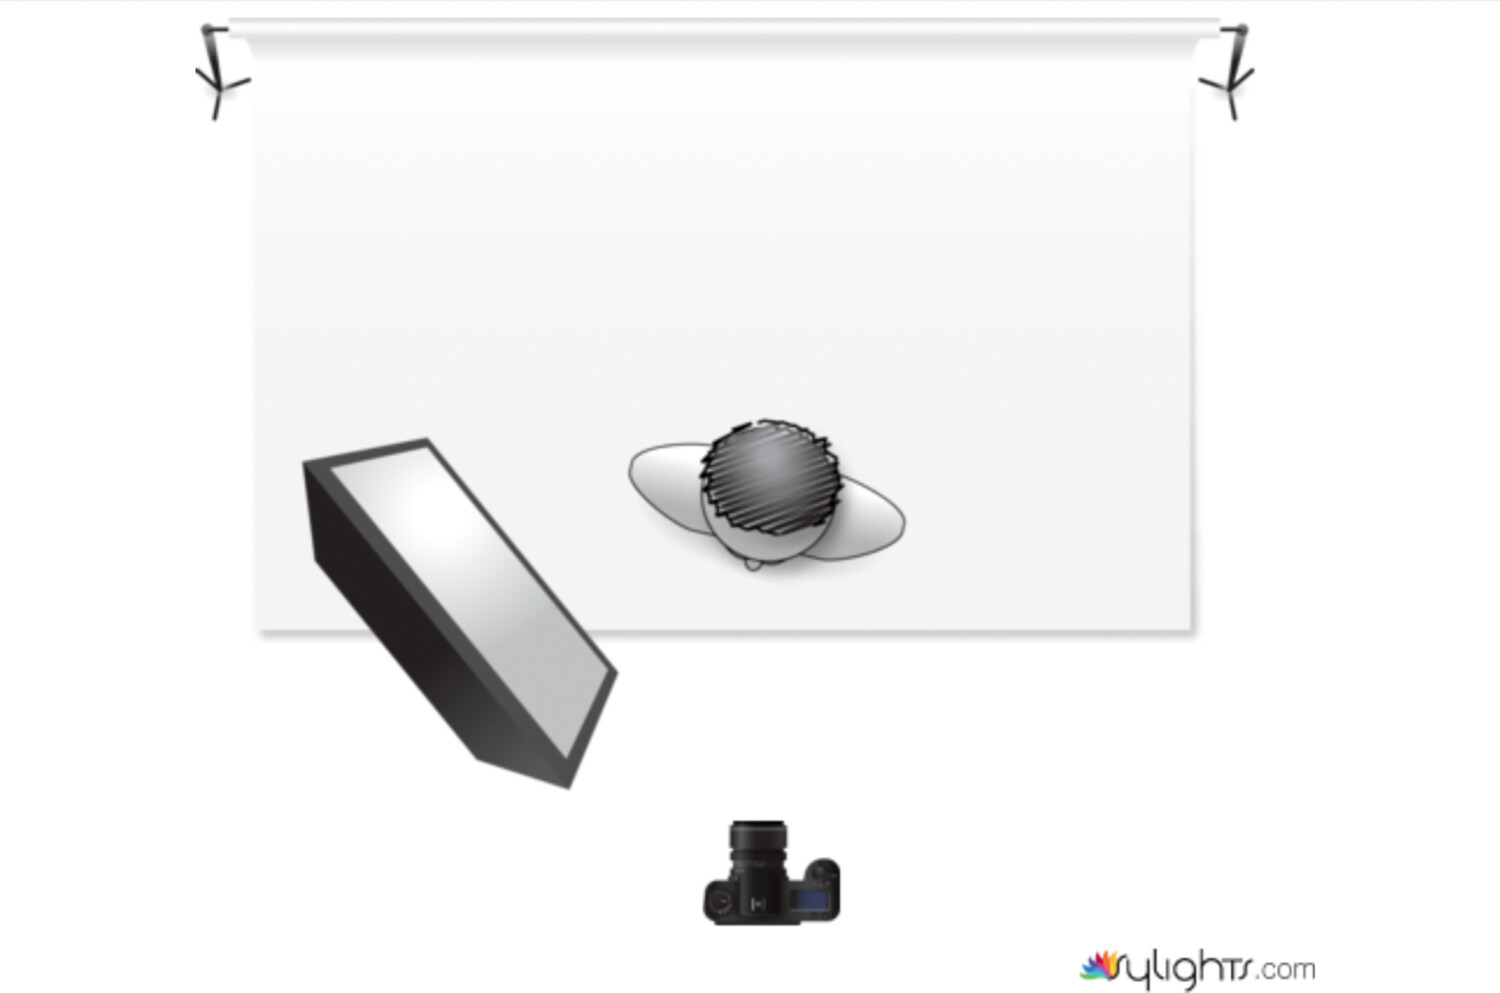
In this example, the softbox is directly in front of and offset slightly from the subject. This results in a lighting pattern called ‘loop lighting’. Because the light source is so close, the resulting soft light is ideal for portraits.

2.

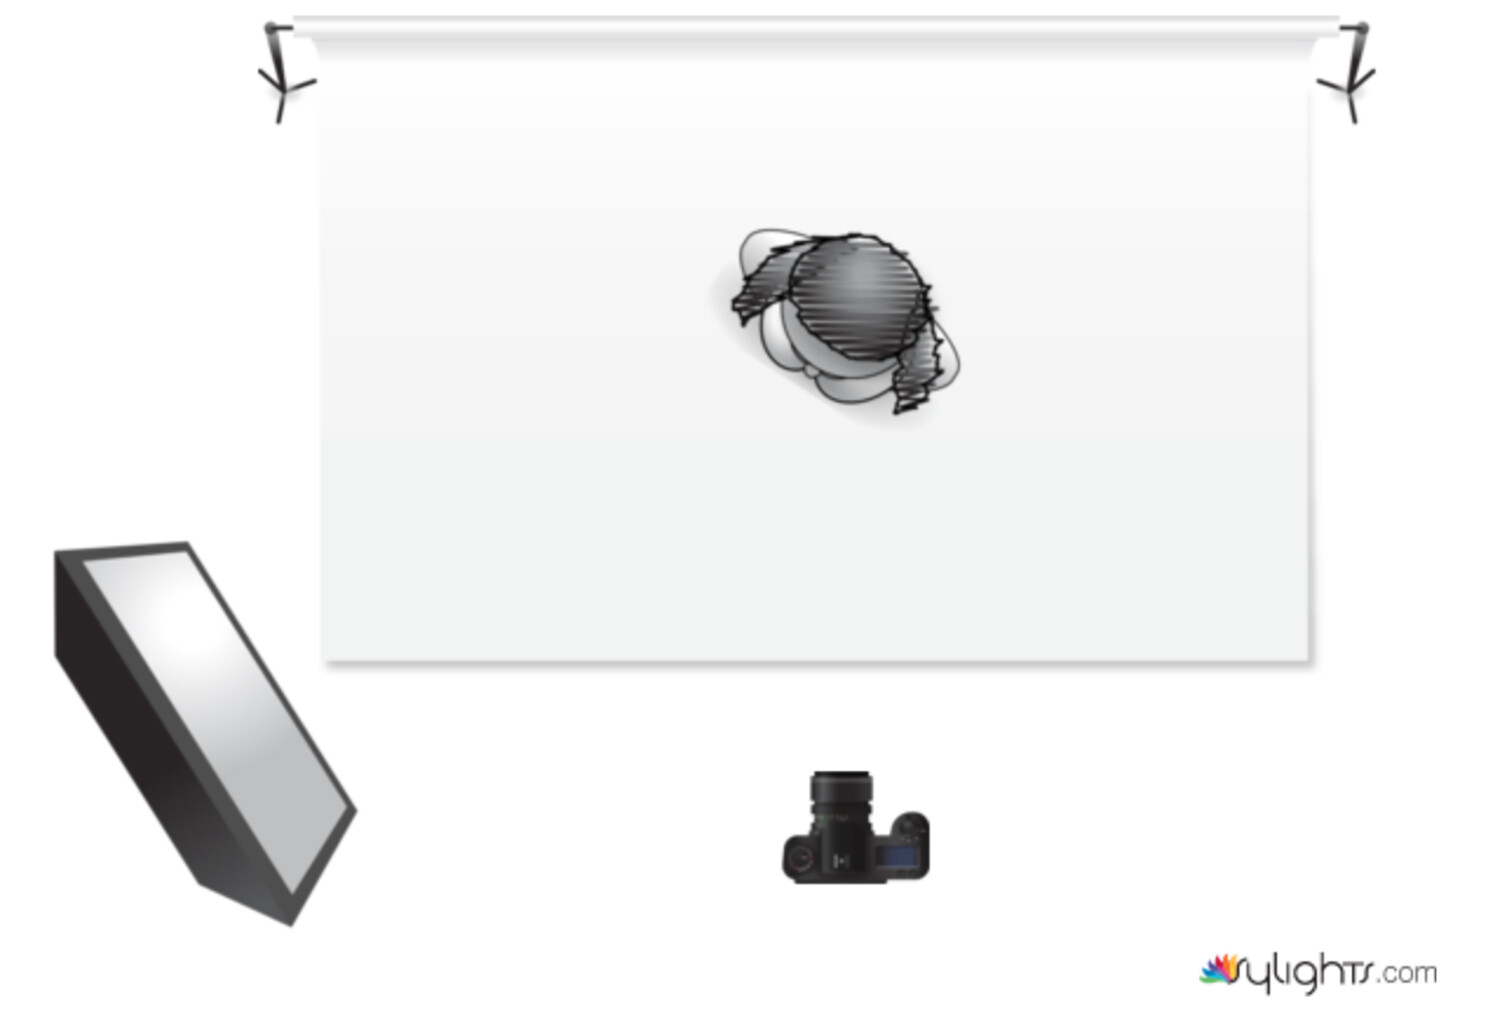
Like the previous example, the softbox for this image is really close to the subject. But this time, it’s placed at 45 degrees and slightly above. Look at the catchlights in his eyes, and you can see exactly how close the light source is. Again, the light here is really soft, and you can see this quality in the smooth tonal transitions from the highlight areas to the shadow areas.

3.

This setup is almost the same as the previous setup, except the softbox is slightly further away and there’s a white reflector at camera right.

Placing the light further away reduces the speed of the light falloff, which in this case means that the shadows don’t dominate as quickly as in the previous example. The reflector also helps with this.

4.

Medium-sized softboxes are well suited to clamshell-styled setups. Simply place your softbox directly in front of and above your subject, pointed down at 45 degrees. Then place a reflector underneath and pointed upwards at 45 degrees. (Without a reflector this would be called ‘butterfly lighting’.)

5.

Softboxes can be used to great dramatic effect when used as side lighting. Deep shadows and soft highlights can really add a lot of depth to your images.

6.

The previous examples all had the softbox in close for the softest possible light. You can also pull your light source back to make use of harder light to good effect. But pay close attention to the clearer transitions between the shadow and highlight areas.

The End

I’m not telling you to limit yourself to a softbox. By all means, go out and use and explore every modifier you can get your hands on. Just remember that as you’re planning your lighting for any given situation, sometimes the ease and simplicity of the basics might give you the results you need.

The post A Love Letter to the Humble Softbox appeared first on Digital Photography School.


Digital Photography School

 
Comments Off on A Love Letter to the Humble Softbox

Posted in Photography


dPS Writer’s Favorite Lens: Why I Love My 35mm F1.4

10 Sep

I’ve used a multitude of different lenses over the years, but never one that I have loved using so much as my 35mm f1.4.

This lens fits with my style of photography. I like things fairly natural and unmanipulated. I love isolating my subject and enjoy being able to photograph in low light without a flash. Also, I prefer getting close to what I am photographing.

Buddha Face - dPS Writer’s Favorite Lens: Why I Love My 35mm F1.4

My 35mm lens gives me a slightly wider field of view than our typical visual attention. Our visual attention is around 55 °, not including peripheral vision, and the angle of view of a 35mm on a full frame camera body is 63 °.

At wide aperture settings, this lens charms me. In most lighting conditions I can achieve super sharp focus and beautiful bokeh in my backgrounds. I am not left shaking in my boots wondering if my shutter speed is too slow.

This is not a review. This is an article about why I love my 35mm f1.4 lens and how I make the most of it in everyday use.

Why I Bought a 35mm f1.4 Lens

Nikkormat FTN with 50mm lens - dPS Writer’s Favorite Lens: Why I Love My 35mm F1.4

My original Nikkomat FTN and 50mm f1.4 lens

My first camera, purchased second hand in 1983, was a Nikkormat FTN with a 50mm f1.4 lens. After using this lens for 28 years it was no longer consistently producing sharp photos. I think it was just worn out.

At the time I had the popular 24-70mm and 70-200mm f2.8 zooms but was not happy with either of them. They were big, heavy third party lenses that also did not always produce sharp images. For a number of reasons, I was gravitating back to using prime lenses. I’ve always had a collection of older primes and love them.

I became so familiar with my old 50mm. I loved the wide aperture but preferred a wider angle of view. After checking online for example photos produced by the 35mm f1.4 lens, I convinced myself it was worth the money. At US$ 1696 it is not cheap. But I figured that if I use it for 10 years it works out to less than 50 cents per day.

Versatility in Most Situations

Lotus Flowers - dPS Writer’s Favorite Lens: Why I Love My 35mm F1.4

Capturing a diverse range of images with a single lens is a common reason people often prefer zooms. But I find I can use my 35mm lens to photograph just about anything. It just suits my style. I am not a sports or bird photographer so much.

For travel, street, environmental portraits, and even more standard portraits, I am happy to use my 35mm. At times I’ll need a telephoto to get in closer so I switch to my 105mm or a longer lens.

During the photography workshops I teach, this is often the only lens I take with me now. I can use it to demonstrate and make examples of anything that I am teaching. For the subjects I like to photograph I most often use this lens.

The great photographer Robert Capa said, “If your pictures aren’t good enough, you aren’t close enough.”

I find the 35mm lens is the perfect focal length to get close enough.

Street and Travel Photography

Poi Sang Long Festival - dPS Writer’s Favorite Lens: Why I Love My 35mm F1.4

Whether you’re shooting wide, medium or close-up street compositions, the 35mm f1.4 can capture them all well.

Taking in the feeling of a market or parade with a wide photo is essential to have in a series of images. Often using a 24mm or wider lens can squeeze too much into one frame. Choosing a location far enough back from the scene to include a good amount of it works best with a 35mm.

Medium range compositions, where you photograph some of the environment and one main subject, are perfect for a 35mm lens. You can get in close and still easily show enough of the surroundings to keep your subject in context with your photo story.

I do like controlling how much or how little of the background is in focus in a medium range composition. I don’t always choose the widest aperture setting as too much detail from the story could be lost. Having the widest aperture of f1.4 gives me more flexibility in how far back I can get from my subject and still control the bokeh.

Macro photos are not possible with this lens, but I can get pretty close. The lens can focus down to about 30cm (1 foot). For including some detail in a photo series, this is often good enough. If I need a macro image I swap lenses for my 105mm or 55mm micro.

Malu young Thai girl - dPS Writer’s Favorite Lens: Why I Love My 35mm F1.4

Environmental Portraits

Portraiture which includes some of the surroundings, telling more of the story, is my favorite genre of photography. I love using my 35mm f1.4 lens for creating environmental portraits. Being able to get in close enough to my subject and still see sufficient background is vital.

Connecting with my subjects is also important to me. Often I will be chatting with them while I am photographing. Other times I will be silent, only communicating with a smile and some gesturing.

Photographing with my 35mm I can create more intimate portraits than when I am further back with my 105mm.

Silver Temple Artist - dPS Writer’s Favorite Lens: Why I Love My 35mm F1.4

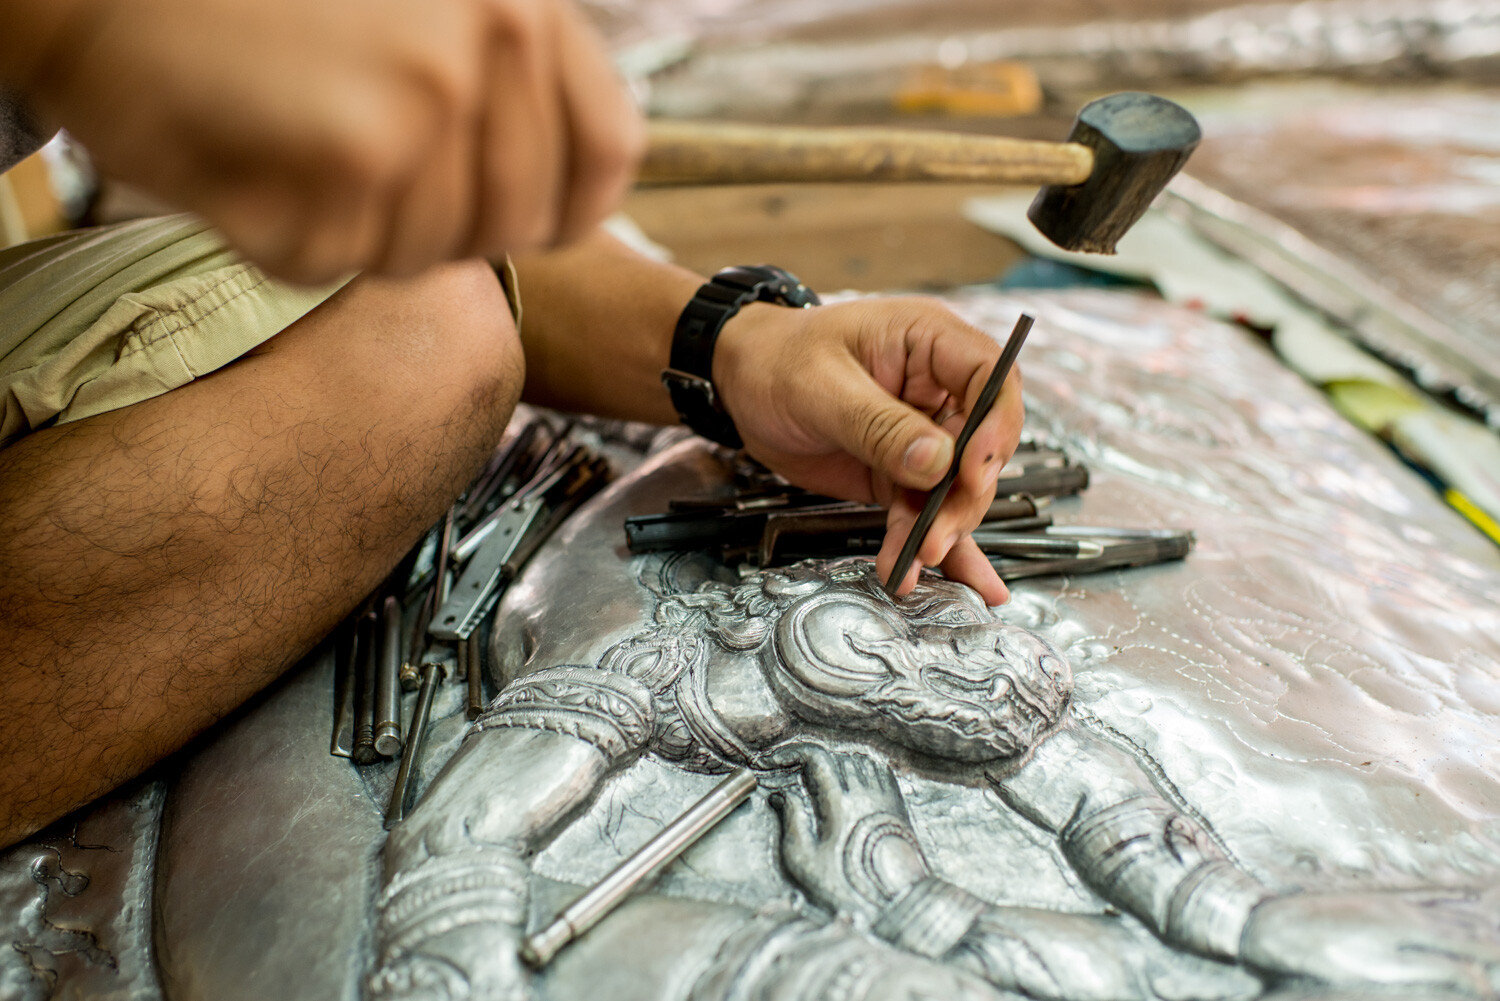
I’ve photographed this guy working on his pressed metal art many times. He’s at the Silver Temple in Chiang Mai that we visit during one of our photography workshops. I know he is comfortable being photographed.

When he’s busy we don’t talk much, if at all. I can be close enough to him to exclude a lot of the clutter in the background and show just what he is working on. Then I can come in closer and capture a little more detail.

Silver Temple Artist close up - dPS Writer’s Favorite Lens: Why I Love My 35mm F1.4

Regular Portraits

Photographers often prefer a longer lens than a 35mm for making regular portraits. I do use my 105mm much of the time for photographing people in posed positions. However, I like to create a variety of styles during a portrait session and I find my 35mm lens provides pleasing alternatives.

With wider lenses, you start to see some distortion, which is not all that great for portraits. At 35mm there is no real noticeable distortion, but even still, I usually will not place my subject at the edge of the frame.

Working with a model and using a 35mm lens it is important to build a rapport with them first. You do not want them feeling uncomfortable with you being so close. Showing them a sample of the photos you are taking will often help them relax and build their confidence in what you are doing. This is especially so if the model is concerned that being so close to the camera may be distorting their features.

This young woman was very confident and experienced in being photographed. Still, she was a little wary of me being so close. I had started the session photographing with my 105mm lens. Once I changed to the 35mm I made sure to show her some of the pictures I was taking with it and she loved them.

Thai Dancer - dPS Writer’s Favorite Lens: Why I Love My 35mm F1.4

Architecture and Landscape Photography

It’s not at all uncommon to use a 35mm lens for landscapes or photographing buildings. There’s no huge advantage of having such a wide aperture for these subjects as I will typically want more rather than less in focus. At times I will focus on an element in the foreground and intentionally blur out most of the landscape in the background.

Lack of distortion makes the 35mm a good choice for architectural photography. Having a similar field of view to what we see naturally also helps structural photos look more natural.

Chedi Luang, Chiang Mai, Thailand - dPS Writer’s Favorite Lens: Why I Love My 35mm F1.4

Loving a Lens

I’ve gotten a huge amount of use out of my 35mm f1.4 lens. The experience of using it frequently and really enjoying it has helped me to get to know it well. Being so familiar with a lens means you can make more creative photos with it.

35mm f1.4 Lens well loved - dPS Writer’s Favorite Lens: Why I Love My 35mm F1.4

My 35mm f1.4 looking well loved.

I love this lens and I have a feeling for it. I know, often by instinct, how much my background will be blurred. With the 35mm, I can be close enough to my subject to comfortably communicate with them. Also, I am able to include or exclude as much or little background detail as I want.

Lens love is different than lens lust. You can lust after a new lens every day of the week. To build a loving relationship with a lens you must be committed to taking it out frequently and enjoying spending time with it.

Here’s a video with more about why I love my 35mm f1.4 lens. Do you have a favorite lens? Which one, and why?

The post dPS Writer’s Favorite Lens: Why I Love My 35mm F1.4 appeared first on Digital Photography School.


Digital Photography School

 
Comments Off on dPS Writer’s Favorite Lens: Why I Love My 35mm F1.4

Posted in Photography


Shooting for Love in 2018

04 Jul


Jake Garn Photography

 
Comments Off on Shooting for Love in 2018

Posted in Uncategorized


How a Studio Photographer Came to Love Natural Light Again

10 May

I’m a studio photographer. There are no two ways around that fact. It also happens to be the way I like it. I prefer the absolute control I have over every single factor in a studio environment. That way, I’m not at the whim of changing light at different times of the day or inclement weather.

How a Studio Photographer Came to Love Natural Light Again - studio portrait of a lady

As a studio photographer, my preferences are for an environment where I control every aspect of the light.

A lot of this might have to do with the fact that I live in the United Kingdom, and for the most part, the stereotypes about the weather aren’t wrong. That and daylight hours throughout the year vary wildly. In the summer, I may have daylight until 11 PM, in the winter, that changes to 3 PM. Locked away in my studio, I don’t have to worry about sudden unpredicted rain (in Yorkshire, there’s a lot of it).

I don’t have to worry about summer temperatures dropping below ten degrees (Celcius) causing severe discomfort for my subjects and myself. Most importantly, I don’t have to worry about the light being even slightly different then I want. In a studio, I decide what I want and if the lights aren’t quite there, I change them until they are as desired.

Of course, I have nothing against natural light. I just have a preference based on how I like to work.

Using Natural Light

outdoor portrait of a girl - How a Studio Photographer Came to Love Natural Light Again

On occasion, I get out to use natural light when there’s something specific to achieve.

This doesn’t mean I have forsaken natural light as some sort of taboo subject. No, I still use it from time to time, but it’s usually when I’m trying to do something specific in a certain location or with a special technique that can’t be done in a studio.

portrait of a man with gray hair - How a Studio Photographer Came to Love Natural Light Again

This image was taken only as a technical exercise because of how the light was behaving in a bit of open shade close to sunset.

Shifting perspective

How a Studio Photographer Came to Love Natural Light Again - window lit studio

The large windows in this natural light studio make the space a veritable playground for any photographer enthusiastic about lighting.

Last year, I booked a natural light studio with enormous windows for the first time and the experience completely changed the way I think about these things. I went in treating the whole thing as an experiment. As such, I had no concrete plans. I was going to go in and explore the space, look for pockets of light, and try to seize whatever opportunity presented itself.

How a Studio Photographer Came to Love Natural Light Again - portrait of a lady indoors

The dim, overcast day made for this glorious soft light coming through the windows.

Long story short, I was hooked in minutes. I’m sure the sight of me bouncing from corner to corner going “Ooo, look at the light here and look it at it over here” was more than a bit comical.

The whole experience was like a four hour treasure hunt. It seemed like everywhere I turned, the light was doing something new that was worth exploiting. I can easily compare the feeling to the enthusiasm I felt when I first got a camera and just randomly walked around taking photos of everything and burning through film like it didn’t matter.

As an added bonus, the changeability of the light (one of the factors that kept me firmly in the studio) made new opportunities all the time. On several occasions, I’d move from one spot to another, only to see what the light was doing in the first spot later on and I’d go straight back to it and get completely different results.

girl next to a window - How a Studio Photographer Came to Love Natural Light Again

A short while after the previous image was taken, the sun came out a bit changing the light from this window completely.

There is one thing that I found very hard to replicate in a studio environment. This particular studio is in an old industrial mill and the windows (there are a lot of them) are gargantuan. This gave the light a beautiful soft quality that would be hard to replicate with artificial lighting.

Needless to say, I loved my first time in a natural light studio and have since made it a point to go back and try to find other natural light venues as well.

lady in a gold top - How a Studio Photographer Came to Love Natural Light Again

Even from further away, the light from the windows was still soft and provided gentle tonal transitions.

New ideas

An unexpected side effect of this experience is that I every time I come out of one of these places, I leave with a head full of ideas on how I can apply what I’ve seen the light doing in the studio.

darker portrait of lady in yellow top - How a Studio Photographer Came to Love Natural Light Again

Using a strobe with High-Speed Sync functionality allowed me to darken the studio’s windows for a dramatic background while lighting the subject the way I would in a normal studio environment.

On top of that, I have always forsaken the option of mixing natural light with flash. For whatever reason, I never really felt that it was worth the effort. My opinion on this has changed dramatically since my first visit to that studio. Now I’m always looking for new ideas on how I can use and exploit natural light at any time of day and mix it with studio strobes if need be.

portrait of a girl with long blond hair - How a Studio Photographer Came to Love Natural Light Again

Also made using High-Speed Sync, the flash allowed me to fill in the shadows created by the backlighting from the windows. The result is an even exposure throughout the frame and no blown out windows.

Am I a Convert to Natural Light?

I’m still a studio photographer, there’s no doubt about that. I still prefer the control the studio provides and I will still default to that. However, I won’t be going out of my way to avoid natural light settings in the future.

Between the multitude of opportunities these experiences provided me and the ideas I took away from them, I will be making it a point to regularly shoot in natural light just to shake things up a bit if nothing else.

The end

The point of all this? Good question. If you’re like me, and you find yourself stuck in a rigid pattern, such as my adherence to studio work, I encourage to make the conscious choice of going out and pursuing the exact opposite.

You might very well find that your convictions towards whatever it is you’re stuck to aren’t founded as solidly as you had thought. If nothing else, it will give the opportunity to learn something new and to grow as a photographer and nobody can argue that that’s a bad thing.

The post How a Studio Photographer Came to Love Natural Light Again appeared first on Digital Photography School.


Digital Photography School

 
Comments Off on How a Studio Photographer Came to Love Natural Light Again

Posted in Photography


4 Tips to Help You Love Using Manual Mode

07 May

In this article, I’d like to share with you a few tips on how to utilize some of your camera’s functions to help you come to grips with shooting in Manual Mode.

Sometimes stripping back to the basics and only using minimal, older equipment with none of the modern features new cameras possess, can help you grow as a photographer. Sometimes making good use of selective technology on your digital camera can also help you learn and create more accurate exposures more easily than is ever possible with older cameras.

Asian woman holding an old 35mm film camera - 4 Tips to Help You Love Using Manual Mode

I started learning on a camera which had no auto anything. There were no options other than to learn Manual Mode. I still use shoot manual 99% of the time.

During the photography workshops we run, I love to encourage people to switch to manual and commit to it for a period of time. If you try Manual Mode once or twice for a short time it’s likely you will not “get” it. You need to commit and using only Manual for most of what you photograph for long enough until you feel you are making progress.

man taking a photo - 4 Tips to Help You Love Using Manual Mode

1. Live View/Electronic View Finder

Many cameras now have LCD screens/electronic viewfinders which display how the exposure will look when you take a photo in Manual Mode. If your camera has this function it pretty much eliminates the need to look at the exposure meter or change your metering mode to obtain well-exposed photographs.

By focusing your attention on the exposure of the image on your LCD screen or in your electronic viewfinder while you are adjusting your aperture, shutter speed, and ISO settings you can easily see when your photo will look good.

Asian woman photographer 4 Tips to Help You Love Using Manual Mode

You need have your screen or viewfinder set so it’s neutral, not too bright and not too dark. To check this you can take a few test photos and then review them (on the computer). If they are over or underexposed adjust the brightness value of your camera’s LCD screen and/or viewfinder until your photos have the same exposure value you are seeing in the viewfinder or on your monitor in Live View mode.

2. Use Your Spot Meter

If you prefer not to use Live View or do not have an electronic viewfinder which displays the changes to the exposure value as you adjust your controls, using the spot meter can help you achieve more accurate reading and set your exposures more precisely.

Woman selling mangoes - 4 Tips to Help You Love Using Manual Mode

Modern cameras have a selection of metering modes which include a spot meter. Most often using the averaging mode, which takes a reading from multiple segments of the image area and gives an exposure value the camera calculates, is sufficient.

However, in some situations, particularly if your subject is back-lit or contrast in the scene you are photographing is high, using the spot meter setting will allow you to make a reading off the area of the image which is most vital to you.

For example, making a portrait where your background is significantly lighter or darker than your subject it is best to take a spot meter reading from their face as this is usually the most important part of your image. Using the averaged setting your camera’s meter will also read from the background and calculate that into the result it returns, potentially giving you a less than satisfactory exposure.

Karen woman smoking a pipe - 4 Tips to Help You Love Using Manual Mode

Learning to use your spot meter will assist you in creating more accurate exposures. I have one of the function buttons on my cameras set to switch to spot metering, allowing me to quickly and easily take a reading from any particular part of my composition.

3. Review Your Photos

It’s not a healthy practice to always be checking your camera’s monitor after every photo you take, as this can interrupt your attention from your subject. But it can be helpful to review your first few images after making adjustments to your exposure settings.

Taking a look at the results after changing your aperture, shutter speed, or ISO will give you a clear idea as to whether your settings are suitable for the photos you want to create. If you see a photo that’s too bright or too dark overall or in a part of the composition you prefer to see well exposed, then you will need to make some adjustment to your settings.

Asian woman reviewing a photo on a DSLR camera monitor - 4 Tips to Help You Love Using Manual Mode

As you practice this technique you may start to find you can estimate how much you need to alter your exposure settings rather than consulting your exposure meter again. This does take some practice, but if you form a habit of doing this, you will find this is a quick and easy way to achieve a better exposure.

4. Check Your Metadata

Our digital cameras record an incredible amount of metadata, associated information about each photograph you take. Learning to read and understand even a small amount of this information can assist you in producing more consistently pleasing exposures.

Back of a DSLR camera at dusk - 4 Tips to Help You Love Using Manual Mode

Being able to freely review the exposure value for any photo you have taken can help you understand why it’s good or maybe why it needs improving. I find this information most handy when I am sitting at my computer reviewing my images from a photography session.

Comparing photos made with different exposure values and looking at the metadata can help you have a better understanding of what settings you can use next time.

In Conclusion

Evening photo with bold colors taken during a Chaing Mai Photo Workshop

Autofocus, Facial Recognition, Auto White Balance, and ISO flexibility are all modern advancements in camera technology which make using Manual Mode easier. Because you don’t have to pay so much attention to these things and can better concentrate on setting your exposure well.

Exposure is one of the key elements of every photograph. Learning to understand how you can use the various features of your camera to assist you in making better exposures will help you become a more creative photographer.

?

The post 4 Tips to Help You Love Using Manual Mode appeared first on Digital Photography School.


Digital Photography School

 
Comments Off on 4 Tips to Help You Love Using Manual Mode

Posted in Photography


The Broccoli Tree and the dangers of sharing photos of the places you love online

13 Mar

Landscape, wildlife, and adventure photographers (among others) will often keep their most treasured locations and subjects secret. And while this might seem rude or selfish or mean, the tale of The Broccoli Tree in Sweden—told beautifully in a recent vlogbrothers video by best-selling author John Green—explains exactly why this practice might also be necessary.

The Broccoli Tree, for those who aren’t familiar, is (or was) a tree in Huskvarna, Sweden that somehow became social media famous.

Photographing this tree became a passion project of photographer Patrik Svedberg, and over the course of 4+ years, the tree gained quite a following on Instagram. In fact, it kind of became Insta-famous so-to-speak, accruing over 31,000 followers to date.

But Insta-fame comes with consequences in this day and age. No matter how beautiful or inspiring, no matter how much joy something brings to the general populace, there will always be those people who get some deluded self-satisfaction out of destroying it.

This is what happened to The Broccoli Tree.

One day in September of 2017, Svedberg went to photograph his favorite tree, only to find that someone had sawed one of the tree’s branches almost all the way through. It wasn’t long before the whole tree had to be cut down.

Ever since the tree got viral a couple of years ago the number one joke has been ”what if someone cuts it down..?” Or ”What´s next, maybe you should cut it down and take photos haha.” I´ve never had good answer to that question, or joke. It´s not like we´re planted together, we live different lives the tree and I. This question was so common so I guess it was just a matter of time before some guys mentally retarded enough would crawl up from under a stone and make it happen as a part of a bet or something. Clearly it´s a obsession in lots of minds out there for some inscrutable reason. One of the trees branches has now (a couple of days ago..?) been sawn in almost all the way through and it´s just a matter of time before it´ll fall off. I won´t be around to document it, others will for sure so I guess you lunatics who did it can enjoy every moment. You can win a bet. Get cheered at. Even get a bit infamous. Congrats. What an accomplishment. I guess you were excited like little children while you did it, must have taken quite a while. For sure you are excited now, aspecially when the word is out. Now is your moment. High fives, maybe some back slapping. Suck it in. Time will erode those memories, excitement will turn into second thoughts. But the saddest thing of all, however You absolutely cannot un-saw a tree. —– I leave the judgement to others and have to move on to work, you can talk to each other about this below of course, but I feel for now this is what I have to say in this matter. Cheer up, there will be a tomorrow after this. // Patrik

A post shared by A tree on Instagram (@thebroccolitree) on

You can hear the entire story in the video at the top of this post, although you might be surprised to find that Green’s takeaway isn’t that people should keep these locations a secret, or not share photos of them at all. In fact, he comes to a totally different, if somewhat melancholy, conclusion:

The truth is, if we hoard and hide what we love, we can still lose it. Only then, we’re alone in the loss. You can’t un-saw a tree, but you can’t un-see one either. The Broccoli Tree is gone… but its beauty survives.

Articles: Digital Photography Review (dpreview.com)

 
Comments Off on The Broccoli Tree and the dangers of sharing photos of the places you love online

Posted in Uncategorized


10 Reasons Why You Need to Learn to Love Your Tripod

22 Nov

When I first purchased my tripod it sat unused for several months. In some ways, I was a bit afraid of it, all the effort of having to carry it around and set it up, etc. Would people look at me funny? Was it heavy to carry around? Setting it up properly looked complicated and seemed to take ages. Did I really need one?

How to Learn to Love Your Tripod

After a trip in what turned out to be a low light environment where I wasted a day of travel by coming back with no sharp shots, I bit the bullet and dusted off that tripod. Now it pretty much goes wherever my camera goes and is my go-to accessory in many situations.

Eventually I learned to love my tripod, hopefully, you will too. Some people think having a tripod limits your capabilities. Yes, you do have to carry it, which may limit where you go, or how far you can carry it. But it is my opinion that even with those limitations, the benefits of using a tripod far outway the issues.

Reasons to Love your Tripod

#1 – Slowing Down is a Good Thing

Having to position your tripod, take the time to set up the camera, get the angle and framing right all take time. This means you often need to think about where you will position your gear before you actually do so. Then it means you need to think quite specifically about your composition so you can put your gear in the right place to achieve that.

All this careful consideration gives you time to look at your subject, to really take time and properly see it, to see the possibilities beyond the first initial obvious frame you might take. Taking the time to think about your composition also offers opportunities to be creative and experiment.

10 Reasons Why You Need to Learn to Love Your Tripod - food shot

An overhead flat still life shot takes a lot of fiddling to get set up correctly.

10 Reasons Why You Need to Learn to Love Your Tripod

Camera set up in an overhead position, pointing straight down. Not all tripods allow this movement with the center pole, so check before you purchase.

10 Reasons Why You Need to Learn to Love Your Tripod

An L Plate tripod mount makes it much easier to change between portrait and landscape orientation, but they are an extra cost. Provided your tripod head has drop notches, this is easy to achieve.

10 Reasons Why You Need to Learn to Love Your Tripod

A quick release lever tripod mount is my preferred option. Other choices include screw mounted closures instead. Note the included spirit level.

2 – The Tripod Carries the Weight

If you have a large or heavy lens (and camera body) it can be very tiring to lift and hold and shoot with for extended periods. Bird and wildlife photographers often use long lenses that can be very heavy. A tripod will take the weight for you, allowing you to shoot for longer without fatigue. If you need more flexibility in capturing birds in flight, or animals on the move, a gimbal head allows freedom of movement and support at the same time.

10 Reasons Why You Need to Learn to Love Your Tripod

This is the wrong way to be using the center column, it adds the opportunity for vibration and is not very stable.

3 – Video

I am not a videographer myself, but there is nothing worse than watching a wobbly handheld video. Keeping it steady on a tripod with a fluid head is a good way to start.

4 – Sharpness and Stability

Of course, the whole point of using a tripod is to ensure you get sharp shots by removing any camera movement or vibration. Additionally, you can use a remote or self-timer to limit further physical contact when taking the shot and maximize sharpness. My camera has a custom setting for landscapes that flips up the mirror and pauses for 2 seconds for the vibrations to flatten before the shutter clicks.

10 Reasons Why You Need to Learn to Love Your Tripod

Using an L plate makes it easier to mount the camera in either landscape or portrait orientation.

10 Reasons Why You Need to Learn to Love Your Tripod

L Plate with the camera set up in Portrait.

5 – Macro

When dealing with a small subject and a very limited depth of field, getting focus on the right spot can be hard. It is even harder when you are hand holding to keep the focus steady. Just breathing is enough movement to throw the line off and end up with blurry shots. Using a tripod combined with manual focus is often a good way to improve your keeper ratings with macro photography.

Additionally, if your camera supports it, using live view and zooming in to fix the focus more accurately could improve your keeper rate a huge amount (it did for me). My final tip is to use a wireless remote as well.

10 Reasons Why You Need to Learn to Love Your Tripod

10 Reasons Why You Need to Learn to Love Your Tripod

6 – Landscape and Panorama

Lugging a tripod on a hike for a day seems like a huge effort, but being able to set up your camera and take sharp shots is worth it in my opinion. Should you want to experiment with hyperfocal distances a tripod is recommended. Using filters to tone down a bright sky? Need a tripod.

Landscapes often lend themselves to a panorama, where you take several shots and blend them into one big (usually long) one. It is important to get your horizontal or vertical lines straight so the frames match up when you are stitching them together in software. You also need to make sure the camera is oriented flat on the rotation as well. Some people even work out the parallax point and may shoot using a nodal rail.

All these elements require a tripod to ensure they happen correctly.

10 Reasons Why You Need to Learn to Love Your Tripod

This 7-minute long exposure absolutely required the use of a tripod.

7 – Low Light

All cameras struggle when the light situation is low – astrophotography, light painting, timelapse, light trails or just generally limited lighting circumstances. To counter the limited light, the camera will be required to hold the shutter open for longer. It is very difficult to hold a camera perfectly steady in your hands for even one second, let alone 20 seconds, or even several minutes.

The only way to guarantee sharp shots is to hold the camera still, in other words, use a tripod.

10 Reasons Why You Need to Learn to Love Your Tripod

A long exposure shot of around 20 seconds to try and remove the crowds of people attending the event, instead I have blurry ghosts.

10 Reasons Why You Need to Learn to Love Your Tripod

Night shot of a fire dancer – the tripod allowed me to take a longer exposure time and capture the trails of fire.

8 – Special Effects

Focus stacking, HDR (High Dynamic Range) and exposure blending are reasonably commonly used special effects these days. The common factor is several frames are taken but the camera itself stays perfectly still (or may only move in tiny increments). The multiple images are then blended together later using post-processing techniques. Therefore in order to keep the camera perfectly still from frame to frame, you must use a tripod.

10 Reasons Why You Need to Learn to Love Your Tripod

Two frames are blended for this shot, the berries in one and the falling icing sugar in another.

9 – Long Exposures

Those lovely foamy waterfalls and swirls of whitewater in streams or smoke like waves around rocks and shorelines require exposures of that are much longer than usual. They could be tenths of a second, a few seconds or several minutes, depending on the lighting conditions. To keep your camera that still for that long, demands a tripod must be used.

Often, to simulate the limited lighting conditions required to give the very soft flowing effect, filters will also be used, which are mounted on the front of the lens. It is very difficult to load and mount the filters if the camera is not sitting on a tripod, leaving your hands free to add the extra equipment.

10 Reasons Why You Need to Learn to Love Your Tripod

Shot at 1/15th of a second, too long to handhold steady, but long enough to capture the colored lights on the trees.

10 – Self-Portraits

Not the quick snap up the nostrils at arm’s length which is the best you can hope for with a cell phone usually. Instead, using a tripod allows you to be very creative with your self-portraits. Adding in a wireless remote, and shooting fine art self-portraits becomes easy and fun.

10 Reasons Why You Need to Learn to Love Your Tripod

Top view of a camera with a wireless remote trigger mounted on the hot shoe and plugged into the camera.

10 Reasons Why You Need to Learn to Love Your Tripod

Back view of a camera with a wireless remote trigger mounted on the hot shoe and plugged into the camera.

10 Reasons Why You Need to Learn to Love Your Tripod

Wireless remote and a camera trigger ready to be plugged into the camera.

This self-portrait was taken with the camera in an overhead position pointing straight down. The remote was in my hand.

Summary

Tripods require some effort to use. They must be taken with you, whether that be in the studio, a wander in the gardens or several hours long hike in the mountains. It is extra weight and an awkward shape to carry. For many people, they prefer to go without and successfully manage to do so.

Personally, I believe the benefits a tripod offers are invaluable. By forcing me to slow down and think more about my photography, my composition skills improved a great deal with my landscape work.

Being prepared to use and experiment with a tripod allowed me to move into macro photography. Adding in manual focus and a wireless remote improved my sharpness and accuracy with very limited depth of field.

Having the capability to set the camera up at unusual angles and heights, and keeping my hands free for other things gave me the freedom to try out food photography, still life shots and creative self-portraits.

Anytime you need the camera to hold still for just a bit longer than you can (or want to) hold it is when you need a tripod. There are lots of fun things you can shoot but they might be difficult if your hands aren’t very steady or your gear is heavy.

So learn to love your tripod, soon it will be your best friend.

The post 10 Reasons Why You Need to Learn to Love Your Tripod by Stacey Hill appeared first on Digital Photography School.


Digital Photography School

 
Comments Off on 10 Reasons Why You Need to Learn to Love Your Tripod

Posted in Photography


For the Love of STEM: 20+ Edible Creations Inspired by Math & Science

14 Sep

[ By SA Rogers in Art & Sculpture & Craft. ]

Science, technology, engineering and mathematics rarely get more delicious than this, illustrated and replicated in the form of solid chocolate, sugar crystals, fondant icing, pancakes and even bagels. Wouldn’t you want to take a bite out of an anatomically correct life-sized human skull, a 3D representation of kinetic movement, a Rubik’s cube, a Hubble Telescope photo or gory veterinary surgery in cake form?

Kinetic Tarts & Geometric Cakes

3D-printed molds allow pastry chef Dinara Kasko to make pies, tarts, cakes and other treats with shapes unlike anything you’ve ever seen in a dessert case before. Her latest is a collaboration with artist Jose Margulis, a series of delicious-looking cakes inspired by kinetic waves. They’re made of ingredients like almond sponge cake, yogurt mousse, mascarpone and streusel. Older works include ‘Triangulation,’ a lime-basil cake for SoGood magazine, and ‘The Bubbles,’ which take their inspiration from cells. For the latter, she explains, “I used such geometric constructing principles as triangulation, the Voronoi diagram and biomimicry.” Intrigued? You can buy silicone cake molds from her website and try to recreate these desserts at home.

Geometric Patterns Inside a Cylinder of Chocolate

Geometric patterns hidden within a solid cylinder of chocolate are slowly revealed by a blade on a mill. Studio Wieki Somers teamed up with chocolatier Rafael Mutter to create this installation for Vitra Design Museum, displayed at Art Basel in 2012 for a retrospective of dutch furniture designer and architect Gerrit Rietveld. The patterns continuously change the deeper into the cylinder you go, more complex at times and simpler at others, but always mathematical in nature.

Gory Veterinary Anatomy Cakes

This one’s for the veterinarians out there. One student at the Nottingham Veterinary School created this semi-realistic model of a canine’s superficial head muscles in cake form as part of a fundraiser; another rendered a dog testicle, while a third portrayed a leg amputation in edible form. There’s also equine surgery, and an ‘ascarid impaction colic,’ a procedure to get rid of a severe worm infestation in horses. Looks tasty, huh?

Rubik’s Cube Pastries

French pastry chef Cedric Grolet offers a unique edible spin on the Rubik’s cube in the form of 27 individual pastries. Though he’s spurned the handheld puzzle’s usual primary colors for muted pastels, the object remains recognizable in form. You can purchase one of these cakes at Le Dali, a restaurant inside the Le Meurice Hotel in Paris.

Galaxy Eclairs

Looking like something straight out of NASA’s stunning satellite imagery of space, these cosmic eclairs by Musse Confectionery in Ukraine are truly out of this world. The glaze swirls together hues of blue, purple, pink and white for results so beautiful they’d almost be hard to eat (except that they look delicious.) The chef took inspiration from Hubble Space Telescope photos, offering the eclairs in flavors like raspberry, vanilla, pistachio, salted caramel and chocolate. They’re available in the confectionery’s shop in Kiev.

Next Page – Click Below to Read More:
For The Love Of Stem 20 Edible Creations Inspired By Math Science

Share on Facebook


[ By SA Rogers in Art & Sculpture & Craft. ]

[ WebUrbanist | Archives | Galleries | Privacy | TOS ]


WebUrbanist

 
Comments Off on For the Love of STEM: 20+ Edible Creations Inspired by Math & Science

Posted in Creativity


A mother shares her love of adventure with her son

14 May
Sarah-Jane “SJ” Staszak is suspended from a cliff with her son Hamish. (Photo courtesy of Benjamin Von Wong)

Benjamin Von Wong is at it again, this time partnering with digital artist Karen Alsop on a Heart Project to give a paralyzed mother another opportunity to share her love of adventure with her 8-year old son Hamish.

Von Wong and Alsop teamed up to give former outdoor education instructor SJ Staszak a chance to create some magical images with Hamish. Staying true to their individual artistic approaches, Von Wong set up a shoot where SJ and Hamish were suspended off a cliff (as were Von Wong and the lighting equipment) and Alsop used digital manipulation to edit studio photos of the mother-son duo.

‘Tunnel of Life’ (photo courtesy of Karen Alsop)

Read Von Wong’s post for more photos and behind-the-scenes footage

Articles: Digital Photography Review (dpreview.com)

 
Comments Off on A mother shares her love of adventure with her son

Posted in Uncategorized


Resolution, aliasing and light loss – why we love Bryce Bayer’s baby anyway

29 Mar

It’s unlikely Kodak’s Bryce Bayer had any idea that, 40 years after patenting a ‘Color Imaging Array’ that his design would underpin nearly all contemporary photography and live in the pockets of countless millions of people around the world.

It seems so obvious, once someone else has thought of it, but capturing red, green and blue information as an interspersed, mosaic-style array was breakthrough.
Image: based on original by Colin M.L Burnett

The Bayer Color Filter Array is a genuinely brilliant piece of design: it’s a highly effective way of capturing color information from silicon sensors that can’t inherently distinguish color. Most importantly, it does a good job of achieving this color capture while still capturing a good level of spatial resolution.

However, it isn’t entirely without its drawbacks: It doesn’t capture nearly as much color resolution as a camera’s pixel count seems to imply, it’s especially prone to sampling artifacts and it throws away a lot of light. So how bad are these problems and why don’t they stop us using it?

Resolution

There’s a limit to how much resolution you can capture with any pixel-based sensor. Sampling theory dictates that a system can only perfectly reproduce signals at half the sampling frequency (a limit known as the Nyquist Frequency). If you think about trying to represent a single pixel-width black line, you need at least two pixels to be sure of representing it properly: one to capture the line and another to capture the not-line.

Just to make things more tricky, this assumes your pixels are aligned perfectly with the line. If they’re slightly misaligned, you may get two grey pixels instead. This is taking into consideration by the Kell factor, which says that you’ll actually only reliably capture resolution around 0.7x your Nyquist frequency.

A sensor capturing detail at every pixel can perfectly represent data at up to 1/2 of its sampling frequency, so 4000 vertical pixels can represent 2000 cycles (or 2000 line pairs as we’d tend to think of it). This is a fundamental rule of sampling theory.

But, of course, a Bayer sensor doesn’t sample all the way to its maximum frequency because you’re only sampling single colors at each pixel, then deriving the other color values from neighboring pixels. This lowers resolution (effectively slightly blurring the image).

So, with these two factors (the limitations of sampling and Bayer’s lower sampling rate) in mind, how much resolution should you expect from a Bayer sensor? Since human vision is most sensitive to green information, it’s the green part of a Bayer sensor that’s used to provide most of the spatial resolution. Let’s have a look at how it compares to sampling luminance information at every pixel.

Counter-intuitive though it may sound, the green channel captures just as much horizontal and vertical detail as the sensor capturing data at every pixel. Where it loses out is on the diagonals, which sample at 1/2 the frequency.

Looking at just the green component, you should see that a Bayer sensor can still capture the same horizontal and vertical green (and luminance) information as a sensor sampling every pixel. You lose something on the diagonals, but you still get a good level of detail capture. This is a key aspect of what makes Bayer so effective.*

Red and blue information is captured at much lower resolutions than green. However, human vision is more sensitive to luminance (brightness) information than chroma (color) information, which makes this trade-off visually acceptable in most circumstances.

It’s a less good story when we look at the red and blue channels. Their sampling resolution is much lower than the luminance detail captured by the green channel. It’s worth bearing in mind that human vision is much more sensitive to luminance resolution than it is to color information, so viewers are likely to be more tolerant of this shortcoming.

Aliasing

So what happens to everything above the Nyquist frequency? Well, unless you do something to stop it, your camera will try to capture this information, then present it in a way it can represent. A process called aliasing.

Think about photographing a diagonal black stripe with a low resolution camera. Even with a black and white camera, you risk the diagonal being represented as a series of stair steps: a low-frequency pattern that acts as an ‘alias’ for the real pattern.

The same thing happens with fine repeating patterns that are a higher frequency than your sensor can cope with: they appear as spurious aliases of the real pattern. These spurious patterns are known as moiré. This isn’t unique to Bayer, though, it’s a side-effect of trying to capture higher frequencies than your sampling can cope with. It will occur on all sensors that use a repeating pattern of pixels to capture a scene.
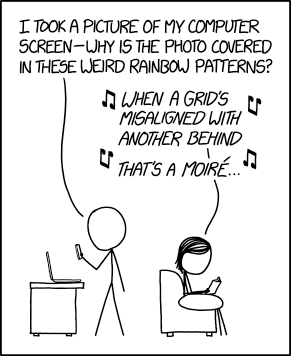
Source: XKCD

Sensors that use the Bayer pattern are especially prone to aliasing though, because the red and blue channels are being sampled at much lower frequencies than the full pixel count. This means there are two Nyquist frequencies (a green/luminance limit and a red/blue limit) and two types of aliasing you’ll tend to encounter: errors in detail too fine for the sensor to correctly capture the pattern of and errors in (much less fine) detail that the camera can’t correctly assess the color of.

‘the Bayer pattern is especially prone to aliasing’

To reduce this first kind of error most cameras have, historically, included Optical Low Pass Filters, also known as Anti-Aliasing filters. These are filters mounted in front of the sensor that intentionally blur light across nearby pixels, so that the sensor doesn’t ever ‘see’ the very high frequencies that it can’t correctly render, and doesn’t then misrepresent them as aliasing.**

The point at the center of the Siemens star is too fine for this monochrome camera to represent, so it’s produced a spurious diamond-shaped ‘alias’  at the center instead. This image second was shot with a very high resolution camera, blurred to remove high frequencies, then downsized to the same resolution as the first shot. It still can’t accurately represent the star, but doesn’t alias when failing.

These aren’t so strong as to completely prevent all types of aliasing (very few people would be happy with a filter that blurred the resolution down to 1/4 of the pixel height: the Nyquist frequency of red and blue capture), instead they blur the light just enough to avoid harsh stair-stepping and reduce the severity of the false color on high-contrast edges.

With a Bayer filter, you get a fun color component to this aliasing. Not only has the camera tried to capture finer detail than its sensor can manage, you get to see the side-effect of the different resolutions the camera captures each color with. Again, if you compare this with a significantly over-sampled image, blurred then downsized, you don’t see this problem. However, look closely you can still see traces of the false color that occurred at the much higher frequency this camera was shooting at.

This means that, a camera with an anti-aliasing filter, you shouldn’t see as much false color in the high-contrast mono targets within our test scene, but it’ll do nothing to prevent spurious (aliased) patterns in the color resolution targets.

Even with an anti-aliasing filter, you’ll still get aliasing of color detail, because the maximum frequency of red or blue that can be captured is much lower. This image was shot at the same nominal resolution but with red, green and blue information captured for each output pixel: showing how the target could appear, with this many pixels.

Light loss

At the silicon level, modern sensors are pretty amazing. Most of them operate at an efficiency (the proportion of light energy converted into electrons) around 50-80%. This means there’s less than 1EV of performance improvement to be had in that respect, because you can’t double the performance of something that’s already over 50% effective. However, before the light can get to the sensor, the Bayer design throws away around 1EV of light, because each pixel has a filter in front of it, blocking out the colors it’s not meant to be measuring.

‘The Bayer design throws away
around 1EV of light’

This is why Leica’s ‘Monochrom’ models, which don’t include a color filter array, are around one stop more sensitive than their color-aware sister models. (And, since they can’t produce false color at high-contrast edges, they don’t include anti aliasing filters, either).

It’s this light loss component that may eventually spell the end of the Bayer pattern as we know it. For all its advantages, Bayer’s long term dominance is probably most at risk if it gets in the way of improved low-light performance. This is why several manufacturers are looking for alternatives to the Bayer pattern that allow more light through to the sensor. It’s telling, though, that most of these attempts are essentially variations on the Bayer theme, rather than total reinventions.

The alternatives

These variations aren’t the only alternatives to the Bayer design, of course.

Sigma’s Foveon technology attempts to measure multiple colors at the same location, so promises higher color resolution, no light loss to a color filter array and less aliasing. But, while these sensors are capable of producing very high pixel-level sharpness, this currently comes at an even greater noise cost (which limits both dynamic range and low light performance), as well as struggling to compete with the color reproduction accuracy that can be achieved using well-tuned colored filters. More recent versions reduce the color resolution of two of their channels, sacrificing some of their color resolution advantage for improved noise performance.

‘The worst form… except all those others that have been tried’

Meanwhile, Fujifilm has struck out on its own, with the X-Trans color filter pattern. This still uses red, green and blue filters but features a larger repeat unit: a pattern that repeats less frequently, to reduce the risk of it clashing with the frequency it’s trying to capture. However, while the demosaicing of X-Trans by third-party software is improving, and the processing power needed to produce good-looking video looks like it’s being resolved, there are still drawbacks to the design.

Ironically, devoting so much of the sensor to green/luminance capture appears to have the side-effect of reducing its ability to capture and represent foliage (perhaps because it lacks the red and blue information required to render the subtle tint of different greens).

Which leaves Bayer in a situation akin to Winston Churchill’s take on Democracy as: ‘the worst form of Government except all those other forms that have been tried from time to time.’

40 not out

As we’ve seen before, the sheer amount of effort being put into development and improvement of Bayer sensors and their demosaicing is helping them overcome the inherent disadvantages. Higher pixel counts keep pushing the level of color detail that can be resolved, despite the 1/2 green, 1/4 red, 1/4 blue capture ratio.

And, because the frequencies that risk aliasing relate to the sampling frequency, higher pixel count sensors are showing increasingly little aliasing. The likelihood of you encountering frequencies high enough to cause aliasing falls as your pixel count helps you resolve more and more detail.

Add to this the fact that lenses can’t perfectly transmit all the detail that hits them, and you start to reach the point that the lens will effectively filter-out the very high frequencies that would otherwise induce aliasing. At present, we’ve seen filter-less full frame sensors of 36MP, APS-C sensors of 24MP and Four Thirds sensors of 16MP, all of which are sampling their lenses at over 200 pixels per mm, and these only produce significant moiré when paired with very sharp lenses shot wide-enough open that diffraction doesn’t end up playing the anti-aliasing role.

So, despite the cost of light and of color resolution, and the risk of error, Bryce Bayer’s design remains firmly at the heart of digital photography, more than 40 years after it was first patented.


Thanks are extended to DSPographer for sanity-checking an early draft and to Doug Kerr, whose posts helped inform the article, who inspired the diagrams and who was hugely supportive in getting the article to a publishable state.

* Unsurprisingly, some manufacturers have tried to take advantage of this increased diagonal resolution by effectively rotating the pattern by 45°: this isn’t commonplace enough to derail this article with such trickery, so we’ll label them ‘witchcraft’ and carry on as we were.

** The more precocious among you may be wondering ‘but wouldn’t your AA filter need to attenuate different frequencies for the horizontal, vertical and diagonal axes?’ Well, ideally, yes, but it’s easier said than done and far beyond the scope of this article.

Articles: Digital Photography Review (dpreview.com)

 
Comments Off on Resolution, aliasing and light loss – why we love Bryce Bayer’s baby anyway

Posted in Uncategorized