RSS
 

Posts Tagged ‘lessons’

What Life Lessons Can Teach You About Photography

31 May
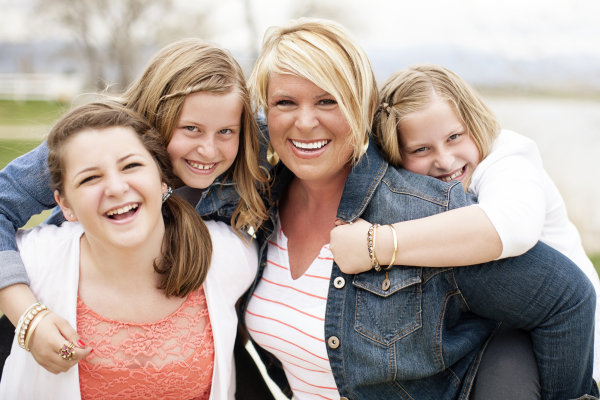
family-600x400b

Image of my new crazy family by Mia McCloy

A few months ago I got married. (Confetti! Streamers! Cake if you have it!) In doing this, I took on a gorgeous husband and three darling stepdaughters. Add my two adorable sons to the mix and you end up with a total of seven people sharing a couple of bathrooms, a kitchen, and the lion’s share of my patience. All of a sudden things like meal planning and buying in bulk have gone from concepts I’ve heard about to the only thing keeping me out of an inpatient treatment facility. To spare my sanity and enable me to do a hundred loads of laundry each day, everything in my life has been streamlined either by necessity or default including my photography business.

While it’s a continuous progression I realized the other day, when I was folding a mountain of clothes remembering a simpler time, that I am turning-out some of my best work in over a decade of being a professional photographer. I have to assume this is partly from streamlining everything from my shooting style to my editing process, and partly because my personal life changes have forced my professional life to adapt as well. So far, all for the better if you don’t count the laundry thing. I love them madly but having five children isn’t for everyone. In the event you don’t want to take on a small army of kids as a social experiment just to see if it improves your photography, here are some lessons I’ve learned recently and how you can apply it to your own photography.

What life lessons can teach you about photography
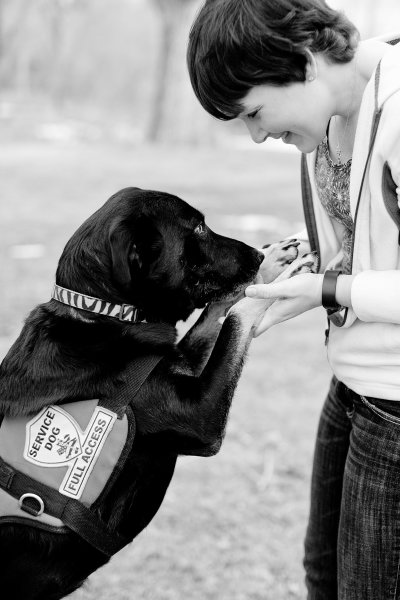
IMG_8899b

Work is more meaningful and balanced

This sounds so lovely but really it’s just a byproduct of my continuous lack of time. In the past, any image that caught my eye for any reason at all would be subjected to editing and delivery to the client. This would add hours to each job I took on. Now only the really, really good stuff ever sees the light of day, or my client’s eyeballs. Images that once would have gotten ten minutes of editing just because I saw one tiny bit of pretty in it, are now trashed because I know they will only bring down the finished product as a whole. I shoot with more purpose because I am on time constraints I never had before.

Are my clients suffering? No. They are getting quality over quantity.

Also, hearing “BUT THAT’S NOT FAIR!” roughly a thousand times a day puts fairness in a whole new perspective. It also puts having children in a whole new perspective, but that’s another ball of wax–unidentifiable and likely stuck to my kitchen floor.

It used to be that I had no real office hours. I shot when my schedule allowed and when the clients needed. I edited late at night after kids were asleep. I answered emails when I got around to it. I took every advantage of working from home one could. Don’t get me wrong–spending all day in yoga pants is still a giant perk, but now I have office hours. I return emails as soon as possible, even if that means from my phone, while waiting in the carpool lane at one of the three different schools at which I drop-off and pick-up children. I don’t see the sunrise at the end of my workday anymore because frankly I’m way too tired to stay up past 10 p.m. now. My clients are getting every ounce of me they deserve. But my photography business is no longer claiming my very soul. It’s fair for everyone.

TIP: Don’t let photography take over your life.

This goes for hobbyists and professionals alike. The work/life balance has always been a tough one for me, but as cliché as it sounds, we all need to reevaluate honestly and often. Shoot what you can, edit when you can, deliver where you can. Contrary to every photography quote I’ve ever heard, shots can be missed–there are a million more opportunities for an amazing picture tomorrow.

IMG_8688b

Learn how to say no

It used to be that if you asked me nicely, I would take on about any assignment. Taking pictures of houses even though I don’t have the equipment, or know-how, real estate photography requires? You bet! Do some product photography for your best friend sister’s boyfriend’s cousin? Sign me up! You want a professional photographer to hang-out with on Saturday mornings for your kid’s little league games? Of course I will! Now, not so much.

Not only do I not have that kind of time, I don’t have the desire. I’m spending all of the “doing-something-I-don’t-want-to-do” time I can spare chaperoning middle school field trips and taking kids to dentists, doctors, play dates, and street corners with “Free To Good Home” signs. I don’t want to do real estate, product, sport, or a dozen other types of photography. I want to do the kind of photography I’m good, at and the kind that I enjoy doing. On the flip side of that coin, I just can’t do favors like I used to. The line for a minute of my time now starts here and goes back quite a ways. I allow people to cut the line all the time, so you’ll be there a while waiting.

TIP: Just say no!

When in your gut it doesn’t seem like a job you want or can do, when the idea isn’t exciting or fun on any level, when you have to work with people that make you miserable, say no. When you are overwhelmed, behind and feel like taking on one more thing may break you, say no. When you are asked to do something that offers you no benefit, not even warm, fuzzy feelings, say no.
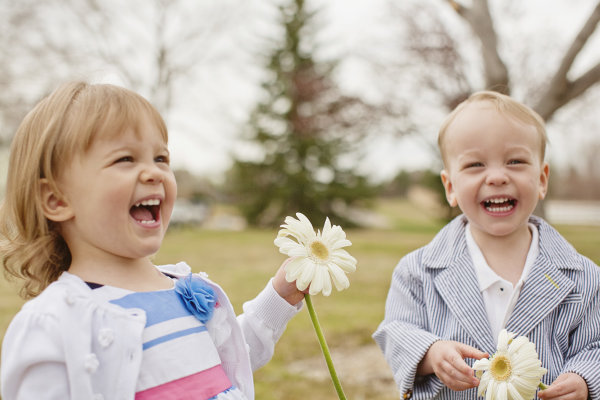
IMG_1674b

Say “Thank You” more often

I’ll be honest–I have no idea where this comes from; perhaps me attempting to model good manners for five kids who are all allergic to the word “please”. Regardless it’s a great lesson. It used to be that when I was complimented for my photography I would immediately detract; it’s not that I’m a good photographer, it’s that I have really beautiful clients. It’s not that an image is exceptional, it’s that I got lucky. It’s that I have an amazing lens. It’s that I have a great camera. It’s that perfect light just happened. It’s anything but me. It has taken 10 years but I am finally able to just say, “Thank You”.

The truth is that I do have a great camera, live in a beautiful place of the world that allows for ideal background settings, and have really beautiful clients. But I’m also a really good photographer. I can find light, work a complicated camera to my every advantage, put people at ease, and edit a diamond in the rough (image) to perfection. As uncomfortable as it still is for me to say that, it must be true because I’ve been doing this a while and people continue to hire me. Lots of photographers have these same talents, and more, and it’s important that we (you as well) start realizing that they are in fact talents and not just random acts of luck.

TIP: When someone compliments your work say, “Thank you!” with a big smile, and nothing more.

If this is something you’ve struggled with, it will feel unnatural. Keep doing it anyway. Saying an honest thank you is one of the nicest things you can do in the face of a compliment. Explaining why you think you are not deserving of it is one of the rudest.  
IMG_9640b

Play to your strengths

Having so many people need me (and only me) has redefined my objective. Much like saying no to photography jobs that are not well suited for my skill set, I have been pickier taking on jobs that are in my wheelhouse. Family photography falls into my lap often and most of the time it’s a perfect match for me. My love-hate relationship with weddings however has finally come to a close; weddings are no longer something I will do. Neither is endless editing to achieve fancy vintage (and similar) toning. My clients get a fun and spontaneous shooting atmosphere and final images in straightforward color or black and white. It’s my very best, and most honest work.

TIP: Try new things when it makes sense.

Challenge yourself when necessary, but play to your strengths–you’re good at them for a reason.

IMG_1010b

Charge what you’re worth

Just like having a business partner forces accountability, having a personal partner makes me look at the big picture. At the end of the day, photography is my job. It’s how I make my living. There are glamorous and fun sides (though not near as many as people think), and there are dirty and gloomy sides too, just like any job. I can’t work for free. Granted I have pro bono projects I take on (my heart, it bleeds), although I now do them much more selectively, and when I know it will benefit me in the long run either with new business or free marketing.

Gone are the days when I could take on a very low-paying project with no other benefit just because it seemed like fun. I’m finally charging what I’m worth, I’m no longer part of that deadly middle ground of charging too much to be a good deal, and not enough to be considered any good. I read a while back that as soon as you could no longer afford yourself, you were charging enough. At the time I passed it off as greedy and mean-spirited but I have to say: friends, I’ve come to the dark side and the water is fine. The clients that can afford me, do. The ones that can’t? They save up until they can, or they are careful to take advantage of my rare sales. I haven’t lost clients and bigger than that, my work has more value.

TIP: Evaluate your pricing.

Consider everything from wear-and-tear of your equipment to your electric bill that keeps your computer running into the wee hours of the morn. There’s a good chance you aren’t charging what your are worth, if only because it’s hard to make that jump and put a dollar figure on something that used to be a hobby, or something people consider art. I promise you though, if you’re not going to charge, someone else will. So while I consider my business as personal as it comes, it’s still a business. Besides, it takes a lot of laundry detergent to keep my new family of seven in clean clothes.

What other things have you experienced in life that have helped you learn something about your photography? What other tips do you have? Please share in the comments below.

The post What Life Lessons Can Teach You About Photography by Lynsey Mattingly appeared first on Digital Photography School.


Digital Photography School

 
Comments Off on What Life Lessons Can Teach You About Photography

Posted in Photography


Tips for Taking Street Portraits – Lessons Learned in India

26 Mar

On my trip to Rajasthan, India I packed my Canon 400D (Rebel XTi) with two lenses: my Canon EF 70-200mm f/2.8 IS USM (for long and candid photos) and my Canon EF 50mm f/1.8 II (for indoor portraits and low light photos) because I was aiming for portrait on the streets and specially head shots. Here are a few tips for taking street portraits, from my humble experience, and how to approach people before you take you shot.

#1 Always smile

11

You always want to let anyone who sees you with a camera know that you are a cheerful person and therefore they won’t mind being photographed by you. Even if they become angry because you asked, just smile and back off. You need to remember that being a photographer in the street is an image for all photographers in the public eyes.

#2 Avoid using the built-in flash on your camera

A common mistake that most beginners fall into is using the built in flash. For me this is meant only for quick shots of friends or family. But if you want to a portrait with great light, use natural daylight in the shade by making the subject face towards the light not the opposite.

21

#3 Don’t shoot in the sun

The reason is simple, hard light means hard shadows! Normally when you take a portrait for someone in the sun it creates hard shadows under the eyes, which is very bad for a portrait most of the time. Try to draw your subject to the nearest shady area available, or you can use a smooth board (or reflector) to make the light more even on the subject, that is if you dare to do all that with a stranger.

31

#4 Think about the light and shadows

It’s not enough just to take the shot in the shade during the day, away from the sun. You also need to consider how the light and the shadows are becoming on the subject’s face. You can do that by taking a test shot, then reviewing it on your camera screen by looking for the highlights and the shadows. If you don’t know how, practice it at home with your family or friends before going out to the streets.

41

#5 Don’t ask the person to smile

The good portrait comes first from the subject, then from you. So when you ask someone to smile, and they will, it won’t be a natural smile and sometimes it will bad for the shot. So don’t ask and they will reveal their true expression to the camera whether it’s a smile or sadness, sometimes you will be surprised.

51

52

#6 Use a large aperture for a blurry background

One of the key important things in portraiture is to focus on the eyes and blur the background, and sometimes part of the face. It will make a more dramatic and more attractive portrait to the viewer. And it also blur the background so it makes the viewer’s eye go only to the subject’s eye.

61

#7 Think about the background

What lies behind the subject is important, sometimes it’s good to have people in it and sometimes it’s better empty with no one. It really depends on how you intend to show your portrait.

71


Editor’s note: as I was searching Flickr for portrait images for the weekly inspiration collections (Portraits of men – portraits of women, I kept finding Zuhair’s portraits stood out among the rest. So I approached him and asked him to share some tips with us and he was gracious enough to do so. I hope you enjoy his images as much I do. If the eyes are the windows to the soul, I feel Zuhair’s portraits do a great job of showing us his subjects’ souls. 


The post Tips for Taking Street Portraits – Lessons Learned in India by Zuhair A. Al-Traifi appeared first on Digital Photography School.


Digital Photography School

 
Comments Off on Tips for Taking Street Portraits – Lessons Learned in India

Posted in Photography


Tips for Taking Street Portraits – Lessons Learned in India

25 Mar

On my trip to Rajasthan, India I packed my Canon 400D (Rebel XTi) with two lenses: my Canon EF 70-200mm f/2.8 IS USM (for long and candid photos) and my Canon EF 50mm f/1.8 II (for indoor portraits and low light photos) because I was aiming for portrait on the streets and specially head shots. Here are a few tips for taking street portraits, from my humble experience, and how to approach people before you take you shot.

#1 Always smile

11

You always want to let anyone who sees you with a camera know that you are a cheerful person and therefore they won’t mind being photographed by you. Even if they become angry because you asked, just smile and back off. You need to remember that being a photographer in the street is an image for all photographers in the public eyes.

#2 Avoid using the built-in flash on your camera

A common mistake that most beginners fall into is using the built in flash. For me this is meant only for quick shots of friends or family. But if you want to a portrait with great light, use natural daylight in the shade by making the subject face towards the light not the opposite.

21

#3 Don’t shoot in the sun

The reason is simple, hard light means hard shadows! Normally when you take a portrait for someone in the sun it creates hard shadows under the eyes, which is very bad for a portrait most of the time. Try to draw your subject to the nearest shady area available, or you can use a smooth board (or reflector) to make the light more even on the subject, that is if you dare to do all that with a stranger.

31

#4 Think about the light and shadows

It’s not enough just to take the shot in the shade during the day, away from the sun. You also need to consider how the light and the shadows are becoming on the subject’s face. You can do that by taking a test shot, then reviewing it on your camera screen by looking for the highlights and the shadows. If you don’t know how, practice it at home with your family or friends before going out to the streets.

41

#5 Don’t ask the person to smile

The good portrait comes first from the subject, then from you. So when you ask someone to smile, and they will, it won’t be a natural smile and sometimes it will bad for the shot. So don’t ask and they will reveal their true expression to the camera whether it’s a smile or sadness, sometimes you will be surprised.

51

52

#6 Use a large aperture for a blurry background

One of the key important things in portraiture is to focus on the eyes and blur the background, and sometimes part of the face. It will make a more dramatic and more attractive portrait to the viewer. And it also blur the background so it makes the viewer’s eye go only to the subject’s eye.

61

#7 Think about the background

What lies behind the subject is important, sometimes it’s good to have people in it and sometimes it’s better empty with no one. It really depends on how you intend to show your portrait.

71


Editor’s note: as I was searching Flickr for portrait images for the weekly inspiration collections (Portraits of men – portraits of women, I kept finding Zuhair’s portraits stood out among the rest. So I approached him and asked him to share some tips with us and he was gracious enough to do so. I hope you enjoy his images as much I do. If the eyes are the windows to the soul, I feel Zuhair’s portraits do a great job of showing us his subjects’ souls. 


The post Tips for Taking Street Portraits – Lessons Learned in India by Zuhair A. Al-Traifi appeared first on Digital Photography School.


Digital Photography School

 
Comments Off on Tips for Taking Street Portraits – Lessons Learned in India

Posted in Photography


10 Highly Useful Photography Lessons You Can Learn Today From YouTube

14 Feb

It doesn’t matter if you are a beginner or a professional photographer: Learning and perfecting your technique will help you be a better one! Being a photographer is more than shooting and uploading pictures. As in almost any other profession, any good photographer should stay up-to-date with the market and master his skills. By searching for tutorials, you will get Continue Reading

The post 10 Highly Useful Photography Lessons You Can Learn Today From YouTube appeared first on Photodoto.


Photodoto

 
Comments Off on 10 Highly Useful Photography Lessons You Can Learn Today From YouTube

Posted in Photography


A Year of Photographic Lessons – Journey of a Novice Photographer

30 Jan

About a year ago I decided to try and take my photography to the next level – to go beyond basic snapshots and try and get the wow factor into my images. I hope this article covering my photographic experiences of 2013, and the lessons I’ve learned gives you some ideas for 2014.

This is the story of my year of photographic lessons – maybe you can relate, or are on a similar journey.

Note: the images in this article are in chronological order with my early work near the top, and my most recent images at the bottom. Hopefully you can see where I’ve started from and how much I’ve progressed in a year. You can do this too!

Photography lessons novice 01

STEP ONE: – join a photography club

The single biggest thing that made a difference to my photography in 2013 was joining a local club in Dublin, Ireland (www.offshoot.ie). This proved to be the turning point for a few reasons:

  • It was an opportunity to learn from like-minded, enthusiastic and friendly photographers; and a chance to be inspired by their stunning work.
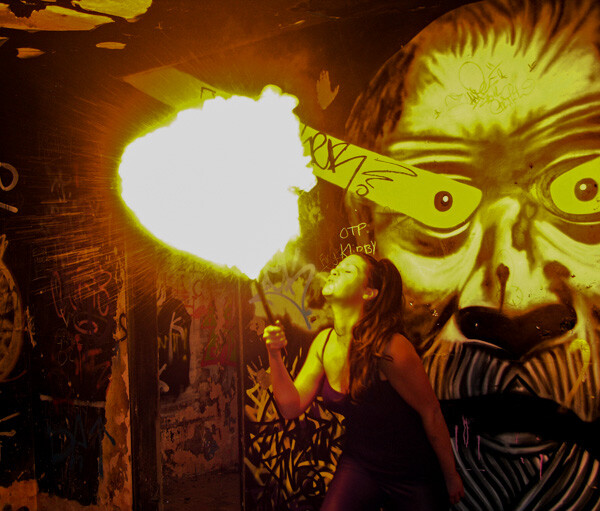
  • Organized field trips; providing some amazing photo opportunities including; a fire breather, light painting, model shoots, etc.
  • Learning by practical sessions – new techniques like portraits and lighting, or macro to introduce new areas of photography I had never explored previously.
  • Joining a club, above all, provided an opportunity to learn, as well as inspiration and motivation to get out taking photos more often, and to do it better.

Photography lessons novice 02

STEP TWO – try entering competitions

Competitions are one aspect of photography clubs which tends to put a lot of people off. However, I found that the competitions are very useful to help concentrate the mind on a particular topic, or learn a new technique. For example: long exposure or macro photography, which I had never tried before.

Getting expert feedback from judges can be invaluable – usually they will want to help you improve, and will provide helpful feedback on your image, e.g.. exposure, cropping, etc. Competitions are also a chance to show your off your work, and let’s face it, we all like some recognition. So winning competitions doesn’t exactly do any harm.

STEP THREE – Learn the basics

It’s important to get to know the basics on the technical side. It’s no substitute for the photographer’s eye, but the lack of technical skills might prevent you from capturing the image that you want. The good news is there are loads of great sources from the photography club, great websites like dPS, flickr, books, and podcasts. The big lessons for me included:

  • Exposure and how to control it with aperture and ISO – is the image too bright or too dark
  • How to get sharp images by adjusting focus modes, shutter speed and using a tripod
  • Depth of field – controlling what is in focus
  • Composition – some of the classic components of a good image, like using the rule of thirds
  • Cropping images – using software to crop to the important part of the image, and remove distracting elements
  • How to do the basics in photo editing software like Lightroom or Photoshop to crop images, correct exposure, resize images and more importantly, to build and safely store your library of images

Getting a good understanding of the above should make a big difference in the quality of your images.

Photography lessons novice 03

STEP FOUR – know your camera

I try to consider the basics above and the results are improving. I generally manage to get a few images that I really like, and I think the occasional one at least that has the wow factor. With a modern DSLR you don’t need to understand all its complexities but you do need to know the key features, to get the most out of it. You don’t want to miss a shot of a spectacular sunset while you trawl through the manual, so understanding the main controls are essential including:

  • Focus – manual and auto focus modes
  • Image stabilization
  • Metering modes
  • Manual mode – controlling aperture, ISO, and shutter speed
  • Image file type – Jpeg or Raw
  • White balance

A big milestone for me as I got to know my camera, and got more confident, was stepping out of Auto mode and going Manual. I can attest, when you get it right, it really works. When you get it wrong, delete – it’s the busiest key on my keyboard. I still need to get my head around the focus modes, white balance and some of the more exotic possibilities like HDR.

STEP FIVE – get the right gear

Photography lessons novice 04When I joined the club I must say I had a bit of camera envy – mine being a Nikon 8 megapixel E8700 bridge camera, of 2004 vintage, which had served me well. People in the club correctly told me that it’s not the camera that makes the difference but the photographer. My vintage Nikon was great for many situations, but couldn’t match the quality and versatility of a modern DSLR.

Unfortunately, when I bought it on a family visit to New York in 2004 I explained to my wife that this $ 1100 camera was a lifetime investment. After some negotiation with my wife, I made a new lifetime investment in 2013, and am delighted with my Nikon D7100, although I’m still trying to come to grips with its incredible capabilities. I would definitely recommend a tripod also as one essential piece of gear that will improve your results, and help you to with long exposure, night shots and getting sharp images in focus.

Don’t rush into buying a whole load of gear however, wait until you find that your current camera or lens is holding you back.

Note: the images below were all taken with my new D7100.Photography lessons novice 05

Photography lessons novice 06

WHAT’S NEXT – plan for 2014

So where to next? What does 2014 bring, I hear you ask. Now is the time to put a plan together!

  1. Make a calendar of the many sports and cultural events that might provide new and varied photo opportunities
  2. Projects – to develop your skills; e.g. one day in your city, monochrome (B/W), sports, nature, architecture
  3. New things to explore – some new techniques or skills to master to take you out of your comfort zone and try a new area such as long exposures or portraits

Photography lessons novice 07

Most of all – think before you shoot

This was the biggest lesson of all for me – use everything you have learned to get the best possible result. Use your knowledge of the exposure and composition. Try a different camera angle or point of view, depth of field, lens, or shutter speed to try and create an image with the wow factor.

Above all get out there taking photos and enjoy, there is no substitute for practical experience.

Photography lessons novice 08

Further reading

For more tips for beginners – head over here.

Photo Nuts and Bolts – know your camera and take better photos, a dPS ebook.

The post A Year of Photographic Lessons – Journey of a Novice Photographer by Rob Hackett appeared first on Digital Photography School.


Digital Photography School

 
Comments Off on A Year of Photographic Lessons – Journey of a Novice Photographer

Posted in Photography


6 Lessons the Square Format Can Teach You About Composition

29 Jul

Square format composition

In another article I wrote that one of the main attractions of the square format for me is composition. Today I’m going to elaborate on that idea.

Composition in the square format is a different process than within a rectangular frame. The benefit of understanding of why that is so is that you will be able to apply the lessons learnt to improving the composition of your images in any aspect ratio. Even if you never intend to use it in earnest, it’s worthwhile playing around with the square format for this reason alone.

Let’s take a look at some of these factors:

1. Balance

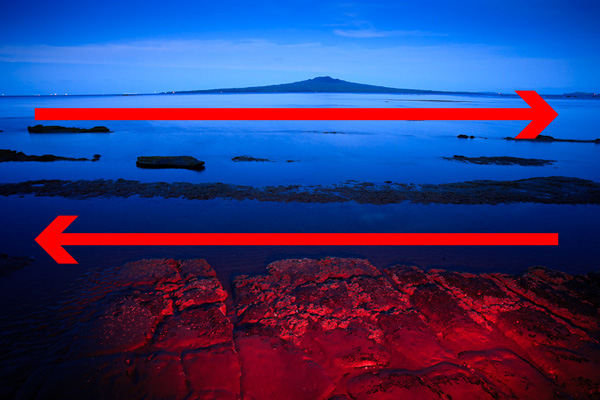
A square is a perfectly balanced shape. Each side is equal in length. Using the square format encourages the eye to move around the frame in a circle. This is different to the rectangular frame, where the eye is encouraged to move from side to side (in the landscape format) or up and down (in the portrait format). There are many factors that influence the way the eye moves around a photo, including the use of line, texture, colour, selective focus and negative space. But the shape of the frame is a major factor.

In this landscape, composed within the 3:2 aspect ratio of my 35mm camera, the eye is encouraged to move from side to side by the shape of the frame and the horizontal lines:

Square format composition

In this square format photo, the eye is encouraged to move around the frame in a circle:

Square format composition

2. Space

Negative space is the term used to describe the empty space in an image around the subject. Composition is often improved by getting closer to the subject. But sometimes you can create atmosphere or emphasise the shape of the subject by including negative space around it. In the rectangular frame, this can be difficult to do as it results in a lot of empty space. But it can be very effective in the square format.

Here is a photo that I took of a lizard in the 3:2 aspect ratio:

Square format composition

And here is the same photo cropped to a square:

Square format composition

Which do you prefer? There is no right answer – it’s entirely subjective. But it’s interesting how the dynamic of the image is changed by a single crop.

3. Simplicity

The square format lends itself to a simple approach. There is less room within the square frame than the rectangular one, therefore simplifying the composition becomes a necessity.

Creating a simple composition is often much harder than it seems. But it’s a very useful exercise. For your photos to have impact, you want to eliminate as many distractions as possible. The focus should be on your subject. If there are other elements within the frame that pull the viewer’s eye away from the subject that can lessen the strength of the image.

The composition of this image is about as simple as it is possible to get:

Square format composition

4. Shape

How many shapes can you see in the images below? There are circles, squares, diamonds, rectangles and triangles within these photos. The square format lends itself to this style of composition. I think that’s because the square is such a powerful shape in itself, that it emphasises other shapes within it. Linked with this are the ideas of balance and simplicity. Simplifying the composition emphasises shape, and so does placing shapes within a square frame. Converting to black and white emphasises them further.

Square format composition

5. Central composition

In the square format you can often place the subject in the centre of the frame for an effective composition. Generally speaking, many photographers tend to avoid place the subject off-centre for a more interesting composition.The rule-of-thirds is a reminder of this. But in the square format that doesn’t apply.

It’s even more true when the image is simple. The less distractions there are in the frame, the more effective a central composition becomes. If the subject has a strong shape, the empty space around it emphasises the shape. And the square format provides the perfect, balanced frame:

Square format composition

6. Black and white

Take away colour and what do you have? An image that relies on tonal contrast for impact and that emphases visual elements such as line, texture and shape. The square format and black and white seem made for each other, which perhaps explains its popularity with fine art photographers.

Take another look at the photos in this article. Do you prefer the colour images or the monochrome ones? The answer may give you an idea for future photo projects.

Final thought: Have fun

Whether you shoot with the intention of utilising the square format, or go back over old images to see whether they can be improved by cropping to a square, the most important thing is to have fun with the process. Enjoy the challenge of getting to grips with the square format and its implications for composition. Don’t take it too seriously. You’ll create some beautiful images and the lessons you learn about composition along the way will help you create better images in the future.


Post originally from: Digital Photography Tips.

Check out our more Photography Tips at Photography Tips for Beginners, Portrait Photography Tips and Wedding Photography Tips.

6 Lessons the Square Format Can Teach You About Composition


Digital Photography School

 
Comments Off on 6 Lessons the Square Format Can Teach You About Composition

Posted in Photography


Misho Baranovic: 50 lessons I’ve learned about mobile photography

19 Jul

eyeem3.jpeg

We love this 50 Things I’ve Learned About Mobile Photography List (and iPhone Photography) by Misho Baranovic, an accomplished mobile photographer and Connect contributor. You’ll find some universal truths in there and maybe a few things you disagree with, but Baranovic’s list is guaranteed to get you thinking, and laughing, too. Click through for some extracts and a link to the full article. 

News: Digital Photography Review (dpreview.com)

 
Comments Off on Misho Baranovic: 50 lessons I’ve learned about mobile photography

Posted in Uncategorized


Eric Kim: 10 lessons William Klein has taught me about street photography

02 May

klein-kid-gun-488x660.jpg

We love the work of LA-based street photographer Eric Kim, and we’re big fans of his regularly-updated blog. In this 2-page article, originally published on his website, Eric explains how the work of famed street photographer William Klein has taught him valuable lessons that inform his own outlook, and his photography. Click through to read more. 

News: Digital Photography Review (dpreview.com)

 
Comments Off on Eric Kim: 10 lessons William Klein has taught me about street photography

Posted in Uncategorized


Weddings Through The Eyes of a “Noob”: Lessons I Learned

23 Feb
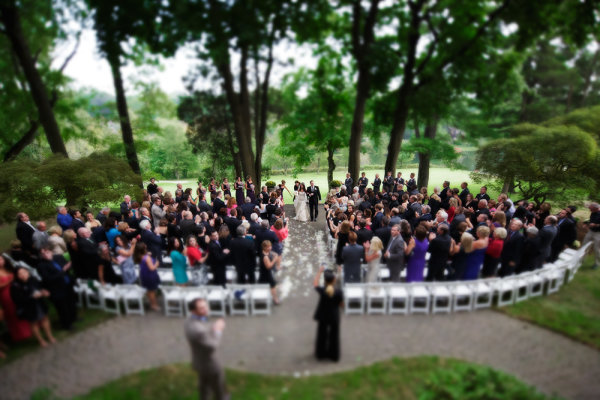
One of the things I'll do is set up a remote camera in the back of the ceremony, elevated if possible.  In this shot, a tilt-shift lens was used to create that miniature look.  EOS 5D Mark III, TS-E 17mm f/4L. Exposure was 1/320, ISO 3200, f/4.

One of the things I’ll do is set up a remote camera in the back of the ceremony, elevated if possible. In this shot, a tilt-shift lens was used to create that miniature look. EOS 5D Mark III, TS-E 17mm f/4L. Exposure was 1/320, ISO 3200, f/4. Photo by Rick Berk/kNot Photography

Throughout the first 20 years of my career in photography, I’d photographed a lot of different things- NHL All-Star games, Major League Baseball, NFL Football. I’d photographed portraits, boudoir, model portfolios. Landscape photography became a passion of mine. One thing I never photographed was a wedding.  When I began my career, I assisted on exactly two weddings. Never did I shoot one.  The two weddings I assisted on went so badly that I never wanted to touch one again.  I thought all weddings were like that. It wasn’t until years later that I understood it was more the photographer I worked for than it was the weddings themselves.

This type of shot is the kind that makes for a nice touch in the overall collection from a wedding.  They complete the set and really show a photographer's attention to detail.  EOS-1D X, EF 100mm f/2.8L IS Macro. ISO 800, 1/200, f/8.

This type of shot is the kind that makes for a nice touch in the overall collection from a wedding. They complete the set and really show a photographer’s attention to detail. EOS-1D X, EF 100mm f/2.8L IS Macro. ISO 800, 1/200, f/8. Photo by Rick Berk/ OneRedTreePhoto.com

For a variety of reasons, I made myself available as a second shooter in 2012, and got my first taste shooting weddings.  That first one was intimidating, but I learned a few things along the way.

This is a must. Depending on the setting it will always change, but at least one formal portrait of the bride is essential.  This shot simply used on camera flash, bounced into a reflector at camera left. EOS-1D X, EF 85mm f/1.2L II. 1/250, f/1.2, ISO 400.

This is a must. Depending on the setting it will always change, but at least one formal portrait of the bride is essential. This shot simply used on camera flash, bounced into a reflector at camera left. EOS-1D X, EF 85mm f/1.2L II. 1/250, f/1.2, ISO 400. Photo by Rick Berk/OneRedTreePhoto.com

1. Prepare and be organized.

Prior to the wedding day, speak to the bride and groom about what shots they absolutely must have. Plan when and where you will be shooting each of the shots. If you’re doing group shots in the park, make sure they know that’s the plan, and when you need them there.  Keep a shot list with you. Don’t promise anything more than that you will try to get these shots, because things could always happen preventing you from getting the shot. But at least this way you know what to try and focus on.  This is also where you manage their expectations so they understand that you can’t possibly get EVERYTHING, but you will try to get what’s most important to them.

2. It’s your job to manage things.

Your bride and groom have a ton on their plates on the wedding day. Photography is the last thing on their mind. But you still need to get the shots and you need to do so as efficiently as possible so as not to hold up the proceedings.  Gentle reminders to the bride and groom about the shots they wanted will help, especially if you can give them a few minutes warning. For instance, “We need to get the family portrait, and we have a window in 5 minutes if we can get you all together,” works fine.  They WILL ask why the shot isn’t there if you don’t get it, and even if they are resistant during the event, they will thank you later.

3. Do what you can without their cooperation.

Yes, there will be some shots you absolutely need to pull the bride and groom away for.  But if you can manage to get shots without interfering in their activities, you’ll be exactly the kind of wedding photographer everyone wants- an invisible one who delivers the goods. Shoot preparation shots, detail shots of the rings, the cake, etc., while you have the free time and nothing else is going on. Getting those kinds of shots out of the way makes it easier to get the really important stuff later.

4. Don’t try to go it alone.

It’s easy to underestimate how much work goes into shooting a wedding. Many times, a photographer’s first taste is when a friend asks them.  It’s an honor to be asked, but it’s also a great responsibility.  Theoretically, this is a once in a lifetime event.  You can’t be everywhere at once.  The weddings I worked as a second shooter, I wasn’t a secondary shooter.  I just wasn’t the guy contracted to do the job.  But I shared responsibility for getting certain shots. For instance, the bride and groom getting ready at different locations. One of us would go to the bride’s, one to the groom’s. We’d meet back at the church, or at another location where we might be doing shots, depending on how the day is planned.  This takes a huge amount of pressure off.  In terms of the ceremony, it ensures that multiple angles are covered so if one of you is blocked, the other might have a chance at getting the shot.

5. Be on the lookout for those special moments.

It can be easy to focus on the primary photos and lose sight of those smaller, special moments that, when captured, make for the best images. Be on the lookout for a tender moment between bride and groom, the bride and her father, or the groom and his mother. Look for moments with friends and relatives that might end up telling a story.  This means your camera is always ready and you are always watching. There is no time to let down your guard.

6. Approach it like any other shoot.

There are a lot of little moments that make up a wedding day. Near the end of the father-daughter dance, the bride looked up and had this beautiful expression of admiration for her father. When her mother saw the image, tears came to her eyes.  As a photographer, those are the moments I live for.

There are a lot of little moments that make up a wedding day. Near the end of the father-daughter dance, the bride looked up and had this beautiful expression of admiration for her father. When her mother saw the image, tears came to her eyes. As a photographer, those are the moments I live for. Photo by Rick Berk/OneRedTreePhoto.com

One common theme I’ve heard from all photographers thinking of diving into the wedding pool is that they build it up so much that they become intimidated by it. You were hired for your expertise, so approach it like anything else. Look for creative shots you can use to illustrate the day, to give a storybook feel to the images, and to capture the emotion. If you need the bride and groom and other family members in a certain spot, direct them as you would a portrait shoot. Don’t be afraid to ask for them to do something for you if you think that by doing so, you can provide them with a shot that will make them remember the day fondly for the rest of their lives.

7. Use ALL of what you have.

In my bag at most weddings I keep a 24-70mm lens and 70-200mm lens.  These are my workhorse lenses. But I try to offer variety and for me this means using different lenses for different shots.  I have a 100mm macro for ring and detail shots, but also for portraits.  I use a fisheye lens for some candids on the dance floor. I’ll use an ultra wide angle like a 16-35mm.  I keep a couple of speedlites with me.  Sometimes I use them on camera, sometimes off, and sometimes I turn it off and just shoot available light.  The point of all this is to provide variety.  Different shots with different looks create more interest when the images are viewed as a collection. Yes, you could get away with using a 24-70 for the entire day, but I like to change things up when I can.

8. Have backup.

This means a backup camera, flash, batteries, memory cards.  Anything that can die, go bad, break, corrupt.  If you are being paid, you are considered professional, and being a professional means that the words “My camera broke” cannot be used as an excuse.

9. Check with the officiant

Each priest, minister, judge, or other officiant I have worked with so far has had a different set of rules where photography during the ceremony is concerned. Prior to the ceremony, introduce yourself, and ask what is permissible and what isn’t as far as you are concerned. Is flash ok during the ceremony? Where would he prefer you NOT be during the ceremony? Laying the ground rules beforehand can make a huge difference in how you cover the event.

10. Have fun!

Weddings are fun, happy occasions. Enjoy it. There’s good music, happy people, and you get to capture the memories. If you are enjoying yourself, it will show in your work.

For 20 years I always swore I wouldn’t touch a wedding.  But having shot three of them now, I find I enjoy the challenge and creativity of capturing these once (or twice) in a lifetime event for the couples I’ve worked with. No, they aren’t for everyone. But with the right attitude and know-how, they can be incredibly satisfying to shoot.

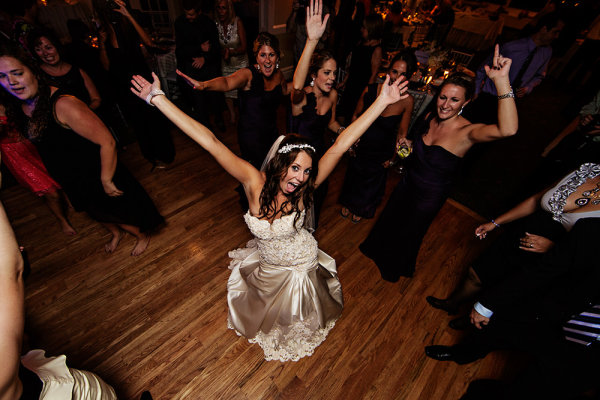
When the dancing started I decided I wanted something different. I mounted a 5D Mark III on a monopod with 14mm lens. a flash was mounted on the camera with the head aimed at the ceiling for bounce. Using a remote release, I got the bride's attention and waited for her reaction, firing when I saw it.

When the dancing started I decided I wanted something different. I mounted a 5D Mark III on a monopod with 14mm lens. a flash was mounted on the camera with the head aimed at the ceiling for bounce. I held the camera out over the dance floor by extending the monopod a few feet. Using a remote release, I got the bride’s attention and waited for her reaction, firing when I saw it. Photo by Rick Berk/kNot Photography

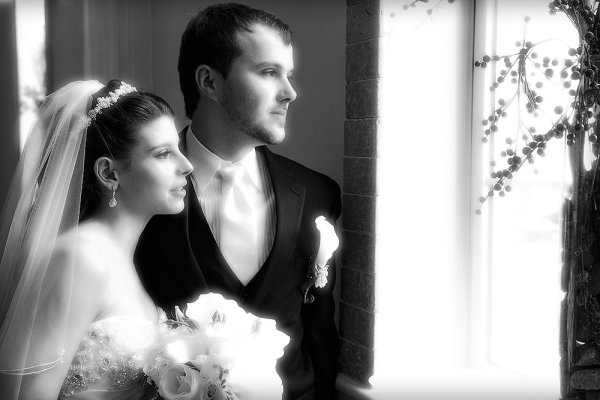
The church had these huge windows with light pouring in.  I knew I wanted to use it but time was tight.  I grabbed the bride and groom quickly and asked them to stand by the window and look out.  I fired off a handful of shots varying the exposure a bit. The black and white conversion added a nice artful touch. EOS-1D X with EF 24-70 f/2.8L II. ISO 1250, 1/100 f/5.6.

The church had these huge windows with light pouring in. I knew I wanted to use it but time was tight. I grabbed the bride and groom quickly and asked them to stand by the window and look out. I fired off a handful of shots varying the exposure a bit. The black and white conversion added a nice artful touch. EOS-1D X with EF 24-70 f/2.8L II. ISO 1250, 1/100 f/5.6. Photo by Rick Berk/OneRedTreePhoto.com

Further Wedding Photography Reading:

  • 21 Tips for Amateur Wedding Photographers
  • 50 Must Have Wedding Photography Shots
  • The One Location Technique for Wedding Photography

Post originally from: Digital Photography Tips.

Check out our more Photography Tips at Photography Tips for Beginners, Portrait Photography Tips and Wedding Photography Tips.

Weddings Through The Eyes of a “Noob”: Lessons I Learned


Digital Photography School

 
Comments Off on Weddings Through The Eyes of a “Noob”: Lessons I Learned

Posted in Photography


Lessons in Graffiti: Math Symbols Make Street Art Equations

23 Feb

[ By WebUrbanist in Art & Street Art & Graffiti. ]

math street art

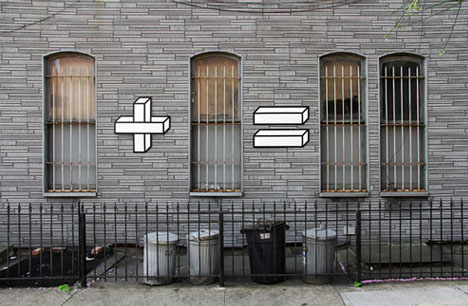
1 window plus 1 window equals 2 windows – seems obvious, but it warrants at least a double-take, so to speak, when you see it so explicitly expressed. Simple black-outlined, white-filled, faux-three-dimensional shapes that render urban happenstance into something with a humorous sense of order.

math graffiti alley tags

Dubbed Sum Times (itself a cute play on words) this latest street project by Aakash Nihalani skips the alpha and numeric and heads straight for the symbolic, turning everything from trash cans and dumpsters to windows and doors into educational equations.

math inspired 3d symbols

The basics of multiplication, divisions, addition and subtraction – literal object lessons that makes chaos more comprehensible, and might even teach school children a thing or two (including how to subvert their surroundings).

math based installation equations

Regular readers and fans may recognize this artist’s style from similarly-abstract street artwork including this urban tape art series and this set of shifting geometries, each of which also impose a kind of three-dimensional geometry on flat urban surfaces.

Share on Facebook


[ By WebUrbanist in Art & Street Art & Graffiti. ]

[ WebUrbanist | Archives | Galleries | Privacy | TOS ]


WebUrbanist

 
Comments Off on Lessons in Graffiti: Math Symbols Make Street Art Equations

Posted in Creativity